![[FIXED] Windows 10/11 PC Is Stuttering Every Few Seconds](https://www.auslogics.com/en/articles/wp-content/uploads/2025/08/FIXED-Windows-1011-PC-Is-Stuttering-Every-Few-Seconds-scaled-1-568x359.webp)
- Why Is My PC Stuttering All of a Sudden?
- How to Fix Computer Stuttering on Windows 10/11
- Solution 1: Check if your system meets the minimum requirements for running your software
- Solution 2: Update your graphics card driver
- Solution 3: Close background applications
- Solution 4: Uninstall the problematic software
- Solution 5: Check your PC’s power management settings
- Solution 6: Scan your system for malware
- Solution 7: Scan your system files for corruption
- Solution 8: Update Windows
- Solution 9: Keep apps and programs updated
- Solution 10: Disable wallpaper slideshow
- Solution 11: Disable notifications and Action Center
- Solution 12: Disable your system’s high precision event timer device
- Solution 13: Reduce thermal throttling
- Solution 14: Disable the CD/DVD drive
- How to Fix Computer Stuttering While Playing Games
- Computer Stuttering: Fixed
- FAQ
PC stuttering is a common problem many Windows users face, whether they use hard disk drives (HDDs) or solid-state drives (SSDs). In other words, this issue isn’t limited to older systems—it can happen to anyone.
The good news? There are several ways to fix it. In this article, we’ll explore the different factors that cause computer stuttering and offer effective solutions to resolve them.
Let’s get started.
Why is my PC stuttering?
Your PC may stutter due to outdated drivers, overheating, background apps, malware, or hardware and software incompatibilities.
✅ Fixes to stop the stutter:
- Check system requirements for your games and software.
- Update graphics drivers manually or with a tool like Auslogics Driver Updater.
- Close background apps and disable unnecessary startup programs.
- Uninstall problematic software that spikes resource usage.
- Adjust power settings to avoid power-saving throttles.
- Scan for malware using Windows Security or a dedicated tool.
- Repair system files using the System File Checker (SFC).
- Install Windows updates or roll back faulty ones.
- Keep your apps and browsers updated.
- Turn off wallpaper slideshow to reduce system load.
- Disable notifications and Action Center.
- Turn off the high precision event timer (HPET) if it causes latency.
- Fix overheating issues (clean fans, reapply thermal paste, monitor temps).
- Disable unused CD/DVD drives to eliminate odd hardware conflicts.
🎮 Bonus tips for gamers:
⚙ Lower in-game graphics settings (but keep resolution high).
⚙ Enable shader pre-compilation if available.
⚙ Try switching to DirectX 11 if DX12 causes issues.
⚙ Toggle Game Mode on/off to see what works better.
⚙ Cap your frame rate to avoid inconsistent FPS delivery.
Why Is My PC Stuttering All of a Sudden?
Sudden stuttering is usually caused by issues with your system’s hardware, software, or settings. It often happens when your CPU, GPU, or memory is overwhelmed, when drivers are outdated, or when background apps are hogging resources.
Let’s take a closer look at the most common culprits behind unexpected stuttering:

Drivers act as the communication bridge between your operating system and hardware components. When your drivers are outdated, faulty, or corrupted—especially graphics, audio, or storage drivers—they may disrupt data flow and cause your computer to stutter.

Ironically, Windows updates don’t always fix bugs and system glitches. Sometimes, updates create PC issues, causing the system to freeze every few seconds.

From RAM issues to a failing hard drive, hardware problems can wreak havoc on your system’s stability. Even a loose connection or overheating component could be to blame.

If too many apps are running in the background simultaneously, your system may be unable to handle all those processes, which affects PC performance.

Malware doesn’t always announce itself. It can quietly run in the background, eating up system resources, tampering with files, or blocking updates. Even low-level threats like adware can slow things down. If your PC stutters out of nowhere, a hidden malicious program could be the culprit—so don’t skip that deep antivirus scan.

If your computer stutters randomly, especially in demanding applications, your system specifications may not meet the requirements for the program you’re running.

This could be the issue if you recently upgraded your PC to Windows 10/11, as the operating system may not support some programs, drivers, or even hardware. So, if you’re wondering, “Why is my PC stuttering?” these may be the causes to look into. However, regardless of the reasons for this abnormal PC behavior, the following solutions should help you resolve it.
How to Fix Computer Stuttering on Windows 10/11
And now to the good news. There’s actually a fix. In fact, there are several user-tested solutions that will help you get rid of PC stuttering. We suggest you start from the easiest ones (we’ve listed them first) and then make your way to the more advanced fixes.
- Several users on Reddit swear by disabling as many background processes as possible.
- In another thread, a user mentioned that disabling HPET stopped their computer from stuttering.
Solution 1: Check if your system meets the minimum requirements for running your software
If you’re running a particularly resource-intensive program, like Photoshop, or are playing one of the most demanding PC games, your PC has to meet specific requirements to support the program. Otherwise, the PC will freeze or lag since it can’t handle all that pressure from the software you’re trying to run.
Therefore, visit the program publisher’s website to check if your system meets all the requirements to support it.
Most resource-intensive software programs depend on your graphics card. So, you have to confirm that your graphics card meets the program’s requirements. Moreover, you may think you’re using the right Intel chipset when using one from the wrong generation. You can check your GPU’s details and chipset make and model in the Windows’ DirectX Diagnostic Tool. Here’s how to do it:
- Press the
Windows key + Rto launch the Run dialog box. - After Run appears, go to the text box and type dxdiag, then hit
Enter.
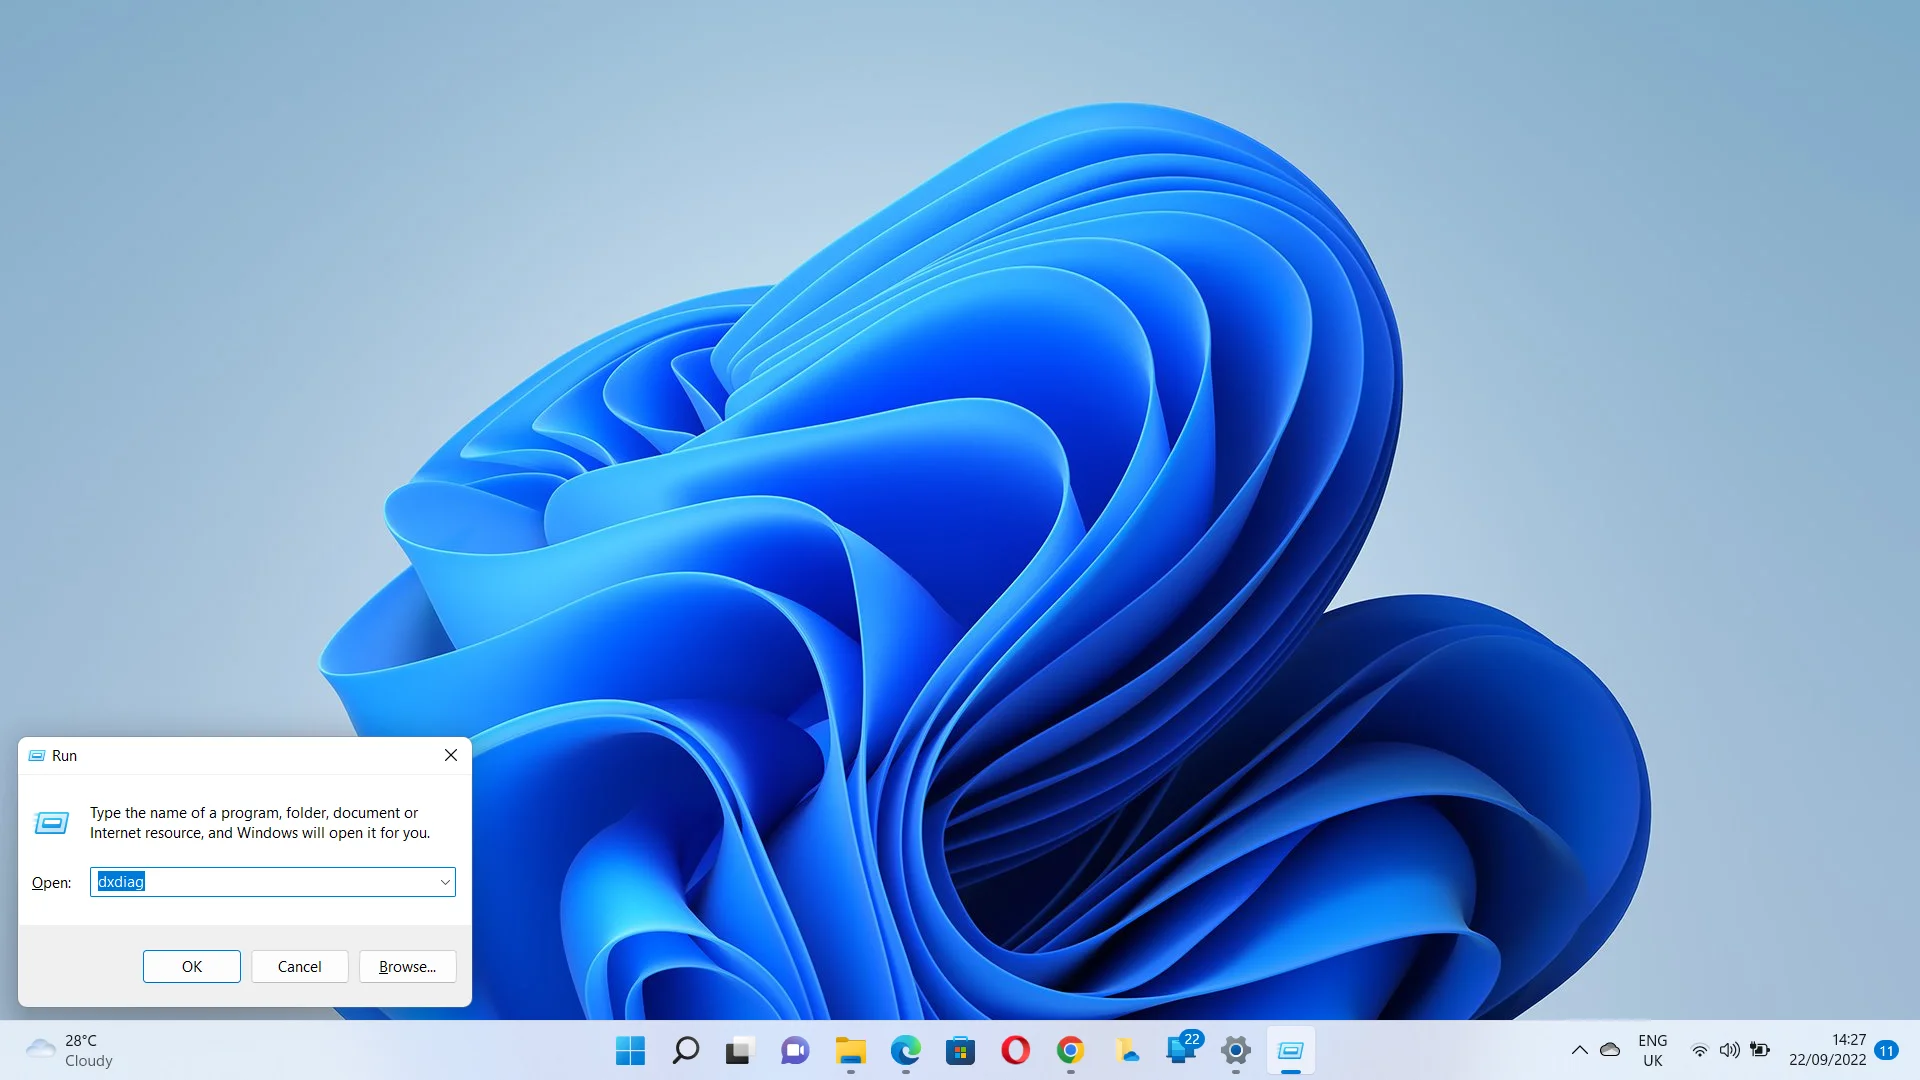
- Click on Yes if you see a pop-up dialog.
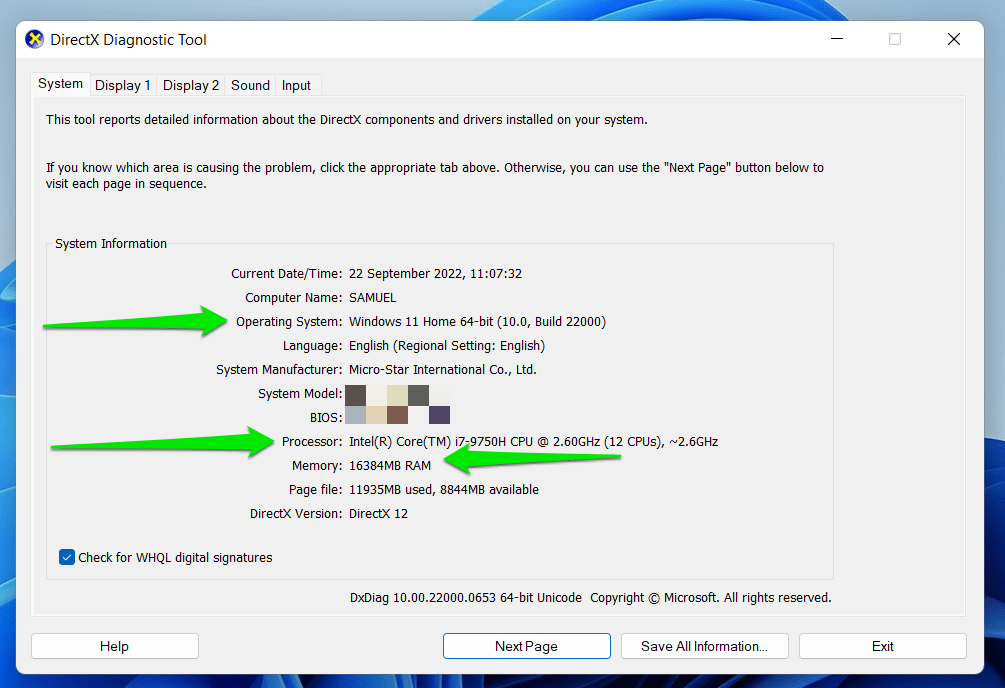
- Go to the System Information section under the System tab to check your PC’s details. You’ll find information about your operating system, processor (including generation), and RAM.
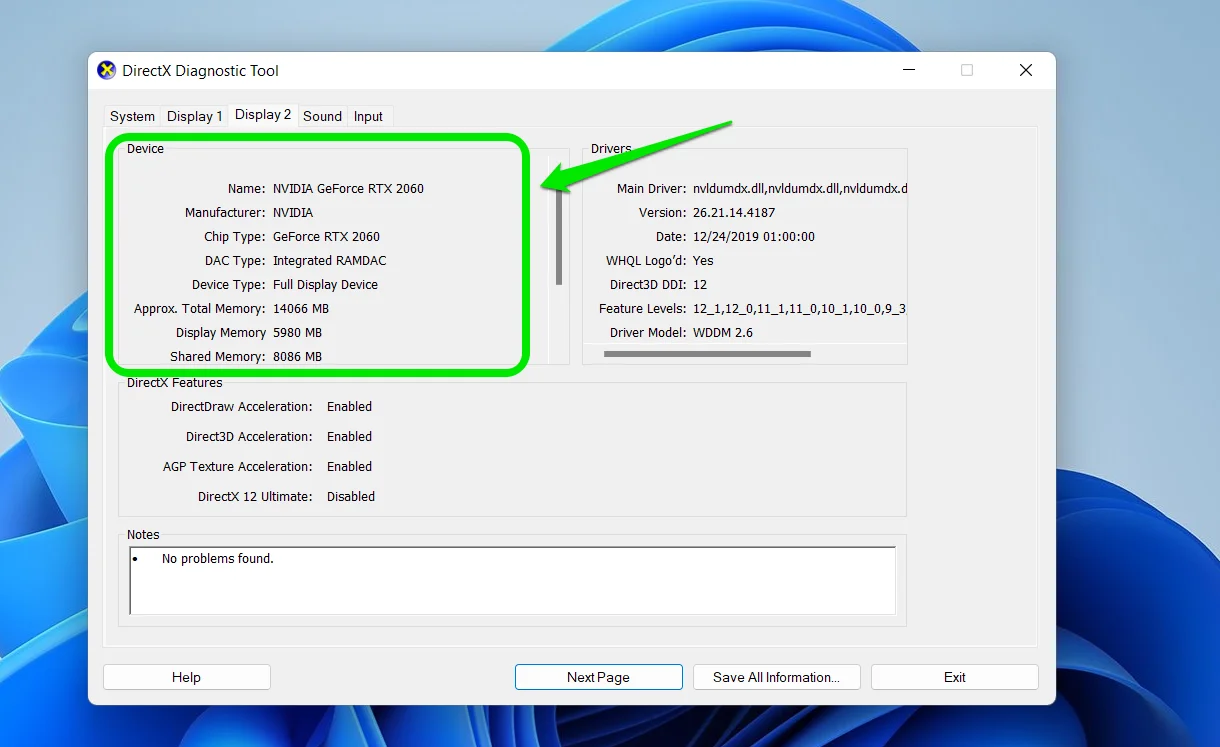
Additionally, take a look at the tabs above. If you have a dedicated graphics card, you will see two display tabs. Display 1 usually shows details for your system’s integrated chip, while Display 2 provides information about your dedicated graphics card, whether it’s an NVIDIA or AMD GPU.
- CPU: Is your processor fast enough and on the supported list?
- RAM: Does your PC have the minimum (or recommended) amount of RAM? 16 GB is often the sweet spot for modern games and creative software.
- Storage type and space: SSDs offer better read/write speeds than HDDs. Also, make sure you have enough free space.
- Operating system: Is your OS version supported? Some software no longer works with older builds of Windows 10.
- Display resolution: High-res software UIs or games may require a minimum screen resolution.
- Drivers and frameworks: Certain apps need up-to-date GPU drivers or supporting libraries like DirectX, .NET, or Visual C++ Redistributables.
💡 Tip: You can usually find these specs on the software publisher’s website. Compare them with your PC’s specs by right-clicking This PC > Properties or using the Task Manager and Device Manager to dig deeper.
📌 Related: Your Graphics Card Does Not Support DirectX 11 Features
Solution 2: Update your graphics card driver
Outdated device drivers are among the most common causes of slow performance, stuttering, and PC freezing on Windows 10/11. The display drivers are specifically to blame if your PC is stuttering every two seconds with audio and video issues or your game starts to lag.
Installing your PC’s latest graphics card drivers is the only way out. You can do that manually or automatically.
How to update your drivers manually:
- Press the
Windows key + Xand select Device Manager from the Quick Access menu. - Find and expand Display adapters, right-click on your display adapter, and click Update driver.
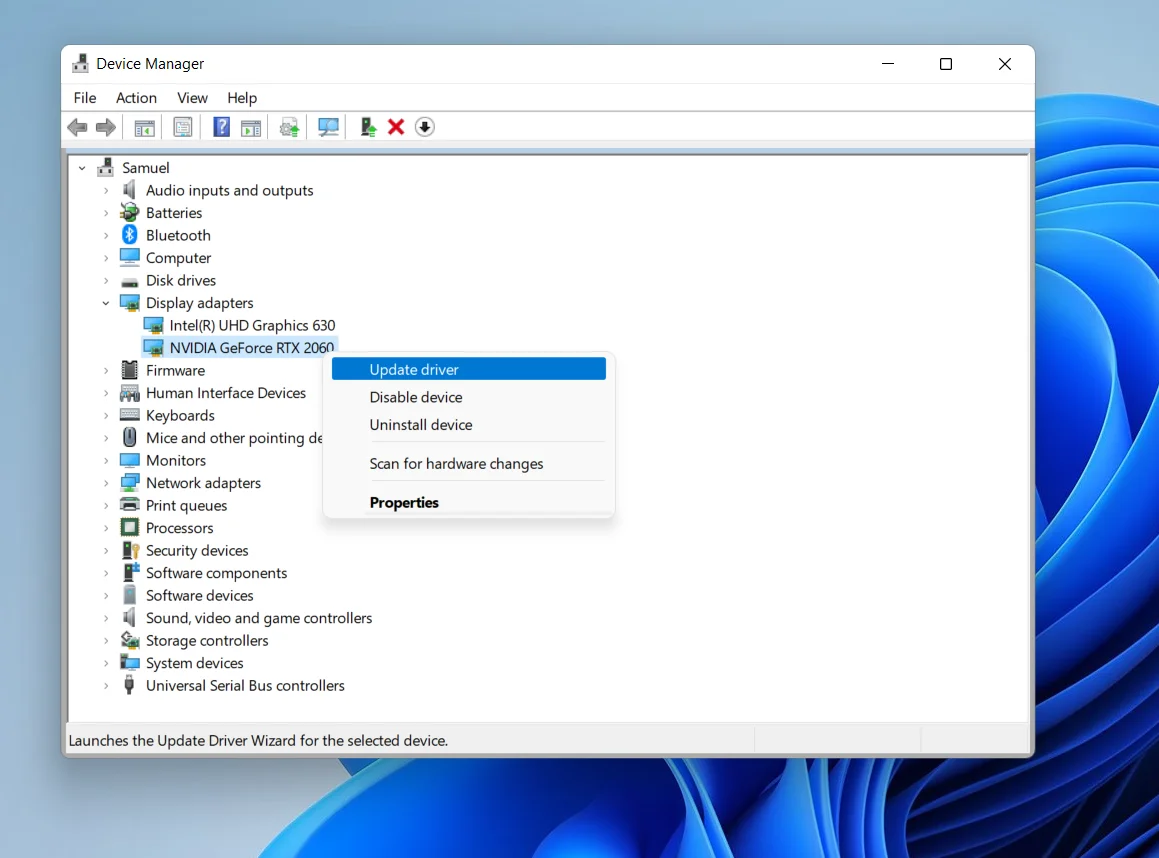
- You’ll be presented with two options. Select Search automatically for drivers to get an automatic update.
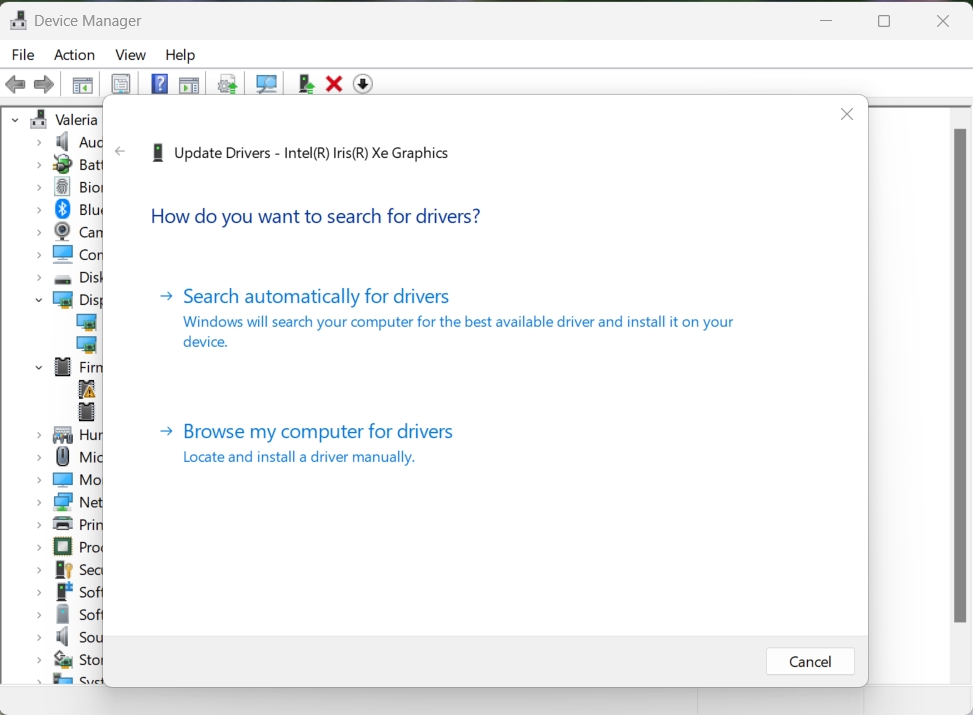
- Or select Browse my computer for drivers to search on your PC and install the new driver files you’ve already downloaded from the manufacturer’s website (AMD or NVIDIA).
Also, read our detailed guide on how to update your graphics driver in minutes.
How to update your drivers automatically:
A more reliable method would be to use a third-party driver updating tool like Auslogics Driver Updater.
This intuitive program scans your system for driver-related issues, such as outdated or corrupted device drivers, and fixes them.
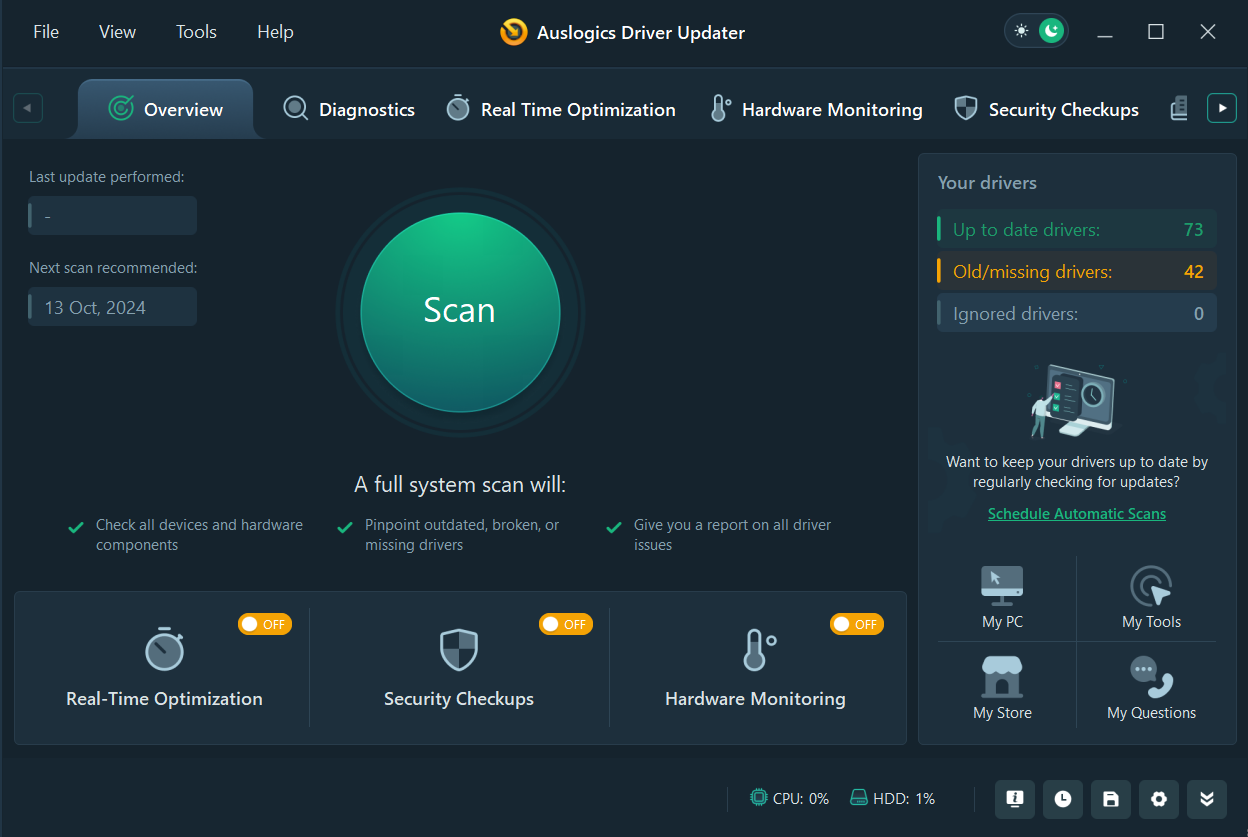
The program also lets you schedule automatic scans to ensure driver updates are installed as soon as they are released.
If the new drivers cause issues, you can quickly revert to the previous versions. Auslogics Driver Updater supports Windows 10 and 11, so you don’t have to worry about whether the tool will work on your system.
It also downloads and installs drivers that are compatible with your operating system.
Once all the updates have been installed, restart your computer and check if the PC stuttering issue persists.
Solution 3: Close background applications
Your system runs best when its resources—CPU, memory, disk usage—aren’t being spread too thin. If you have too many apps running in the background, they can eat up those resources, causing your Windows 10/11 PC to stutter or freeze at random intervals.
Some apps constantly sync data, run scheduled tasks, or simply stay active without your knowledge.
While one or two may not cause an issue, a pile-up can seriously slow things down.
Let’s break this fix into two parts:
A. Stop currently running background apps
B. Disable apps from launching at startup
➡️ A. How to stop currently running background apps (Windows 10/11)
- Press
Ctrl + Shift + Escto open the Task Manager. - Go to the Processes tab.
- Review the list of running applications and background processes.
- Right-click on the ones you don’t need and select End task.
⚠️ Be careful not to close essential system processes—stick to apps you recognize.
➡️ B. How to disable startup and background apps
Some apps launch automatically every time your PC starts. You can disable them to prevent unnecessary strain from the startup.
For Windows 10
- Press
Windows + Ito open Settings. - Go to Apps > Startup.
- Turn off the toggle next to apps you don’t want to run at startup.
- Restart your PC.
How to disable background apps:
- Go back to Settings > Privacy.
- Scroll down the left pane and click on Background apps.
- On the right, turn off background activity for apps you don’t need.
- Restart your PC.
For Windows 11
- Press
Windows + Ito open Settings. - Go to Apps > Startup.
- Turn off the switch for apps you want to prevent from auto-launching.
- Restart your PC.
Solution 4: Uninstall the problematic software
This fix is applicable if you started experiencing the error after installing a particular program. The software may not be compatible with your system.
Or, it might be glitchy, hence the reason it’s consuming a lot of your system resources and causing the PC stuttering problem.
To identify the problematic application, launch the Task Manager and check if the suspicious program is the one causing a spike in system resources.
If it is, uninstall via the Programs and Features section in the Settings app or Control Panel.
Note that when using the Settings app, there are different ways to uninstall programs on Windows 10 and 11.
➡️ Here’s how to remove apps from Windows 10
- Launch the Settings application and click on Apps.
- Use the search feature on the Apps & features page to look for the program you want to uninstall.
- After it shows up, click on it and select Uninstall.
- Click Uninstall again and follow the subsequent instructions.
➡️ How to remove apps from Windows 11
- Launch the Settings app and click Apps on the left side of the window.
- Click Installed apps on the right side of the next screen.
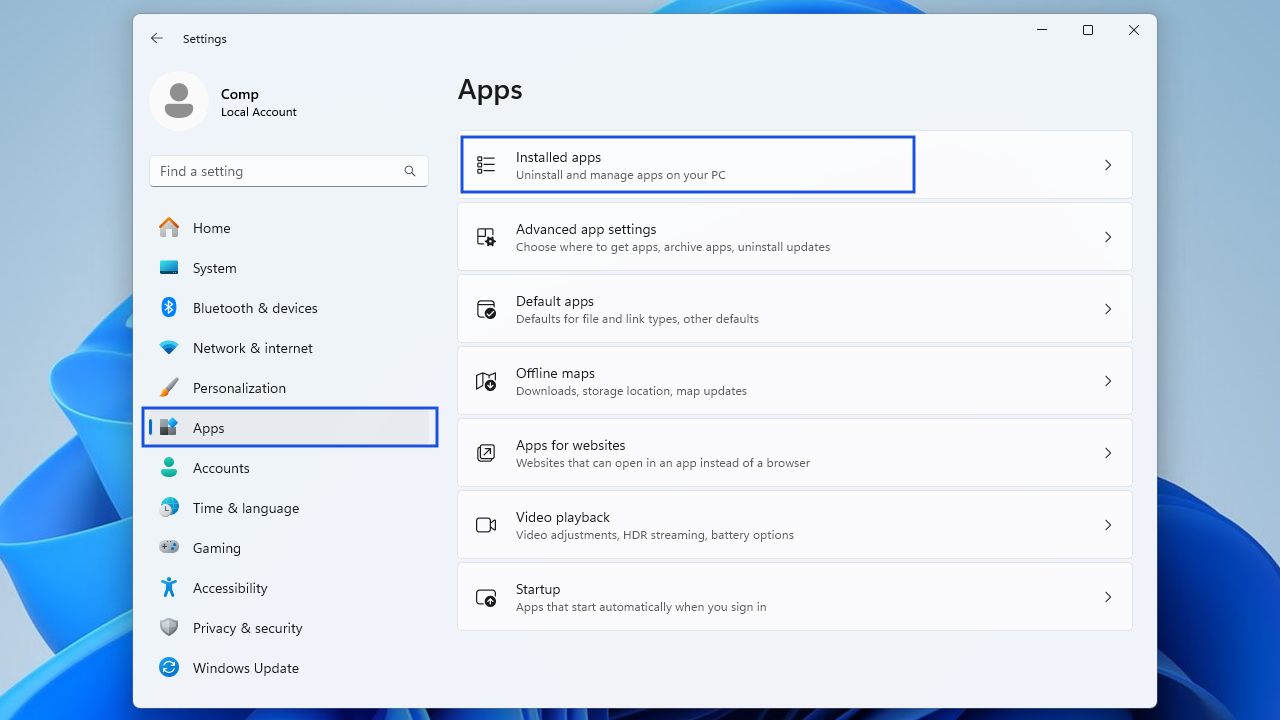
- You can use the search box to find the app you want to remove.
- Once you get to the program, click on the three dots (next to the program’s size) and select Uninstall.
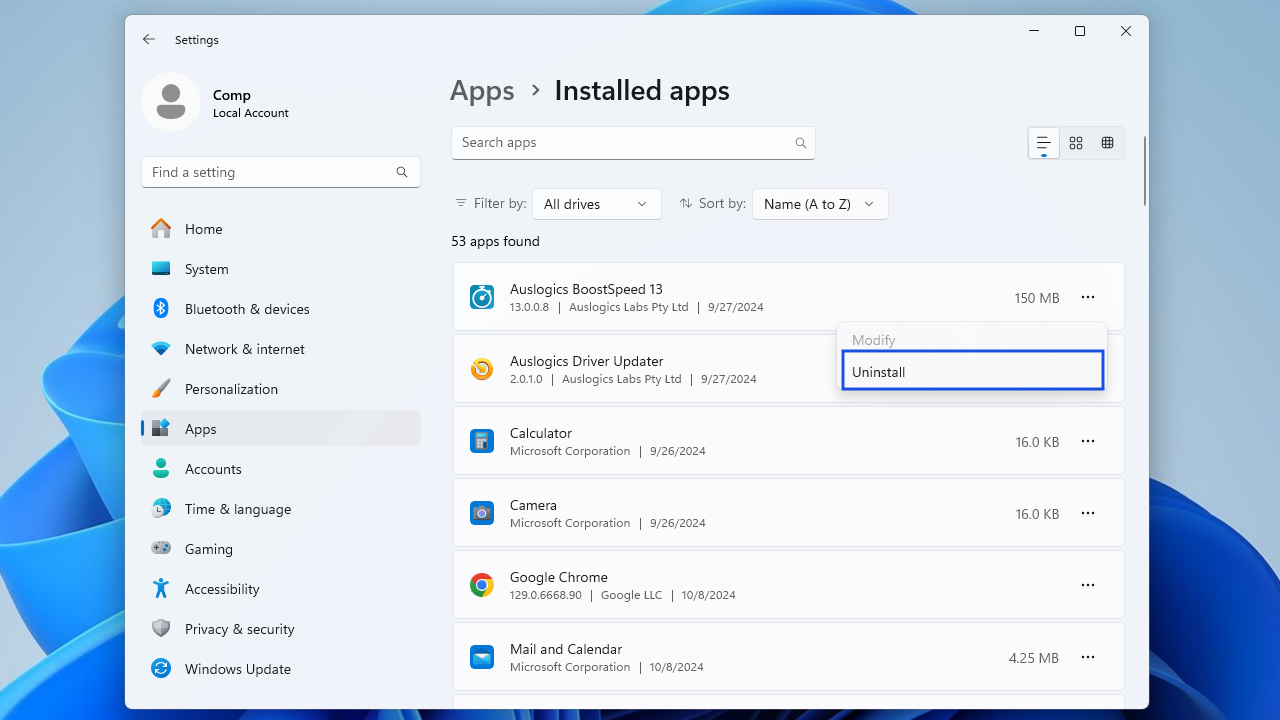
- Click on Uninstall again in the confirmation box and follow the prompts to complete the process.
Check whether your PC stutters every few seconds now. If it still does, proceed with the next solution.
Solution 5: Check your PC’s power management settings
Your computer system has a feature that lets you customize your power plan to control how it consumes power.
Your system may not function optimally if you’ve selected an incorrect power plan. Instead, it’ll start to lag.
Resetting the power plan to its default settings might resolve the error. Here’s how to do it:
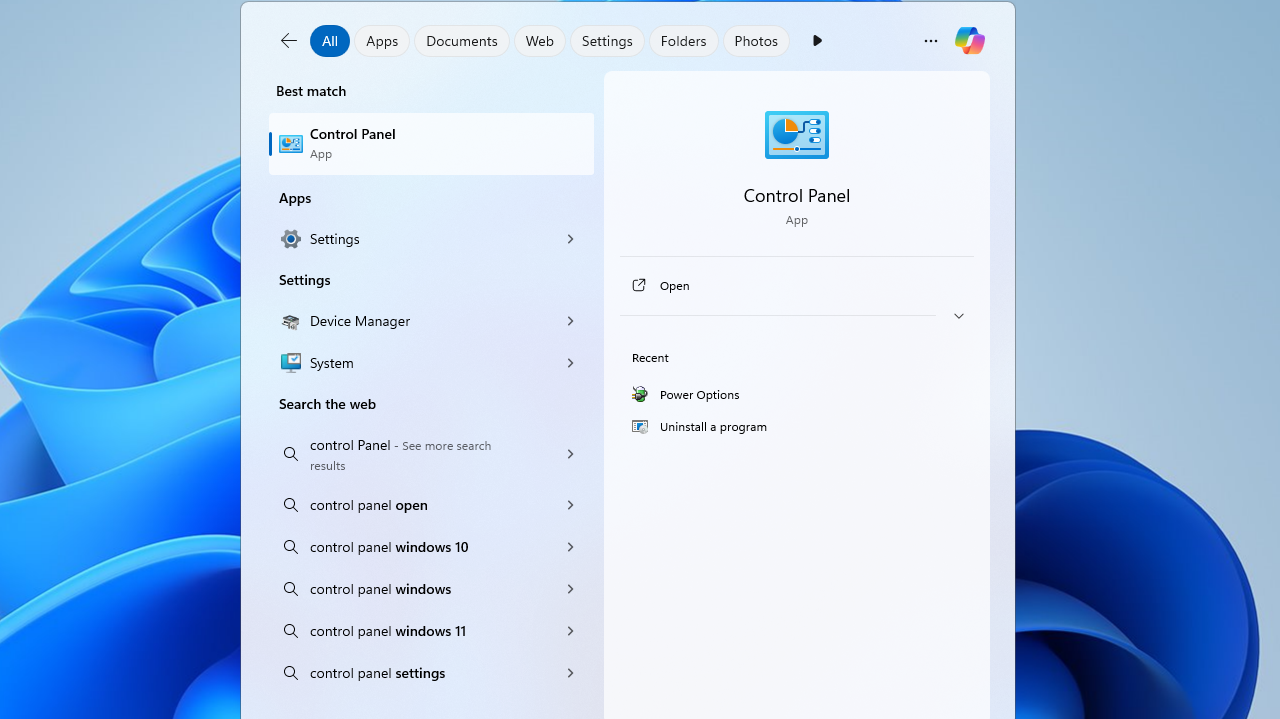
- Type Control Panel in the search bar and click the best match.
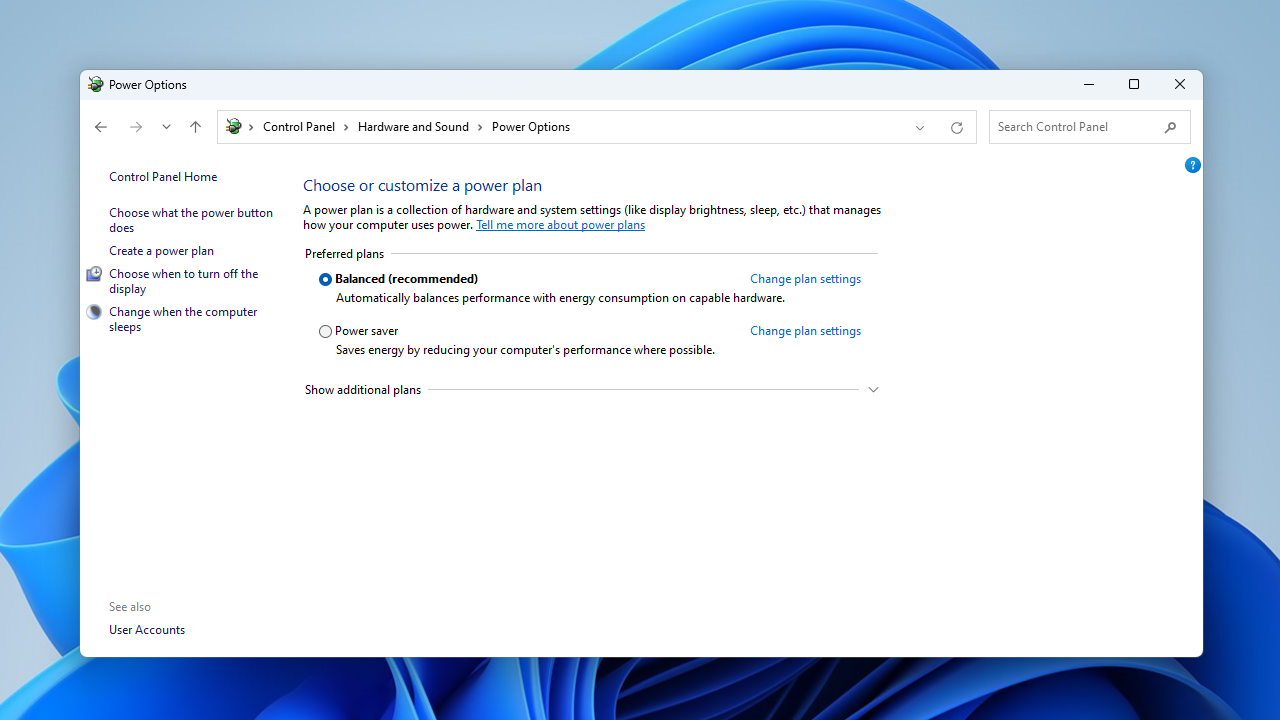
- Select Hardware and Sound.

- Click Choose a power plan under Power Options.
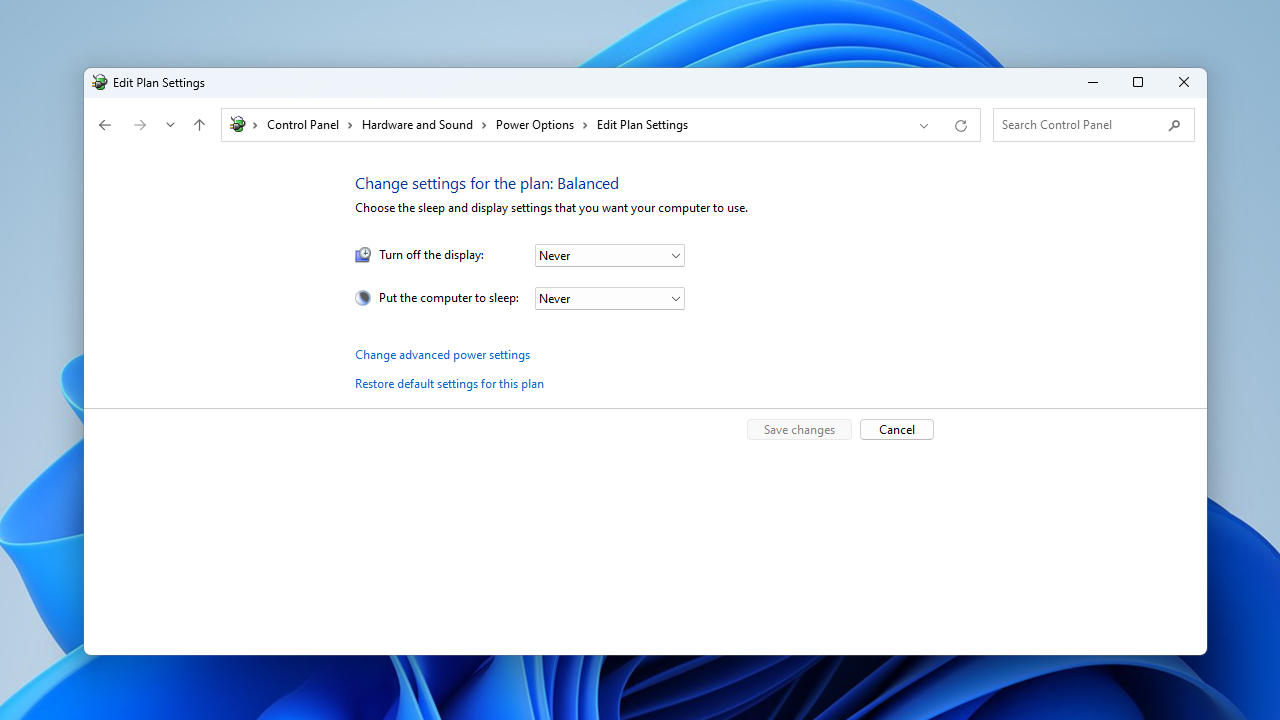
- Click Change plan settings next to your power plan.
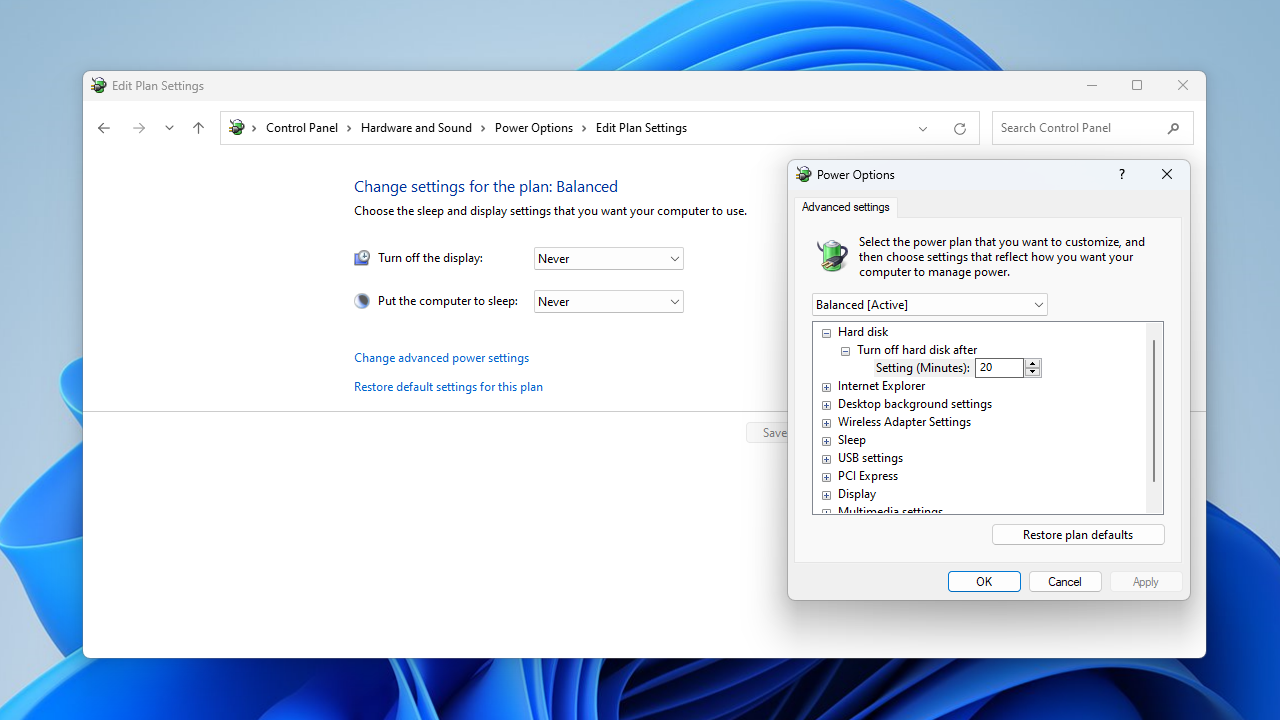
- Click the Change advanced power settings link.
- Click on the Restore plan defaults button at the bottom of the window and confirm. If you have several customized plans, select each from the drop-down list and click Restore plan defaults.
- Click OK to confirm your choice.
- Once done, restart your Windows PC and check if the PC stuttering issue has been resolved.
📌 Related: Windows 10 Control Panel: Where to Find It
Solution 6: Scan your system for malware
A malware infection can corrupt system and application files and cause the computer stuttering issue on your Windows PC.
If the error persists, it’s worth trying a malware scan. You can use a built-in Windows tool called Windows Security (formerly Windows Defender), which offers solid baseline protection.
- Click Start, type Windows Security, and hit
Enter. - Go to Virus & threat protection.
- Click Scan options.
- Select Full scan and click Scan now.
- Wait for the scan to complete.
- Follow prompts to remove any detected threats.
A dedicated anti-malware solution adds enhanced security and will help you make sure that your laptop is malware-free.
Solution 7: Scan your system files for corruption
If the malware removal tool found malware in your system, then there is a high chance some system files have been corrupted or damaged. In that case, running a System File Checker scan will help repair all the corrupted files. To run an SFC scan, follow the instructions below:
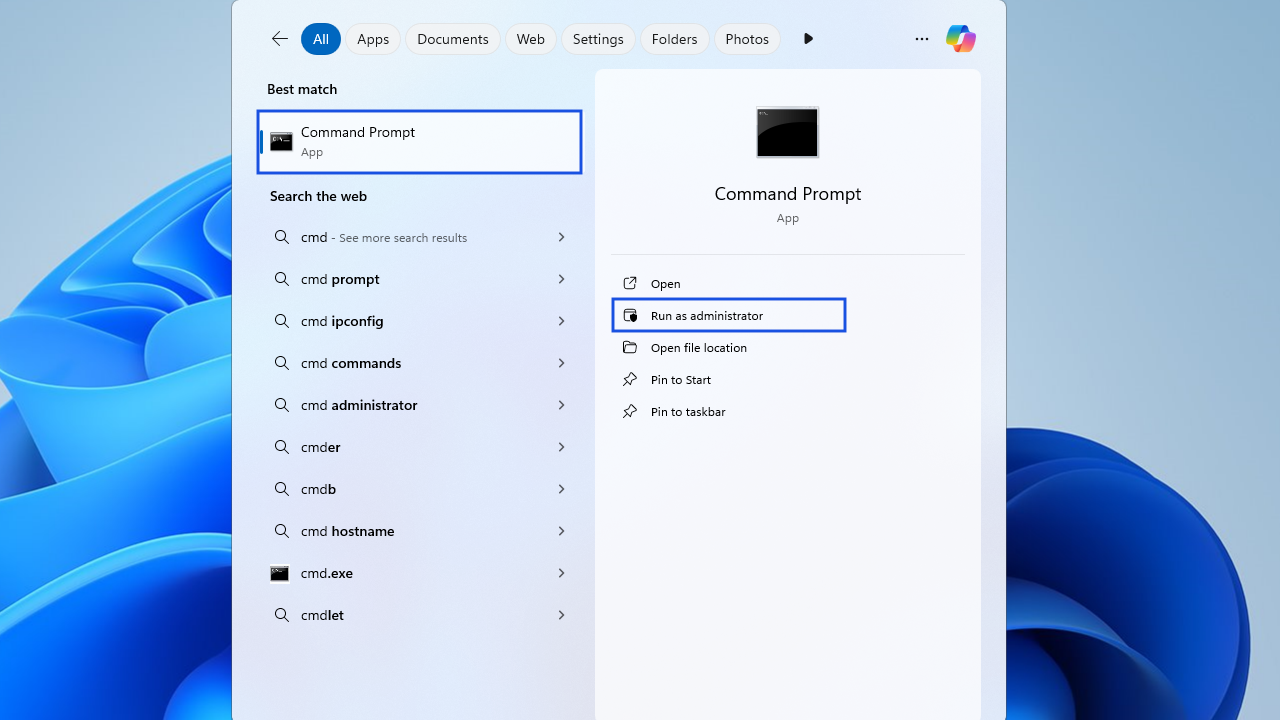
- Type Command Prompt in the search bar and select Run as administrator in the right pane.
- In the elevated Command Prompt, execute the command sfc /scannow. Give the tool a few moments to check for issues and attempt to fix them.
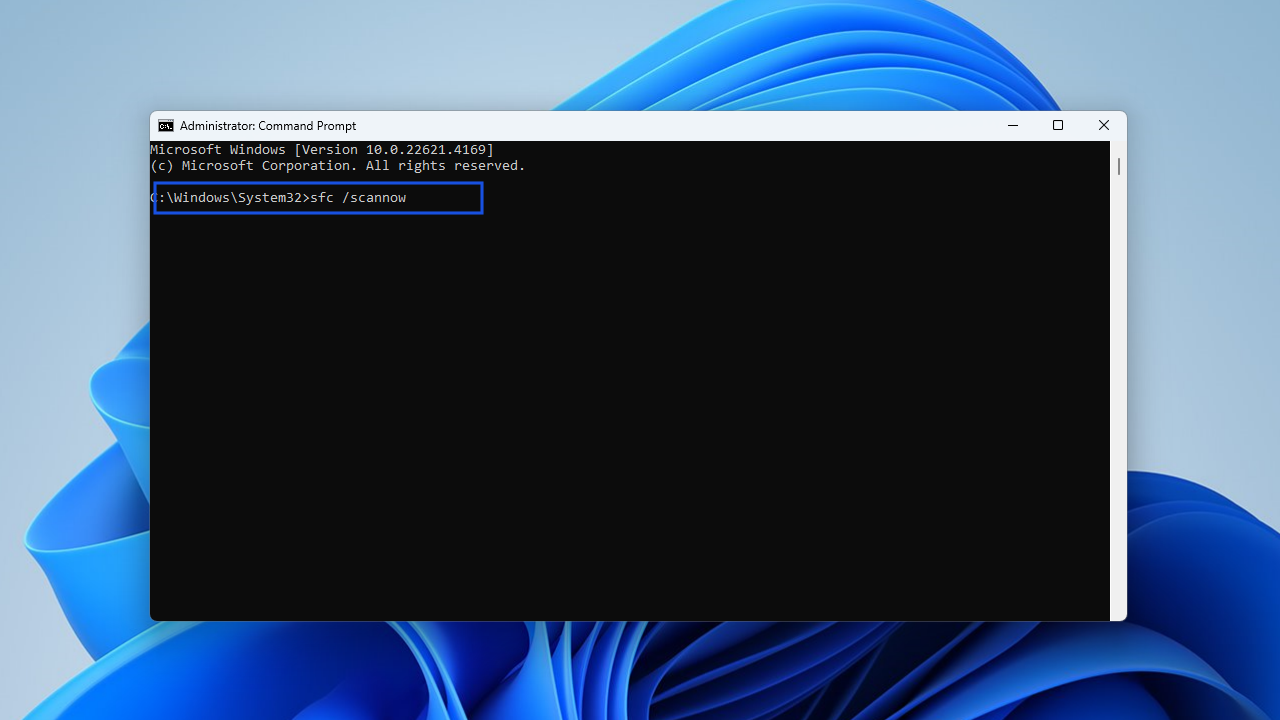
- Once done, reboot Windows and check if Windows keeps stuttering every few seconds.
Solution 8: Update Windows
Windows updates are required to keep your system functioning properly. The updates usually introduce new features, security updates, and enhancements to your OS.
Typically, Windows updates are automatically installed whenever they are available. However, you can manually check for updates and install them.
Here is how to do that on Windows 10:
- Press the
Windows key + Ito open the Settings app. - Type Updates into the Find a setting field, and select Check for updates.
- In the next window, check if any pending updates are waiting to be installed and install them. If there are none, click the Check for updates button and wait for Windows to search for and install all available updates.
- You may be required to click the Download & install button for feature or quality updates.
- After downloading updates, restart your computer to complete the installation.
Follow these steps for Windows 11:
- Press the
Windows key + Ito open the Settings app. - ClickWindows Update in the top-right corner of the Settings window or click the Windows Update tab at the bottom of the left pane.
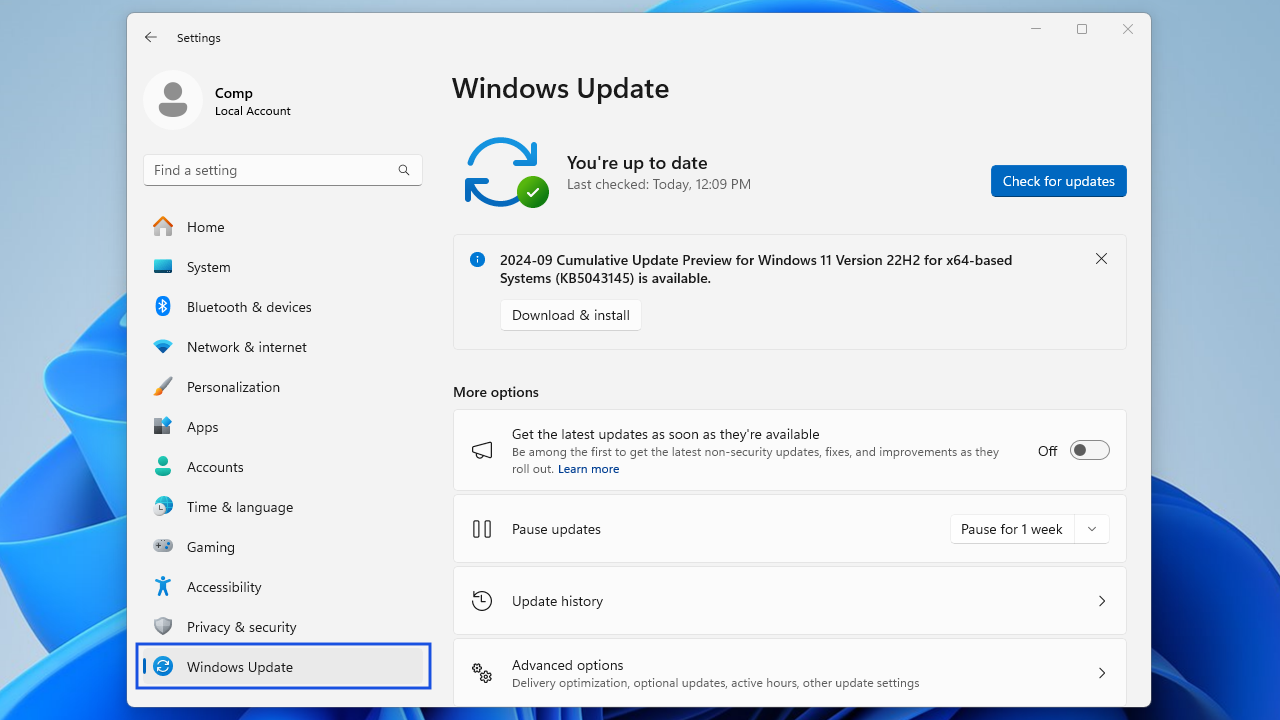
- Click the Check for updates button once you see the Windows Update page.
- You can also click the Download & install button next to a cumulative quality or feature update.
- Restart your computer to complete the installation.
Sometimes, updates could be responsible for PC issues like random freezes and crashes. If that’s the case, then uninstalling the problematic update should fix the problem.
How to uninstall a Windows cumulative update
To uninstall a Windows cumulative update, follow these instructions:
- Press the
Windows key + I, type update history into the Find a setting text box, and select View your Update history.
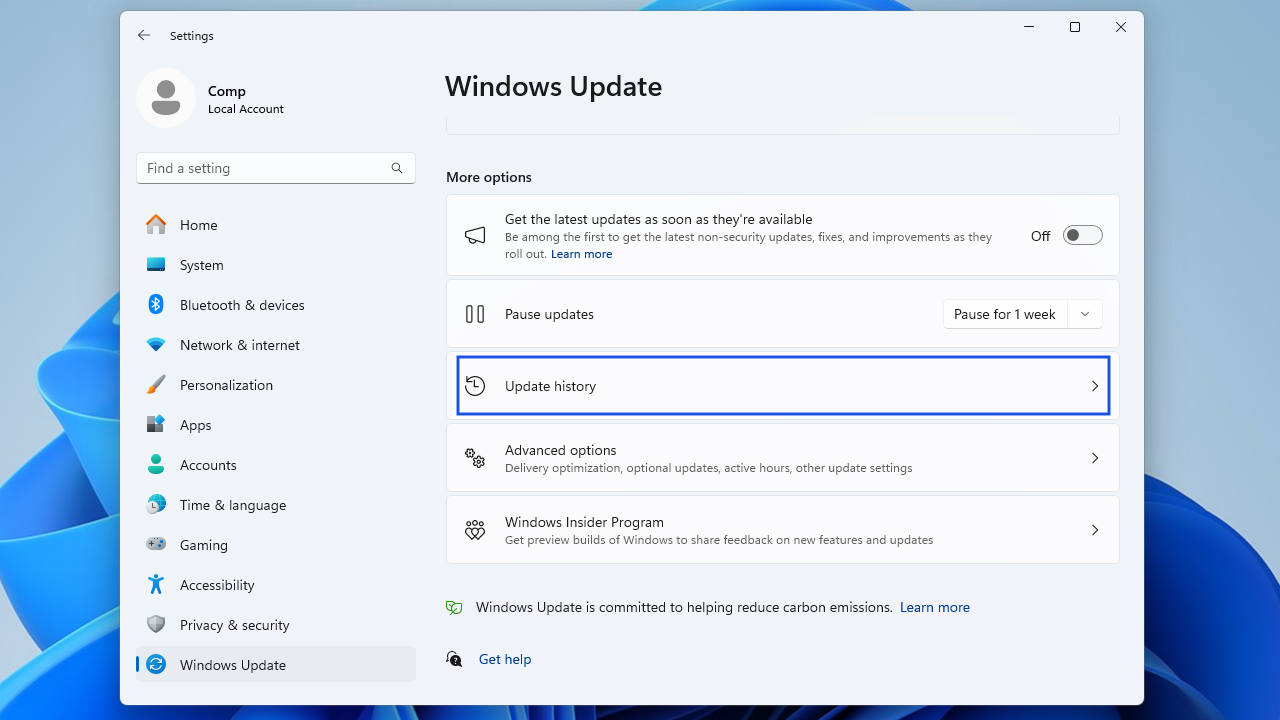
You can see a list of all the recently installed Windows updates. Click the Uninstall updates link to open the Installed updates page in the Control Panel.
📌 Related: Windows Update Troubleshooter: Fixing Windows Update Issues
Solution 9: Keep apps and programs updated
All your applications, including Windows apps and third-party apps, should always be up to date to keep working correctly. If your PC is stuttering every two seconds with audio and video issues when using a browser, update the browser to the latest version.
If this doesn’t work, try disabling all the browser extensions, add-ons, and plugins to check if they are causing the issue.
Alternatively, try using another browser to see if the computer stuttering gets resolved.
Solution 10: Disable wallpaper slideshow
The wallpaper slideshow feature may cause a brief system freeze that can cause Windows 10 and 11 to stutter, especially when gaming or watching videos.
To fix this, turn off the background slideshow or change the interval to make it happen less frequently.
If you want to keep the feature, think about adjusting the interval to once per day to reduce interruptions. Here’s how to disable the feature:
- Right-click on your desktop and choose Personalize.
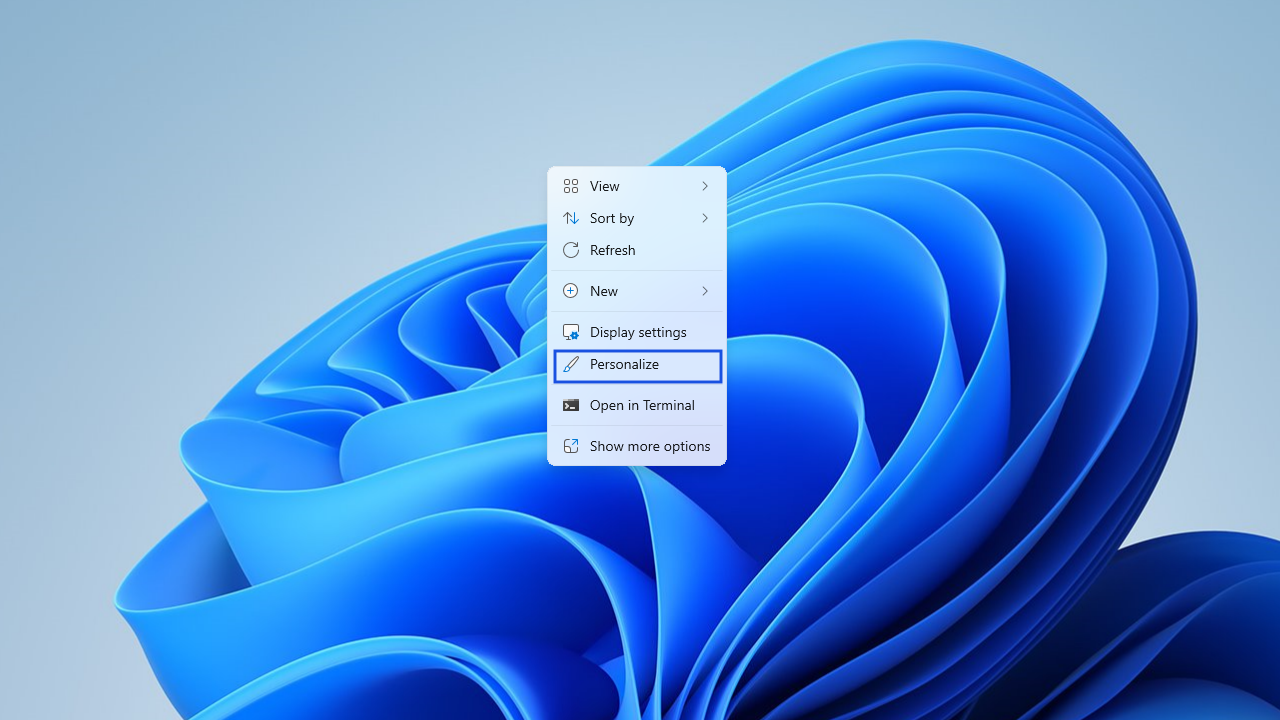
- Select Background.
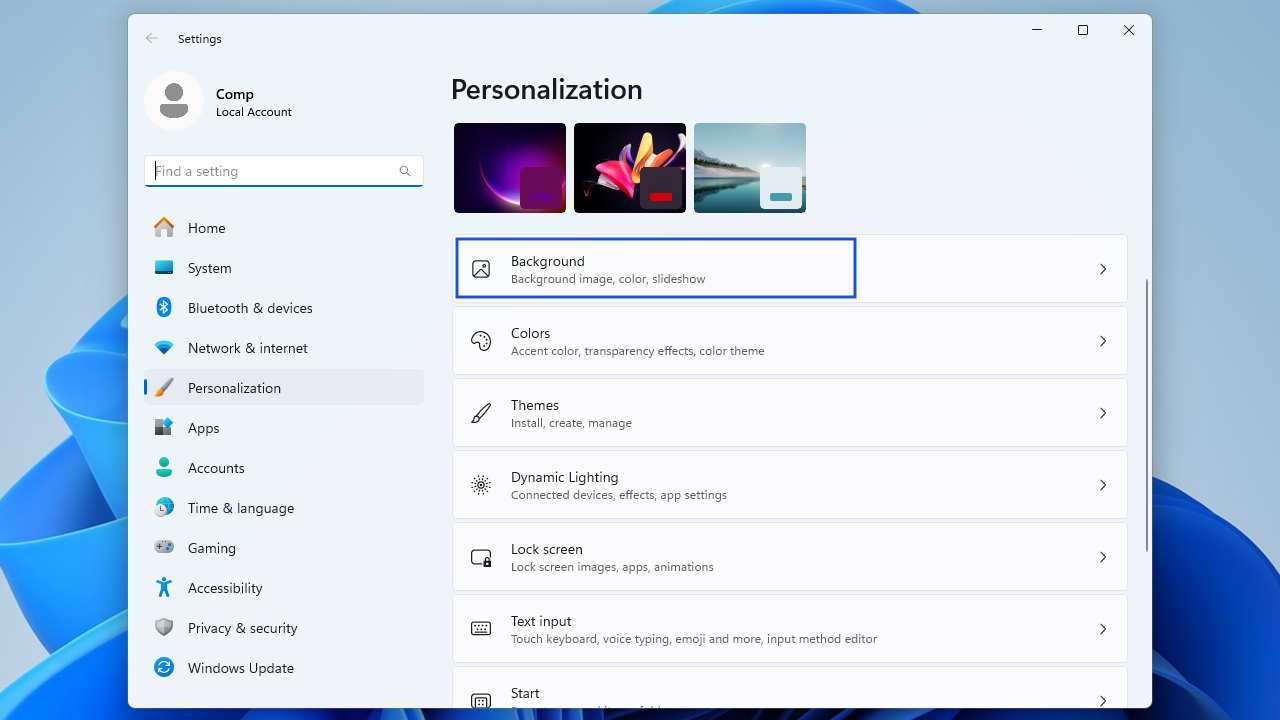
- Select Slideshow from the drop-down beside Personalize your background.
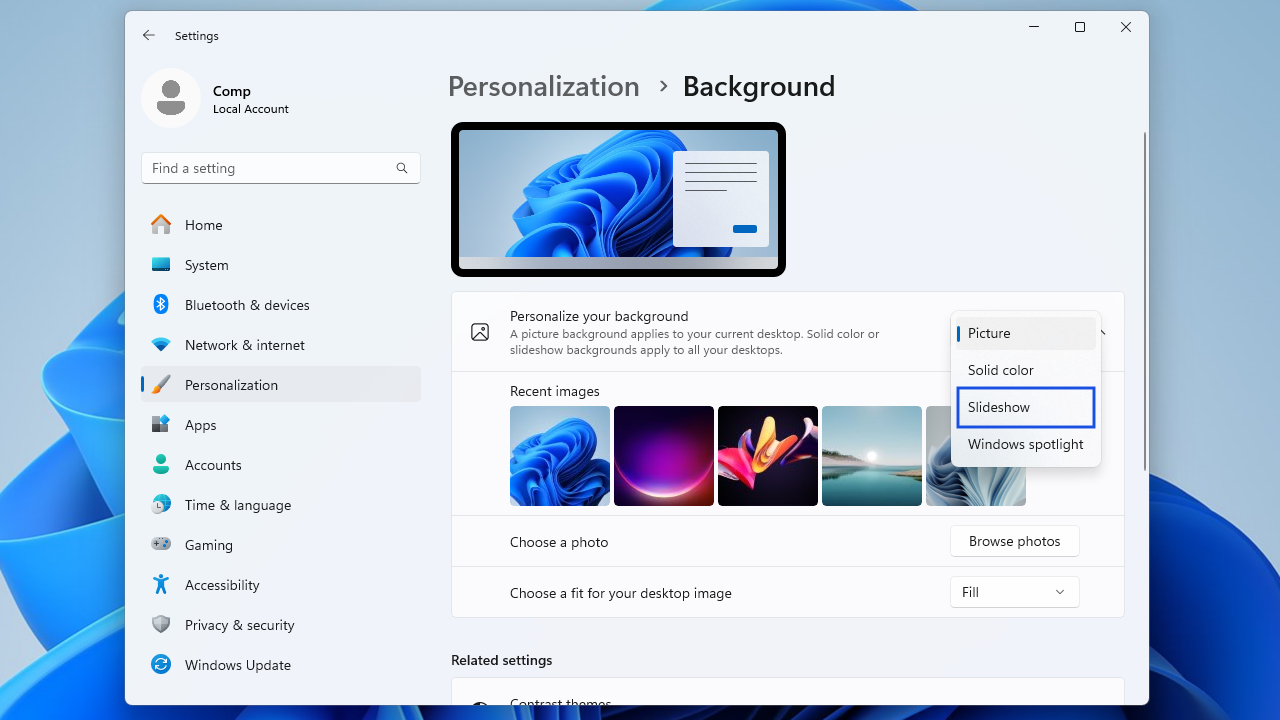
- Use the drop-down menu beside Change picture every to change the interval.
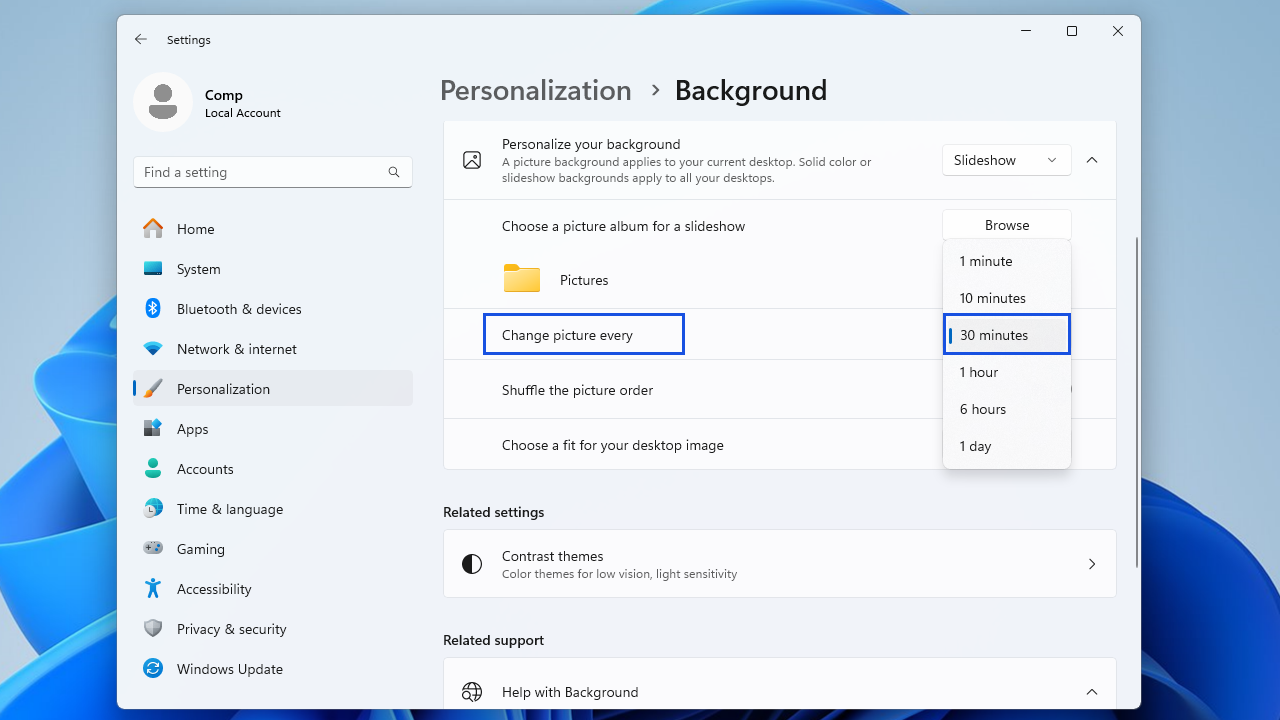
- Restart the PC to see whether it resolves the problem.
Solution 11: Disable notifications and Action Center
According to several users, disabling notifications and Action Center fixed the stuttering issue on their Windows PCs. To try this solution, follow these steps:
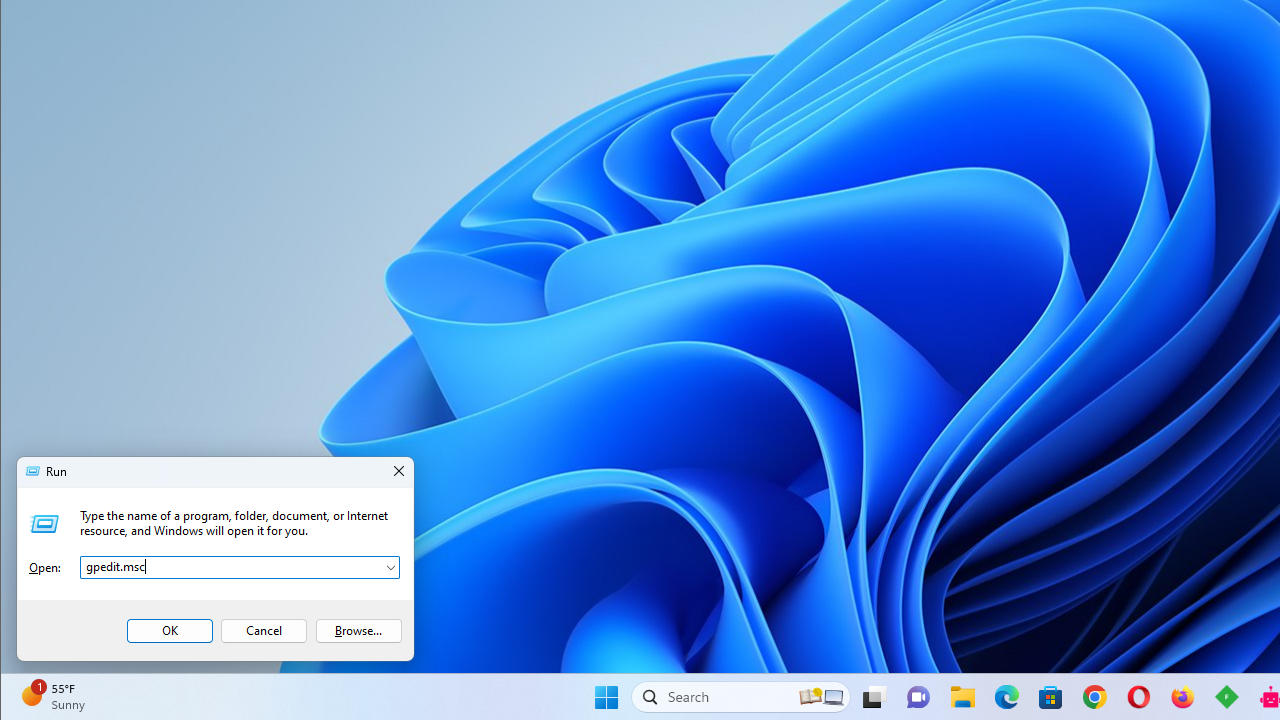
- Press
Windows + R, type gpedit.msc into the Run text box, and hit theEnterkey.
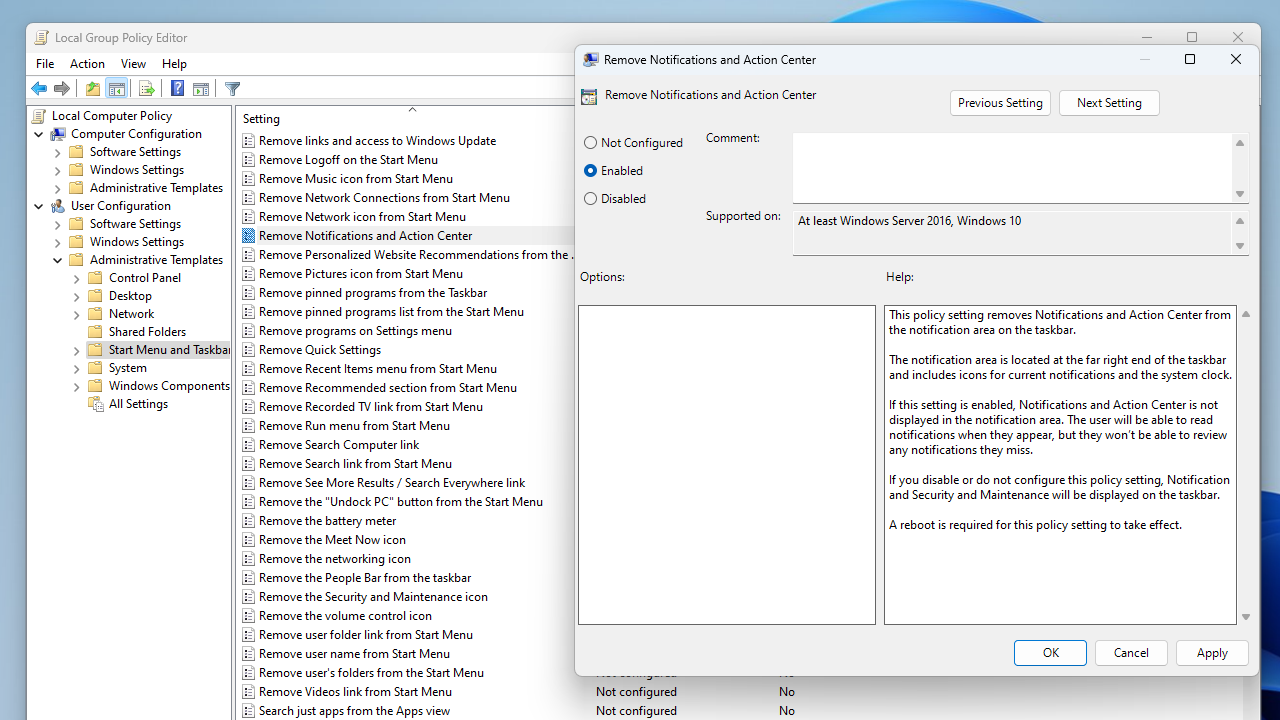
- In the Group Policy Editor window, navigate to this path: User Configuration > Administrative Templates > Start Menu and Taskbar.
- In the right sidebar, locate the Remove Notifications and Action Center policy and double-click it.
- On the next screen, click the Enabled radio button. This removes Action Center, and you won’t be able to review any notifications that you’ve missed.
- Click on Apply, select OK, and restart your system for the changes to take effect.
Solution 12: Disable your system’s high precision event timer device
The high precision event timer, HPET for short, is a Windows device used to synchronize multimedia streams to reduce the need for unnecessary timestamp calculations. The device is designed to smooth your system’s playback.
The tool can indeed increase PC performance and facilitate an impressive playback experience. But it can also cause latency issues and FPS losses when you start playing games. Disabling it can remove the PC stuttering issues you experience when gaming. Follow these steps:
- Launch Device Manager via the Quick Access menu (
Win + X).
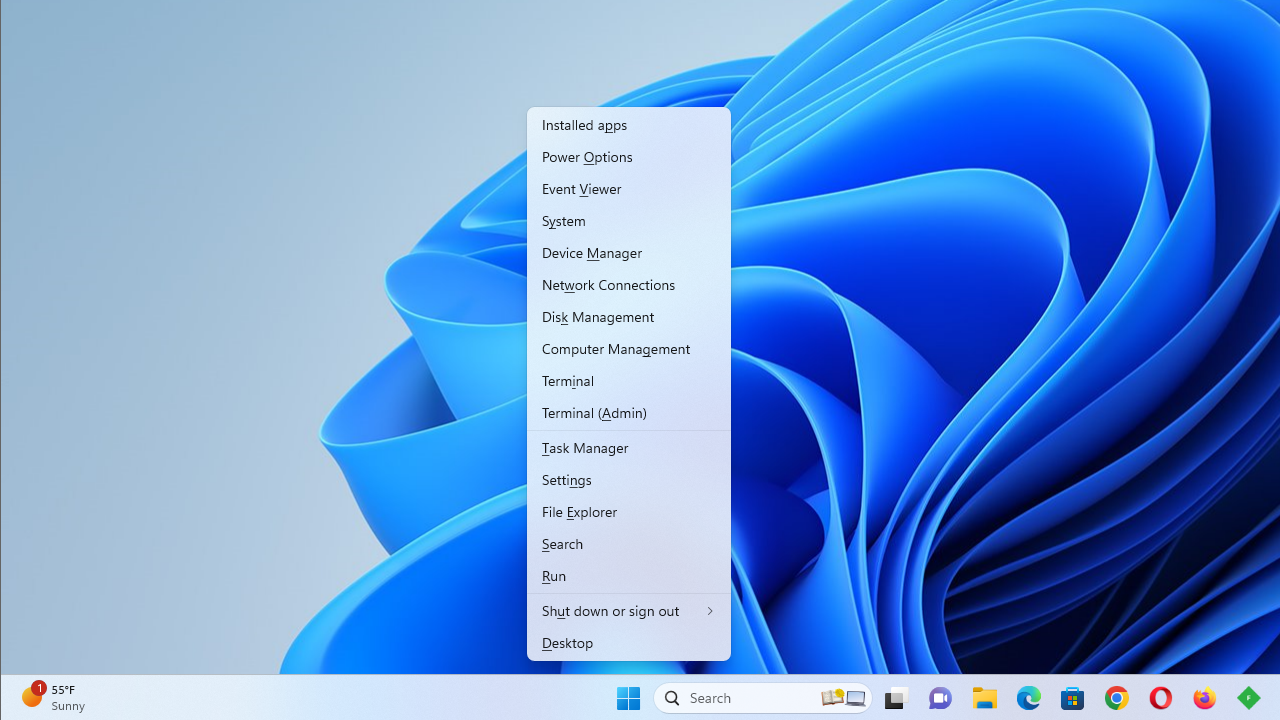
Alternatively, press the Win + R shortcut, type devmgmt.msc into the Run box, and hit the Enter key.

- Once Device Manager appears, go to the System devices category and expand it.
- Next, locate and right-click on High precision event timer.
- Select Disable device from the context menu.
- Click Yes in the confirmation pop-up.
Solution 13: Reduce thermal throttling
When your CPU or GPU overheats, your system initiates thermal throttling—a built-in safety feature that lowers the processor’s clock speed to prevent permanent damage. This is a precautionary step to prevent emergencies before the computer turns off.
Think of it as your PC hitting the brakes just before it crashes into a wall. The processor often slows down, cools down, then speeds back up, etc.
This can cause a PC to stutter every few seconds and be less seamless, which makes troubleshooting difficult.
🔍 Why it happens:
Thermal throttling usually kicks in when the processor’s temperature approaches the maximum limit set by the manufacturer. Factors like dust buildup, ineffective cooling, aging thermal paste, or overclocking can all contribute to the overheating issue.
🧪 How to detect it:
Run a stress test using tools like:
➡️ Prime95 (for CPUs)
➡️ FurMark (for GPUs)
Then monitor your temperatures using software like HWMonitor or Core Temp. If your CPU or GPU is nearing its maximum temperature threshold (often around 90–100°C for CPUs), throttling is likely the culprit.
🧹 How to fix it:
➡️ Clean your PC—remove dust from fans, vents, and heat sinks.
➡️ Check your cooling system—ensure fans are spinning correctly and airflow is unobstructed.
➡️ Reapply thermal paste if it’s been a couple of years or you’ve noticed temperature spikes.
➡️ Undo overclocking—return to stock settings to stabilize temperatures.
💡 Keeping temperatures in check doesn’t just prevent stutters—it can also extend your hardware’s lifespan.
Solution 14: Disable the CD/DVD drive
This fix is something you can try only if your PC has a working CD/DVD drive. Some users reported that disabling their CD/DVD drives has helped them get rid of PC stuttering. Here’s what you can do:
- Press the
Windows key + Xand click Device Manager to launch it. Alternatively, pressWindows + R, type devmgmt.msc, and hit theEnterkey.
- Locate DVD/CD-ROM drives and expand it. Right-click on the drive and click the Disable device button.
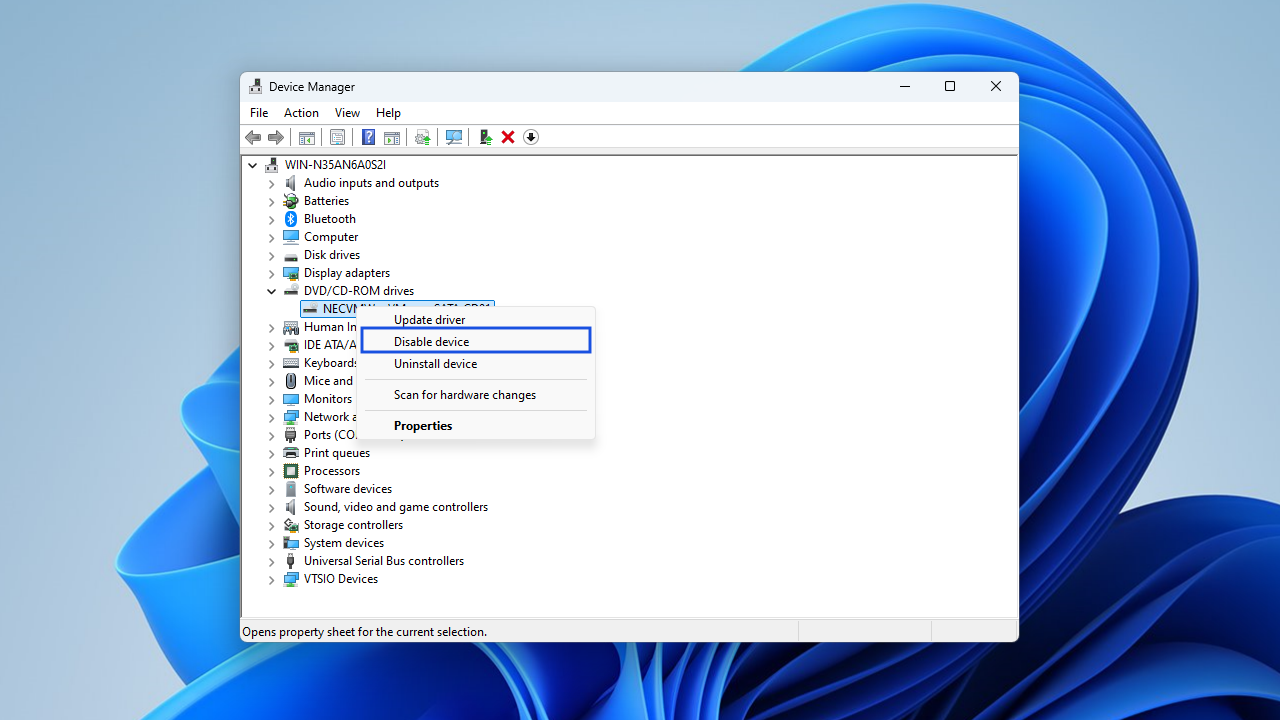
- Click Yes and select OK to save your changes. This action disables the CD/DVD drive.
- To re-enable it, repeat the steps above but select Enable device this time.
- Click OK to save your changes and check if this helps fix the PC stuttering problem.
How to Fix Computer Stuttering While Playing Games
If your PC stutters every few seconds while gaming, the issue could stem from a mix of in-game settings, driver behavior, or system-level performance bottlenecks. Here’s how to reduce or eliminate game stutter and get smoother gameplay:
Lower in-game settings (except resolution)
Start by reducing resource-heavy graphics settings while keeping the resolution unchanged (at least initially). Focus on:
- Shadows
- Ambient occlusion
- Anti-aliasing
- Post-processing effects
- Draw/render distance
- V-Sync or motion blur
These features can significantly strain your GPU and CPU. Lowering them lightens the processing load, improving frame pacing and reducing stutter without drastically affecting visual quality.
Gradually increase settings after stabilization
If the stutter disappears after lowering settings, try increasing them incrementally to find the sweet spot your system can handle. This helps optimize performance without compromising too much on visuals.
Watch for shader compilation stutter in DirectX 12 games
Many modern games that use DirectX 12 experience initial stutter due to real-time shader compilation. This is especially common during cutscenes or when entering new areas. Look for a setting that allows shader pre-compilation (sometimes called Compile Shaders on Startup) in the graphics or video menu.
If unavailable, switching to DirectX 11 mode—when supported—can help, as it handles shaders differently.
Toggle Windows Game Mode
Windows 10/11 includes a Game Mode feature that prioritizes system resources for gaming. However, on some systems, it may introduce stuttering instead of solving it. Go to Settings > Gaming > Game Mode and try toggling it off or on, depending on its current state. Some users report reduced stutter when it’s disabled.
Cap your frame rate for smoother delivery
Uncapped frame rates can cause frame pacing issues, especially if your system fluctuates between high and low FPS.
- Use:
- In-game frame rate limiters
- V-Sync (to sync frames with your monitor’s refresh rate)
External GPU tools like NVIDIA Control Panel or AMD Radeon Software to set frame caps. A steady frame rate ensures smoother transitions and prevents micro-stutters caused by inconsistent delivery.
Computer Stuttering: Fixed
If you’ve been asking, “Why is my PC stuttering all of a sudden?” carefully go through this article and implement the solutions discussed. Stuttering in Windows 10/11 can be a frustrating and persistent issue.
We’ve looked into several possible causes, including out-of-date drivers, troublesome Windows updates, defective hardware, and malicious software.
The solutions offered here give you a detailed how-to for fixing these problems and getting your PC back up and running smoothly.
FAQ
FPS drops occur when your system can’t consistently render frames fast enough. Several factors can cause this:
- Outdated or corrupt graphics drivers: Updated drivers are essential for smooth GPU performance. If they’re not up to date, frame rendering may slow down or stutter.
- High in-game settings: Features like ultra-quality shadows, anti-aliasing, and ambient effects can push your GPU beyond its limits, especially in demanding scenes.
- Background processes: Apps running behind the scenes (like browsers, updaters, or streaming tools) can use up CPU, RAM, and disk resources, leaving less for your game.
- Thermal throttling: When your CPU or GPU gets too hot, it may slow itself down to prevent damage, which often leads to sudden FPS dips.
- System limitations: If your hardware doesn’t meet the game’s requirements or is nearing its capacity, performance will naturally suffer.