- What Is the Windows Update Troubleshooter?
- How to Fix Windows Update Not Working Using the Troubleshooter
- Other Proven Ways to Fix Windows Update Errors
- Method 1: Run an anti-malware scan
- Method 2: Free some space on your system
- Method 3: Turn off Windows Firewall temporarily
- Method 4: Restart the Windows Update service
- Method 5: Clear the Windows Update cache
- Method 6: Delete the contents of the SoftwareDistribution folder
- Method 7: Repair system files with SFC and DISM
- Method 8: Perform a clean boot
- Method 9: Reset Windows Update registry keys
- Method 10: Install updates from Microsoft manually
- Method 11: Perform a system restore
- Common Windows Update Errors on Windows 10/11
- Issue #1: Update stuck at 0%
- Issue #2: Update fails to install
- Issue #3: Slow Windows updates
- Issue #4: Windows Update fails with an error code
- Issue #5: Windows Update service not running
- Issue #6: Feature update stuck during installation
- Issue #7: Windows update loop (repeated installation failure)
- Issue #8: Device incompatible with Windows Update
- Issue #9: Network or proxy settings issues
- Issue #10: Windows Update disabled or not working
- Common Windows Update Errors after Updates
- Windows Update Not Working: Fixed
- FAQ
Sometimes, if your Windows isn’t updating or having issues with the update, you can wait a while and restart your PC. If that doesn’t work, follow this guide because I’ll show you how to fix the problem.
Regular system updates are essential for keeping Windows computers secure, stable, and running efficiently. These updates patch security vulnerabilities, improve performance, and introduce new features. However, it’s ironic that the very updates designed to fix problems can sometimes become problems.
If you are one of many people experiencing issues like failed downloads or any other Windows Update errors , this piece is for you. In this article, I’ll explore some of the most common issues people face with Windows updates and show you how you can fix them.
Let’s begin.
What Is the Windows Update Troubleshooter?
The Windows Update troubleshooter is a tool built into Windows with which you can find and fix common problems with Windows updates . The main advantage of using this tool is that its intuitive interface makes it easy for anyone to fix update problems.
This Windows Update repair tool works by checking your system for common problems like wrong system settings or problems with Windows Update services. These fixes help get updates working again without you needing to do anything complex.
That means you won’t be able to access Windows Update troubleshooter in its current form soon. But you would still be able to access it through the new Get Help platform.
How to Fix Windows Update Not Working Using the Troubleshooter
Here’s how to use the Windows Update troubleshooter to fix system update errors on both Windows 10 and 11:
For Windows 10:
- Press
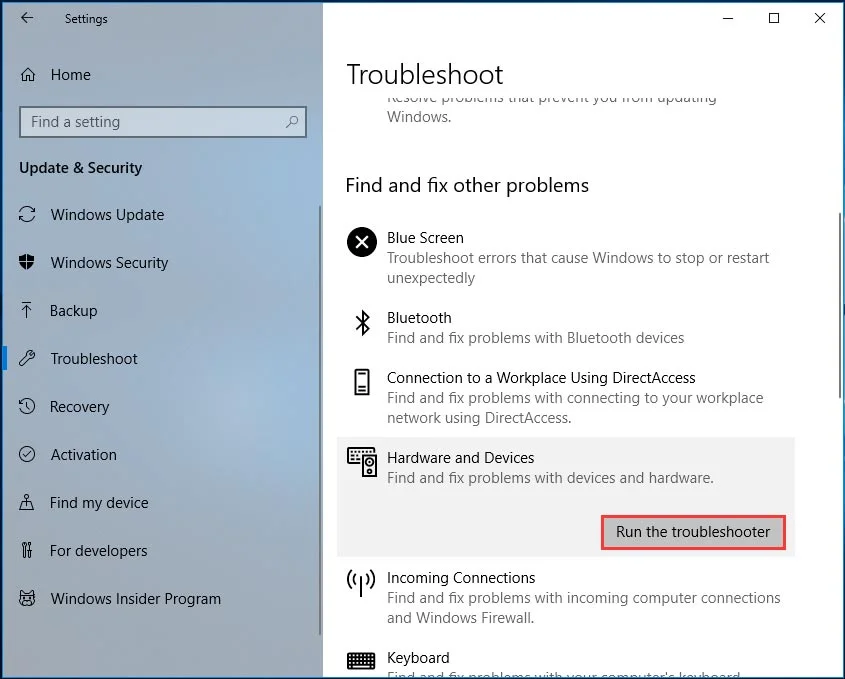
Windows + Ion your keyboard to open the Settings app. In Settings, scroll down and click Update & Security. - In the left-hand menu, select Troubleshoot . On the right, click on Windows Update and then select Run the troubleshooter.
- The troubleshooter will scan for problems. If any issues are found, it’ll suggest or automatically apply fixes. Follow any prompts to complete the process.
- Once the troubleshooter finishes, restart your computer and try running Windows Update again.
For Windows 11:
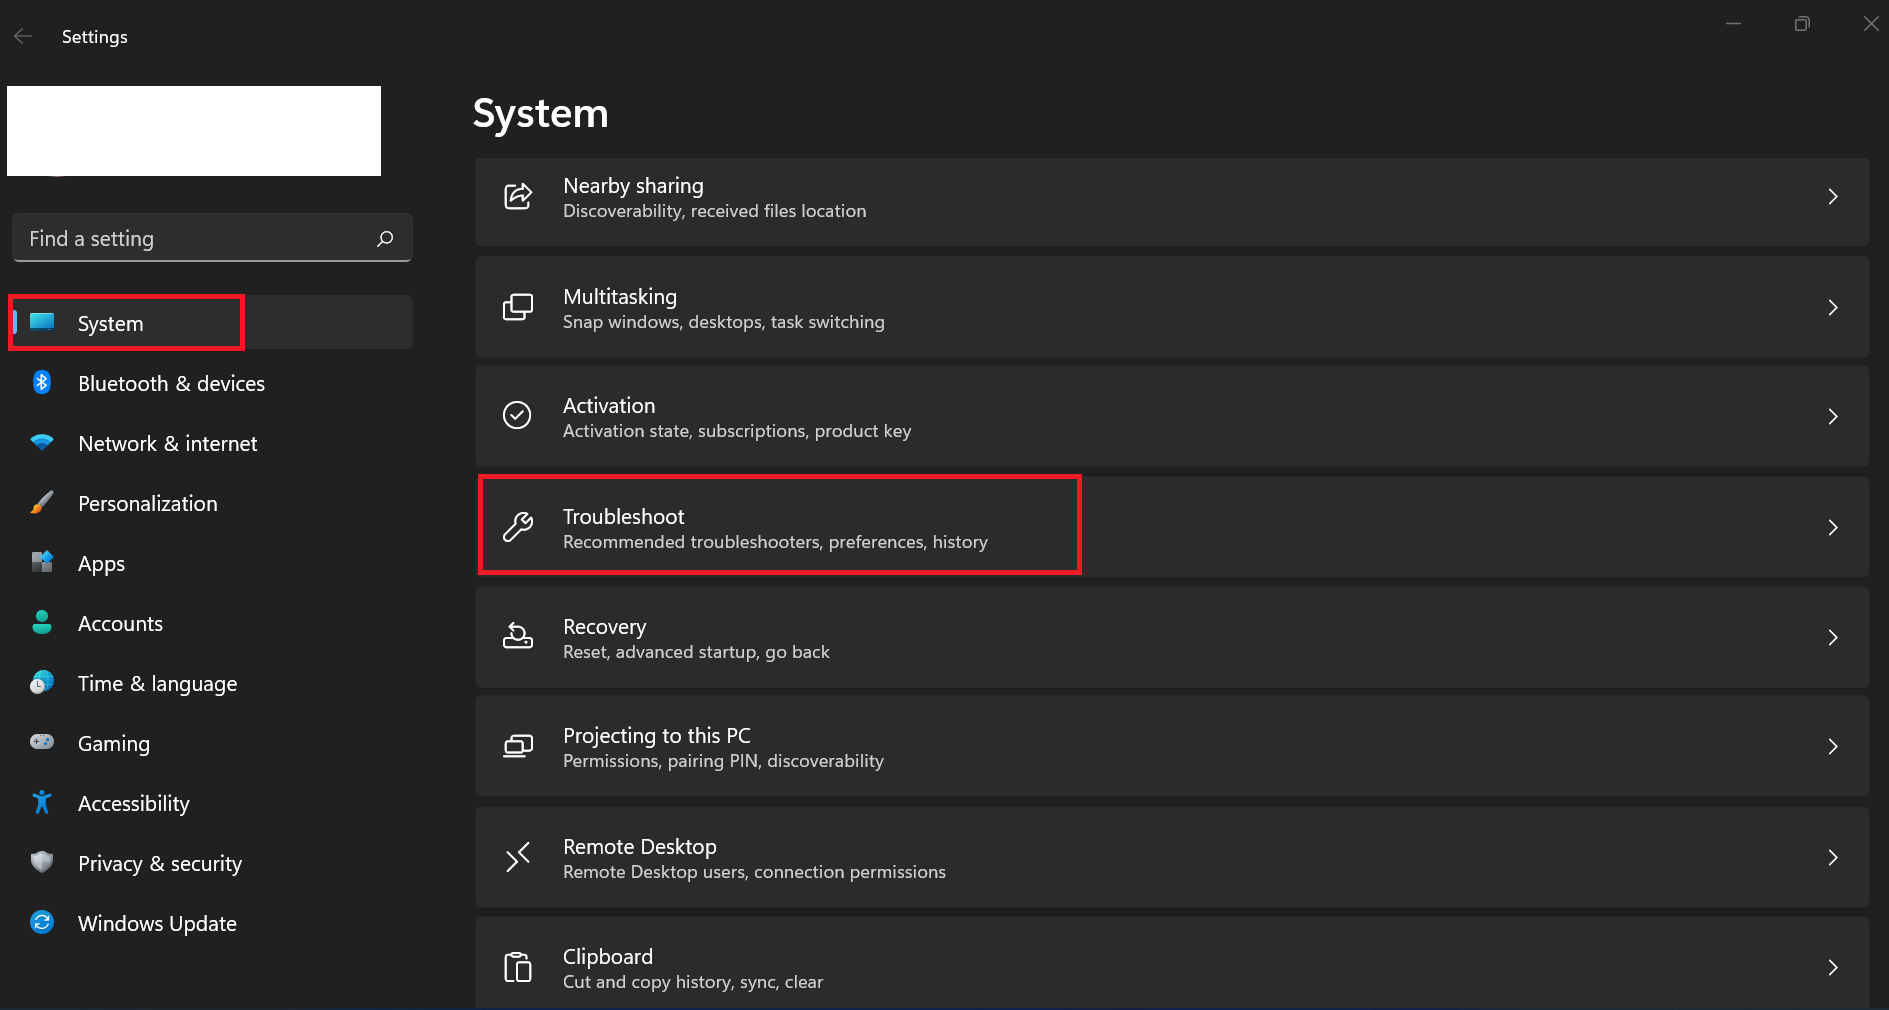
- Press
Windows + Ito open the Setting s app. - In the left-hand menu, click on System. On the right, scroll down and select Troubleshoot.
- Click on Other troubleshooters.
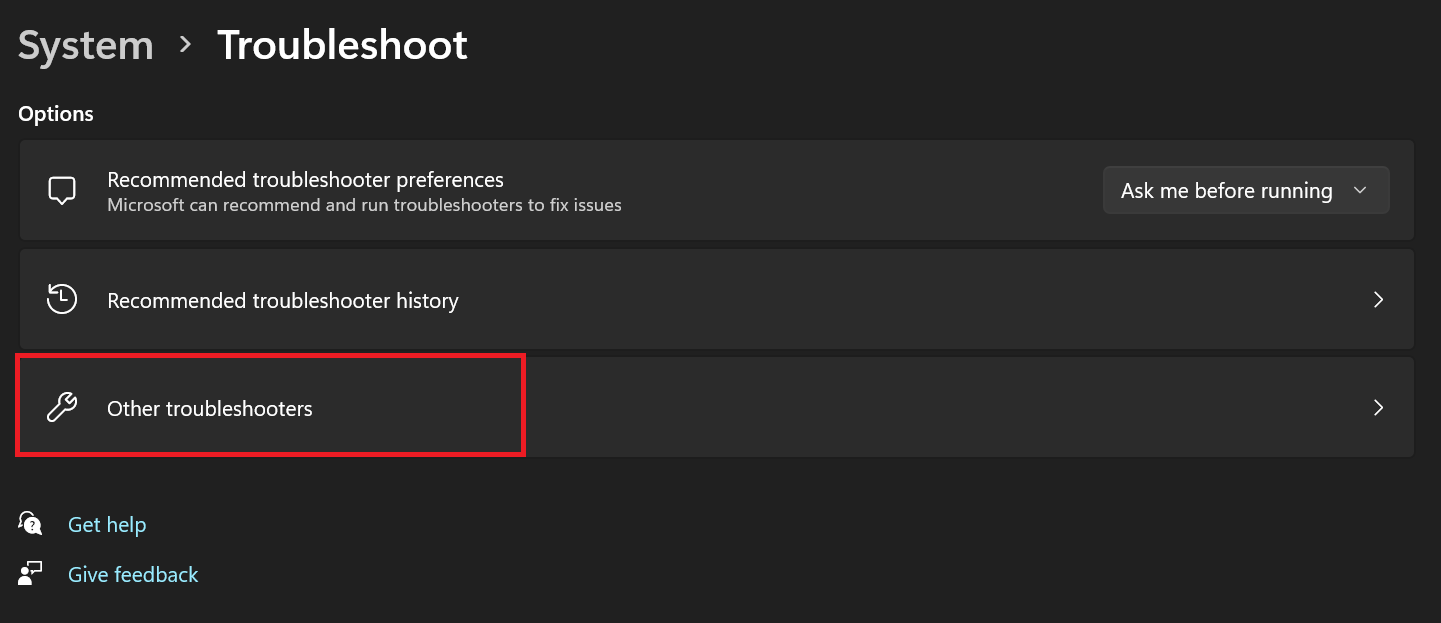
- From the list of options, find Windows Update and click Run next to it.
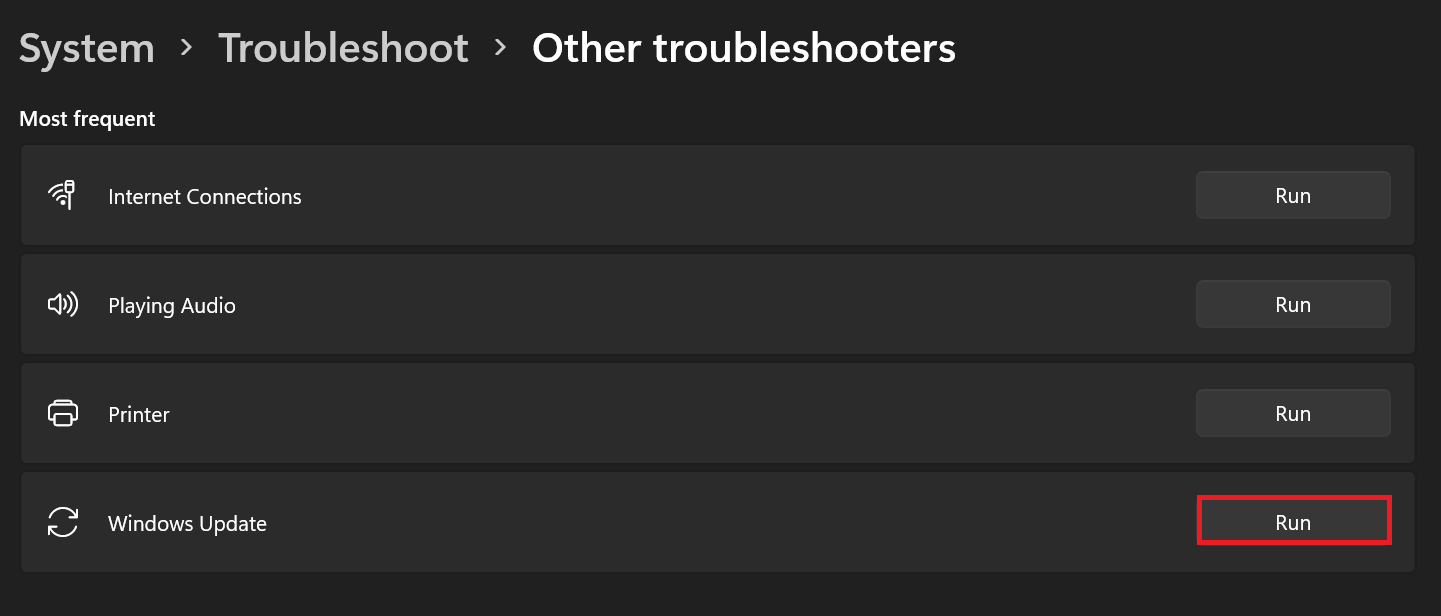
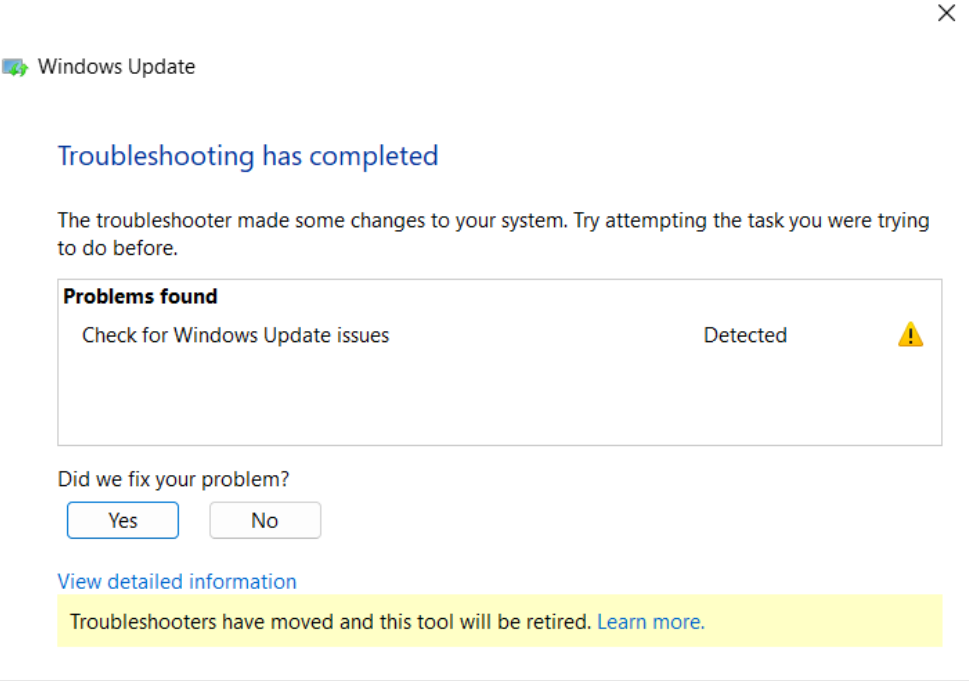
- The troubleshooter will automatically check for problems and apply fixes.
- Follow any on-screen guidance to complete the process.
- You can click on View detailed information to see what the troubleshooter found and how it fixed the problem.
- After the troubleshooter finishes, restart your computer and check if Windows Update works properly.
What if the Windows Update troubleshooter isn’t showing up?
There are situations where the Windows Update troubleshooter might not show up due to corrupted system files , third-party software conflicts, improper installations, and even Windows Update issues.
If you can’t find the Windows Update troubleshooter, here are a few things you can do:
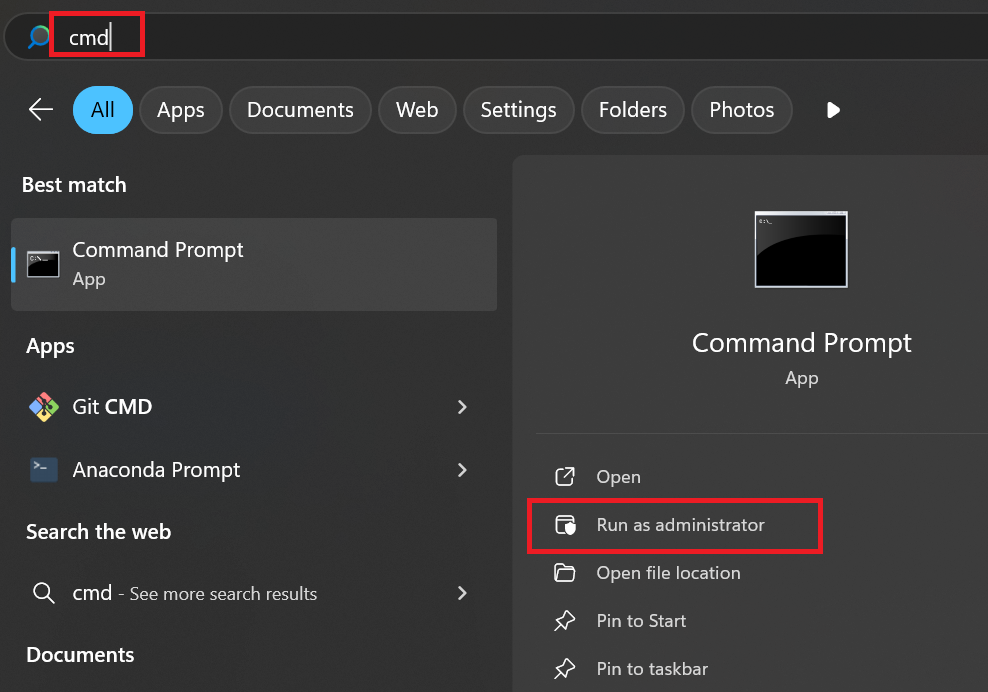
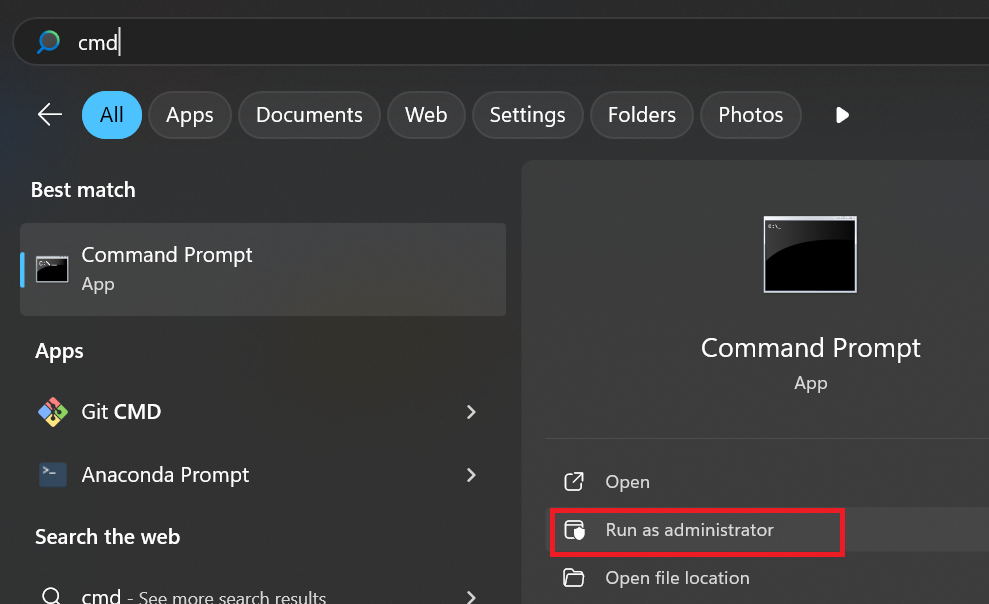
- Run System File Checker: Open the Command Prompt as an administrator (type cmd in Windows Search and click Run as administrator in the right menu), type sfc /scannow , and press
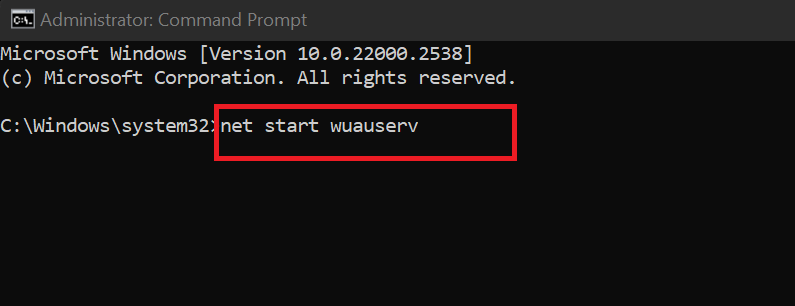
Enterto scan for and repair corrupted system files. - Reset Windows Update components: Open the Command Prompt as an administrator and type net stop wuauserv to stop Windows Update services. Next, delete the SoftwareDistribution folder. Then, go back to the Command Prompt and type net start wuauserv to restart the services.
- Use the Microsoft Update Catalog: Visit the Microsoft Update Catalog , search for the update by its KB number, download the correct version for your system, and install it manually.
- Disable or uninstall third-party software: Sometimes, antivirus or other third-party software can interfere with the troubleshooter. Temporarily disable your antivirus software and try running the troubleshooter again. Also, try deleting any apps you recently installed to see if that fixes the problem.
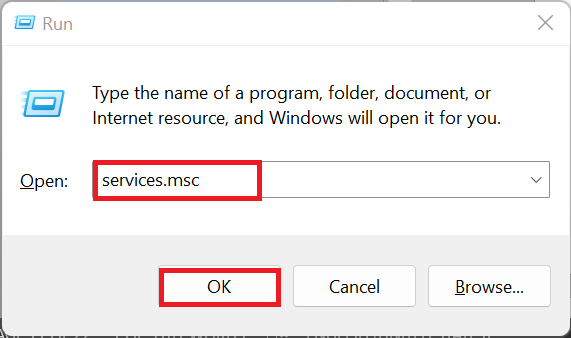
- Restart Windows Update and BITS services: Press
Windows + R, type services.msc , and click OK. Make sure that Windows Update and Background Intelligent Transfer Service are running and set to Automatic .
In the following sections, we’ll explore proven alternative solutions to tackle Windows Update issues.
Other Proven Ways to Fix Windows Update Errors
If the troubleshooter did not find any errors or couldn’t fix your Windows Update issue, below are proven methods that should solve the problem permanently:
Method 1: Run an anti-malware scan
Problems like Windows Update not working can be an indication of a bigger problem like malware infection . Malicious software can disrupt Windows Update processes by disabling essential services, corrupting system files, or blocking access to Microsoft’s servers.
Malicious software typically blocks Windows updates since an outdated system is vulnerable to threats. Plus, without Windows updates, the malware can easily avoid detection and removal through security patches.
This is beyond what the Windows Update diagnostic tool can solve. Instead, you need to run a full scan with a trusted antivirus or anti-malware program to detect and remove any threats. If all you have is Windows Security, you can follow these steps:
- Search for Windows Security in the Start menu and open the app.
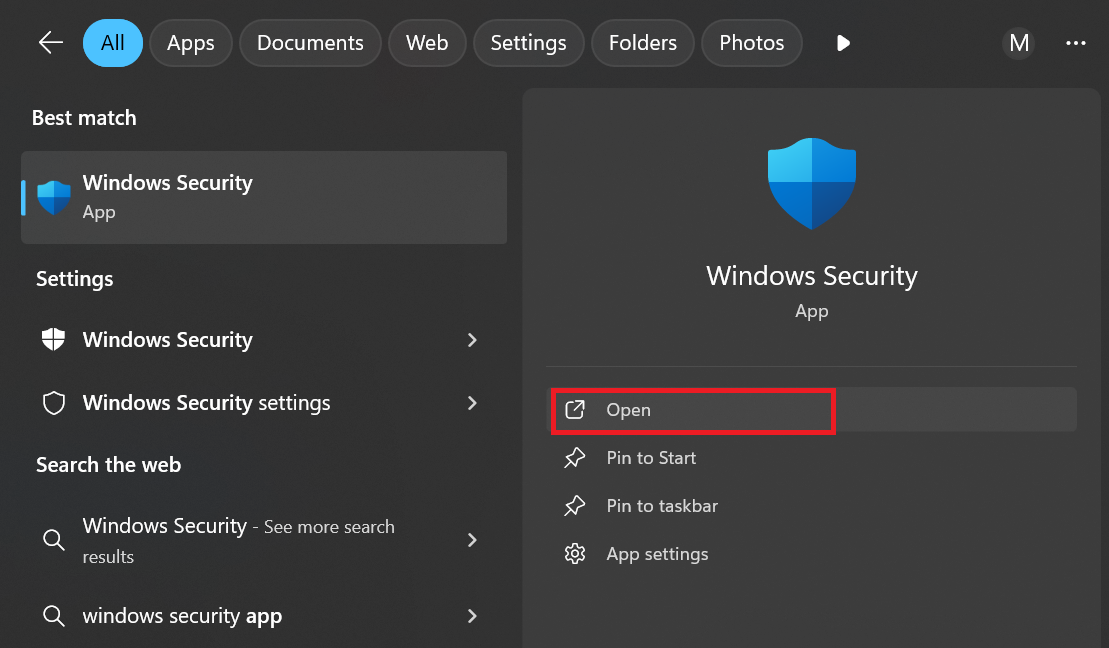
- In the Windows Security window, click on Virus & threat protection.
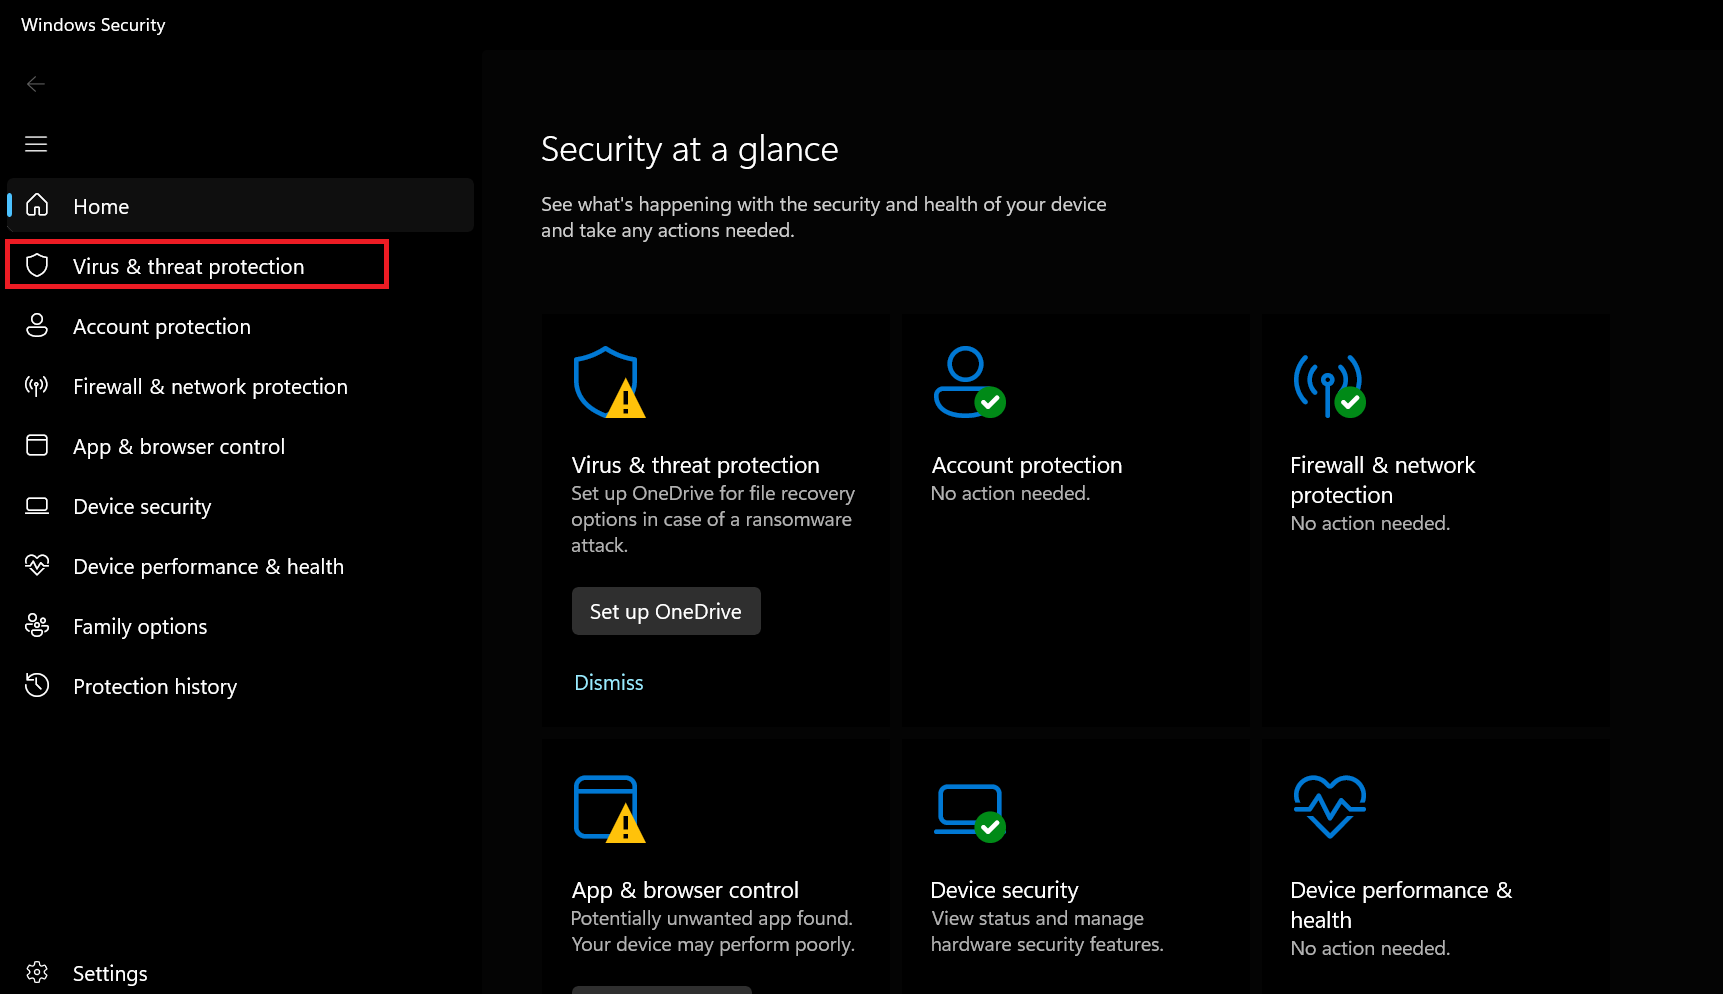
- Under the Current threats section, click on Scan options.
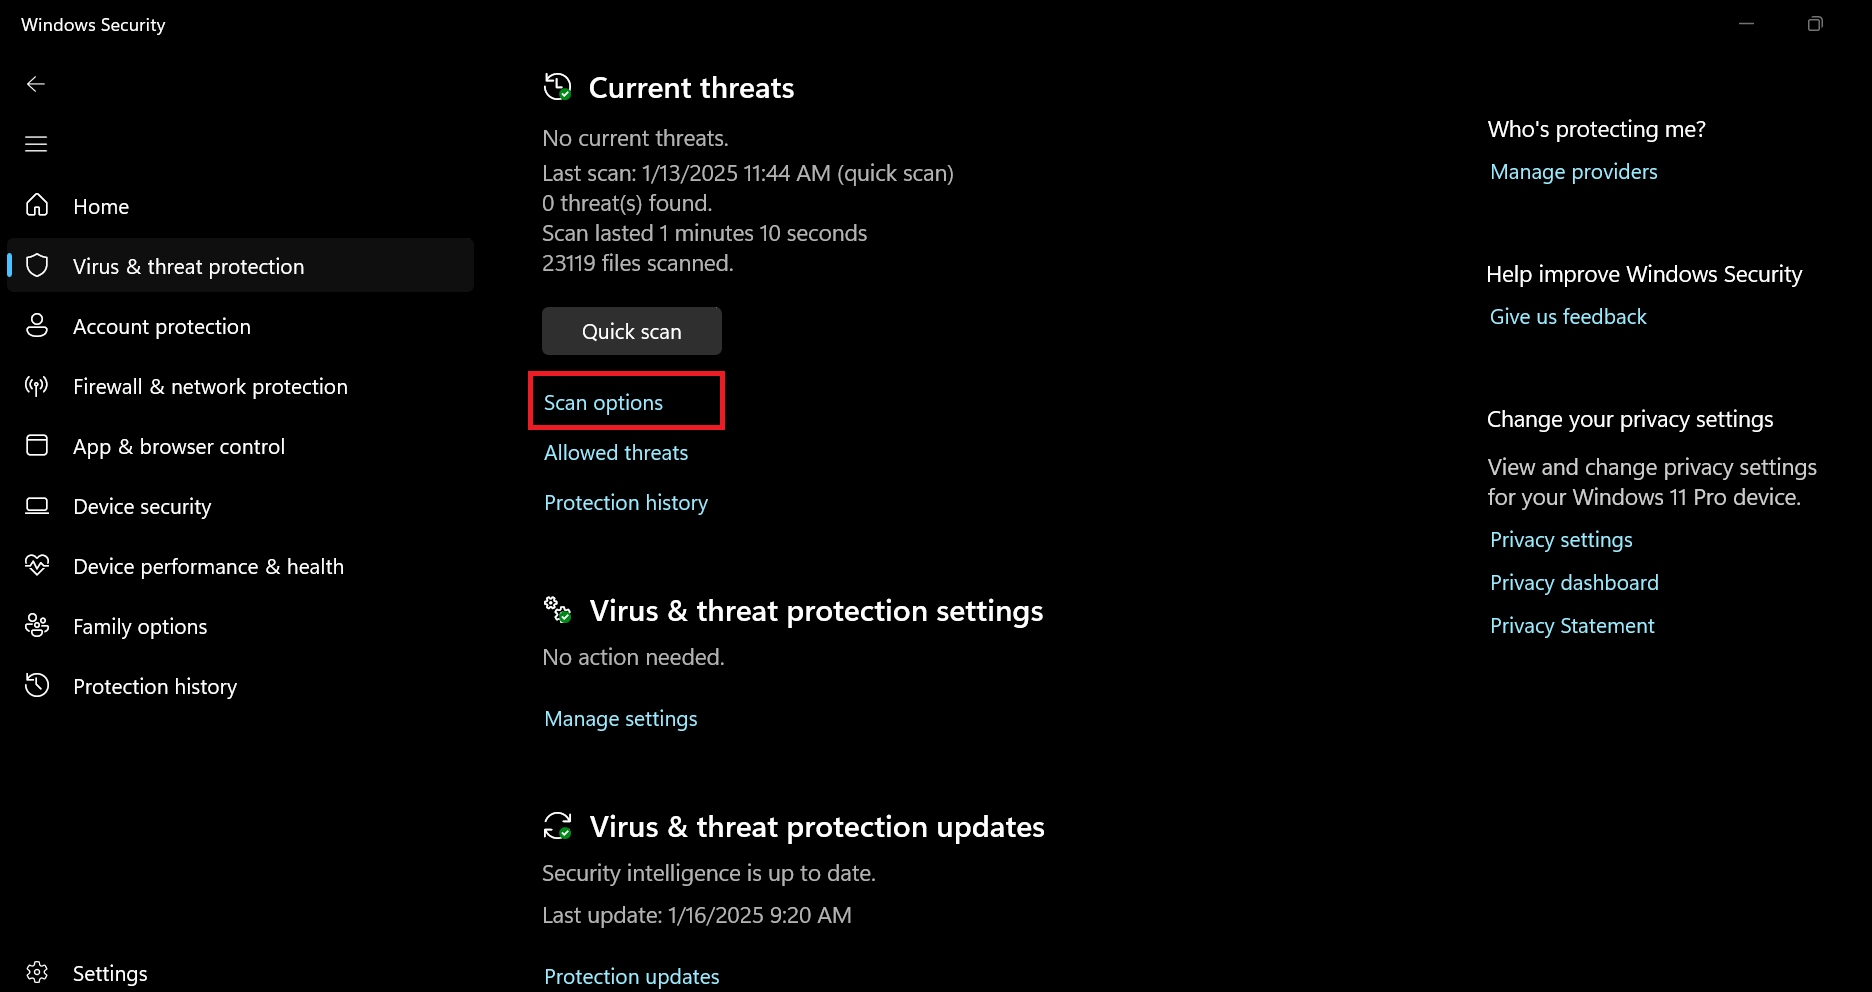
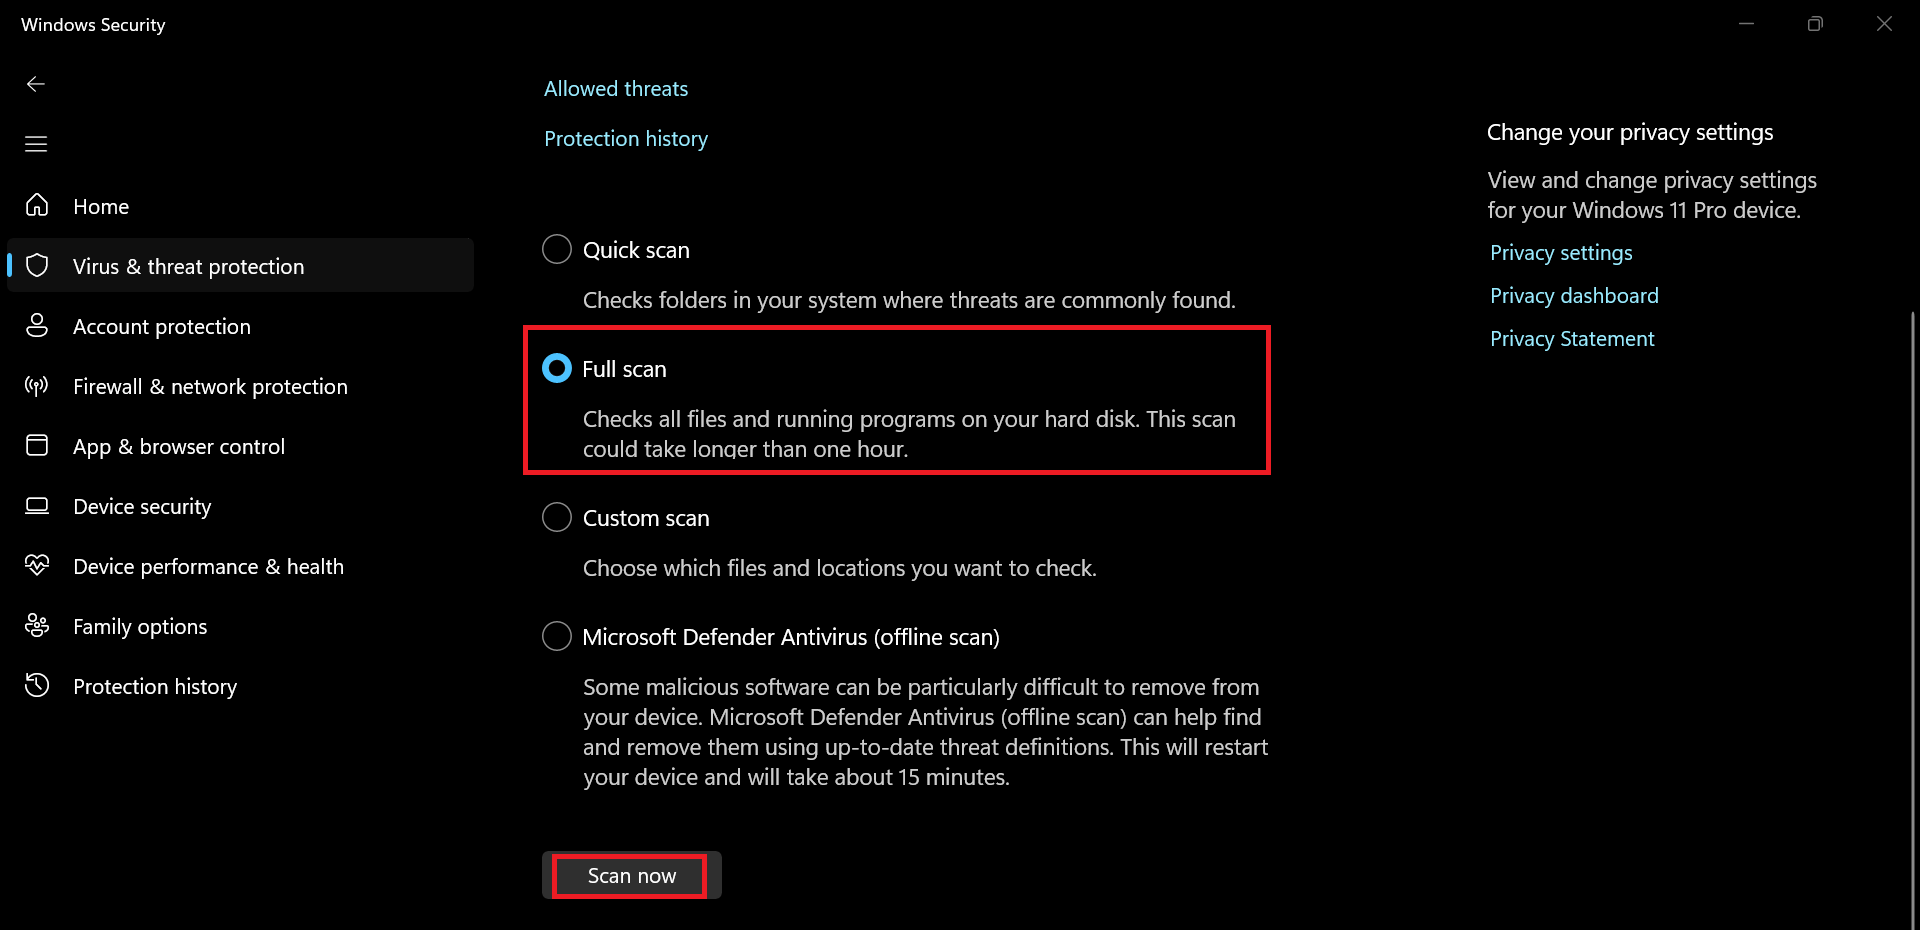
- Select Full scan and then click Scan now . This will scan your entire system for malware and potentially unwanted software.
Once the scan is complete, follow any prompts to quarantine or remove any threats found. Afterward, restart your computer and try running Windows Update again to see if your Windows Update error is resolved.
Method 2: Free some space on your system
Windows needs disk space to download and install updates. So if Windows Update is not working, and you are sure it’s not a malware problem, you should check if you have enough space left.
You need at least 10GB of free space on your main drive to install updates successfully without errors. If your storage is almost full, there are several ways to get more storage space . Let’s go through them:
Move files to an external drive or cloud storage
You can transfer large files like photos, videos, and documents to an external drive or a cloud storage service like OneDrive or Google Drive. Consider moving some of your large files to an external hard drive or to the cloud. You can delete these large files after moving them and check if the problem is solved.
- Go to Settings and click on System.
- Then, go to Storage and select Temporary files.
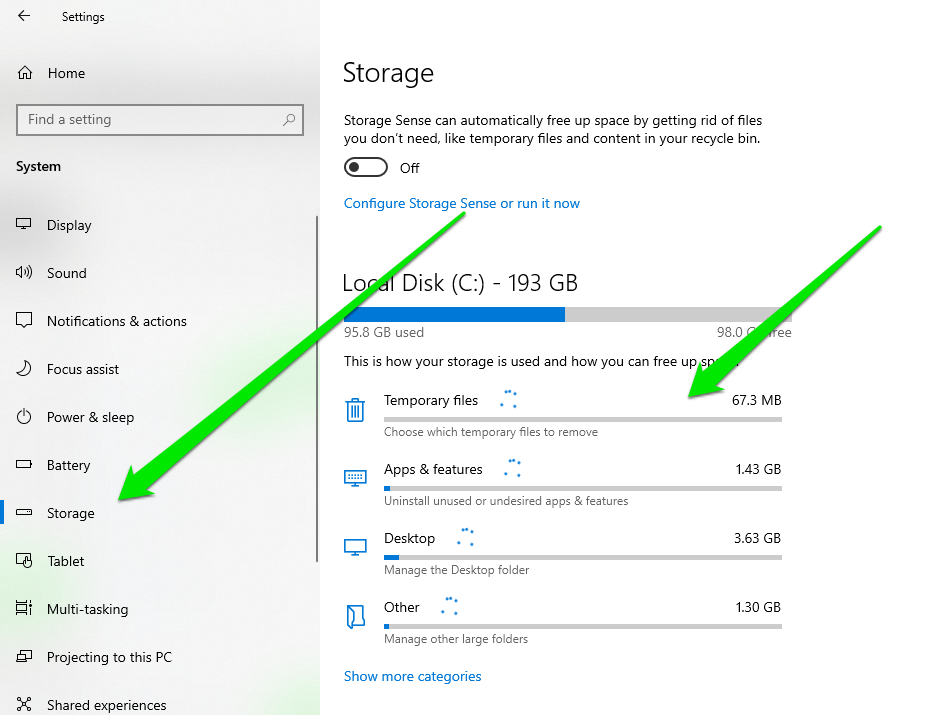
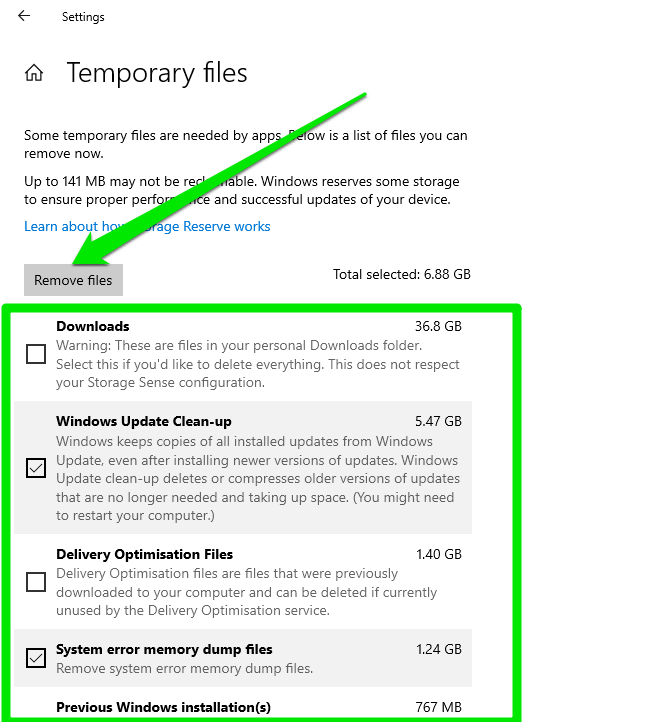
- Select the files you want to remove by checking the boxes and clicking the Remove files button.
- Type Disk Cleanup in the search bar and select it from the results.
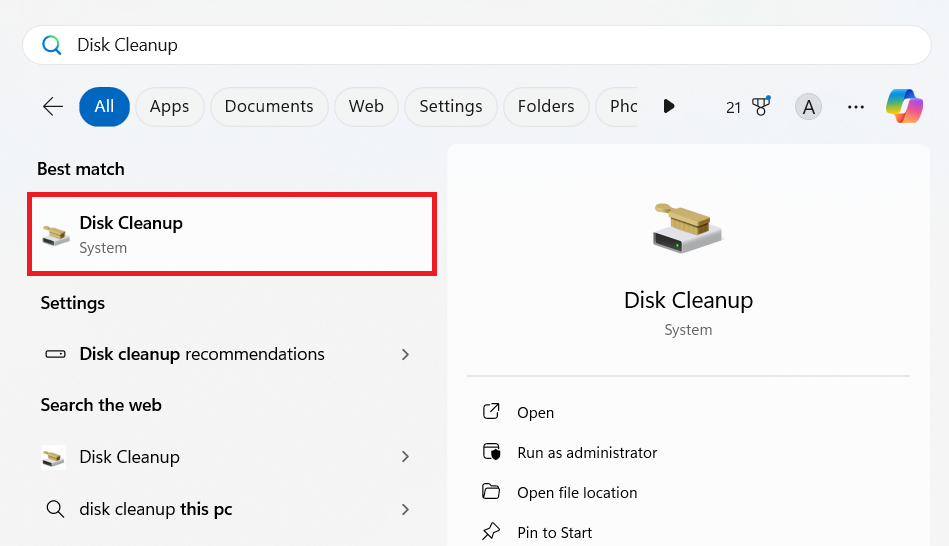
- Choose the drive you want to clean up (usually the C: drive).
- Check the boxes next to the file types you want to delete, such as Temporary files, Thumbnails, and Recycle Bin.
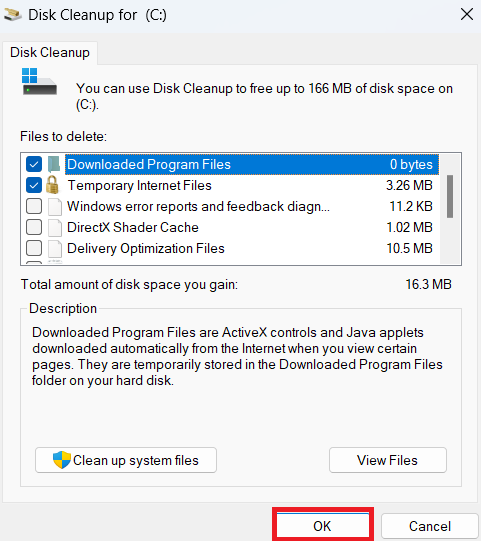
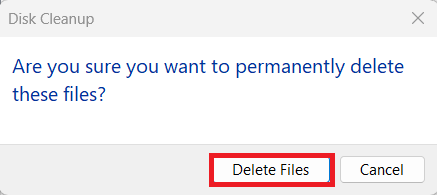
- Click OK and then Delete Files to confirm.
Uninstall unnecessary programs
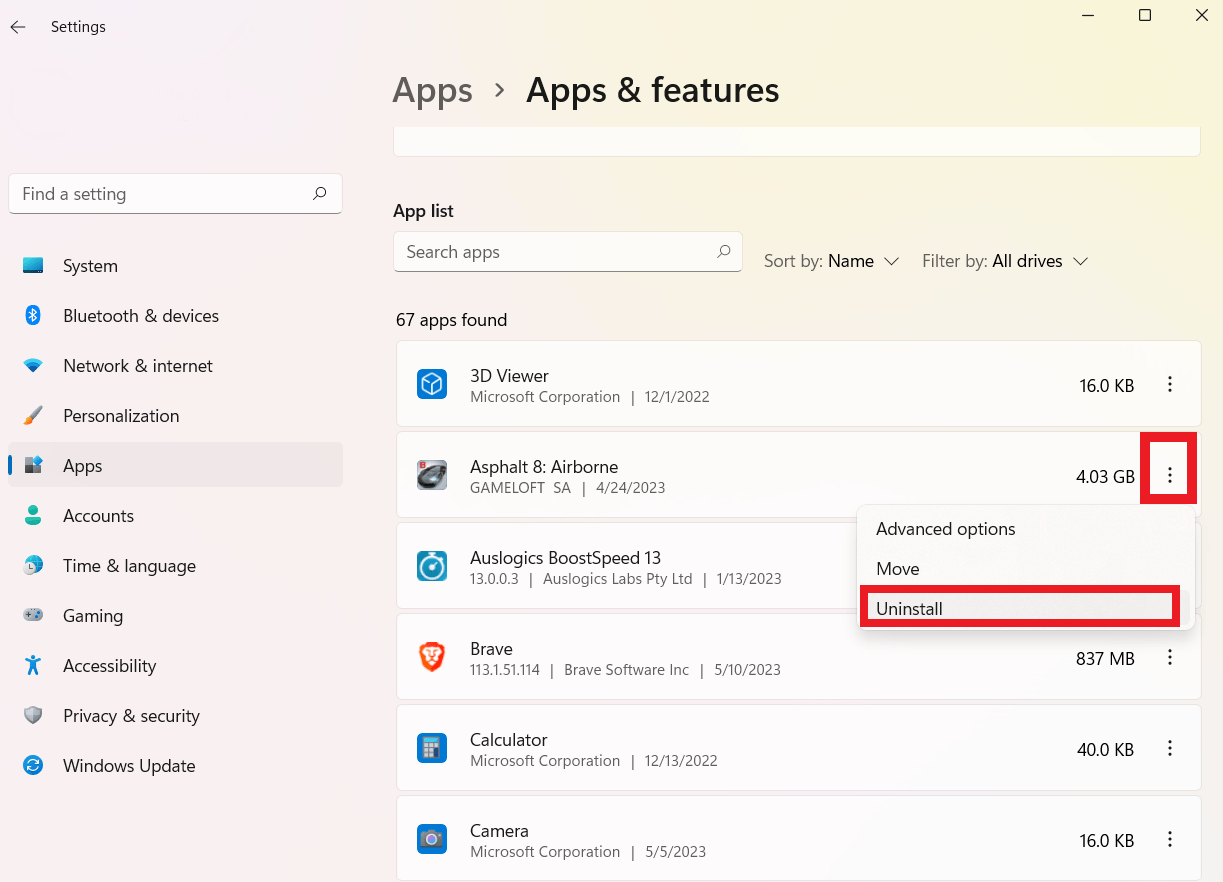
- Press
Windows + Ito open the Settings window. - Go to Apps and then Installed apps (Apps & features in Windows 10).
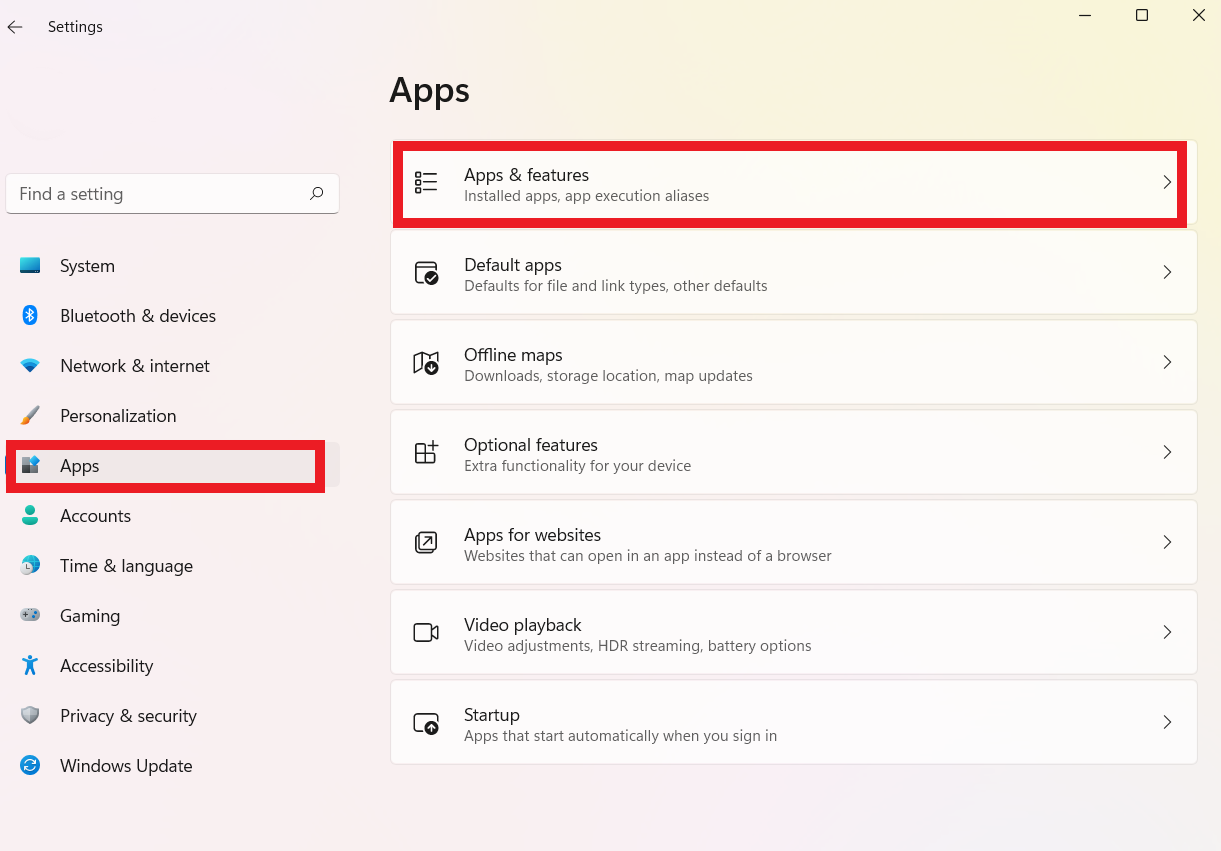
- Browse through the list and uninstall programs you no longer need by clicking on them and selecting Uninstall .
Method 3: Turn off Windows Firewall temporarily
Your Windows Firewall helps you control incoming and outgoing network traffic based on security rules. But sometimes, if your firewall settings are not configured correctly, they may block the connection to Microsoft’s update servers.
This can be the reason why Windows Update is not working . So, if you’re having trouble with Windows updates, it’s a good idea to turn off your firewall for a few minutes and see if this helps.
To turn off your firewall, follow these steps:
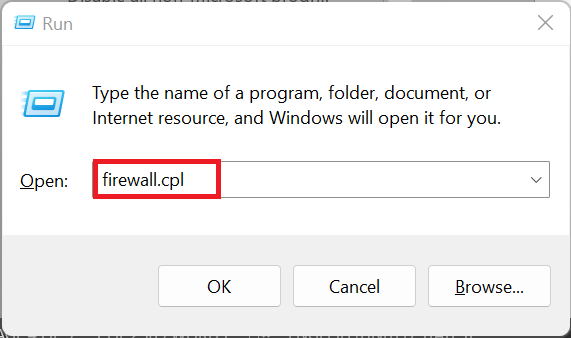
- Press
Windows + Rto open the Run dialog box. Type firewall.cpl and hitEnter.
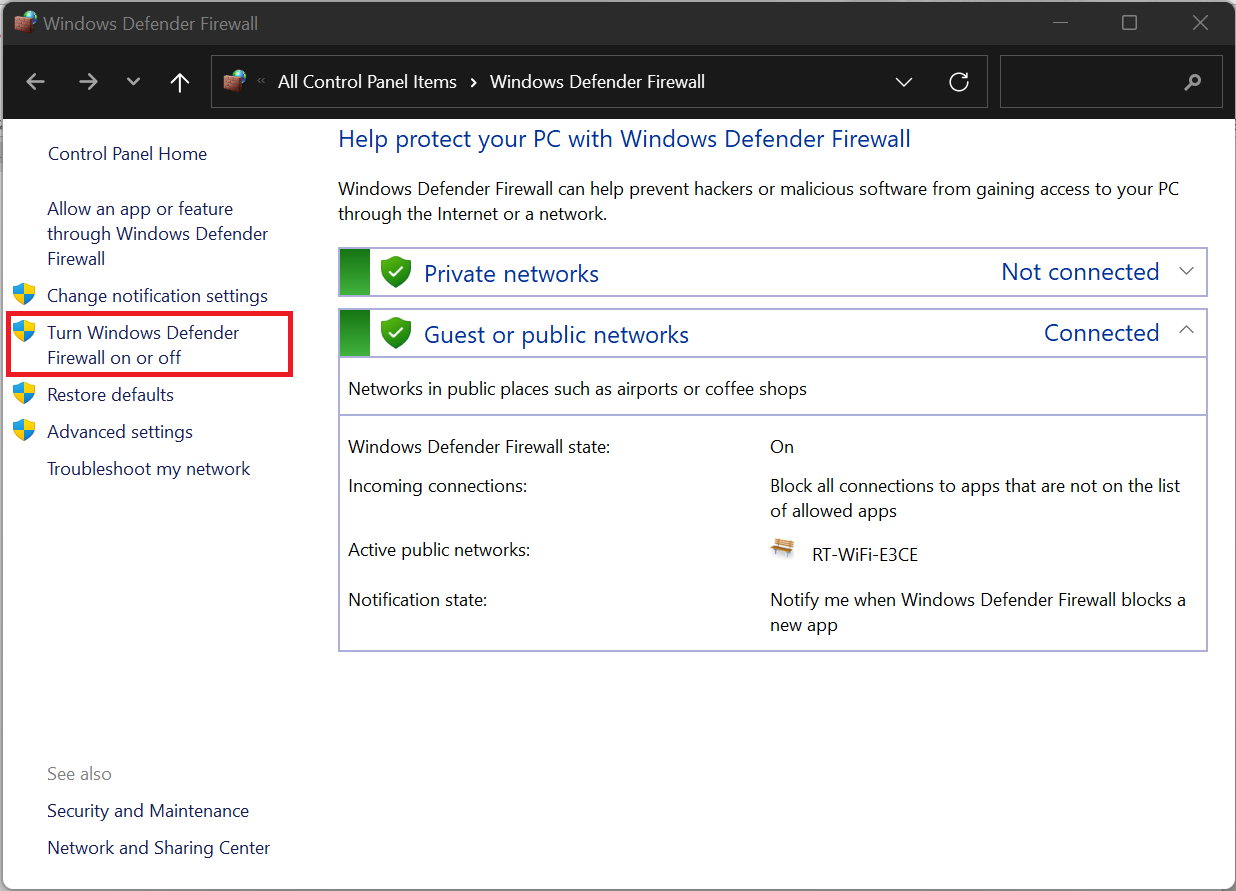
- On the left-hand side of the screen, select Turn Windows Defender Firewall on or off.
- You will see a list of network types. Under each one, select the option that says Turn off Windows Defender Firewall . Then, click OK .
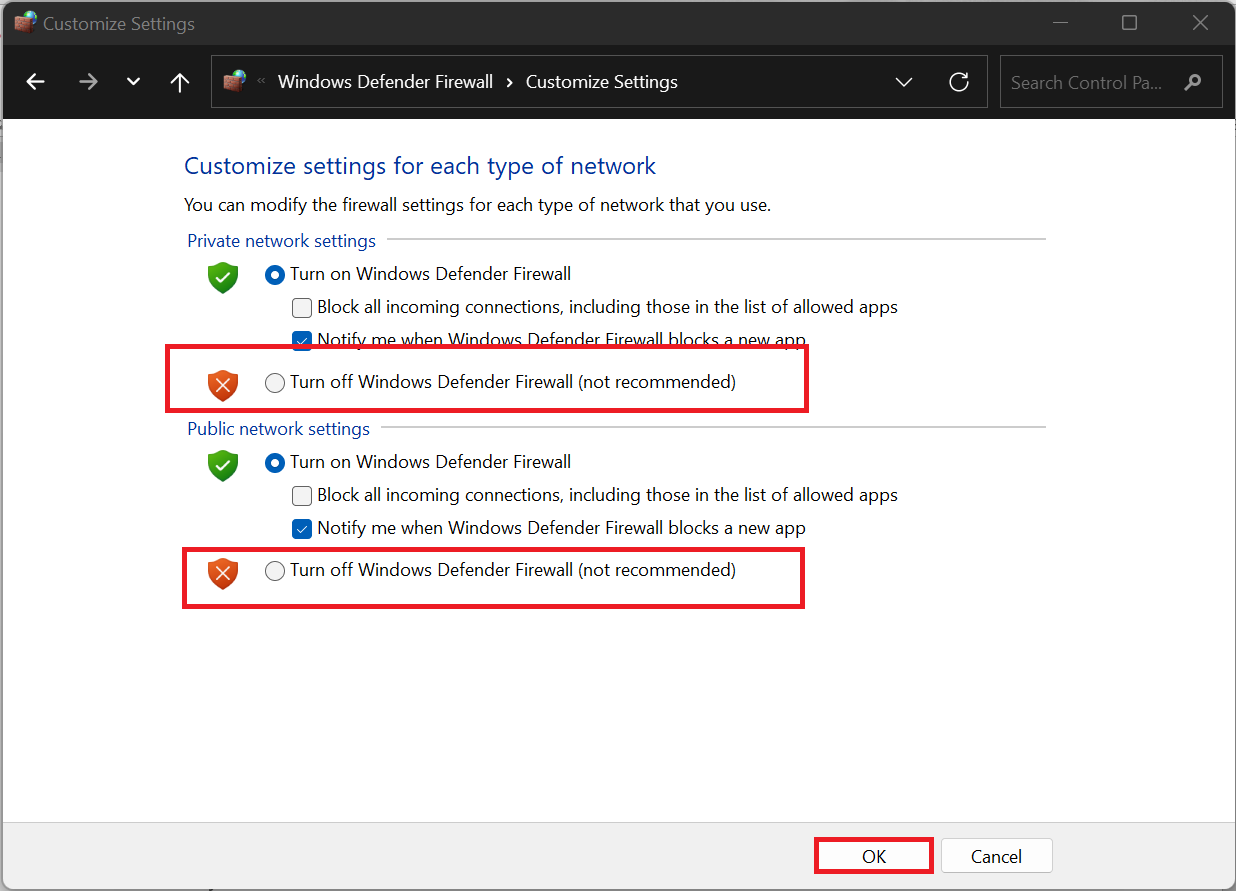
After turning off your firewall, try running Windows Update once again. If this solves the problem, remember to turn the firewall back on once you’re done troubleshooting to maintain your system’s security.
Method 4: Restart the Windows Update service
Sometimes, the Windows Update service may encounter errors while running, which might be the reason your Windows update is not downloading. This can happen if the service is interrupted or if temporary issues occur while it is running.
Stopping the service can fix this problem by clearing any active processes or conflicts. When you restart, it resets its operation, allowing it to resume updates properly.
Here is how to do it:
- Press the
Windows + Rkeys to open the Run box. In the box, type services.msc and hit theEnterkey to open the Services window.
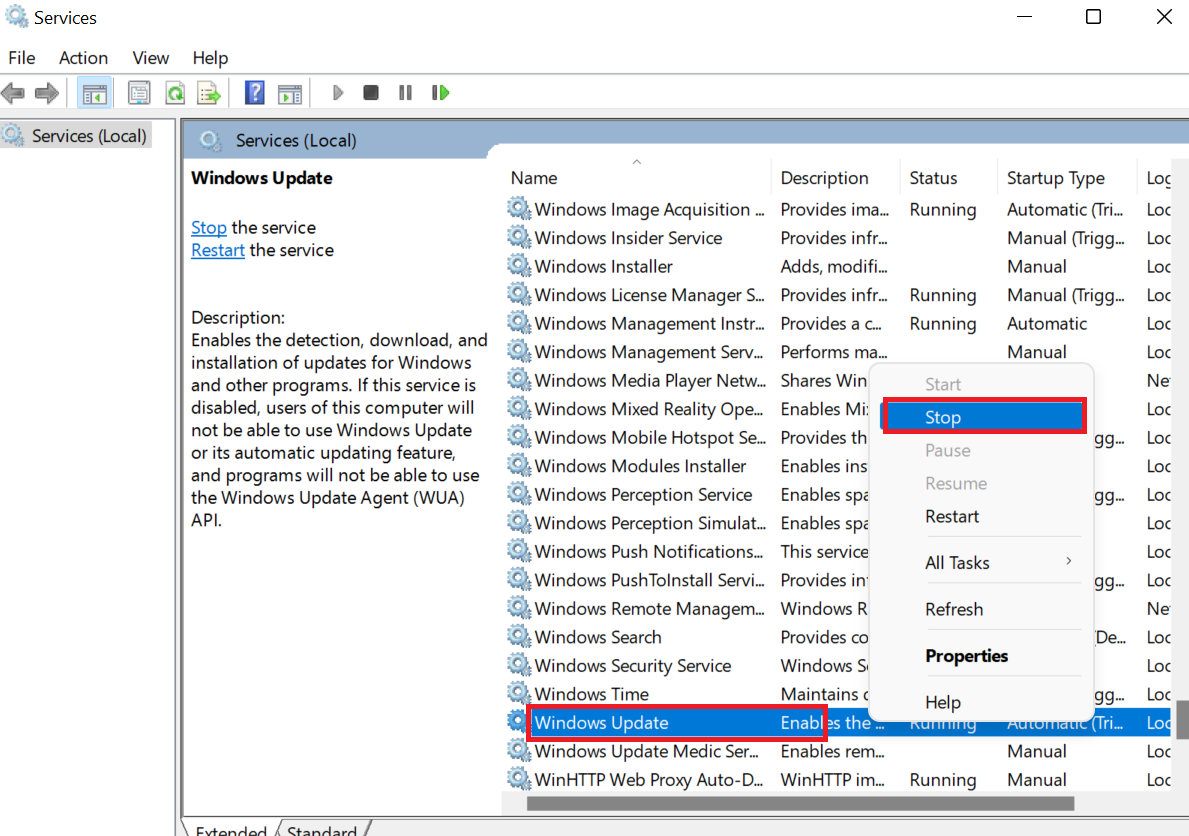
- In the Services window, scroll down until you find the Windows Update service. Right-click on it and click Stop .
- Right-click on Windows Update again and select Start to restart the service.
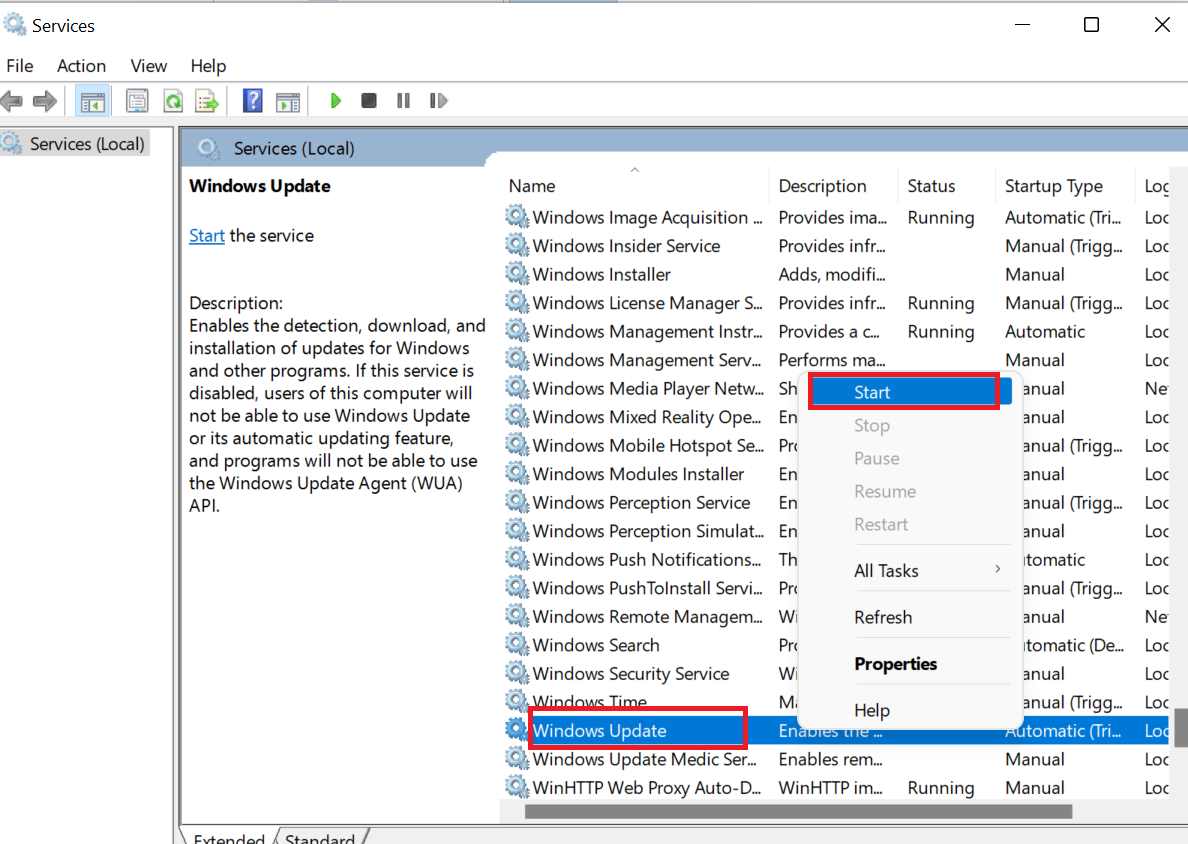
- Close the Services window and check for updates again.
Method 5: Clear the Windows Update cache
The Windows Update cache stores temporary files needed for downloading and installing updates. Ideally, these files help speed up the process by avoiding repeated downloads. But if the content of the cache becomes corrupted or outdated, it can cause errors like “Windows Update failed.”
Follow these steps to fix the issue:
- Search for Command Prompt and run it as an administrator.
- Enter these commands into the Command Prompt one by one and hit
Enter:
net stop wuauserv

net stop bits
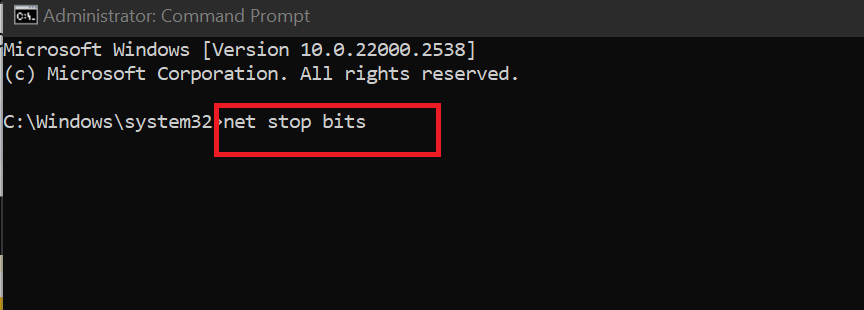
del /s /q %windir%\SoftwareDistribution\Download\*
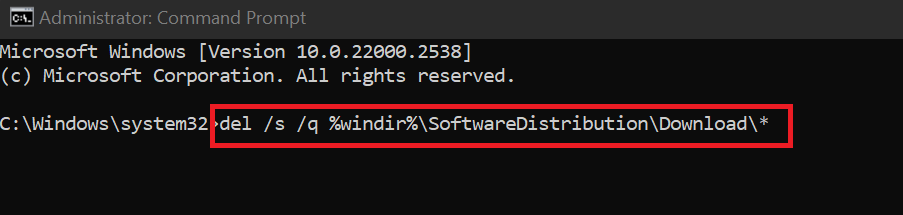
net start wuauserv

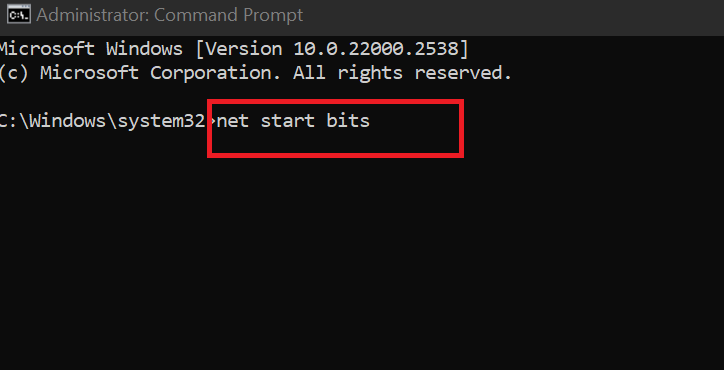
net start bits

Try downloading the update again and see if this solves the problem for good.
Method 6: Delete the contents of the SoftwareDistribution folder
After clearing the Windows Update cache, deleting the entire SoftwareDistribution folder can further resolve stubborn update problems. This folder stores Windows Update files, logs, and the update history.
By deleting it, Windows is forced to recreate a fresh update environment, often resolving the problem with Windows Update not working . Some Reddit users have tried this method, and it worked for them.
Here’s how to delete the SoftwareDistribution folder:
- Open the Command Prompt as an admin and run the following commands one after the other. These commands will temporarily stop Windows Update services:
net stop wuauserv
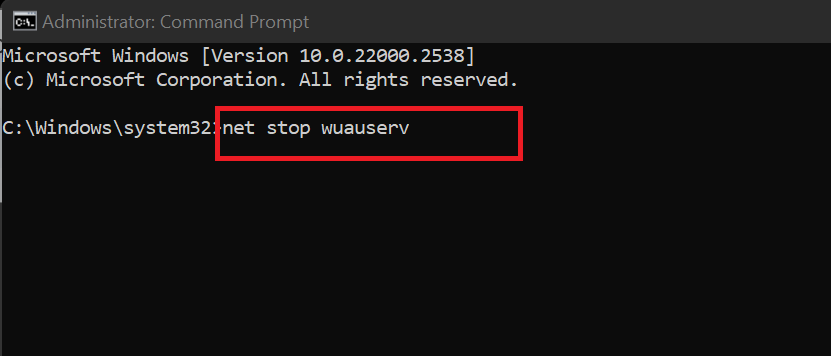
net stop bits

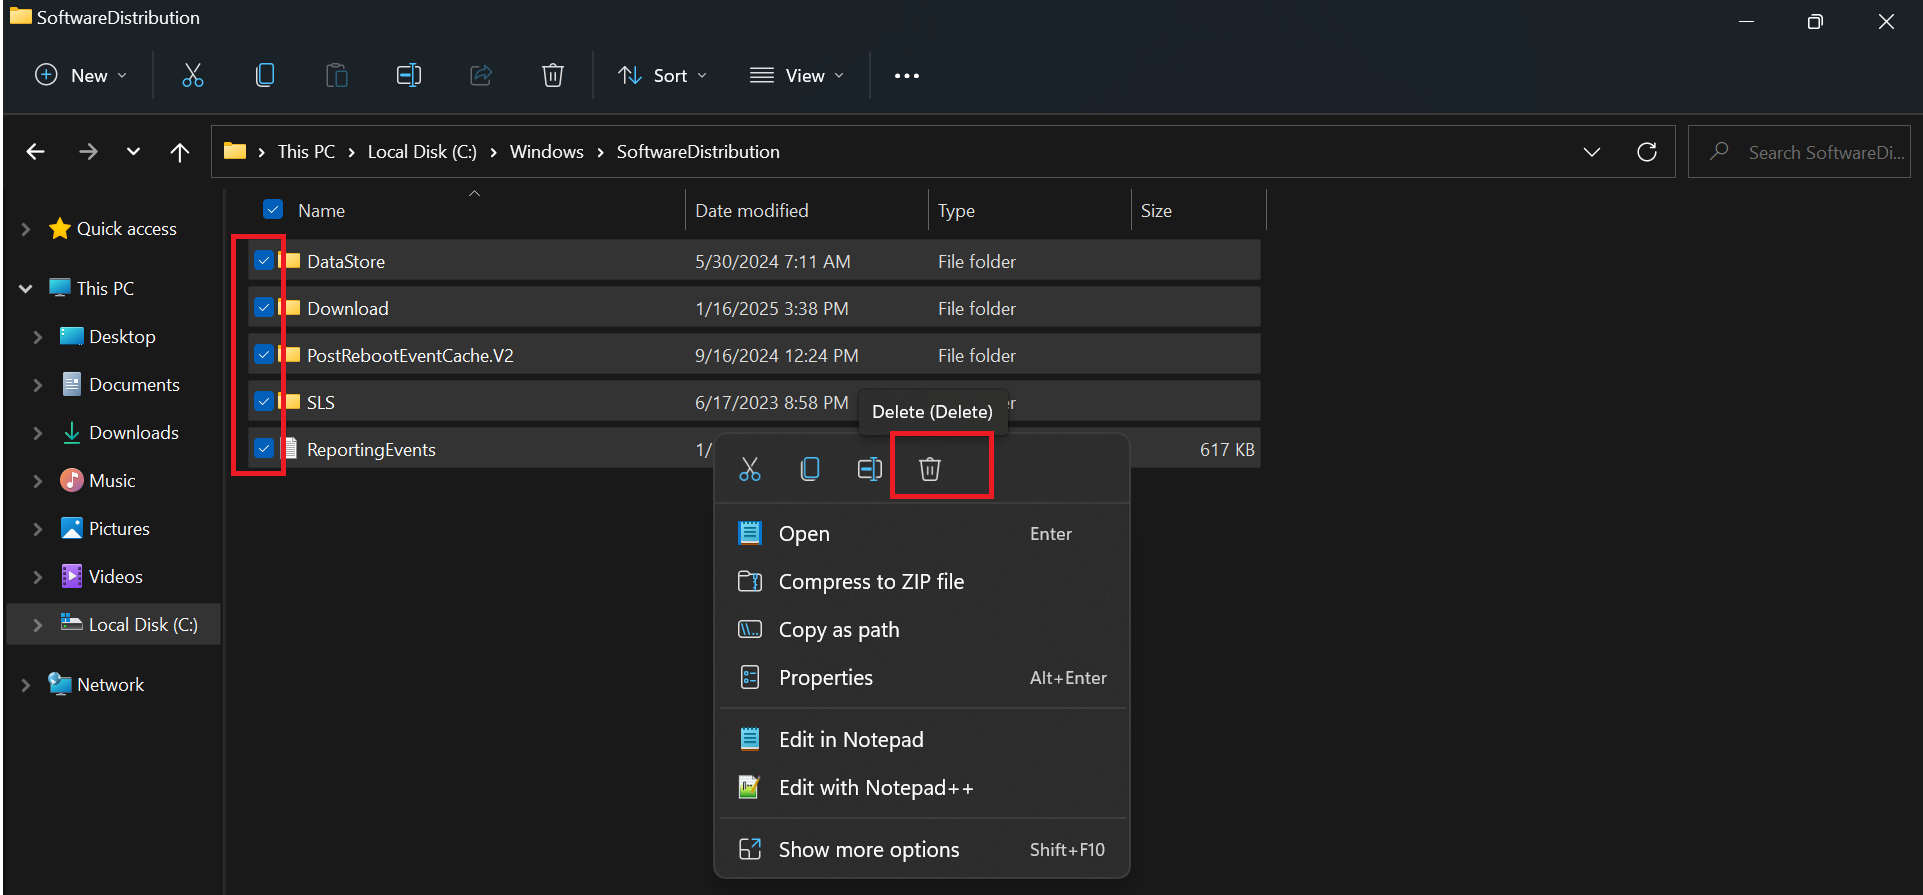
- Open Windows Explorer and navigate to C:\Windows\SoftwareDistribution. You can copy and paste it in the search field.

- Select everything in the folder (
Ctrl + A) and select Delete.
- Open the Command Prompt again and type the following commands one after the other to restart Windows Update services:
net start wuauserv
net start bits
Go back and check if this fixed your Windows Update error.
📌 Related: Windows Update Cleanup: How to Delete Old Windows Update Files Safely
Method 7: Repair system files with SFC and DISM
Repairing system files with SFC (System File Checker) and DISM (Deployment Image Servicing and Management) can fix Windows Update errors caused by corrupted or missing files. SFC scans and repairs system files, while DISM fixes the system image, ensuring that the operating system files and configurations are intact and up to date.
Go through the steps below to run the SFC and DISM scans:
- Open the Command Prompt as an administrator.
- In the Command Prompt window, type the following command to run DISM, press
Enter, and wait for the scan to complete:
DISM /Online /Cleanup-Image /RestoreHealth

- Once the DISM scan is complete, run System File Checker by typing the following command and pressing
Enterand wait for the scan to finish:
sfc /scannow

- After both scans are complete, restart your PC to apply any repairs. Once again, check if your Windows Update error has been fixed.
Method 8: Perform a clean boot
Sometimes, apps or programs not made by Microsoft can interfere with Windows updates because of the way they interact with the operating system. They might change system files, block certain processes, or hog necessary resources.
When this happens, Windows might not get the clear path it needs to download, install, and configure updates. You can perform a clean boot to disable these non-Microsoft apps to see if that fixes the problem.
Let’s go through the steps:
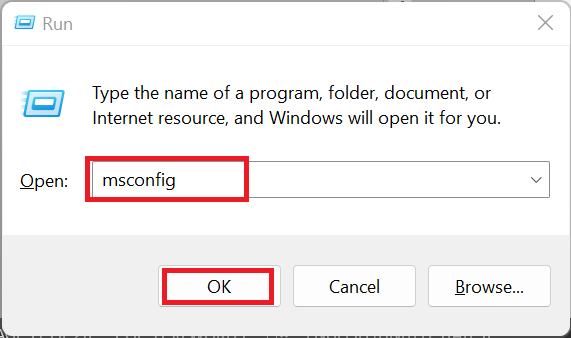
- Open the Run box by pressing
Windows + R. - In the Run box, type msconfig and hit
Enterto go to System Configuration.
- Click on the Services tab and tick the Hide all Microsoft Services box to leave only the third-party applications. Click on Disable all and then OK.
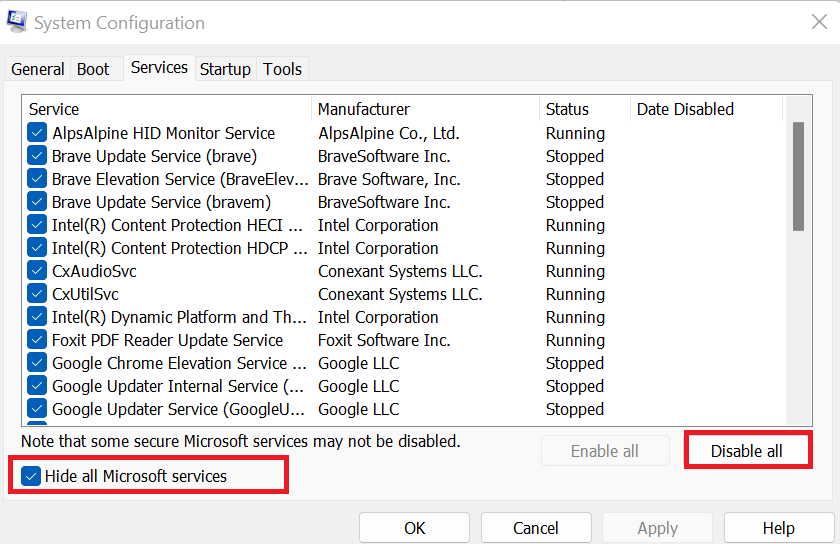
- After that, try running the update again.
If this fixes the Windows Update problem, it means one of those disabled programs was causing the problem. So, start enabling each program one by one and try running the update again until you find the one that’s causing the issue and remove it.
Method 9: Reset Windows Update registry keys
Registry keys store important settings and configurations for Windows Update. When they are damaged or modified incorrectly, Windows updates may not work. You can reset the registry keys to their default values.
Windows + R, type regedit, and hit Enter), click File > Export, choose a location, name the file, select All under Export range, and click Save. Here’s how to reset the Windows Update registry keys:
- Open the Command Prompt and run it as an administrator.
- In the Command Prompt, type the following commands one by one, hitting
Enterafter each, to stop the update-related services:
net stop wuauserv
net stop bits
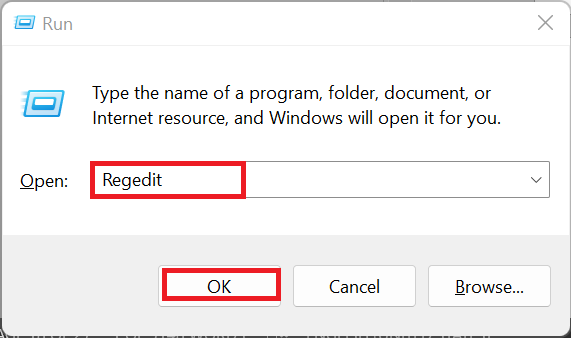
- Press
Windows + R, type regedit in the run box, and pressEnterto open the Registry Editor.
- Navigate to the following path:
HKEY_LOCAL_MACHINE\SOFTWARE\Microsoft\Windows\CurrentVersion\WindowsUpdate
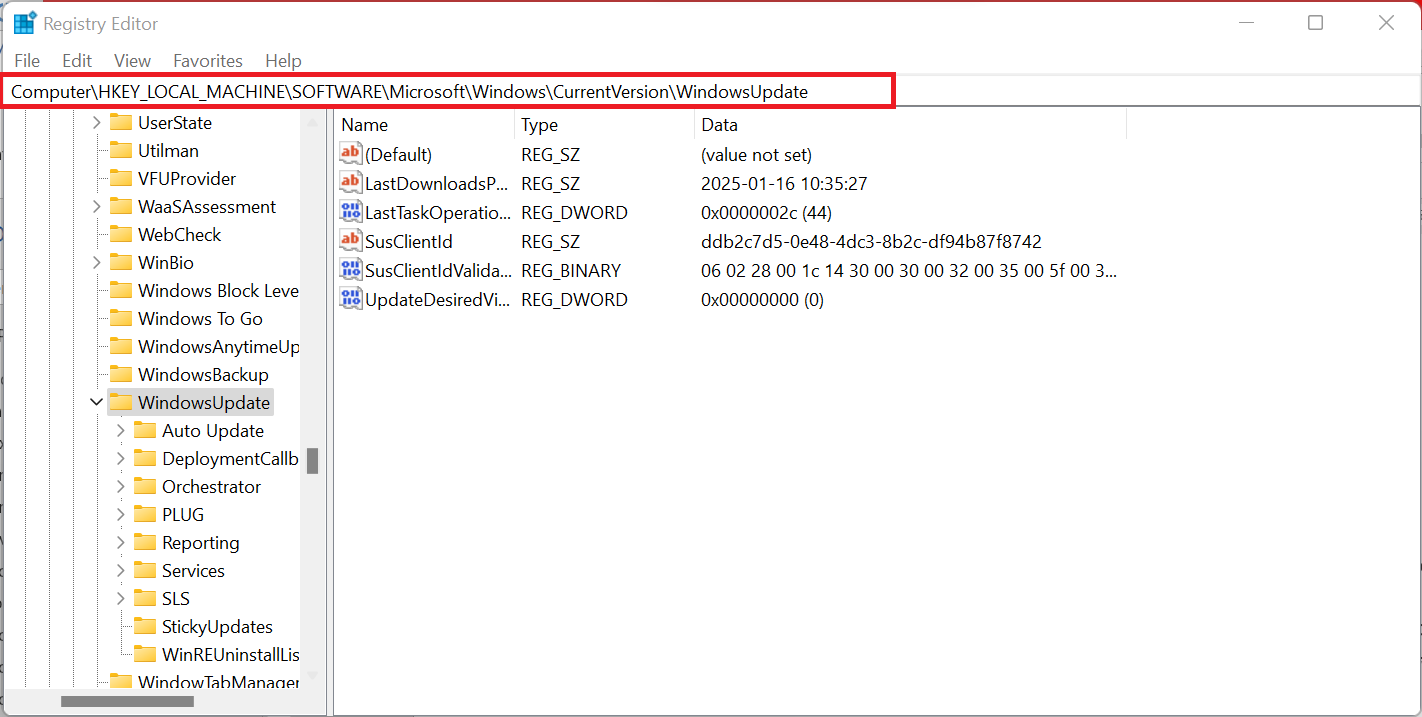
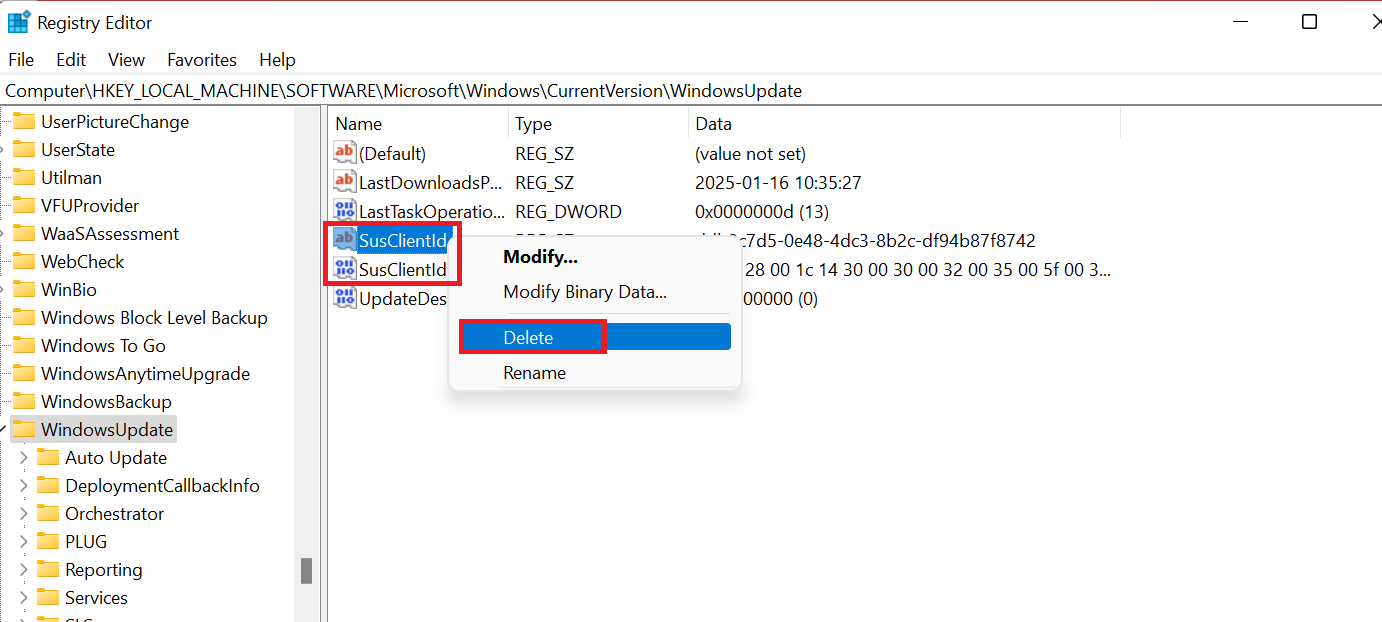
- In the right pane, right-click on the following values (if they exist) and select Delete :
- SusClientId
- SusClientIdValidation
- Open the Command Prompt again as an administrator.
Type the following commands one after the other to restart the Windows Update services:
net start wuauserv
net start bits
After completing these steps, go back and check for updates again.
Method 10: Install updates from Microsoft manually
Manually installing updates from Microsoft can work when Windows Update fails due to various issues like network problems, corrupted update files, or service interruptions. By manually downloading the update files from the Microsoft Update Catalog, you bypass the usual update process without relying on the Windows Update service.
To do that, follow these steps:
- Go to Settings > Windows Update (Settings > Update & Security > Windows Update in Windows 10) and copy the details of the update that is failing. Make a note of the KB (knowledge base) number for the update (e.g., KB5006746).
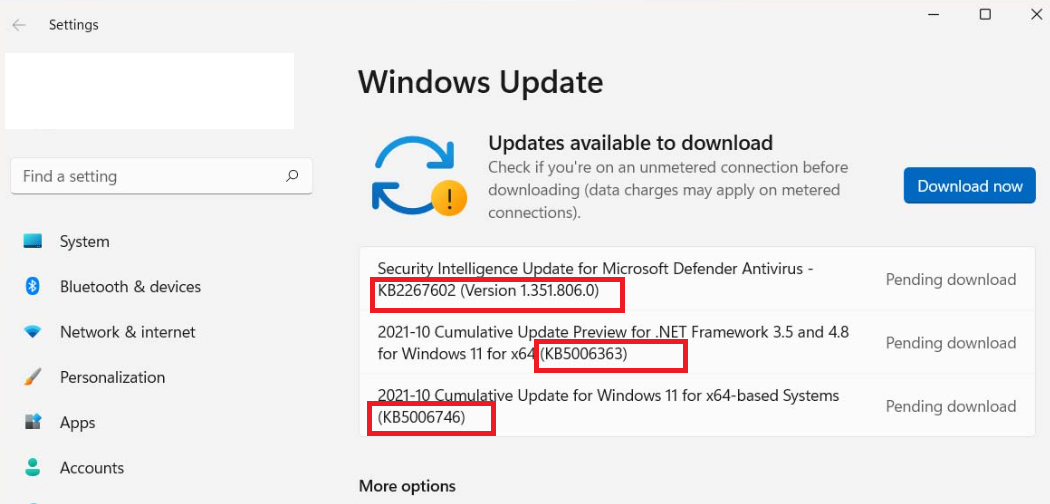
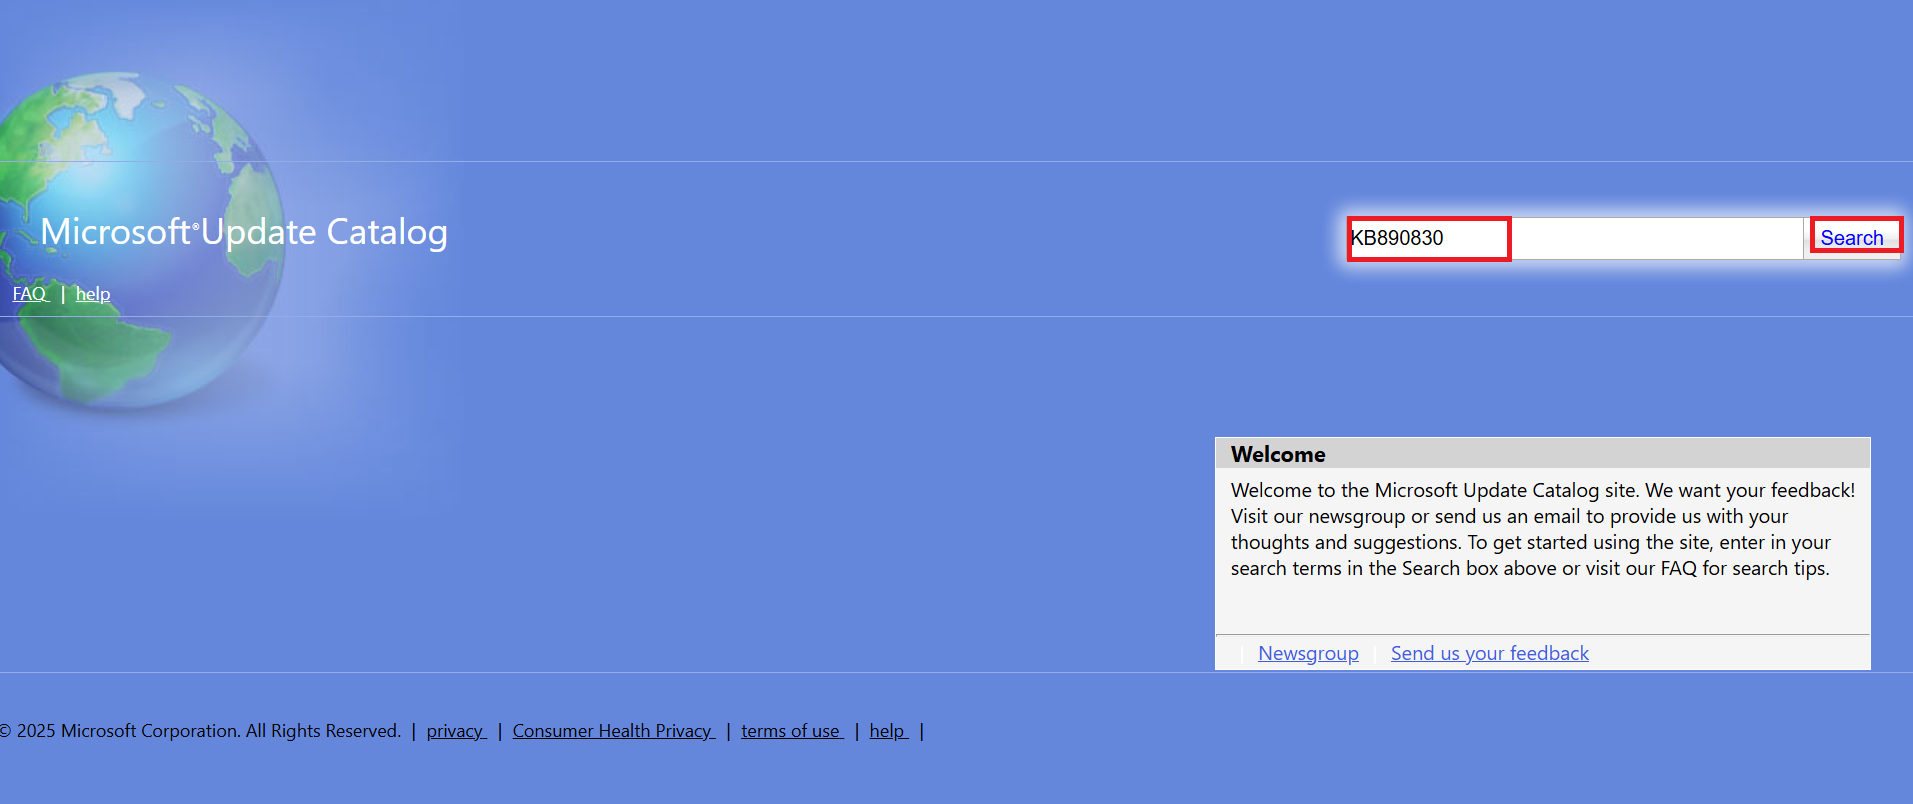
- Go to the Microsoft Update Catalog on another computer. In the search box, type the KB number (e.g., KB5006746) and press
Enter.
- Look for the version of the update that matches your operating system (Windows 10 or 11) and your system architecture (e.g., x64 for 64-bit or x86 for 32-bit systems). Once you find it, click the Download button next to the correct version.
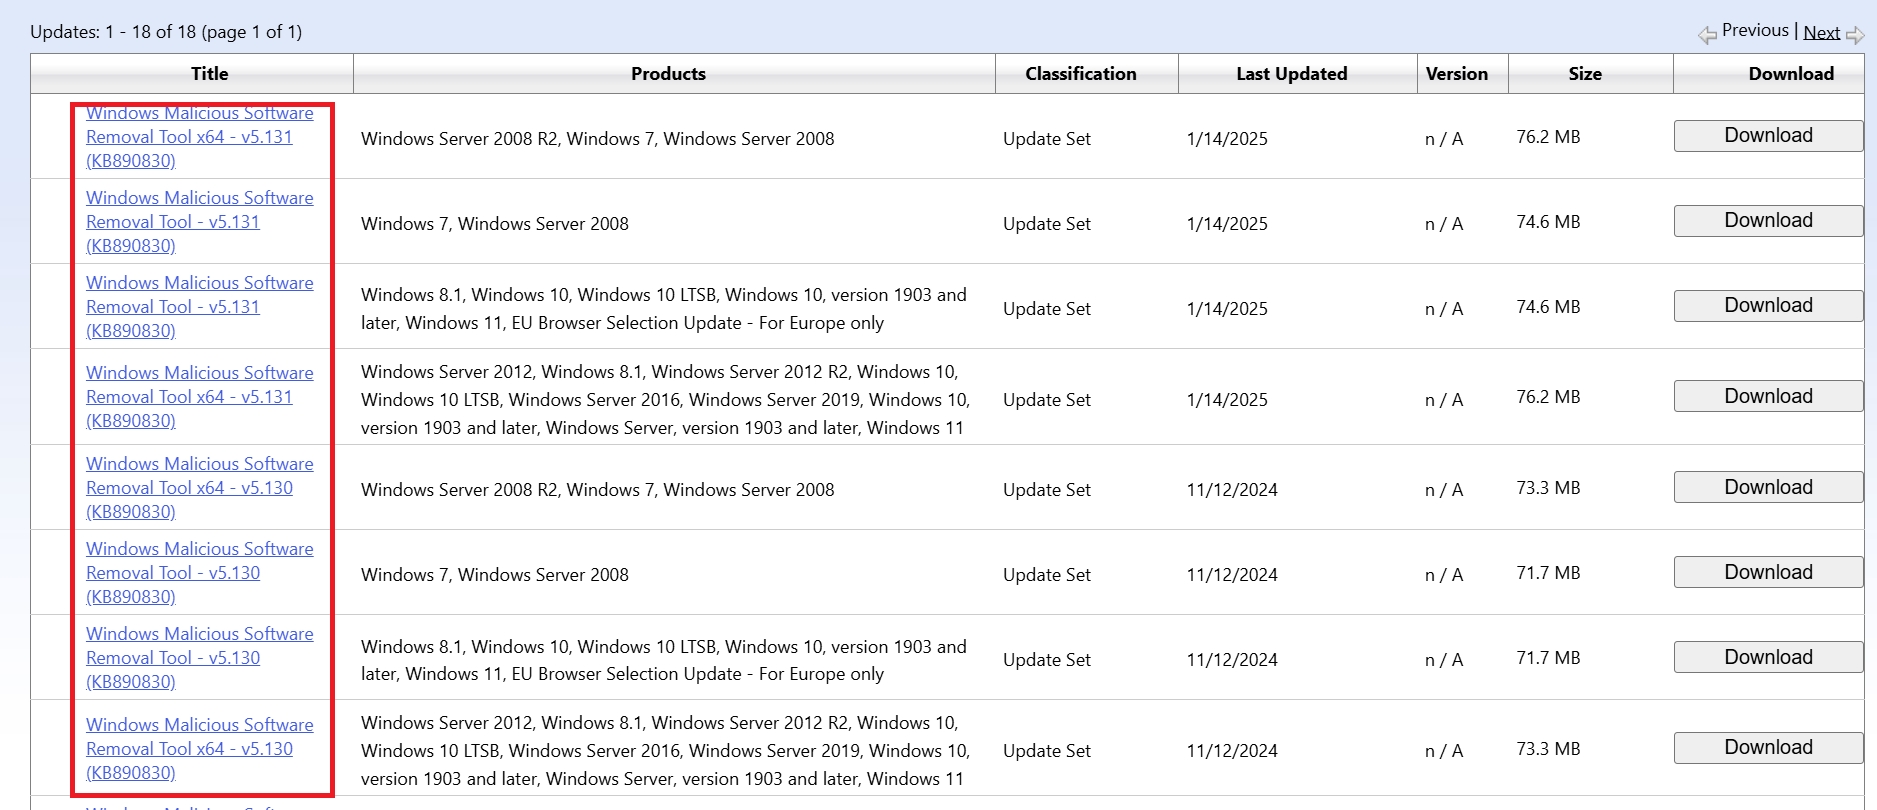
- After downloading the update file, run it on your computer. Follow the on-screen prompts to complete the installation.
After the installation, restart your computer to apply the update and check if the issue is gone.
Method 11: Perform a system restore
Finally, if Windows Update is still not working after trying other fixes, performing a system restore can be a useful last resort. It allows you to roll back your system to a previous state when updates were working properly.
It restores system files, settings, and installed programs to their earlier configurations, potentially resolving issues caused by recent changes or updates.
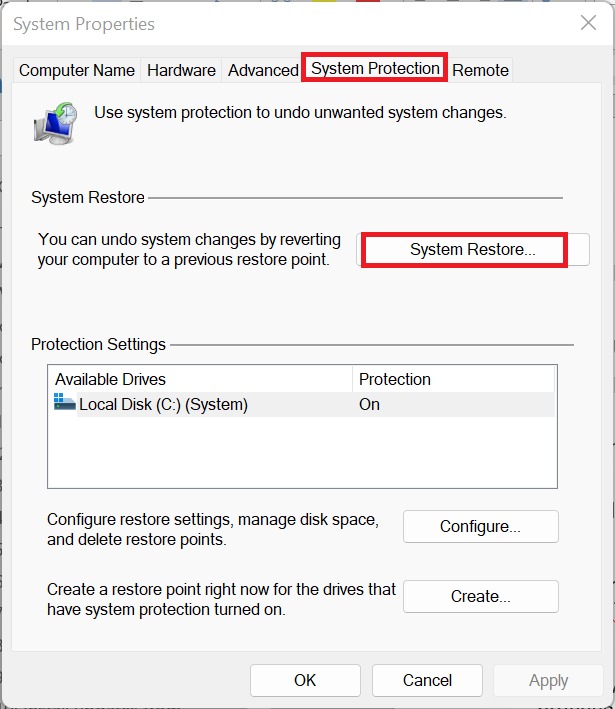
- In Windows Search, type Create a restore point and open the corresponding Control Panel tool.
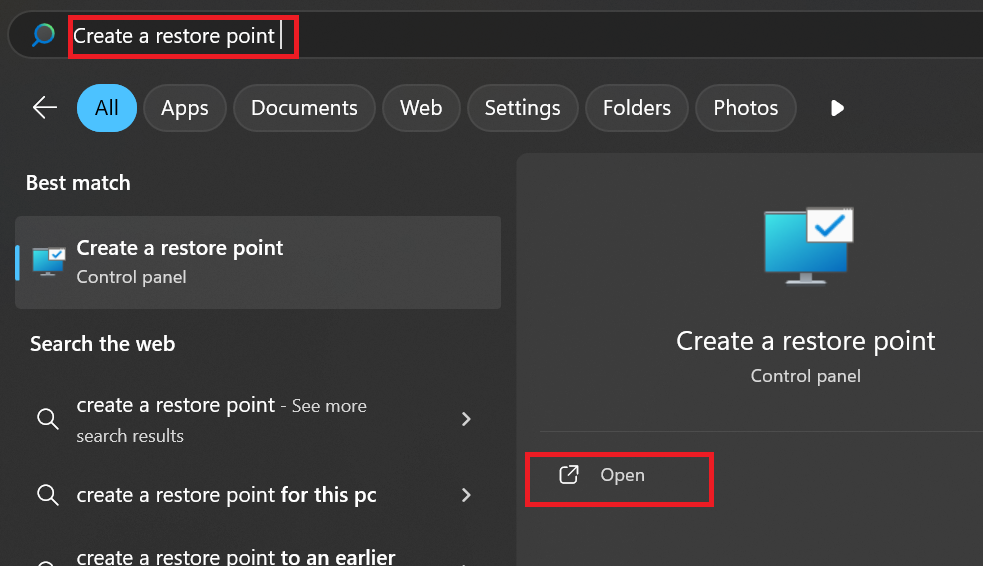
- Under the System Protection tab, click the System Restore button.
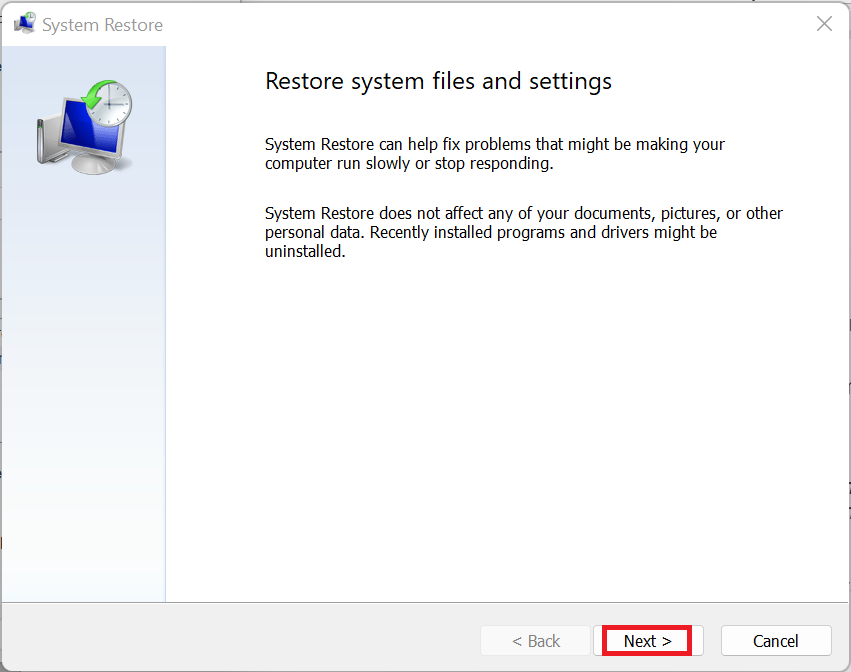
- In the System Restore window, click Next .
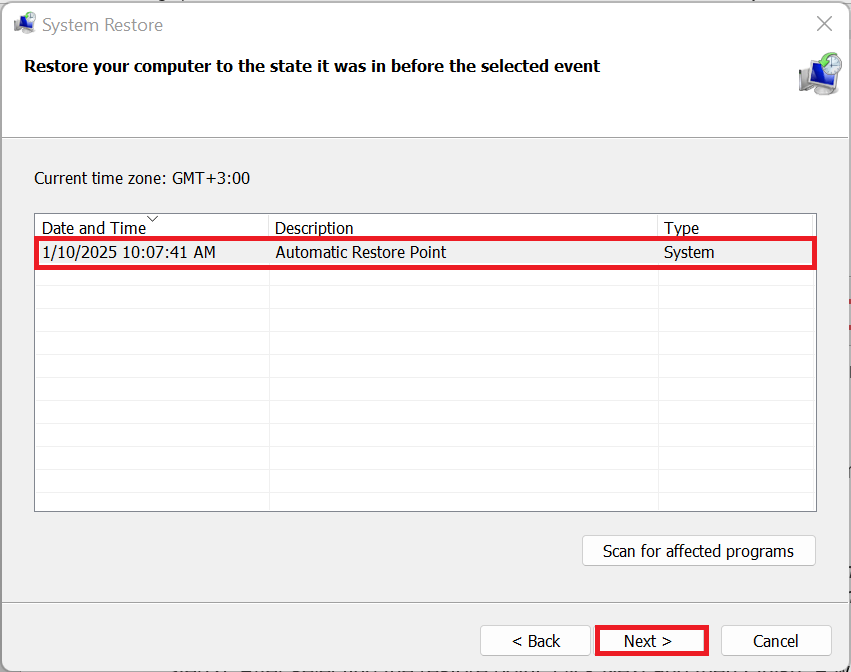
- Select a restore point from the list, preferably one that was created before you started experiencing Windows Update issues, click Next , then click Finish .
- A window will appear warning you that the process cannot be undone. If you’re ready, click Yes to proceed.
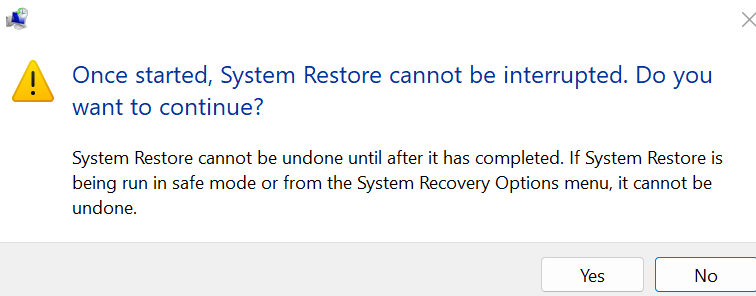
Your PC will restart, and the restore process will begin. This might take several minutes.
Once completed, Windows will boot up to the state of the selected restore point. Once your system has been restored, check for updates to verify if the issue is resolved.
Here is a summary of all the methods for fixing Windows update issues:
| Method | What it does | How to do it |
|---|---|---|
| Run an anti-malware scan | Detects and removes malware that may block Windows Update |
|
| Free some space | Frees up disk space required for downloading and installing updates |
|
| Turn off the firewall temporarily | Prevents misconfigured firewall settings from blocking update servers |
|
| Restart the Windows Update service | Clears errors by restarting the update service |
|
| Clear Windows Update cache | Removes corrupted temporary update files |
|
| Delete the SoftwareDistribution folder | Forces Windows to recreate update files, fixing stubborn errors |
|
| Repair system files (SFC & DISM) | Fixes corrupted or missing system files affecting updates |
|
| Disable non-Microsoft programs | Eliminates software conflicts that may block updates |
|
| Reset Windows Update registry keys | Restores corrupted registry settings related to updates |
|
| Install updates manually | Bypasses automatic updates by manually installing updates |
|
| Perform a system restore | Revert the system to a previous stable state to fix update issues |
|
Common Windows Update Errors on Windows 10/11
The following are some issues that may arise while trying to install system updates. With a diverse range of potential complications, it’s vital to understand the common problems to better troubleshoot them.
Issue #1: Update stuck at 0%
Description:
Windows Update may remain stuck at 0% due to an unstable internet connection , a malfunctioning update service, or insufficient disk space.
Possible solutions:
- Check your internet connection.
- Restart the Windows Update service.
- Delete all files in C:\Windows\SoftwareDistribution.
Issue #2: Update fails to install
Description:
A Windows update may download successfully but fail to install, showing a “Windows Update failed” message. This can occur due to insufficient storage space, corrupted system files, or incompatible software.
Possible solutions:
- Free up disk space .
- Run SFC and DISM scans to repair system files.
- Uninstall outdated or incompatible programs.
Issue #3: Slow Windows updates
Description:
Windows updates may download slowly due to a weak internet connection or insufficient system resources such as CPU or RAM.
Possible solutions:
- Improve your internet connection .
- Close unnecessary programs to free up system resources.
Issue #4: Windows Update fails with an error code
Description:
Windows Update failures often come with error codes that may seem confusing but serve as indicators of specific issues. These codes can point to problems such as network connectivity issues, corrupted system files, or software incompatibility. Understanding them can help diagnose and resolve update failures more effectively.
Below is a list of some popular Windows Update error codes, along with descriptions and solutions for each:
| Error code | Description | Solution |
|---|---|---|
| 0x80073712 | Required update file is missing or corrupted |
|
| 0x80246007 | Windows update failed to download or install updates |
|
| 0x80072ee7 | Invalid server address or network issues prevent Windows from connecting |
netsh int ip reset
|
| 0x800f0900 | Generic Windows Update error due to corrupted files or system issues |
|
| 0xc1900223 | Windows update was unsuccessful due to network or DNS configuration issues |
netsh winsock reset
|
| 0x80070057 | Invalid parameters or corrupted update files |
|
| 0x80073701 | Missing system files required for updates |
|
| 0x800703e6 | Invalid access to memory location, possibly due to file corruption |
|
| 0x800f0986 | Cumulative update failed to install due to corrupted system files |
|
| 0x800f0984 | Feature update installation failure due to missing or corrupted components |
|
| 0x80240017 | Windows update failed to install due to corrupted files or incompatible drivers |
|
| 0x800F0922 | Not enough free space in the system reserved partition or failure to connect to the update server |
|
Issue #5: Windows Update service not running
Description:
The Windows Update service is responsible for delivering and installing system updates, security patches, and improvements. If the service is not running, updates may fail due to it being disabled or malfunctioning.
Solution:
- Restart the Windows Update service.
- Reset Windows Update registry keys.
Issue #6: Feature update stuck during installation
Description:
A feature update may freeze or fail due to system file issues or conflicts with third-party apps.
Solution:
- Run the Windows Update troubleshooter.
- Check for sufficient disk space.
- Perform a clean boot to identify conflicting applications.
Issue #7: Windows update loop (repeated installation failure)
Description:
Windows updates may fail repeatedly and roll back due to corrupt update files or system errors.
Solution:
- Use System Restore to revert to a previous working state.
- Delete the SoftwareDistribution folder.
- Run SFC and DISM to repair system files.
Issue #8: Device incompatible with Windows Update
Description:
Older computers may lack the required components for a new Windows version.
Solution:
- Update drivers to ensure compatibility.
- Consider upgrading hardware, such as RAM or storage.
- Consult a professional for a compatibility assessment.
Issue #9: Network or proxy settings issues
Description:
Incorrect network or proxy settings can prevent Windows Update from connecting to Microsoft servers.
Solution:
- Check for a stable internet connection.
- Disable any active VPN.
- Reset network configurations if needed.
Issue #10: Windows Update disabled or not working
Description:
The Windows Update service may be disabled manually or affected by system conflicts or malware.
Solution:
- Enable and restart the Windows Update service via the registry.
- Scan for malware to remove potential threats.
Here is a quick summary of the errors you might face and how you can fix them:
| Issue | Description | Solution |
|---|---|---|
| Update stuck at 0% | Windows update progress may be stuck at 0% due to an unstable internet connection, malfunctioning update service, or outdated drivers |
|
| Update fails to install | Updates may download but fail to install due to insufficient storage, corrupted system files, or incompatible software |
|
| Slow Windows updates | Slow updates can be caused by a bad internet connection or insufficient system resources like CPU and RAM |
|
| Windows Update fails with an error code | Various error codes may appear during update failures, indicating issues like network problems, corrupted files, or software incompatibility |
|
| Windows Update service not running | The Windows Update service may be disabled or malfunctioning, preventing updates from being installed |
|
| Feature update stuck during installation | Feature updates may freeze during installation due to system file corruption, insufficient disk space, or software conflicts |
|
| Windows update loop (repeated installation failure) | The update process repeatedly fails and rolls back due to corrupt update files or system errors |
|
| Device incompatible with Windows Update | Hardware incompatibility or outdated drivers may prevent updates from installing |
|
| Network or proxy settings issues | Network issues or incorrect proxy settings can block the Windows Update service from connecting to Microsoft servers |
|
| Windows Update disabled or not working | The Windows Update service may be manually disabled or affected by system conflicts or malware |
|
Common Windows Update Errors after Updates
After fixing the issue with Windows update, there is still a possibility of finding errors. The following are some of the most common of them and how you can fix them.
| Error | Description | Solution |
|---|---|---|
| Blue screen of death (BSOD) after an update | BSOD can occur after a Windows update due to incompatible drivers, hardware malfunctions, or corrupt system files |
|
| System crashes or instability after updates | Updates may introduce bugs that cause system crashes or instability, often due to software conflicts or incompatible hardware |
|
| Device incompatible with the new update | Older devices may not meet the hardware or software requirements for a new update, leading to poor system performance |
|
| Corrupted files or missing system files after an update | Disk errors or installation interruptions can corrupt or delete system files, leading to errors or crashes |
|
| Driver issues triggered by updates | Updates may introduce changes requiring updated drivers; incompatible or automatically installed drivers can cause issues |
|
Windows Update Not Working: Fixed
Running into issues like Windows Update getting stuck at 0% or failing to install can be a real headache. However, the Windows Update troubleshooter is an excellent starting point for diagnosing and solving common problems.
If the troubleshooter doesn’t work, try the other options we covered, such as resetting Windows Update components, checking for software conflicts, or manually installing updates via the Microsoft Update Catalog.
After fixing the issue, make sure to keep your system up to date with regular updates, disk cleanups, and driver checks to maintain smooth PC performance.
That said, we’d love to hear from you! Did this piece help you, or did we miss something? Tell us in the comments.
FAQ
Install-Module PSWindowsUpdate
Confirm any prompts that appear, then run these commands one at a time to check for and install updates:
Get-WindowsUpdate
Install-WindowsUpdate
These commands will scan for available updates and then install them.