![[FIXED] Windows Update Error 0x80073701](https://www.auslogics.com/en/articles/wp-content/uploads/2023/07/FIXED-Error-Code-0xc0000005-in-Windows-10-2-568x359.png)
- What Is ERROR_SXS_ASSEMBLY_MISSING on Windows 10?
- How to Fix Error 0x80073701 on Windows 10
- Fix 1: Run the Windows Update Troubleshooter
- Fix 2: Restart Windows Update services
- Fix 3: Find faulty system files and replace them
- Fix 4: Reset the Winsock component
- Fix 5: Flush your DNS cache
- Fix 6: Release and renew your IP address
- Fix 7: Reset your hosts file
- Fix 8: Reset Windows Update components
- Fix 9: Perform a clean boot
- Fix 10: Check Your PC for Malware
- Fix 11: Clean up your computer
- Fix 12: Troubleshoot your connection issues
- Fix 13: Disable your VPN
- Fix 14: Perform a system restore
- Fix 15: Run a checkup of your OS
- Conclusion
- FAQ
The 0x80073701 issue is one of those Windows Update errors that show up when the client app fails to download and install updates. It’s also known as ERROR_SXS_ASSEMBLY_MISSING in technical terms.
If you’ve been struggling with the install error – 0x80073701 , just keep reading.
In this article, you’ll find fixes that will show you how to get rid of it and complete your update.
What Is ERROR_SXS_ASSEMBLY_MISSING on Windows 10?
Windows update error 0x80073701 is an indication that the Windows Update client is unable to find some files.
While this could be the case, other underlying problems could be triggering the (0x80073701) issue, including:
- Malfunctioning Windows Update services or components
- Corrupt system files
- Application interference
- Network connection problems
- Malware
- VPN usage
You can get rid of the 0x80073701 glitch by fixing its root causes.
While each solution below will show you how to fix the Windows update error 0x80073701 , only the ones that resolve the particular issues that exist on your computer will work.
So, apply them one after the other until the install error – 0x80073701 disappears.
Related: [FIXED] Windows 10 Update Error 0x8000ffff
How to Fix Error 0x80073701 on Windows 10
The most popular Windows OS in the world, Windows 10 is, unfortunately, quite prone to update issues. Turning a blind eye on them is not recommended since it will leave your OS unstable and easy prey for malware.
Adding to that is the fact that the current version is Windows 10’s final feature update. We recommend that you fix the 0x80073701 error asap to keep your software up to date.
Fix 1: Run the Windows Update Troubleshooter
If you see a message like “ There were some problems installing updates”, chances are high that some of your update components are acting up. Your first step should be running the Windows Update troubleshooter .
The utility is designed to check for common issues that trigger update errors and perform routine activities, such as restarting Windows Update services and resolving app conflicts.
- Go to the Settings application by tapping
Windows key + I.You can also summon the app by right-clicking the Start button and clicking on Settings in the Power User menu. - Click on the Update & Security icon after the Settings window shows up. Navigate to Update & Security in Windows 10.
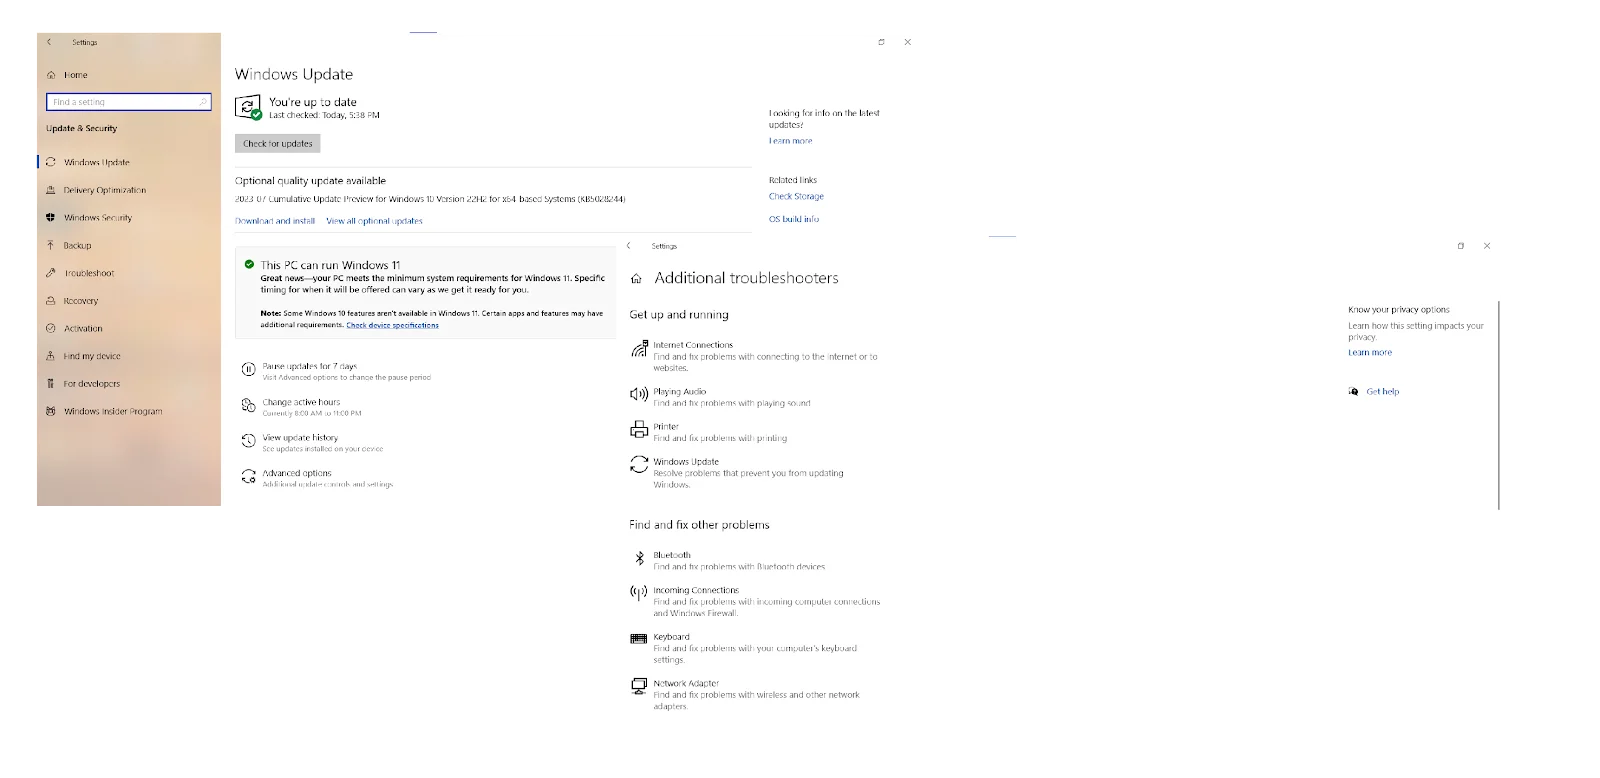
- After the Windows Update page shows up, go to the left side of the window and click on “Troubleshoot.”
- Click Additional troubleshooters on the Troubleshoot tab.
- Select Windows Update under Additional troubleshooters.
- Click Run the troubleshooter under Windows Update.
- Allow the tool to scan for problems. Once it’s done, it will show you the issues it found, if any, and allow you to apply the necessary fixes.
- After the process completes, restart your system and check whether the install error – 0x80073701 is resolved.
Related: How to fix Windows update error 0x80092004?
Fix 2: Restart Windows Update services
Windows Update services are responsible for delivering updates to your OS. They may encounter errors, such as 0x80073701 , 0x800f0986, or 0x80070026, become stuck, and prevent updates from being installed or downloaded.
Luckily, you can easily restart the Windows Update services on your PC:
- Press the
Windows key + Rkeyboard combo to open the Run dialog box. - Enter
services.mscinto the Run box. - Press Enter to open the Services Manager.
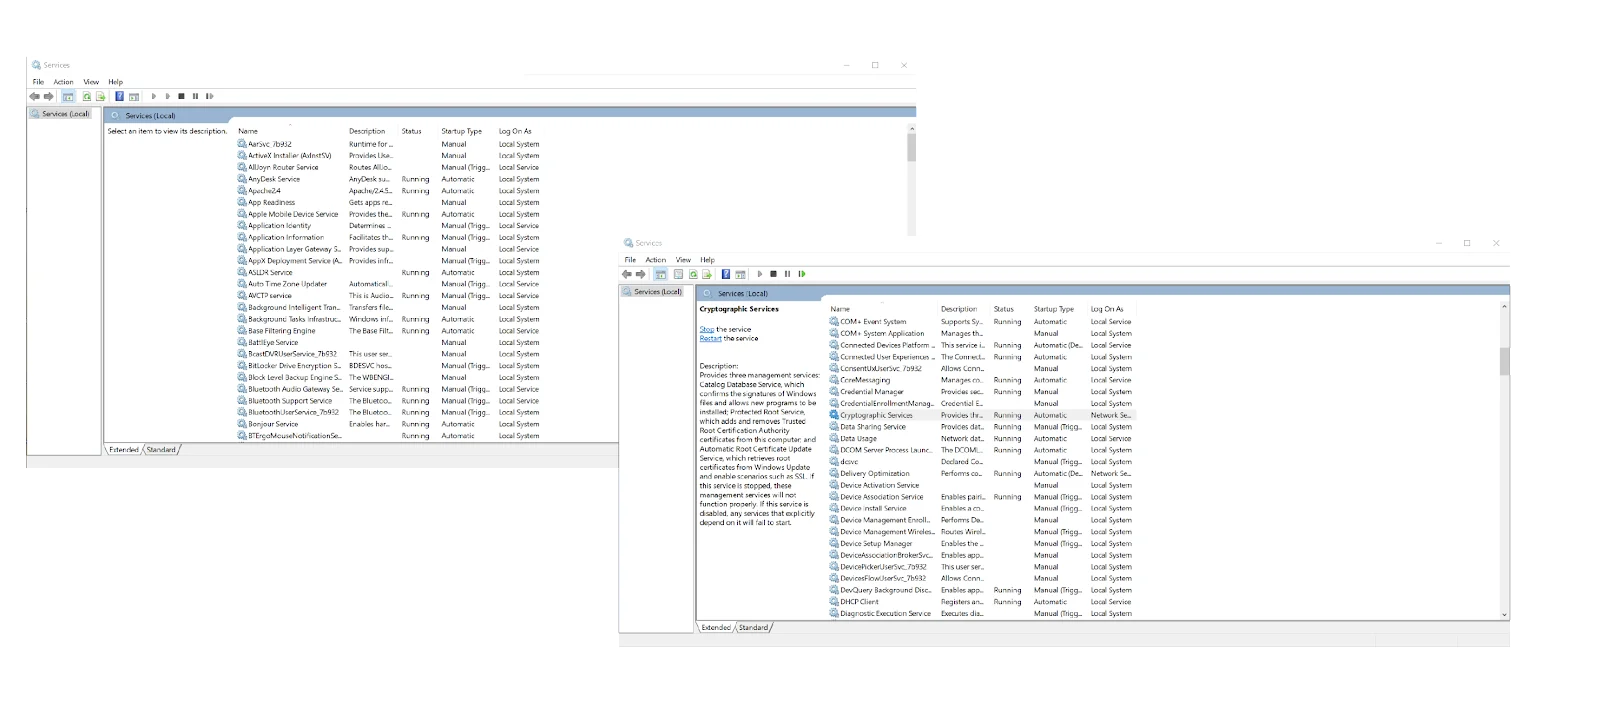
- In the Services Manager, locate the following services:
Windows Update Service (wuauserv)
Background Intelligent Transfer Service (BITS)
Cryptographic Service (CryptSvc)
- Right-click on each service and select Restart from the context menu.
- After restarting all these services, check for updates to see if the error_sxs_assembly_missing issue has been resolved.
Related: How to get rid of the Windows Update Error 80246001?
Fix 3: Find faulty system files and replace them
You will keep running into the Windows update error 0x80073701 if there are missing or corrupt system files on your PC.
You’ll have to find the problematic files and replace them using the System File Checker (SFC) tool.
But before you run it, you have to provide the replacement files using the DISM (Deployment Image Servicing and Management) tool:
- On your taskbar, right-click the Start button and click on Run once the Quick Access menu appears. Or, press the Windows logo key + R combination to launch the program faster.
- After Run shows up, type CMD, and tap
Ctrl + Shift + Enter. - Select the Yes option once the User Account Control dialog window pops up and requests permission to run the Command Prompt as an administrator.
- You need healthy files for repairing the Windows image. Make sure you obtain them from a reliable source, such as Windows installation media in the form of a DVD or bootable USB.
- Insert or connect the DVD or bootable USB and run the following command:
DISM.exe /Online /Cleanup-Image /RestoreHealth /Source:C:\Source\Windows /LimitAccess
- Allow the command to execute before you move on to the next step.
- After that, type
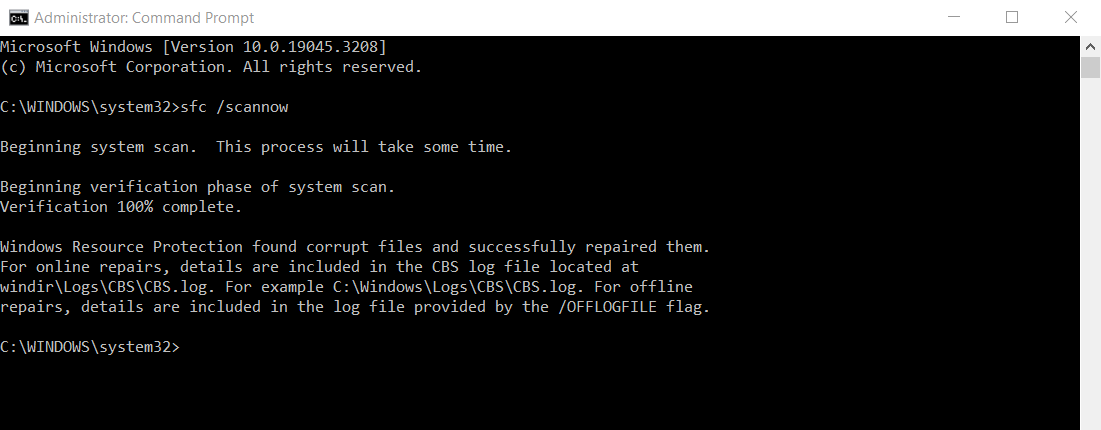
sfc /scannowinto the Command Prompt window and hit the Enter key.
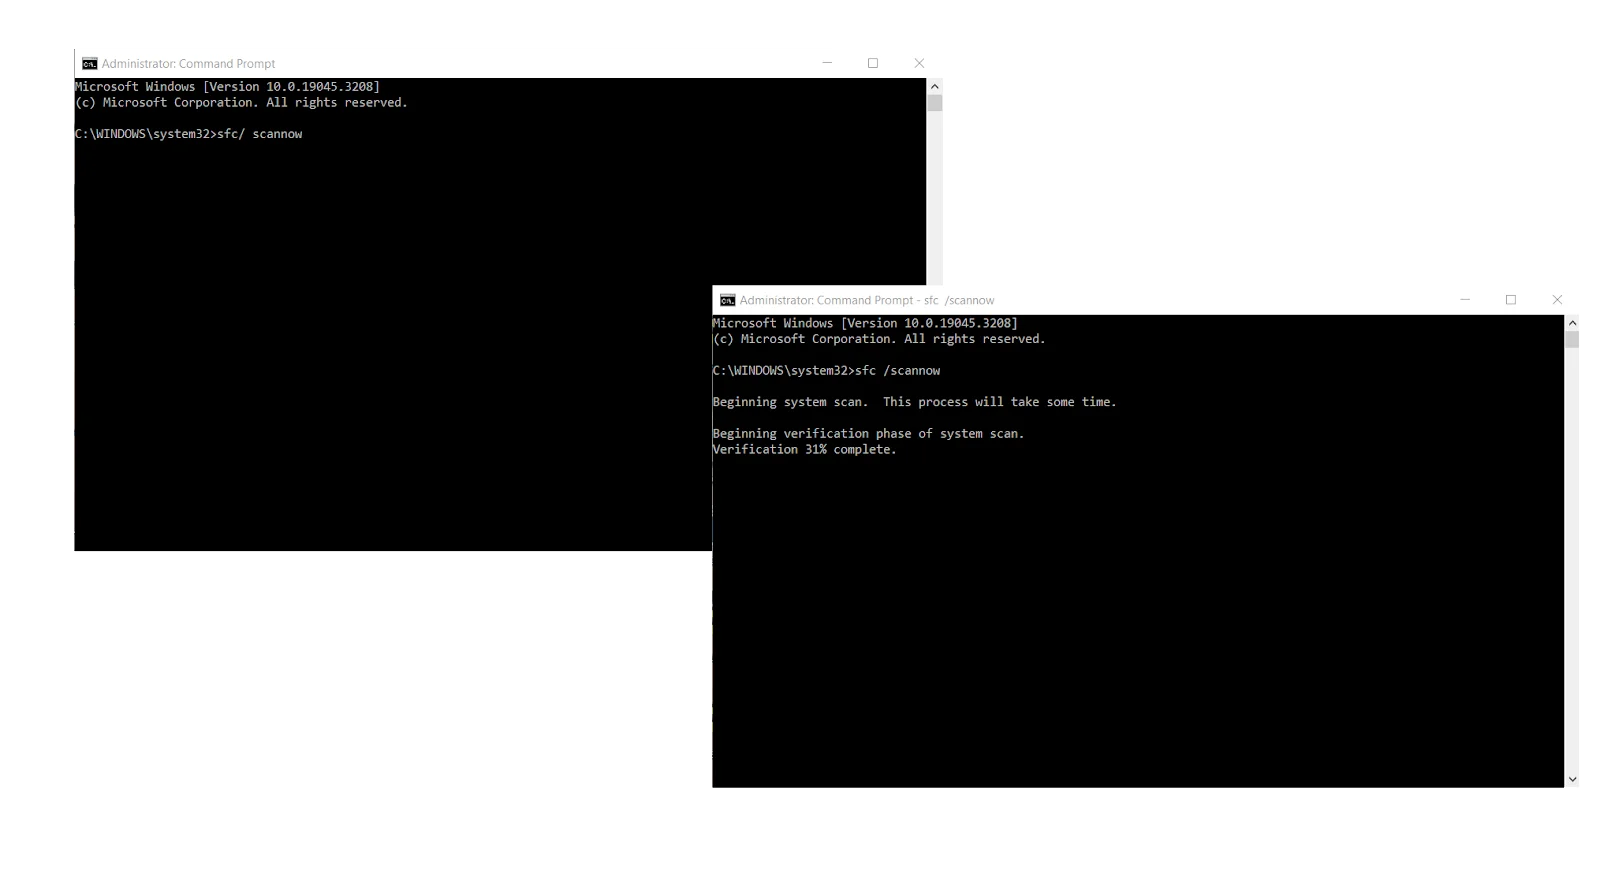
If you see a scan result that reads, “Windows Resource Protection found corrupt files and successfully repaired them,” restart your computer and check if the “ There were some problems installing updates” error (0x80073701) has been resolved.
Run System File Checker in Safe Mode
If you see a message that reads, “Windows Resource Protection could not perform the requested operation,” it means you have to run the System File Checker in Safe Mode to troubleshoot the install error – 0x80073701 :
- Go to the Settings application by tapping
Windows + I. You can also summon the app by right-clicking the Start button and clicking on Settings in the Power User menu. - Click on the Update & Security icon after the Settings window shows up.
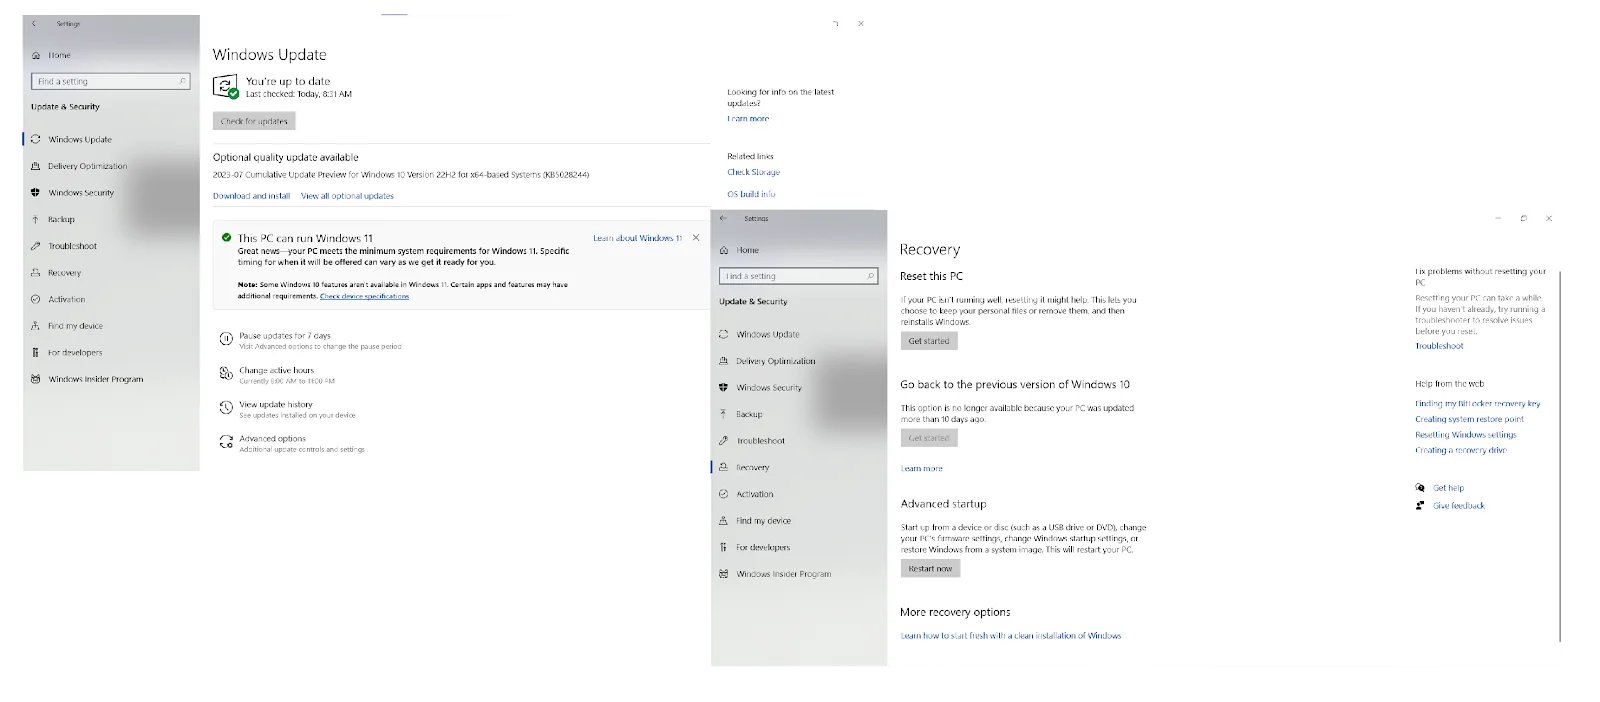
- After the Windows Update page shows up, go to the left side of the window and click on Recovery.
- Next, go to the Recovery page and select Restart Now under Advanced Startup.
- Windows will now restart your computer into the Advanced Startup environment.
- Click on the Troubleshoot tile on the “Choose an Option” screen.
- Select Advanced Options once the Troubleshoot page opens.
- After that, click on Startup Settings on the Advanced Options screen.
- Select Restart on the Startup Settings screen to reboot your computer.
- Once your PC restarts, choose the number beside Safe Mode to boot your system in Safe Mode.
- Now, run the System File Checker as we’ve shown you above.
Also Read: How to Get And Use Windows 10 Media Creation Tool
Fix 4: Reset the Winsock component
The Windows Update client might be showing the 0x80073701 error due to a connection problem caused by a faulty Winsock component.
The Winsock (Windows Socket) component is a dynamic link library file that holds network configurations that many apps depend on to connect to the internet.
Resetting the component is likely to fix the error_sxs_assembly_missing issue:
- Open the Search utility beside the Start button by pressing the
Windows + Skeyboard shortcut or clicking the magnifying glass icon in the taskbar. - Enter command into the search bar once it appears.
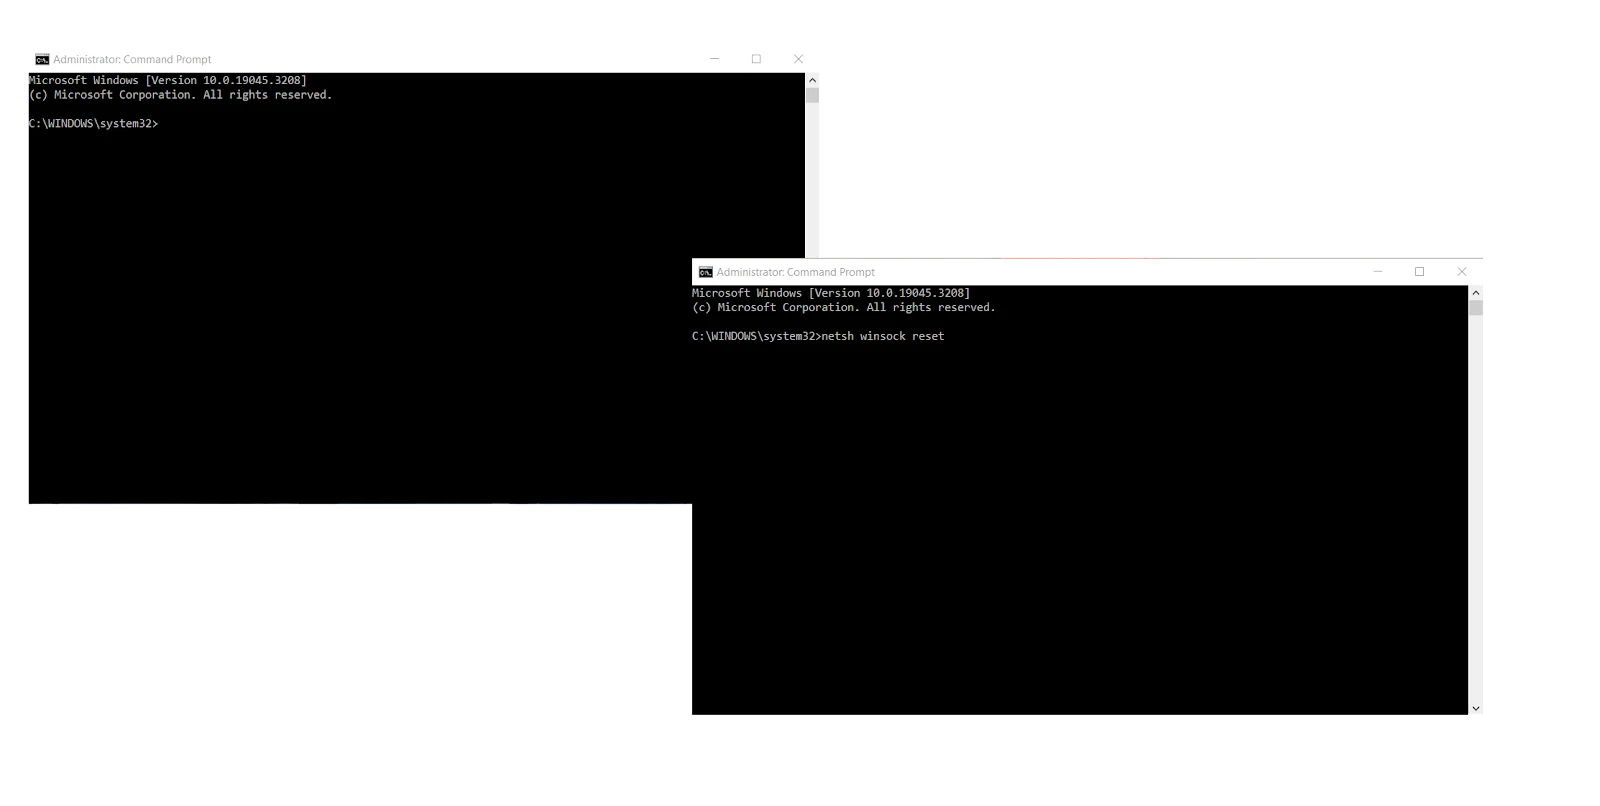
- After you see Command Prompt in the results, right-click it and click on Run as Administrator.
- Next, click on Yes after the User Account Control dialog window shows up and asks for permission.
- After that, type the following line into the Command Prompt window and hit the Enter key:
netsh winsock reset - Windows will now clear the parameters in the Winsock component and reset the DLL file.
- Once the command executes successfully, reboot your PC and check for the error_sxs_assembly_missing (0x80073701) issue.
Fix 5: Flush your DNS cache
Instead of using a DNS server to resolve every website domain name, your computer saves the IP addresses and domain names of the websites you visit in a DNS cache.
This way, it can quickly look at the cache to match a domain name with its IP address. Unfortunately, your DNS cache can go haywire and trigger an issue like error 0x80073701 .
Here is how to flush it to fix the problem:
- Use the
Windows + Rkeyboard combo to open Run or right-click the Start button and select Run from the menu. - Once Run shows up, type CMD and press
Shift + Ctrl + Enter. - Select Yes on the UAC pop-up.
- When you see the Administrator: Command Prompt window, type this line into the black window and punch the Enter button:
ipconfig /flushdns - Wait for a message such as “Successfully flushed the DNS Resolver Cache”.
- Close the Command Prompt window and check if the install error – 0x80073701 has been fixed.
Fix 6: Release and renew your IP address
Error 0x80073701 in Windows 10 may result from an expired DHCP IP address. To get your system a new, working IP address, you have to release your current IP and request a new one:
- Use the
Windows + Rkeyboard combo to open Run or right-click the Start button and select Run from the menu. - Once Run shows up, type CMD and press Shift + Ctrl + Enter.
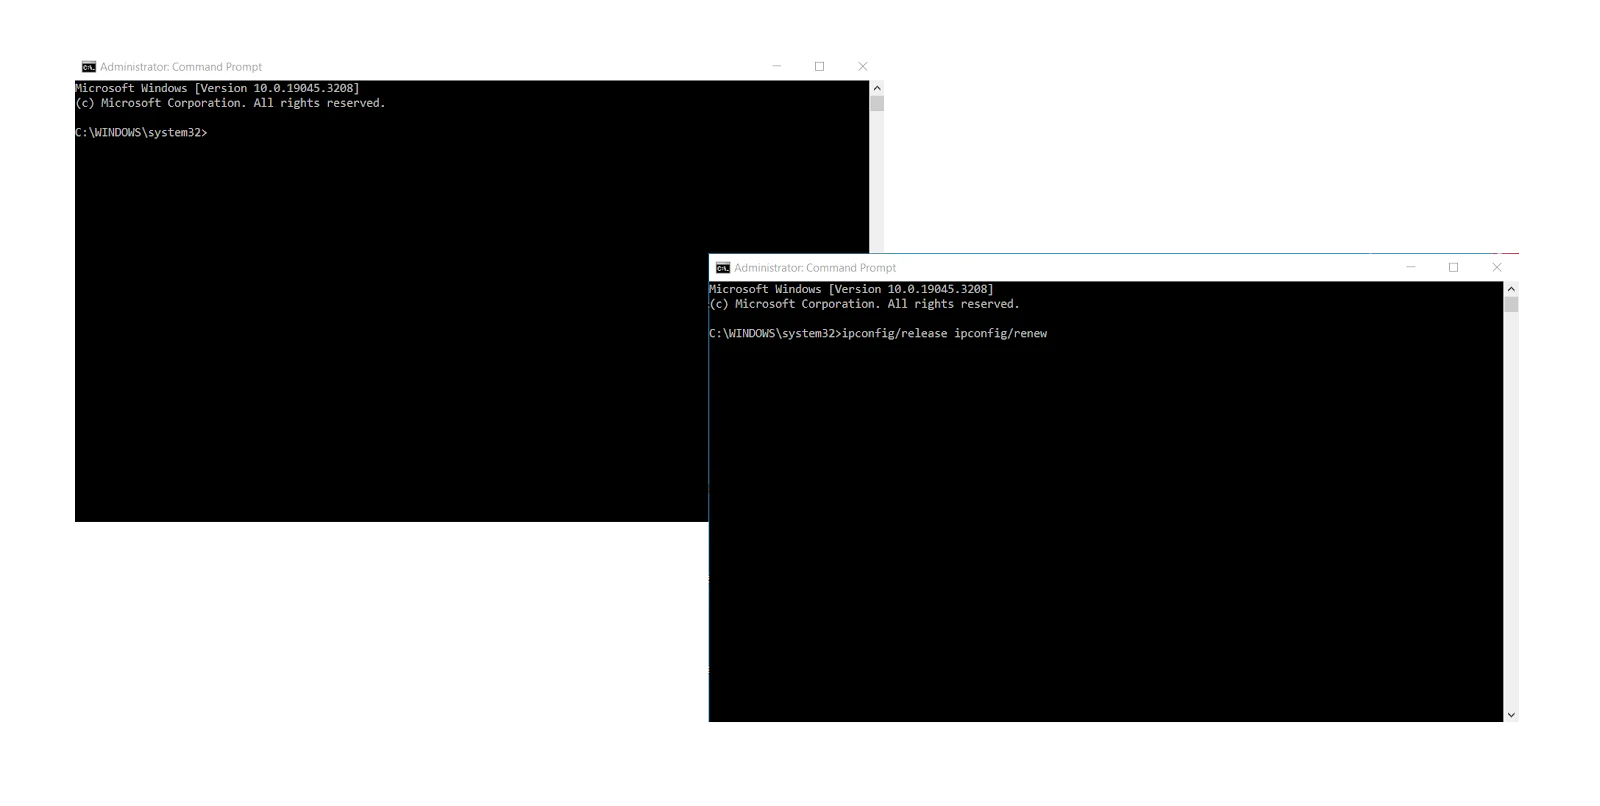
- Select the Yes option after the User Account Control menu pops up and requests permission to allow the Command Prompt to launch as an administrator.
- When you see the Administrator: Command Prompt window, type these lines into the black window and punch the Enter button after entering each line:
ipconfig/release
ipconfig/renew
- After renewing your IP address, restart your PC and see if the Windows update error 0x80073701 has been resolved.
Fix 7: Reset your hosts file
Your Hosts file is a text file that helps match hostnames to their IP addresses. When the file becomes corrupt or contains the wrong parameters, it affects the computer’s network connection and can trigger the install error – 0x80073701.
In this case, resetting the file to its default state will resolve the network connection problem:
- Open the Windows search interface by clicking the magnifying glass icon in the taskbar or pressing Win + S.
- Type “notepad” after the search box appears.
- Click on Notepad in the search results.
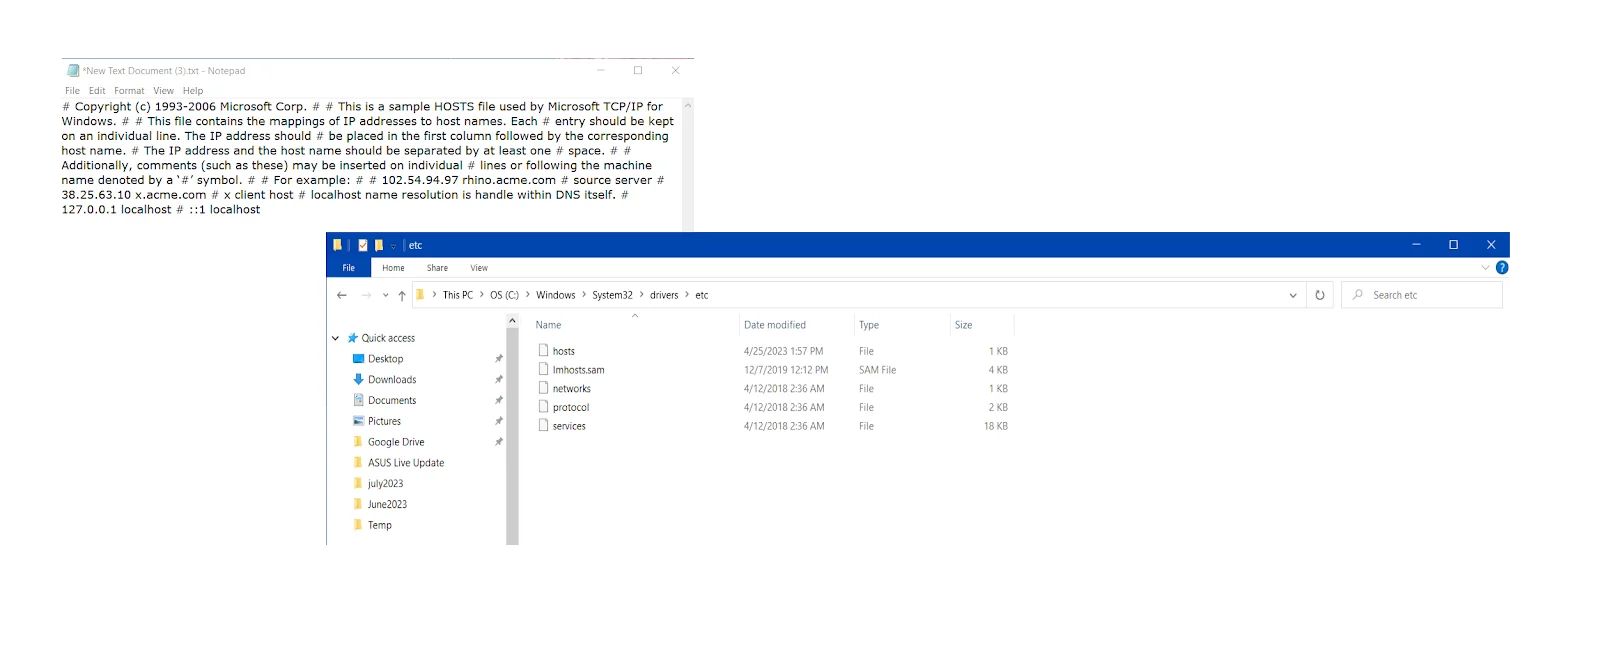
- Once Notepad shows up, copy and paste the following into the new text file:
# Copyright (c) 1993-2006 Microsoft Corp.
# # This is a sample HOSTS file used by Microsoft TCP/IP for Windows.
# # This file contains the mappings of IP addresses to host names. Each # entry should be kept on an individual line.
The IP address should # be placed in the first column followed by the corresponding host name.
# The IP address and the host name should be separated by at least one # space.
# # Additionally, comments (such as these) may be inserted on individual # lines or following the machine name denoted by a ‘#’ symbol.
# # For example: # # 102.54.94.97 rhino.acme.com # source server # 38.25.63.10 x.acme.com # x client host # localhost name resolution is handled within DNS itself. # 127.0.0.1 localhost # ::1 localhost
- Go to the File menu in the top-left corner of the Notepad window and click on Save As.
- Go to the File Name text box in the Save As dialog window and type hosts.
- Navigate to the desktop and click on the Save button.
- Next, press
Windows + Eto open a File Explorer window. - Once the window shows up, click on the address bar, copy and paste the following line, and tap the Enter button:
%WinDir%\System32\Drivers\Etc - Once you see the ETC folder, right-click on the Hosts file and select Rename. Change the name of the file to Hosts.old.
- Now, go to your desktop and copy the new Hosts file you created to the ETC folder.
- After that, check if the error_sxs_assembly_missing (0x80073701) issue has been fixed.
Fix 8: Reset Windows Update components
If you still can’t get rid of the Windows update error 0x80073701, consider resetting every update-related component. To automate the process, you can use a batch script:
- Press the
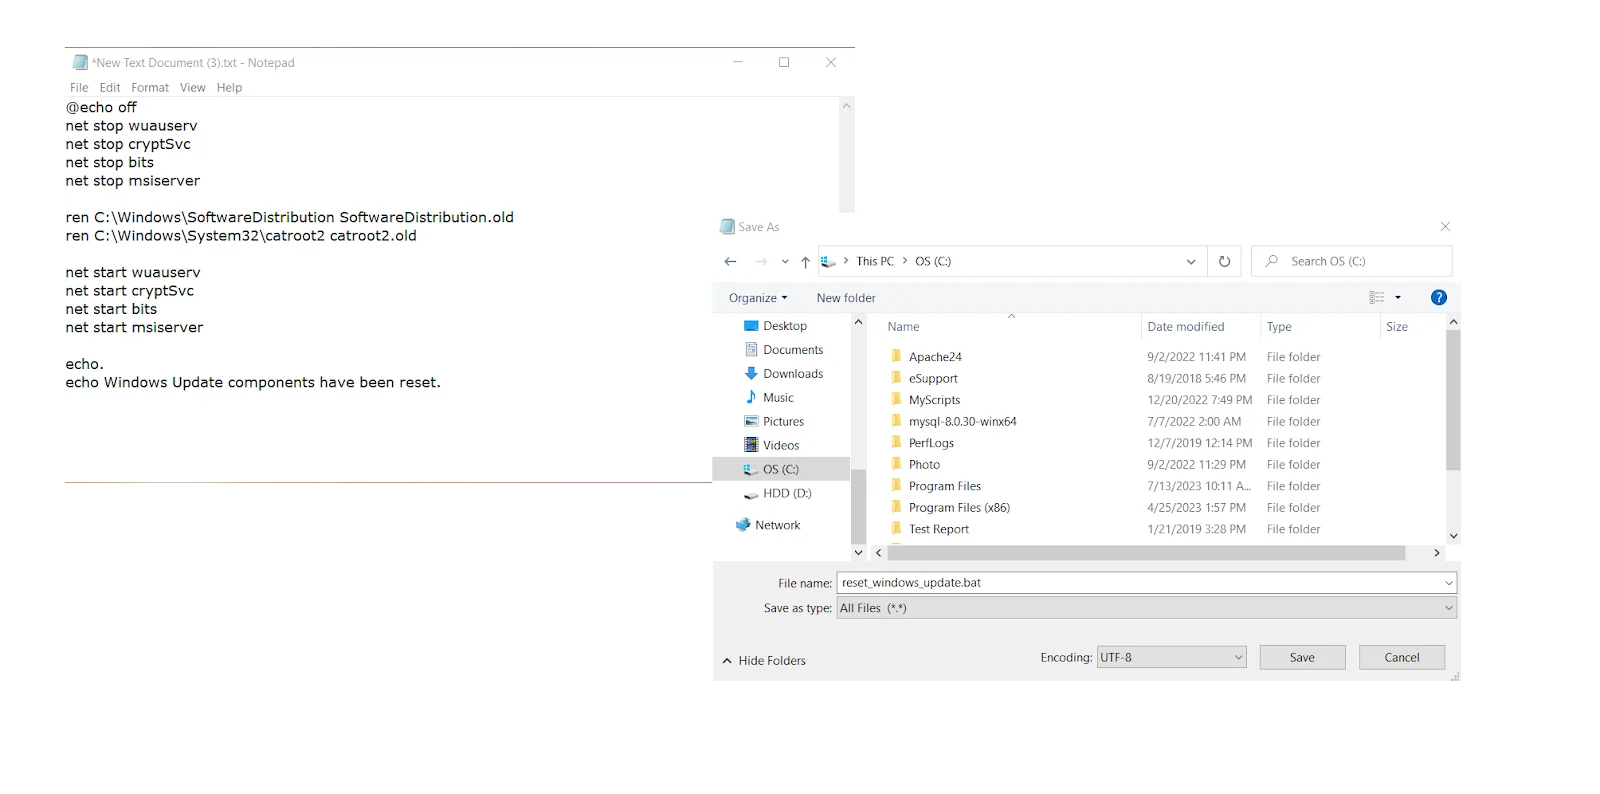
Windows key + Scombination, type in Notepad, and right-click on the Notepad app in the search results. Select the Run as administrator option to open Notepad with elevated rights. - Copy the following script and paste it into the Notepad window:
@echo off
net stop wuauserv
net stop cryptSvc
net stop bits
net stop msiserver
ren C:\Windows\SoftwareDistribution SoftwareDistribution.old
ren C:\Windows\System32\catroot2 catroot2.old
net start wuauserv
net start cryptSvc
net start bits
net start msiserver
echo.
echo Windows Update components have been reset.
- Click on File in the Notepad app’s menu and select Save As.
- Choose a location where to save the file.
- In the Save as type menu, select the All Files option. Name the file and add the .bat extension, like “reset_windows_update.bat.”
- Click the Save option.
- Locate the .bat file, right-click on it, and select Run as administrator. If required, click on Yes to enable the script to make changes to your system.
- The script will stop your Windows Update services, rename the SoftwareDistribution and catroot2 folders, and then restart the services.
- Wait a few minutes until the process is over. The Command Prompt will close automatically.
- Restart your computer to apply the changes and check if the 0x80073701 glitch has been eliminated.
Fix 9: Perform a clean boot
A third-party application could be forcing the Windows Update client to produce the install error – 0x80073701 . You can put an end to the issue by stopping that application by performing a clean boot in Windows 10.
When you start your system in a clean boot environment, you prevent startup applications from running on your PC.
After doing that , check whether the 0x80073701 issue shows up.
Fix 10: Check Your PC for Malware
With more than 450,000 new pieces of malware and potentially unwanted applications detected daily, every PC in the world is at risk of getting infected. If the error_sxs_assembly_missing issue persists, chances are malware might be at play in your case – especially if you work in the education sector .
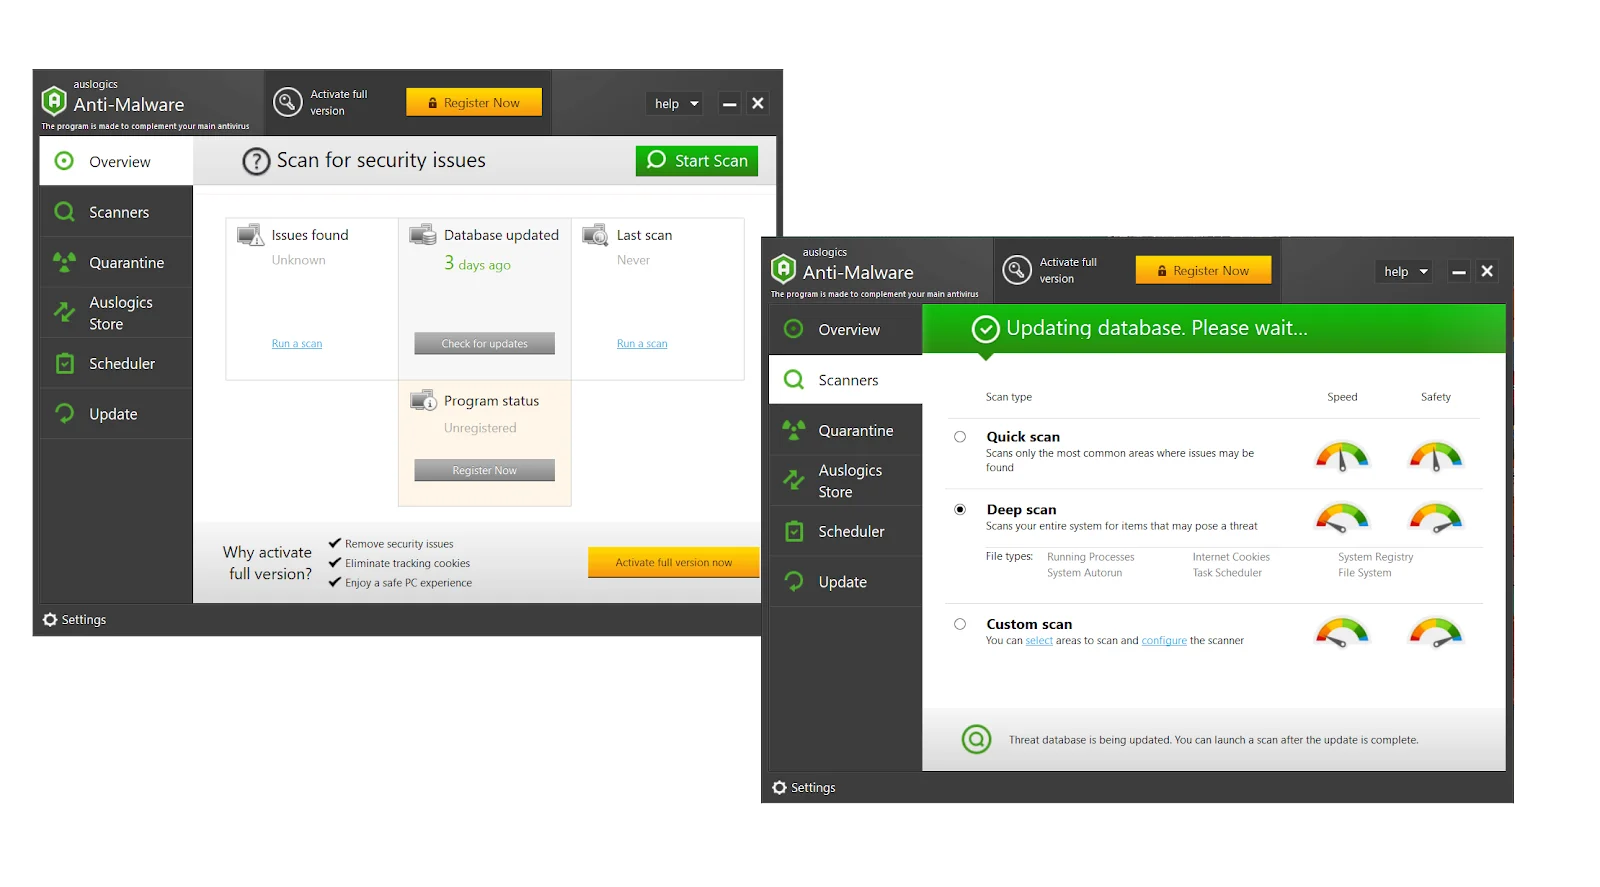
There are several w ays to remove malware from Windows. One of them is by using Auslogics Anti-Malware:
- Download the Auslogics Anti-Malware app on your Windows PC and install it using the instructions in the installation wizard.
- Wait a few minutes until the tool’s anti-malware database is updated with the latest malware definitions.
- Navigate to the Scanners tab and open it.
- Select the type of scan you would like to run. We recommend performing a deep scan to check all the components of your system.
- Once the scan is done, quarantine or eliminate the threats detected by the tool.
- After doing that, check if you can install updates without facing the 0x80073701 issue.
Related: Auslogics Anti-Malware: Features and Reviews
Fix 11: Clean up your computer
A PC cluttered with unnecessary or out-of-date files and apps is likely to experience update issues, including the install error – 0x80073701 . To make sure your updates can install properly, get rid of unnecessary files and programs.
Don’t forget to delete temporary Internet files and remove duplicate files. You can also try running the Windows Update Cleanup and Windows Disk Cleanup features.
Related: How to Get More Storage on PC – Clean Up Your PC to Run Faster
Fix 12: Troubleshoot your connection issues
To get rid of the Windows update error 0x80073701 , you may need to troubleshoot network connection problems on Windows 10.
Make sure your Wi-Fi connection is on (if you are using a wireless connection): Settings -> Network & Internet -> Wi-Fi. Another option is to run the Internet Connections troubleshooter:
- Open the Settings app and select the Update & Security option.
- Go to the Troubleshoot section and click on Additional troubleshooters.
- Select the Internet Connections option and click the Run the troubleshooter button.
- After running the troubleshooter, check if error 0x80073701 has been eliminated.
Related: Windows 10 Won’t Connect to Wi-Fi Automatically [Fixed]
Fix 13: Disable your VPN
There are many benefits to using a VPN, so it’s no wonder VPN usage steadily increases – mostly because people want to protect their personal data.
Unfortunately, using a VPN is not always a smooth ride: it can trigger various issues, including Wi-Fi not working with a VPN, Error Code 609, and the 0x80073701 issue.
You may need to temporarily disable your VPN to help your updates install properly.
Related: How to Choose VPN: Best Free VPN for Windows 10 PC
Fix 14: Perform a system restore
If all your efforts have been to no avail, meaning the Windows update error 0x80073701 keeps bothering you, performing a system restore may be your best bet. It will help you fix issues and undo updates and changes triggering error_sxs_assembly_missing (0x80073701). Here is how to restore your Windows OS to a previous state:
- Press the
Windows key + Scombination on your keyboard and type System Restore into the search bar. - Locate the Create a restore point option and select it.
- Switch to the System Protection tab in the System Properties window.
- Click on the System Restore button.
- Click Next to see available restore points.
- Choose the restore point you want to use (choose a date before the 0x80073701 issue started).
- Confirm your restore point selection by clicking Next and then clicking Finish.
- Click Yes to start the system restore process.
- Your PC will restart and begin the restore process. It may take some time, so be patient and let it run uninterrupted.
- After the restore is complete and Windows boots up, check if the install error – 0x80073701 is no longer present.
Related: How to fix the System Restore error 0x8007045b in Windows 10
Fix 15: Run a checkup of your OS
To eliminate a persistent problem like the error 0x80073701, you may need to run a complete checkup of your entire system, scanning every nook and cranny for potential culprits.
Doing that manually will take plenty of time and effort, so we recommend you to automate the process.
For instance, a tool like Auslogics BoostSpeed identifies causes of system or application problems and easily eliminates them:
- Download the BoostSpeed tool and install it on your Windows computer.
- On the My Dashboard window, click on the large blue Scan button.
- Wait while Auslogics BoostSpeed is checking your PC for issues.
- Once the scan is over, click on the Resolve All button.
As soon as Auslogics BoostSpeed is done fixing your problems, restart your PC and check if the Windows update error 0x80073701 has been resolved.
Conclusion
The install error – 0x80073701is a persistent problem that prevents users from receiving and installing updates. From faulty Windows Update components and poor connectivity to malware and file corruption, there are various factors that can trigger this issue.
You can fix it by ensuring your system is free from malware, junk, and software conflicts and its components are in top shape.
FAQ
The Windows Update troubleshooter is a helpful tool for fixing update-related issues, including the Windows update error 0x80073701. Here is how to run the Windows Update troubleshooter in Windows 10:
- Open Settings, go to Update & Security and opt for Troubleshoot.
- Click on the Additional troubleshooters link, scroll down and select Windows Update.
- Click the Run the troubleshooter button.
If there were some problems installing updates, the fault may lie with one or more of these factors:
- Malfunctioning Windows Update components
- Corrupt system files
- Third-party software conflicts
- Internet connection issues
- Malware
- PC junk
- VPN usage
There is no way to disable automatic updates in Windows 10 permanently. However, you can temporarily pause updates in Windows 10 Pro and Enterprise:
- Go to Settings, click Update & Security and select the Windows Update option.
- Under Update settings, select Advanced options.
- In the Pause updates section, open the drop-down menu.
- Select for how long you want to pause updates (up to 35 days).
- Windows updates will resume automatically after this period.
If you are a Win 10 user, you can set your connection to metered to postpone some updates:
- Launch the Settings, opt for Network & Internet, and go to Wi-Fi or Ethernet, depending on your connection type.
- Click on your network, scroll down and enable the ‘Set as metered connection’ option.
- When Windows treats your connection as metered, it delays some updates.