- What Does the Windows Error Code 0x80070057 Mean?
- How to Fix Windows Update Error 0x80070057
- Activate the Administrator Account
- Run the Windows Update Troubleshooter
- Free Up Storage Space
- Scan for Malware
- Restart Windows Update-Related Services
- Use a Microsoft Account on Your PC
- Rename the Software Distribution Folder
- Run the CHKDSK Tool to Fix Hard Drive Problems
- Repair Faulty System Files
- Perform a Clean Boot
- Update the Operating System Manually
- Conclusion
- FAQ
Seeing the Windows Update error 0x80070057 means you can’t download and install important updates. Fixing the issue is critical because updates keep your operating system going. They provide essential security and performance improvements that protect your computer and fine-tune your user experience.
The error will keep your computer stuck with the bugs, performance lapses, and security loopholes the update was deployed to address.
Also read: Why Is My Computer So Slow? – Improve Computer Performance
Thankfully, there are ways to clear the issue, and this article will show you all of them.
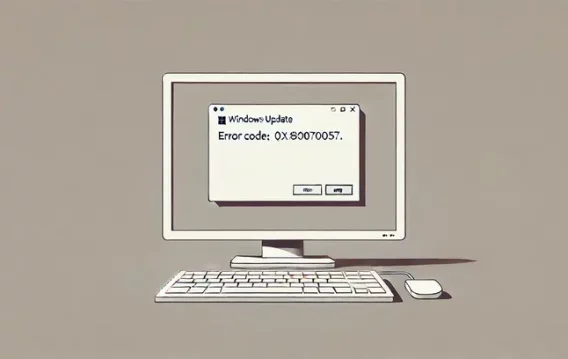
What Does the Windows Error Code 0x80070057 Mean?
The error code 0x80070057 is often associated with permission issues. It can appear in different instances, such as when opening a folder or installing an application. Windows may display the code of the i nstall error – “0x80070057 ” or “ The parameter is incorrect. 0x80070057 ” message in such cases.
In the case of Windows Update, the error prevents the Windows Update client from downloading or installing updates due to permission controls.
📌 Also read: How to Reset Windows Update: Fixing Update Problems
That said, corrupt system files, malware, a malfunctioning internet connection, a problematic storage device, and glitchy system services can also trigger the error.
📌 Also read: How to Find and Fix Corrupted Files in Windows 10?
How to Fix Windows Update Error 0x80070057
The error code has different fixes, from basic troubleshooting methods to more advanced processes.
This guide will simplify each procedure to allow you to apply solutions easily.
So, ensure you’re logged into an administrator account before running the Windows Update client again.
📌 Also read: [FIXED] You need to sign in as an administrator to continue
You can follow these steps to check the type of account you’re using:
- Open the Run dialog box using the Win + R hotkey.
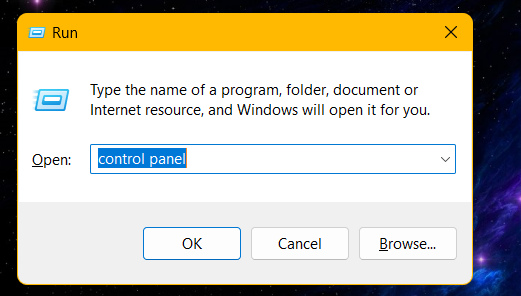
- Type control panel into the text box and click OK.
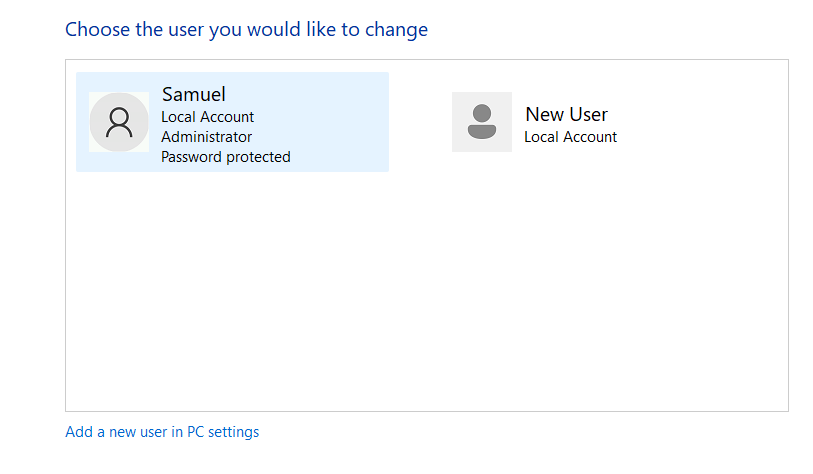
- Click Change account type under User Accounts in the Control Panel home screen.

- You should now see details of your user account under “Choose the user you would like to change.”
Activate the Administrator Account
Even if you’re currently the Administrator, Windows will treat your account as an ordinary user unless you agree to some warnings. For example, you still need to run some programs as administrators to grant them advanced privileges.
You can activate the admin account using an elevated Command Prompt window. Follow these steps:
- Launch the Run dialog window.
- Type “cmd” and press the Shift and Enter keyboard keys simultaneously.
- After Command Prompt opens, type the following and tap the Enter key:
net user administrator /active:yes
- You can now check if the issue has been resolved.
- Note that you can enter the following command to deactivate the administrator account:
net user administrator /active:no
Run the Windows Update Troubleshooter
The Windows Update troubleshooter checks for issues affecting the client and attempts to resolve them. These issues include software conflicts and glitchy system services. If the tool cannot fix the problem, it will report the likely cause. We’ll show you how to run the troubleshooter on Windows 10 and Windows 11.
Follow these steps to run the Windows Update troubleshooter on Windows 11:
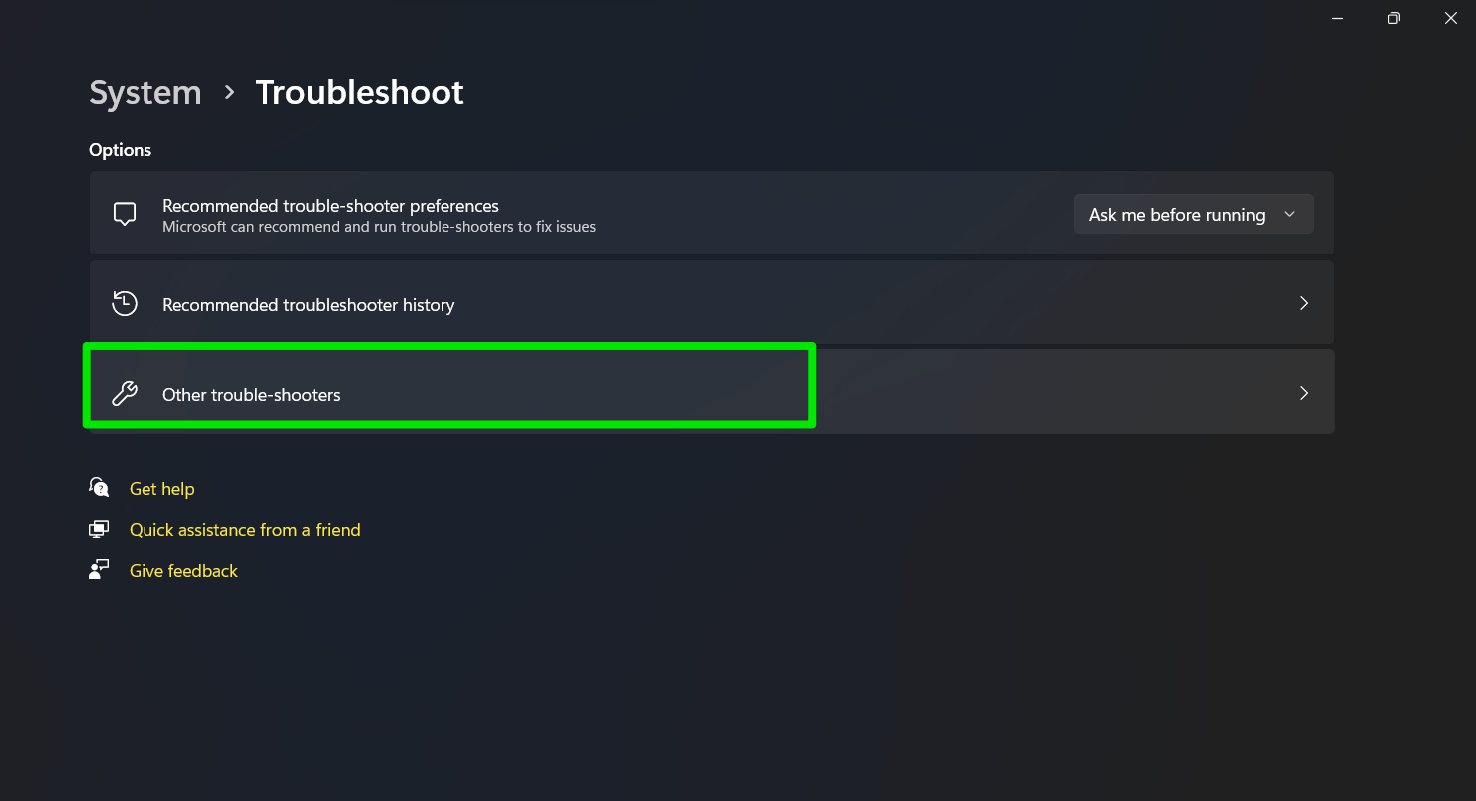
- Launch the Settings application and click System.
- Scroll through the System options and select Troubleshoot.
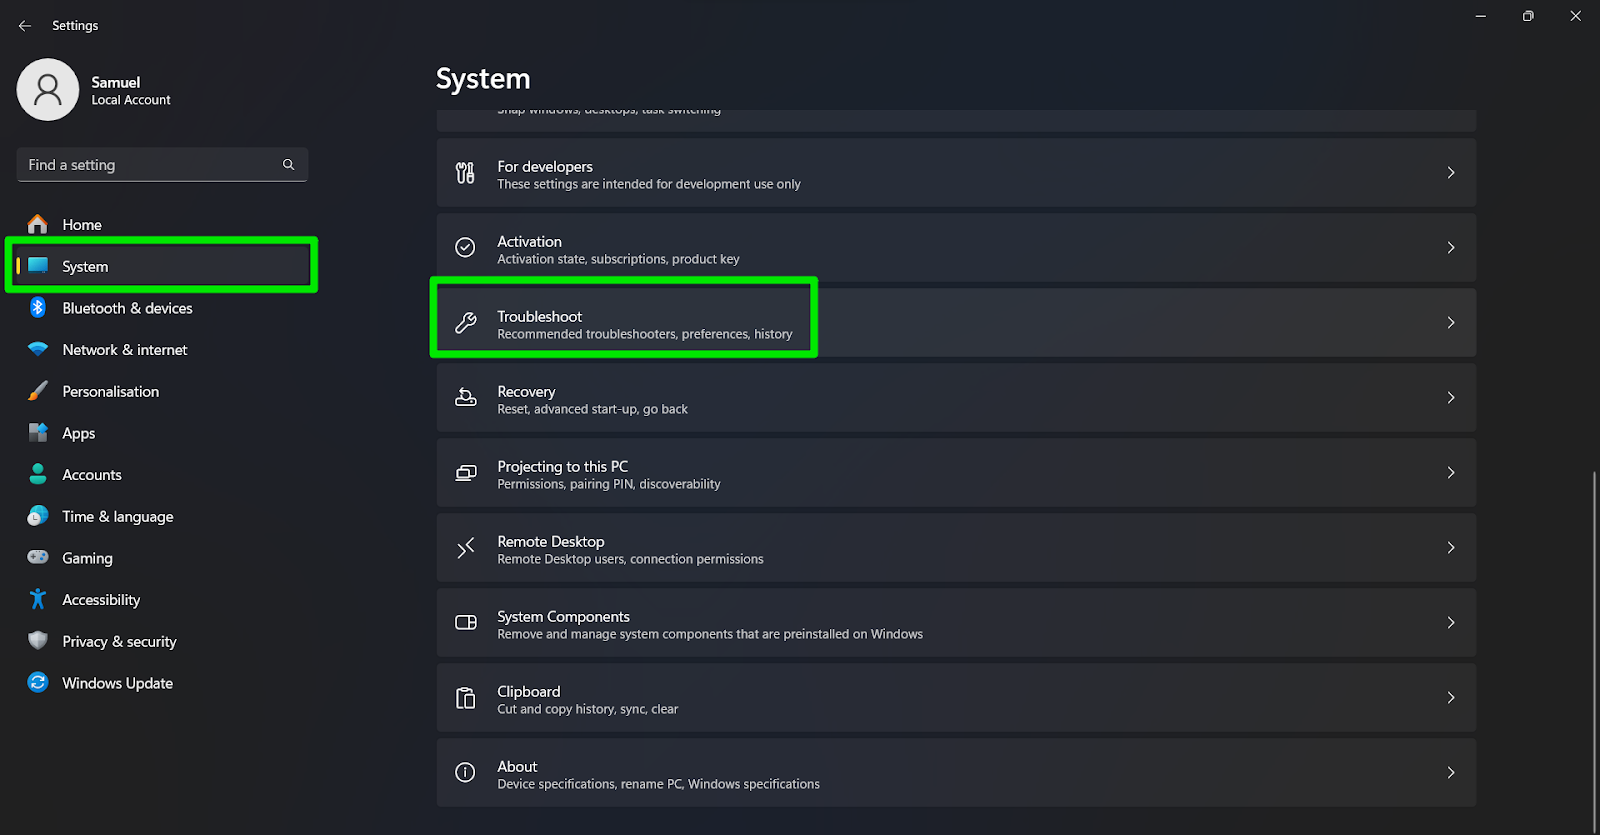
- Click “Other trouble-shooters” when the System > Troubleshoot page opens.
- Next, click Run next to Windows Update.
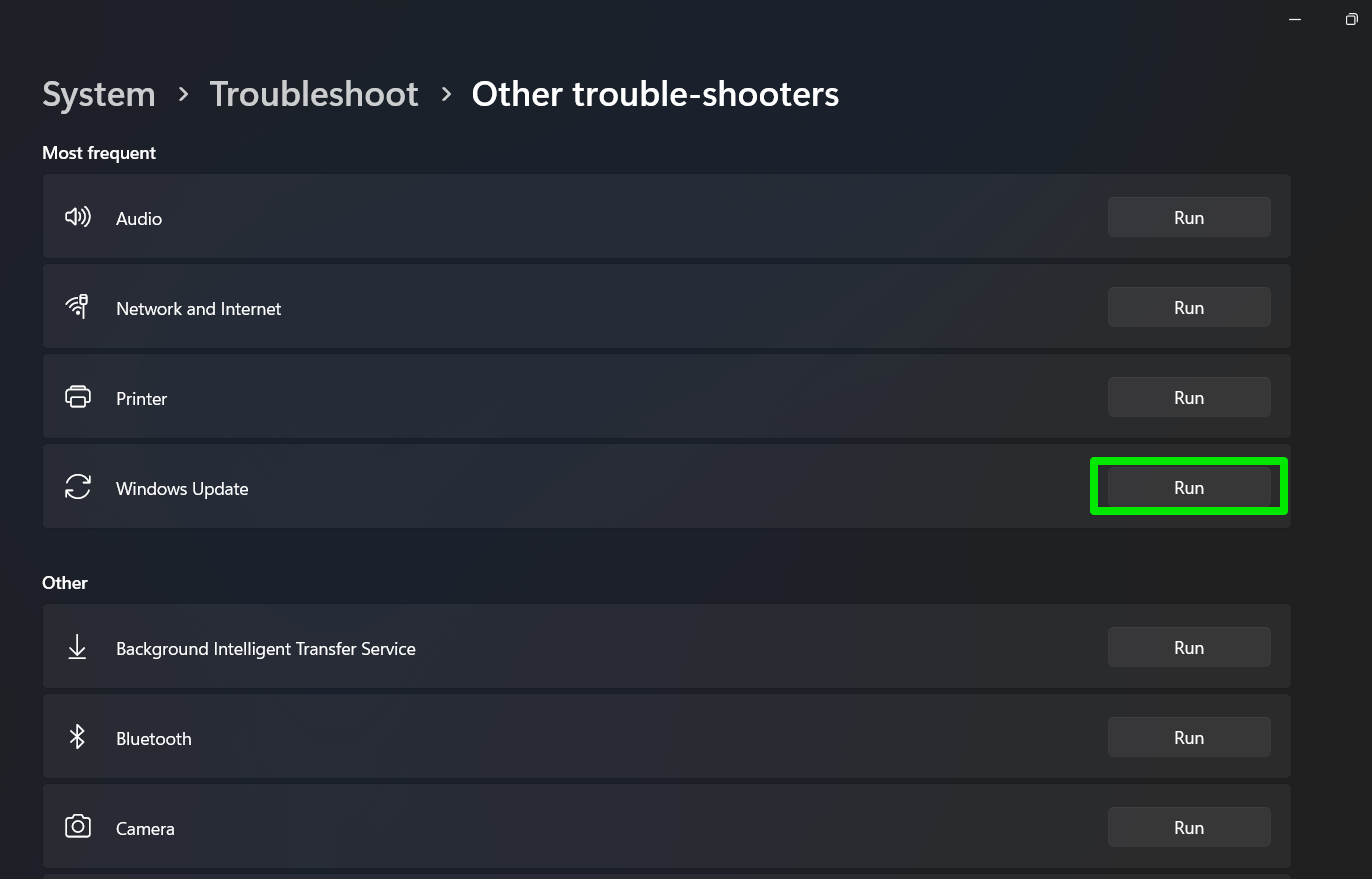
- Allow the Windows Update client to run and fix the issues causing the error.
Follow these steps if you run Windows 10:
- Launch the Settings application and click Update & Security.
- Go to the left side of the screen and select Troubleshoot.
- Click Additional troubleshooters on the Troubleshoot page.
- Next, click Windows Update and click the “Run the troubleshooter” button.
Free Up Storage Space
Windows requires at least 20 GB of free storage space on 64-bit systems and 30 GB on 32-bit systems. That said, it’s recommended that you keep more than 20% of your entire storage space empty to ensure the health of your drive and smooth OS operation.
📌 Also read: How to Speed Up a Hard Drive Performance on Windows?
The error may be showing up because you need more storage space to download and install updates. So try freeing up your disk space and check if that solves the problem. You can follow our complete guide to clear storage space on your device.
📌 Further reading: Windows Update Cleanup: How to Delete Old Windows Update Files
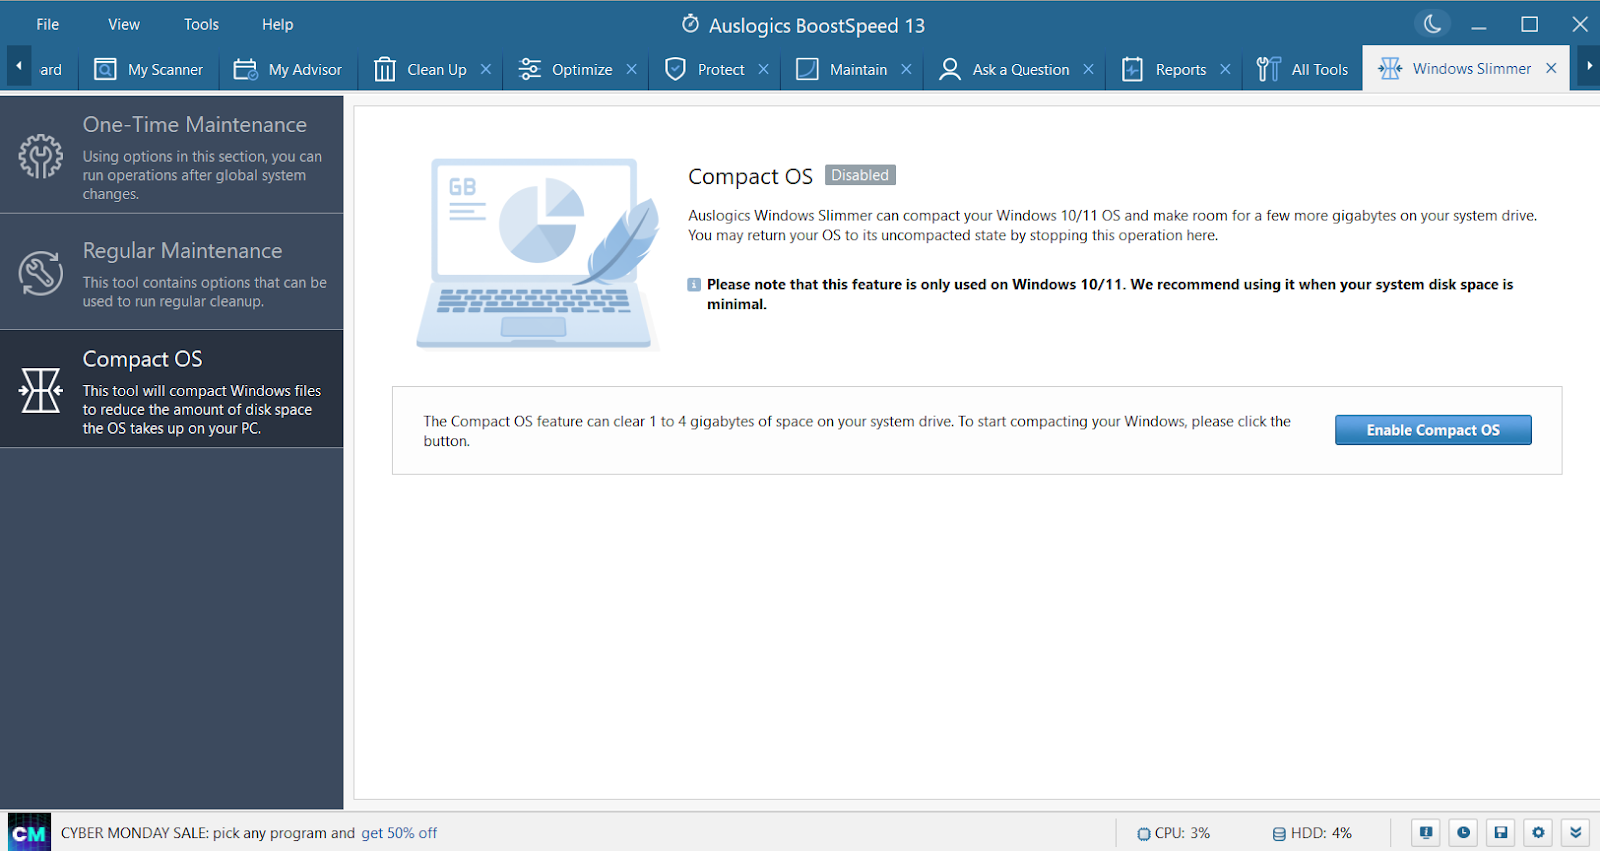
Auslogics BoostSpeed can help ensure your system is free of junk and temporary files that clog your hard drive. These files can be responsible for many system issues, from performance drops to obstructing errors.
The program has many tools that can also help you remove duplicate and large files and unnecessary applications. Moreover, you can use it to check your hard drive’s health and compact Windows to free up space.
Scan for Malware
Malware can compromise the update process by infecting certain system files and services. Using your antivirus program to run a thorough scan can help you find and eliminate the responsible malicious program.
📌 Also read: How to Remove Virus and Other Malware from Windows
But before you start the scan, download and install the latest updates for your antivirus software. Most antivirus programs automatically install updates, but it wouldn’t hurt to check manually. We’ll show you how to update Windows Security and run the required scan. First, ensure Windows Security is up to date:
- Expand your System Tray and select the shield icon.
- Click Virus & threat protection after Windows Security launches.
- Scroll down and click Protection updates.
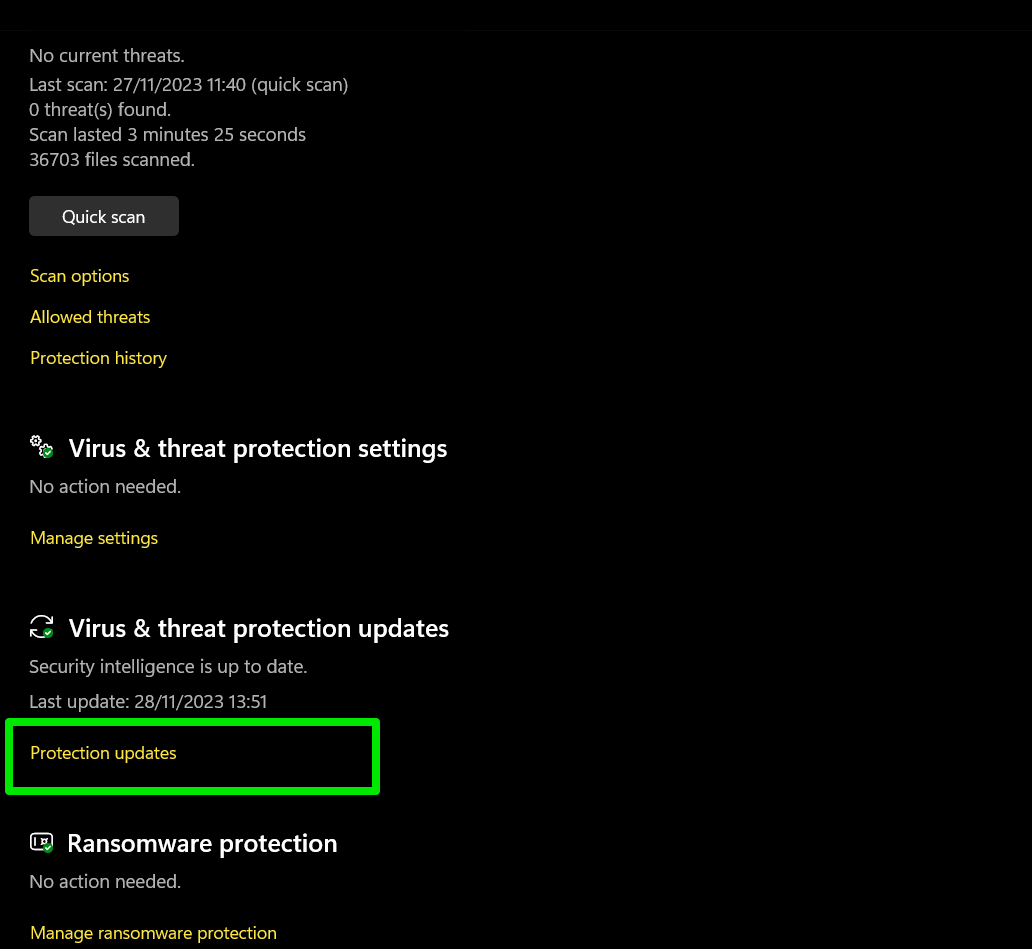
- Select the Check for updates button and allow the tool to download and install the latest virus definitions.
Now, follow these steps to scan for viruses and remove them:
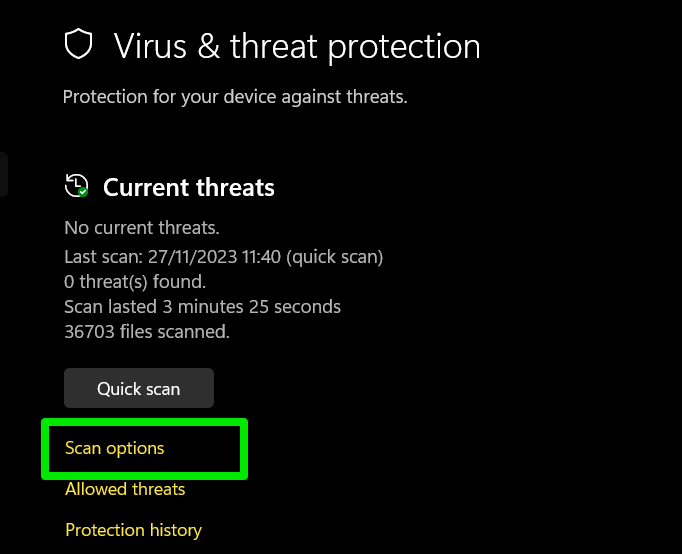
- Go to the Virus & threat protections homepage and select Scan options under Current threats.
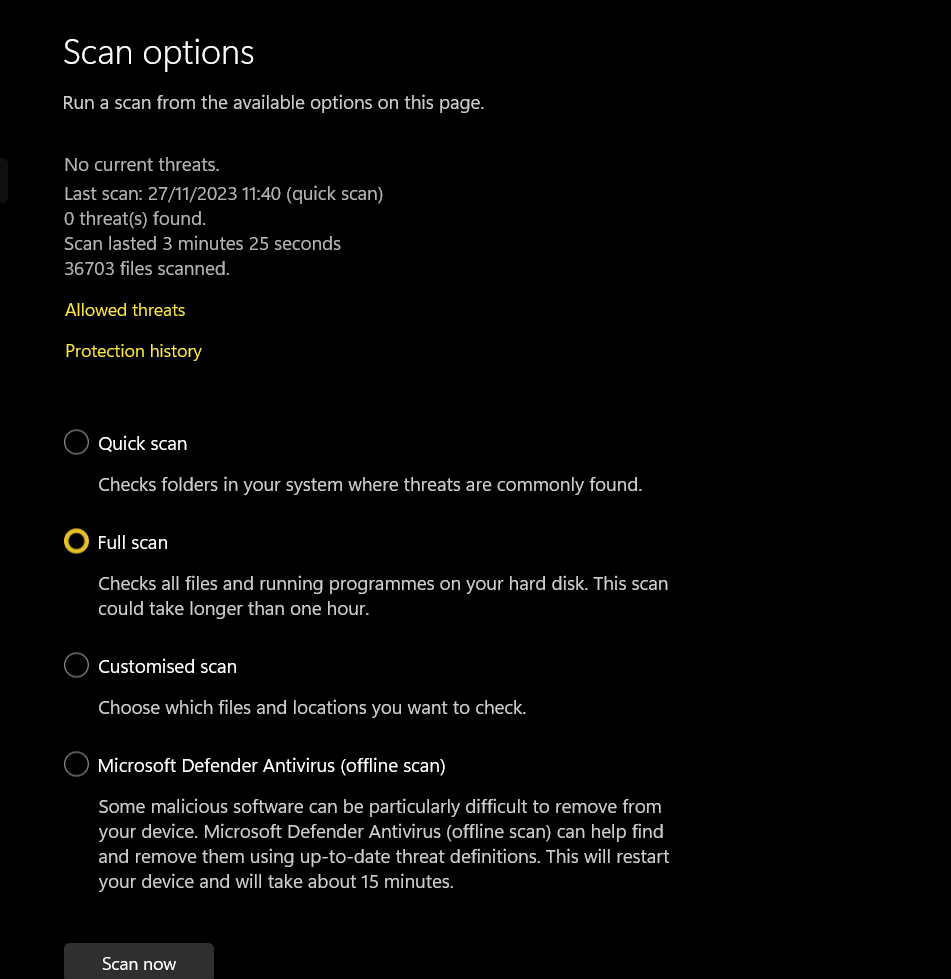
- Select Full scan on the next page and click the Scan now button.
- This scan may take a while. So, be patient and allow the program to complete the process.
- After the full scan is complete, return to the Scan options page, select Microsoft Defender Antivirus (offline scan), and click Scan now.
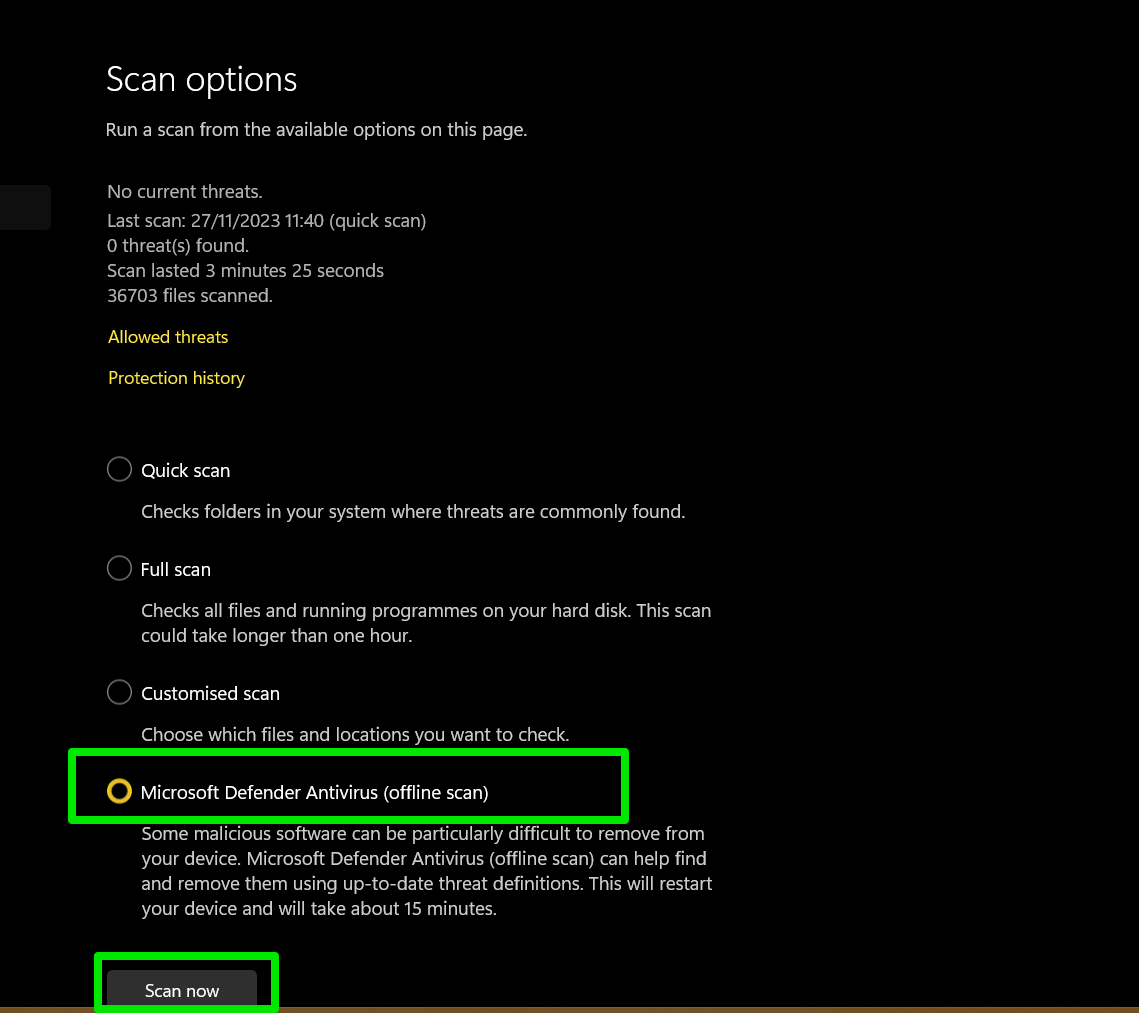
- Windows will restart your PC to run a deep scan to catch hard-to-find malware lurking in hidden system folders.
We also recommend Auslogics Anti-Malware as an extra layer of security. The security program can run alongside major third-party antivirus programs and Windows Security without causing conflicts. It helps you catch malicious programs that may evade your primary protection software.
📌 Also read: How to Prevent Malware: Lock Down Your Online Safety
Restart Windows Update-Related Services
The Windows Update client will not work if certain system services malfunction or are not running. These services include the Background Intelligent Transfer Service, Windows Installer, Update Orchestrator Service, and Windows Update. While they’re automatically turned on when updates are available, or you start checking for updates, they encounter issues sometimes.
In some cases, they may be set to start manually. Restarting each service and setting them to start automatically can resolve the problem for good. Follow these steps:
- Launch Run using the
Win + Rshortcut. - Type services.msc and hit the Enter key.
- Scroll through the Services app and double-click the Windows Update entry.
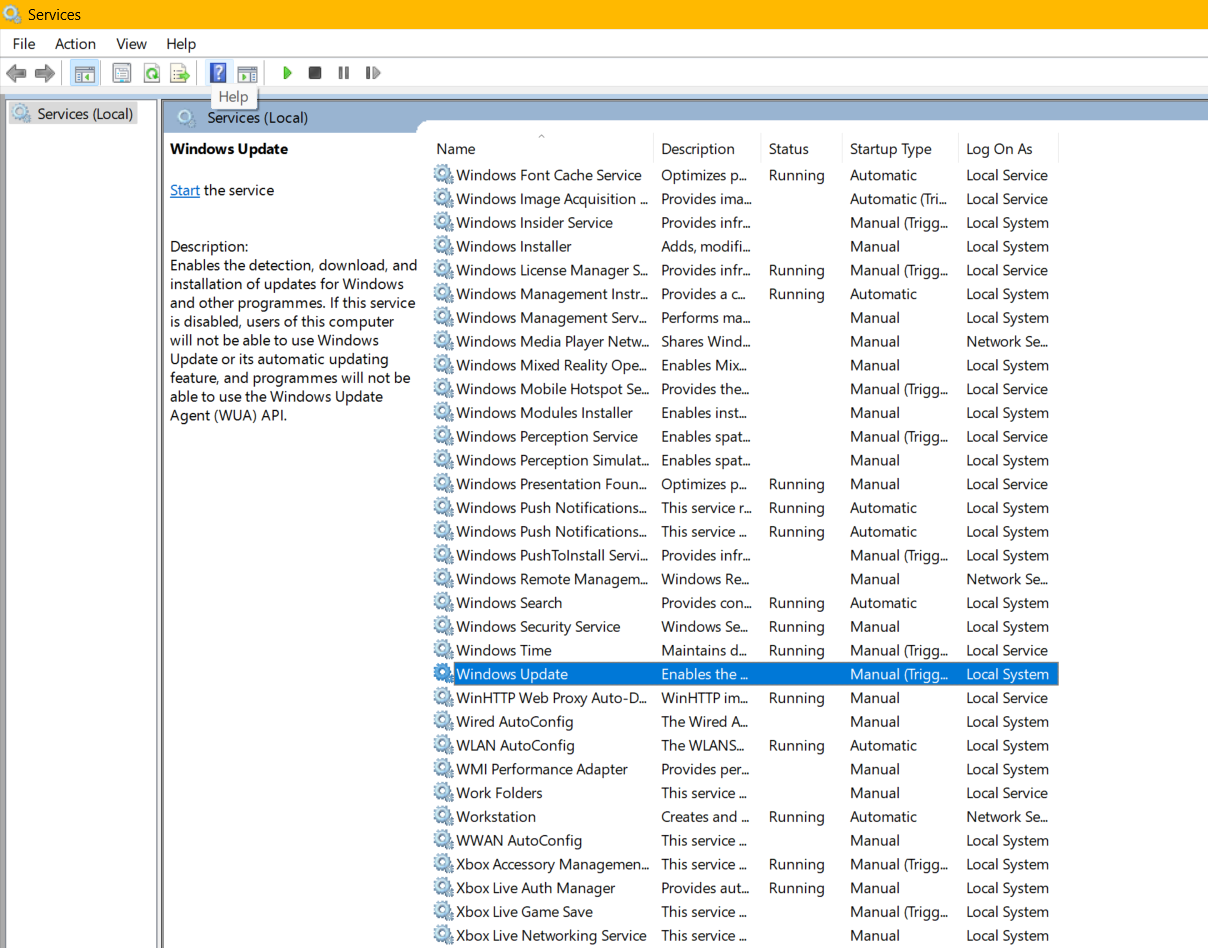
- After the service’s Properties dialog opens, click the Stop button if the service is running. Select Automatic from the Startup type drop-down menu.

- Next, click the Start and OK buttons.
- Repeat the steps for the following services:
- Windows Installer
- Background Intelligent Transfer Service
- Update Orchestrator Service
Use a Microsoft Account on Your PC
- Right-click the Start button and click Settings in the menu.
- Click Accounts.
- Click the Sign in button under Microsoft account.
- Enter your login credentials. Click the Create one link under the Sign in text box to set up an account if you do not have one.
- Follow the subsequent prompts to complete the process and restart your PC to log into the account.
- Now, try running the Windows Update client again.
Rename the Software Distribution Folder
The Software Distribution folder is the Windows Update client’s storage unit. Whenever you update your computer, the client downloads the update files to the folder before installing them.
That way, it can resume the update process whenever your computer loses internet connection or abruptly goes off. However, any of these situations could easily corrupt the files in the folder and trigger error 0x80070057.
When you rename or delete the Software Distribution folder, the Windows Update client will automatically create a new one and download updates from scratch.
You should also rename the Catroot2 folder, another folder required for Windows updates.
Follow these steps to rename the folder:
- Launch Run using the
Win + Rhotkey. - Type CMD into the text box and simultaneously hit the Shift and Enter buttons.
- Select Yes in the User Account Control confirmation box.
- Once Command Prompt opens, run the following commands to stop Windows Update services to gain access to the folder:
net stop wuauserv
net stop bits
- Now, enter the following to rename the folder. Hit the Enter key after typing each command line:
ren %systemroot%\softwaredistribution softwaredistribution.old
ren %systemroot%\system32\catroot2 catroot2.old
- Restart the Windows Update services you stopped earlier using these commands:
net start wuauserv
net start bits
- Check if you can now install the updates.
Run the CHKDSK Tool to Fix Hard Drive Problems
The error also appears when the Windows Update client cannot access specific hard disk areas. So, if you use a hard disk drive, some of its sectors may be damaged.
You can find these sectors and attempt to repair them using the CHKDSK tool. The utility is also designed to prevent your operating system from using bad sectors in the future.
You can follow the instructions in our complete CHKDSK guide to confirm whether the error results from a failing HDD.
📌 Also read: [EASY GUIDE] How to Fix “Windows Detected a Hard Disk Problem” Error
Repair Faulty System Files
Windows Update relies on system files to work correctly. So, it will throw up errors such as 0x80070057 if any of the files it depends on go missing or become corrupt.
If nothing has worked so far, a faulty system file may be the cause of the problem. The good thing is that you can use the SFC tool to replace malfunctioning and missing system files.
The System File Checker (SFC) tool is a command line program designed to deal with issues related to protected Windows files. While you don’t have enough permissions to alter these files, they can still go missing or corrupt due to hard drive problems, system glitches, and malware infection.
These steps will show you how to run the tool:
- Launch Run using the
Win + Rhotkey. - Type CMD into the text box and hit the Shift and Enter buttons simultaneously.
- Select Yes in the User Account Control confirmation box.
- Once Command Prompt opens, run the following command:
DISM.exe /Online /Cleanup-image /Restorehealth
Entering the above command prompts DISM to get the necessary files using the Windows Update client. But, since the client is malfunctioning, you can use a functioning Windows installation media, such as a bootable USB drive, as the source for the files. Enter the following command instead after connecting your Windows installation device:
DISM.exe /Online /Cleanup-Image /RestoreHealth /Source:C:\RepairSource\Windows /LimitAccess
Please note that you must replace the “
C:\RepairSource\Windows” part of the command with the path to the Windows directory in the bootable drive.
- Now, enter the following command line to run the SFC tool:
sfc /scannow
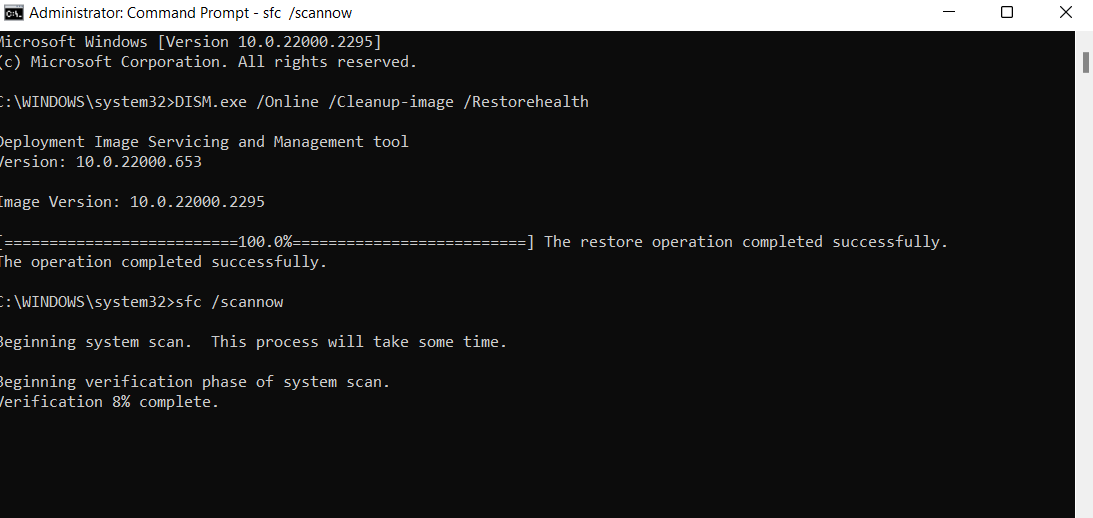
- You should see a “Verification 100% complete” message once the tool finishes the job.
Further reading: How to Find and Fix Corrupted Files in Windows 10?
Perform a Clean Boot
A clean boot allows you to determine whether a startup program or service is causing the Windows Update error 0x80070057. The process involves disabling your system’s third-party startup apps and services and checking if the error persists.
If the error doesn’t show up after starting Windows in a clean state, it means one of the deactivated programs and services is the culprit. You can then find the responsible program by turning on the startup apps one after the other.
You can follow the instructions in our complete clean boot guide to resolve the issue.
📌 Further reading: Quick Tips: How to Disable Startup Programs in Windows 10
Update the Operating System Manually
Updating the operating system manually involves using your web browser to download the update from Microsoft’s website.
This process allows you to bypass the Windows Update client and install the update yourself.
Follow these steps:
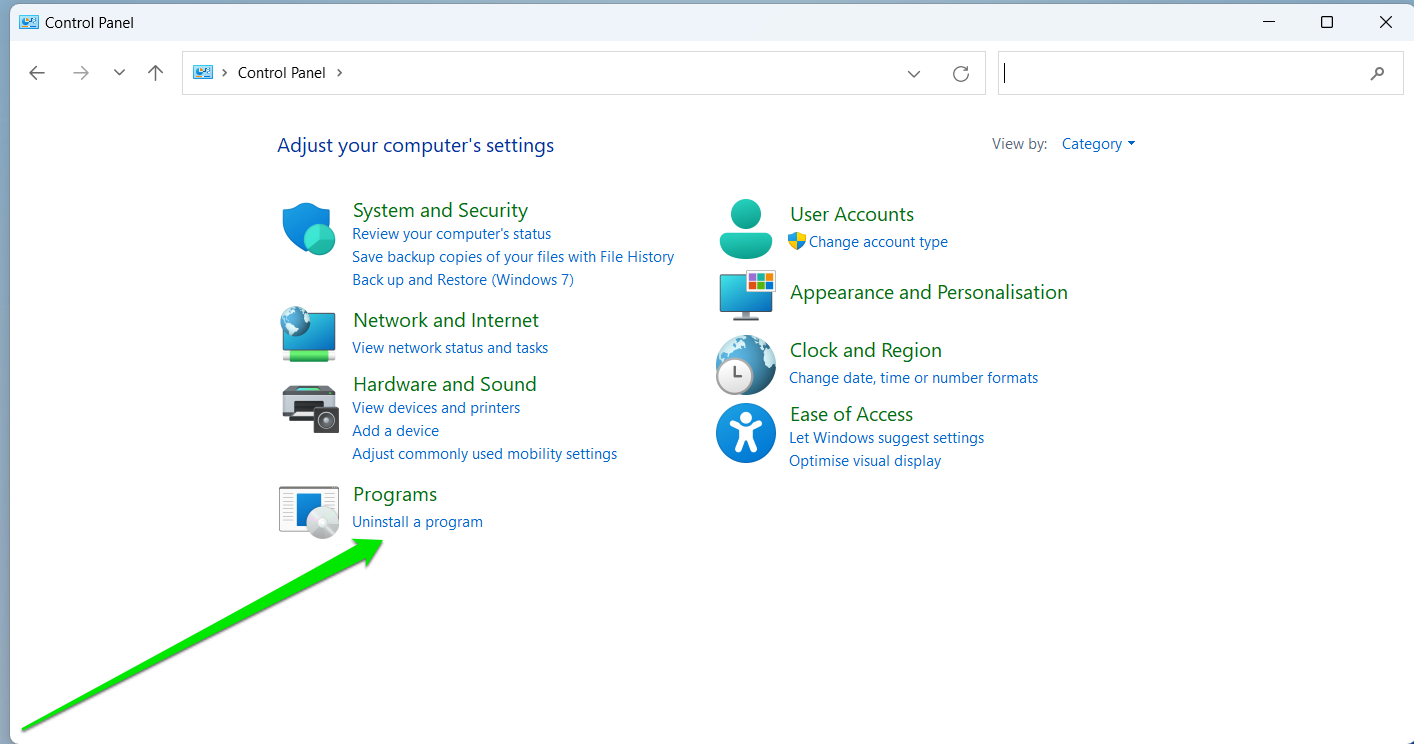
- Open Start, search for Control Panel, and open the program.
- Click Uninstall a program.
- Go to the left side of the Programs and Features page and click View installed updates.
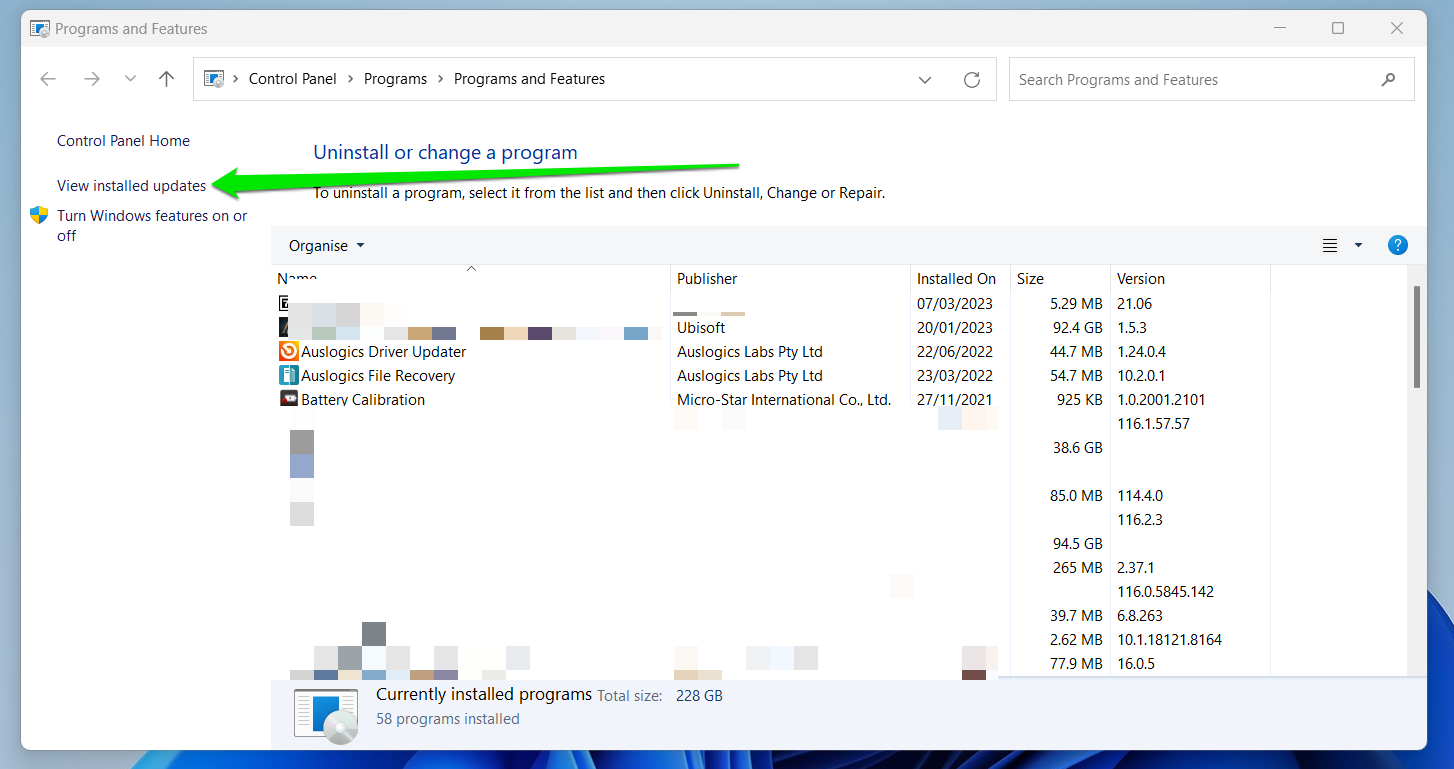
- Now, take note of the last update’s KB number.
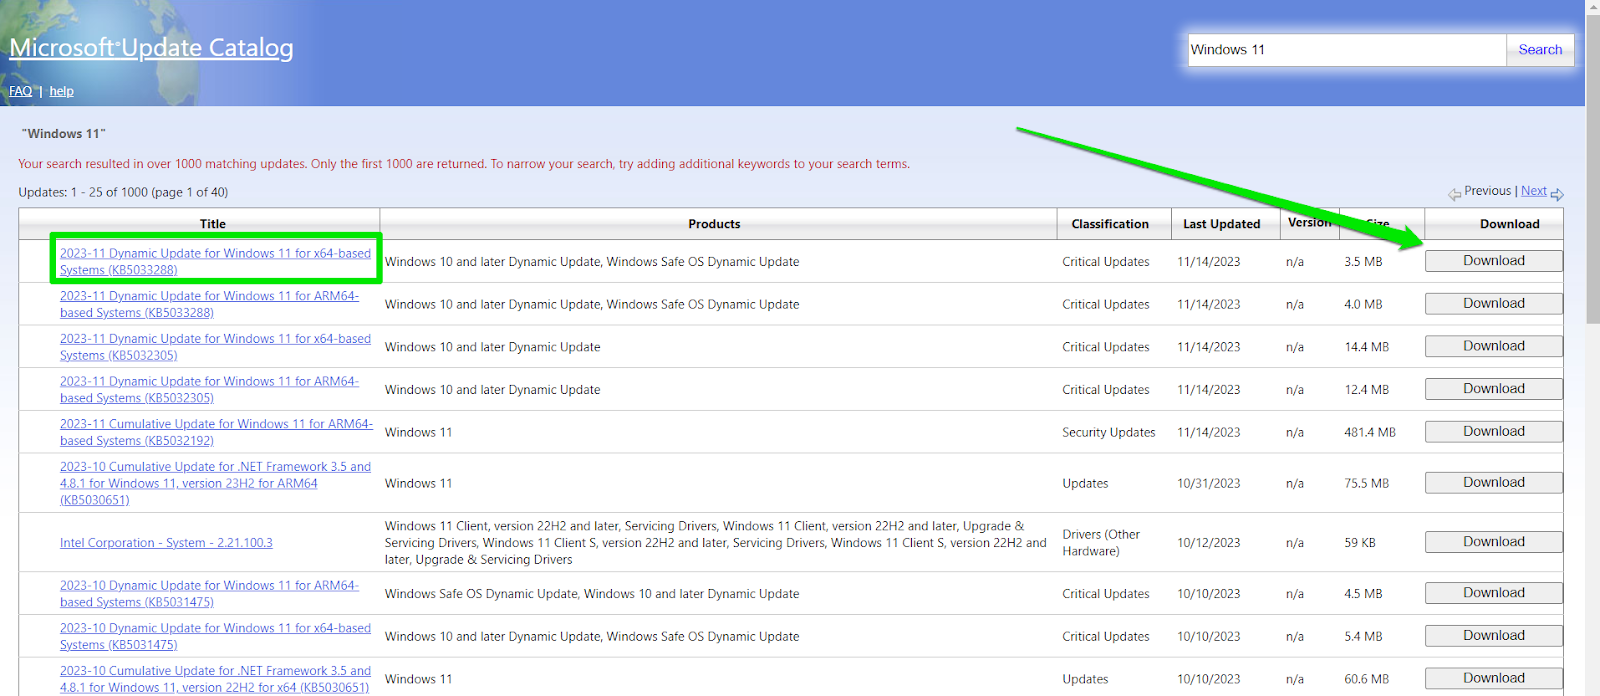
- Go to the Microsoft Update Catalog website.
- If you know the KB number of the specific update you want to download, type it into the search box and hit Enter. If you don’t know the KB number, type “Windows 10” or “Windows 11” depending on your OS and hit Enter.
- You’ll now see a list of updates, with the latest version on top.
- Now, check for updates that come after the KB number of the last update you installed.
- Click the Download button for each update and install them. You can also click the update to check its details.
Conclusion
You can now update Windows without issues. Remember the following to prevent such problems in the future:
Always protect your PC against malware.
Maintain ample free storage space.
Take good care of your hard drive.