
Temporary files take up space over time and can affect your PC one way or the other, like reducing your system’s speed. That’s why it’s crucial to learn how to delete temporary file s to avoid any mishaps. I’ll walk you through various ways to delete temp files , starting with the easiest. Cleaning these types of files shouldn’t be a big deal, but there are some steps you need to follow to free up precious space on your C drive . Let’s begin.
What Are Temporary Files?
When Windows and third-party apps are running an operation, they tend to store data temporarily to speed up the process, act as a backup, or ensure a smooth operation. For example, apps like Microsoft Word generate temp files as backup copies of documents under edit. That way, they can provide a safety net against unexpected crashes or power interruptions. That is why Word shows you previous document versions whenever you restart the app after a crash if you never saved the file locally or to the cloud .
How to Delete Temporary Files on Windows 10/11
Now, let’s find out how to clear temp files from your computer. I’ve listed the methods, beginning from the simplest:
Method 1: Use reliable third-party software
I always use Auslogics BoostSpeed to delete temp file s because the tool makes it so easy to use and gets the job done. This all-in-one tool excels at removing files and other items that slow down your computer. You can also use it to delete damaged registry entries, old Windows Update files , corrupt files, empty folders, duplicates, or large files. The best part is that you can schedule the cleanup activity so that you don’t have to think about it again.
We have a blog article on how to use Auslogics BoostSpeed to remove duplicate photos.
Check out the guide if you have duplicates that are eating up your storage space: How to Find and Remove Duplicate Photos in Windows .
I’ll show you how to delete temp files and schedule it for the next cleanup:
- Download Auslogics BoostSpeed from the official website and install it.

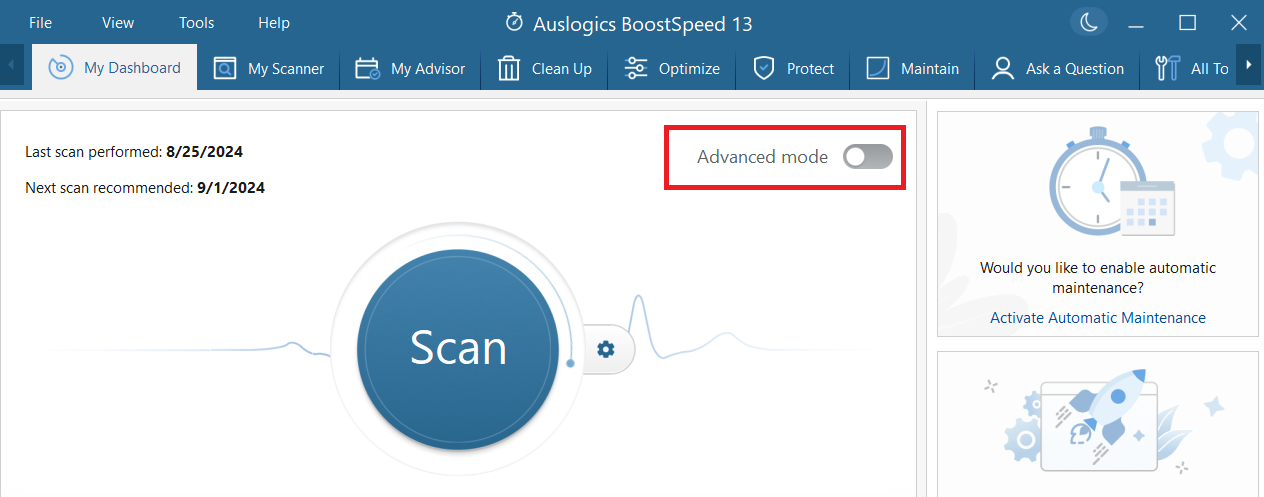
- After launching the program, click on that huge Scan button to start cleaning your temp files right away.
- After the scan is complete, click on See scan details to review the results before confirming deletion.
However, if you want to focus on only the temporary files, click on the gear icon or customize scan near the Scan button to uncheck the areas you don’t want to check.
Use the Scheduler to clean temp files automatically
You don’t have to clean the temporary files yourself. You can automate. You can switch to Advanced mode. Don’t let this term scare you. It’s not for tech-savvies.
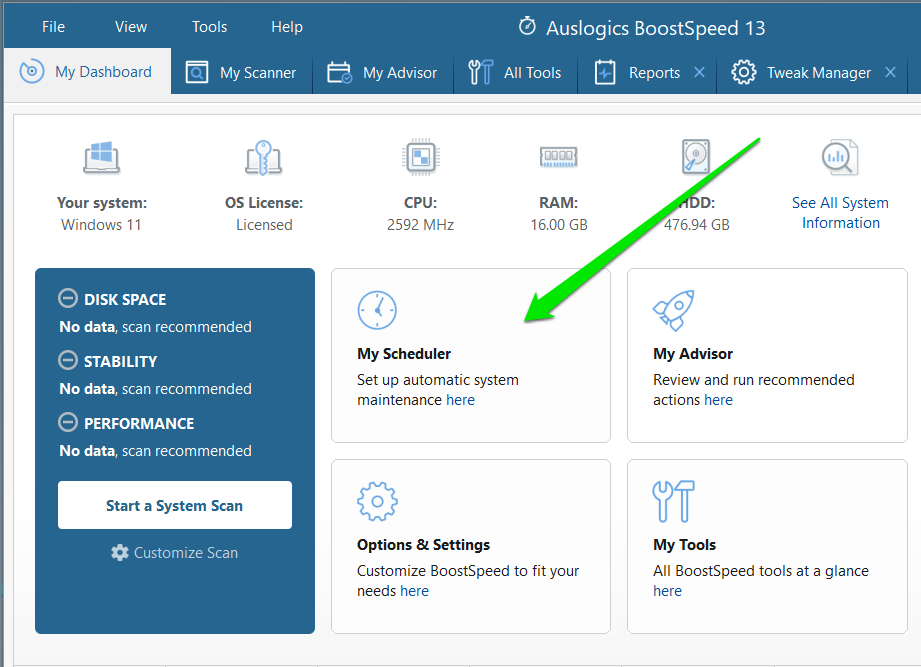
This mode lets you view tools, enter the Scheduler, and allows you to fully fine-tune the tool to your needs. That’s all.
Now, regarding The Scheduler, it allows you to choose the program’s routine for finding and removing temporary files. You can open it by clicking My Scheduler in Advanced mode.
Now, follow these steps to set it up:
- Select My Scanner under Scheduler .
- Go to the right side of the screen and check the Enable automatic maintenance box under Scheduler: My Scanner .
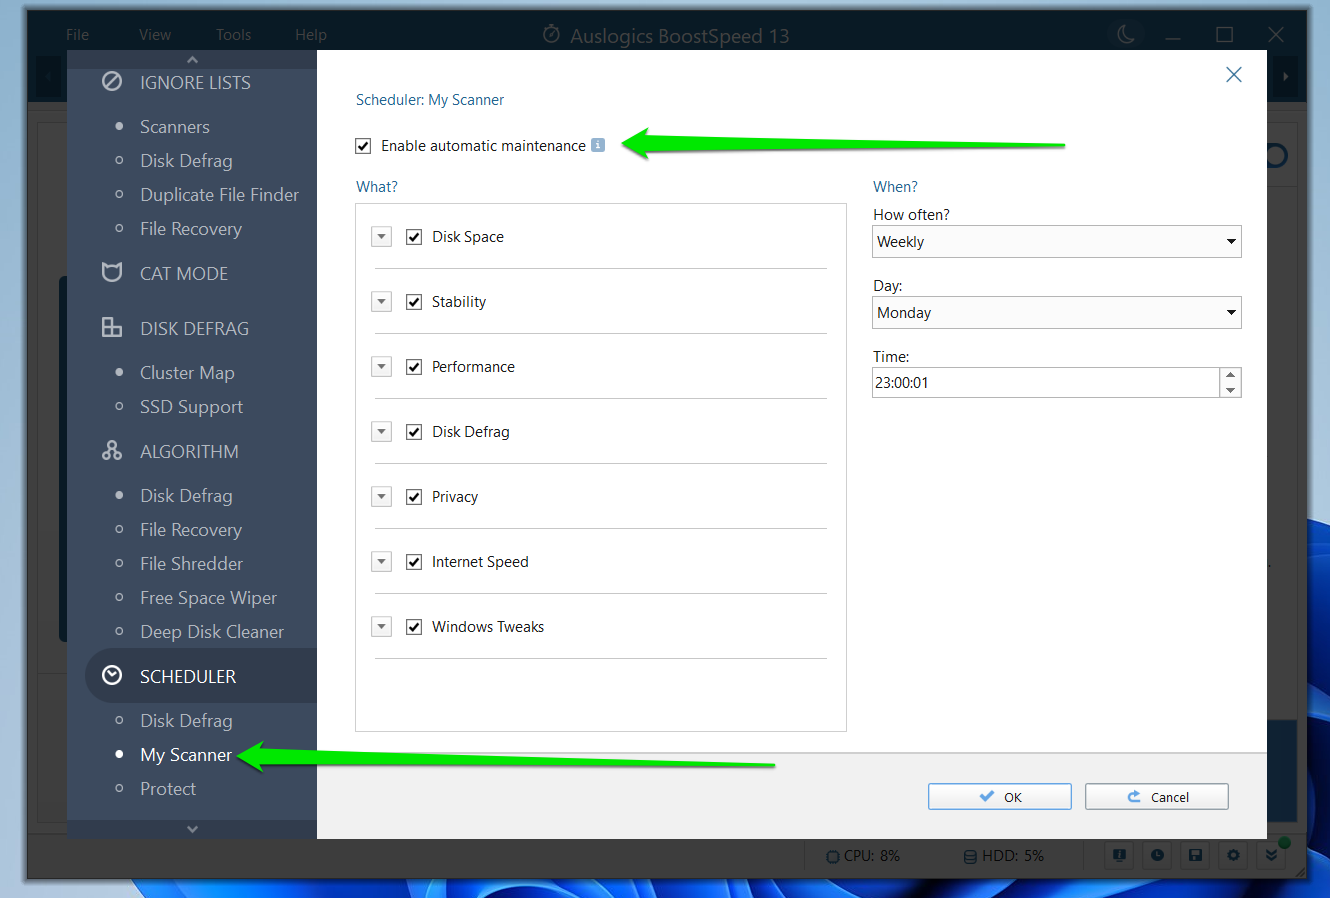
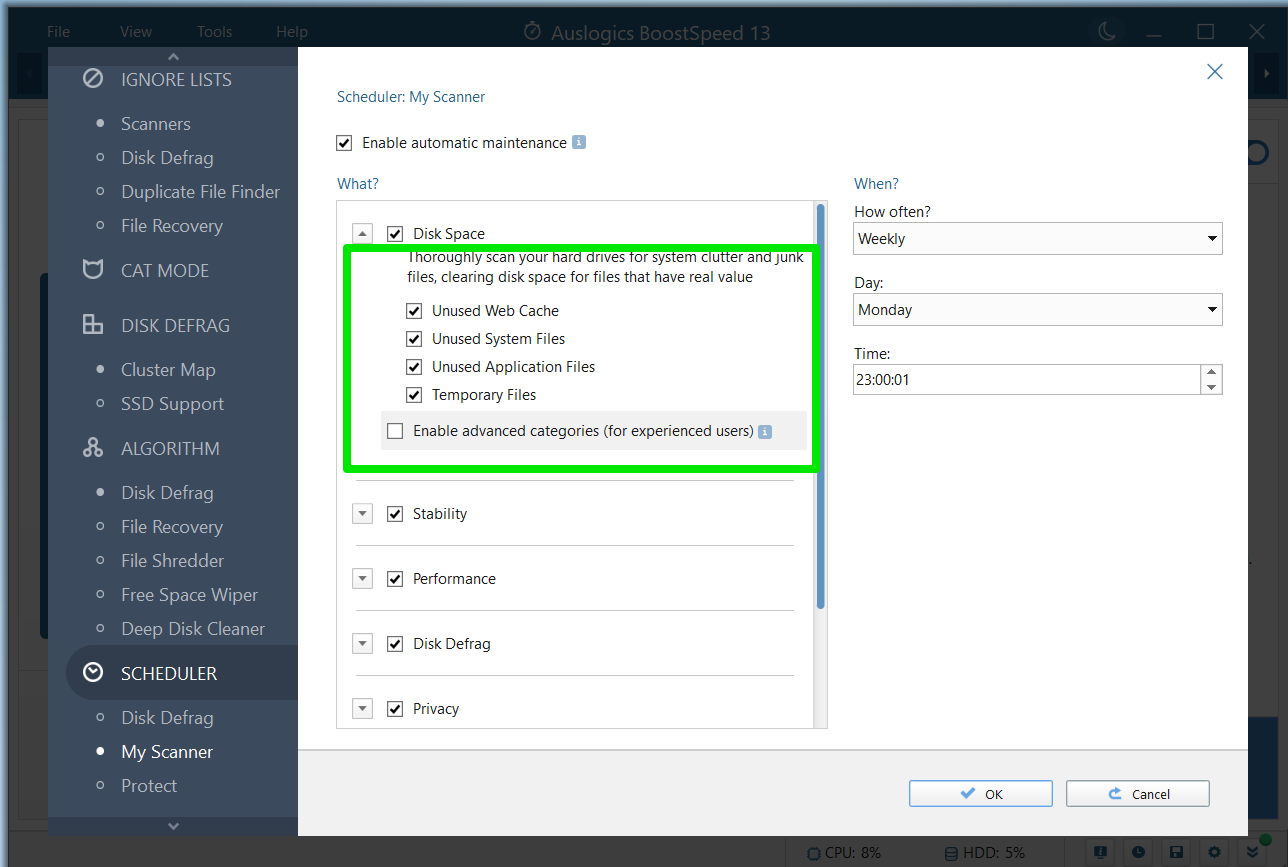
- I recommend keeping all the boxes checked under the What? section. That said, you can choose what you want to scan. Expanding each item shows you exactly what the tool will scan for and delete.
- The When? section allows you to choose how often the scan will run and the specific time of day. If you select When PC is idle, you can specify how long the PC has to be idle for the tool to kick in.
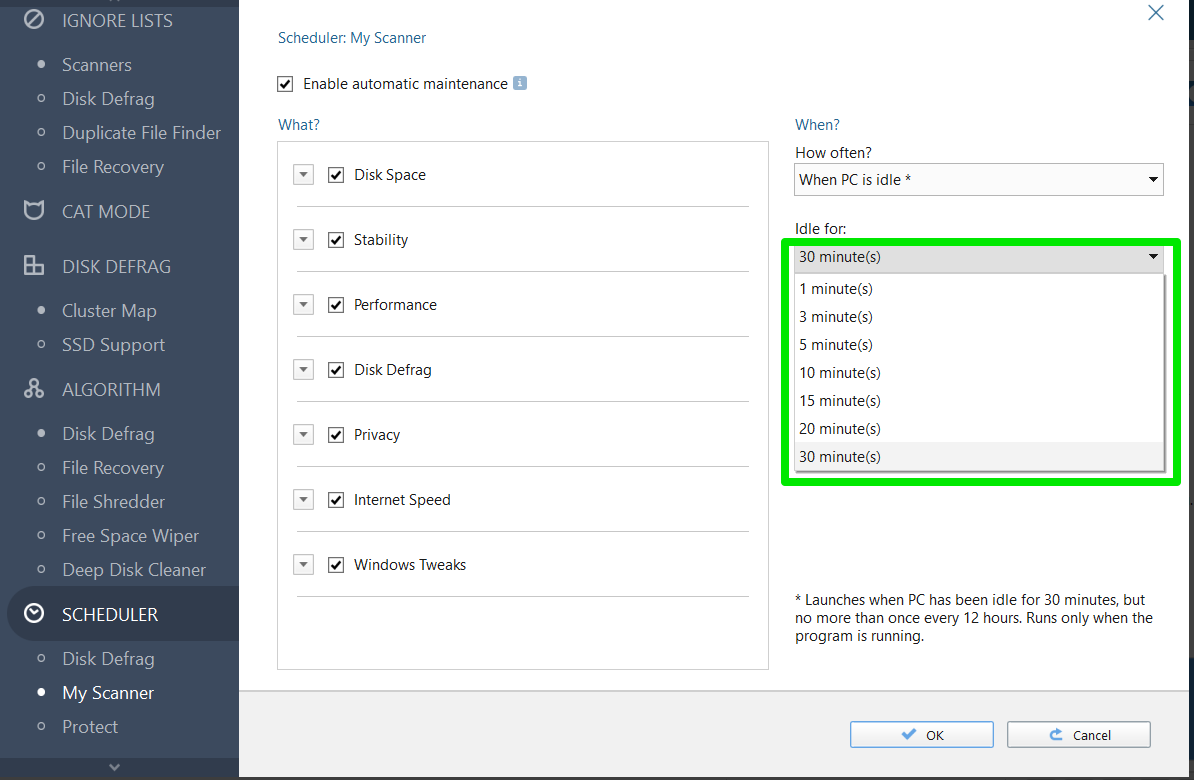
- You should see a note at the bottom of the page showing the time and date for the next scan based on your preference.
The Scheduler will disappear once you click the OK button. You can always go back to the tool to adjust your settings.
Method 2: Use Windows Disk Cleanup
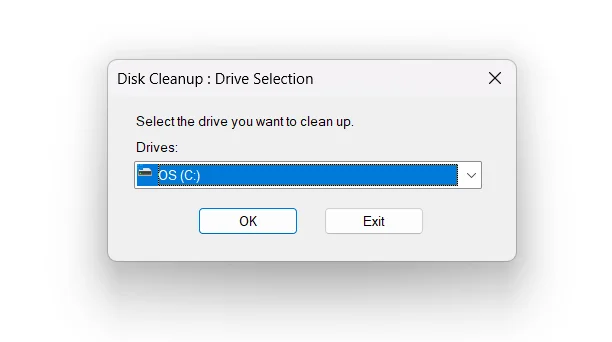
Disk Cleanup is a native Windows utility designed to clean up your computer. It searches and analyzes hard drives for files that are no longer useful and can be safely deleted. Whether you partition your drives or use different physical storage devices, the tool will always prompt you to specify the volume you want to clean up. Follow these steps to delete not only Windows temp files, but all other unnecessary files using Disk Cleanup:
- Open the Start menu, type
disk, and click the Disk Cleanup result.

- The utility will allow you to select a drive if you have multiple hard drives or partitions.
- Select the files you want to remove and click the OK button.
- If you want to remove temporary files created by different Windows components, click the Clean up system files button. The tool will scan those files and display them.
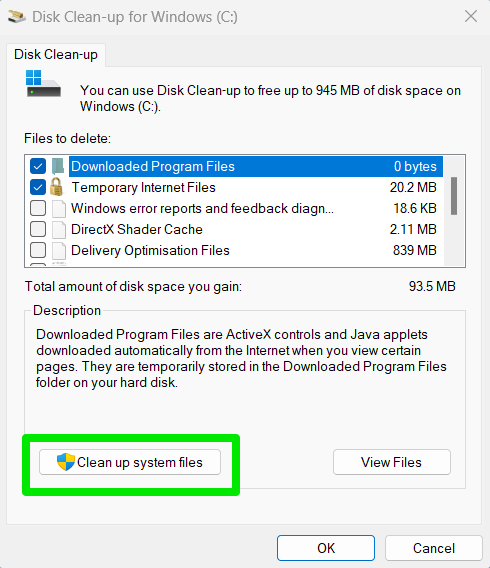
- You can now check the boxes for the files you want to remove and click the OK button.
This is particularly true for web browsers or certain programs. The best way to do a thorough cleaning is to use one of the PC cleaners like Auslogics BoostSpeed.
Method 3: Use the Settings app to delete temp files
The Storage interface in the Settings application is another place where you can see different categories of temporary files and remove them.
It also shows how much space each temporary file category takes up on your drive and allows you to select what to delete.
However, unlike the Disk Cleanup tool that checks other drives, it only scans your primary drive.
Follow these steps:
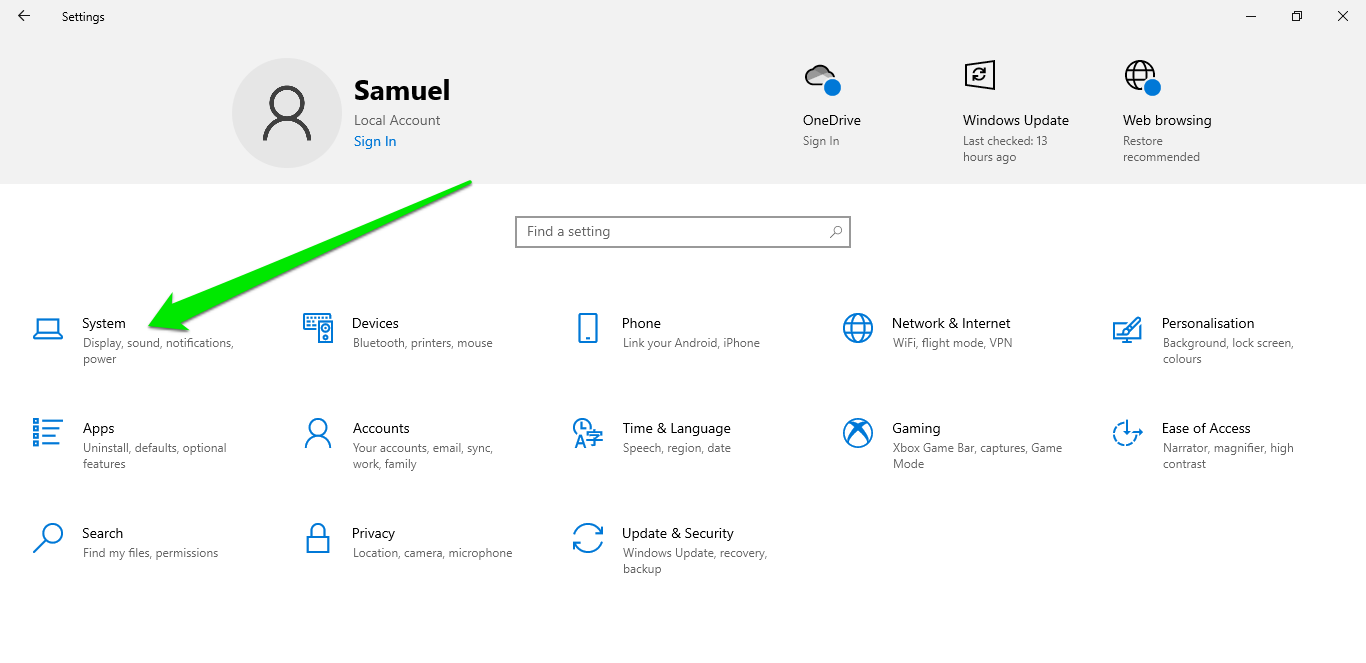
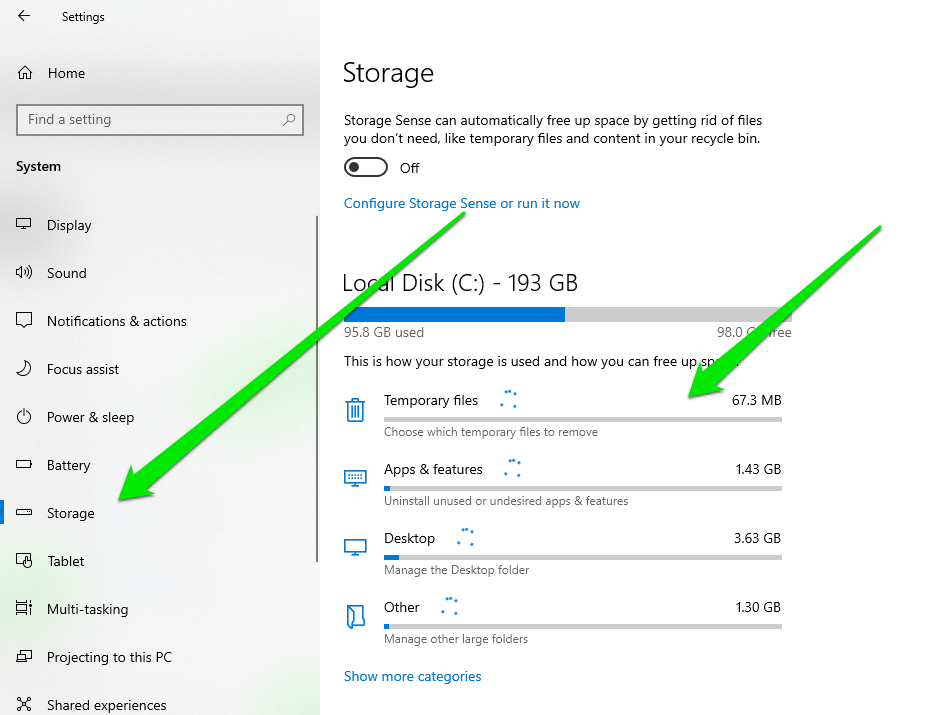
- Open Settings.
- Click the System icon after the Settings page appears.
- Go to the left sidebar and select Storage under System .
- Next, switch to the Storage page and click the Temporary files category.
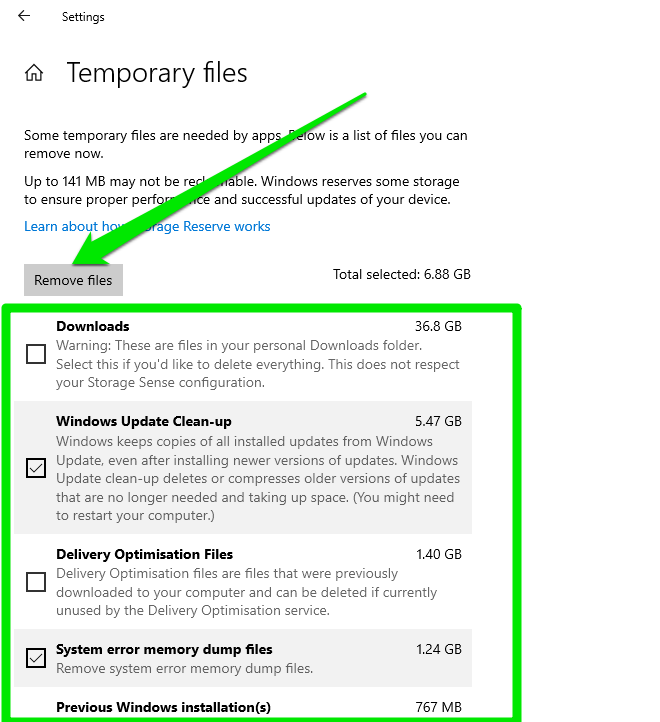
- Allow Windows to calculate the temporary files and display them. You’ll see the total size of all the files within each category.
- Next, select the files you want to remove by clicking their checkboxes and the Remove files button.
Inside Storage, you’ll find the Storage Sense feature. It’s a built-in tool to help you automatically free up space by deleting files you don’t need, such as temp files and contents in your Recycle Bin.
You can set Storage Sense to run every day, week, or month and empty your Recycle Bin every 1, 14, 30, and 60 days. Furthermore, you can set the utility to delete files in your Downloads folder at your preferred specific time.
Just toggle the button and adjust it to your preference, and you’re good to go.
Method 4: Use Temp folders to delete temporary files
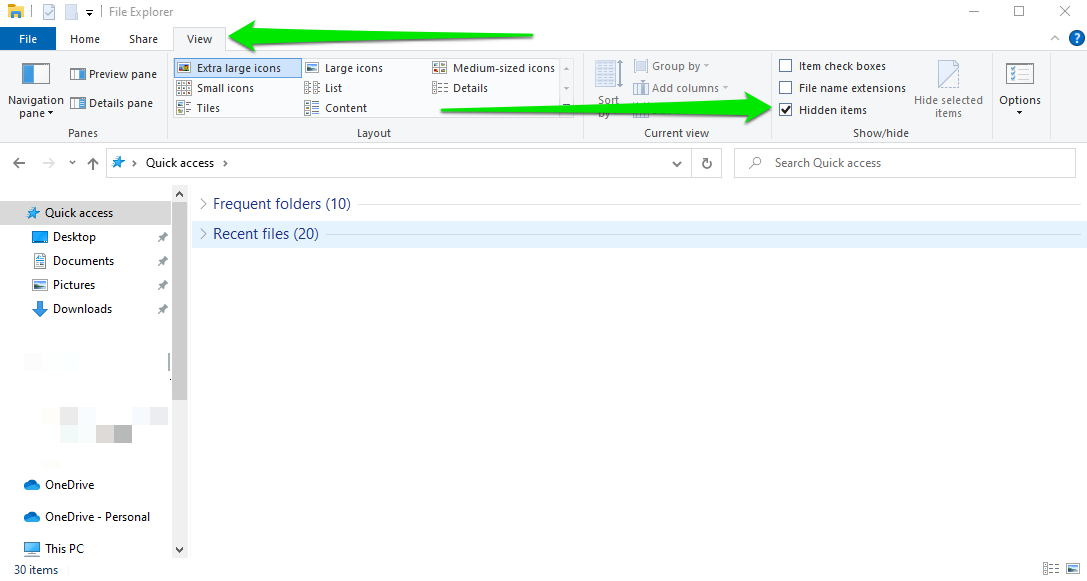
There are two Temp folders in your computer where programs and the operating system store temporary files. Installed applications use one folder, and Windows uses the other. They hold files created during installation, gameplay, browsing, and general app usage. Some user logs and additional information that may no longer be needed are also saved in these folders. You can easily delete these files through File Explorer or Command Prompt . Here’s h ow to clear temp file s using these alternatives: Using File ExplorerFirst, you have to show all your hidden files and folders. These steps will guide you:
- Press the
Win + Ehotkey to open the File Explorer window. - After File Explorer opens, go to the ribbon menu and switch to the View tab.
- Now, check the box beside Hidden items in the Show/hide section.
Now, follow these steps to remove your computer’s temporary files:
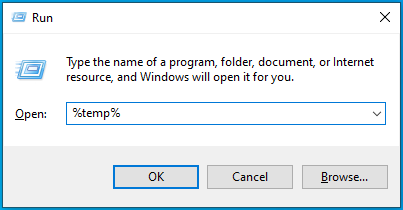
- Use the
Win + Rhotkey to call up the Run dialog box. - Type
%temp%into the text box and tap theEnterkey or click the OK button.
This command will open the following folder: C:\Users\YOUR_USERNAME\AppData\Local\Temp. This folder mainly contains temporary files created by your applications.
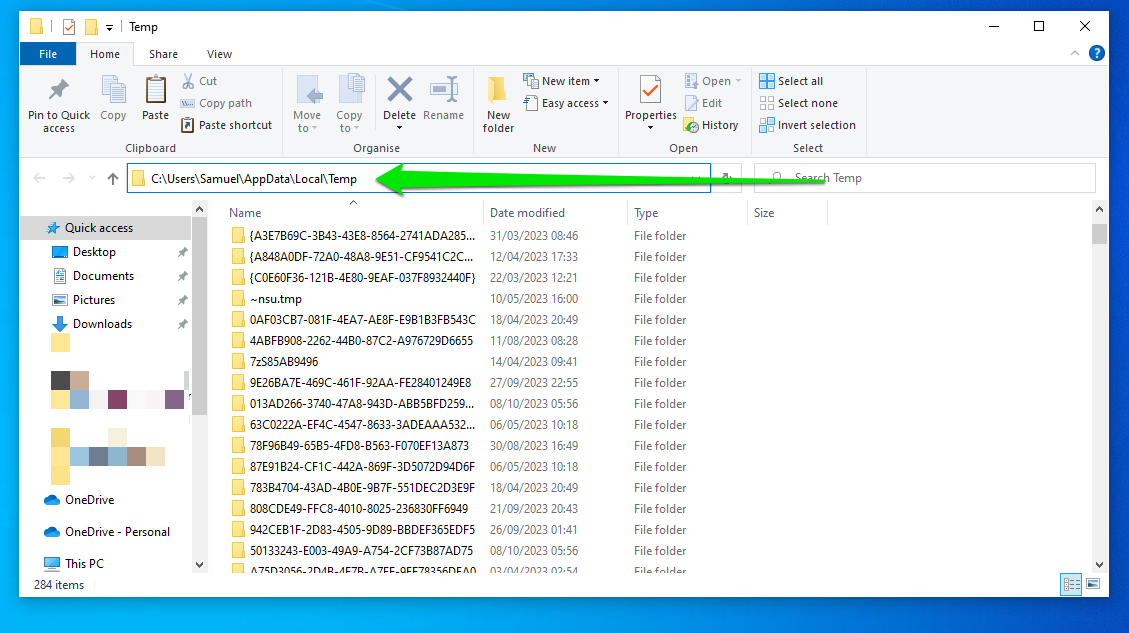
- Now, select all the files in the folder using the
Ctrl + Ahotkey. - Right-click and select Delete or tap the Delete button. You may have to click Continue to allow access.
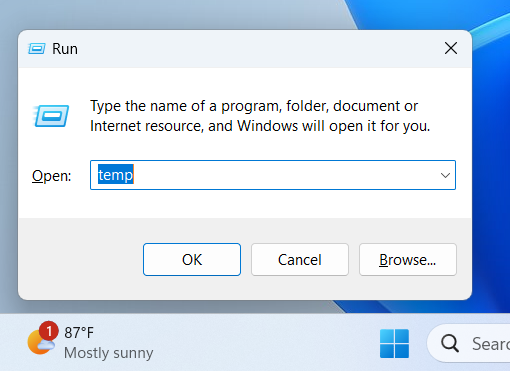
- Now, open the Run dialog box again, type
tempinto the text box, and hitEnter.
- The command will open the following folder: C:\Windows\Temp . This folder contains temporary files created by Windows.
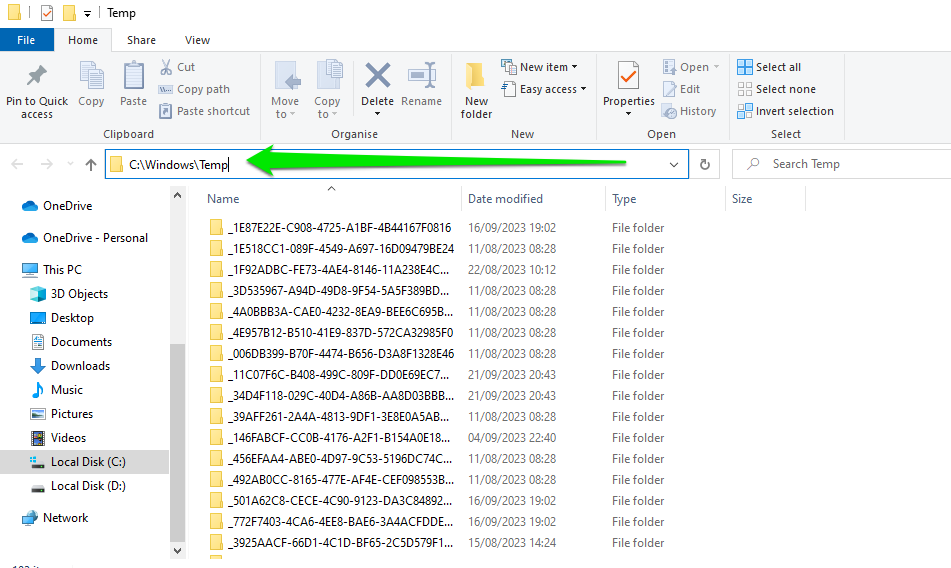
- Now, select and delete all the files in the folder.
Using Command Prompt
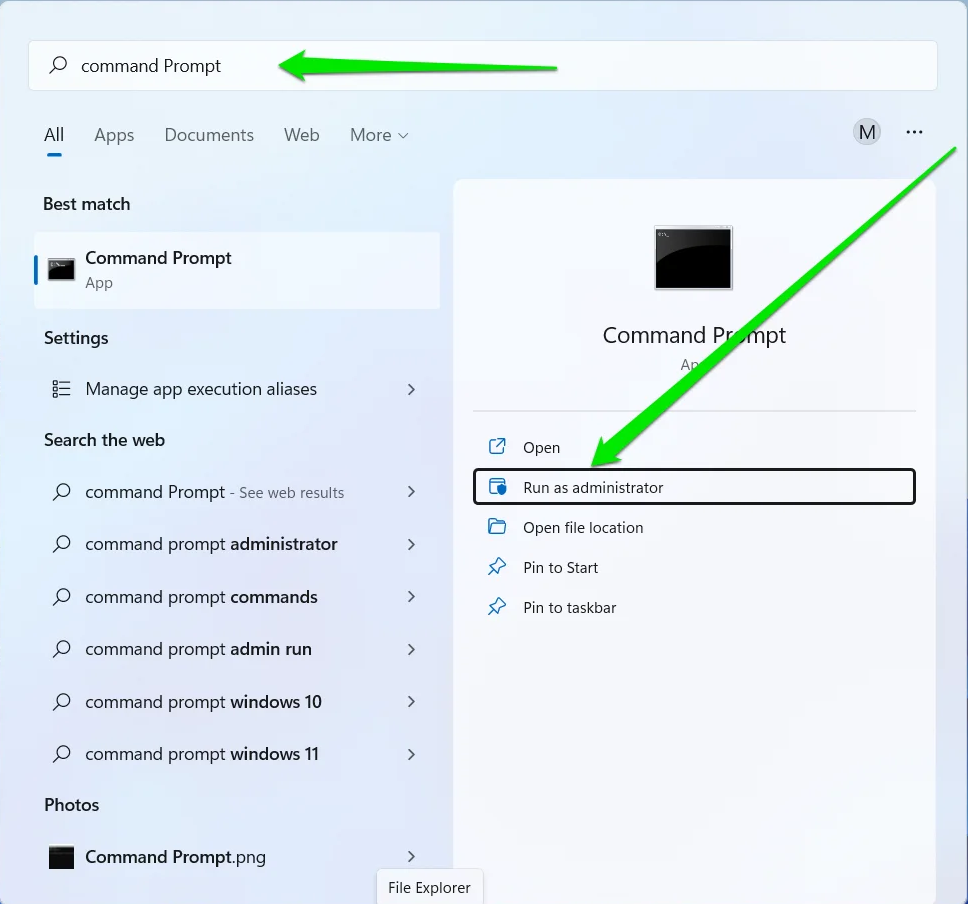
- Go to the Start menu and type
Command Prompt. - Click Run as administrator on the right under the Command Prompt result.
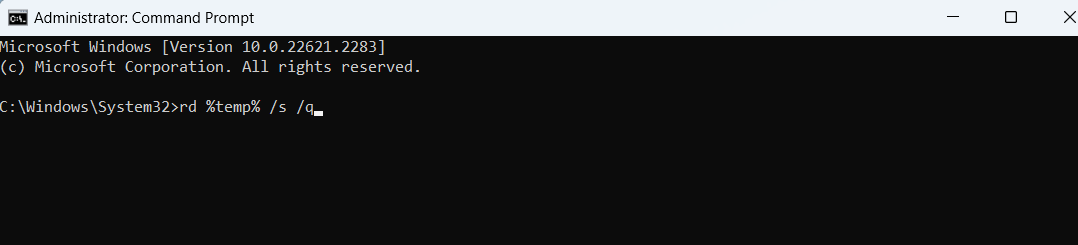
- After the Command Prompt window appears, type the following command line and hit the
Enterkey:
rd %temp% /s /q
- You can point Windows to the specific Temp folder if the %temp% command doesn’t work for any reason. To do that, type in the full path to the folder. The command should look like this:
C:\Users\YOUR_USERNAME\AppData\Local\Temp
- Do the same for the Windows Temp folder.
If you want to know how to remove temporary files the easy way, use Auslogics BoostSpeed.
Additionally, it deeply cleans all your drives and helps to optimize space by completely uninstalling programs and apps, finding duplicate and large files, and defragmenting your drives.
Is It Safe to Delete Temporary Files?
It is generally safe to occasionally delete temp files because they are temporary by definition. That means programs create the files knowing that they will be discarded. Critical components are not attached to the files as a result.
That said, you should take some precautions to not delete critical and non-temporary files in your quest to do your housecleaning. This is where third-party utilities like BoostSpeed come in.
It does a good job of making sure important files are not deleted.
Also read:How to Delete Temporary Internet Files?
Why Should You Delete Your Temporary Files
Should you delete temp files? Yes, and these are the reasons why:
- Get more space on your PC. Temporary files can accumulate to the point that you no longer have enough space to save work files. Also, your computer requires an amount of free space for optimal performance.
- Boost your PC performance. Your system needs enough space for processes to run smoothly, such as virtual memory , search indexing, thumbnails, updates, and temporary files. Third-party applications will also continue to create new temporary files as they work. So, you have to clear files that are no longer needed to create space for your applications and OS to function optimally.
- Resolve any issues with the system software. Sometimes, the problems you encounter with the software are because the temporary files are corrupted. So, when an app accesses these files, it gets an error, causing various issues.
- Secure your privacy. Temp files usually contain sensitive information, like cached web pages, form inputs, or documents you’ve not saved. Unauthorized parties can access potentially sensitive information if they know where to look and if the data is available.
- Information updates. Sometimes, Windows and other applications display cached content instead of fetching real-time data whenever you query information you used before. Deleting the cached files will force them to get the new, updated information.
How to Delete Temporary Files: Explained
I’ve shown you how to delete temp files, and it’s a good practice to remove them regularly. This helps to keep your system running smoothly. Whether you use Auslogics BoostSpeed, the Disk Cleanup tool, or Command Prompt, they will ensure your PC remains clutter-free.
If you have any questions you need answers to, let us know in the comments below! Also, please share it with your friends who might find it helpful!