![[StepbyStep Guide] How to Perform a Clean Boot on Windows 10/11 to Resolve Conflicts](https://www.auslogics.com/en/articles/wp-content/uploads/2024/10/admin-ajax.php-4-2-e1743057179762-568x342.webp)
Every PC runs into technical issues at least once in a while. But it can be frustrating if you do not know what the problem is. Even though Windows has a troubleshooting program, sometimes it may not fix complex errors. A better alternative is to perform a clean boot. The clean boot restarts your computer with the bare minimum of drivers and software your PC needs to boot so you can find out what the problem is. Let’s take a look at how to do a clean boot.
What Is a Clean Boot?
A clean boot allows you to launch your system with the barest minimum Windows needs to run. That is, your computer boots with just the drivers and software that Windows needs to start.
Performing a clean boot on Windows 11 or 10 will disable all of your non-essential apps temporarily. This means a lot of your apps will be unavailable in the clean boot mode, but then, it gives you a safe environment to find and fix issues with Windows.
If the clean boot is successful, you can rule out the operating system as the problem. Now you can carefully find the program that may be causing issues so you can fix these errors appropriately.
Safe Mode loads only the essential Windows drivers and services, creating a minimal environment primarily used for troubleshooting severe system issues. You can find and fix hardware or software problems that may prevent Windows from starting properly.
A clean boot, on the other hand, is designed to help troubleshoot software conflicts in a basic setup environment with only the essential drivers and startup programs running. It’s particularly useful for isolating software conflicts caused by third-party tools since it maintains more system functionality than Safe Mode.
| Feature | Safe Mode | Clean boot |
|---|---|---|
| Purpose | Troubleshoots severe system issues, like faulty drivers or software preventing Windows from starting | Troubleshoots software conflicts, especially those caused by third-party applications |
| Graphics | Limited, with basic visuals and minimal graphics drivers loaded | Better graphics compared to Safe Mode |
| Best use-case scenario | Diagnoses issues like faulty drivers and serious system failures | Isolates software conflicts and third-party application issues while maintaining most of the system’s functionality |
| Access to applications | Restricted. Many applications won’t work or be accessible | More applications are accessible compared to Safe Mode |
| Functionality | Limited functionality; focuses primarily on system-level troubleshooting | Maintains basic Windows functionality, which makes it easier to interact with the system and resolve software issues |
Is It Safe to Perform a Clean Boot on Windows 10/11?
Performing a clean boot on Windows 10 or 11 is safe, provided you do it the right way.
First, clean boot is a built-in Windows feature for troubleshooting. That goes to tell you how safe it is. Usually, the process will not modify your core system files or damage anything. All the changes you make in the process are temporary and restricted to the environment.
Of course, there may be a few concerns, especially if you do the wrong thing.
For instance, if you disable the wrong service, you might notice some issues. But then, these issues are usually temporary, and rebooting will most likely fix them.
Another alternative might be to create a restore point.
Step-by-Step Guide: How to Perform a Clean Boot in Windows 10/11
- Make sure to sign in as an administrator. Otherwise, you won’t have enough privileges to do a clean boot.
- Search Run and type
msconfig.

- Press
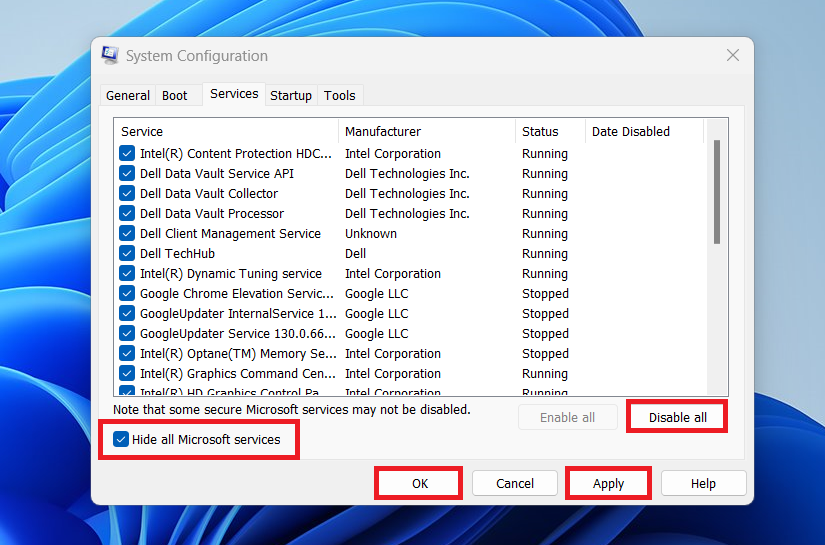
Enterto launch System Configuration. - Go to the Services tab and check the box located next to the Hide all Microsoft services option. Click Disable all.
- Proceed to the Startup tab, then click Open Task Manager.

- Go to the Startup tab and disable all the items present by selecting each item and clicking Disable .

- Close Task Manager.
- Once in the Startup tab in the System Configuration box, click OK .
- Restart your computer by right-clicking the Power icon and selecting Restart.
Once in a clean boot environment, you can carry out what is needed for troubleshooting your issue. The steps to perform depend on the problem you are having, so make sure you know what to do.
How to boot your Windows after a clean boot
Having done a clean boot in Windows 10 and 11, start your PC normally:
- Go to Start and search for Run. In the Run dialog box, type
msconfig.
- Click
Enter. - Proceed to the General tab, and there select Normal startup .

- Navigate to the Services tab and uncheck Hide all Microsoft services. After that, click Enable all.

- Open the Startup tab. Then select Open Task Manager.
- Enable all startup items.
- Finally, save all your changes and restart your computer.
These processes can identify and fix file system errors, bad sectors, or other disk-related problems that may be causing system instability or performance issues.
If this does not work, you may want to consider a factory reset .
Issues You May Face When Performing a Clean Boot on Windows 11/10
Performing a clean boot on Windows 11 or 10 is generally easy. But even then, you might encounter some of these common issues:
- Applications may not work: Since a clean boot disables non-essential services and startup programs, some of your applications may not function as expected in the clean boot state. However, the moment you reboot, everything should be back to normal.
- System instability: A clean boot is intended to help stabilize the system. However, running Windows with only minimal services can sometimes cause system instability. Without certain background processes, the system may behave unexpectedly or crash during certain tasks.
- Difficulty remembering which services to enable: Some users may find it difficult to remember which services to turn on again or even how to revert back to the normal startup. This is why it’s important to properly understand how to do a clean boot before you start the process. You can take a screenshot or make a list of all the activity services before proceeding.
- Misidentifying the culprit: Isolating the specific service or program causing the conflict can be tricky. Just because the computer works when you disable an app or service does not necessarily mean you found the problem. In some cases, you could be dealing with multiple sources. You have to be methodical. Re-enable one service at a time and observe the system’s behavior. It’s slow, but it works.
- The problem may reappear: In some cases, issues might seem resolved during a clean boot but reoccur when you re-enable services. This might indicate that the problem was masked rather than fixed. You can run the Windows Memory Diagnostic or run the Windows hardware troubleshooter if you suspect it’s the hardware. You may need to conduct further investigation to pinpoint the underlying issue.
Why Do You Need to Perform a Clean Boot in Windows ?
The main reason most people perform a clean boot on their Windows PC is to find and fix conflicts with third-party software. However, beyond finding conflicting apps, performing a clean boot can help you achieve more:
- Resolving startup issues: If your PC is experiencing slow startup times or fails to boot properly, a Windows clean boo t can help determine if a startup program is the culprit. It allows you to systematically re-enable services until you find the problematic one.
- Improving system performance: Temporarily disabling non-essential startup items can significantly speed up your system. This is because, even when your computer seems idle, it might be running lots of background apps and processes. And some of these consume lots of computing resources. So, with a clean boot, you can find such apps taking up resources. It can also come in handy when you need maximum system resources for specific tasks like gaming or programming.
- Installing problematic software: If you are having issues installing software, probably because of background conflicts, maybe you can run a clean boot and disable the conflicting app. That way, you can install your software successfully without any issues.
- Running antivirus scans: Performing a virus scan in the clean boot mode can be more effective as it reduces the chance of malware hiding behind other running processes. It also allows antivirus software to access files that might be locked during a normal boot.
- Uninstalling stubborn programs: Some programs may resist uninstallation because they are tied to some running processes or services. A clean boot can help you fix this by ensuring these interfering processes aren’t active. That way, you can completely remove the software.
How to Perform a Clean Boot: Explained
Performing a clean boot on Windows 10 or 11 is a great way to get your computer back in shape. The process works well and can help you find issues related to third-party software conflicts. It is relatively safe, so you can run it whenever you suspect there are problems. However, whenever you try this, always remember to back up your files.
Finally, we would like to hear from you; did this solve the problem? If yes, tell us, how easy was the process?