
If you’ve bought a new processor or have never tested your old one, running a test shows you whether it is more or less powerful than you believe it is. The test can also expose stability and other problems that you can resolve to prolong the CPU’s life.
This article will cover the nitty-gritty of CPU stress testing, showing you what to do before and after running a stress test.
What Is the CPU Stress Test?
CPU stress testing is a process that pushes a computer’s central processing unit (CPU) to its limits to assess its computing performance. This test aims to ensure the CPU can handle high usage scenarios by running complex calculations that maximize CPU usage.
It’s like putting a car through a high-speed, endurance race to check how much its engines can endure under extreme conditions. The process involves using software programs that simulate real-life heavy usage. These tools subject the CPU to heavy computations and complex processes, typically for prolonged periods.
Why Stress Testing Your CPU?
Stress testing your CPU can be useful for several reasons. Let’s cover them.
- Understanding CPU capability
One of the primary reasons for stress testing your CPU is to ensure it can handle the most demanding tasks. This is especially important if you intend to run heavy processes like video editing, 3D rendering, or scientific simulations. The stress test will help you understand how many of these tasks your CPU can handle at once and for how long. That way, you’ll know when to allow your PC to cool down.
Also read: CPU Cores Explained: Does the Number of Cores Affect CPU Performance?
- Identifying potential issues
Stress testing can help predict hardware failures before they happen. For example, if a CPU begins to show instability at lower loads than it previously handled with ease, it might be an early warning sign of impending failure. This early knowledge allows you to take proactive measures.
- Benchmarking
Most stress testing tools provide numerical results to allow you to compare your CPU against others. For example, if you previously used a computer to comfortably run specific programs, you can use benchmarking tools to check how your new computer compares.
- Thermal management
Your CPU generates heat whenever it runs demanding tasks. When it produces excessive heat, it suffers throttling , which means its performance drastically reduces. That is why your computer is fitted with a cooling system to dissipate that heat.
Related: Why Is My Computer Overheating? Top Reasons and Effective Fixes
Most cooling systems are adequate under normal conditions. However, intense workloads may expose your cooling system’s weaknesses. Running the stress testing tool will allow you to know when to upgrade, replace, or clean the cooling system . That is because you need a reliable cooling unit to allow your CPU to handle heavy loads for long periods.
Also read: How to Cool Down Your CPU Through the Windows Registry
- Overclocking and undervolting
If you want to overclock your CPU to squeeze out extra performance, you need to stress test your overclocking configuration to ensure the processor can handle extended periods of heavy usage without issues. Apart from stability, stress testing also helps you confirm whether temperatures remain within safe limits. The same goes for undervolting . If you plan to reduce CPU voltage, stress testing will show you if your processor can still operate stably under intense workload.
Further reading: The Why and How of Computer Stress Tests: A User’s Handbook
How to Choose the Right CPU Stress Test Tool
Choosing the right CPU stress test tool depends on your specific needs. Consider compatibility with your operating system, the level of stress you want to apply, and whether you’re interested in running GPU and CPU stress tests simultaneously.
Also read: How to Stress Test GPU for Peak Performance
You may want to look for tools that provide detailed metrics and are regularly updated to support the latest hardware. Additionally, you can run tools with benchmarking capabilities to compare your CPU’s scores against others.
Preparation Before CPU Stress Testing
Do the following before running the stress testing application:
1. Back up important data:
While stress testing is generally safe, there’s still a risk of crashes and system instability that may lead to data loss. So, back up files that are too critical to lose before initiating the test.
2. Update system software:
Ensure you update your drivers , Windows, and BIOS/Firmware. Outdated software can affect the stress test result negatively, showing you wrong information about your CPU’s true capabilities.
3. Close applications:
Quit every open application that isn’t essential to Windows. You can use the Task Manager to identify and close them, including background processes .
4. Ensure your cooling system is reliable:
Make sure your cooling system is dust-free and doesn’t have gunk or blockages (if you use liquid cooling). That way, you can rest easy about temperature results or troubleshoot other problems with the cooling system.
5. Document baseline temperature and performance:
Check your system’s temperature and performance while idle to establish a baseline. You can use tools like Ryzen Master (for AMD CPUs), HWMonitor, or Core Temp to track clock speeds, voltages, and temperatures. You can use the Task Manager to check how many percent of your CPU is being used.
How to Perform a CPU Stress Test
Every CPU stress testing tool has different processes. However, these steps will show you the general procedure on how to test CPU performance.
- Choose a stress testing tool: Select a tool that fits your requirements, as mentioned earlier.
- Set up your monitoring tools: Run the monitoring programs that you will use to measure temperature and clock speeds.
- Run the test: Most tools offer a simple interface to start the test. Some may allow you to adjust settings, such as the number of threads to use or the test duration. Enter your settings before clicking the start button.
- Monitor your system: Use your monitoring software to keep an eye on temperatures, system voltages, CPU usage, and clock speeds while the tool runs the test.
- Evaluate stability: If your system crashes, freezes, or displays errors, it may indicate instability at current settings or cooling issues.
- Adjust and retest: Based on your results, you may need to adjust overclocking settings or improve cooling before testing again.
How to Use Different CPU Stress Test Software
To give you an actual idea of how things work, we’ll show you how to start the stress testing process using different tools.
Cinebench
Cinebench is a benchmarking tool that tortures your CPU for a short period and produces a score. You can use the score to compare your processor’s performance against others.
You can check your CPU’s single-core and multi-core performances using the tool.
There are different iterations of Cinebench, including Cinebench R23 and Cinebench 2024. Both have similar offerings, but Cinebench 2024 also allows users to stress test their GPUs.
Here’s how to use the tool:
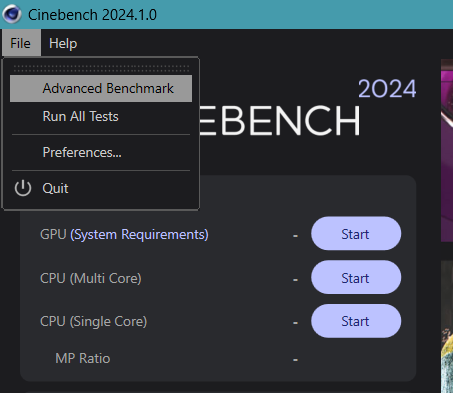
- Download and run Cinebench.
- Click the Start button beside CPU (Single Core) or CPU (Multi Core), depending on the test you want to run. You should ideally run both.

- Each test will run for roughly 10 minutes and produce a score.
However, you can run it for longer to stress your CPU and assess its stability under heavy loads. Here’s how:
- Click File and select Advanced Benchmark.
- Go to the Minimum Test Duration drop-down menu and select 30 minutes (Test Stability).
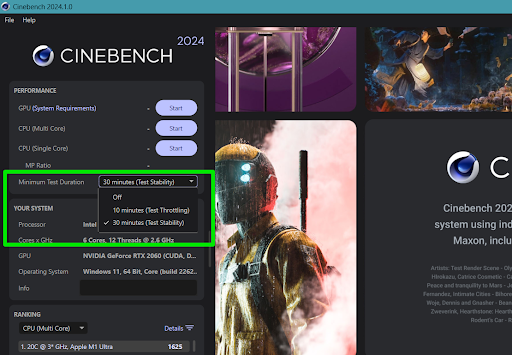
- You can now start your test.
HeavyLoad
HeavyLoad is a free and lightweight PC stress testing tool that allows you to stress your CPU and choose different parameters.
Follow these steps to use it:
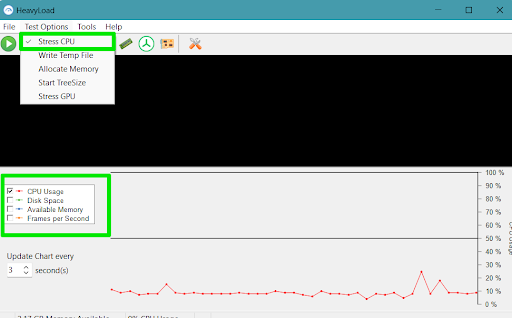
- Download and run HeavyLoad.
- On the main page, you can check the CPU Usage, Disk Space, Available Memory, or Frames per Seconds boxes to see relevant charts and information while the program runs the test.
- Click the Test Options menu at the top of the window and check only “Stress CPU.”
- Go to Tools and select Options.
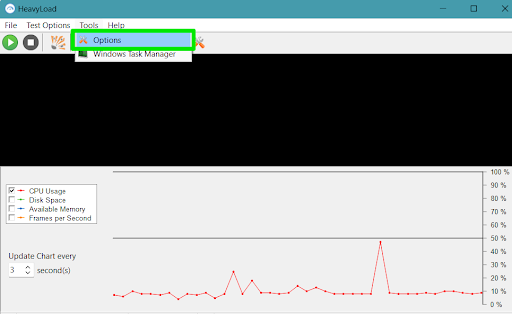
- Now, under the CPU tab, select the number of logical cores you want to stress and click the OK button.
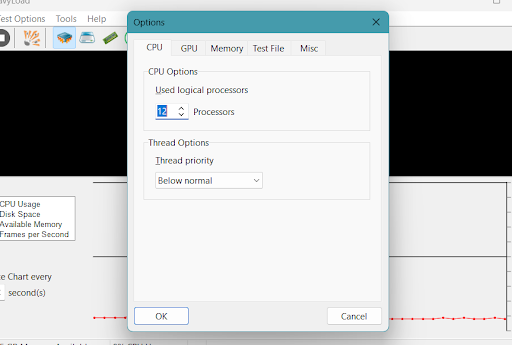
- Click the play button to start the test.
PowerMAX
PowerMAX is another free stress testing program that can help you test your CPU to help you measure stability. The tool does not provide benchmarking scores for performance and stability. The tool’s user interface is straightforward as it allows you to choose the CPU’s instruction set extension to base the test on (SSE or AVX) and the duration of the test. You can run both instructions to measure your processor accordingly.
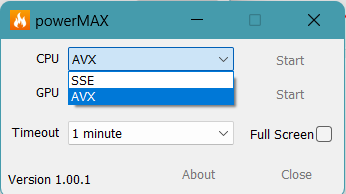
Be careful while using this program as it can potentially cause damage. You’ll see a warning once you launch the tool, which tells you how serious the test can get.
Prime95
Prime95 is a well-known program for testing CPU stability. The interface is simple enough, and you won’t face any roadblocks to testing.
Follow these steps:
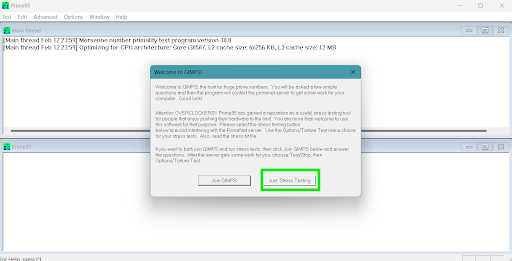
- Download and run Prime95.
- Once you launch the tool, an invitation to join the GIMPS project will appear on the screen. Click Just Stress Testing.
- You should now see the Run a Torture Test dialog window.
- Choose the number of threads you want to stress test.
- Select Blend (all of the above). This option allows you to test your processor and memory allocation. Use the Custom option to set your own test parameters, but only do that if you know what you’re doing.
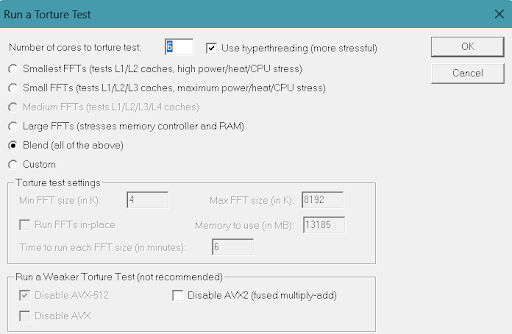
- Click OK.
Understanding Stress Test Metrics
Important metrics to monitor during a CPU stress test include CPU temperature, clock speed, and voltage.
- High temperatures indicate inadequate cooling, while voltage levels affect power consumption and heat output. Clock speed variations can show how well the CPU maintains its performance under load. Some tools also provide error logs that can help identify specific issues.
- While stress testing, ensure you use hardware monitoring tools to keep tabs on temperature and performance, especially when the stress testing tool does not have monitoring capabilities.
Further reading: How to Stop a Laptop from Overheating
Tips for Optimizing CPU Performance
If you notice that your computer isn’t hitting the standards you expect it to or fail a CPU stress test , there are different ways to get it up to speed and even squeeze more performance out of it.
- Get rid of old and unnecessary files: Some temporary and junk files can use up CPU resources. You can use tools like Auslogics BoostSpeed to ensure you don’t have such problems.
- Cooling: Ensure your CPU has adequate cooling, considering air or liquid cooling solutions for better thermal management.
Further reading: How to Cool Down Your Laptop: Overview of Methods with Pros and Cons
- Overclocking: Overclocking helps you boost your CPU performance by adding extra clock speeds.
- Always keep your computer up to date: Windows and PC manufacturers often release updates that improve stability and performance. These include cumulative, quality, and feature updates deployed by Microsoft and BIOS/Firmware and driver updates released by OEMs and device manufacturers.
Also read: How to Manually Check and Install Windows Updates
- Optimize settings: Adjust power settings and disable unnecessary startup programs to ensure maximum performance and reduce CPU load.
Further Reading:Stress Test Secrets: How to Stress Test RAM Right
Conclusion
CPU stress testing is an essential practice if you want to confirm your system’s reliability and performance under heavy load. By carefully selecting the right tools, preparing your system, and understanding the results, you can identify potential issues before they become serious problems. Remember that the goal is not just to push your system to its limits but to ensure it can handle whatever you throw at it with stability and efficiency. Use the comments section below to share your stress testing experience with us.