Apart from function, these systems typically look cooler than their air counterparts. Pairing sophisticated custom loops with radiant coolants almost always produces cooling systems that dazzle as much as they chill.
But these advantages wilt away without maintenance. If you overlook the system for too long, you may notice dirt and gunk in your cooling system. These contaminants can potentially spoil the system’s look and performance.
This article will show you how to clean a water cooler and the importance of PC liquid cooling maintenance .
How Does a Water Cooler Work in a PC?
PC water coolers work by circulating liquid (called coolants) through a closed loop to dissipate heat from CPUs or GPUs. While there are different liquid cooling configurations, the typical cycle involves heated water flowing from the cold plate to the radiator and then back to the cold plate after it cools down.
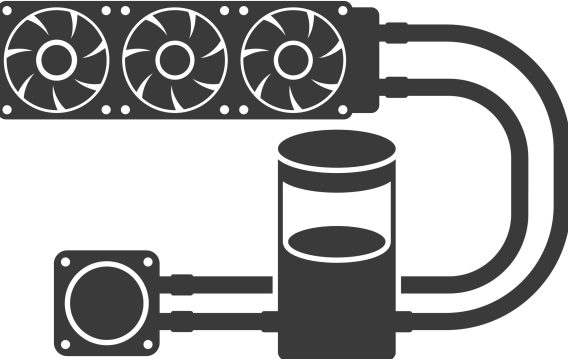
You’ll understand better when you know the role of each component in the system:
- Coolant: The liquid coolant used in these systems is a mixture of water and additives (like anti-corrosion and anti-algae agents) to improve thermal conductivity and prevent issues such as corrosion and microbial growth.
- Water Block (Cold Plate): This is a metal component that directly interacts with the CPU or GPU’s metal plate, known as the Integrated Heat Spreader (IHS). Heat is transferred from the IHS to the liquid coolant through the cold plate and with the help of a thermal paste.
- Pump: The system’s pump is responsible for circulating the liquid coolant through the closed loop. The pump is typically integrated into the water block in typical cooling systems. However, it can be attached to the reservoir in custom loops.
- Tubes: The liquid travels through flexible tubes that connect the water block to other components in the loop.
- Radiator: The heated coolant flows into a radiator, which is equipped with fins that help dissipate heat. Fans attached to the radiator assist in the cooling process by blowing air through the fins.
- Reservoir: Complex cooling systems, such as custom loops, are fitted with reservoirs. They are containers designed to hold extra coolant. The extra liquid replenishes coolant lost to evaporation, and the reservoir can let out air bubbles.
You should note that some systems work slightly differently from others. For example, all-in-one (AIO) sealed cooling solutions contain radiators, tubes, pumps, and water blocks in the same housing.
📌 Also read: Essential Rules: How to Stop Your Laptop from Overheating Now and Forever
Why Is It Important to Clean a PC Water Cooling System
Debris, sediments, and other particles can build up over time and block water passages if you do not properly maintain your cooling system.
The cooling system could also become corrosive, which can cause damage to radiators, water blocks, and other components.
Tubes could also be affected, causing leaks that severely impair internal and expensive PC components, such as the GPU.
You can prevent these issues when you properly flush and clean your cooling system. Maintenance also helps preserve your PC’s aesthetics, prolong the cooling system’s lifespan, and keep your system’s noise low.
You do not necessarily have to refill or replace your liquid cooling system’s coolant routinely. Most all-in-one systems are designed for set-and-forget operations that could last years. Even custom loops can run with the same coolant for an extended period.
However, replacing the coolant may be a good idea if you notice discoloration, poor cooling, and pump noise. You may also have to refill the system if you’re running a custom loop and notice a reduction in the coolant.
📌 Related: How to Clean Your Computer: An Easy DIY Guide for Every User
Is It Safe to Clean a PC Water Cooler?
Cleaning a PC water cooling system is generally considered safe as long as you do it correctly and take proper precautions. The process carries inherent risks, such as liquid leaks, damaging the CPU, GPU, and other ancillaries.
It’s also possible to break some components in the cooling system if you do not handle them correctly or clean them with suitable materials.
However, avoiding water cooling maintenance due to the risks involved is far more costly. So, ensure you follow the proper procedure to clean the loop. If you’re not confident about cleaning the system, contact an expert for help.
How to Clean Your PC Water Cooling System
How do you clean a water cooler? There are specific steps and precautions that you must follow, and you need to get your work tools ready. We’ll show every step in the process.
Step 1: Prepare your workspace and tools
The first step is preparing your tools and the area where you’’ll clean the system.
Ensure the area is clean and dust-free, and make sure you have adequate lighting. You should also work on a stable surface and create provisions to raise your PC to aid with draining.
Your work materials should include:
- Distilled water for flushing the system
- Squeeze bottle or syringe
- A drain pan
- A screwdriver
- A microfiber cloth
- Isopropyl alcohol
- Soft tube with fitting for removing the coolant from the system
- Soft toothbrush for scrubbing water blocks
- Dishwasher detergent
Step 2: Drain the loop
Draining the loop is where you start, whether you want to replace the coolant or clean the water cooling system.
Follow these steps to drain the system properly:
- Turn off your PC: You must turn off the computer and unplug it from its power source before you begin.
- Locate drain port: The liquid cooling system’s drain port is the main water outlet. It is a fitting or valve typically located at the lowest point in the loop. You can consult the system’s manual or documentation for guidance on how to find the port.
- Prepare containers: Place your drain pan or bottle beneath the drain port to catch the coolant. You can elevate your computer to ensure the coolant properly leaves the loop.
- Connect the tube to the drain port: You’ll leave a mess if you attempt to pour out the coolant directly into the container. Instead, connect a soft tube to the drain port to allow the coolant to flow safely into the container.
- Open the drain port: Most drain ports have a handle or knob that you can use to open the pipe. Make sure you do that after connecting the tube to the port.
- Open the reservoir cap: If your cooling system has a reservoir, open the cap to allow air to enter and speed up the draining process. The cap should be at the top of the reservoir. It’s also called the fill port in most systems.
- Drain the coolant: Allow the coolant to flow into the containers. Tilt the case or system slightly to encourage drainage from various components.
You may notice that some tubes and components still contain water. In that case, you can close the drain and fill ports and tilt the PC even more to allow the coolant to enter the reservoir from the GPU and CPU water blocks and the radiator.
You can also blow air into different ports in the loop to force the remaining coolant out of different areas. Blowing air should help if your cooling system is complex. Remember to close the fill port before blowing air into the loop.
- Close the drain and fill ports: Once the loop is drained, close the drain and fill ports securely. Ensure that any valves or fittings are tightened to prevent leaks.
Step 3: Flush the loop
You need to flush the loop numerous times to get rid of gunk and other build-ups in the cooling system. Here, you need distilled water and a loop cleaner. Your loop cleaner can be a white vinegar mixture or a loop cleaning product produced for that specific purpose.
Now, pour the distilled water into the reservoir and turn on your computer. Run the distilled water through the loop for a couple of hours to get it circulated. You can also use a transparent coolant to flush the loop.
Running a CPU or GPU benchmark program can help heat the coolant to flush the system properly. Heating the transparent coolant or distilled water can help you check for minor leaks, as most cooling tubes leak when the coolant reaches its peak temperature.
Next, drain the distilled water, add your vinegar or other flushing solution to the cooling system, and flush.
After completing the flush, you can add your new or old coolant to the loop.
Step 4: Clean cooling system components
Sometimes, flushing the cooling system may not be enough, especially if you’ve used it for more than two years. You may need to detach and clean your water blocks, radiator, and pump to remove gunk and other contaminants from those tight areas.
- Remove and Clean Water Blocks
You must be careful while removing the water blocks to avoid water spilling into your internal components. First, ensure you’ve completely drained the cooling loop, as shown above, before disconnecting the pipes attached to each block (if your GPU and CPU are connected to the loop).
Then, for good measure, place paper towels on the exposed GPU and CPU as you disconnect the pipes. That way, the towels will collect drops of remnant coolants or water that escape the tubes.
You only need a soft toothbrush and dishwasher detergent to clean your water blocks. That said, you may need to use a more acidic mixture like white vinegar to clean a copper water block. But ensure the white vinegar’s percentage is smaller (5% is usually enough) than the distilled water.
If your water block is nickel-plated, please stick to the detergent, as acidic solutions can destroy the plate. Now, use the toothbrush to scrub the water block properly.
After that, flush the block with water and rinse it further with distilled water. Next, you can use a paper towel to dry the block, as it must be completely dried before you reinstall it.
If you use a plexi water block top, ensure you use only soap water, as other aggressive materials, such as alcohol, can cause damage.
- Clean the Radiator
The radiator is the device responsible for cooling the hot liquid. While flushing the loop can also replace the radiator’s content, you may need to remove it to clean it properly. Be careful when detaching the tubes from the component, and ensure liquid doesn’t leak into your PC housing.
You can use compressed air to blow out any debris or dust in the device and wipe the tubes and fins using a microfiber cloth. You can also add liquid to the radiator’s ports, close the ports, and shake the device. Completely drain the liquid, then repeat the process three or more times before reinstalling the radiator.
📌 Related: Enjoy a Dust-Free PC: Expert Tips on How to Clean a Computer
- Clean the Pump
The pump is the cooling system’s device that circulates the coolant through the loop. It can sometimes contain gunk and other debris that regular flushing may not eliminate.
You can carefully disconnect the tubes from the pump and unplug your PC’s power. You can rinse it with distilled water, clean residues and stains with isopropyl alcohol, and clean it with a soft cloth. The pump must be completely dry before you reinstall it.
- Run the Reservoir Pump
Before you connect the pump and turn on your computer, it is recommended to run it separately to check for leaks. That way, you won’t risk damaging your PC’s components. You can directly connect the pump to the power supply using a 24-pin short.
The component allows you to connect the Molex connector pump directly to the power supply instead of powering the motherboard first. After confirming that everything checks out, go on to refill the system with your coolant and turn on your PC.
Conclusion
Keeping your cooling system clean is the surest way to maintain top performance for gaming, rendering, simulation, and other heavy tasks. You can perform regular maintenance by checking for wear and tear and contamination from time to time.
You can tell us about your water-cooling experience through the comments section below and share other tips you may have discovered while cleaning your loop.