![[FIXED] How to Fix Scanning and Repairing Drive Stuck Issue on Windows 10/11?](https://www.auslogics.com/en/articles/wp-content/uploads/2023/08/shutterstock_1761276203-2-1-e1739942117562-568x359.jpg)
Among the most frequently reported Windows 10 errors is the error message that appears on startup and says, “Scanning and repairing drive.”
Sometimes, the error message gets stuck on the screen, preventing your PC from booting properly.
Some users have even reported getting this error message every time they turn on their PC. Naturally, this can get quite annoying — but the problem is easily fixed.
From this article, find out why Windows is scanning and repairing your drive on booting and how to stop Windows from scanning and repairing the drive.
Why is Windows Scanning And Repairing Drive on Booting?
You will typically get the “Scanning and repairing drive” message when your computer hasn’t been properly switched off: due to a forced shutdown, a power failure, etc.
Why does it happen? When you work on your PC, your hard disk and RAM write and read data.
If your computer shuts down unexpectedly, you may lose some of the data stored in RAM — in the worst-case scenario, this can even lead to hard disk damage.
Thus, when you turn on your computer after an “improper” shutdown, Windows automatically scans your driver, trying to fix the issues that occurred during the shutdown.
Finally, we remind you that if you have a habit of performing forced shutdowns, it’s better to stop this practice to avoid potential startup errors—like the one described here.
Also read: Where and How to See the Shutdown and Startup Log in Windows 11 and 10?
How to Stop Windows From Scanning And Repairing the Drive?
If you see the Windows scanning and repairing process is stuck, or if you simply don’t have the time to wait for it to complete, you can bypass the automatic scanning and, instead, repair the drive manually, if needed.
If you are working in Windows Normal Mode, you can try using the Windows Error checking tool or checking the status of your drive.
On the other hand, if you can’t boot Windows, you can try running a CHKDSK scan in Safe Mode or using the Repair-Volume -DriveLetter command in Safe Mode.
Let’s go over the four error-fixing methods in more detail.
Method 1: Using the Windows error checking tool
One of the first things you can try is using the Windows Error Checking tool to scan for and repair any potential issues. Here’s how to do that:
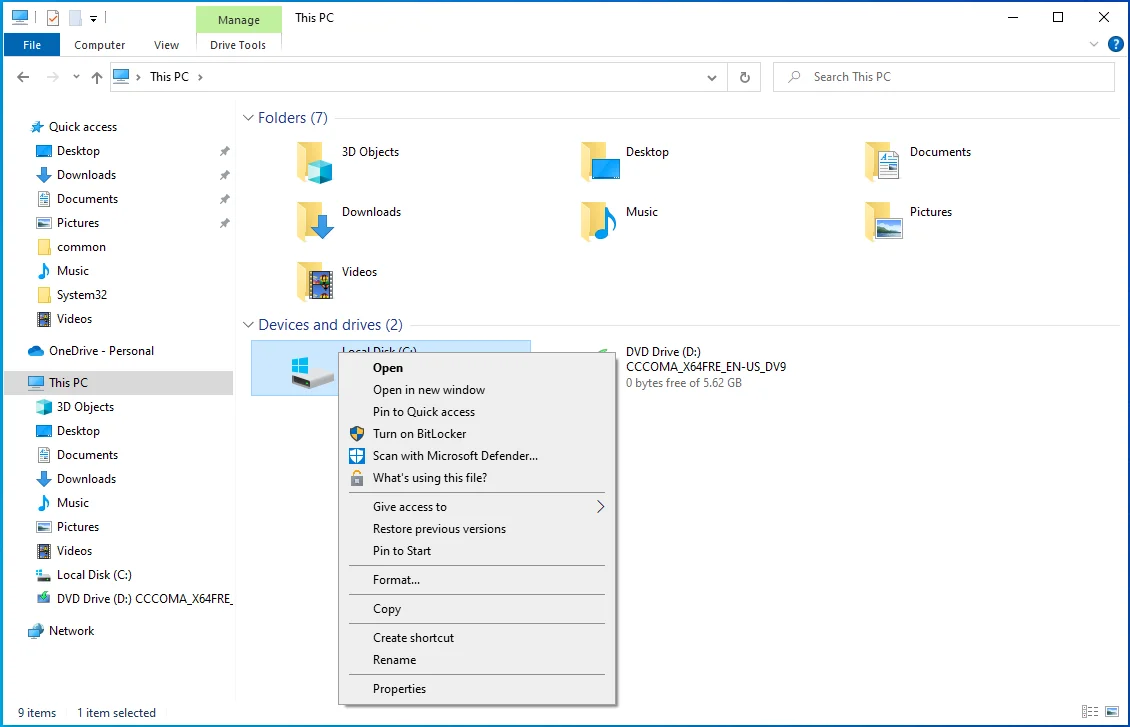
- In the Taskbar, select File Explorer.
- Go to This PC and expand Devices and drives.
- Right-click on the drive you saw in the Windows scan and repair message and select Properties.
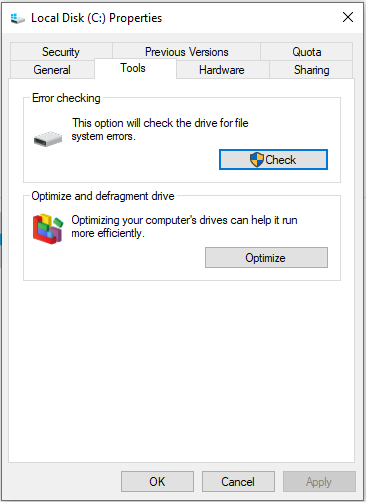
- Go to Tools and, under Error checking, select Check.
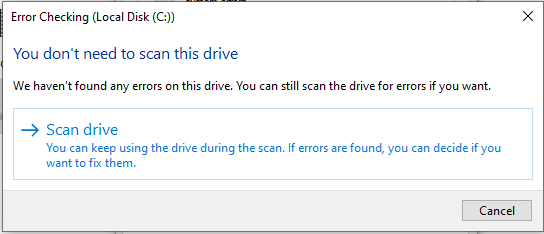
- If errors are revealed during the scanning process, a new window will pop up suggesting you repair the drive. Click Repair.
- If no errors have been found, you will still have the option to scan and repair the drive — in the new window, choose Scan drive.
- Finally, restart your PC and check if the problem has been resolved.
If this method hasn’t worked, you can try checking the status of your drive.
Method 2: Checking drive status
You can see if there are any problems with the drive and if it needs repairing by checking its status. Here’s what to do:
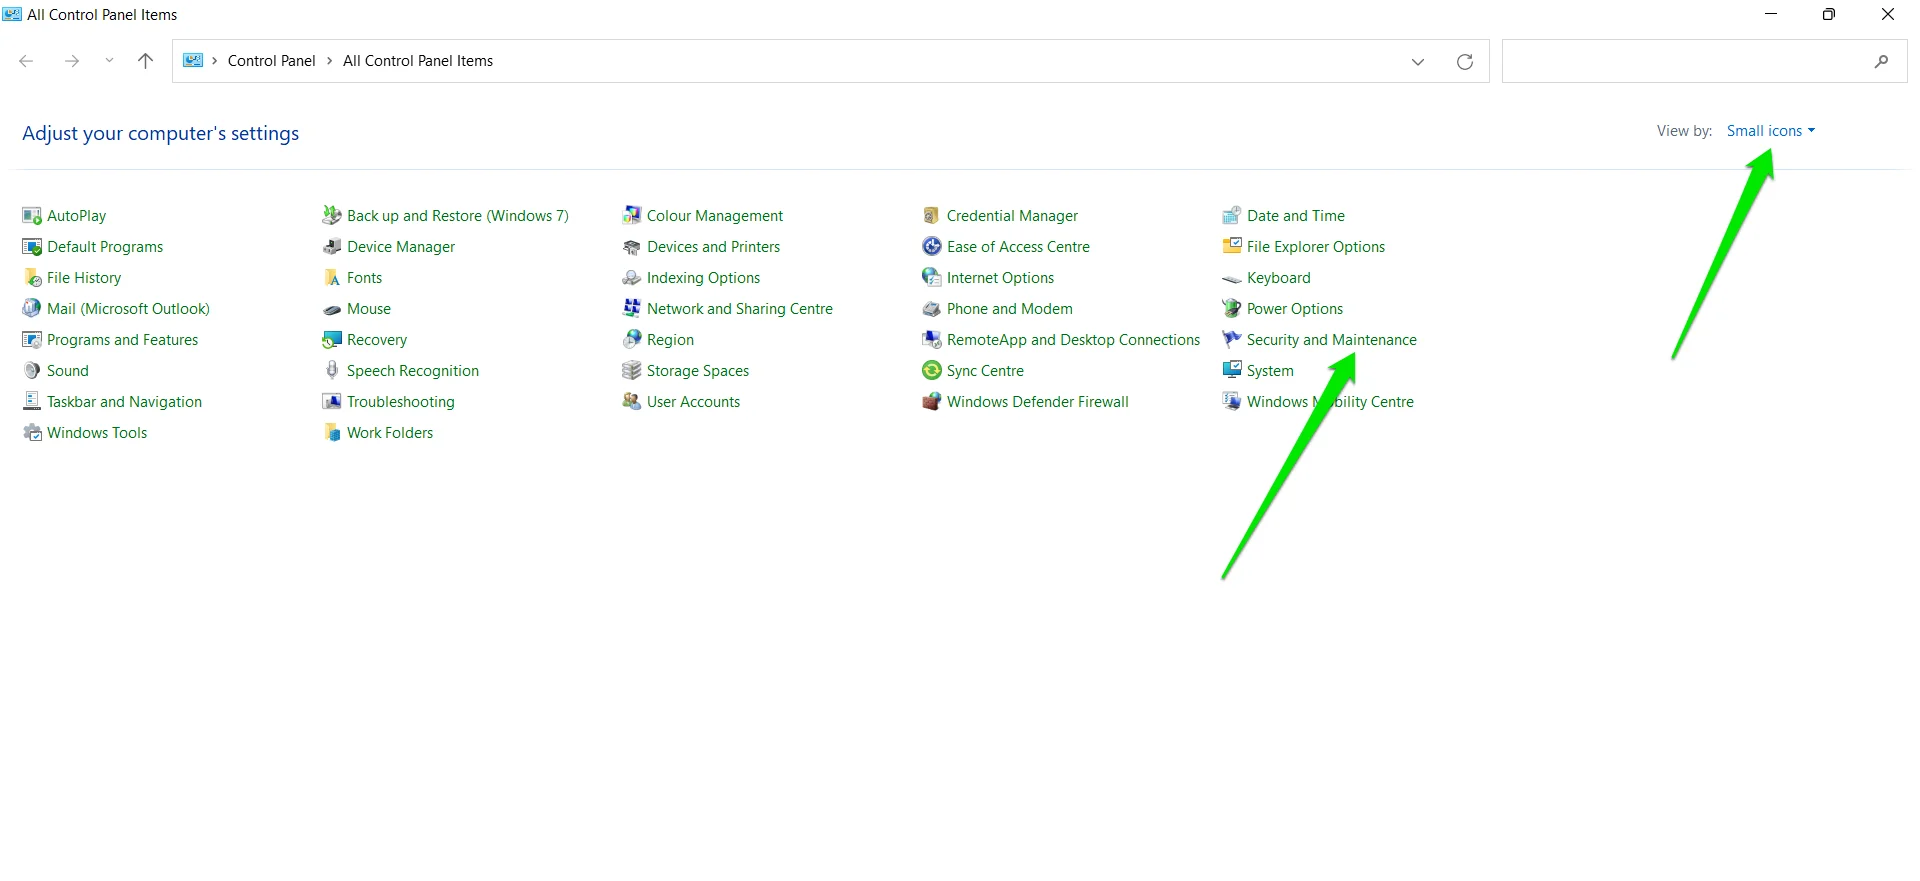
- First, open Control Panel by going to the Start menu and typing
Control Panelin the search bar, then select Control Panel. - Select View by Small icons and click Security and Maintenance.
- Select Maintenance.
- In Drive status, you will find a link that will let you repair the drive. Click this link. Windows will tell you not to bother if the drive is okay.
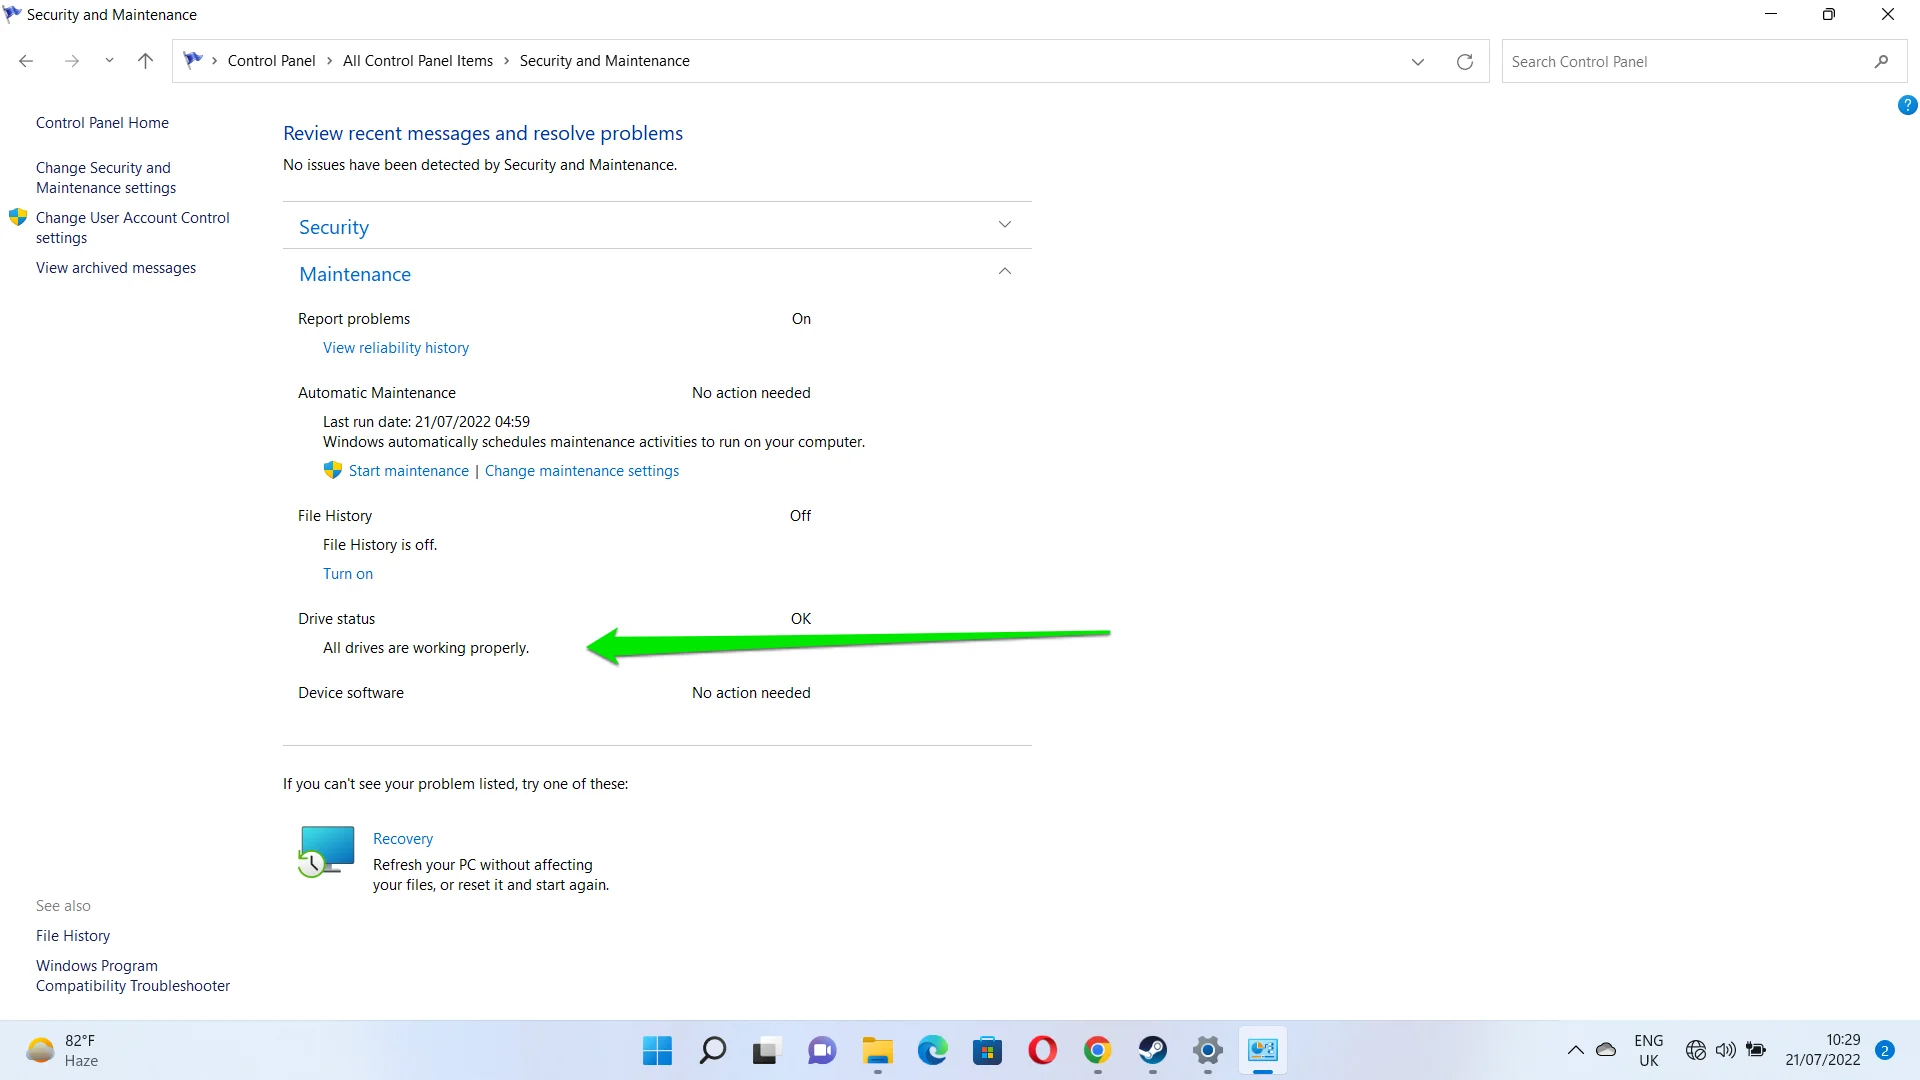
Your drive will now be scanned for potential errors, and if any are found, they will be repaired.
Also read: Windows 10 Control Panel: Where to Find It and How to Use It
Method 3: Running a CHKDSK scan in safe mode
A CHKDSK scan is a quick and easy way to check your computer drive for system file errors and repair any issues that may be found.
If you have a problem booting into Windows, you will need to use the CHKDSK command in Safe Mode.
Follow these steps:
- Launch the Settings application (
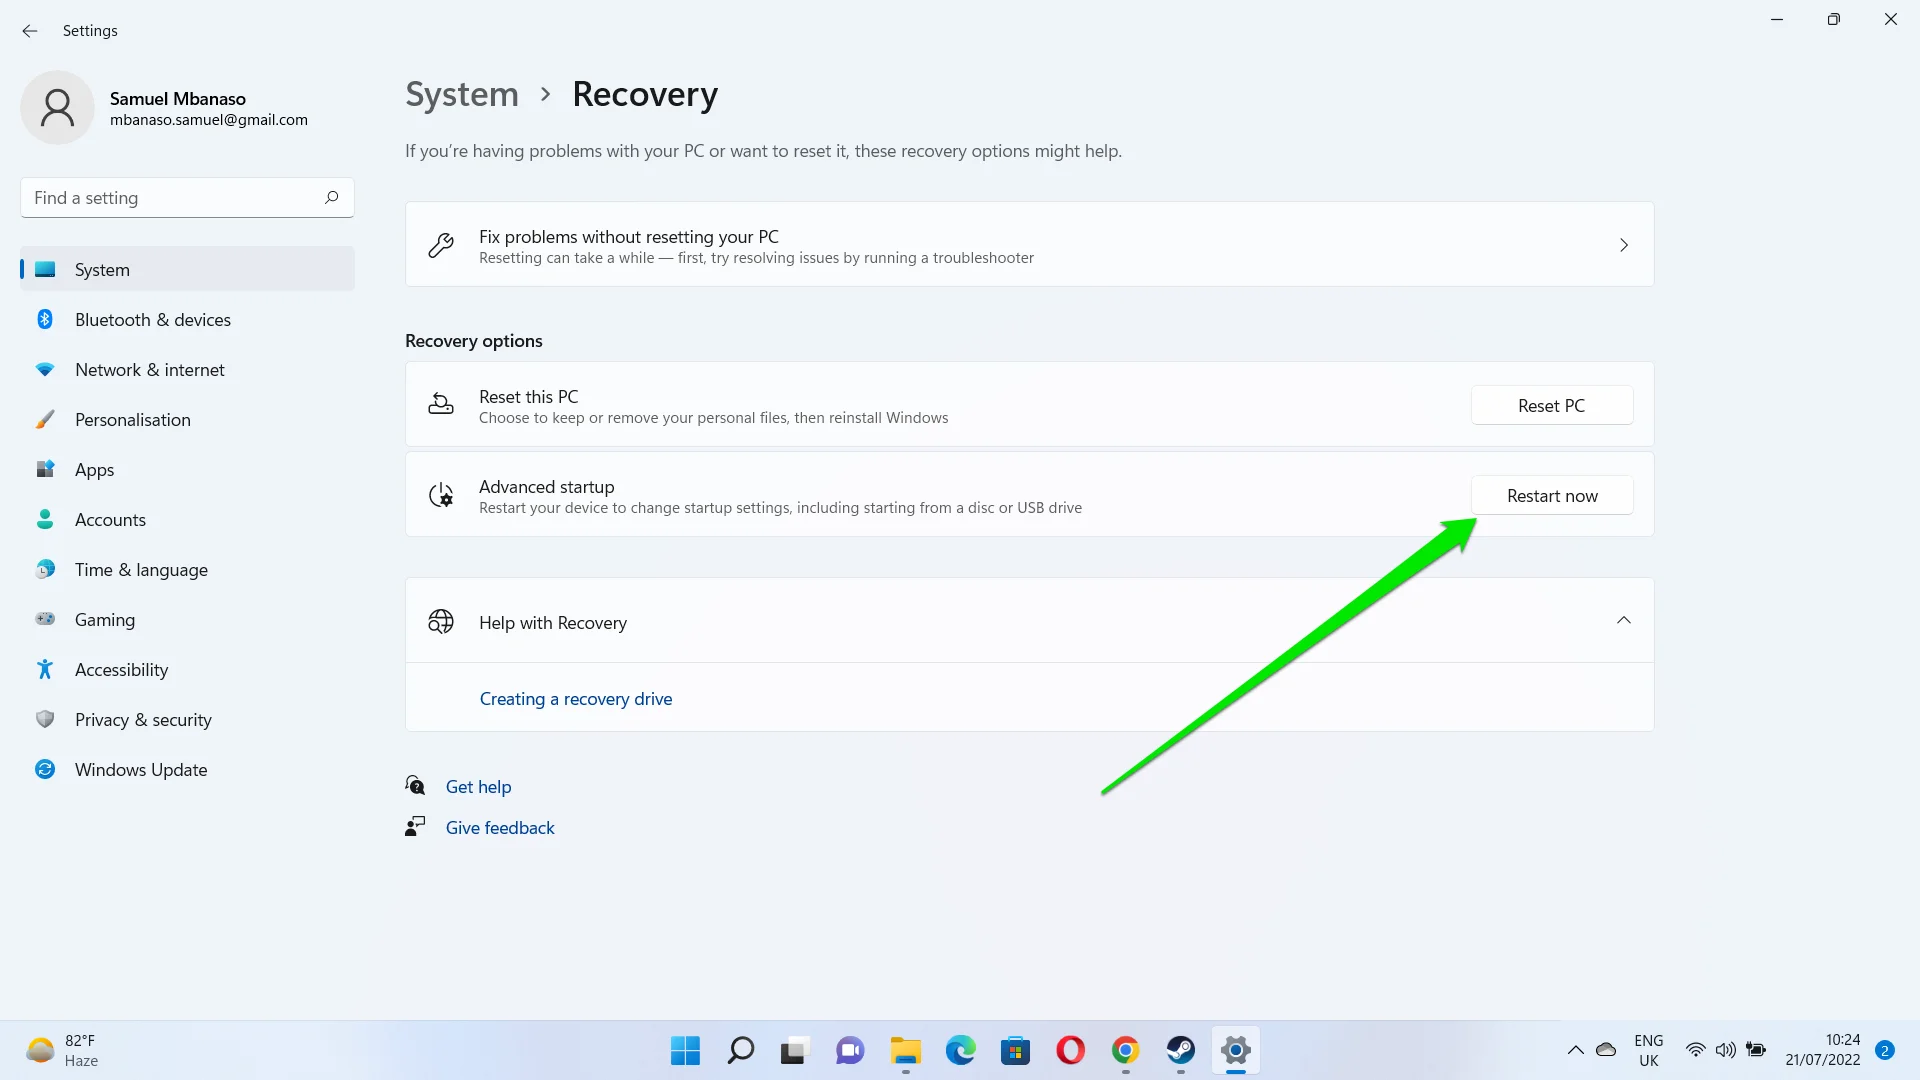
Win + I), click on Update & Security, then go to the Recovery tab once the Update & Security page opens. - Next, click on Restart Now under Advanced Startup.
- Once your system restarts, click on Troubleshoot under Choose an Option.
- Select Advanced Options, then choose Startup Settings.
- Click on Restart, then select Safe Mode once your system reboots.
How to run safe mode in Windows 11
- Open the Settings app and click on Recovery on the System page.
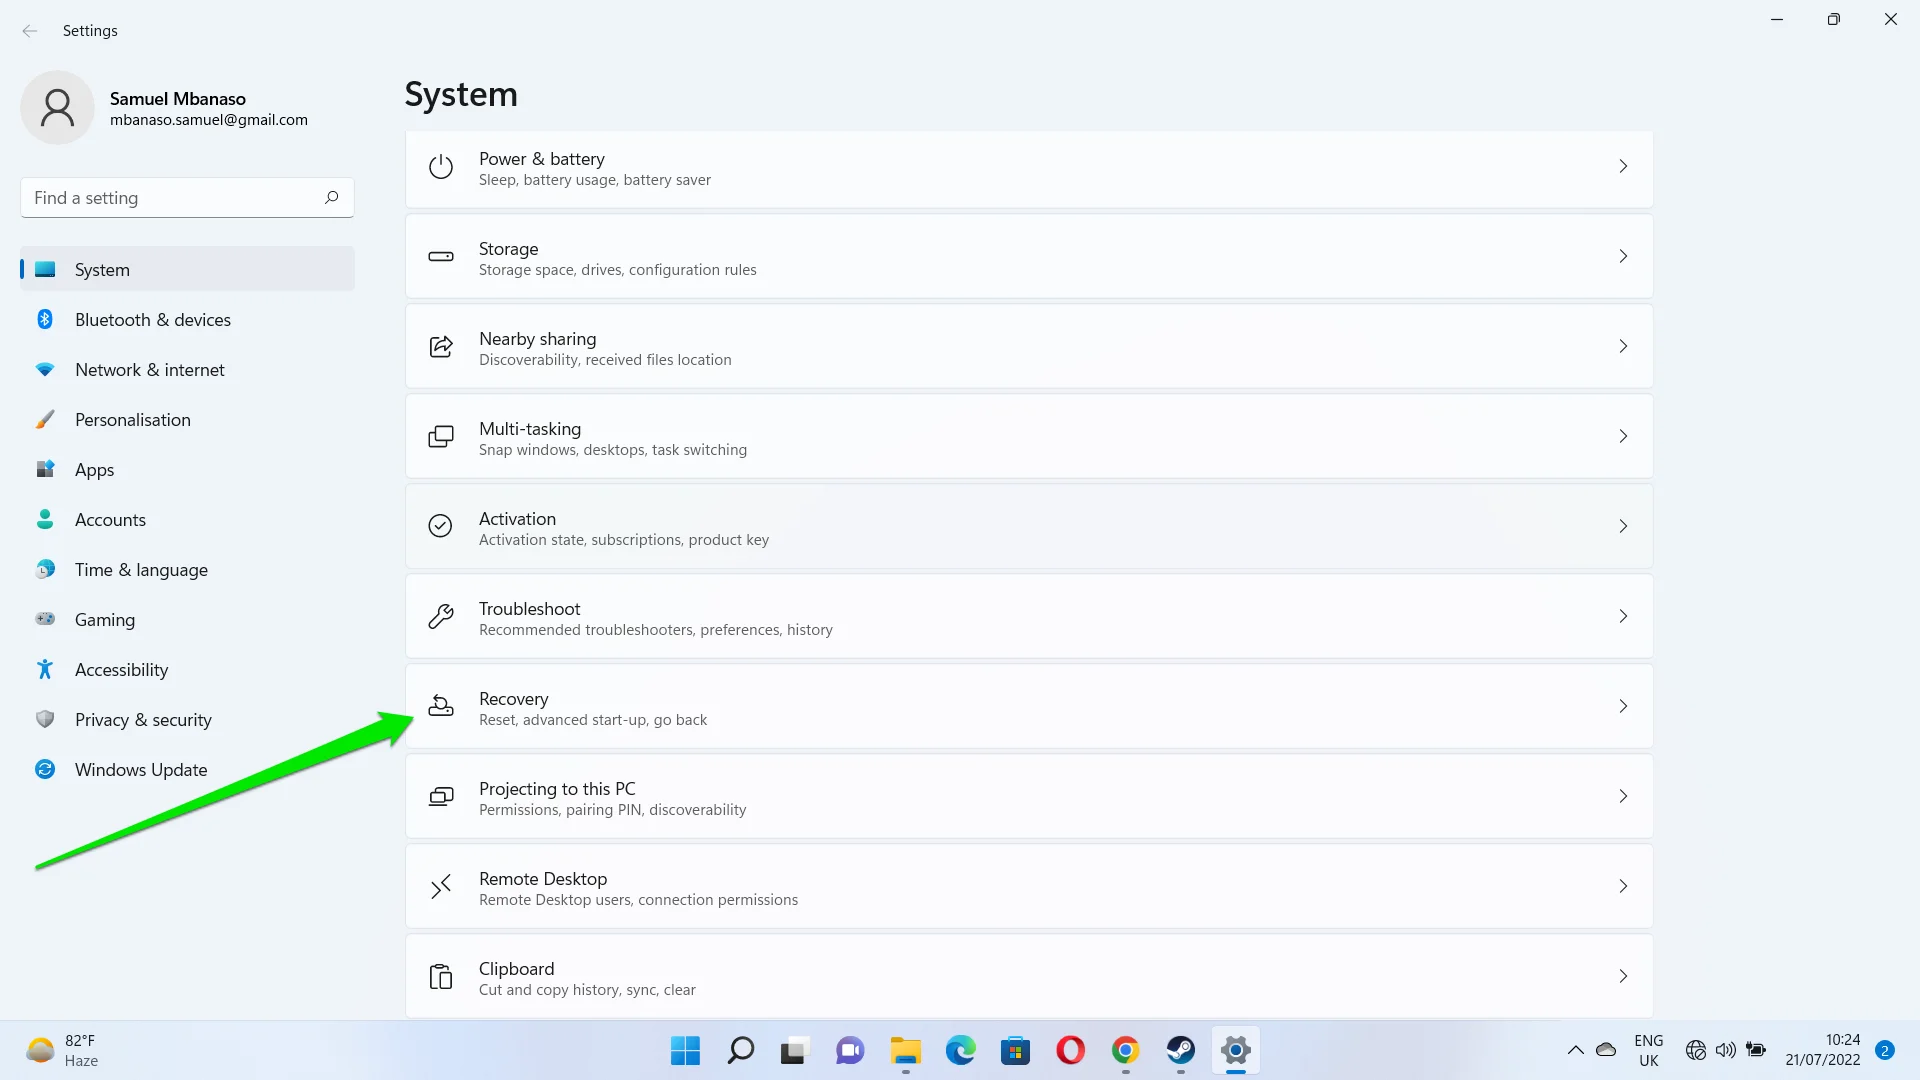
- Click on Restart Now next to Advanced Startup.
Once your PC restarts, follow the steps in the previous guide to open Windows 11 in Safe Mode.
- Press the
Win + Rkey combo on your keyboard to open Run. - Enter
cmdand pressShift + Ctrl + Enterto run Command Prompt in administrator mode. - Type in
chkdsk x: /f(where “x” is the name of the drive you plan to scan and repair) and pressEnter.
When the scanning and repairing process is complete, restart your computer and see if the issues have disappeared.
If they haven’t, try running the repair-Volume-DriveLetter command in Safe Mode.
Also read: Ultimate Guide: How to Check For and Fix Disk Errors with CHKDSK Command
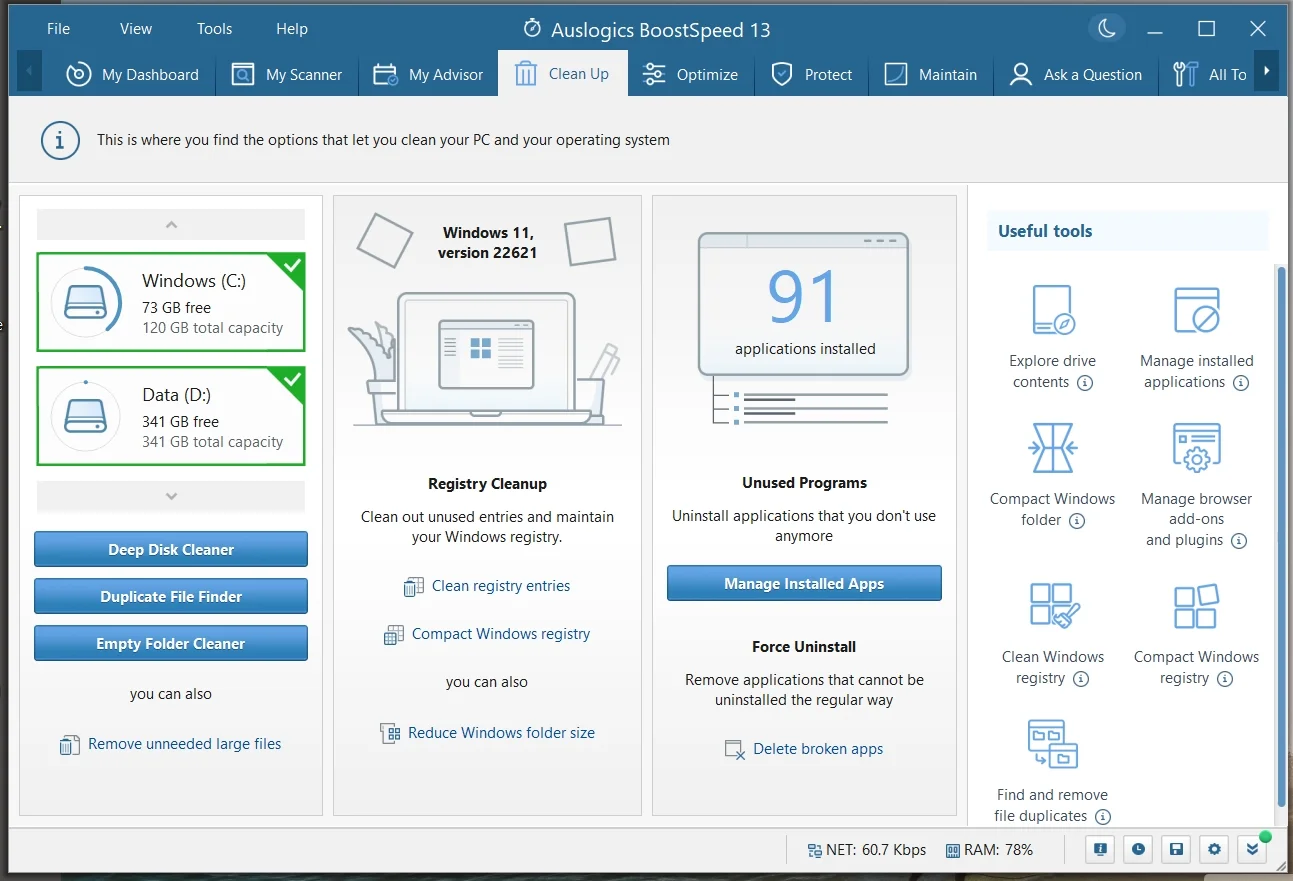
Method 4: Running the Repair-Volume-DriveLetter command in safe mode
Here, you will be using PowerShell to run the Repair-Volume-DriveLetter command to scan for and fix potential drive errors. Here’s how to do that:
- Start Windows 10 in Safe Mode.
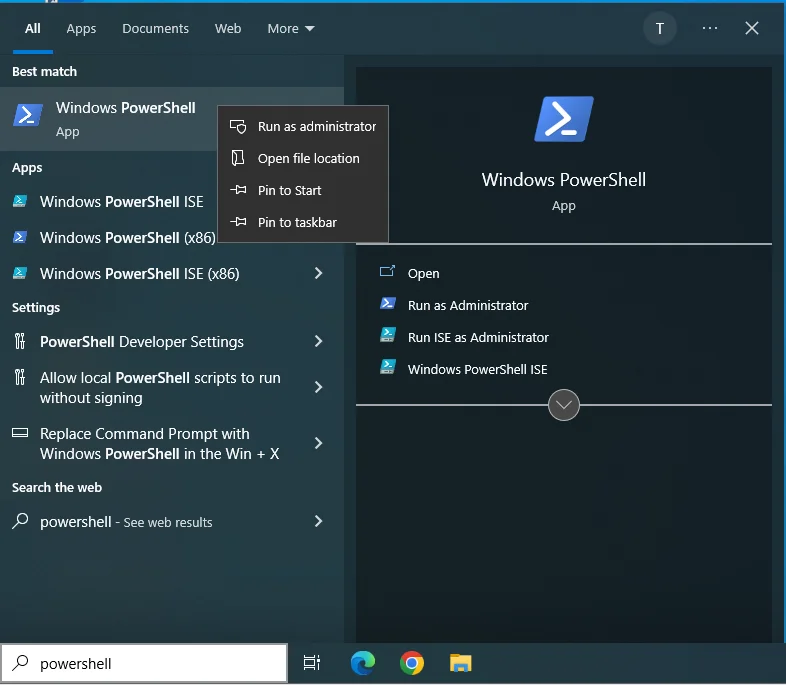
- In the search box, type
PowerShellto open the menu. Right-click Windows PowerShell and choose to run it as an administrator.
- Enter the following command:
repair-volume -driveletter x(where “x” is the name of the drive you want to repair). Then pressEnter.
- When the scanning and repairing process is complete, restart your PC and check if the problem has been fixed.
Also read: How to Fix Disk Errors in Windows 10 Using Windows Commands?
How to Avoid “Scanning and Repairing Drive” Issue in the Future
After successfully resolving the “Scanning and Repairing Drive” issue, it’s crucial to implement preventive measures to avoid encountering similar problems in the future and to ensure smooth and error-free performance of your disk.
Here’s how Auslogics BoostSpeed can be beneficial in preventing future drive errors:
- Disk Cleanup and Optimization: The software removes unnecessary files and temporary data, reducing clutter and the risk of drive fragmentation and errors.
- Disk Defragmentation: BoostSpeed rearranges fragmented files, improving access times and speeding up your hard drive.
- Disk Health Monitoring: BoostSpeed’s tools monitor your hard drives’ health, helping you identify potential issues early and prevent data loss or drive failure.
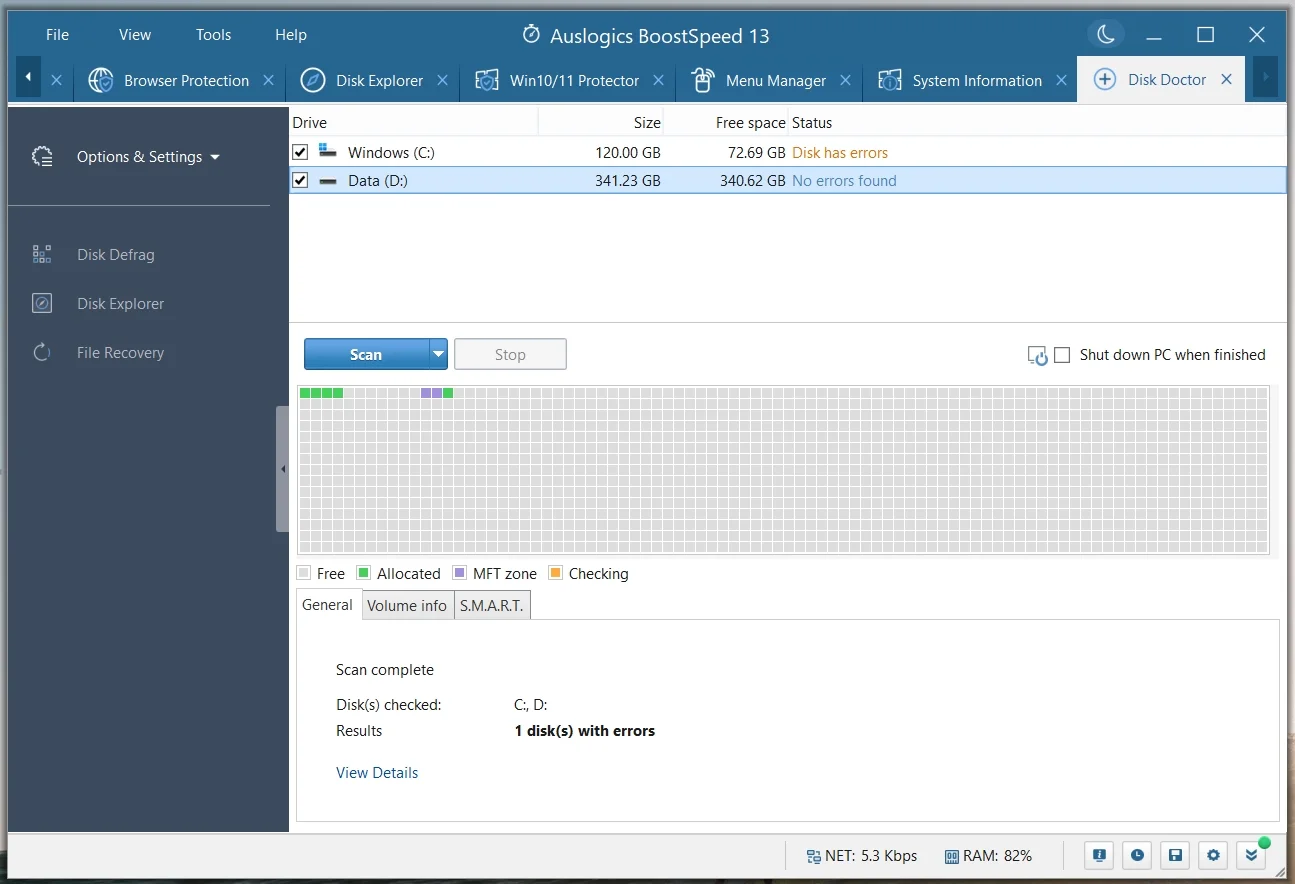
- Startup Optimization: Auslogics BoostSpeed lets you manage startup programs, reducing unnecessary applications during bootup to minimize stress on your drive and prolong its lifespan.
- Registry Cleaning: BoostSpeed cleans and optimizes your Windows registry, preventing performance issues and system crashes that can indirectly affect your drive’s health.
While Auslogics BoostSpeed offers valuable features for drive maintenance and optimization, it’s essential to remember that software solutions cannot prevent physical hardware failures.
Regular backups and using reliable hardware are still crucial for safeguarding your data.
Also read: Why Is My Computer So Slow? – Improve Computer Performance
Conclusion
Experiencing the “Scanning and Repairing Drive” stuck issue on Windows 10/11 can be frustrating, but it’s not an insurmountable problem.
By following the methods outlined in this article, you can effectively troubleshoot and resolve the issue, restoring your system’s functionality.
Incorporating Auslogics BoostSpeed into your regular maintenance routine will help you keep your drives in good condition and reduce the likelihood of encountering future drive errors.
FAQ
To repair a drive in Windows 10, you can use the built-in tool called “Scanning and Repairing Drive.”
When your computer encounters disk errors during startup, Windows will automatically initiate this process to fix the issues. Simply allow the process to complete, and Windows will attempt to repair the drive for you.
The duration of the “Scanning and Repairing Drive” process can vary depending on several factors, such as the size of the drive, the extent of errors detected, and the overall health of the drive. In general, the process can take anywhere from a few minutes to several hours.
It’s essential to be patient and allow the process to finish to ensure that all necessary repairs are performed successfully.
Repairing disk errors refers to the process of identifying and fixing issues or inconsistencies in the file system or data structure of a storage drive.
These errors can occur due to improper shutdowns, power outages, bad sectors, or other factors that affect the drive’s normal operation.
When Windows detects such errors, it attempts to repair them during the “Scanning and Repairing Drive” process, ensuring the drive’s optimal performance and data integrity.