
- What Is Overclocking On a PC?
- Caution: Why Is It Not Recommended to Perform Overclocking?
- How Does Overclocking Work?
- CPU Overclocking Requirements: What You Need
- Does Your CPU Support Overclocking?
- Is Your Motherboard Capable of Overclocking?
- Do You Have the Right Cooling Accessory?
- Can Your Power Supply Unit Provide Enough Voltage?
- How to Safely Overclock Your CPU
- Conclusion
- FAQ
Overclocking your PC or laptop’s CPU means making it run faster than its standard speed. It’s a way to get more power out of your computer, especially useful for gaming or heavy tasks.
But it’s not just about speed; it’s about doing it safely. Careless overclocking can be fraught with risks, leading to potential damage and instability.
This guide will show you how to increase your CPU’s speed step by step, while making sure your computer stays stable and doesn’t overheat. You’ll learn how to push your CPU’s limits the right way, ensuring better performance without risking damage
What Is Overclocking On a PC?
The basic concept of overclocking involves pushing a CPU to exceed its factory (or manufacturer-defined) maximum clock speed.
PC users overclock their hardware to improve performance, equipping it to handle more than it originally could.
For example, if your CPU’s official max boost speed is 4.3 GHz, overclocking may push it to 5.0 GHz.
The term and practice have evolved over the years, stretching back to the 80s when the first CPU was overclocked.
It’s more common—and easier—these days. Just about every gamer tries, at some point, to squeeze out more power from their CPUs, even when they have the best processors for gaming.
The quest for market dominance has also seen big CPU manufacturers enter the overclocking space. Intel and AMD are now shipping CPUs and motherboards with overclocking technologies to lure customers.
There are also software applications designed to aid any user’s foray into bumping up CPU performance.
Caution: Why Is It Not Recommended to Perform Overclocking?
Overclocking, while a tempting avenue for boosting computer performance, is fraught with risks that can significantly outweigh its benefits. This practice of pushing a CPU beyond its designed speed limits might seem like a quick fix for performance enhancement, but it introduces several dangers that are important to consider.
- Risk of Overheating: Overclocking generates additional heat. Without proper cooling solutions, this can lead to overheating, potentially damaging the CPU or other components.
- Stability Issues: Pushing a CPU beyond its intended limits can lead to system instability, crashes, and unpredictable behavior, which can be particularly problematic for tasks requiring reliability.
- Shortened Lifespan: Consistently operating a CPU at higher than recommended speeds can accelerate wear and tear, potentially reducing its lifespan.
- Voided Warranty: Most manufacturers consider overclocking as a violation of the warranty terms. If your CPU is damaged due to overclocking, you might not be covered.
- Increased Power Consumption: Overclocking increases a system’s power consumption, leading to higher electricity bills and possibly requiring a more powerful power supply unit.
- Diminishing Returns: The performance gains from overclocking can be marginal, especially on modern CPUs that already operate at high efficiencies, making the risks and effort outweigh the benefits.
- Technical Expertise Required: Properly overclocking a system requires technical knowledge. Incorrect settings can cause more harm than good.
How Does Overclocking Work?
A CPU’s base clock speed (BCLK), multipliers, and core voltage determine its frequency at any point.
The BCLK is the CPU’s baseline frequency. It can be measured in GHz or MHz, depending on the processor’s spec.
Multipliers (core multipliers or clock ratio) are figures applied to the base clock speed to determine the frequency of each CPU core. For example, 22 (core multiplier) * 200 MHz (BCLK) = 4,400 (MHz) or 4.4 GHz (speed of the CPU core).
Multipliers are also applied to the system’s FSB (Front Side Bus) to determine CPU speed. For example, a 5X multiplier is five times the FSB’s speed.
The core voltage or Vcore is the amount of energy (measured in volts) required to achieve different levels of CPU frequency. The higher the voltage, the higher the frequency, heat, and power consumption.
So, an overclocker must apply the right multiplier to each core’s BCLK and feed the required amount of voltage to increase a CPU’s frequency.
CPU Overclocking Requirements: What You Need
Now that you know the answer to “What is overclocking a CPU?”, it is time to edge towards how to overclock a CPU.
Before you start, you must confirm that you have the hardware and accessories required to successfully overclock your processor. Let’s go through the list.
Does Your CPU Support Overclocking?
The first—and most important—thing to do before you overclock is make sure your processor can actually do it. Not all CPUs can.
If you use an Intel chip, look for the “K” suffix, like the Intel Core i9-11980HK. A “KF” CPU can also overclock, but it lacks an integrated GPU. That said, X series processors, such as the Intel Core i9-13980HX CPU, can also overclock. You can check out Intel’s processor naming convention to know if your CPU is unlocked.
Things are simpler with AMD processors. You can overclock nearly all Ryzen desktop CPUs.
If you have a locked processor, it’s best not to attempt overclocking it.
Is Your Motherboard Capable of Overclocking?
AMD offers overclocking support across most of its chipsets, with the exception of A-series motherboards. You can check out your AMD chipset specifications to be sure.
Intel, on the other hand, allows only full-core frequency overclocking on its Z-series motherboards. You can only perform memory overclocking on the less expensive H- and B- motherboards. Intel’s guide on gaming motherboards shows chipsets that can be overclocked.
You should also note the quality of your motherboard’s power delivery, as it can vary even among high-end products. Some are less stable than others.
So, ensure you thoroughly review your motherboard’s specs regarding overclocking before you go ahead.
Do You Have the Right Cooling Accessory?
The thermal design power (TDP) of your CPU cooler is the next thing on the checklist.
Make sure you’re going for a cooling system with a higher (ideally 40% more) TDP than your default setup. Generally, the higher the TDP, the better.
That said, the cooling technology you use still depends on your chipset. The recommended All-In-One air or liquid cooler is one with a 240mm radiator if you want to overclock every core in a modern Ryzen 5 or Core i5 computer.
You should go for, at least, a 280mm AIO unit for higher processors like the Core i7 and i9 and the Ryzen 9 and 7.
Overclocking is safer now than it used to be, thanks to advanced safety features in modern processors and motherboards. However, it still carries risks like reducing the CPU’s lifespan, potential performance issues, and even the risk of permanent damage. Overclocking also often voids the CPU warranty. Ensuring you have a robust cooling solution is crucial to manage the extra heat generated by overclocking.
Can Your Power Supply Unit Provide Enough Voltage?
Your PSU (Power Supply Unit) is the last piece of the jigsaw. You must have a unit that can supply the required voltage to dial up your CPU’s frequency.
How to Safely Overclock Your CPU
Safely overclocking your CPU involves adding multipliers to the base clock speeds of your processor cores using the required hardware and software utilities.
You also have to decide whether you want to overclock manually or automatically.
If you want to overclock automatically, you may not need additional software if your motherboard has an auto-overclock function. Manufacturer-designed and third-party tools with auto-overclocking features are also available.
You may want to overclock manually because you’ll enjoy more control and nuance.
Regardless of which type you want to use, the first steps are the same.
There are many different software utilities that can help you tune your CPU’s frequency. But this guide will focus on three main tools:
- AMD Ryzen Master – for AMD processors.
- Intel Extreme Tuning Utility (XTU) – for Intel CPUs.
- Your computer’s BIOS.
If you’re working with Intel or AMD tools, you can easily make changes while your system is running and conduct stress tests.
Going through the BIOS means you have to restart your computer every time you want to tune your CPU frequency and check the results.
Motherboard manufacturers also use different names for overclocking parameters, unlike Windows tools that use more standardized naming conventions. That said, you can easily identify the option you want to tweak.
If you want to learn how to overclock a CPU on a laptop, you’re better off using the BIOS, as the AMD tool does not support most laptop chipsets, and Intel XTU only supports a few high-end mobile CPUs.
While the BIOS is more stressful, it is still a recommended option.
The steps for using the BIOS or Windows utilities are basically the same. Only the software is different. We’ll start with using the Intel and AMD tools.
Overclocking Your AMD Processor
If you’re using a post-2017 AMD CPU that’s capable of overclocking, your best option aside from your BIOS is the AMD Ryzen Master. For pre-2017 processors, you can use the AMD OverDrive tool. You should note that the tool only works on supported devices.
Carefully follow the steps outlined here to safely overclock your chip using the utility.
Take Baseline Readings of Your Computer’s Temperature and Performance
The first step is recording your CPU’s heat levels and peak performance using its default configuration and maximum clock speed. This way, you can easily identify changes in performance, how well your cooling unit is doing, and the voltage you need to overclock.
Taking baseline readings will also help you to pinpoint potential issues and inconsistencies.
You can use the benchmarking feature in the AMD utility to measure performance and track temperature. You can also use other tools, such as CPU-Z, 3DMark,and Cinebench if you want varied readings. Core Temp is another program that helps you measure your PC temperature.
So, run different variations of the stress tests and take note of the results. You can run single and multi-core tests to see how your CPU’s default speed performs.
Next, take note of your computer temperature after running the test. Remember to take your room temperature into consideration because you may have to use the system outside your current environment after overclocking.
If your CPU temperature is more than 80 degrees after the test completes, please consider upgrading your cooling unit.
Adjust Your CPU Frequency
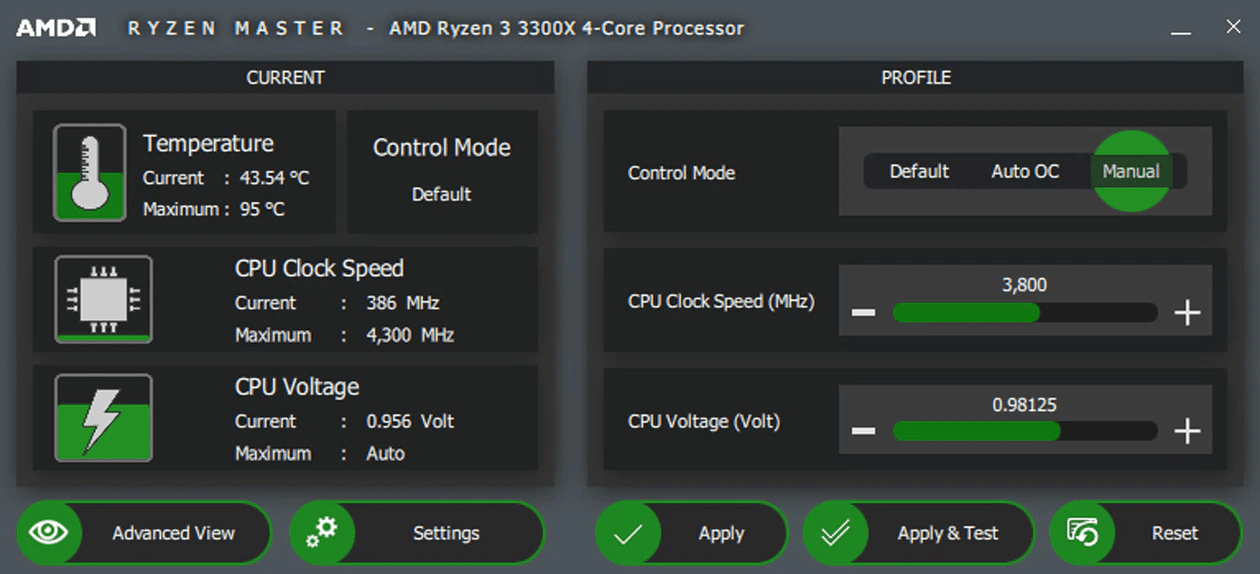
After taking your baseline readings, you can now start the overclocking process. Open the Ryzen Master program and switch to Advanced View. Go to the Profile 1 tab if you haven’t applied any overclocking settings yet.
- Click a Profile to start editing.
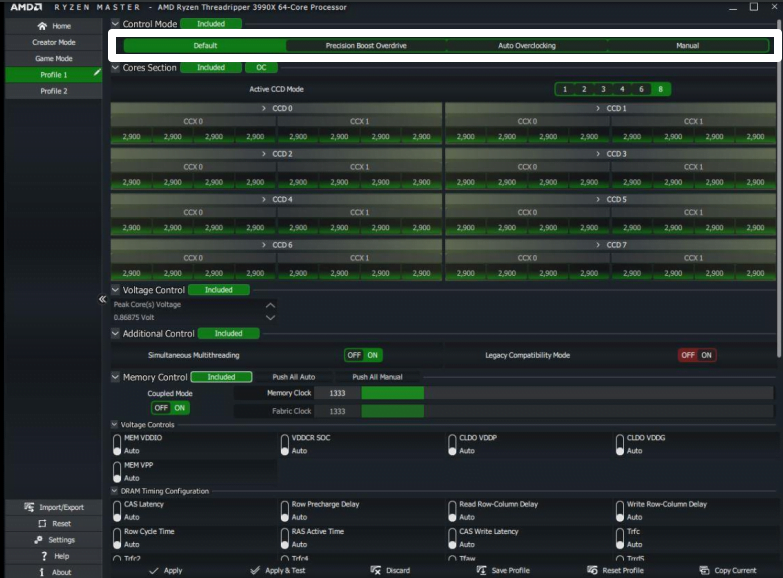
- Under the Control Mode, you should see the Manual, Auto Overclocking, Precision Boost Overdrive, and Default tabs.
Before we cover them, let’s define some terms that you’ll encounter and have to use:
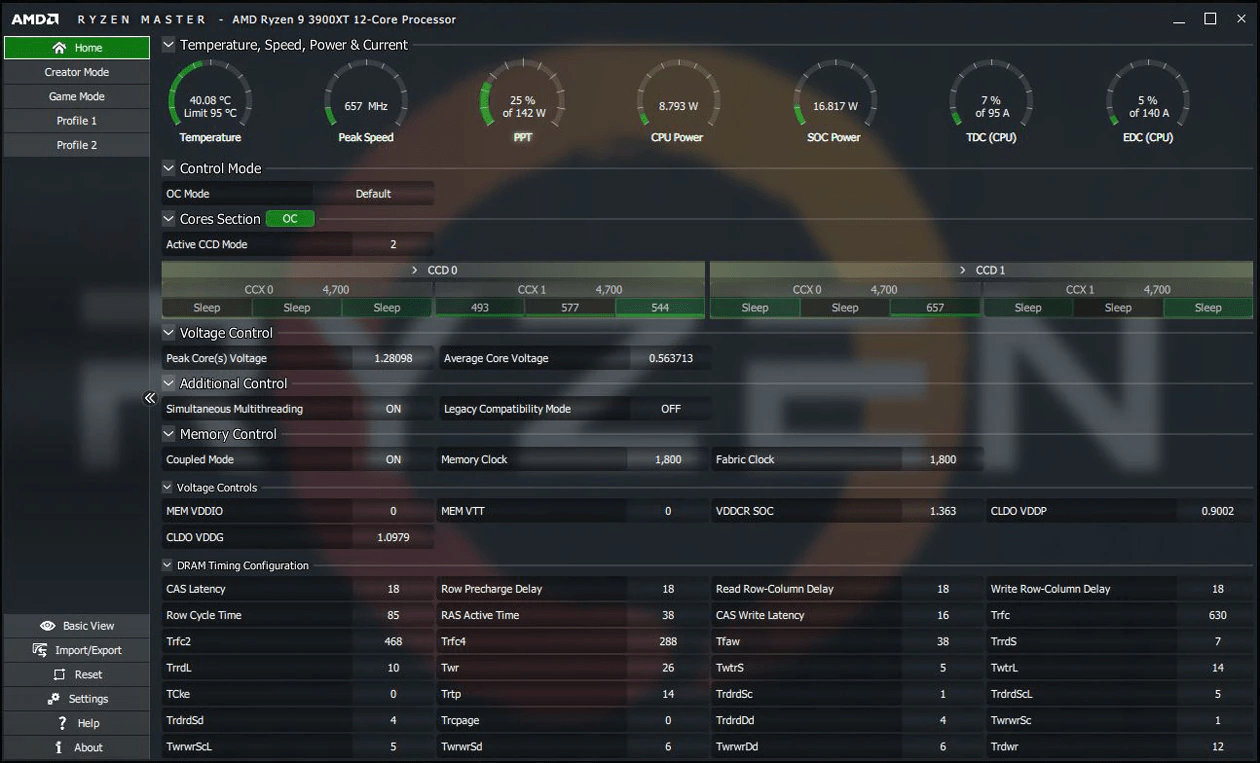
- PPT (Package Power Tracking): The total power that you can feed your CPU.
- TDC (Thermal Design Current): Total sustained amperage (currents) that you feed the CPU for longer periods under thermal limitations.
- EDC (Electrical Design Current): Total amperage delivered to the CPU in short bursts during peak performance.
The Default Mode
The Default tab is your CPU’s stock base speed. The processor doesn’t attempt to use its maximum boost speed for long in this mode. Every control option under this tab is locked, so you can’t get to perform any kind of overclocking here.
The Precision Boost Overdrive Mode
This mode mimics automatic overclocking but doesn’t go beyond the CPU’s advertised boost frequency. It automatically attempts to enhance multi-threaded performance using the built-in boost mechanism shipped with the computer’s motherboard and processor.
In the PBO mode, you can boost the CPU frequency by manipulating the EDC, TDC, and PPT limits. Enter a small increment, test your new configuration, and repeat until you get better and stable speeds.
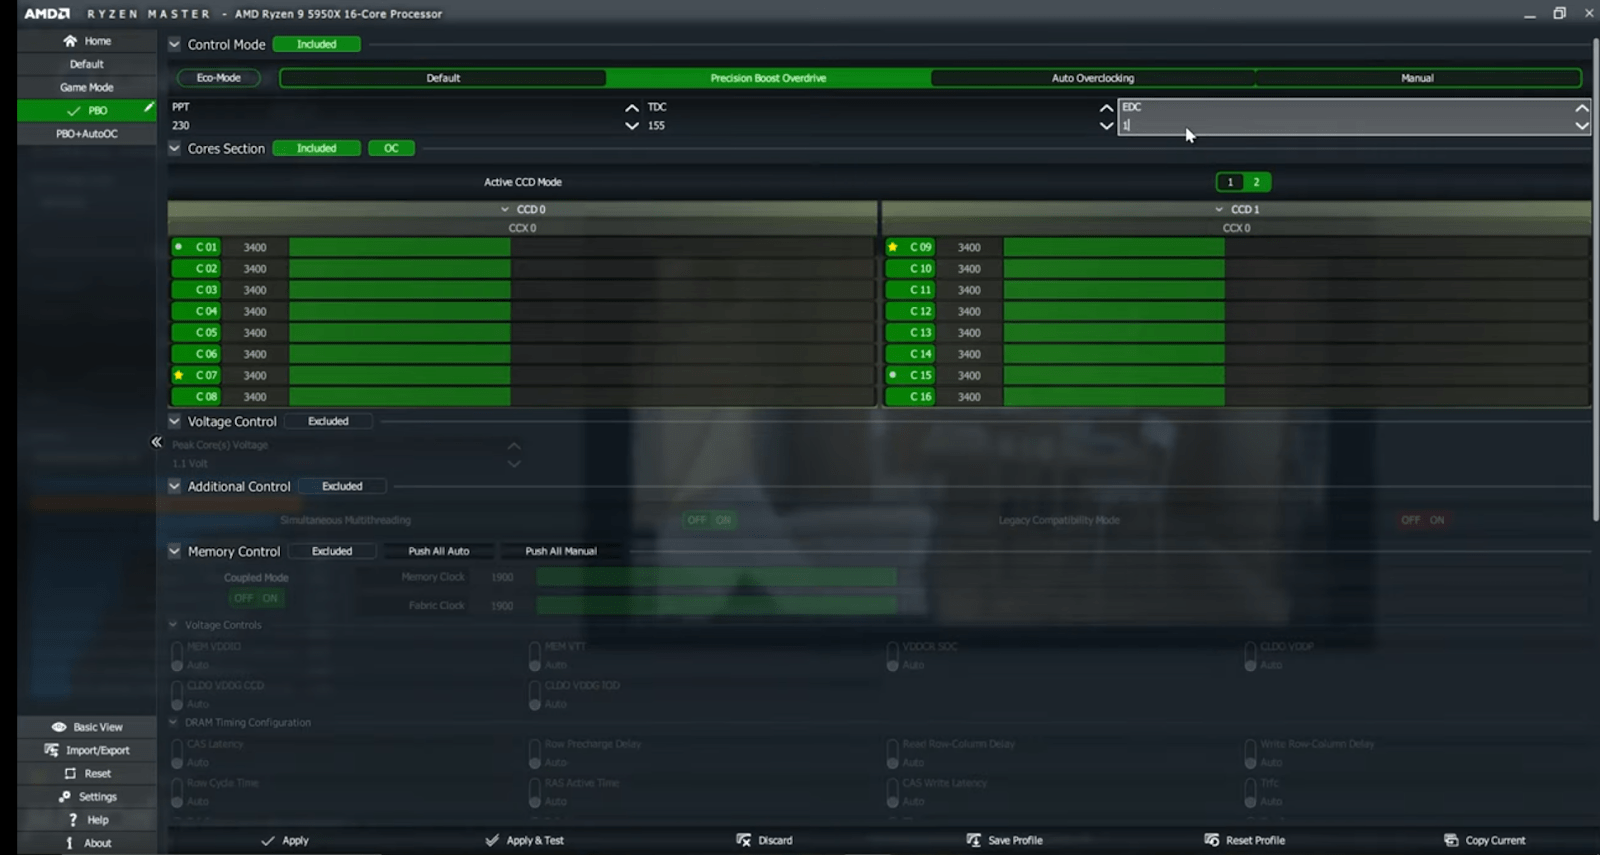
You cannot change the voltage controls here, as the system automatically does that.
This mode doesn’t require you to restart your computer to see changes. So, you can start running a stress test on another benchmarking tool in the background.
Auto Overclocking
This mode is more aggressive than the PBO mode because it allows your CPU to push beyond its advertised maximum frequency.
Like PBO, you cannot change voltage settings. However, you can go to the Boost Override CPU option to enter the CPU frequency you want.
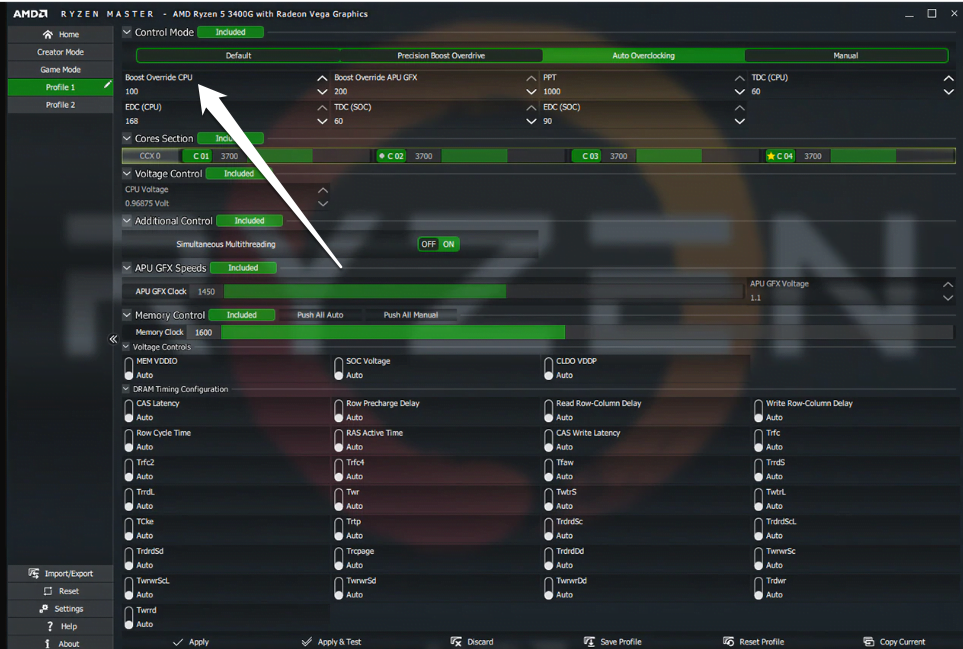
It manipulates the CPU settings automatically, using your computer’s built-in boost mechanism, in an attempt to achieve that speed. We recommend that you increase the Boost Overdrive numbers by a factor of 25 and then run the benchmark test to check changes.
You have to reboot your PC to apply changes. So do that before running the benchmark tests.
Manual
The Manual mode is for more advanced tuning and should be used by people who know what they are doing. It gives you access to voltage controls and allows you to manipulate the frequency of each CPU core.
You can use the Manual tab to get even more speeds than the Auto Overclocking mode offers. This mode allows you to expand CCD and CCX sections so you can see the best cores to manipulate.
The program shows a yellow star beside the core with the best overclocking potential and a gray dot beside the second-best. You can use the slider beside each core to overclock them.
That said, you can play things safe by clicking the red rectangular button to the right of the CCX expander to turn the fastest core green. After that, slide other cores to the same value.
Also Read: CPU Cores Explained: Does the Number of Cores Affect CPU Performance?
Now, try applying small increments to the voltage and test your new settings using Cinebench or another benchmark tool. Keep increasing the voltage bit by bit until you get your desired results.
You don’t have to restart the system to apply the overclock in this case. However, a reboot is required if you want to switch to a different mode.
Make sure you note down any changes you notice as you restart your computer. If your computer is stable after an increment, boost it further.
You should stop when you start noticing issues, such as performance drops, freezing, crashing, and BSODs. You can also consider increasing the voltage the CPU receives when you notice these issues.
📌 Also read: [QUICK SOLUTION] How to Find Out the Cause of BSODs Using the Event Viewer
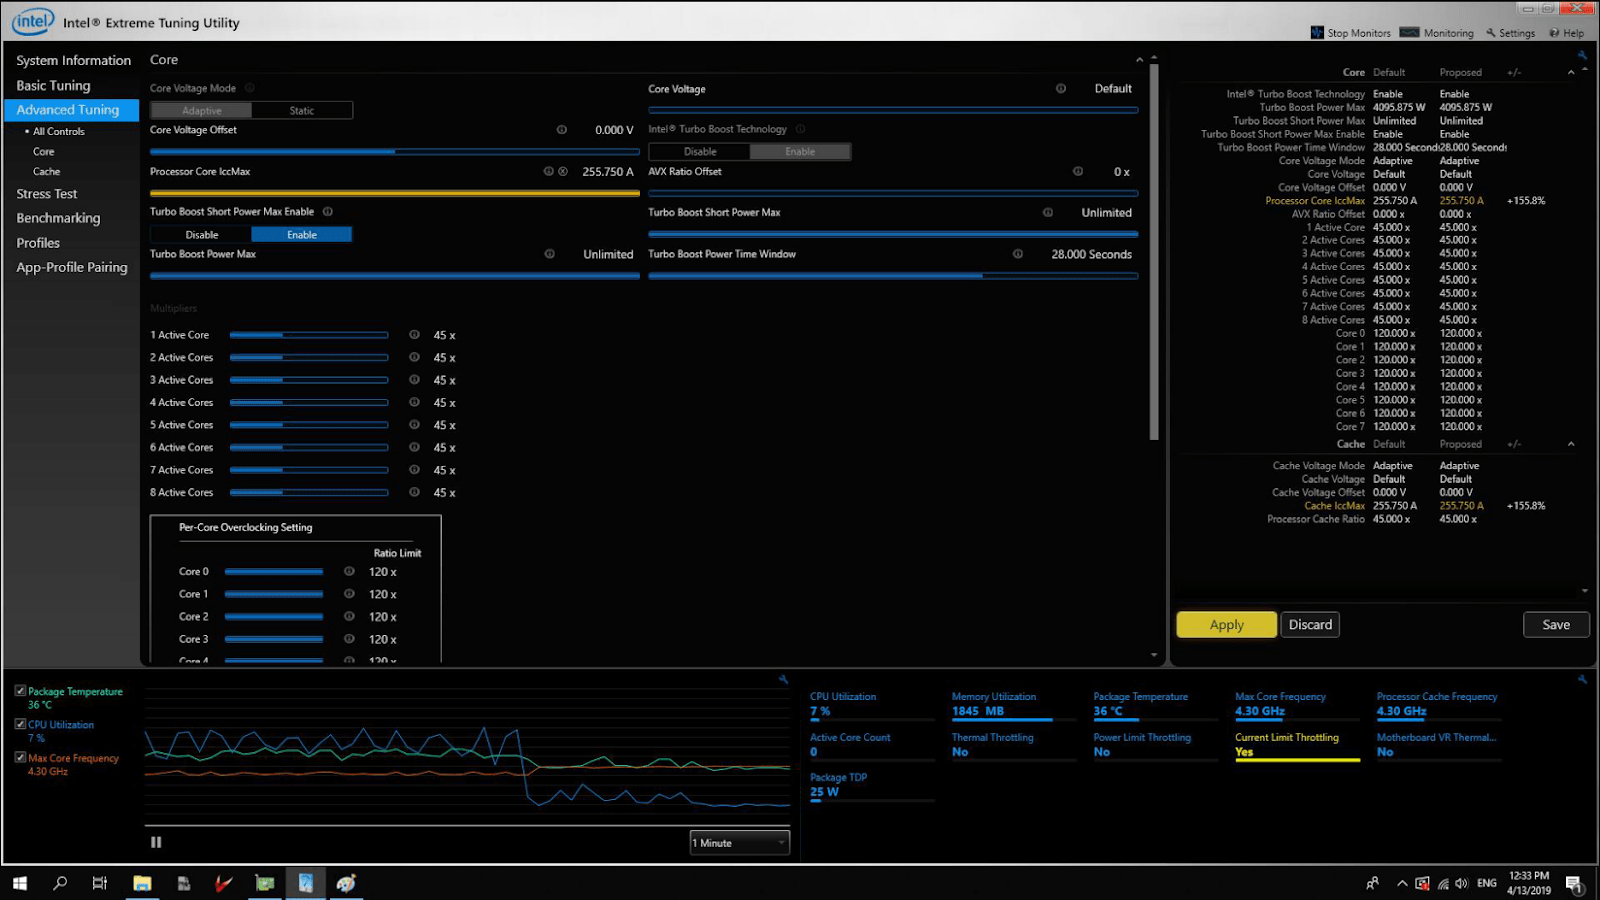
Overclocking Your Intel Processor
This process follows the same basic principles as overclocking your AMD processor. Only in this case you’ll be using Intel Extreme Tuning Utility instead. Note that the tool only works for unlocked Intel desktop and laptop CPUs.
Taking Baseline Readings
You must start by running tests to determine your CPU’s peak performance and temperature when it runs at stock speed. You can use the Intel XTU program to run a benchmark test.
Just open the application and select Run Benchmark in either the Basic Tuning or Benchmarking tab. The Benchmarking tab will show you all the readings you need after the test is completed, and you’ll get a score.
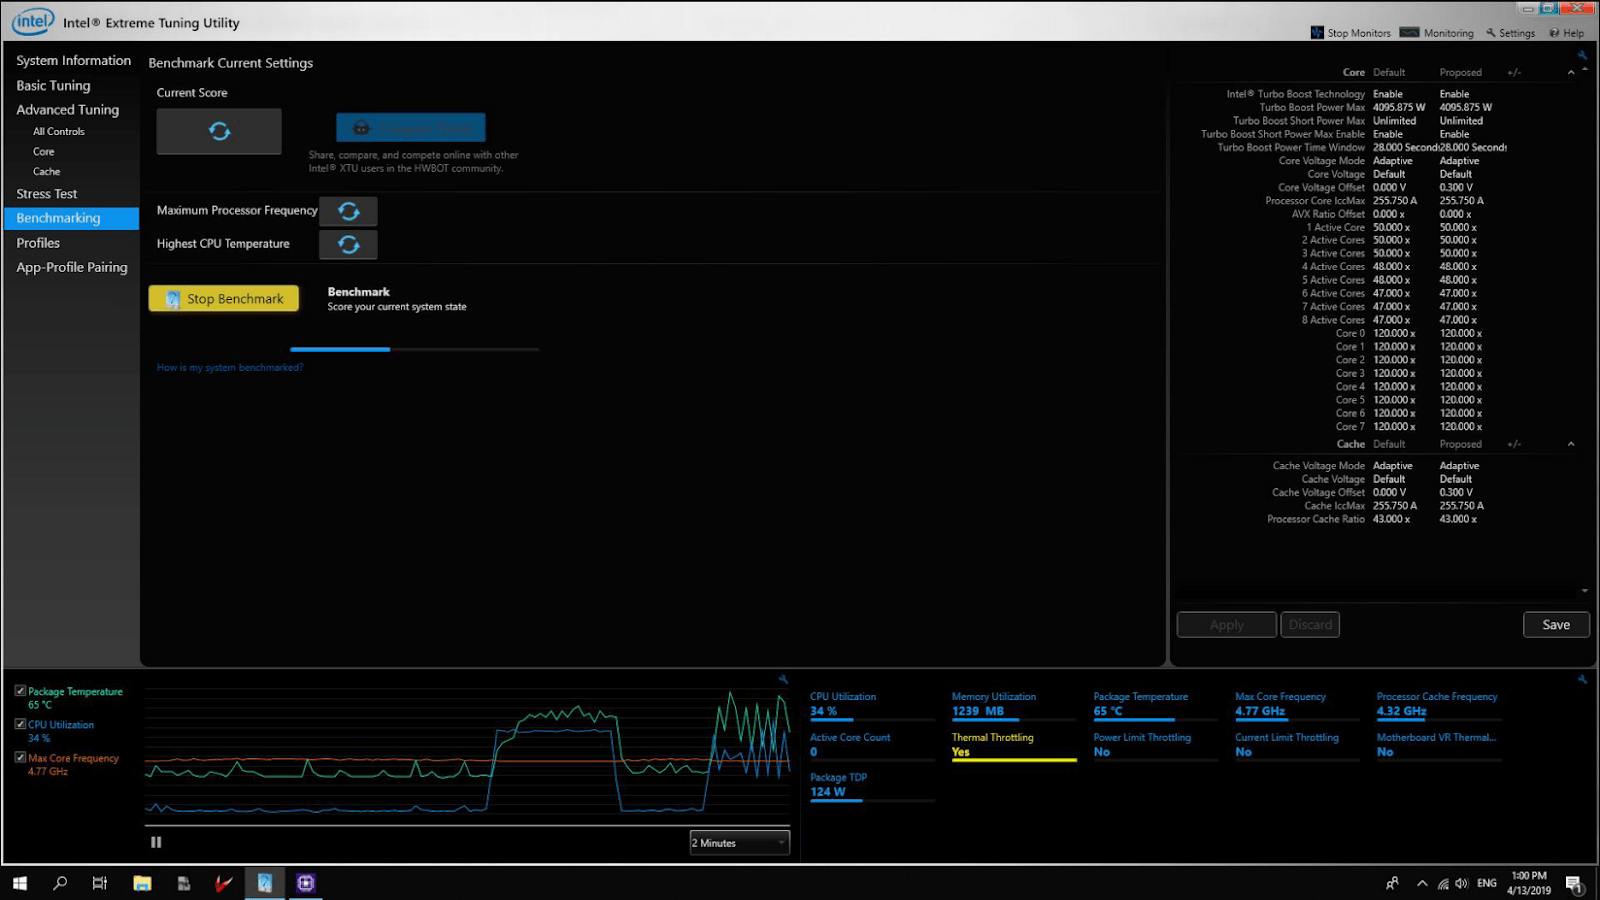
That said, you could run the test using Cinebench and check your temperature using another program, such as Core Temp.
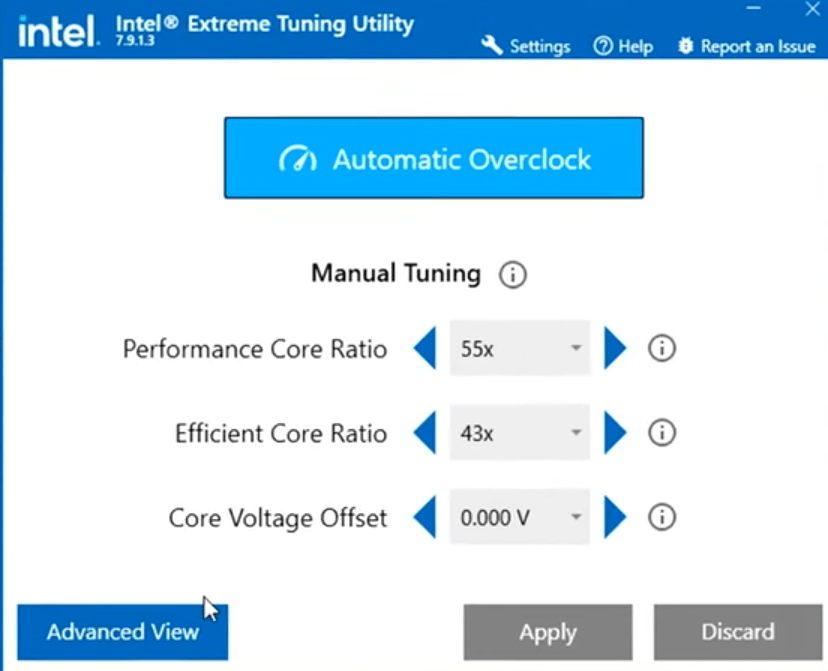
Using XTU’s Compact Mode
Once you start the Intel XTU program, you’ll see a simple tuning mode. Here, you can simply click the Automatic Overclock button to allow the program to boost your CPU frequency. You can also tune the CPU manually by adjusting Performance Core Ratio, Efficient Core Ratio, and Core Voltage Offset.
Tuning Your CPU Frequency Using Intel XTU’s Basic Tuning
However, if you want to do things manually, you can adjust the Processor Core Ratio and Processor Cache Ratio figures. You should start by increasing their values by 1 and maintain basically the same values for both options.
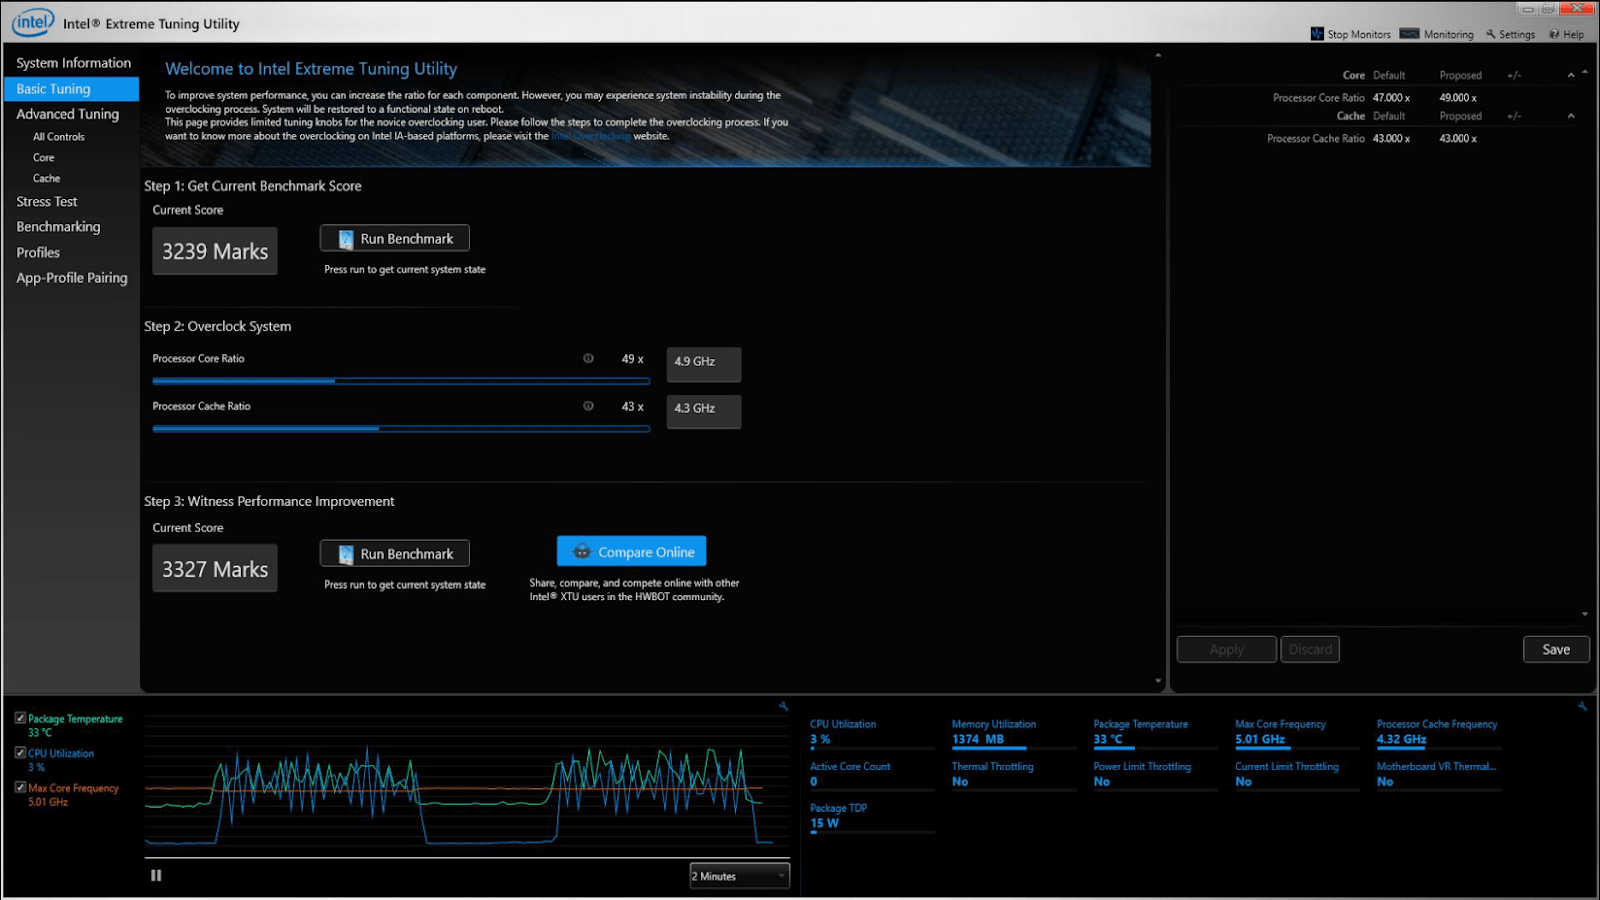
After increasing the value, test your computer by restarting it and running the benchmark test. Repeat the process until you get something stable enough for your CPU.
Overclocking Your CPU Using Intel XTU’s Advanced Tuning
This tab is more suited to advanced users, as it allows for more complex overclocking operations. Before using the options in this tab, we recommend that you read more about Intel Extreme Tuning Utility and overclocking first.
Using the advanced tab without proper knowledge could lead to errors and potential damage.
Under this section, you can adjust every individual core’s Processor Core Ratio, Voltage (Vcore), AVX (advanced vector extension) Offsets, and more.
With every change you make here, especially the Voltage and Voltage Offset options, use very small increments and test your settings.
You should ideally stick to adjusting the Processor Core Ratio, Processor Cache Ratio, and Core Voltage settings even in this mode. You can use other settings if you really know what you’re doing.
You should also set the AVX Offset to -2 or -1 so that you can reach higher overall clock speeds. AVX workloads take a significant toll on your CPU, and the processor usually requires more energy to handle them.
Using the BIOS to Overclock
You can use your BIOS to overclock your AMD or Intel chip.
Warning: Overclocking via the BIOS can lead to system instability, hardware damage, or voiding warranties. Proceed with caution and ensure you have adequate cooling and understand the risks involved. Inexperienced users should seek professional advice before attempting.
This method works on overclockable chipsets and CPUs. These BIOS (or UEFI as they’re now called) settings include tuning options that allow you to push your CPU beyond its stock frequency.
📌 Also read: Best BIOS Settings for Better Performance and Gaming
Like other methods, you should start with taking your baseline measurements. Run benchmark tools to check your system’s performance at your CPU’s factory max clock speed. You should also check your computer’s temperature and power consumption.
After that, follow these steps to open your system’s BIOS:
For Windows 10:
- Tap the
Windows logo key and Ibutton on your keyboard to start the Settings application. - Go to Update & Security after Settings opens.
- Select Recovery in the left sidebar under Update & Security and click Restart now under Advanced start-up.
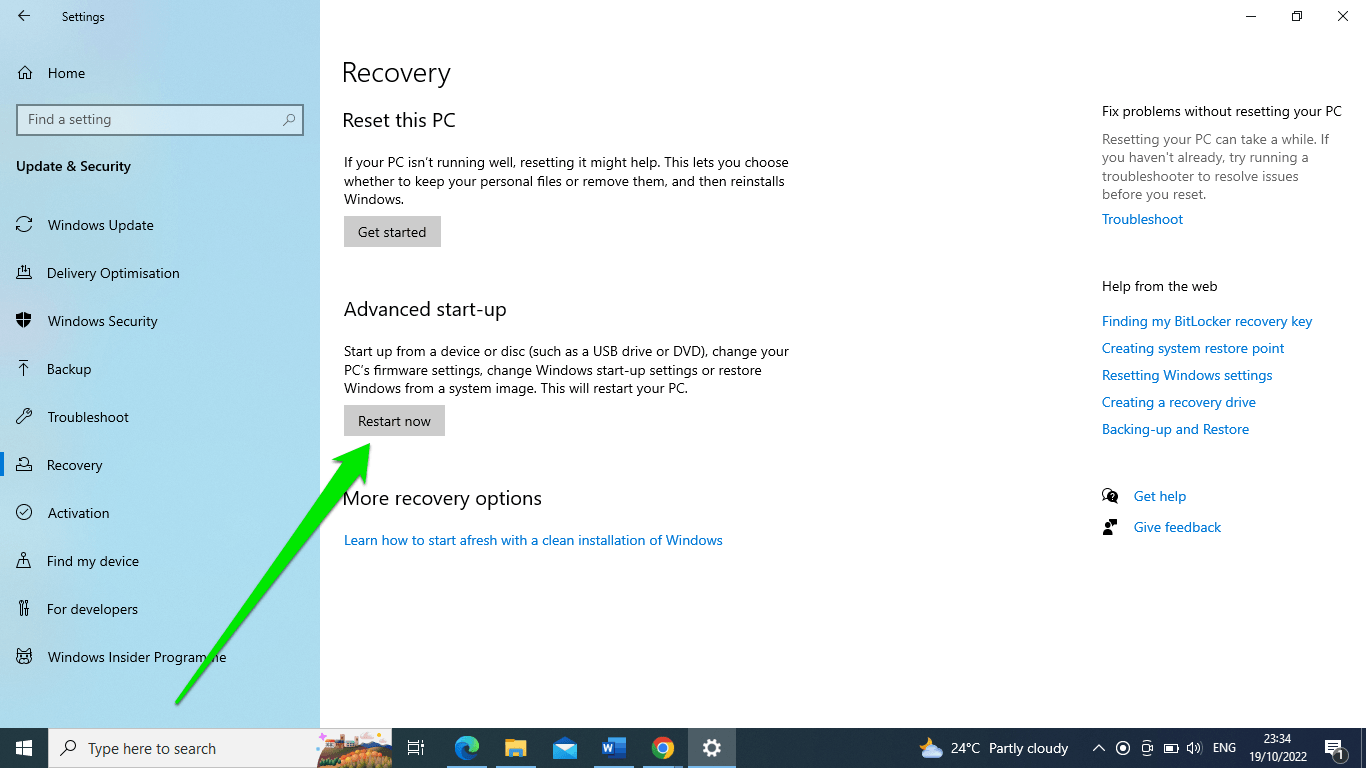
- Windows will now reboot to the Windows Recovery Environment.
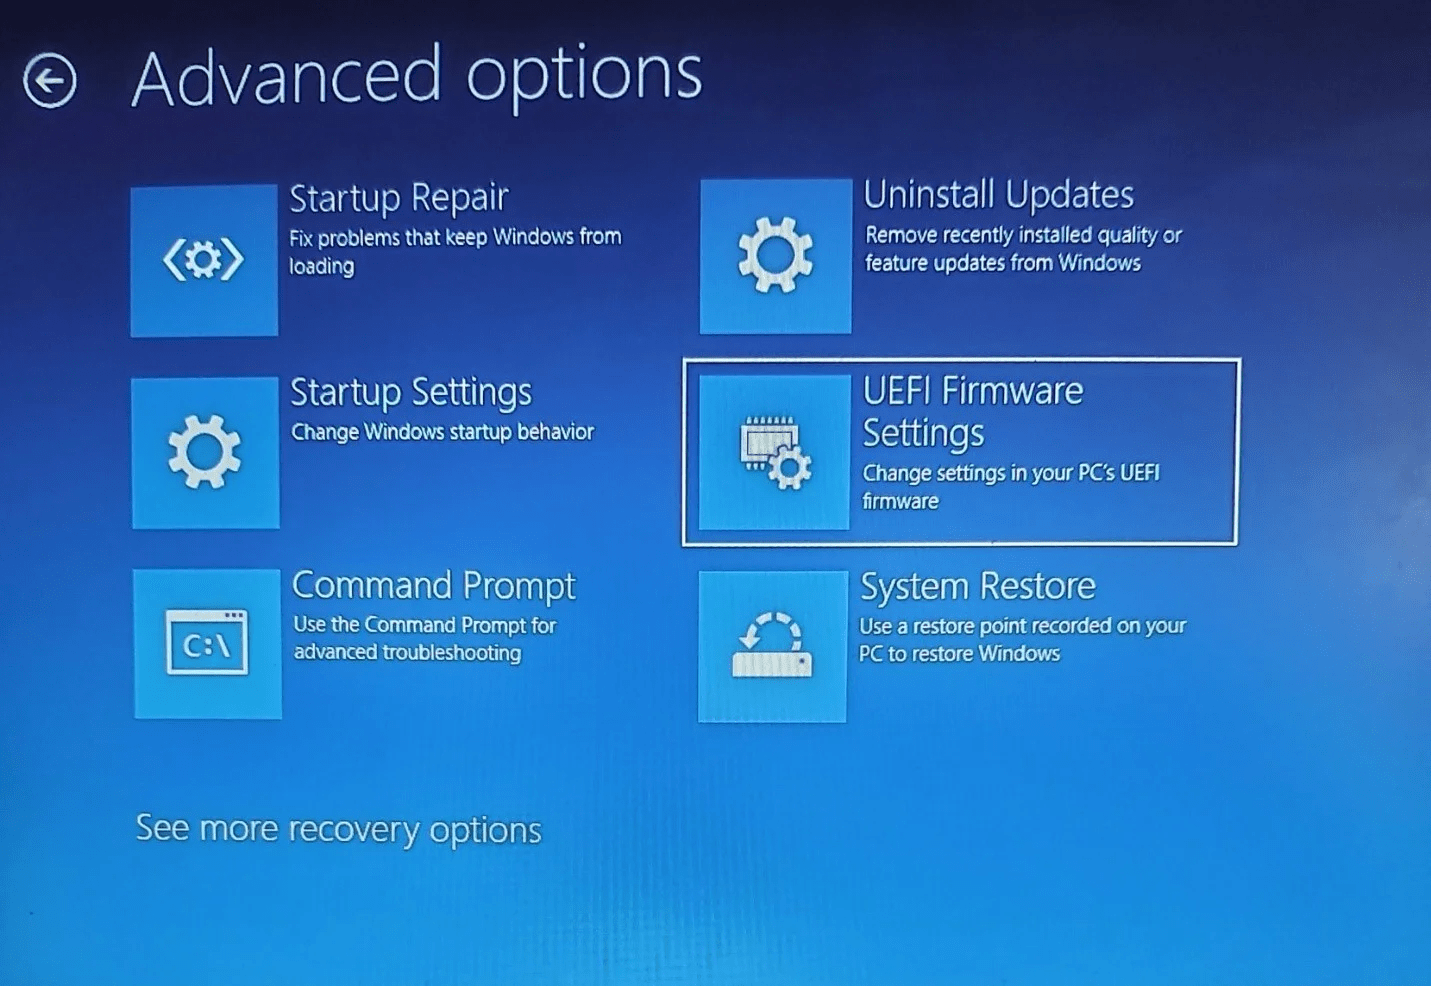
- Select Troubleshoot on the first page and click Advanced options.
- Now, click UEFI Firmware Settings under Advanced options.
For Windows 11:
- Launch the Settings app.
- Scroll through the System window and click Recovery.
- Select Restart now next to Advanced startup.
You can also tap Del or F2 repeatedly after booting your computer to enter your BIOS. That said, the keys are different, depending on your OEM. But the steps above are more universal.
Windows also allows you to enter the Advanced Startup screen when you hold the Shift key and click the Restart option in your power menu.
Locate Your Overclocking Settings in BIOS
Every manufacturer uses a different BIOS or UEFI interface. So, depending on your system, the overclocking section might be called something different, such as “OC,” Frequency Control, AI Tweaker, Advanced CPU Core settings, or CPU Settings.
Now, you can look for the multiplier or similar option and increase it. In some cases, you have the option of increasing the frequency.
Make sure you use only small increments. If you’re adjusting the multiplier, increase it by 1, then reboot your system and test. Keep repeating until you find a stable overclocking setting.
Conclusion
Overclocking the CPU on a PC or laptop can significantly enhance performance, especially for demanding tasks like gaming or heavy software usage.
However, it’s crucial to approach this process with care, balancing the benefits of increased speed against the risks of potential hardware damage and overheating. Always ensure proper cooling and start with conservative settings, gradually increasing as you monitor stability and temperature.
Remember, a successful overclocking is as much about patience and precision as it is about pushing the limits of your hardware.