
- What Is a GPU Stress Test?
- Why Stress Test Your GPU?
- How to Choose the Right GPU Stress Test Tool
- Preparation Before GPU Stress Testing
- How to Perform the GPU Stress Test
- How to use the best GPU stress test tools
- Monitoring during the test
- After the Stress Test
- Benefits of Periodic GPU Stress Testing
- Conclusion
- FAQ
Indeed, system requirements for games, video editors, and 3D rendering programs generally tell you which graphics cards are ideal to run certain applications. However, they don’t always tell you how long your GPU can handle intense usage while running the highest settings. That’s where stress testing comes in handy. The processes will expose your GPU’s weaknesses and help you confirm how long the processor can hold out. This article will cover the meaning of GPU stress testing, why you need to run it, and how to test GPU performance.
What Is a GPU Stress Test?
A GPU stress test is a diagnostic process designed to push a computer’s graphics processing unit (GPU) to its absolute limits. It involves running complex computations and rendering tasks that put enough load on the GPU to force it to run at maximum clock speeds.
The primary goal is to ensure the GPU operates reliably under heavy loads. It can expose stability weaknesses, issues with drivers, cooling inadequacies, and any potential failures or limitations in its performance.
Why Stress Test Your GPU?
Learning how to stress test your PC is important for various reasons, each with its unique justification. We’ll explain several key reasons to help you understand the scenarios that necessitate the graphic card stress test.
Learning how to stress test your PC is important for various reasons, each with its unique justification. We’ll explain several key reasons to help you understand the scenarios that necessitate the graphic card stress test.
- Ensuring stability for high-end gaming and professional work
Modern games and professional applications like 3D modeling software or video editing tools demand high GPU performance. Stress testing tools simulate these tasks at high settings, allowing you to confirm the maximum computing demands the GPU can handle while remaining stable. This knowledge is crucial for ensuring that the GPU can support these activities over extended periods without crashing or experiencing performance degradation.
- Evaluating overclocking limits
Overclocking a GPU can significantly improve performance but also introduces risks like overheating or instability. Stress testing helps determine the highest stable clock speeds and voltages. That way, your overclocking attempt will not compromise the system’s reliability.
- Identifying potential hardware issues
Stress tests push the GPU to its limits, which can reveal underlying hardware problems not apparent during regular use. Issues such as faulty memory, inadequate cooling, or power supply deficiencies come to light, allowing for early intervention before they cause data loss or hardware failure.
- Thermal performance assessment
Effective cooling is crucial for maintaining GPU performance and longevity. Stress testing helps assess whether your current cooling system (air or liquid) can keep the GPU within safe temperature levels under heavy load. This way, you can identify the need for better cooling solutions or adjustments to prevent thermal failure.
Related: Ultimate Guide: How to Stop a Laptop from Overheating
- Benchmarking and performance comparison
While stress testing primarily focuses on stability, it can also offer insights into the GPU’s performance relative to others. This is particularly valuable for enthusiasts and professionals who need to ensure their hardware meets specific performance metrics for their applications or games.
While both stress testing and benchmarking involve pushing the GPU, their objectives differ. Stress testing focuses on stability and endurance under maximum load, while benchmarking measures the GPU’s performance under various conditions to provide a quantitative score.
- Identifying other potential problems
High GPU loads can sometimes expose vulnerabilities in system hardware or software. For example, a GPU driver might be buggy, corrupt, or incompatible with the processor, causing stability issues. Sometimes, even Windows updates can interfere with the GPU’s operations.
Further Reading: The Why and How of Computer Stress Tests: A User’s Handbook
How to Choose the Right GPU Stress Test Tool
Selecting the appropriate tool for GPU stress testing involves considering several factors:
- Compatibility: Ensure the tool supports your GPU architecture, operating system, and driver version.
- Features: Look for tools that allow detailed configuration of test parameters and offer real-time temperature, clock speed, and voltage monitoring.
- Reputation: Opt for tools with strong reputations in tech communities, indicating reliability and accuracy.
Preparation Before GPU Stress Testing
You should ideally do the following before you begin stress testing:
- Update drivers: Ensure your GPU drivers are up to date to avoid any compatibility issues. Using the latest software for your GPU also helps you assess the processor more correctly, as you’ll be using the latest software technologies while running the test.
- Check your system: Confirm that your cooling system is functioning correctly and that your power supply unit (PSU) can handle the increased load. You need reliable cooling to ensure your computer does not suffer overheating during the test. Your PSU must also supply the required load to the GPU to ensure it can reach its maximum clock speed.
Related: Quick Tips: How to Control CPU Fan Speed on Windows PCs
- Overclock your GPU: If you intend to overclock your GPU, this is the best time to do it. Enter your settings now before running the stress test. That way, you’ll be measuring your overclocked GPU’s stability and performance.
- Back up data: Although rare, stress testing can cause system crashes. Backing up important data is advisable.
- Use the right performance settings: You should apply the settings you intend to use when running your regular applications. For example, you can switch to the Ultimate Performance power option if you intend to use it when running games and other demanding applications.
- Establish a baseline: After applying your settings and closing every other application, take note of your computer’s temperature and GPU clock speed in its current state.
How to Perform the GPU Stress Test
The GPU stress test involves running a benchmarking or stress testing tool. These steps will show you what to do from start to finish.
-
Install the stress test software
Download and install your chosen GPU stress test tool using the brief guide we provided above. This could be a dedicated tool like FurMark, 3DMark, or Unigine suites, which are designed specifically for putting GPUs through intensive workloads to test their limits.
-
Install reporting utilities
There are different tools that you can use to monitor the following metrics while you test your GPU:
- Frame rate: The FPS (frames per second) that your GPU can maintain throughout the test, depending on your settings. You can use tools like FrameView and OCAT (Open Capture and Analytics Tool).
- Temperature: This metric determines how well your cooling system is keeping the GPU cool. It also measures the processor’s power efficiency. Anything above 95°c might be too dangerous. You can install tools like MSI Afterburner and HWiNFO to monitor temperature.
-
Run the test
- Launch the stress test tool: Open your chosen GPU stress test application.
- Configure test parameters: Before starting the test, you’ll need to set up the parameters.
This involves selecting the resolution, graphical settings, and test duration that best match your regular usage or the maximum capabilities you want to test.
- Start the stress test: The software will render complex scenes or perform calculations that push your GPU to its maximum capacity. This is where your GPU’s performance and stability are truly challenged.
How to use the best GPU stress test tools
You can’t run a synthetic GPU stress test without a stress test tool. As mentioned, these tools simulate gaming and 3D rendering processing demands to subject the GPU to heavy loads.
FurMark
FurMark is one of the most popular stress testing tools around. It puts so much load on your GPU that even NVIDIA warns users against running the tool . FurMark also warns you about the dangers of using the tool once you run it. However, you can apply custom presets and other safety precautions, such as temperature warnings. That way, the tool can warn you when your GPU is hitting unsustainable temperatures. Follow these steps to use FurMark:
- Go to the Geeks3D website to download the latest version of the program.
- Install the utility and run it.
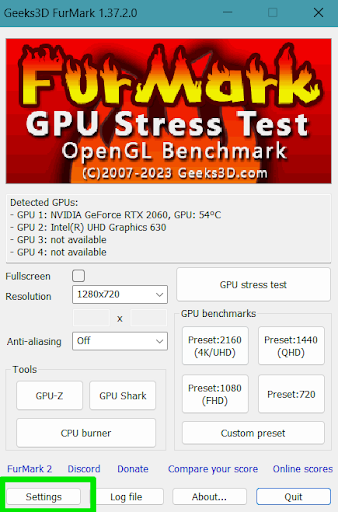
- The tool’s window will now appear, showing details of the GPUs it detects alongside options for presets.
- Click the Settings button in the bottom-left corner to open advanced options.
- The FurMark settings dialog shows 3D test options and allows you to turn on the temperature alarm and set the benchmarking duration.
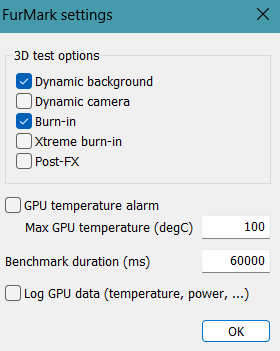
- Click OK after entering your settings.
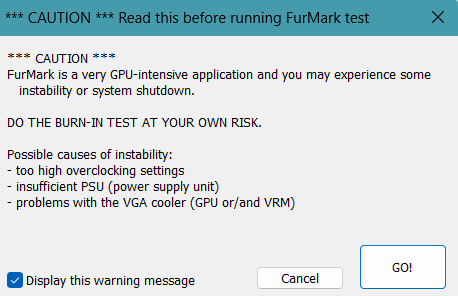
- Clicking the GPU stress test button will trigger a warning dialog. You can click GO! to start the test.
Unigine Heaven
Unigine Heaven is another freeware stress testing tool with benchmarking capabilities. It strains your GPU by rendering a demanding 3D environment, allowing you to evaluate your GPU’s performance.
Follow these steps to use it:
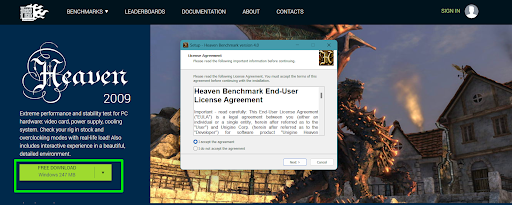
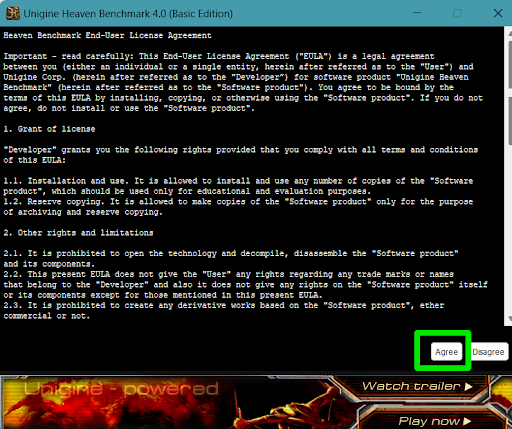
- Launch the program and accept the terms.
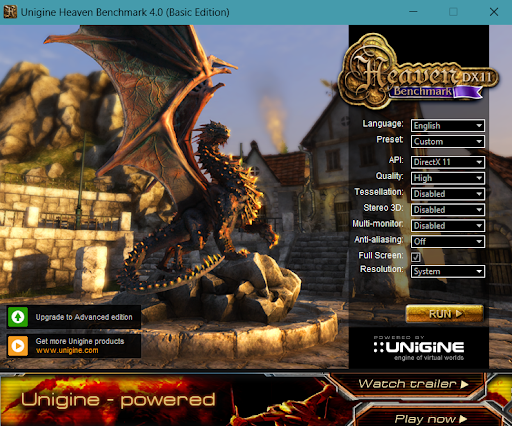
- Once Unigine Heaven opens, you’ll see a window that allows you to select different options, from resolution to API and quality.
- Click the Run button to start the test after choosing your presets.
3DMark
3DMark is a benchmarking tool that pushes your GPU and provides a score at the end of the test. While you can access the basic stress testing utility for free, you need the paid version to run other advanced tests.
Follow these steps to use 3DMark:
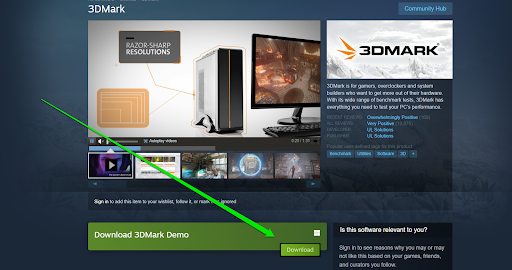
- You have to go through Steam to obtain the demo version of 3DMark. That means you must have Steam installed on your computer.
- After installing the program, you only have to click the Run button, as it will automatically detect your graphics card, CPU, and other PC specs.
- It will now run the test and provide results.
Also Read:
Crucial Steps: How to Effectively Stress Test CPU
Monitoring during the test
- Watch the FPS and frametime: Use the built-in metrics in your stress test tool or third-party software (like OCAT) to monitor the FPS and frametime. These indicators will help you understand how smoothly your GPU can render the test scenes under load.
- Keep an eye on temperature: Monitoring GPU temperature during the test is crucial. Use the monitoring tools you installed, such as HWiNFO, MSI Afterburner, or your stress test tool’s built-in temperature monitor to track your GPU’s temperature figures and ensure they don’t exceed the manufacturer’s recommended maximums.
- System stability: Observe your computer’s stability throughout the test. Look out for crashes, graphical glitches, or errors, as these can indicate that your GPU is being pushed beyond its stable operating limits.
Synthetic benchmarks and stress testing tools cannot always show you the real picture, as the result is based on those specific tools.
If you intend to use the GPU primarily for gaming, run the games you intend to play. Choose their highest settings and use monitoring tools to measure how your GPU holds up. Some games, such as Ashes of the Singularity, Forza Horizon 5, and Cyberpunk 2077, have built-in benchmarks that can help evaluate your GPU.
Further reading: How to Keep Your Windows 10/11 Laptop Cool While Gaming?
After the Stress Test
- Analyze results: Review the data collected during the test. Did your GPU maintain acceptable temperatures? Were there any performance drops, crashes, or instability issues? This information will help you understand the component’s limits so you can decide whether to upgrade or reduce the load you intend to feed the GPU.
- Make adjustments if necessary: If you encounter any issues during the test, consider making system adjustments. These adjustments can include improving cooling, tweaking overclocking settings, updating drivers, and installing a new graphics card . You can test again after your adjustment to find a stable configuration.
- Periodic testing: Periodically running stress tests, especially after making changes to your system by installing new hardware, means you can stay updated about your system’’s capabilities under pressure.
Benefits of Periodic GPU Stress Testing
While it’s not advisable to run stress tests all the time, you should check your GPU from time to time, especially to confirm whether it can withstand the pressure of newly released games and other sanding software. The following are the benefits or running periodic tests:
- Identifying cooling and performance issues before they cause damage.
- Ensuring stability after system changes, such as overclocking or hardware upgrades.
- Providing peace of mind that your GPU can handle demanding applications.
Also Read:
Stress Test Secrets: How to Stress Test RAM Right
Conclusion
Remember to take precautions before you start stress testing your GPU. It’s also recommended that you run the stress test when you replace your GPU. That way, you can assess the new component.
Please go to the comments section below to let us know if you need further help. You can also share your GPU-testing experience with us, explaining your results and challenges.