![[EASY GUIDE] How to Fix Windows Detected a Hard Disk Problem Error](https://www.auslogics.com/en/articles/wp-content/uploads/2023/10/shutterstock_1825915115-1-568x359.jpg)
- Method 1: Checking Your Drive’s Health
- Method 2: Using Startup Repair
- Method 3: Using CHKDSK
- Method 4: Using Auslogics BoostSpeed’s Disk Tools
- Method 5: Using the Repair-Volume cmdlet in Windows PowerShell
- Method 6: Using the System File Checker
- Method 7: Removing Malware
- Method 8: Restore Windows to a More Stable State
- Wrapping Up: Do Not Rule Out Backing Up Your Drive
- FAQ
It is only natural to start worrying when you encounter disk errors on Windows. One message dialog that makes users panic reads this:
“Windows detected a hard disk problem.”
“Back up your files immediately to prevent information loss, and then contact the computer manufacturer to determine if you need to repair or replace the disk.”
The dialog also gives you options to back up your files or set a reminder to show up later.
This error message generally warns you of serious issues that can result in complete data loss.
If you’re one of the users asking, “How do I fix disk errors in Windows 10 without using any software?” because you keep seeing the dialog, we’ve got you covered. We will show you ways to resolve the issue using built-in Windows tools and reliable third-party software.
Also Read: Ultimate Guide: Fix Hard Disk Errors 303, 305 & SMART 301
Method 1: Checking Your Drive’s Health
Before digging into how to fix drive errors, knowing if your drive is healthy or malfunctioning will be helpful. You can learn about your hard drive’s condition using different built-in Windows tools. They include the Security and Maintenance section of the Control Panel, the Error Checking tool, and the SMART function.
We’ll go through the different tools one after the other.
Using Control Panel’s Security and Maintenance section:
- On your keyboard, press the
Windows Key. - Type
Control Panel, then hitEnter. - Select System and Security and click Security and Maintenance.
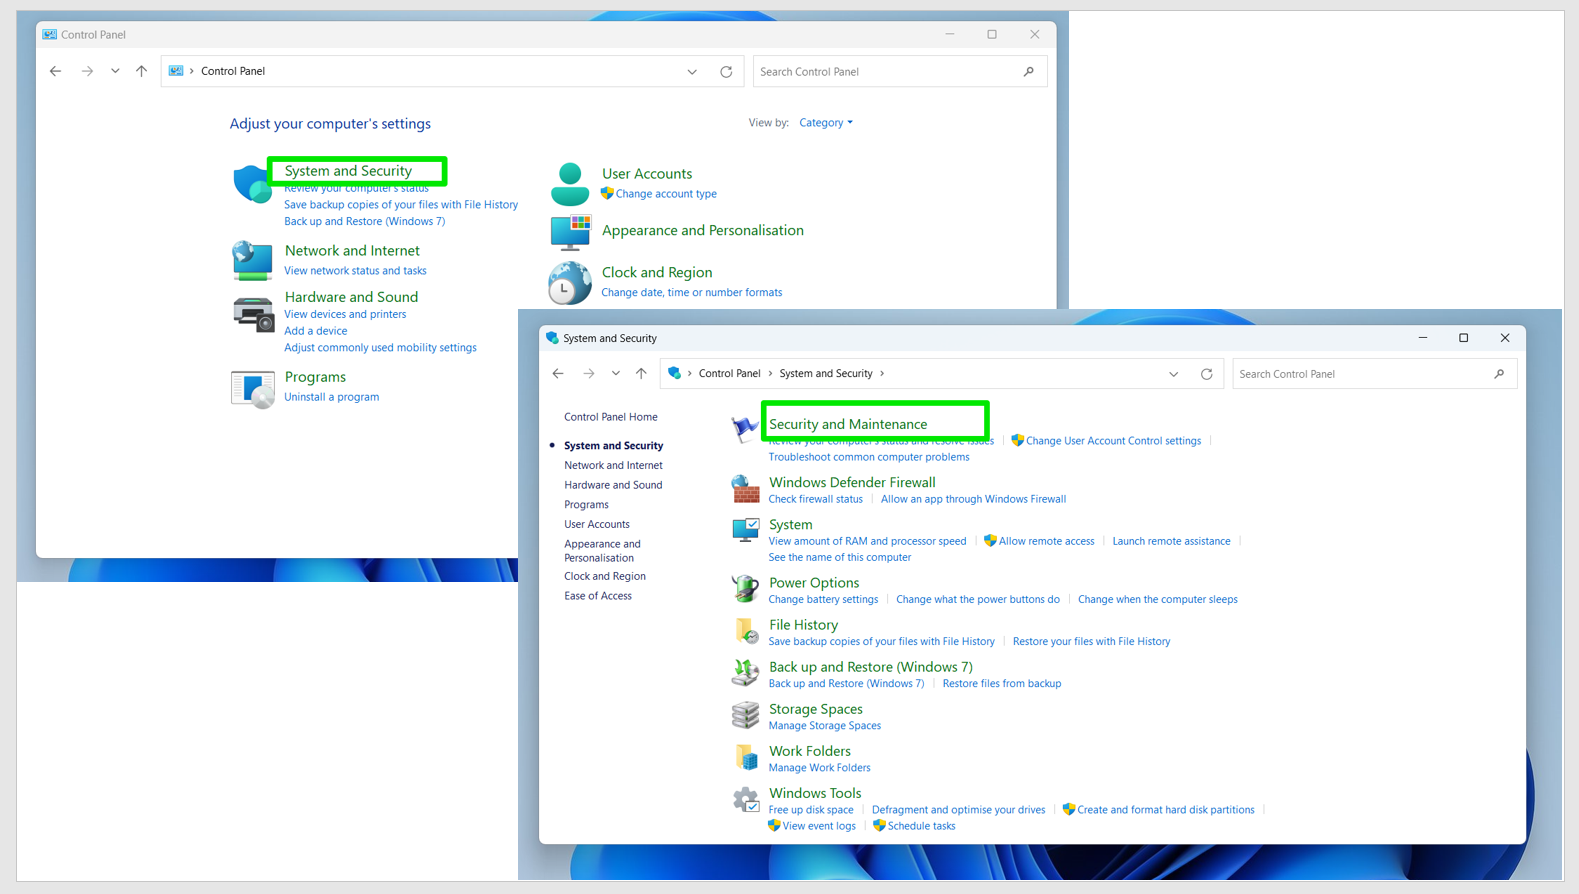
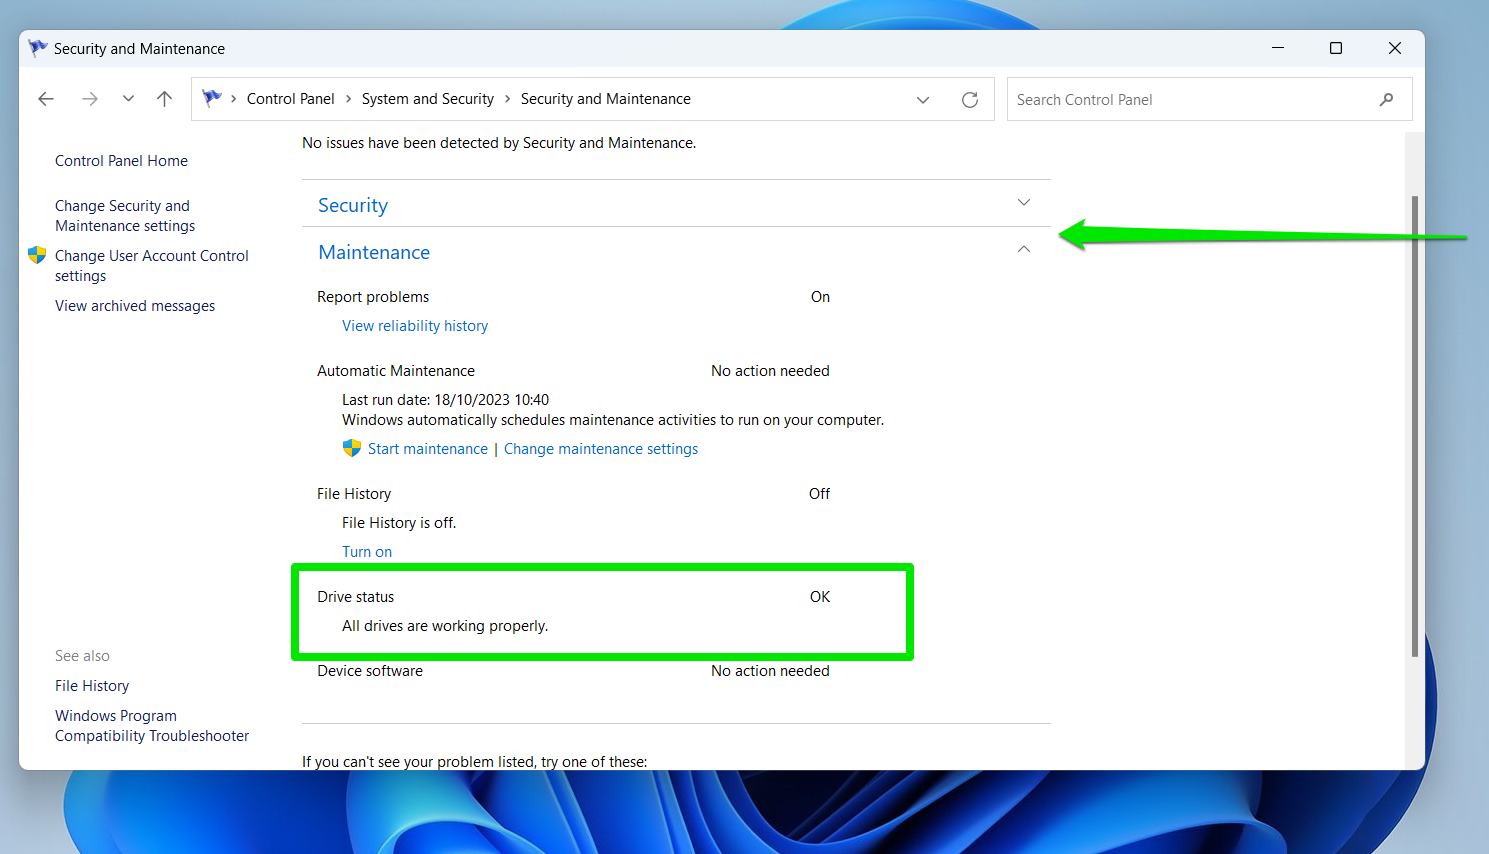
- Inside the Security and Maintenance page, click Maintenance to expand its contents.
- Scroll down until you find Drive status. You will be able to see existing hard drive issues here. Otherwise, the section will display a message saying, “All drives are working properly.”
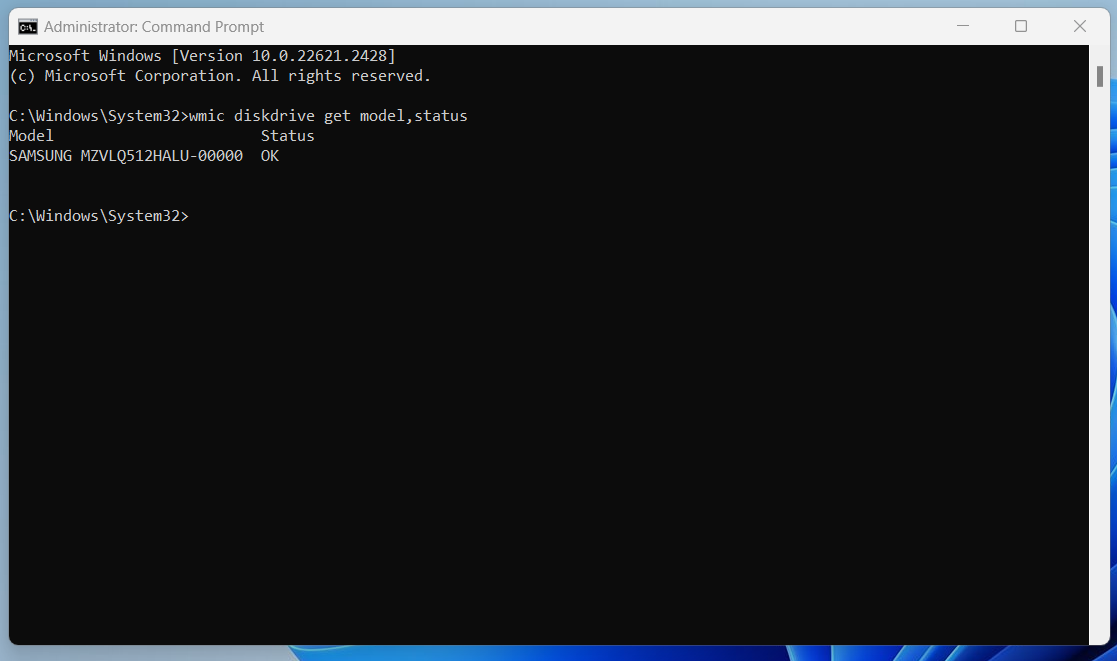
Using the SMART (Self-Monitoring, Analysis, and Reporting Technology) test:
- Go to the Start menu and launch Command Prompt as an administrator. Type
CMDand click Run as Administrator. - Type the following command and hit the
Enterbutton:
wmic diskdrive get model,status
You’ll see a simple OK message under status if everything is alright with your disk.
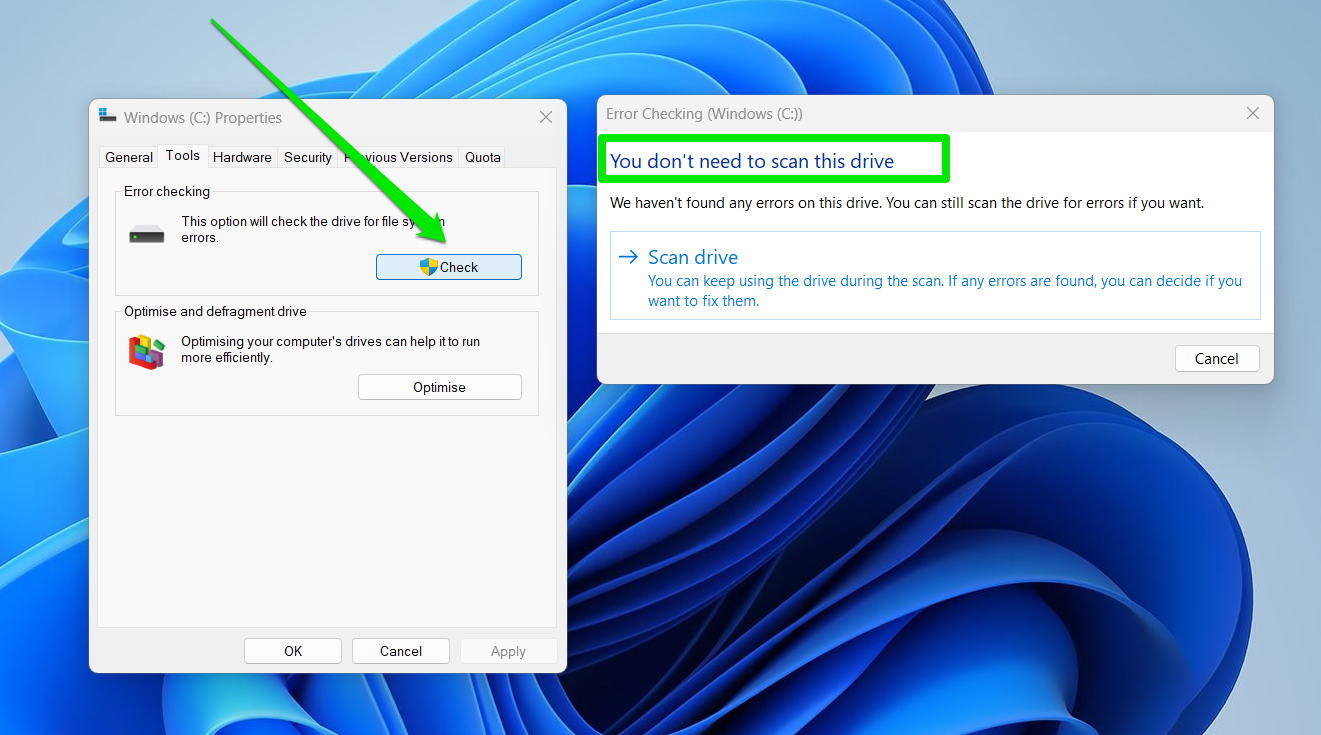
Using the Error Checking tool:
- Launch File Explorer, right-click your drive in the left navigation pane and select Properties.
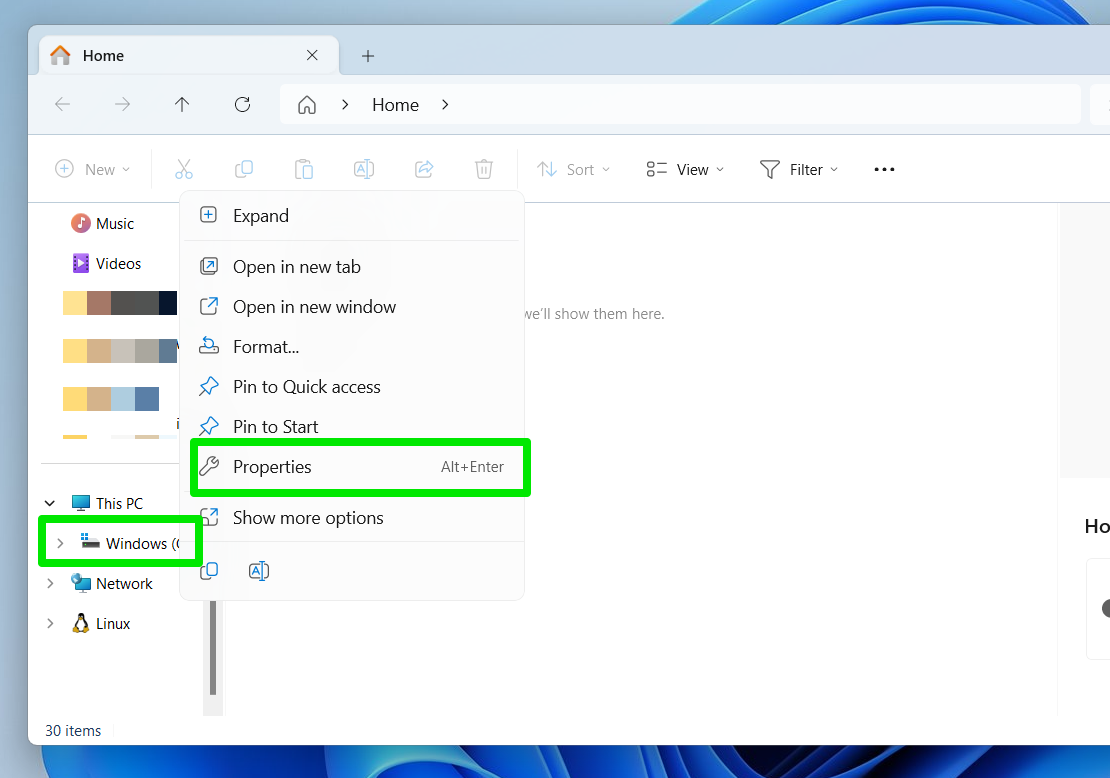
- Go to the Tools tab of the Properties dialog and click Check under Error checking.
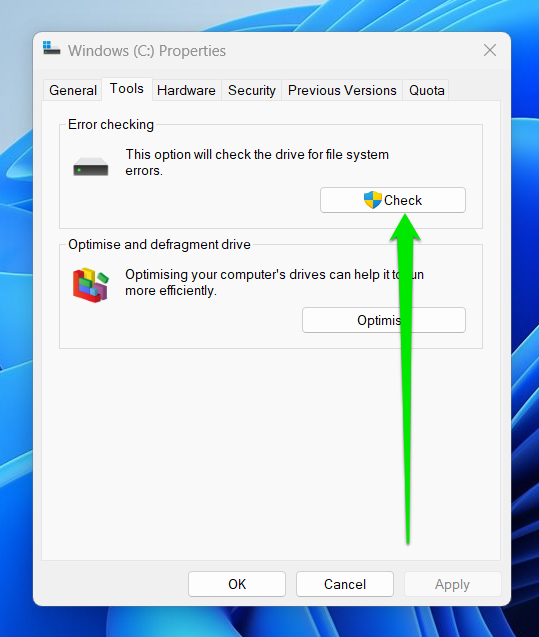
- You’ll get a quick response telling you you do not need to check the drive to see if everything is alright. On the other hand, the dialog may read, “ Windows found errors on this drive ” if the hard drive has problems.
Also Read: How to Run Hard Drive Diagnostics on Windows PC?
Method 2: Using Startup Repair
You need a Windows 10 installation disc or bootable USB drive to use the Startup Repair feature. The feature is Microsoft’s built-in tool for troubleshooting boot-related issues. It can clear the “Windows detected a hard disk problem” dialog if your hard drive’s boot sector is causing the issue.
Also Read: How to Get And Use Windows 10 Media Creation Tool
These steps will show you how to fix disk errors using Startup Repair:
- Plug the bootable USB drive or insert the installation disc into your computer.
- Press the power button to turn on your computer.
- Plug the bootable USB drive or insert the installation disc into your computer.
- Press the power button to turn on your computer.
- Remember to press the Boot Menu option key immediately after your system starts. Usually, you can enter the Boot Menu by pressing
F12on your keyboard. However, the key varies. So, it is best that you consult your motherboard manual.
Also Read: How to Change Boot Order in BIOS in Windows 10/11
- Select the bootable USB drive by pressing your keyboard’s up/down keys.
- Once you’ve selected the bootable USB drive, hit
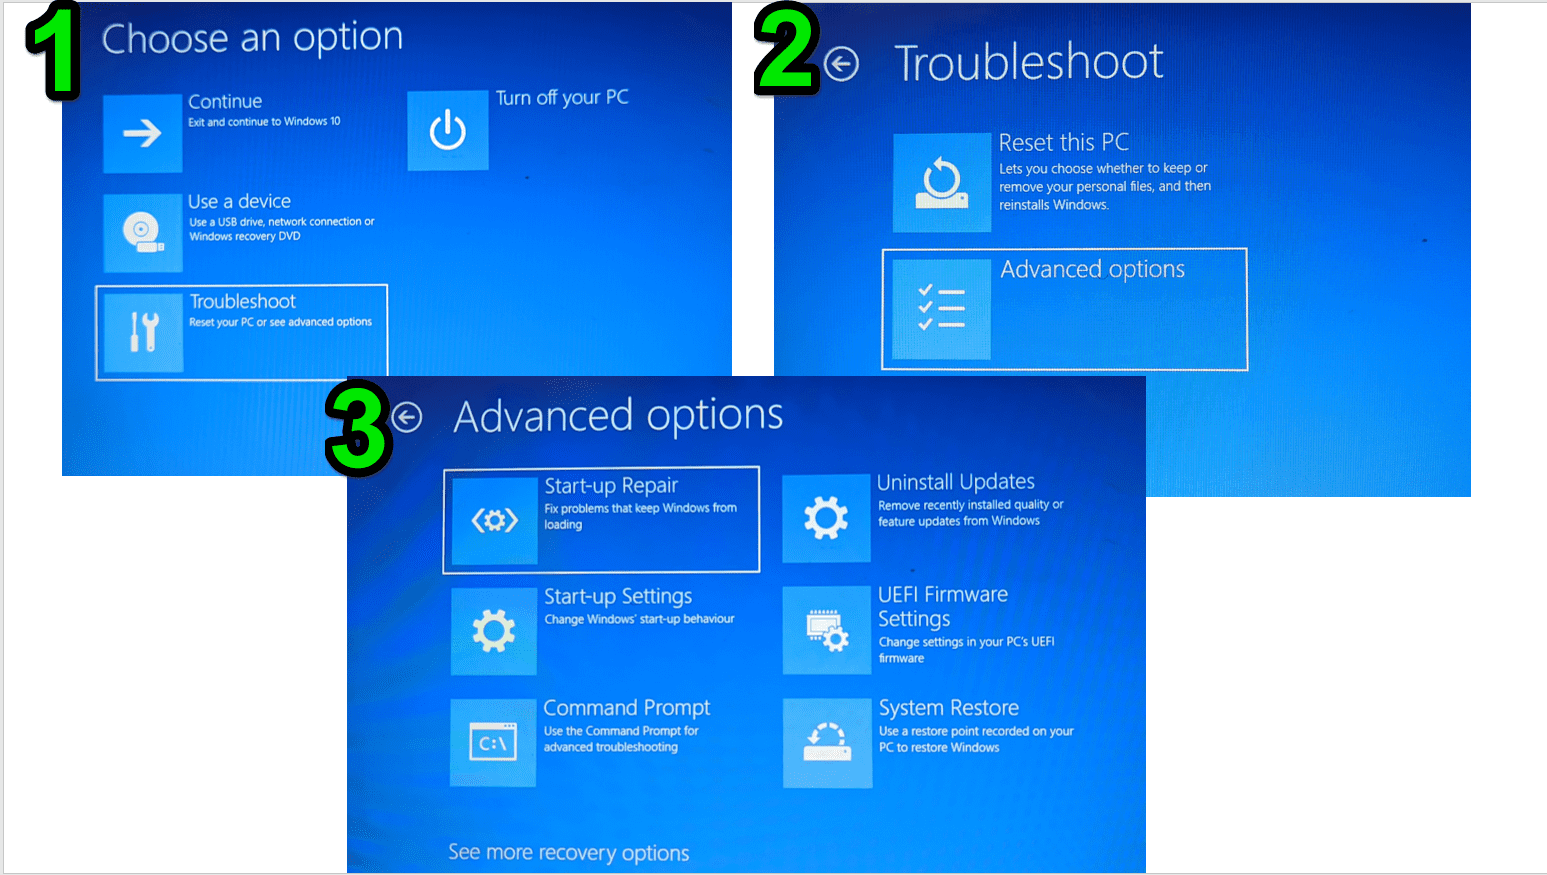
Enter. - When you reach the Windows setup screen, click Next, then select Repair your Computer.
- Follow this path:
Troubleshoot ->Advanced options ->Start-up Repair
- After the repair process is complete, unplug your bootable USB drive.
- Restart your computer and let your system boot normally.
Also Read: How to Speed Up Windows 10 Startup and Make Your PC Boot Faster?
Method 3: Using CHKDSK
One of the great things about Windows is its tool that can find and fix errors on hard drives. By using the CHKDSK utility, you will be able to resolve most issues that cause your hard drive to become inaccessible.
You can follow our guide on checking for and fixing disk errors with CHKDSK to use the tool.
So, once the process is complete, you will notice shorter application startup times and a general improvement in the speed of your PC.
Method 4: Using Auslogics BoostSpeed’s Disk Tools
Auslogics BoostSpeed is a system optimization program designed to improve your computer’s overall performance. It has numerous tools dedicated to different PC hardware and software components.
Its range of disk tools can help you defragment your hard drive, find and fix disk errors, recover files, and free up storage space.
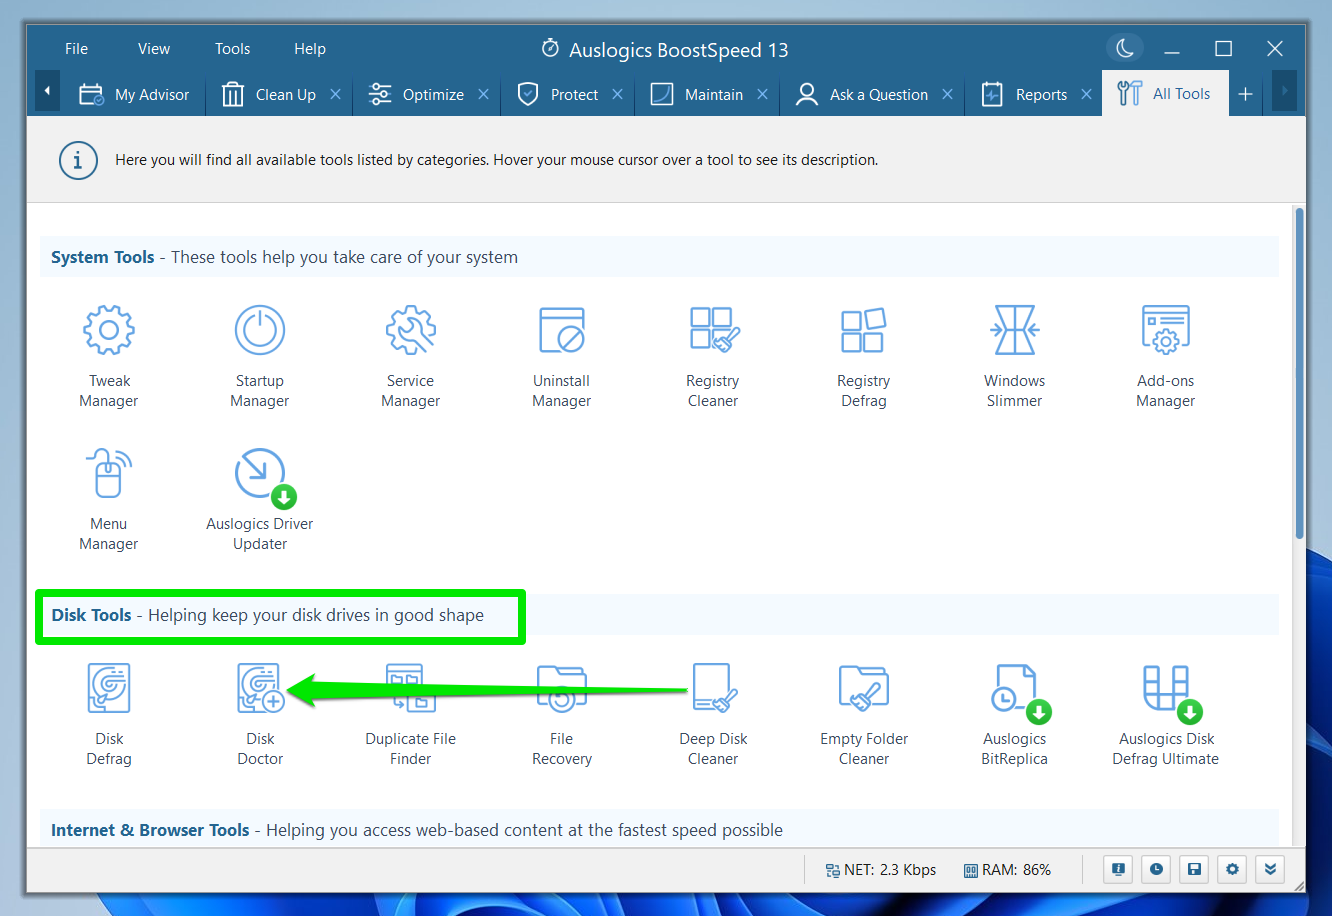
The Disk Doctor can show you why Windows 10 detected a hard disk problem . Follow these steps to use it:
- Download and install Auslogics BoostSpeed.
- Switch to Advanced mode after the dashboard appears and click My Tools.
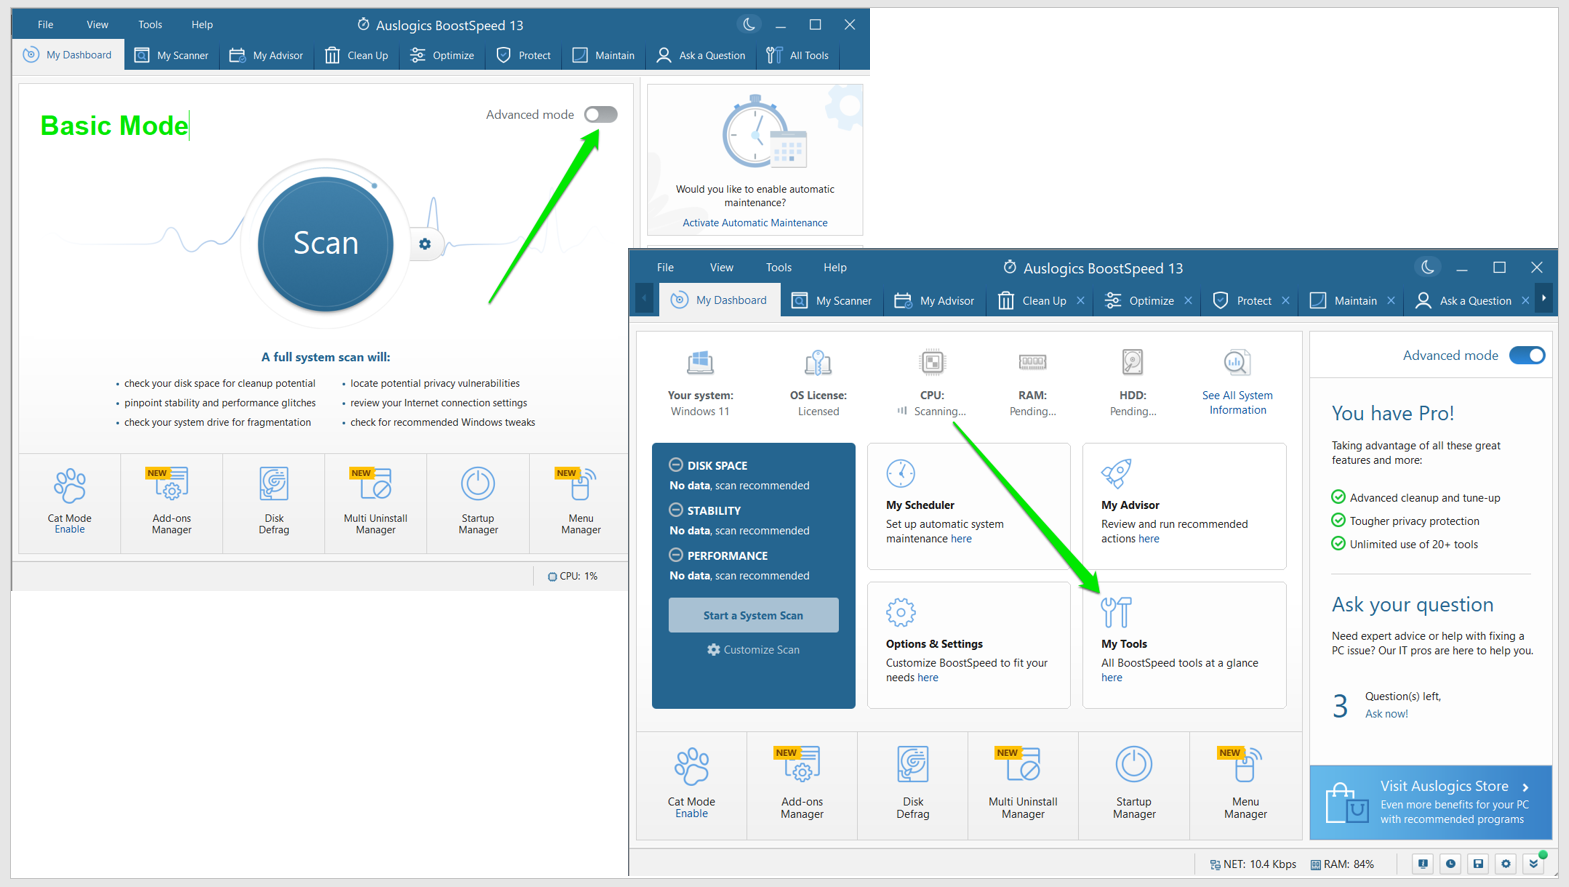
- Go to the Disk Tools section and select Disk Doctor.
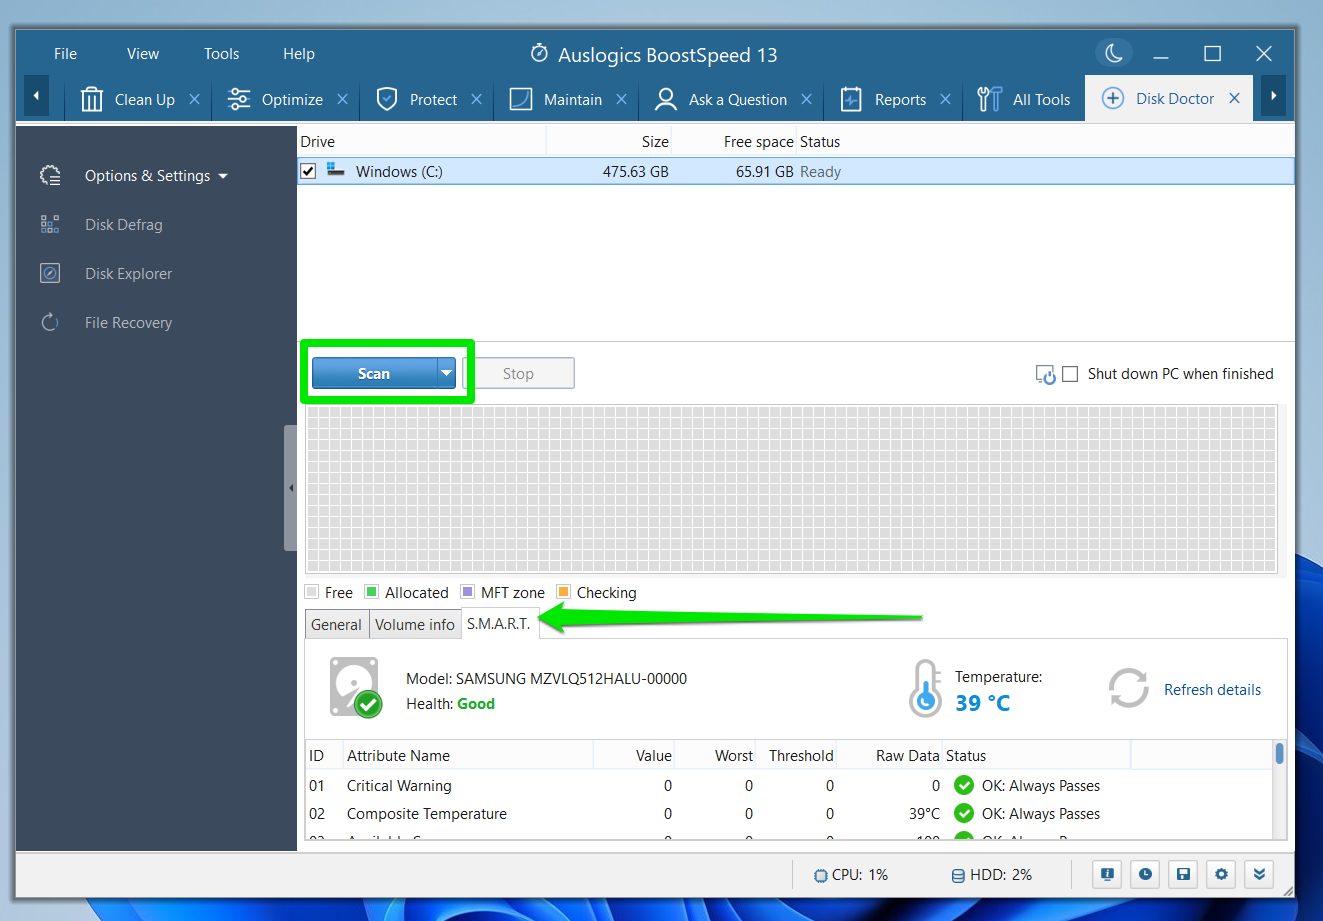
- Select the drive you want to scan.
- Before you start the scan, you can go to the bottom of the screen and switch to the S.M.A.R.T. tab to check the drive’s status.
- You can now click on the Scan button to check for errors.
Also Read: Speed Up Slow Computer as a Pro – Introducing Auslogics BoostSpeed 13
Method 5: Using the Repair-Volume cmdlet in Windows PowerShell
Now, you might ask, “How do I fix a disk error with a manual command on Windows 10?” Well, you can access Windows PowerShell and use the Repair-Volume command. It’s a built-in utility similar to CHKDSK, designed to find and fix hard drive errors . It can potentially find issues triggering the “Windows found errors on this drive” issue and resolve them.
Here’s how to fix hard drive errors through Windows PowerShell :
- Go to your taskbar, then right-click the Windows icon.
- Select Windows PowerShell (Admin) from the options. If you’re on Windows 11, select Terminal (Admin).

- Once Windows PowerShell (Admin) is up, type
Repair-Volume -DriveLetter C -Scanand hitEnter.
If you have multiple drives, you can type their drive letters beside each other without spaces, and the tool will scan them. For example, you can scan drives C, D, and E using the following command:
Repair-Volume -DriveLetter CDE -Scan
Press Enter to proceed. If the results show errors, run the command in the next step.
- Type
Repair-Volume C –OfflineScanAndFix, then hitEnter. - After running the commands above, restart your computer.
- Repeat Steps 1 to 2, then type
Repair-Volume C –Scan. HitEnterto see if the errors have been fixed.
Also Read: Most Useful Powershell Commands: Cheat Sheet with Examples
Method 6: Using the System File Checker
The “ Windows has detected a hard disk problem ” error might result from a corrupt system file. That’s because Windows may report your hard drive problematic if it cannot read some of its core files. You can use the System File Checker (SFC) to check if your hard drive contains corrupt files and fix them.
Helpful Read: How to Find and Fix Corrupted Files in Windows 10
Follow these steps:
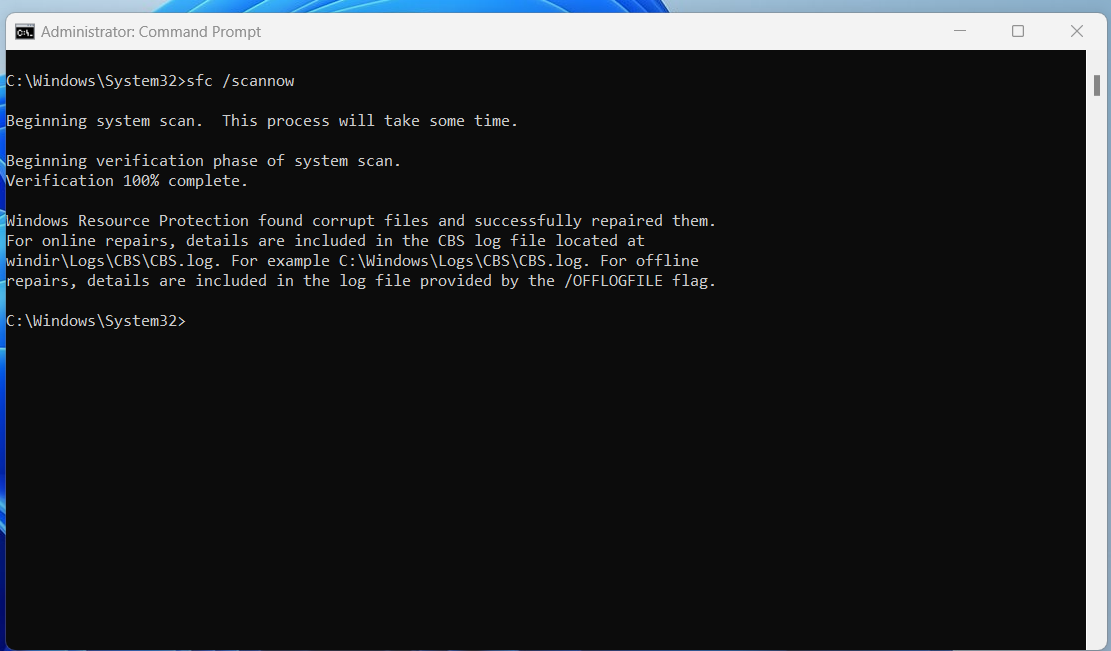
- Launch Command Prompt as an Administrator.
- After Command Prompt opens, type the following line and press the
Enterkeyboard button:
SFC /scannow
- Allow the scan to run, as it may likely take a while.
- You’ll get a completion message that conveys the findings of the scan.
If you see a message that says, “Windows resource protection cannot perform the requested operation,” then SFC couldn’t scan your files. There are workarounds for this problem, such as running the scan in Safe Mode.
You can follow our guide on fixing the Windows resource error to resolve the issue.
Method 7: Removing Malware
Malware programs can tamper with file arrangements on hard drives and cause logical errors as part of their nefarious activities. When such issues occur, Windows may begin to report that it found a problem with your hard drive.
You can run a full scan with your antivirus program to eliminate the malicious program causing the issue.
Also Read: How to Remove Virus and Other Malware from Windows
Full scans take longer than regular checks, so you may have to be patient.
You should also ensure your antivirus application is up to date with the latest virus definitions to enable it to work effectively.
Also Read: How to Keep Your Software Up to Date
You can follow these steps to update Windows native antivirus and run the full scan:
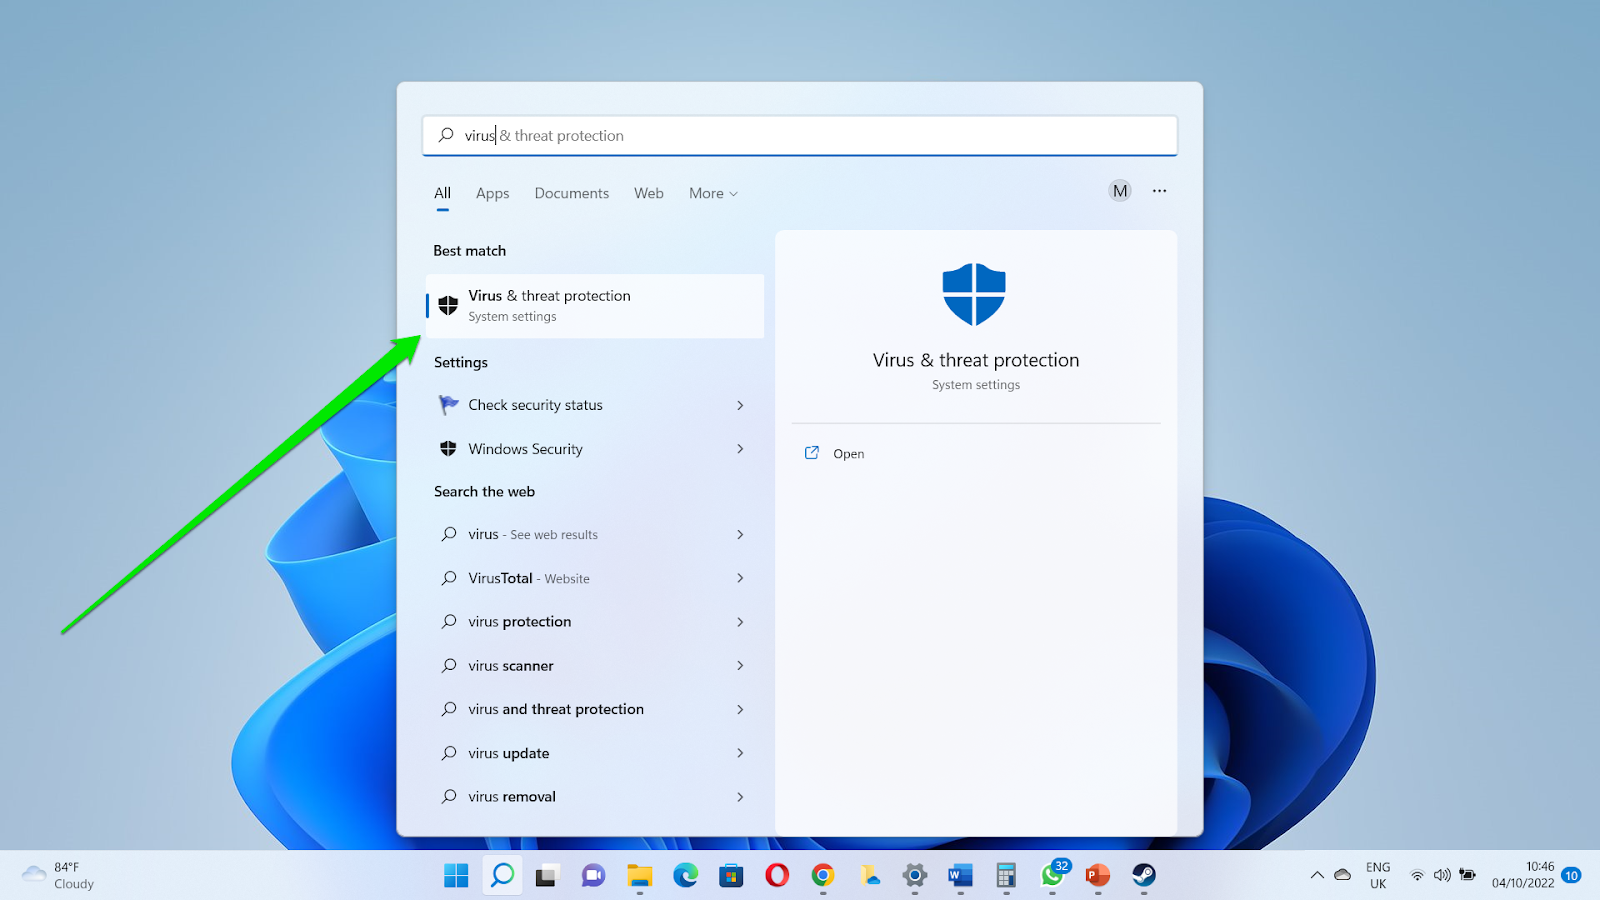
- Go to the Start menu and type
Virus. - Click Virus & threat protection on the Start menu’s search result page.
- Scroll to Virus & threat protection updates and click the Protection updates link.

- Click the Check for updates button.

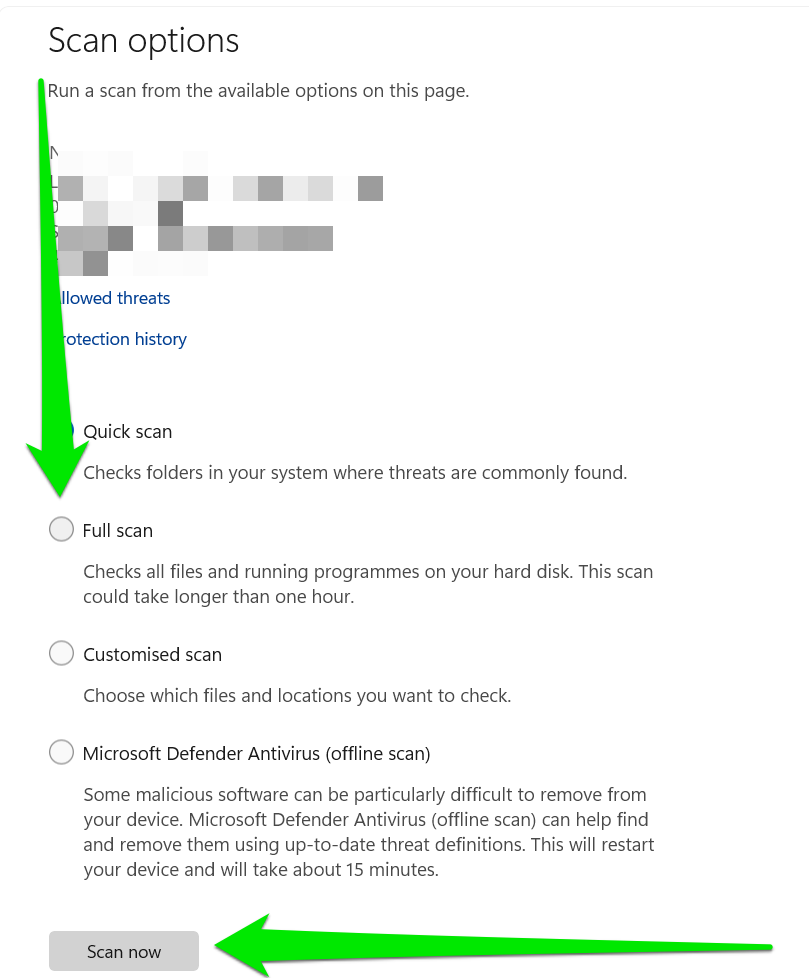
- Return to the previous page after the updates are complete and select Scan options in the Current threats section.
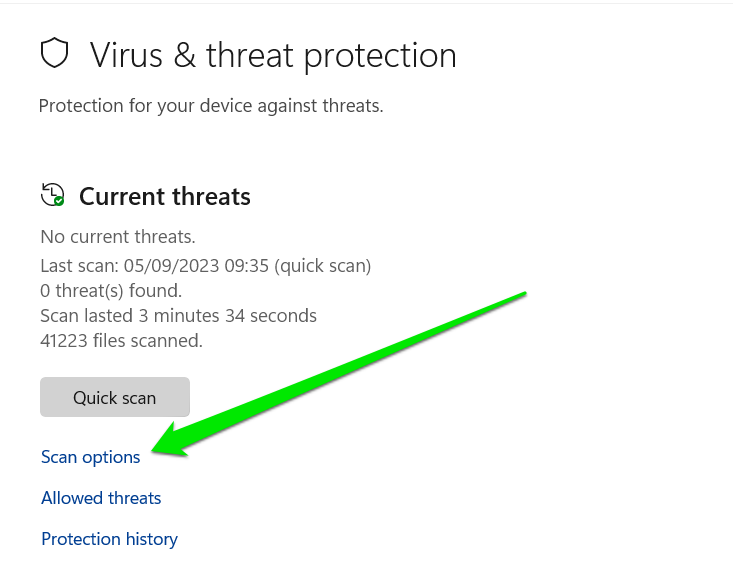
- Choose Full Scan and click the Scan Now button.
- Allow the scan to complete and check if the issue persists.
Helpful Read: How to Prevent Malware: Lock Down Your Online Safety
Method 8: Restore Windows to a More Stable State
Some changes you recently applied to your computer may cause the problem. An application, driver, or update you installed might conflict with some system components and trigger the error.
The System Restore utility will help you undo those changes and return Windows to a more stable state. You can follow our complete guide on restoring Windows to fix the problem.
Also Read: Windows 10 Backup Guide: Backing Up to an External Hard Drive
Wrapping Up: Do Not Rule Out Backing Up Your Drive
Regardless of the results of any SMART test or scan, you shouldn’t rule out the fact that your hard drive may be faulty. Look out for signs that indicate imminent failure.
These signs include whirring, grinding, and clink sounds; frequent crashes, slow read times, and regular program glitches; read/write errors and missing and corrupt files; and increased heat. The BIOS may also fail to recognize the drive.
You should back your hard drive and prepare to replace it if you continually see those signs.