
- How to Find Autosaved Documents in Word
- Option 1: Activate the Word autosave feature Via Microsoft Word settings
- Option 2: Check the AppData folder
- Option 3: Use the option to recover unsaved documents
- Option 4: Check the recycle bin
- Option 5: Search Your Computer for .asd or .wbk Files
- Option 6: Check the document directory
- Option 7: Search for the document via search
- Conclusion
- FAQ
One of the most popular text processors in the world is undeniably
Microsoft Word. For most users, this program allows them to create text documents easily.
However, many of us tend to forget to save our work. This is also why the autosave feature exists: to help us avoid data loss.
If you’re wondering how to find, activate, and access the Word autosave location on Windows 10 and 11, you’ll be glad you found this article!
Today, we’ll teach you how to open the Word autosave location on Windows 10 and 11.
Read through this post to learn how to retrieve files that you forgot to save.
How to Find Autosaved Documents in Word
To use the autosave feature in Microsoft Word 2023, the file you’re editing must be saved in the Microsoft Cloud. If you’ve installed the latest Office version and wish to use autosave for your local files in Windows 11, follow these steps:
- Open the document and go to File > Info.
- Select Upload and then select Save to Cloud.
- Choose OneDrive or SharePoint.
Once this is done, you can go on with the steps below to locate your Autosaved Documents in Word.
Option 1: Activate the Word autosave feature Via Microsoft Word settings
Before you learn how to open the Word autosave location on Windows 10, you must know how to activate the feature first.
You can do that by following the instructions below:
- Launch Word, then click File.
- Select Options, then click Save on the left-pane menu.
- Make sure that the Save AutoRecover information option is selected. You can also choose your preferred time interval for automatic saving.
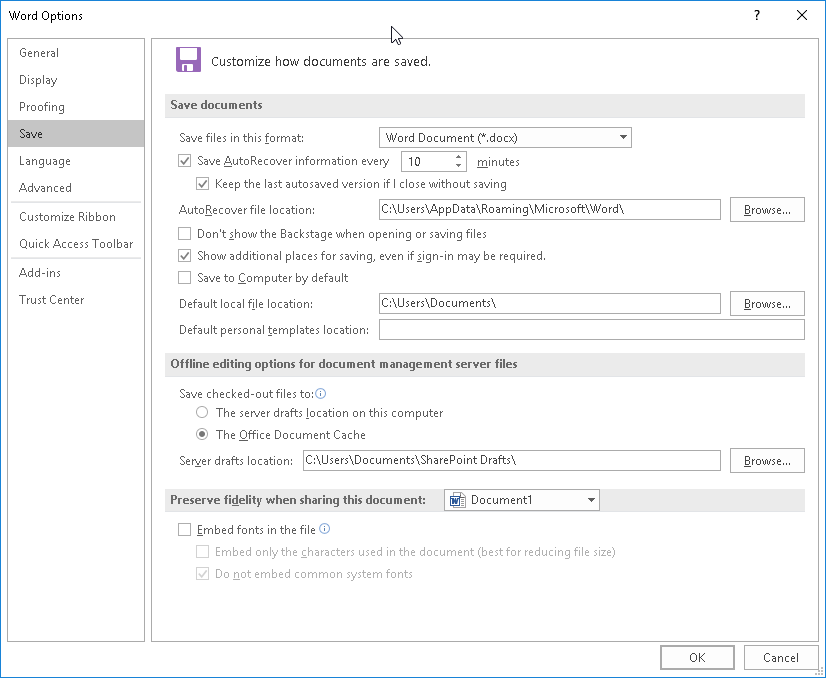
- Go to the AutoRecover file location field. Here, you will see the location of the autosave directory. By default, it is set to C:\Users\Your_username\AppData\Roaming\Microsoft\Word\. However, you can always change that to your preferred location by clicking the Browse button.
Once you’ve located the autosave location on your computer, you need to launch Word and navigate to the directory. Look for the automatically saved file and double-click it to open it in Word. The directory may be hidden on your computer, especially when it is located in the AppData folder. You can quickly access the folder by pasting the location in the address bar of File Explorer. Of course, you can still manually access that folder. You just have to follow the path. Remember to reveal the hidden items so you can see the AppData folder. Once you’ve done this, you will be able to access the Word autosave location without any issues. Despite several face-lifts, Microsoft gave to Windows 11, the procedure remains the same. So if you’re looking for how to open the Word autosave location on Windows 11, follow the same steps.
Option 2: Check the AppData folder
As we’ve mentioned, the default autosave location for Word is the AppData folder. Microsoft Word can save the files in various locations, including:
- C:\Users\Your_username\AppData\Local\Microsoft\Word and
- C:\Users\Your_username\AppData\Local\Temp.
- C:\Users\Your_username\AppData\Roaming\Microsoft\Word.
- C:\Users\Your_username\AppData\Local\Microsoft\Office\UnsavedFiles.
The aforementioned folders contain various types of Word files. Typically, the autosave files have a squiggly line or a tilde before the file name. They also have a .tmp extension along with a 4-digit number assigned to them. Here are some things to consider:
- A Word document inside an autosave folder will look like this: ~wrdxxxx.tmp.
- A temporary document file will look like this: ~wrfxxxx.tmp.
- An auto-recovery file will look like this: ~wraxxxx.tmp.
It is worth noting that complete auto-recovery files will not have a .tmp extension. Instead, you will see them with
Once you find one of those files, double-click it. Doing so will open the document in Word. Make sure you save the file after opening it.
Also Read: How to Delete Temporary Files from Windows 10 PCs
Option 3: Use the option to recover unsaved documents
If Word unexpectedly crashes or you accidentally close the program, don’t panic. You can still open the autosave location by following the instructions below:
- Open Word, then go to File.
- Select Recent, then click Recover Unsaved Documents.
- You will now be able to see the autosave location folder. Now, you can select the document you wish to restore.
Another option for accessing the autosave location would be to navigate to this path:
File ->Info ->Manage Versions ->Recover Unsaved Documents
Make sure you save the file once you open it.
Discussing document recovery, we absolutely cannot ignore the problem of accidentally deleting files on your computer.
Would you like to restore something that you have unintentionally deleted before? Use the File Recovery tool to get back the files you need.
Also Read: How to Recover Deleted Files on Windows 10
Option 4: Check the recycle bin
Another way to retrieve unsaved documents on Windows 11 is to check the Recycle Bin. Word often creates autosaves that, if not restored, end up in the recycle bin. You might also check there to restore a document you previously deleted.
- Double-click the Recycle Bin on your desktop to open it.
- Search through the files for your unsaved or missing documents. Pay attention to file names ending with .doc, .docx, and .dot extensions.
- If you find the document you’re looking for, right-click the file and select Restore to recover it.
Windows 10/11 (8, 7, Vista, XP)
Also Read:Ultimate Guide: How to Remove Recycle Bin from Desktop on Windows PC
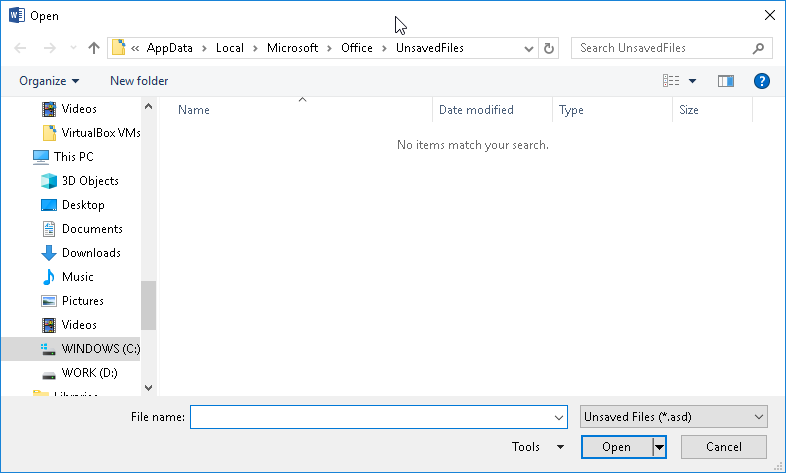
Option 5: Search Your Computer for .asd or .wbk Files
Word automatically saves your files. However, there are some instances when it can be difficult to find the autosave location. If you can’t find the autosave location, it would be ideal to search for the specific file extension.
Autosaved Word files typically have a .asd or .wbk file extension. You can search for these files by following these instructions:
- On your keyboard, press
Windows Key + E. This should launch File Explorer. - Once File Explorer is up, click the search bar in the top right corner.
- Type .wbk or .asd, then press Enter.
- Your system will search for all .wbk and .asd files. Right-click the file and select Open file location. This will open the Word autosave location, which allows you to see all your automatically saved files.
If you can’t locate any .asd or .wbk files, make sure to search for .tmp files. It is worth noting that .tmp files are not necessarily related to Word. Some might be part of other applications. To learn how to identify temporary files associated with Word, return to Option One. The Word autosave feature is indeed quite useful. However, autosaved files are still prone to corruption. If they get infected with viruses, you will lose them entirely. So, to protect your autosaved files and your entire system, make sure you use a reliable security tool like Auslogics Anti-Malware
.
This program detects common and unusual threats and attacks that may damage your files and your computer. With this program, you can rest easy knowing that your PC and your files are sufficiently protected.
Also Read:How to repair and recover a corrupted Microsoft Word file?
Option 6: Check the document directory
In some cases, the autosaved files can be found in the same directory where you saved your file. However, these files are typically hidden. You can reveal them by following the steps below:
- Launch Word.
- Go to File, then click Open.
- Click Browse, then navigate to the directory where you saved the file.
- Make sure you change the File type from All Word Documents to All Files.
- You should be able to see the backup file. This file is easily recognizable because it will have Backup of in its name.
- Open the file, then save it.
Option 7: Search for the document via search
It’s possible that you already saved the document but forgot about it, that you mistakenly saved it to a location that you can’t remember, or that you saved it to the cloud. This can happen in Windows 7, where the latest Word versions use OneDrive as the default save location. Try searching for the document on your Windows 11 PC:
- Hit the Windows key and then type the document name. If you can’t remember the name, use a combination of keywords.
- If the result list contains the document you’re looking for, click the document to open it.
Conclusion
Locating the Word autosave location on Windows 10/11 is a straightforward process that can save you from potential data loss and help you recover important documents.
By following the steps outlined in this guide, you can easily access and manage your autosaved files, ensuring that your work is safe and secure.
Can you suggest improvements to this article? Share them in the comments below!
If you’ve faced any other kind of problem-related to your PC, like your computer turning off without warning, let us know, and we’ll find a smart solution, especially for you.
FAQ
Ctrl + Fand type the word you’re looking for in the search bar. The tool will highlight all instances of that word in the article.To find recently saved files in Word, you can go to the “File” tab, select “Open,” and then click on “Recent.” Here, you’ll see a list of recently opened and saved documents.
You can also use the “Recent Documents” list on the Word start page.