- What Does Disk Cleanup Do?
- How to Perform a Disk Cleanup on Windows 10/11
- How to Automate Windows 10/11 Disk Cleanup
- Go Beyond Disk Cleanup: Use Storage Sense to Clean Unnecessary Files
- What Can You Delete in Windows Disk Cleanup?
- Community Advice and Troubleshooting Tips for Windows 10/11 Disk Cleanup
- Run Windows Disk Cleanup to Free Up Disk Space: Completed
- FAQ
As we continue to use our PCs, they accumulate every kind of junk, from old Windows updates, temporary internet files, to system cache. And these can take up lots of space and slow down the computer. However, you can use W indows Disk Cleanu p to get your space back and improve your computer performance. This utility is quite old (it was introduced back in 1998 on Windows 98), but it still gets the job done. Let’s find out h ow to free up disk space on your P C using Disk Cleanup. Let’s begin.
What Does Disk Cleanup Do?
Windows Disk Cleanup is a built-in utility in Windows 10 and 11 that helps you to free up space on your hard drive by removing unnecessary files.
Over time, temporary files, system cache, and old installation data gather up and take space. And that can slow down your system.
When you run Disk Cleanup, it identifies and safely deletes these files so that you can get the needed space for other relevant files.
The Deep Disk Cleaner function provides a comprehensive solution to clean junk files, cache, and temporary Windows files—all with one click. You can even automate the cleanup process on a regular schedule to ensure your PC stays optimized and under control effortlessly.
How to Perform a Disk Cleanup on Windows 10/11
Follow the below simple steps to clean your system using Disk Cleanup:
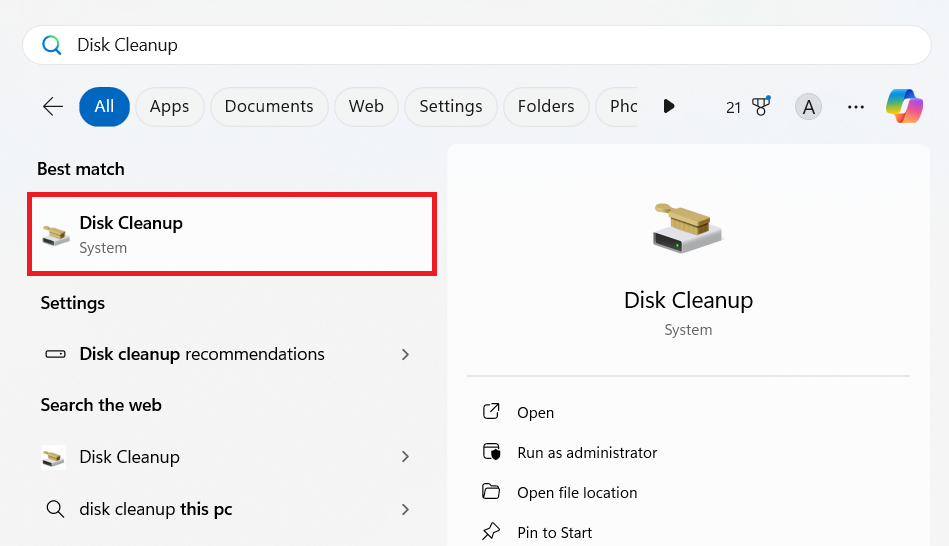
- Type in “Disk Cleanup” in the search bar and hit Enter.
- If you have multiple drives connected, you’ll have to choose the drive you want to clean up in the Disk Cleanup: Drive Selection window.

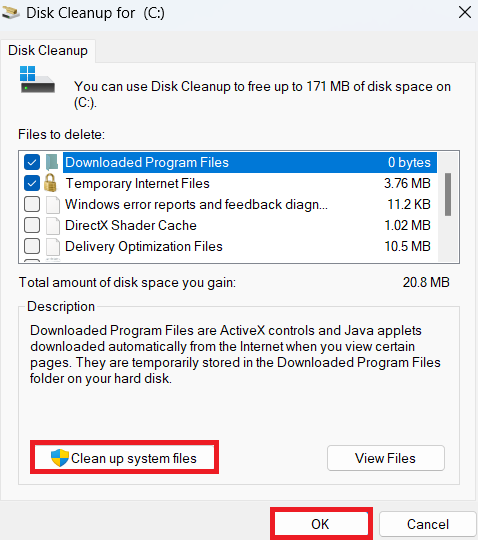
- When Disk Cleanup opens, select the files you want to delete and select OK to start the process.

- You can also use the Clean up system files feature to delete files like leftover data, Windows updates, old installation files, and outdated device drivers. Click on Clean up system files to activate it, select the files you want to remove, and press OK .
How to Automate Windows 10/11 Disk Cleanup
Windows Disk Cleanup doesn’t have an automatic feature to schedule the cleanup. However, you can use Task Scheduler for that. It’s a built-in tool used for, as you might have guessed, running programs or scripts at specific times or when certain events happen.
Here’s how to do it:
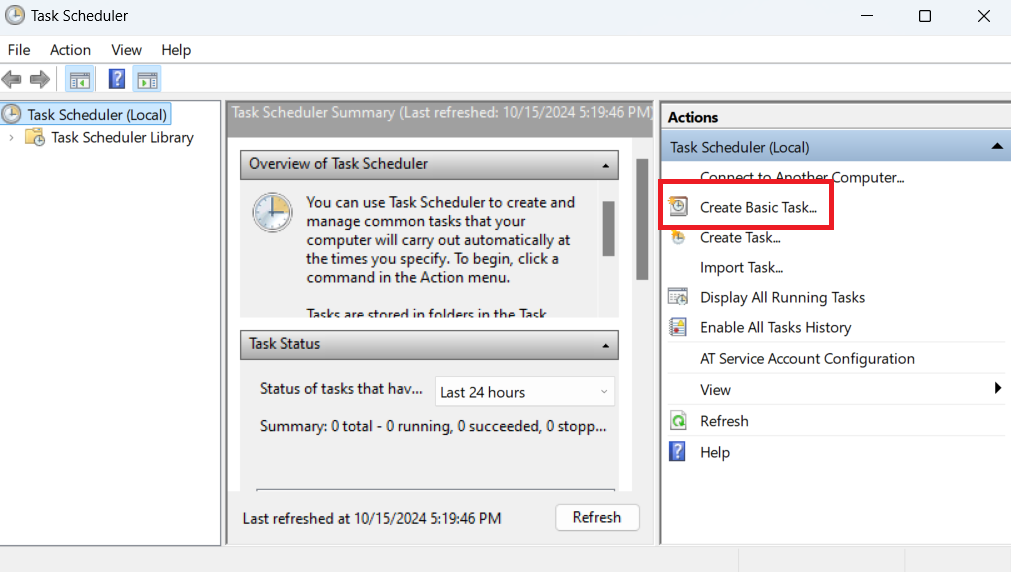
- Go to the search box, enter “Task Scheduler,” and click on the relevant result.

- When the window opens, click on Create Basic Task .
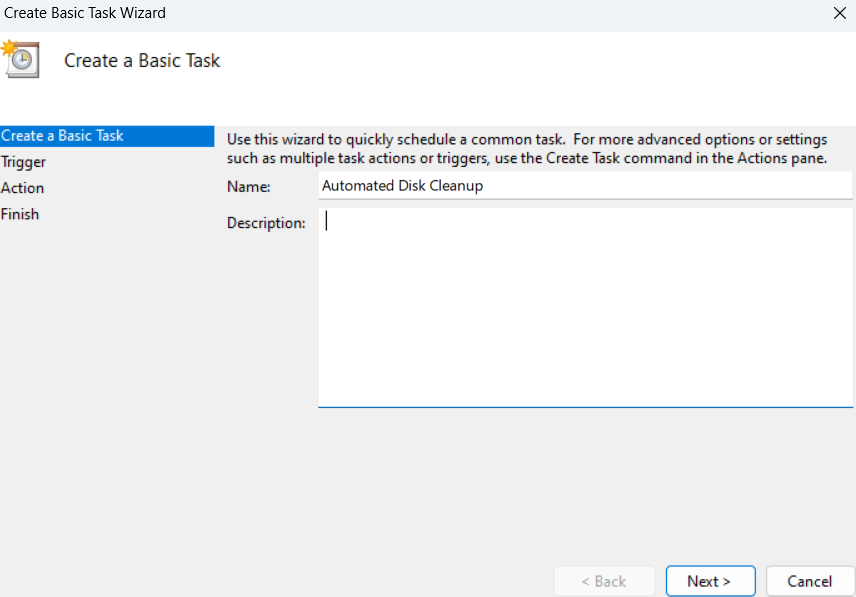
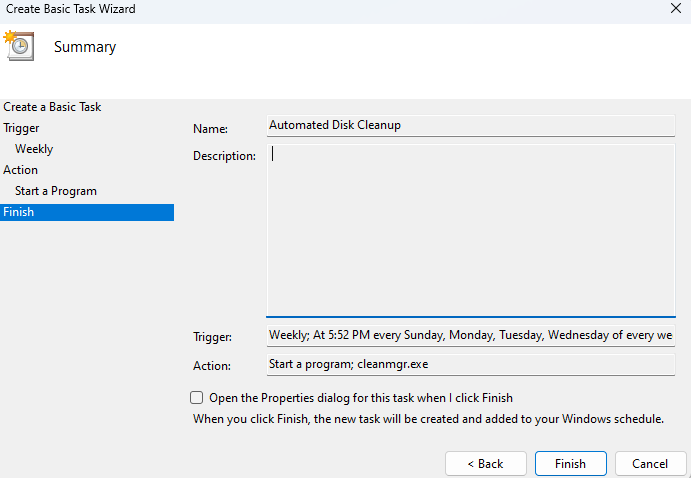
- In the Create Basic Task Wizard window, enter “Automated Disk Cleanup” in the Name section and click Next . You can leave the Description field empty.
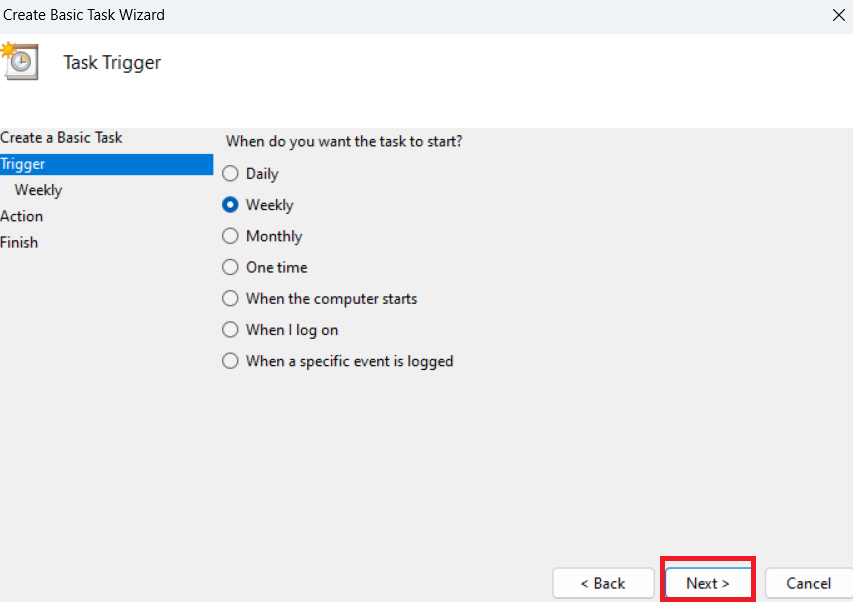
- Choose when you want Windows to begin the disk cleanup, whether daily, weekly, monthly, or when you start your computer, and select Next .
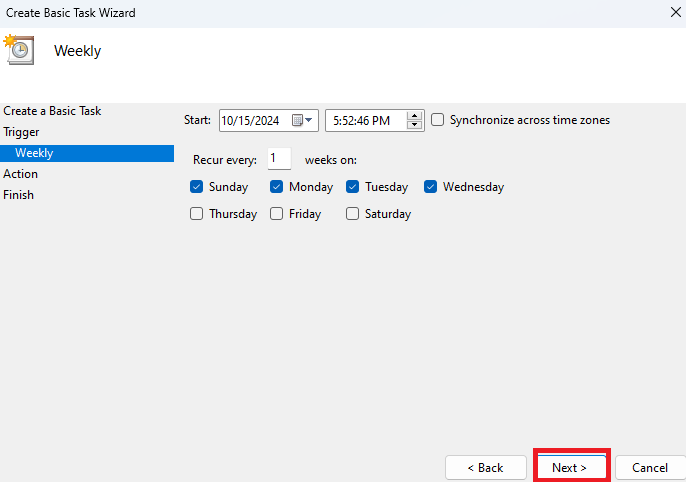
- You’ll have extra details to fill in, depending on the option you choose. For example, if you check the screenshot below, I’ll have to decide which recurring weeks and on what days Disk Cleanup will run. Fill in the information and go to Next .
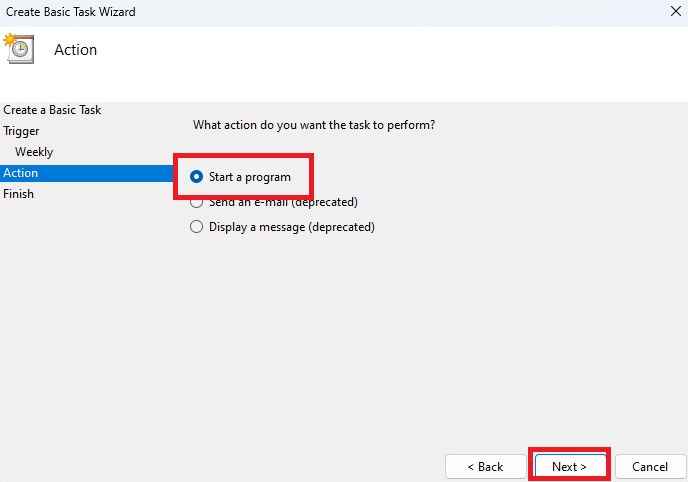
- Select Start a program in the next window, and opt for the Next option.
- Enter “cleanmgr.exe” in the Program/Script box and click Next .
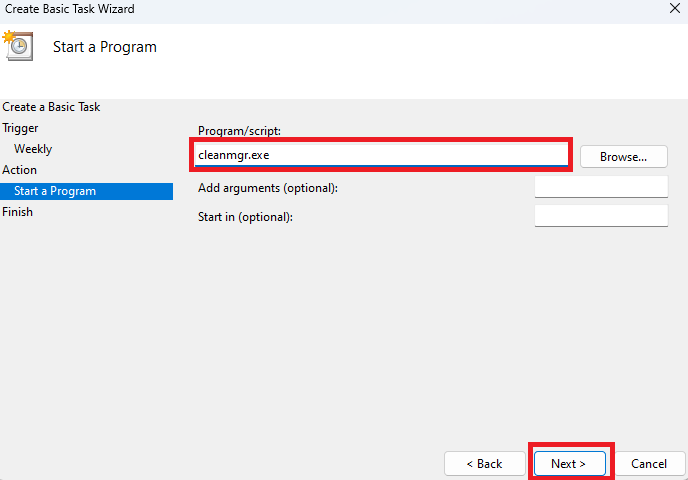
- Check if everything is okay and click Finish .
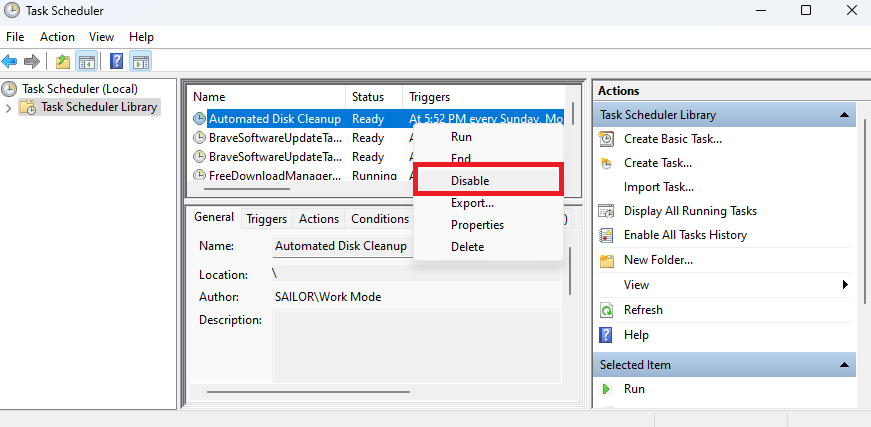
How to disable the Disk Cleanup scheduler
In case you decide you don’t need Disk Cleanup automatically running, follow the steps below to disable, end, or delete it:
- Open Task Scheduler and select Task Scheduler Library .
- Then, search for Automated Disk Cleanup or the name you used for the scheduler.
- Right-click on it and select Disable , End , or Delete .
Go Beyond Disk Cleanup: Use Storage Sense to Clean Unnecessary Files
Think of Storage Sense as the always-on version of Disk Cleanup. It offers an automated and more integrated way to manage the space on your hard drive. Plus, it’s a handy tool if you don’t have time to clear the temp files yourself. In other words, you can use Storage Sense without ever touching Windows Disk Cleanup.
That said, there are slight differences even though they perform the same tasks.
Here’s a table comparison to explain what I mean:
| Feature | Storage Sense | Disk Cleanup |
|---|---|---|
| Files the tools delete | Windows Update Cleanup files, temporary Windows installation files, temporary files, Recycle Bin files, Downloads folder files, Microsoft Defender Antivirus files, temporary internet files, thumbnails, DirectX Shader Cache files, Delivery Optimization files, Windows error reports and feedback diagnostics | Delivery Optimization files, Windows error reports and feedback diagnostics, DirectX Shader Cache files, Windows Update Cleanup files, temporary Windows installation files, temporary files, Recycle Bin files, Downloads folder files, Microsoft Defender Antivirus files, temporary internet files, thumbnails |
| Automation | Automated | Not automated |
| Scheduling | Can be scheduled | No scheduling |
| Can settings be adjusted? | Yes | Yes |
| Type of users | Casual users who prefer Windows to automatically clean up unnecessary files | Advanced users who prefer manual control |
Ultimately, you can choose to stop using Windows Disk Cleanup and use Storage Sense. Whatever option you go for, it performs the same function. So, it’s really according to your preference. Let’s see how you can use Storage Sense:
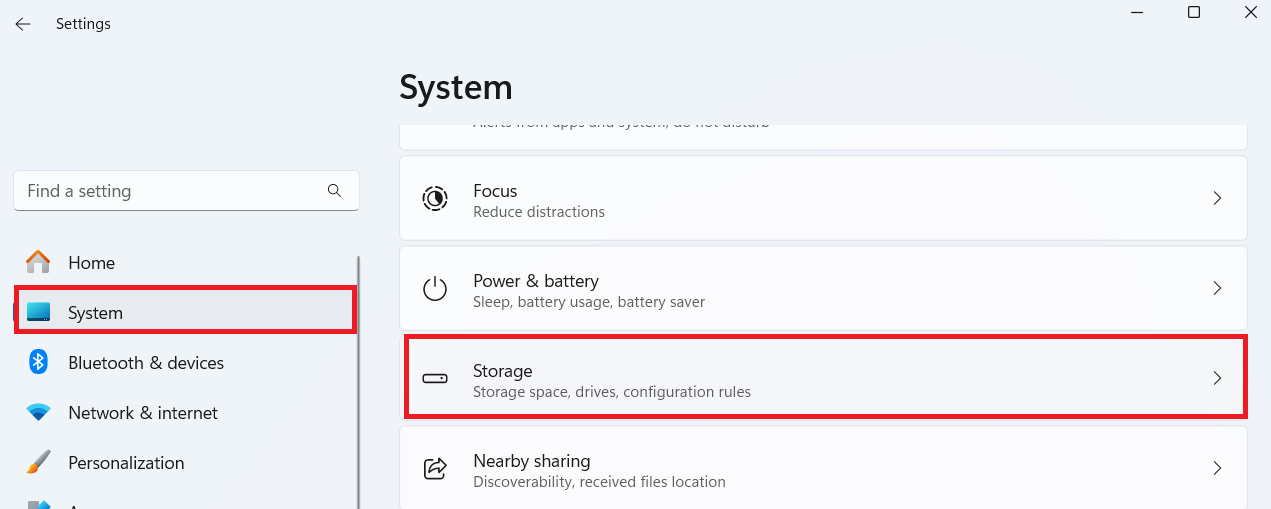
- Go to Settings and click on System . Then, search for Storage and click on it.
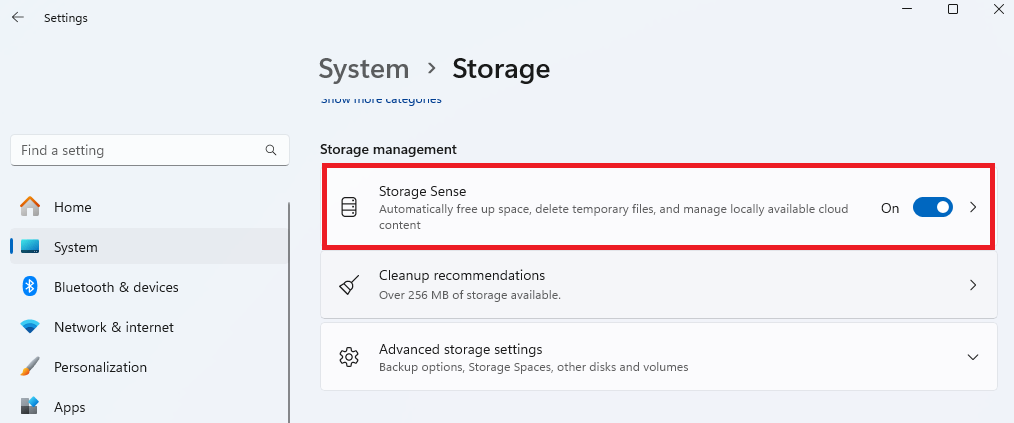
- If this is your first time using Storage Sense, scroll down and toggle the switch to enable Storage Sense under Storage management. For Windows 10, you should see the switch button the moment you click on Storage .
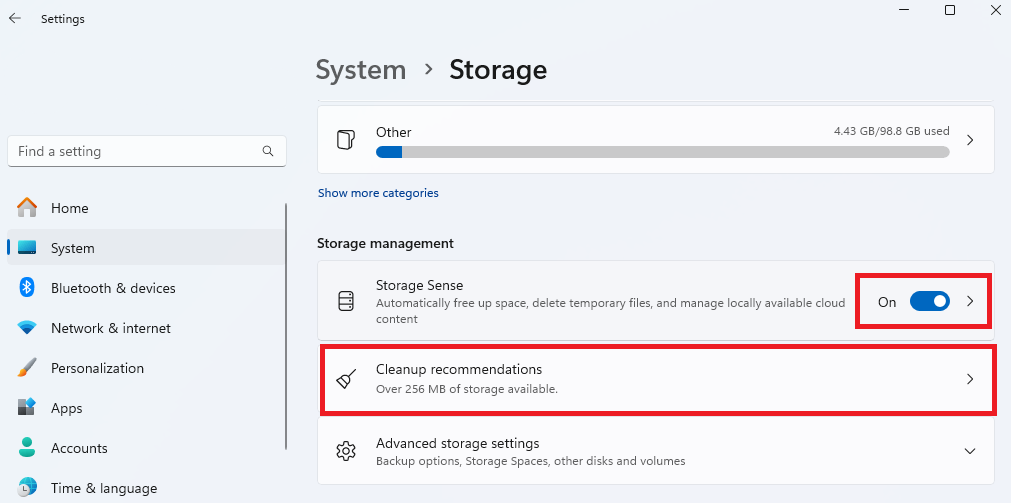
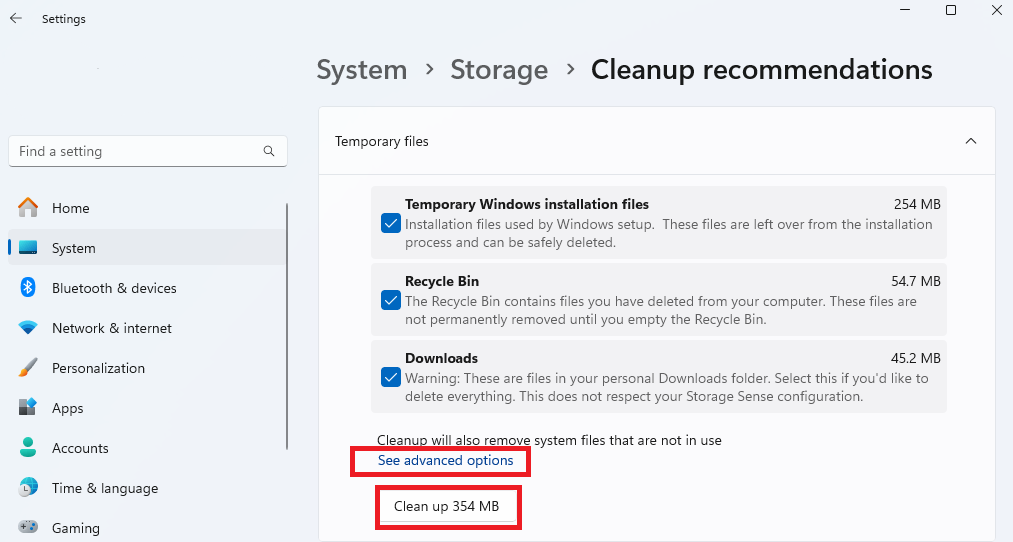
Now, click on Cleanup recommendations to select which files to delete. Check Temporary Windows installation files , Recycle Bin , and Downloads (for Windows 11) and click Clean up to clear those unneeded files.
- If you want more options, click on See advanced options .
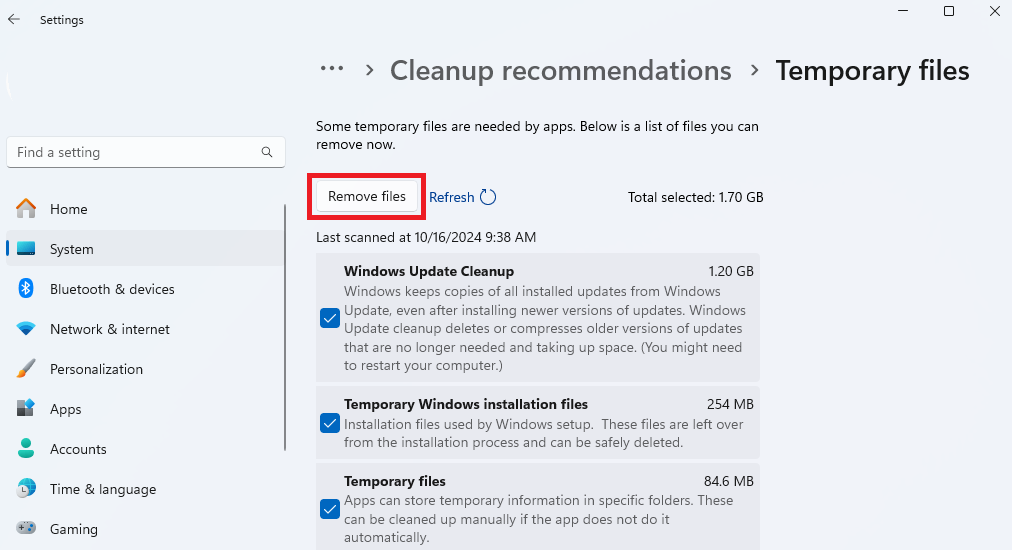
- After clicking See advanced options , you’ll see all the same options you’ll see in Disk Cleanup on Windows 10 and 11. Select them and click Remove files .
How to schedule Storage Sense
Storage Sense is designed by default to run automatically when you enable it, but the exact schedule can vary.
Generally, this utility is configured to run when your hard drive is low on space. However, you can adjust this to run according to your preference. And that’s what I’ll show you in this section.
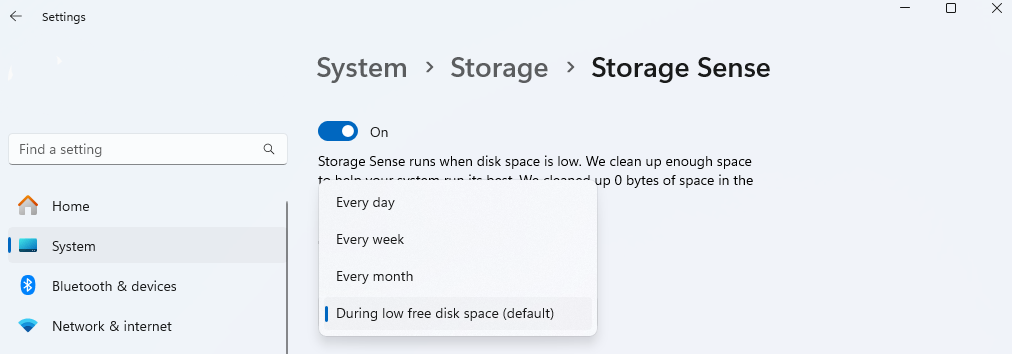
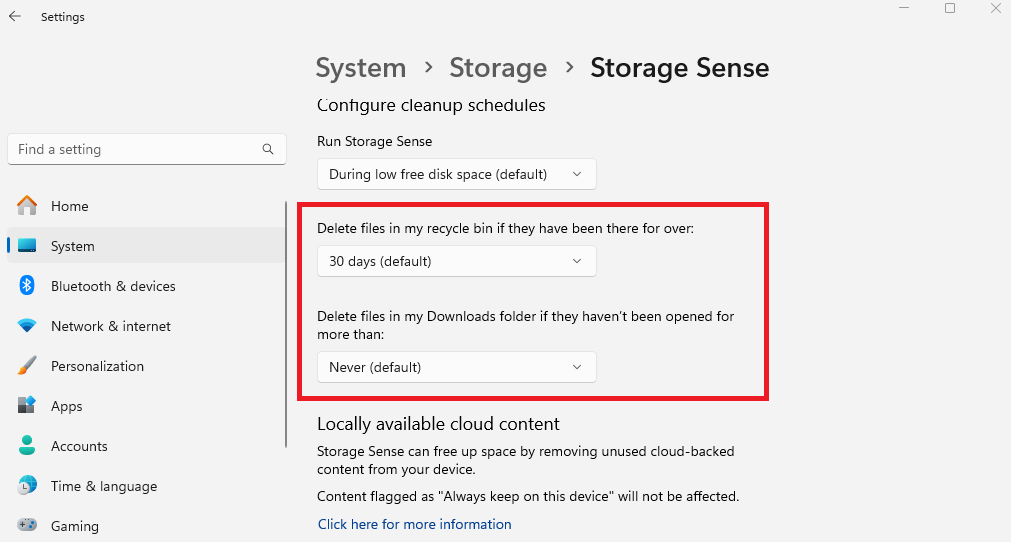
- Click on Storage Sense to get to the schedule page.
- Under Run Storage Sense , click on During low free disk space (default) to expand it, and select your preferred option.
- In the same manner, click on 30 days (default) under Delete files in my recycle bin if they have been there for over: and choose the option you like. You can also keep it at the default if you want.
- Do the same for the Delete files in my Downloads folder if they haven’t been opened for more than: setting .
With Auslogics BoostSpeed, you gain access to a comprehensive suite of tools that not only clean but also optimize your entire system.
BoostSpeed goes beyond surface-level cleanup, addressing duplicate files, browser cache, and deep disk clutter while also fixing registry errors to enhance performance.
Its advanced features include real-time system monitoring, customizable cleaning options, and privacy protection.
Whether you’re a gamer looking to boost frame rates or a casual user wanting a smoother experience, BoostSpeed delivers reliable, user-friendly solutions.
What Can You Delete in Windows Disk Cleanup?
There are a lot of files found on Disk Cleanup. So, it’s understandable if you don’t know what they all are. Let’s go through which files are safe to delete:
- Temporary internet files. Website data such as photos, HTML files, and scripts are stored in temporary internet files when you use the Internet. You can delete these files to free up space on your hard drive and improve your online security and privacy.
- Downloaded program files. ActiveX controls and Java applets you get off the Internet fall into this category. It’s safe to delete these files unless you regularly use applications that require them.
- System error memory dump files. Your system creates memory dump files if a critical error occurs, like a crash or BSOD . Deleting these files is often risk-free unless you are actively collaborating with technical assistance to resolve system difficulties.
- Recycle Bin. This keeps your deleted files safe. If you’re not planning on restoring those files, you can permanently remove them.
- Temporary files. These files are generated by programs and are usually unnecessary after the tasks they were linked with have been completed. So, you can delete the temp files to get more space.
Basically, if you have ongoing tasks, pending updates, or encountered unexpected program crashes, it’s best to keep those temporary files until everything is done.
- Thumbnails. The system creates thumbnails, which are small preview images, to speed up the process of navigating through files. You can delete them, but Windows will generate them if necessary. So, keep that in mind.
- Windows Update Cleanup. Once Windows updates are installed, system files from earlier versions can gather and take up a lot of space on your hard drive. If the last update was successful, it’s safe to delete these files. However, in this case, you won’t be able to roll back the update if anything goes wrong.
Check out this guide: [Easy Guide] How to Get More Storage on Your Windows 10/11 PC
Community Advice and Troubleshooting Tips for Windows 10/11 Disk Cleanup
When it comes to using Windows Disk Cleanup, community advice and tips can go a long way, especially if you’re facing issues that are not easy to solve. Here are some of the popular suggestions from various forums and communities:
- The “Low disk space” error due to a full temp folder. If you realize that the Temp folder quickly gets full after running Disk Cleanup, you may get the “Low disk space” error. To find the cause, you can use Resource Monitor or Task Manager to look for processes using a lot of resources. You might also want to check any programs you’ve recently installed and delete them.
- Running Disk Cleanup as an administrator. Sometimes, Disk Cleanup may not remove certain files, particularly files like Windows Update Cleanup ones. You can run the tool with administrative privileges to correct the issue. Type “disk cleanup” in the search bar, right-click on it, and select Run as administrator .
- Fixing Disk Cleanup when it’s stuck or not working. If the program is stuck and not completing the cleanup process, you can clear the Windows Update cache, according to some users. To do that, go to system services (
Windows + R> type “services.msc”) and stop Windows Update Service. Then, go to the Software Distribution folder and delete the files in there.
It’s more effective to use PC cleaners and optimizers like Auslogics BoostSpeed that can find these duplicate files, automatically defragment your drive, and clean your registry. This will ensure your PC runs at its best.
Run Windows Disk Cleanup to Free Up Disk Space: Completed
The Windows 10/11 disk cleanup is a straightforward process that anyone can follow. Whether you choose the manual or automated method, you can get more space on your drive using this tool.
And with alternatives like Storage Sense, you have even more flexibility to manage your storage space. Do you have any questions? Share them in the comments below!