
Windows PCs can easily fill up with clutter that consumes valuable space, slowly affecting performance. The WinSxS folder is one location that holds many useless files that can be deleted to free up space on your computer.
However, how do you go about it, and is it even safe to do so? This article will explain how to clean the Winsxs folder in Windows 10.
Read on to learn.
What Is the WinSxS Folder?
WinSxS stands for side by side, as the folder contains different file versions stored together. It also contains crucial components to help update and customize the operating system.
So, it has the files involved in switching editions, recovering missing or damaged system files, adding or removing features, etc.
Can I Remove WinSxS On Windows 10?
You’re probably asking yourself, “Is it safe to delete WinSxS?” Well, deleting this folder would be a bad idea because the operating system needs the crucial components in it.
Therefore, deleting it would make it impossible for the operating system to perform some operations and cause problems. Windows update and booting issues are among the consequences you may experience.
However, the WinSxS folder also stores older operating system versions to make it easier to roll back. It does this with every system update, meaning it gets bigger over time.
Deleting these files would help free up space on your machine.
Windows 10 automatically scans this folder for the files it no longer needs and deletes them. However, you can manually delete the useless files if your PC runs out of space.
How to Check the Size of the WinSxS Folder
Windows allows you to check how much space the WinSxS folder uses on your PC. Follow these steps to do so:
- Use the
Windows key + Scombination to open the Windows search bar. - Type in command prompt and right-click the Command Prompt search result.
- Choose Run as administrator.
- Click the Yes button once the User Account Control prompt box appears.
- When the elevated prompt appears, type in the following command and then hit Enter:
dism /Online /Cleanup-Image /AnalyzeComponentStore
- Wait for the process to finish. The WinSxS folder’s size is under the Actual Size of Component Store section.
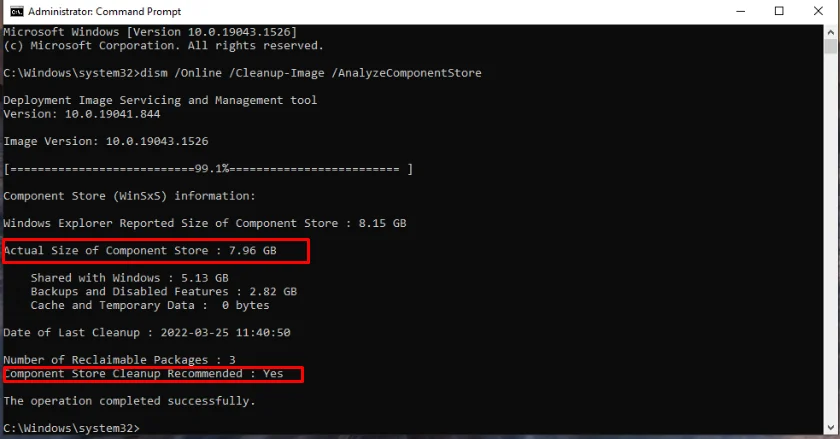
- You can also check the Component Store Cleanup Recommended section to see if the operating system recommends you clean up the WinSxS folder.
How to Clean Up WinSxS
There are different ways to clean the WinSxS folder in Windows 10. We will discuss the easiest ways to do so without causing system damage, so follow the instructions carefully.
Let’s jump right in.
Method 1: Use the task scheduler
The Task Scheduler enables you to delete useless files from the WinSxS folder quickly. Here is how to use it:
- Use the
Windows + Rkey combo to bring up the Run dialog box. - Type in
taskschd.mscand click on the OK button. - Use the left sidebar to navigate to the following location:
Task Scheduler Library\Microsoft\Windows\Servicing
- Once here, go to StartComponentCleanup on the right pane.
- Then go to the Actions section and click on the Run button.
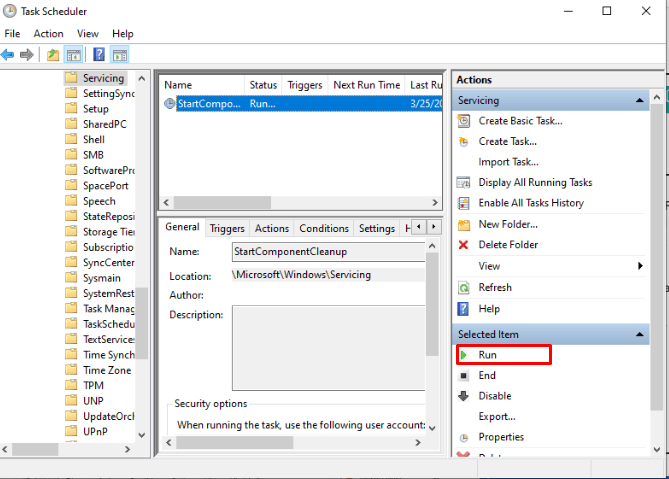
- The Task Scheduler will start cleaning the WinSxS folder. Wait for the process to finish.
Method 2: Use DISM
The Deployment Image Servicing and Management tool helps repair corrupted system images in Windows. However, you can also use it to clean the WinSxS folder.
Follow these instructions to use this tool:
- Open the search bar using the
Windows + Skeyboard shortcut. - Type in command prompt and then choose Run as administrator on the right menu pane.
- Select Yes on the UAC window.
- Type in this command and hit Enter.
Dism.exe /online /Cleanup-Image /StartComponentCleanup
- Wait for it to finish and then close the Command Prompt.
Method 3: Use disk cleanup
Disk cleanup is a legacy tool that allows you to check for useless files on your machine and delete them.
Here is how to use it to clean up the WinSxS folder:
- Press the
Windows key + Ecombination to open the File Explorer. - Select This PC on the left menu pane.
- Right-click on Local Disk (C:) and choose Properties.
- Go to the General tab and click the Disk Cleanup” button at the bottom.
- Head to the “Files to delete” section and select checkboxes for the files you want to delete. Then click on the OK button.
- If you want to free up more space, click on the Clean up system files button.
- Select the checkbox for Windows Update Cleanup and other files you want to delete.
- Finally, click on the OK button.
Related: Disk Cleanup Tips: How to Compress a Drive to Save Disk Space in Windows 10
Method 4: Use storage sense
The other simple way to clean up the WinSxS folder is through storage sense in Windows 10. Use these instructions:
- Right-click on the Windows button in the screen’s bottom-left corner and choose Settings.
- Go to System.
- Choose Storage under System on the left pane.
- Head to the Local Disk C section and click on Temporary files. If you can’t see that option, click on the Show more categories link.
- Clear the selected checkboxes and choose Windows Update Cleanup.

- Once done, click on the Remove files button at the top of the window.
Method 5: Use a professional software
Use a professional PC cleaner to thoroughly scan your computer for useless files and effectively remove them. A good example we recommend is Auslogics Windows Slimmer.
This unique app scans your computer for disabled components, old System Restore points, outdated Windows libraries, and Windows update files and automatically deletes them.
It also lets you tweak your machine’s settings to help boost performance.
Therefore, if you feel like your regular PC scans don’t remove all the clutter from the system, this tool is what you need. It has a user-friendly user interface, so you can download it and start using it today.
Conclusion
Have you been wondering, “Why is WinSxS so big?” If yes, we hope this article has helped you understand how to clean the WinSxS folder to ensure it doesn’t waste valuable storage space.
However, if you still have questions regarding today’s post, feel free to leave a comment below. Also, check out our blog for more helpful Windows 10 guides like this one.