
- Why Does Netflix Keep Crashing?
- How to Fix the “Netflix Keeps Freezing” Problem
- Fix 1: Restart Your PC
- Fix 2: Make Sure Windows is Up to Date
- Fix 3: Update Your Web Browser
- Fix 4: Clear Browser Cookies and Data
- Fix 5: Run the Apps Troubleshooter
- Fix 6: Fix Your Network Connection
- Fix 7: Allow the Netflix App through the Firewall
- Fix 8: Fix Your Graphics Driver
- Fix 9: Reinstall the Netflix App
- Conclusion
- FAQ
Whenever Netflix freezes, restarting the app typically resolves the issue. But what if it keeps recurring?There are different variations of this issue:
- Video freezes while sound is still on
- Netflix freezes but Windows still functions
- Both Netflix and the device freeze
- Netflix keeps crashing after freezing
The problem can occur whilst streaming videos on the Netflix app and supported web browsers on Windows. This article will uncover the cause of the problem and how to get rid of it.
Also Read: How To Fix Netflix Error Code M7353-5101
Why Does Netflix Keep Crashing?
That doesn’t mean there’s only one cause. The issue can be the result of a number of other system glitches, from basic computer problems to more complex bugs. That said, it can vary from computer to computer. The following can trigger the “ Netflix keeps stopping or freezing” issue:
- Overloaded system memory
- Long-term device use
- Outdated operating system
- Malfunctioning graphics driver
- Internet issues
- Clogged up browser data
- Outdated browser
- Issues with the Netflix App
How to Fix the “Netflix Keeps Freezing” Problem
You may have to apply different fixes to get rid of the problem. We’ve arranged the solutions from basic to advanced to guide you.
Fix 1: Restart Your PC
Sometimes, people run their Windows computers for long periods without turning it off. This practice is mostly to keep apps open and avoid long startup times.
Helpful: Laptop Lifespan: Why You Should Definitely Shut Down Your PC Every Night
You can also overburden your CPU over a short period by running too many apps. Opening and closing apps, installing and uninstalling programs, and running multiple windows leave a digital footprint that your processor, system memory, and disk must continue to handle. When you restart your computer, you’re giving it a clean slate, allowing it to let go of unnecessary background processes that eat up resources. Move on to the next solution if the “Netflix frozen” problem persists after restarting your computer.
Related: How to Clear RAM and Reduce RAM Usage in Windows 10
Fix 2: Make Sure Windows is Up to Date
An outdated Windows build, whether it’s Windows 10 or Windows 11, may be the reason streaming is interrupted on the app or your web browser.
Microsoft releases regular updates to get rid of such issues and ensure compatibility with updated streaming technologies.
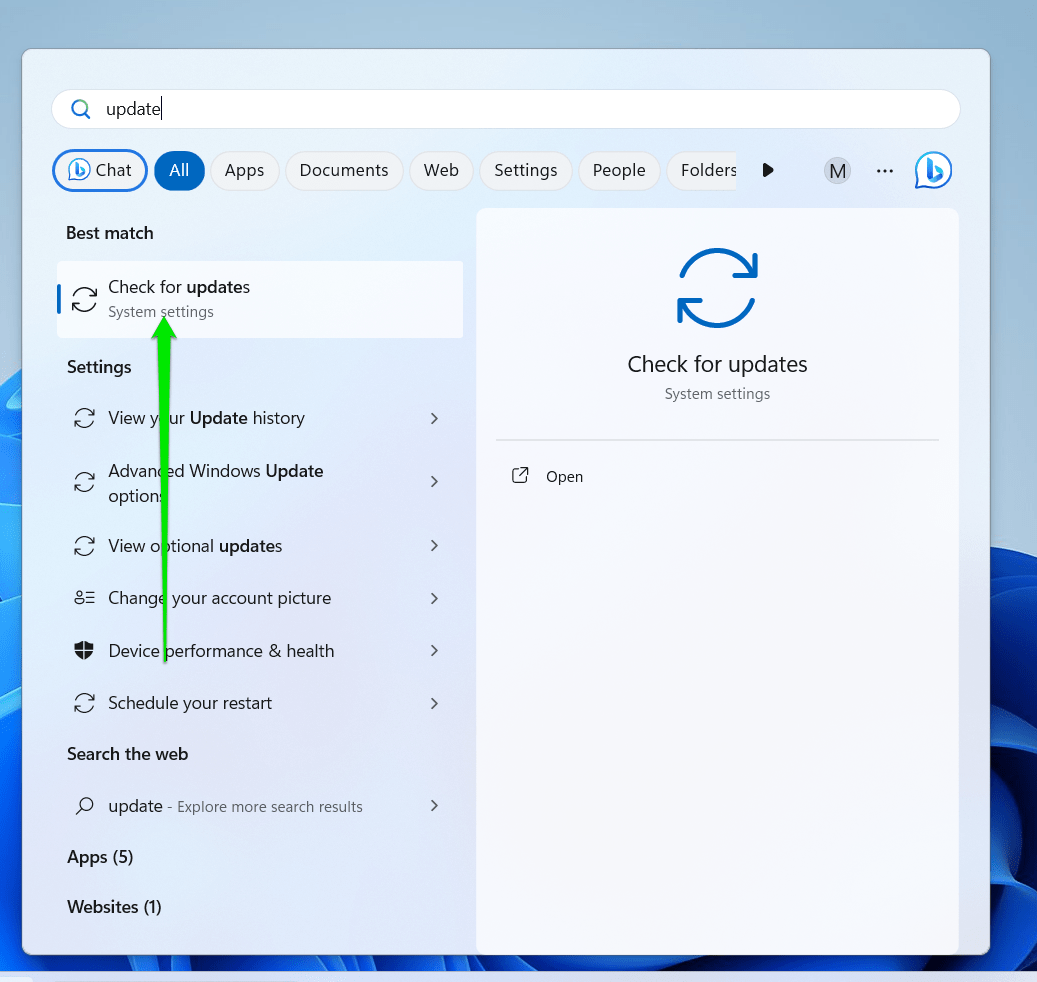
To start the update, launch the Start search window (Windows + S), type updates, and select Check for Updates.
Make sure you allow the Windows Update utility to download and install every available update, including feature and quality updates.
Restart your computer to allow your OS to complete the installation.
Auslogics Driver Updater is an excellent tool for automatically identifying and updating all your system drivers to the latest versions, ensuring a smoother and more reliable streaming experience.
Related: Ultimate Guide: How to Manually Check and Install Windows Updates
Fix 3: Update Your Web Browser
If you’re experiencing the issue on a web browser, chances are you’re using a version that can’t quite handle what Netflix is throwing at it.
In some cases, the browser might be dealing with bugs that may have been fixed in its latest update.
In other situations, it may not be quite equipped with the latest technologies to render Netflix videos.
We’ll show you how to update different web browsers that can run Netflix.
Also read: What is the Best Internet Browser?
Updating ChromeGoogle Chrome notifies you to update the browser, and in most cases, installs the update automatically. The menu icon to the right of the address bar often changes colors to indicate when an update was released. An Update button is usually next to the icon whenever an update is available. You can click it to start the process. You can also follow these steps to force Chrome to start the Update:
- Click the icon and select Settings.
- Go to the left menu of the Settings page, scroll down, and click About Chrome.
- The browser should automatically start checking for and downloading available updates.
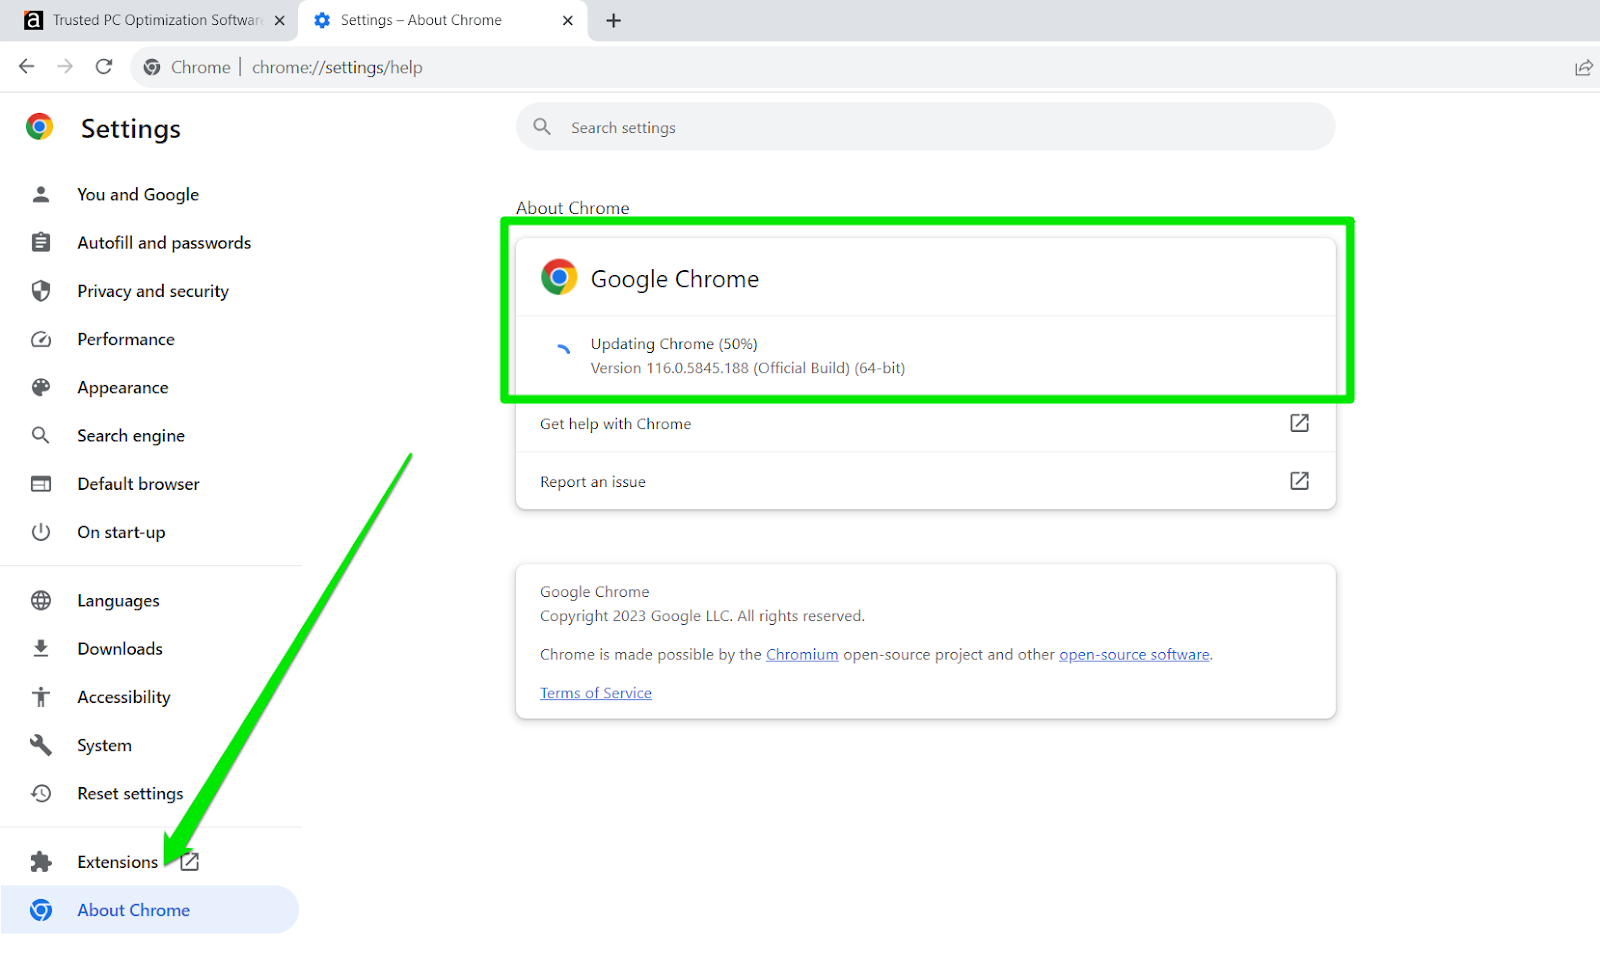
- Restart it to complete the process.
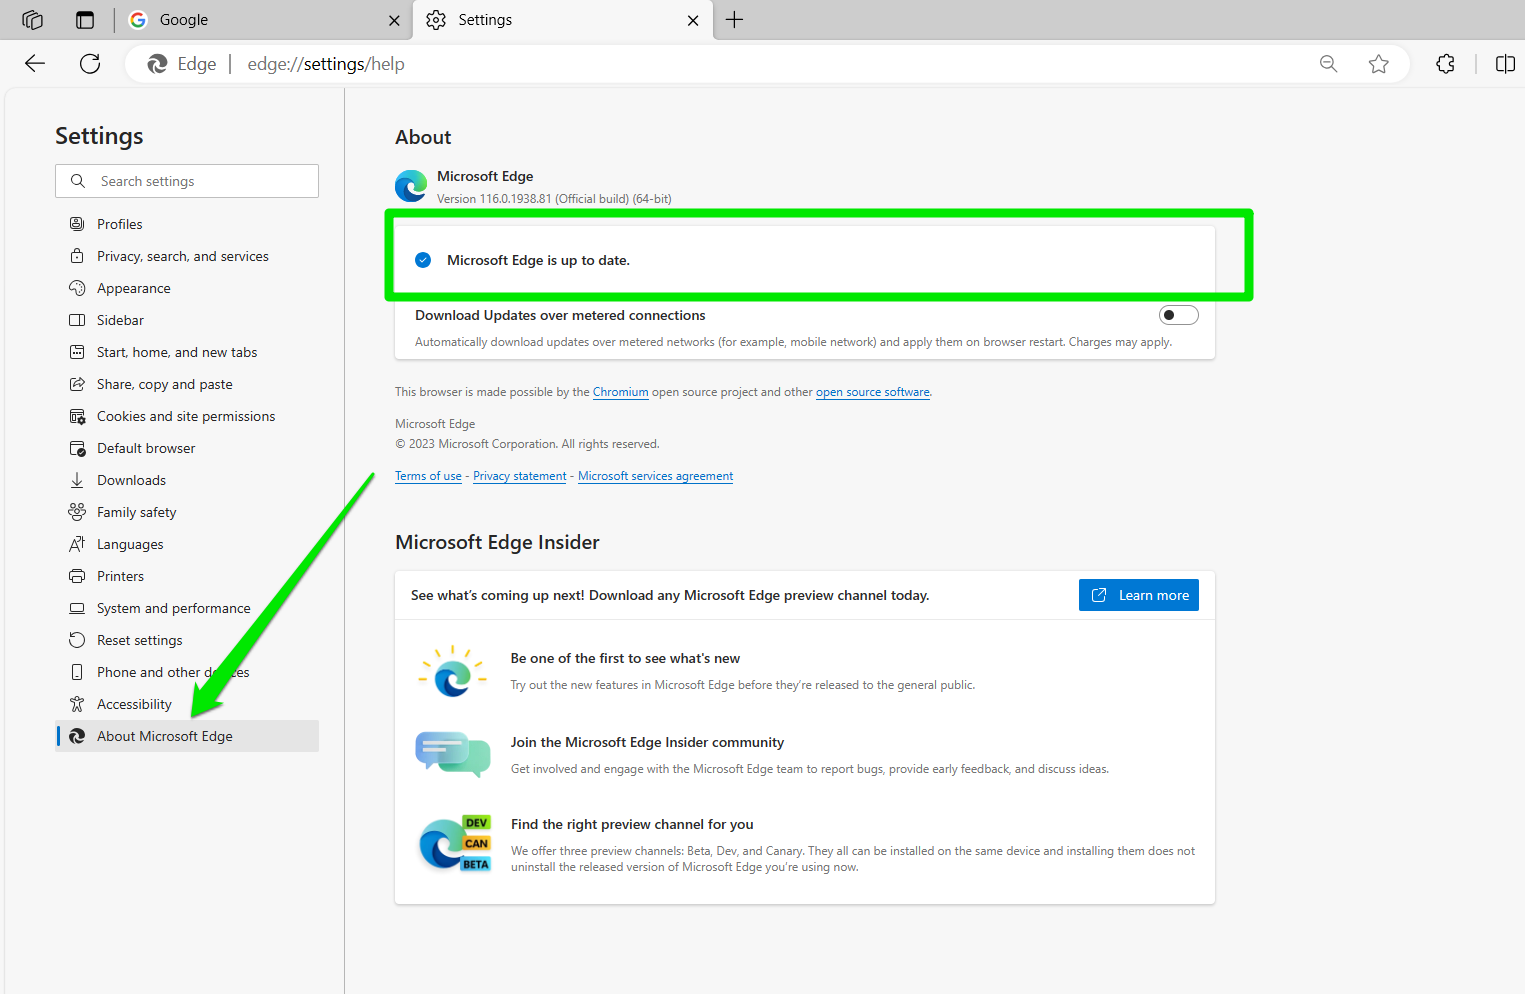
Updating Microsoft EdgeLike Chrome, updating Microsoft Edge is simple. Go to the About page of Microsoft Edge to check if the browser is up to date and install the latest update. Follow these steps:
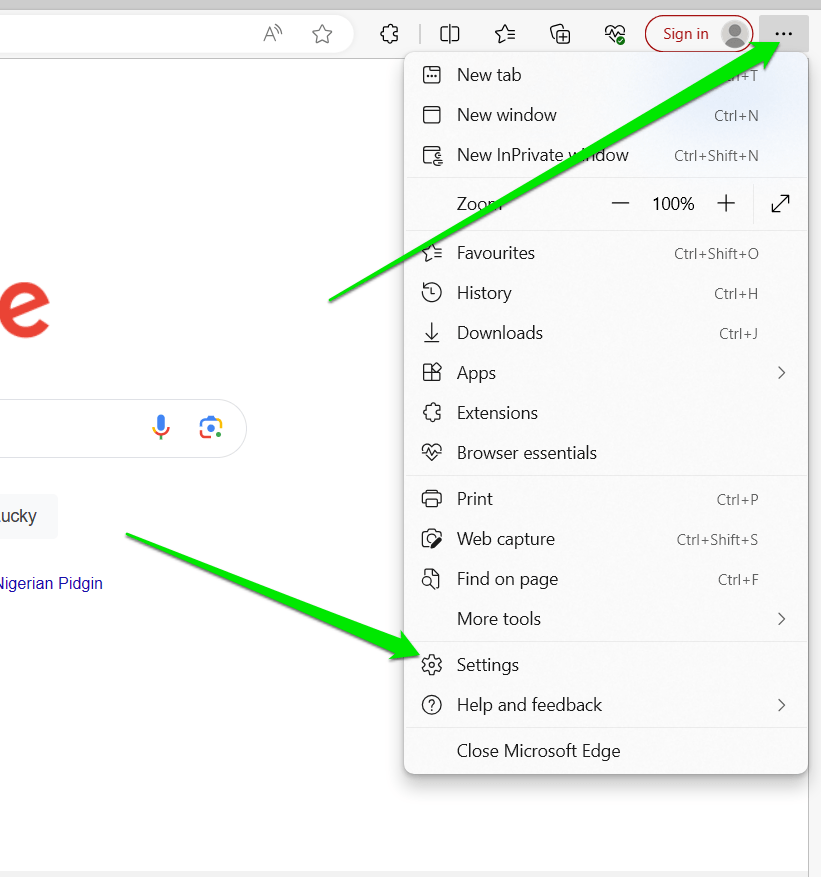
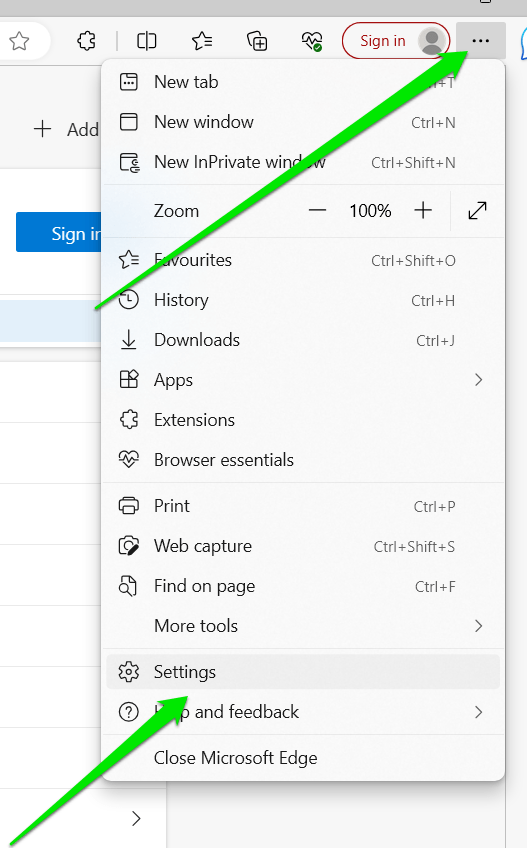
- After launching the app, go to the top-right corner and click the three dots.
- Select Settings.
- When the Settings page opens, select About Microsoft Edge in the left menu.
- Click the Download and Install option if an update is available. You will be notified if the browser is up to date.
Updating Mozilla Firefox
- Launch Firefox and click the hamburger menu icon beside the address bar.
- Select Help from the menu.
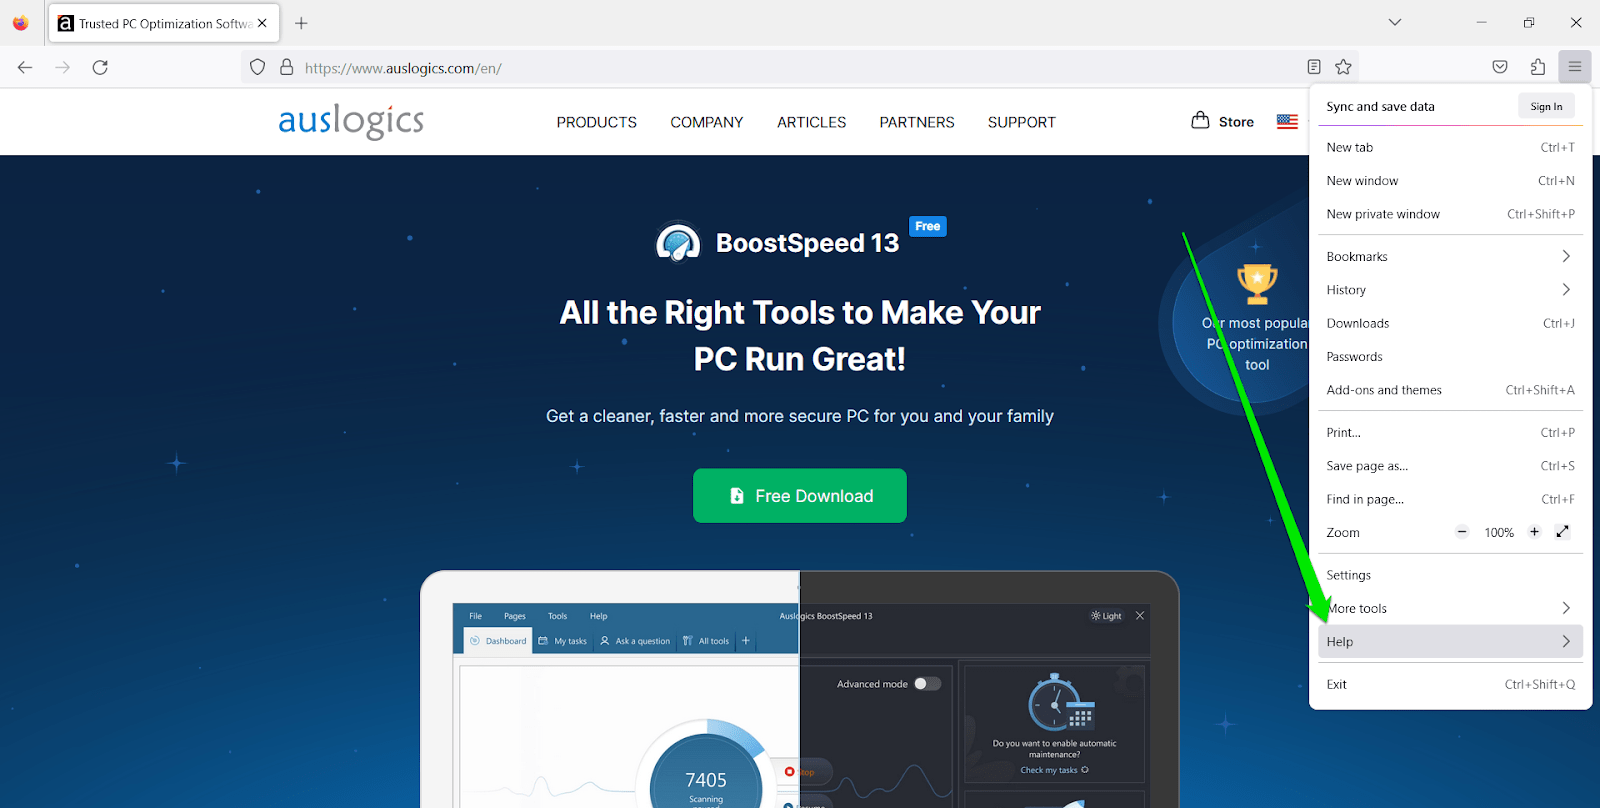
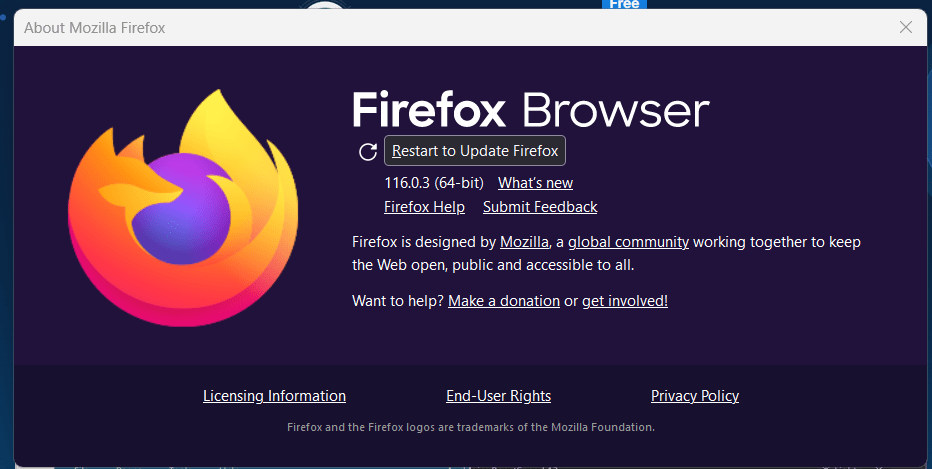
- Click About Firefox.
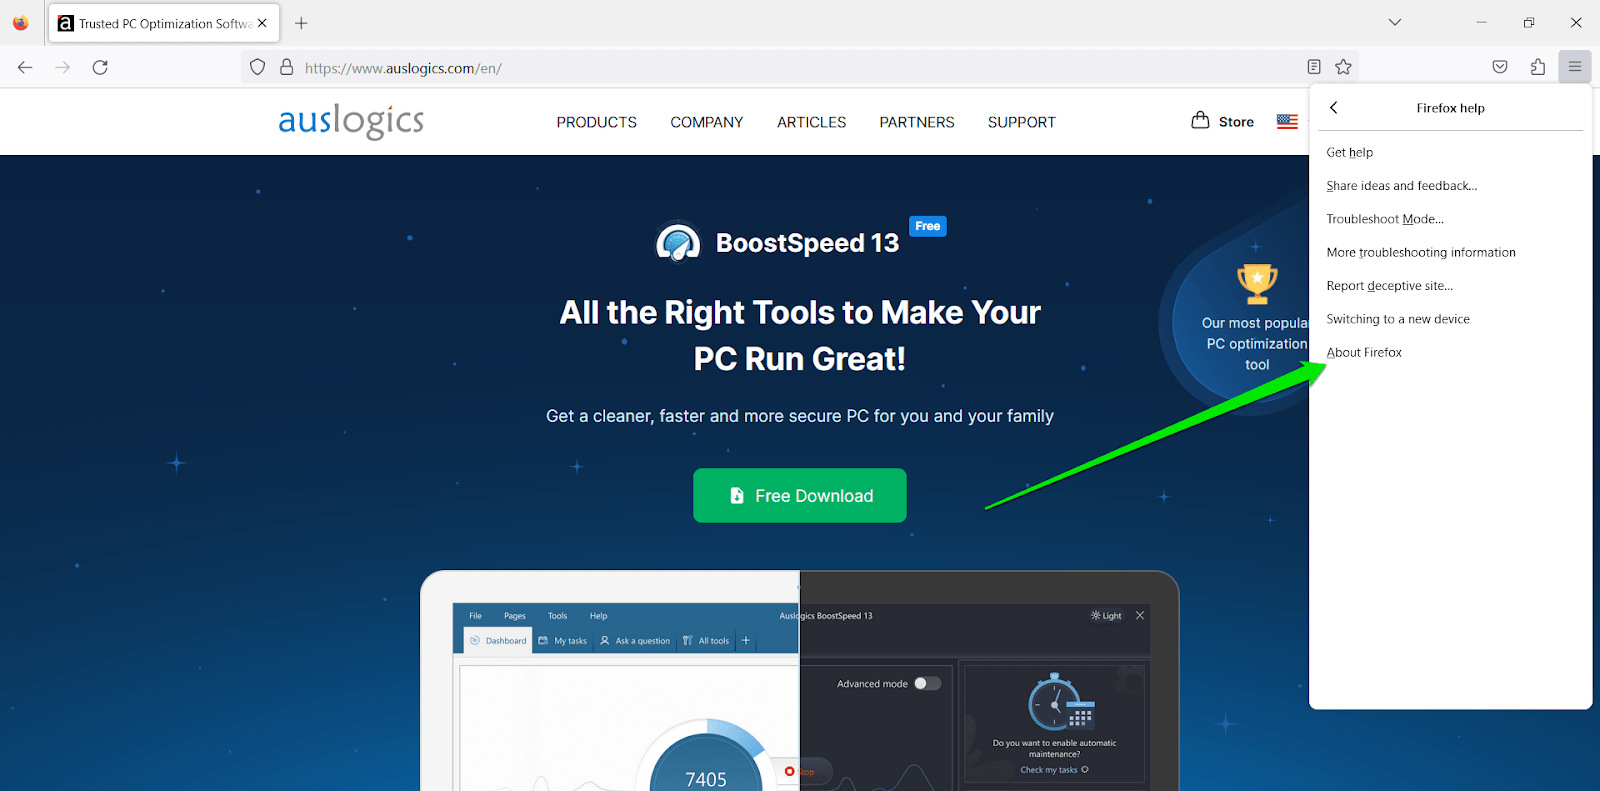
- The browser will now check for updates and download them.
- Click the Restart to update Firefox button to complete the process.
Fix 4: Clear Browser Cookies and Data
Every web browser stores temporary Internet files to your computer to allow them to load web pages faster. Websites also load micro programs, called cookies, to visiting devices so they can improve performance and render more targeted content. These files can become corrupt or too large overtime, cause conflicts, and trigger errors that may cause Netflix to freeze. You can clear your browser’s cookies to check if that gets rid of the problem. You can also clear cookies stored on your computer by Netflix. To do that, visit the Clear Cookies page
.
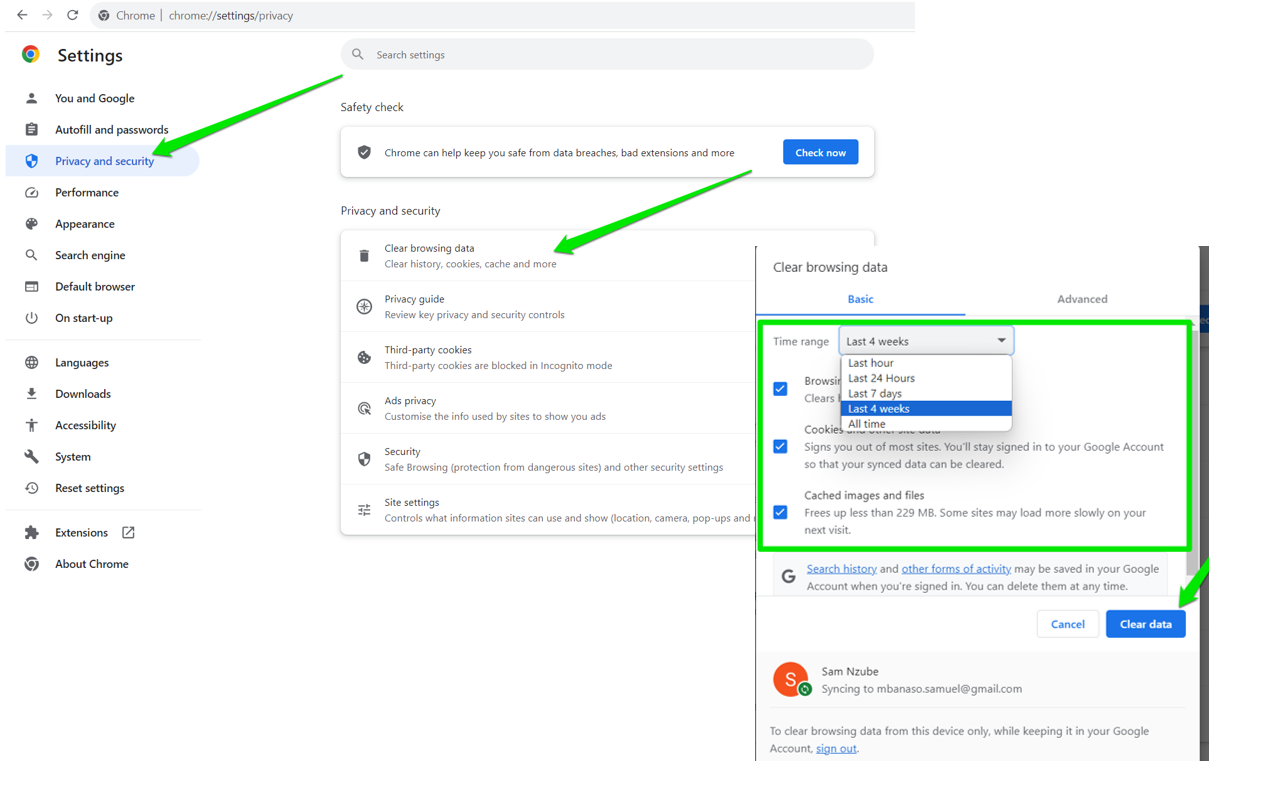
To clear your browsing data on Chrome, open the Settings page, select Privacy and Security on the left, and click Clear Browsing Data. You can then select the data you want to remove and click Clear Data.
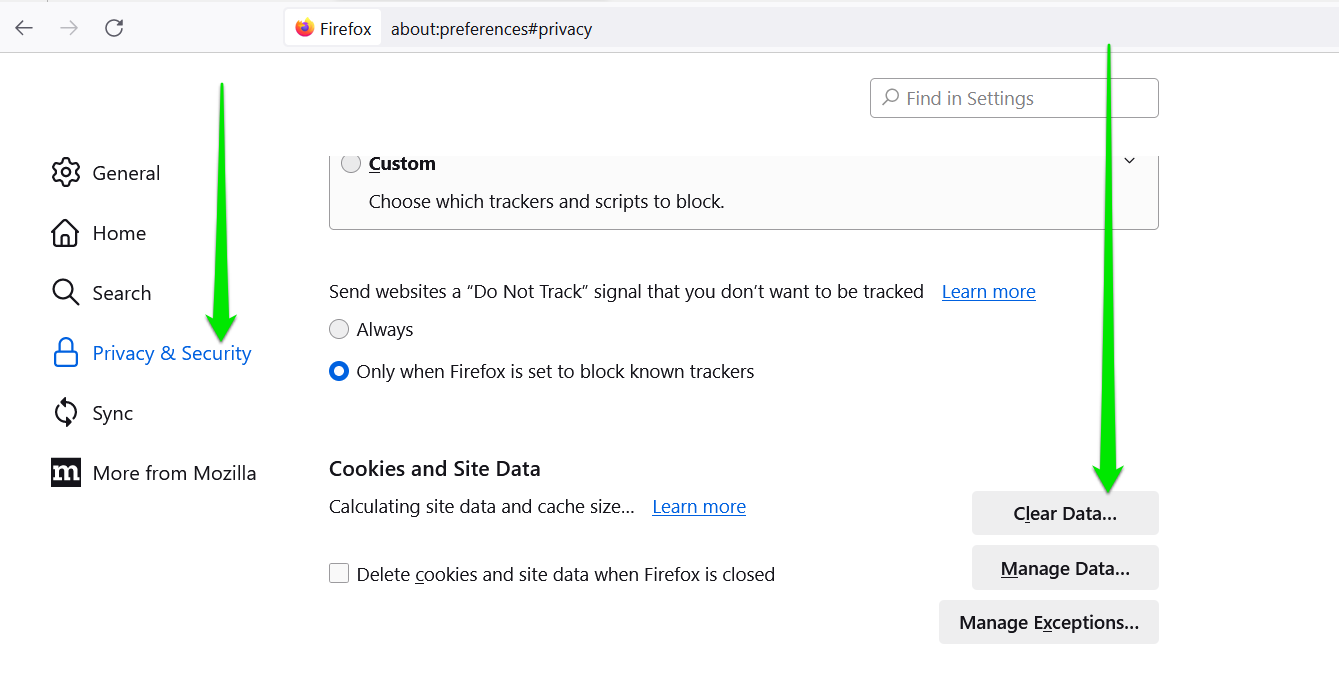
Clearing your data on Firefox involves going to the browser’s Settings page, selecting Privacy and Security in the left menu, scrolling down, and clicking Clear Data.
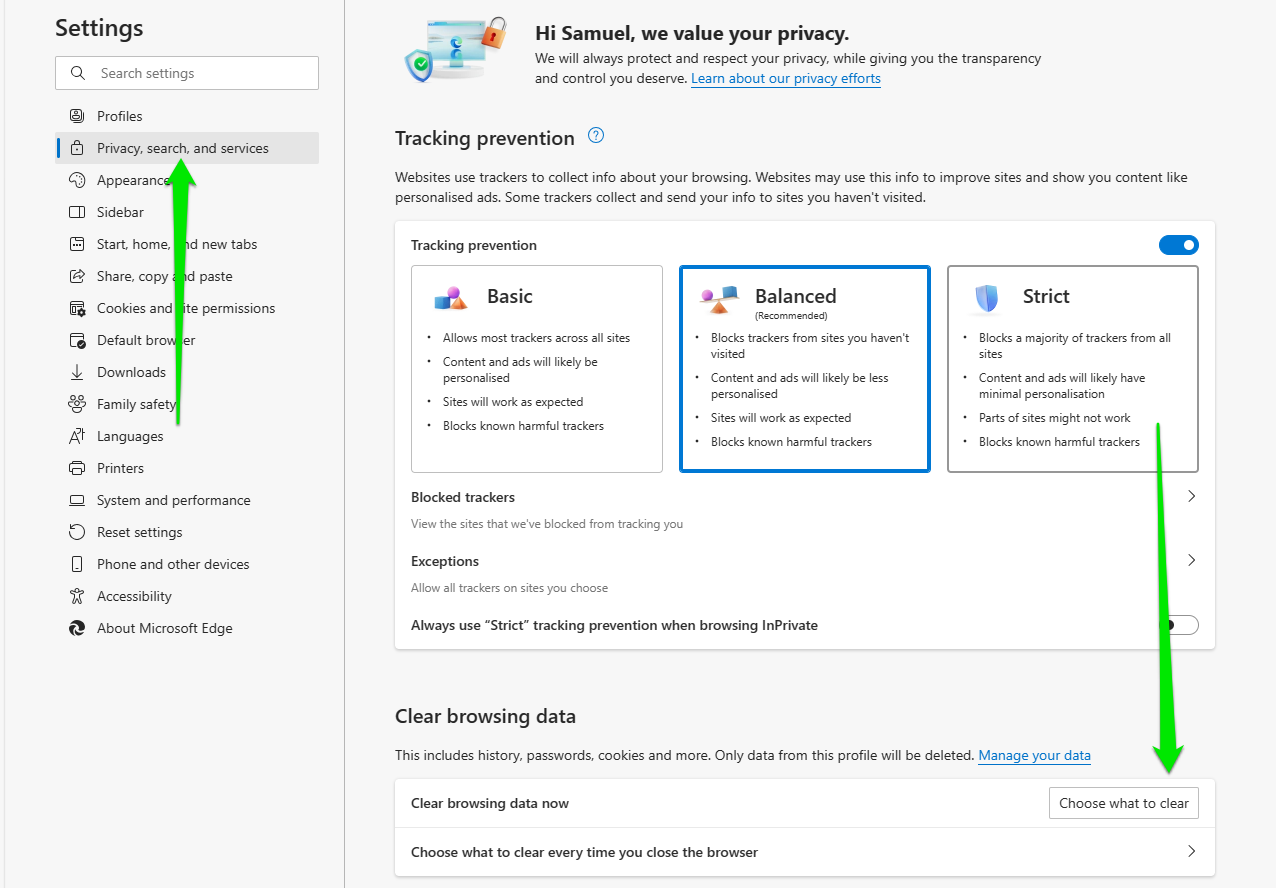
To clear Microsoft Edge’s browsing data , click Settings, go to the left side of Settings and select Privacy, search, and services, and click Choose what to clear under Clear browsing data.
Also read: Proven Ways to Clean Windows 10
Fix 5: Run the Apps Troubleshooter
If the freezing issue keeps preventing you from streaming videos through the Windows app, you can run the Windows apps troubleshooter
.
The troubleshooter works with programs installed from the Microsoft Store. It checks for things like software conflicts and corrupt files to figure out why any app may be malfunctioning.
There are different methods involved in running the troubleshooter on Windows 10 and Windows 11.
Follow these steps to run it on Windows 10:
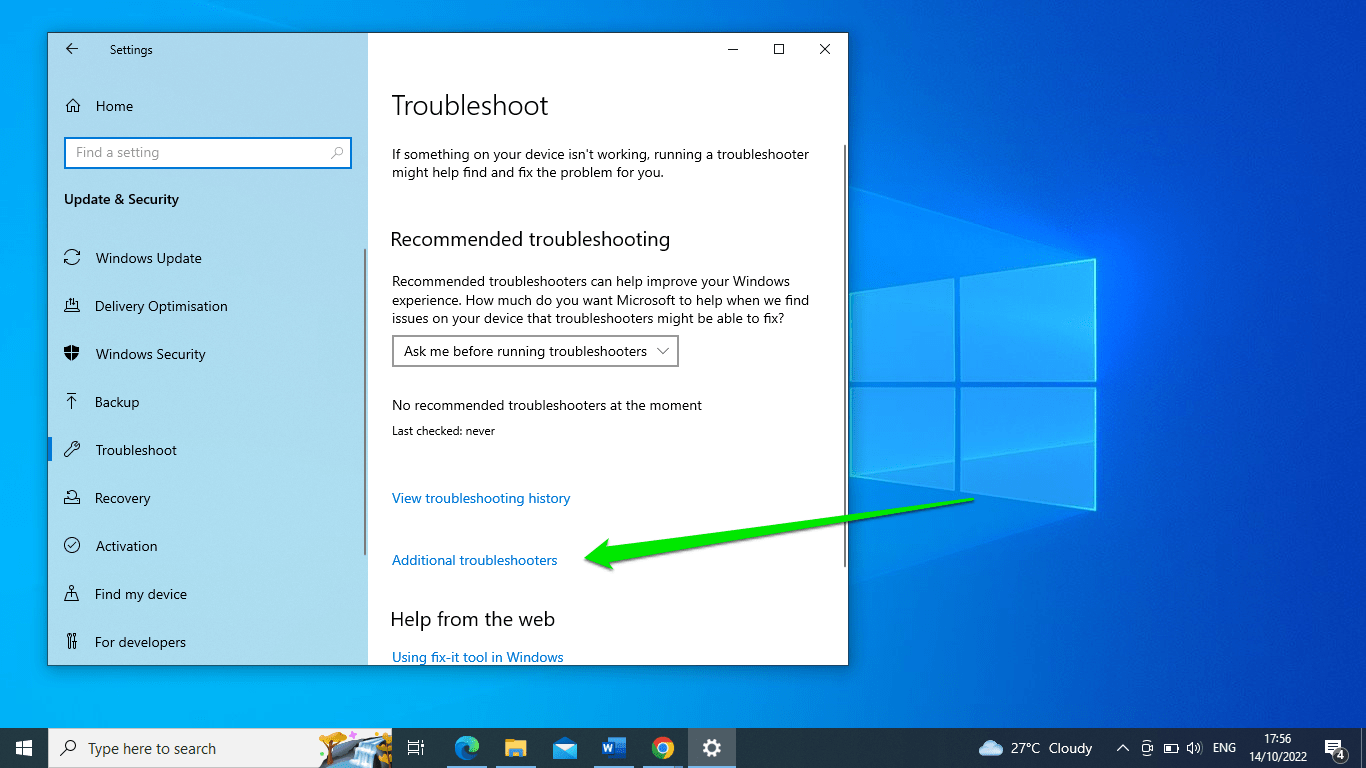
- Launch the Settings app (right-click Start and click Settings) and select Update & Security.

- Go to the left side of the Update & Security page and click Troubleshoot.
- Select Additional Troubleshooters after the Troubleshoot page opens.
- Click Windows Store Apps and click Run the Troubleshooter.
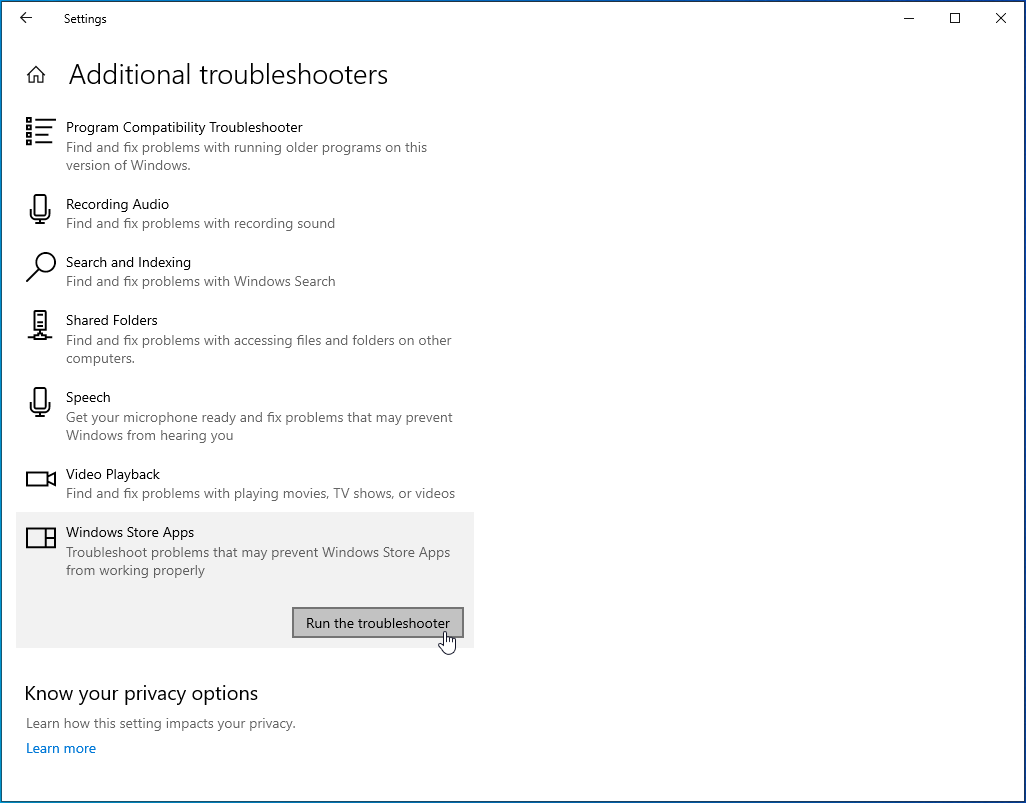
- The troubleshooter will now check for issues with Windows store apps, including Netflix, and attempt to resolve any problems it finds.
Windows 11 does not have a dedicated Windows Store Apps troubleshooter in the Settings app like Windows 10. Instead, you can go through the Start menu to launch the classic Microsoft Store Apps troubleshooter.
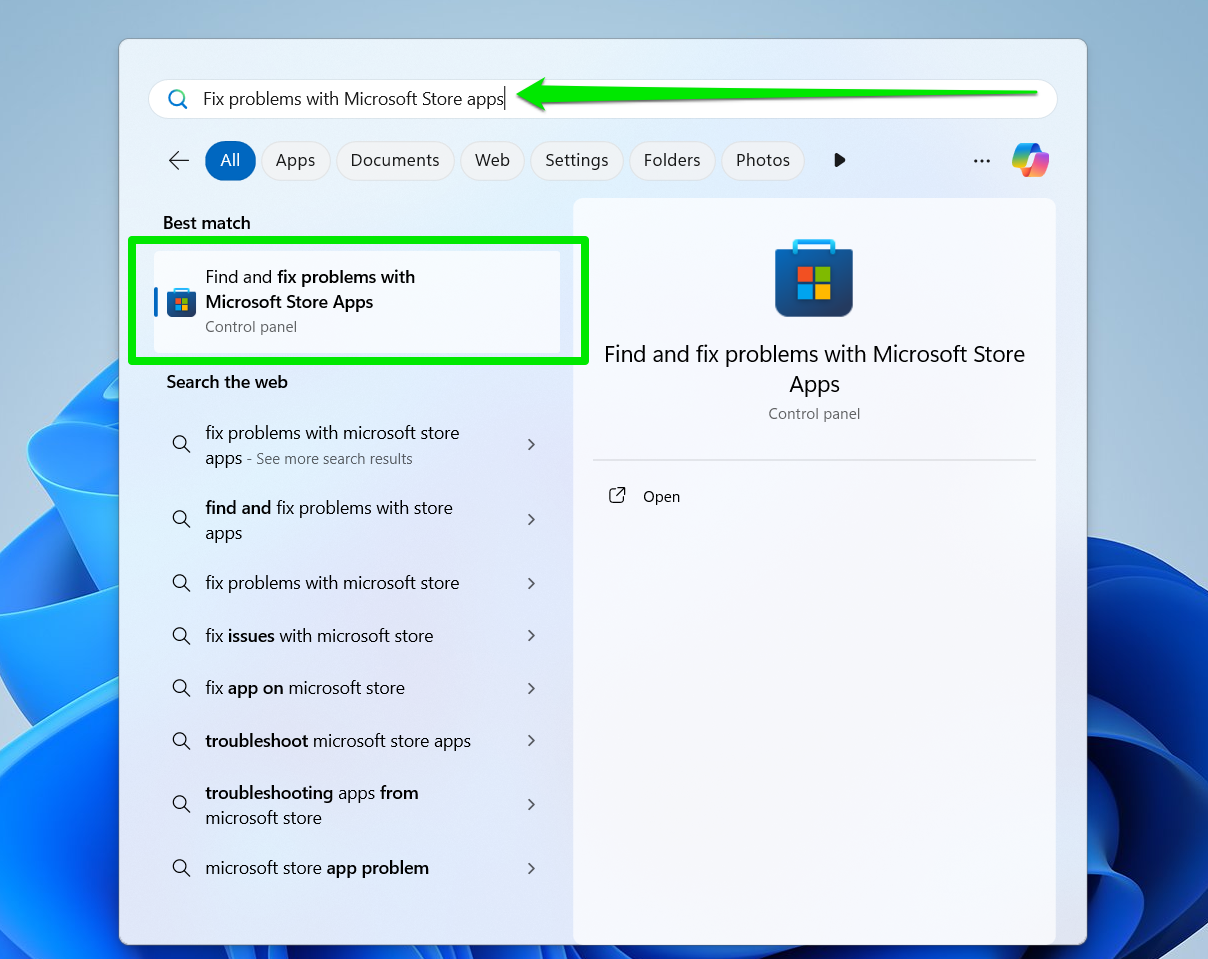
- Launch the Start menu or click the search icon in your taskbar.
- Type “Fix problems with Microsoft Store Apps.”
- Click “Find and fix problems with Microsoft Store Apps” under Settings or Best match.
- The Microsoft Store Apps troubleshooter will now appear. Select the Next button.
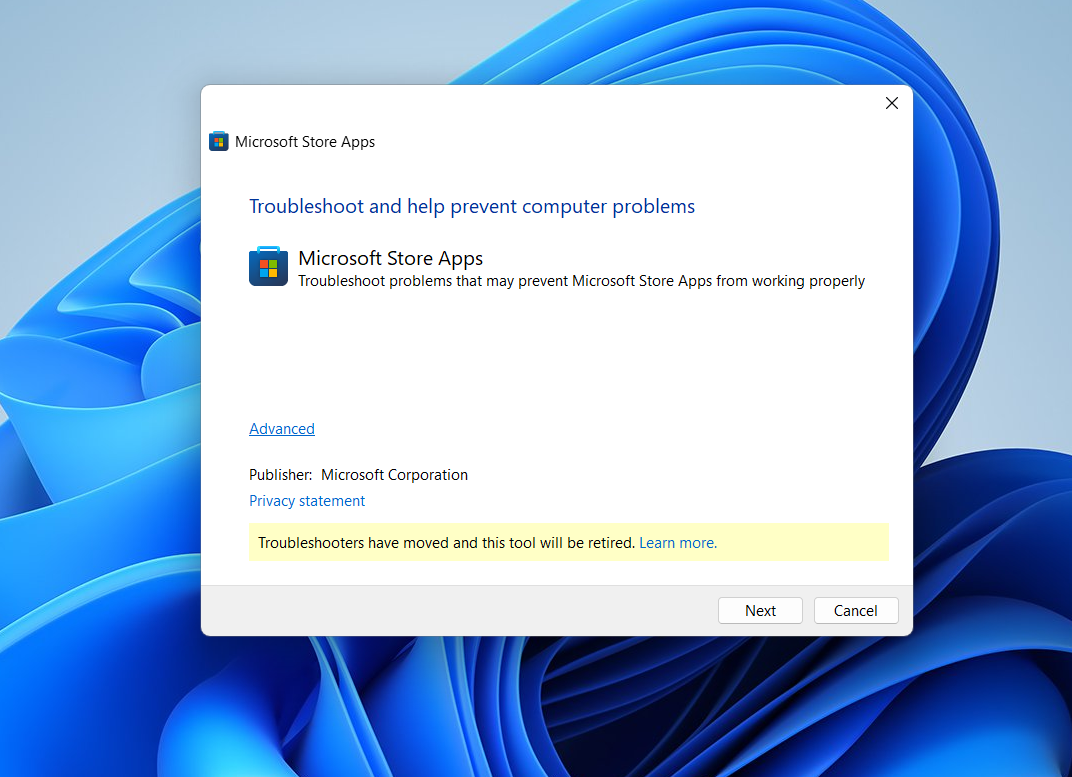
- The tool will now run its diagnostics algorithm and try to run down problems affecting apps downloaded from the Store, including Netflix. It will provided suggestions once the process is complete.
Alternatively, you can go through the Settings app to use the Program Compatibility Troubleshooter, which runs in the Get Help platform:
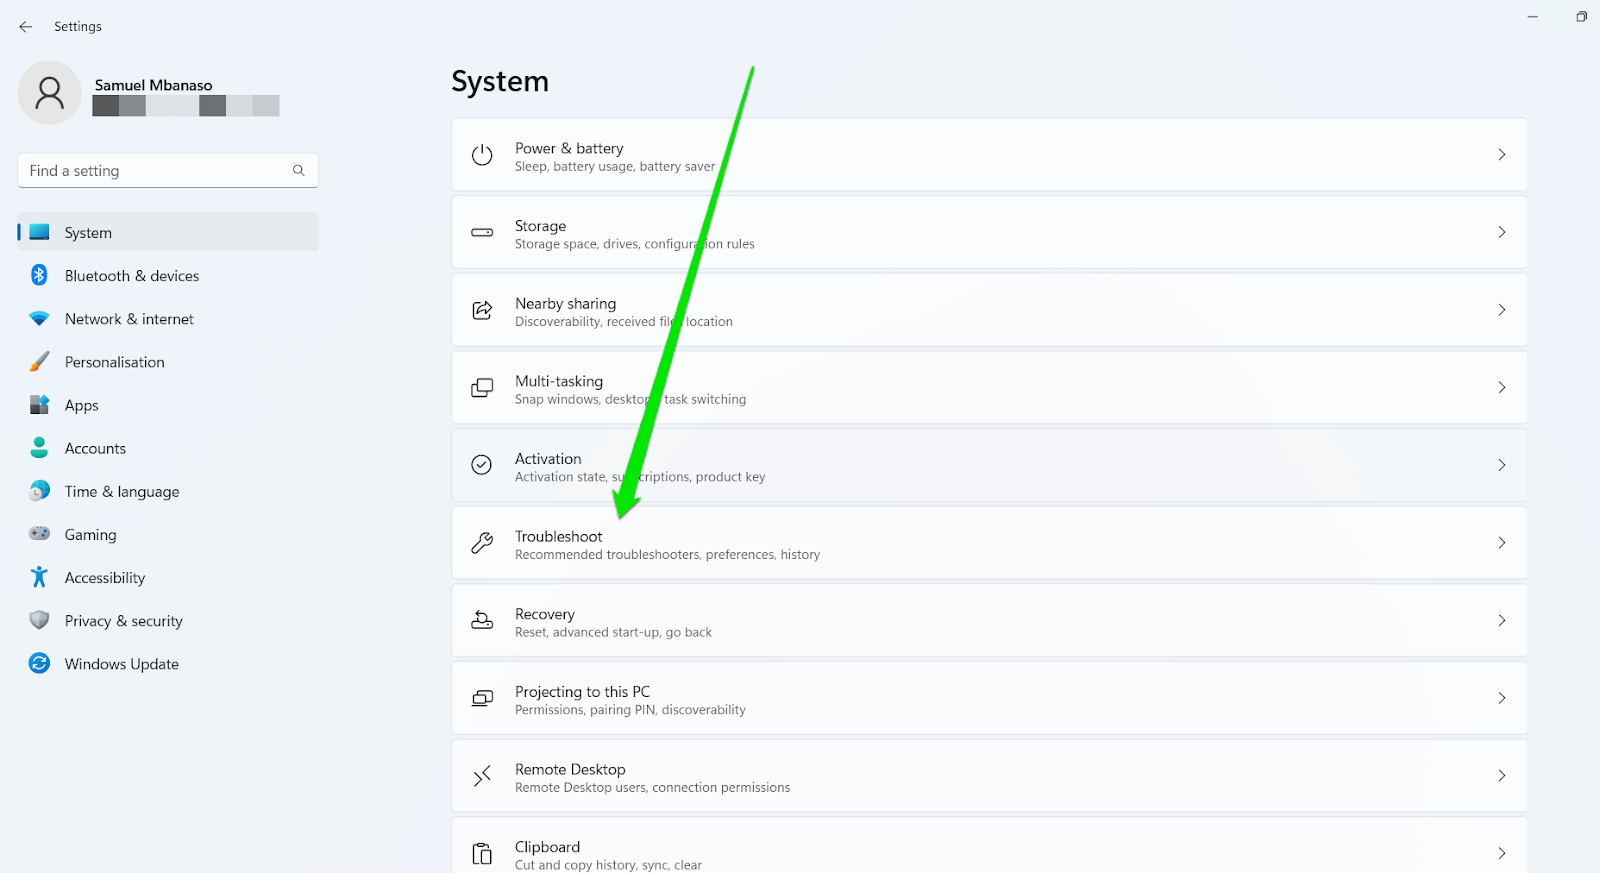
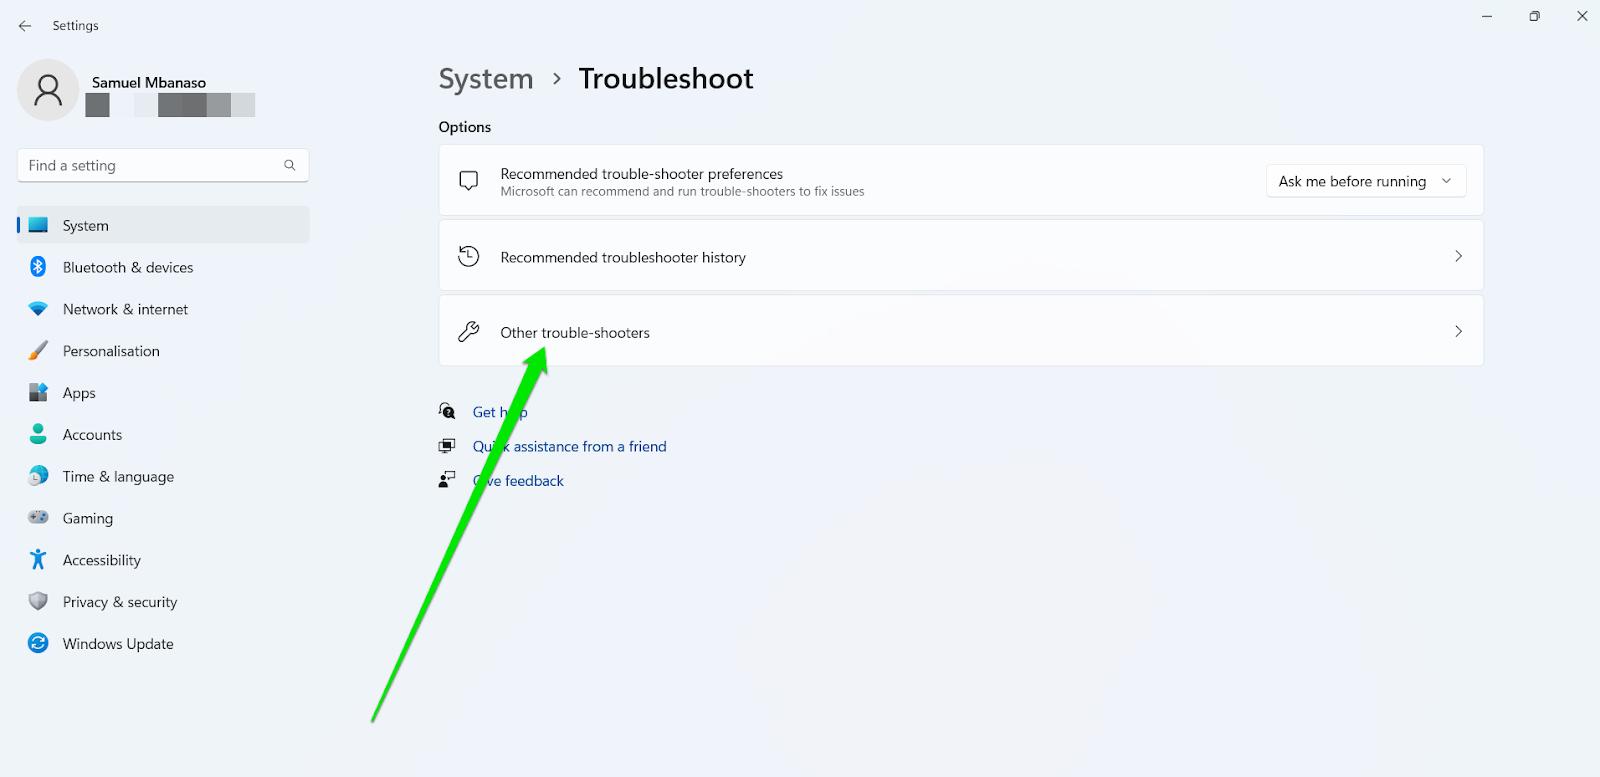
- Go to Settings, select System > Troubleshoot.
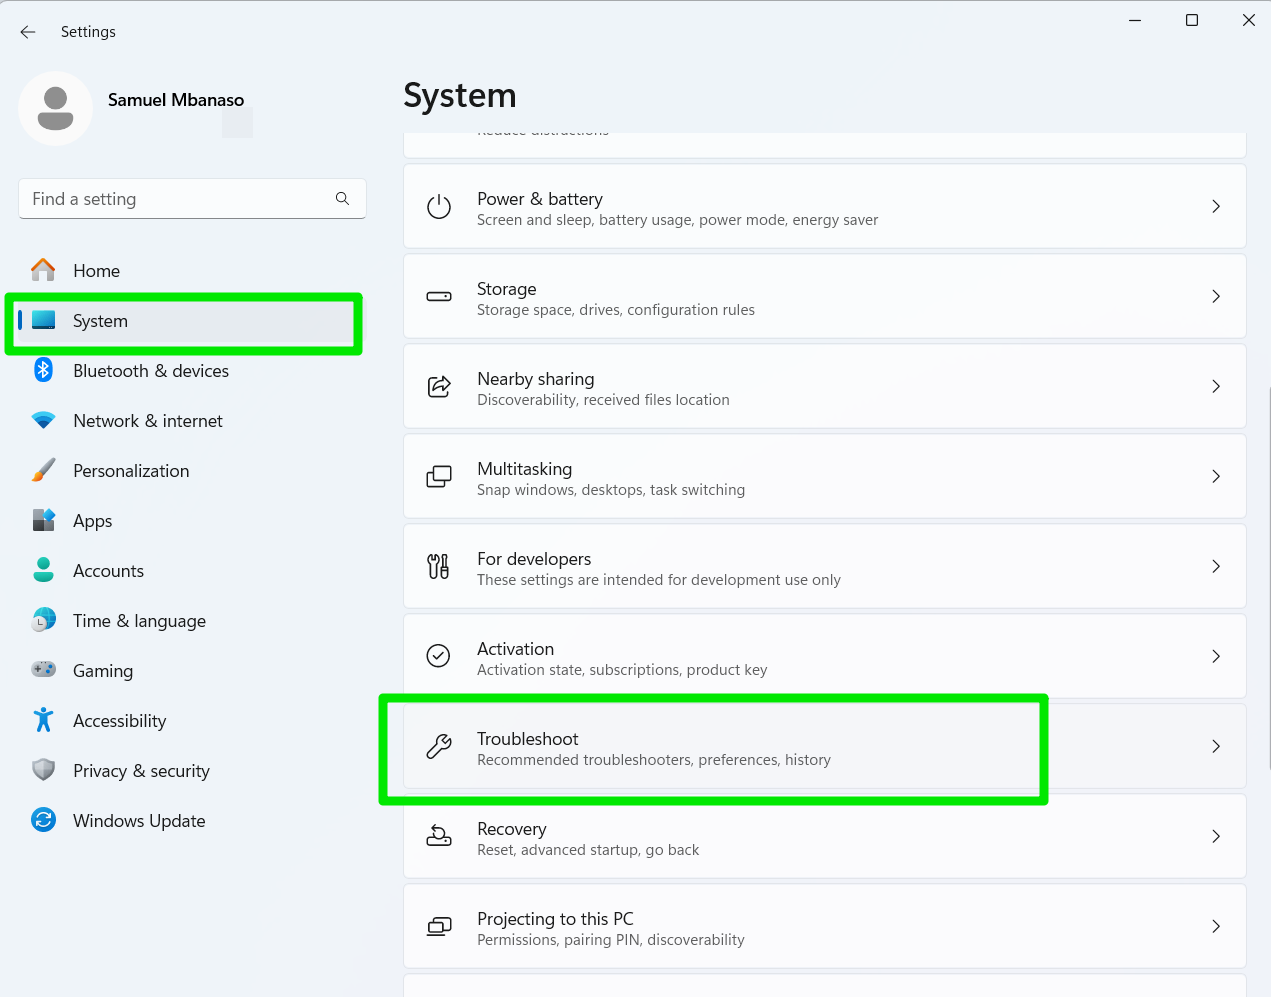
- Click Other Troubleshooters.
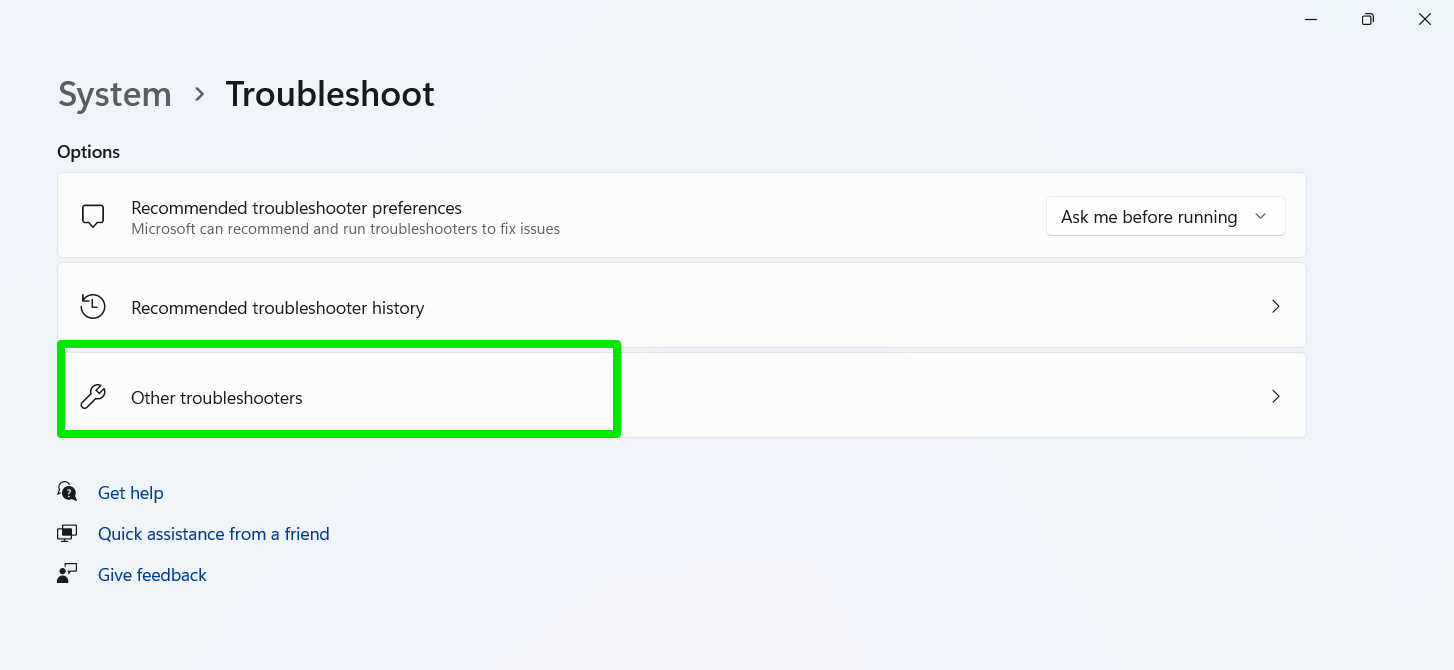
- Now, click Run next to the Program Compatibility Troubleshooter.
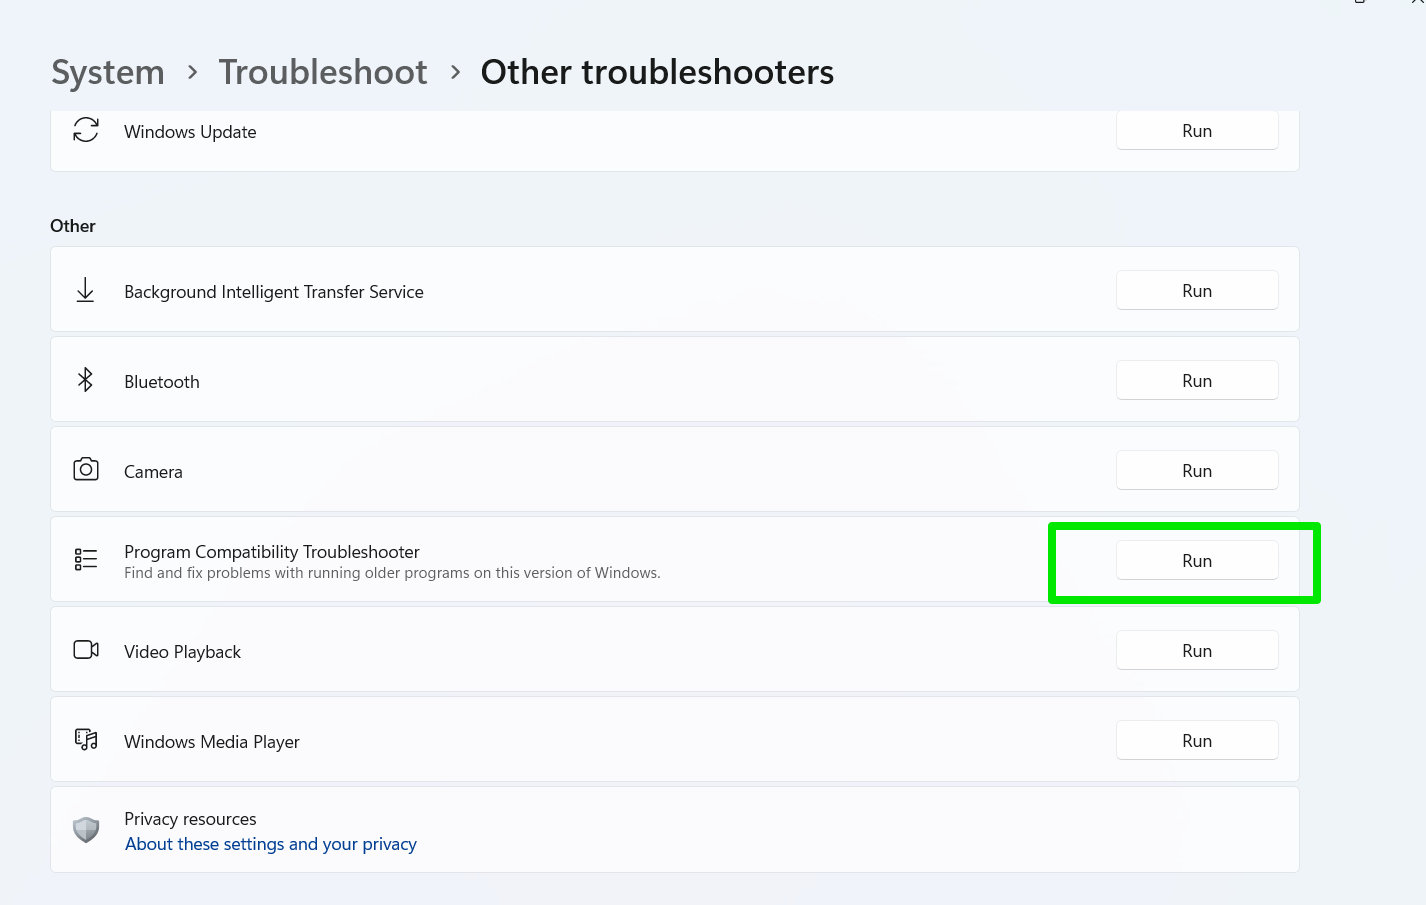
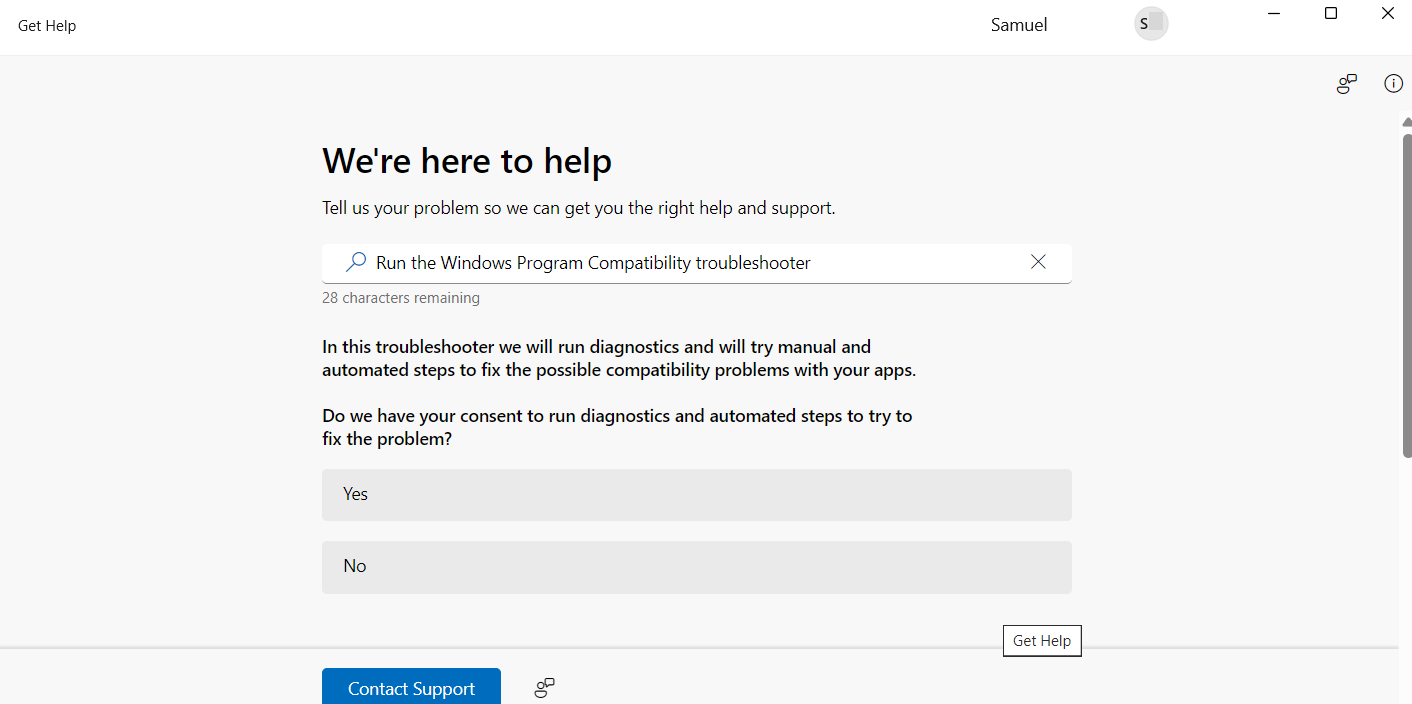
- Follow the instructions in the Get Help app to resolve the issue.
Fix 6: Fix Your Network Connection
A faulty network is another common reason why Netflix keeps pausing and freezing in the middle of streaming.
If the application or your web browser struggles to maintain a healthy Internet signal, it begins to throw up performance issues.
Different system issues can cause a drop or outright loss of Internet connection. We’ll be going through different fixes on how to resolve this problem.
Helpful: Boost Internet on Your PC: Tips on How to Speed Up Your Internet Connection
Restart Your RouterWhenever you contact your service provider about signal problems, the first thing they ask is if you’ve restarted your modem or wireless router. That’s because we tend to forget that they are also electronic devices that can glitch after a period of use. Restarting the router works in most cases because the device’s congested memory and buffers from previous connections can be cleared. A restart also helps to refresh and reset the router’s software if it encounters any glitch. Temporary network congestion is another issue that a quick reboot can solve. It allows the device to reconnect to the network and renew DHCP leases for connected devices to clear network congestion and connection conflicts. This activity ensures valid IP addresses and network configurations. Additionally, restarting ensures that updates or configuration changes from the Internet service provider are properly applied, contributing to a smoother network experience. Whether you use a wired or wireless router/modem, you have to follow the same process:
- Disconnect your router/modem from its power source. If your network setup combines a router and modem, unplug both devices.
- If your modem or router has a backup battery, remove the battery from the device. Shut down the device completely if the battery is not removable.
- Restart your computer.
- Now, plug your router/modem back into its power source and turn them on.
- The device’s light indicators will let you know when they are ready.
- Now, try connecting to your PC again to check for the issue.
Consider Changing Your Network BandMost modern wireless routers use the 2.4 Ghz and 5.0 GHz frequency bands to broadcast Internet signals. You’ll see both bands listed as two different available WiFi connections whenever you want to connect. Consider going to your network selection page and switching to a different band if you’re currently experiencing the problem on one frequency. In some situations, one band is better than the other. If your router is far from your device and there are walls and other barriers between you, you’re better off using the 2.4 GHz band. That said, the 5.0 GHz offers you faster throughput and is better for streaming. So, you can switch to the 5.0 GHz band and go closer to your router, then check if that resolves the network problems. Run the Network TroubleshooterThe network troubleshooter is another built-in Microsoft tool designed to check your computer’s network infrastructure to diagnose and fix common issues. It restarts network related services to try and resolve conflicts that may be preventing your computer from connecting to the Internet. Follow these steps to run the Network Troubleshooter on Windows 10:
- Launch the Settings app (right-click Start and click Settings) and select Network and Internet.
- Go to Status.
- Select Network troubleshooter under the Change your network settings section.
- Allow the troubleshooter to check your network and provide a report.
- Follow the steps it prescribes if it finds an issue.
- Check if the problem goes away.
Follow these steps if you have a Windows 11 computer:
- Right-click Start and select Settings or press
Windows+I. - Scroll through the System page and select Troubleshoot.
- Click Other Trouble-Shooters.
- Click Run beside Network and Internet.
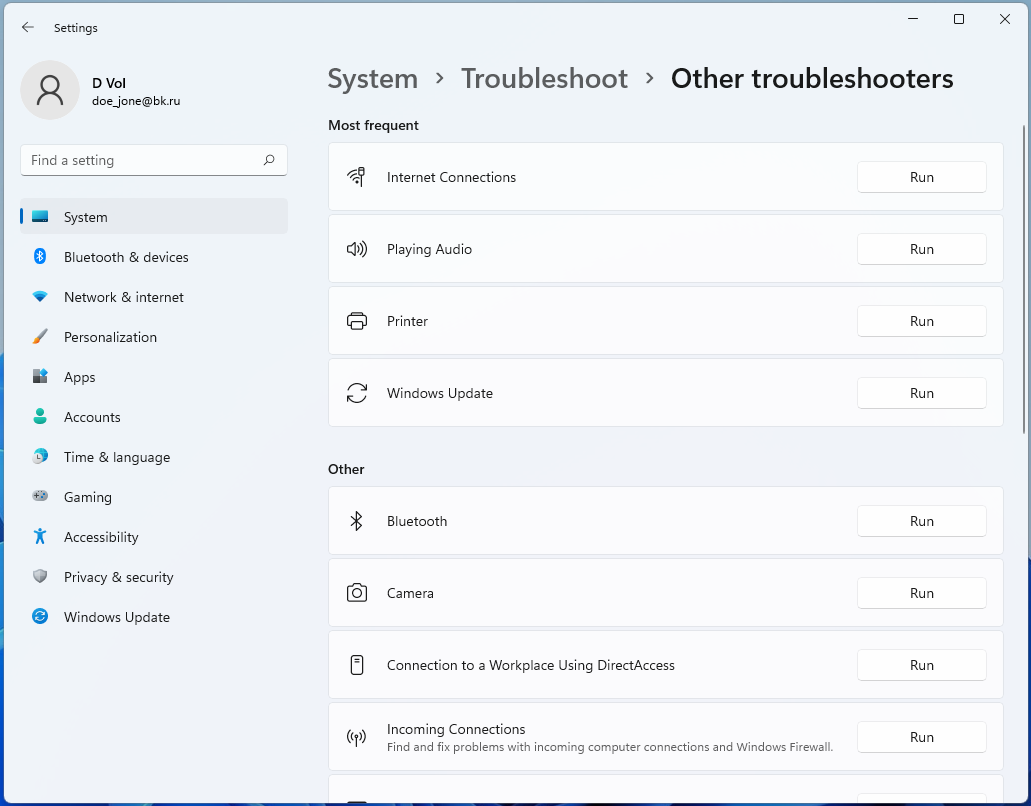
- Allow the troubleshooter to check your network and provide a report.
- Follow the steps if it finds an issue and check if the problem goes away.
Also read: How To Fix Can’t Connect To This Network Error On Windows 10/11
Fix the DNSYour ISP provides the default servers that your computer routes all DNS requests to. These DNS servers resolve alphanumeric hostnames to IP addresses, allowing your browsers to know which website you’re trying to open. As it turns out, ISP-provided DNS servers are not usually the best for speed and reliability. Netflix may be freezing on your computer because of the server you’re currently using. So, switch to a different server and check if that resolves the problem. You can follow this step by step guide to learn how to change DNS servers for your computers and web browsers
.
Also read: [FIXED] “Your DNS Server Might Be Unavailable” Error On Windows 11
Flush Your DNS CacheYour computer compiles most of the IP address and hostnames it resolves through your DNS server to a cache file on your hard drive. That way, it will refer to the DNS cache to resolve domain names in the future instead of using the DNS server repeatedly. Sometimes, wrong information in the current cache can cause connection problems. Once you’ve changed your DNS server, you should ideally purge the cache to allow your computer rebuild it with information from the new server. Follow these steps to flush the DNS cache:
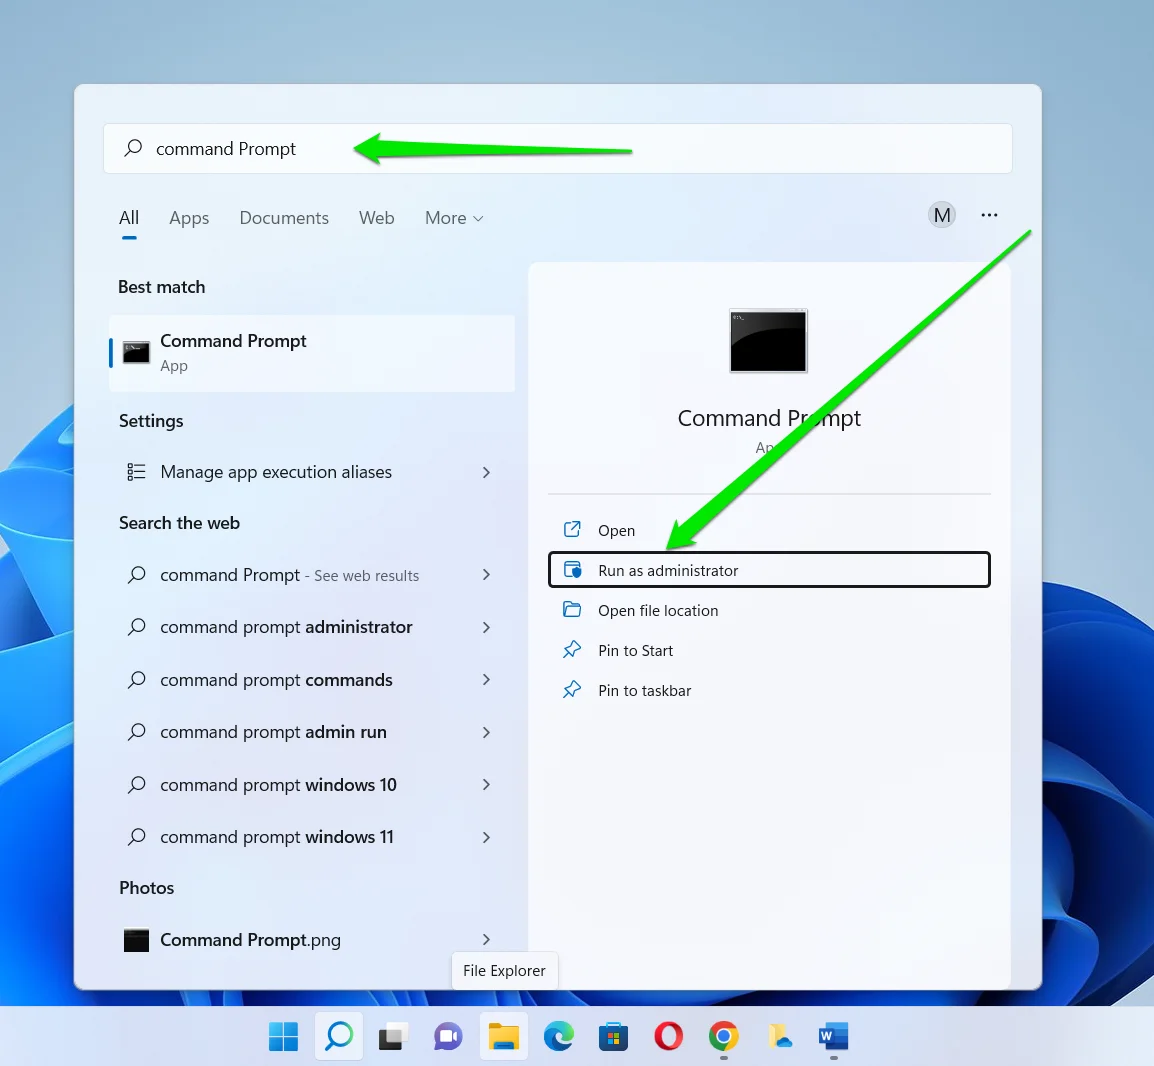
- Launch the Command Prompt as an administrator. Type
Command promptin the Start menu and select Run as Administrator.
- Select Yes in the UAC warning dialog window.
- Type
ipconfig /flushdnsand hitEnterafter the Command Prompt appears.
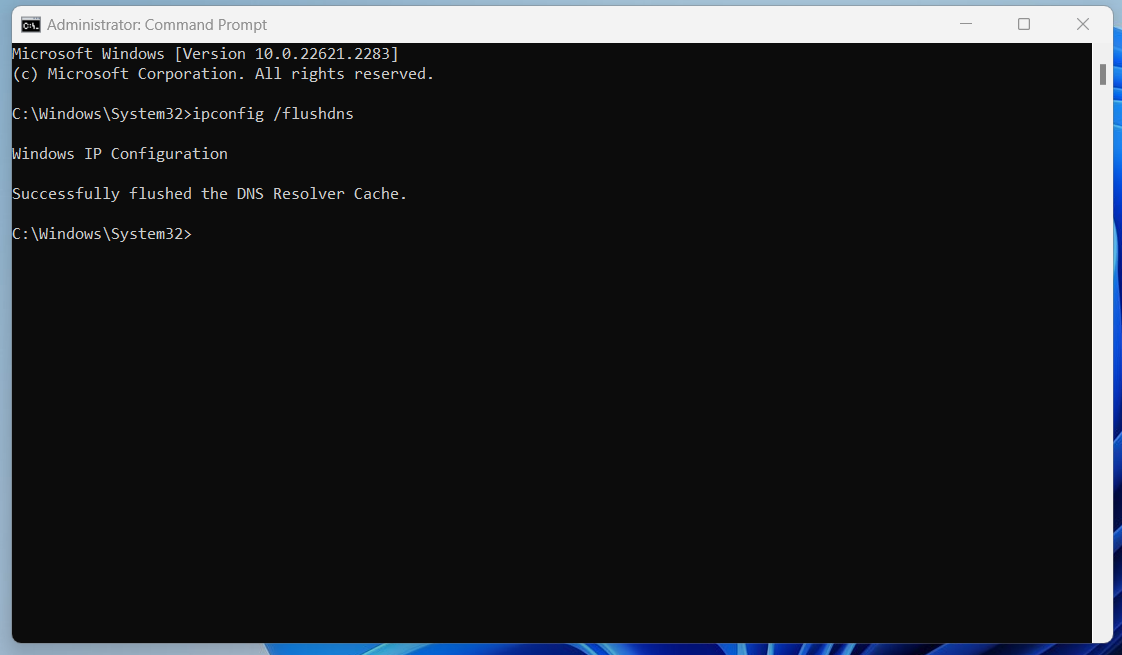
- Open Netflix and check for the problem.
Also read: Here is How to View DNS Cache on Any Windows 10/11 Computer
Release and Renew Your IP AddressYour router leases an IP address to your computer from a pool of available addresses for a specific period. This IP address should be unavailable to other devices connected to the router. But in rare situations, a misconfiguration may result in the router assigning the same IP to another device, causing IP address conflicts
.
In such a case, you have to relinquish the IP address to resolve the conflict.
You may also need to release the address if the lease period is over or to update your computer’s network configuration.
After releasing the IP, you must place an order to get a new one. That process is called renewing your IP address.
Follow this guide:
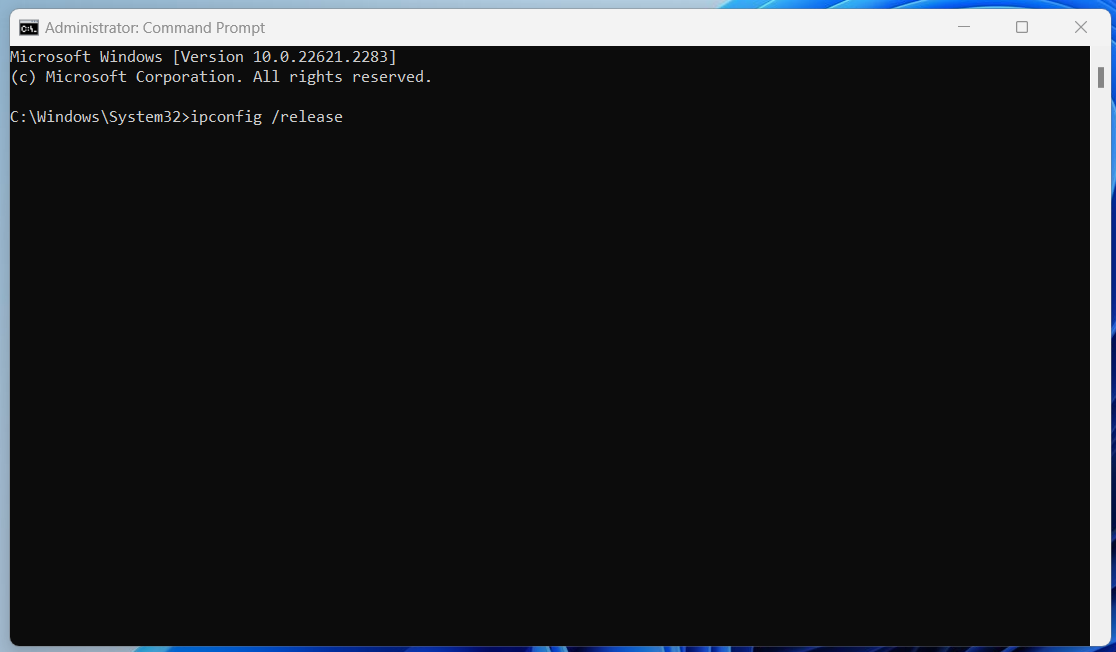
- Launch the Command Prompt as an administrator. Type
CMDin the Start menu and select Run as Administrator. - Select Yes in the UAC warning dialog window.
- Type
ipconfig /releaseand hitEnterafter the Command Prompt appears.
- Type
ipconfig /renewand hitEnter.
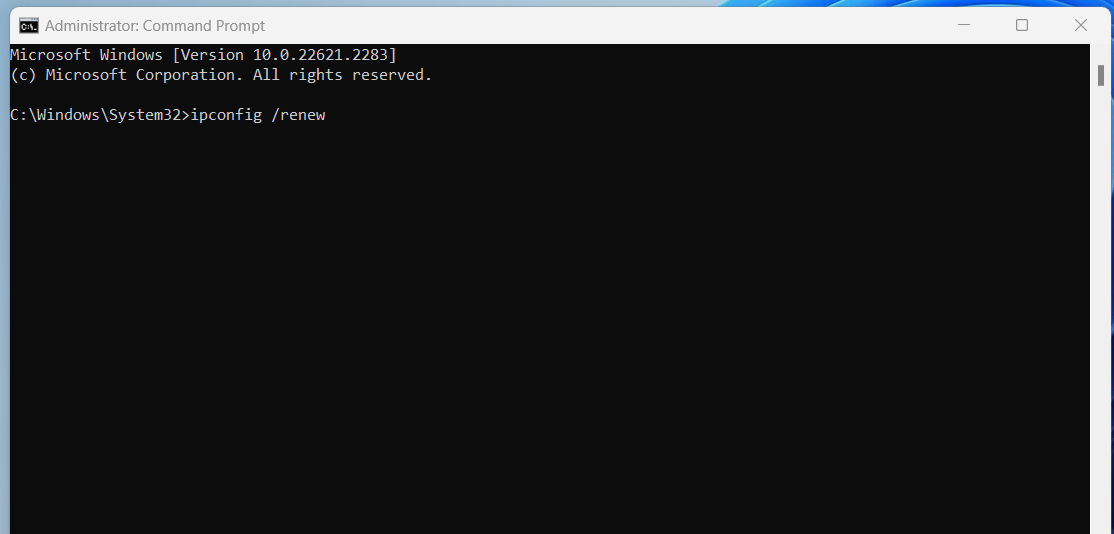
- Open Netflix and check for the problem.
Also read: “Your IP Has Been Temporarily Blocked”- How to Unblock IP?
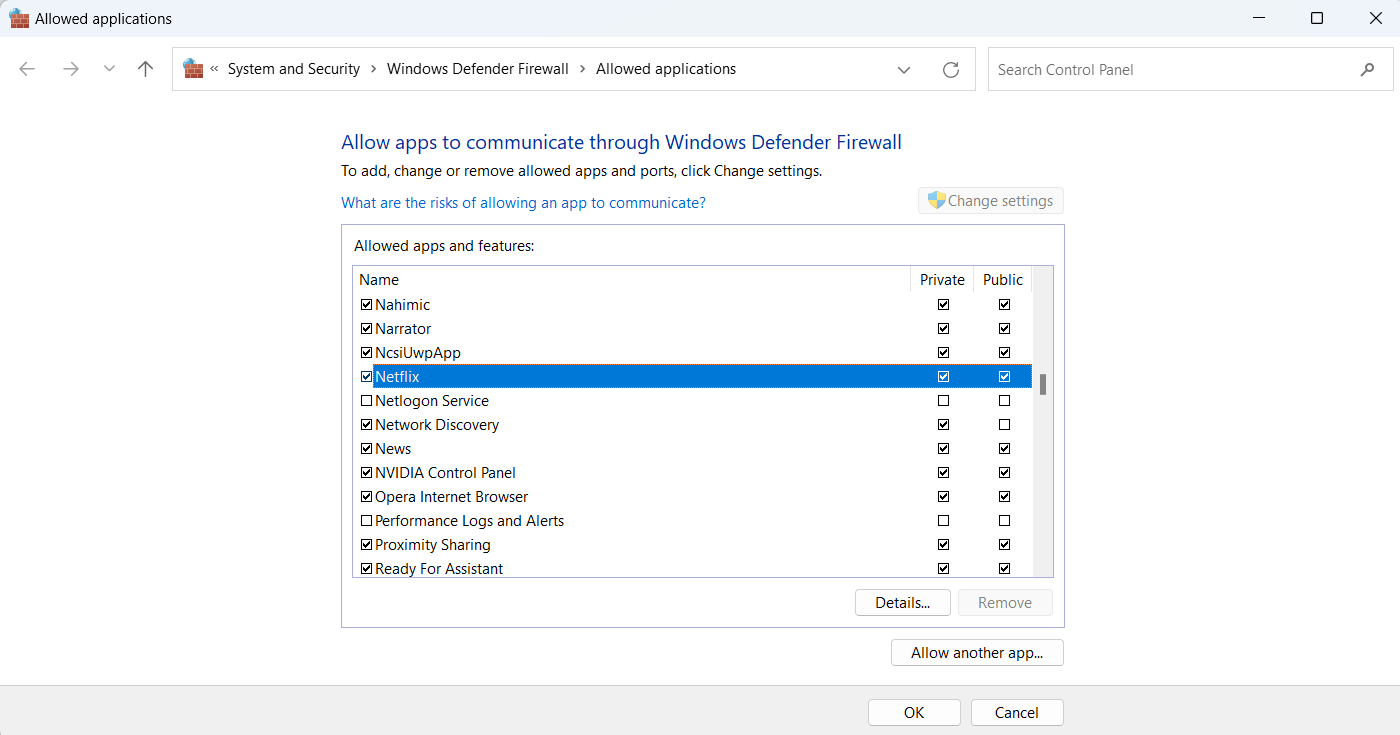
Fix 7: Allow the Netflix App through the Firewall
Netflix might continue freezing no matter what you try if your firewall keeps blocking it. You can ensure that this is not the case by entering your firewall settings and adding Netflix to its allow list.
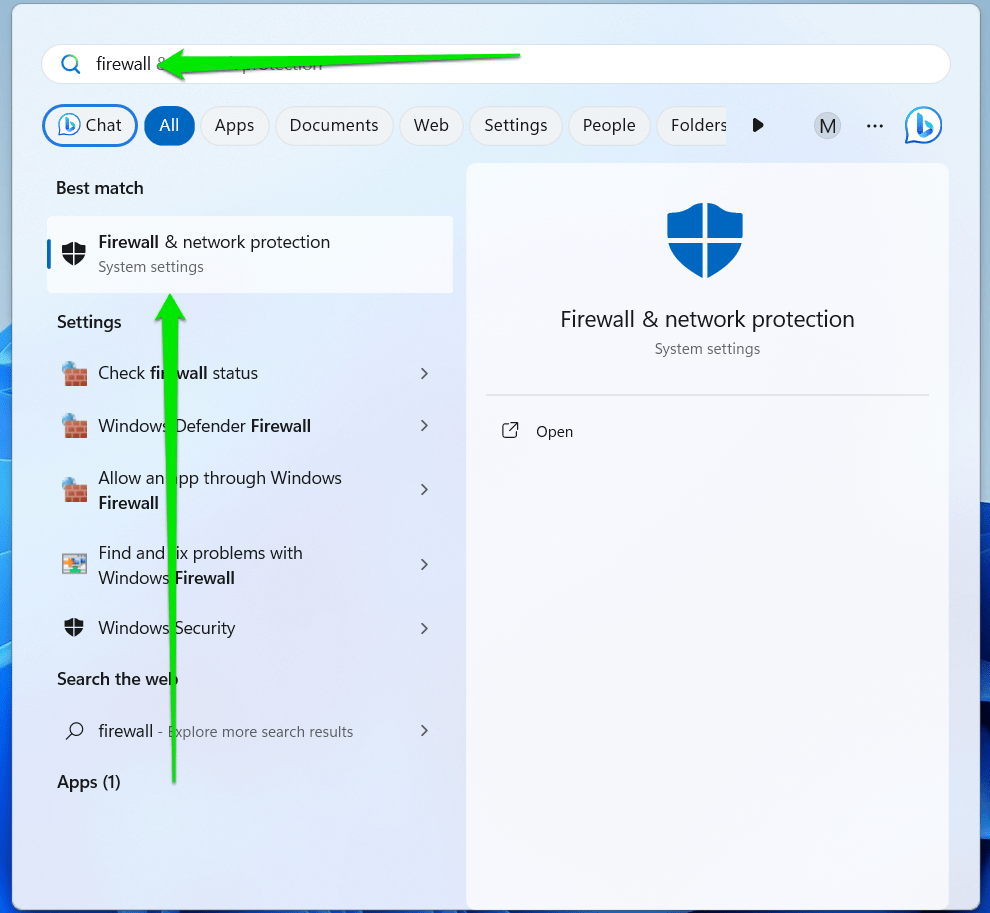
Here’s the process for Windows Defender Firewall:
- Open the Start button and type
firewall. - Click Firewall & Network Protection in the search results.
- Select Allow an app through firewall.
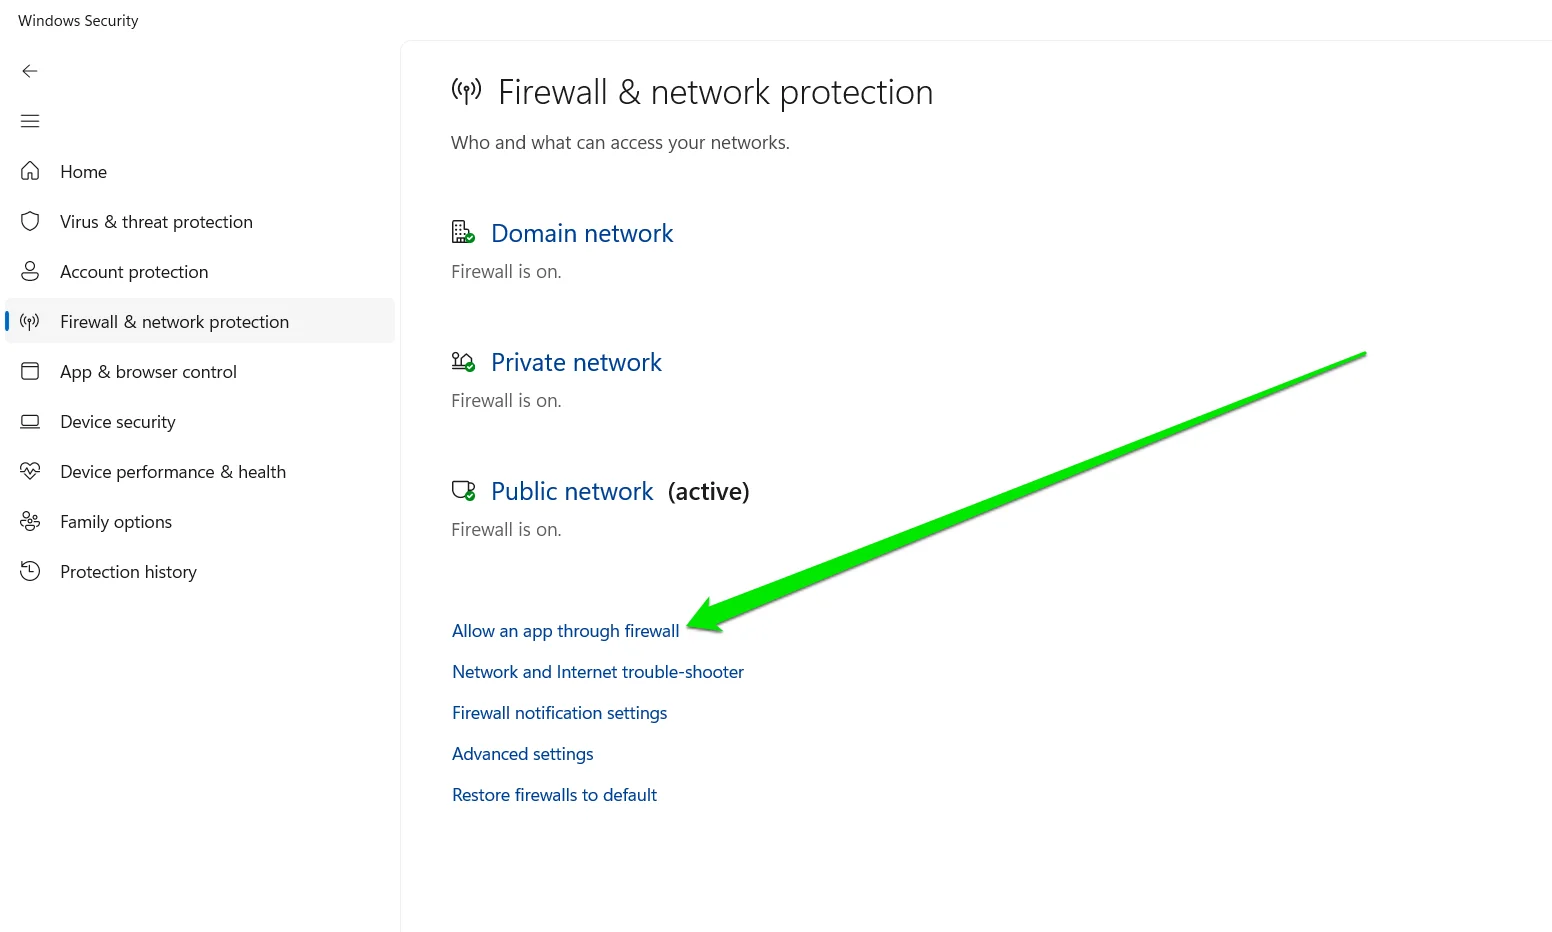
- Click Change Settings when the Allowed Applications window shows up.
- Scroll down to locate Netflix and check all its boxes.
- Do the same for your browser.
- Click the OK button.
Now, check if the “Netflix not working” problem persists.
Fix 8: Fix Your Graphics Driver
Your graphics card controls what you see on your screen, especially video playback. If Netflix is freezing while your device is working or while audio is still playing, your graphics card’s driver may have something to do with it. The driver is responsible for interpreting your operating system’s needs to the graphics card and vice versa. If it’s corrupt or out of date, you’re bound to experience graphics-related problems. Updating the driver should be your next move if nothing has worked till now.
Related: [EASY GUIDE] How to Update Device Drivers on a Windows 10 PC?
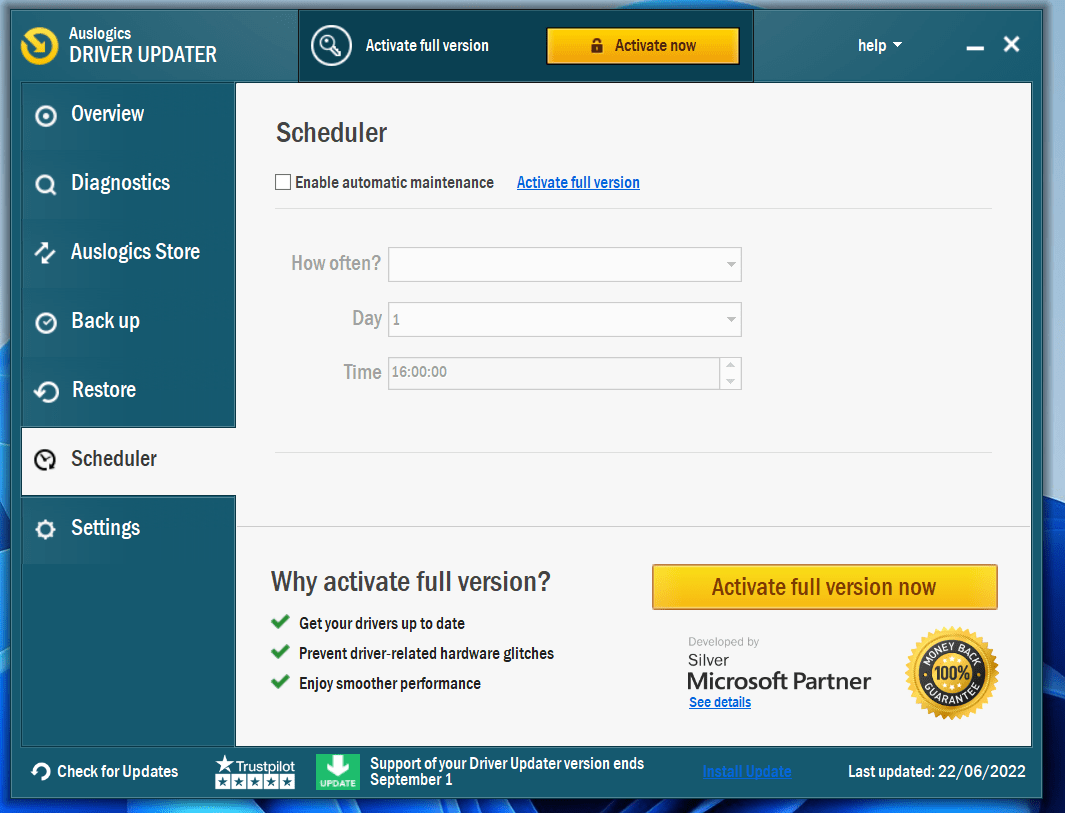
The best way to keep your driver up to date and ensure this issue doesn’t happen in the future is using an application that automates the driver-updating process. Auslogics Driver Updater is an industry-trusted utility that can help you track and resolve driver issues automatically.
The program allows you to schedule scans so that it can check for outdated and malfunctioning drivers and install their official updates from time to time.
You can configure it to perform this task whenever your computer starts. That way, you no longer have to worry that a hardware driver is causing stability problems.
Fix 9: Reinstall the Netflix App
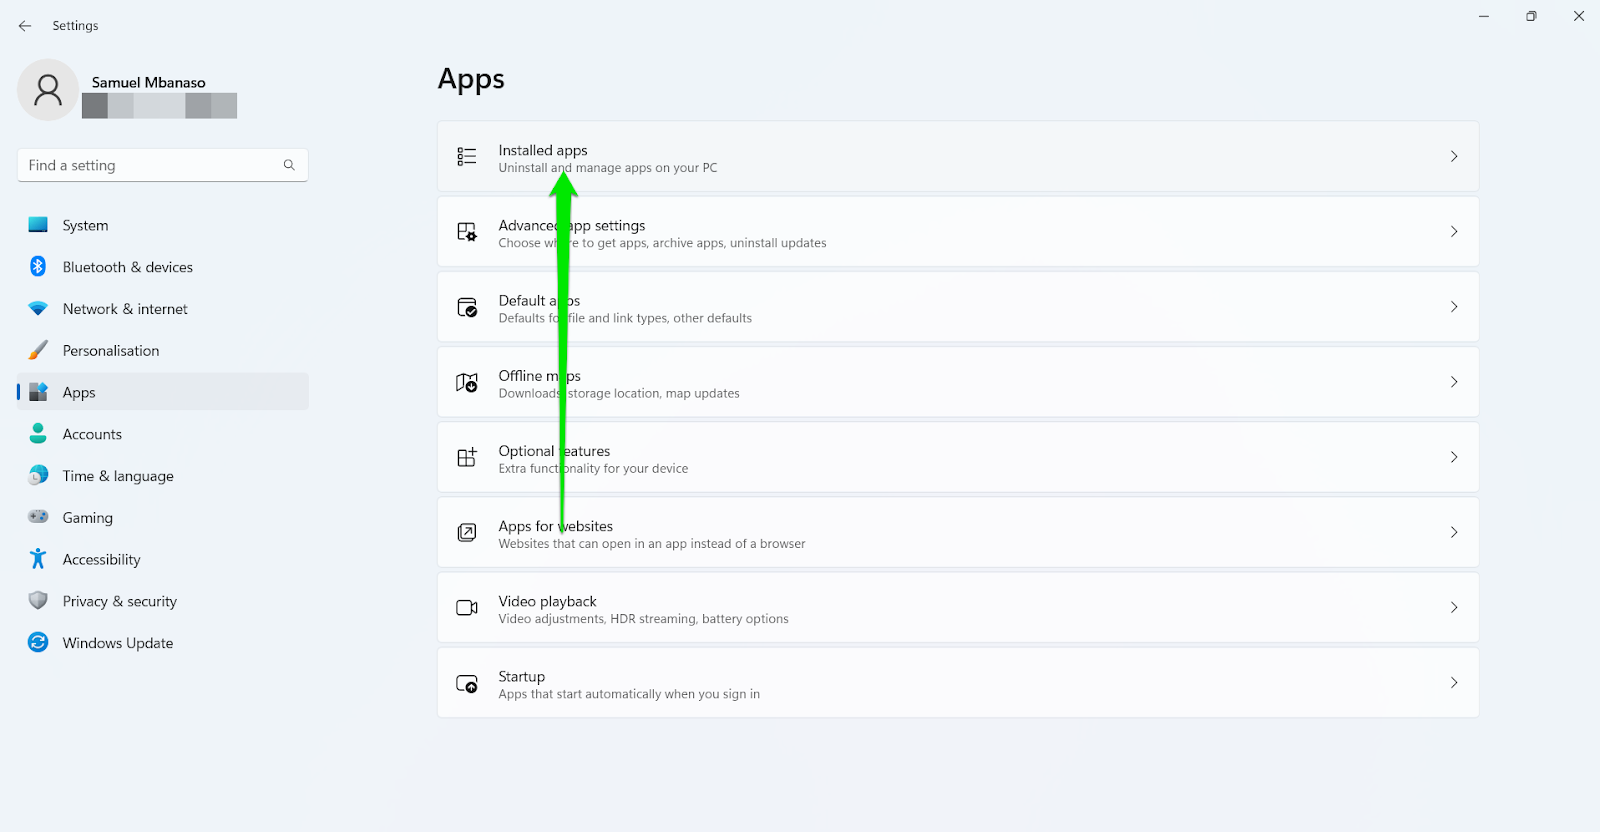
Consider reinstalling the application if nothing has worked so far. Since you installed the app through the Microsoft Store, you have to go through the Settings app.
- Launch Settings and click Apps.
- Select Installed Apps if you’re running Windows 11.
- Type
netflixinto the Search box. - If you’re on Windows 10, click the Netflix app and select Uninstall.
- If you’re on Windows 11, click the three dots beside Netflix and select Uninstall.
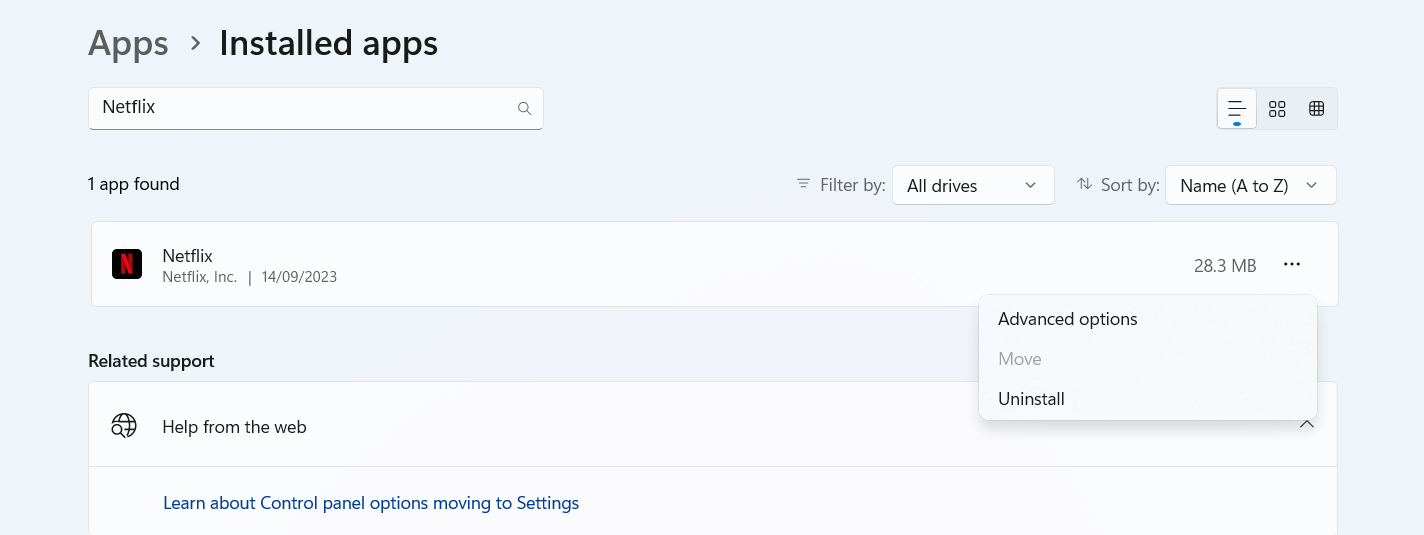
- Allow Windows to remove the program.
- Restart your computer.
- Open the Microsoft Store, search for Netflix, and install the program.
Conclusion
The freezing issue doesn’t have to overshadow the excitement of streaming your favorite shows and movies. We believe the fixes in this article finally got you to stop asking questions like, “Why does my Netflix keep pausing?”
Remember to keep your PC free from malware by using a competent virus-removal tool a longside Windows Security.
FAQ
There are other things that you can try before contacting your device manufacturer’s support. They include:
- Setting your date and time to automatic through settings
- Remove malware from your computer
- Switching to the web version if you’re using the app and vice versa
- Disable any VPN/Proxy that you may be using
- Disable experimental features on your GPU software
Depending on your TV’s make and model, the Netflix app might be freezing because of the following:
- Your device is experiencing software glitches that can be cleared after a reboot
- It may be time to log out of Netflix and sign in again
- Your Netflix app is out of date
- Internet connection problems
You might not be getting sound on Netflix because:
- Your computer’s audio is turned down
- You did not select the right speaker
- Your computer’s current sample rate and bit depth
- Your browser’s current tab might be muted
- There are issues with Surround Sound 5.1
- The TV show or movie you’re streaming has audio issues