
Do you want to learn how to view DNS cache in Windows 10? If so, this tutorial is for you. On a Windows 10 PC, there are several methods you can use to display the DNS contents. First, here’s a summary of what the DNS cache means.
What Is the DNS Cache?
DNS (Domain Name System) cache, sometimes referred to as DNS Resolver Cache, is a temporary storage of information maintained by your computer.
It contains records of all the recently visited websites and their IP addresses.
It serves as a database that keeps a copy of a DNS lookup locally stored on your browser or operating system. Your computer can quickly refer to it when you load a website.
The DNS cache is like a phonebook that stores an index of all public websites and their IP addresses.
Its main purpose is to speed up a request to load a website by handling name resolution of addresses you recently visited before the request is sent out to many public DNS servers.
Since the information is available locally, the process is much quicker.
How to Check DNS Cache on Windows 10
As noted earlier, various ways exist to display the DNS cache on Windows 10. This can be useful if you want to diagnose DNS issues, for example, where an invalid or out-of-date DNS record might be cached.
Method 1: Via Command Prompt
To display the contents of the DNS cache, you need to execute the following command in an elevated Command Prompt:
- Press the
Windows + Sshortcut keys and type in cmd. - Click on Run as administrator on the right pane.

- On the Command Prompt window, type the following command and press Enter:
ipconfig /displaydns
Upon execution of the command, the following results will be displayed:
- Record Name – This is the name you query the DNS for and the records, such as addresses that belong to that name.
- Record Type – This refers to the type of entry, displayed as a number (although they are commonly referred to by their names). Each DNS protocol has a number.
- Time to Live (TTL) – This value describes how long a cache entry is valid, displayed in seconds.
- Data Length – This describes the length in bytes. For instance, the IPv4 address is four bytes, and the IPv6 address is 16 bytes.
- Section – This is the answer to the query.
- CNAME Record – This is the canonical name record.
You can export the results of the DNS cache using this command:
ipconfig /displaydns > dnscachecontents.txt
This will save the output in the text document, dnscachecontents.txt.
📌 Also read: [FIXED] Server DNS address could not be found on Windows 10/11
Method 2: Via PowerShell
You can view the DNS cache using Windows PowerShell. And like in Command Prompt, you can also export or save the database. Here’s the procedure:
- Press the
Windows + Xkeyboard shortcut and select Windows PowerShell Admin. Alternatively, if you can’t find that option, press theWindows + Sshortcut keys, type in PowerShell, and select Run as Administrator on the right pane.
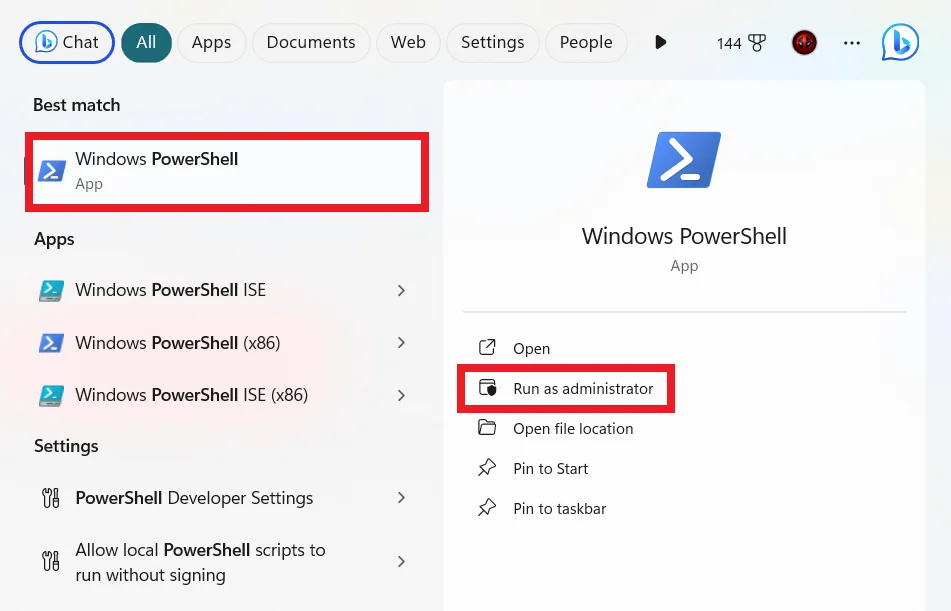
- Next, input the command
Get-DnsClientCache, and press Enter. - Use the
Get-Help cmdletto get more information:
Help Get-DnsClientCache –full
Why Clear DNS Cache?
When you run into Internet connectivity issues, flushing or clearing the DNS cache usually resolves the problem. You may want to clear your DNS cache for a varied number of reasons, including:
- When attempting to troubleshoot connectivity issues, where you have difficulty accessing websites and applications: If the domain name in the cache has an incorrect or invalid IP address, the website won’t be able to return the correct information. If you clear your browser history, the DNS cache will still contain the old corrupt details. Flushing helps to get the DNS to update the results.
- When attempting to troubleshoot or resolve DNS spoofing or DNS cache poisoning issues: Cybercriminals may try to access the cache and insert or change the IP address to redirect you to a website designed to gather sensitive data like passwords and banking details. Clearing the DNS cache prevents this.
- Protecting your privacy: Although the DNS cache does not contain personal data like cookies or JavaScript, it retains a history of addresses you’ve visited recently and those you visit frequently. Such information can be dangerous in the hands of a skilled hacker. By clearing the DNS cache, you erase your address history, making it less likely for a hacker to track your online behavior.
- Resolving stale or outdated information about visited sites: An example here would be if a website has moved servers.
📌 Also read: Boost Internet on Your PC: Tips on How to Speed Up Your Internet Connection
Is It Safe to Flush the DNS Cache?
It is important to note that flushing the DNS cache doesn’t negatively impact your system. DNS cache ensures quick access to websites, and when you clear it the first time you visit a website, it may take longer than usual to load. But afterwards, the results will be quicker again.
📌 Related: How to Delete Temporary Internet Files?
How to Clear DNS Cache
To clear the DNS cache, you can use a command line or Windows PowerShell for whatever reason.
Method 1: Clear DNS Cache using Command Prompt
- Press the
Windows Key + S, and type CMD. - Choose the Run as administrator option in the right pane.
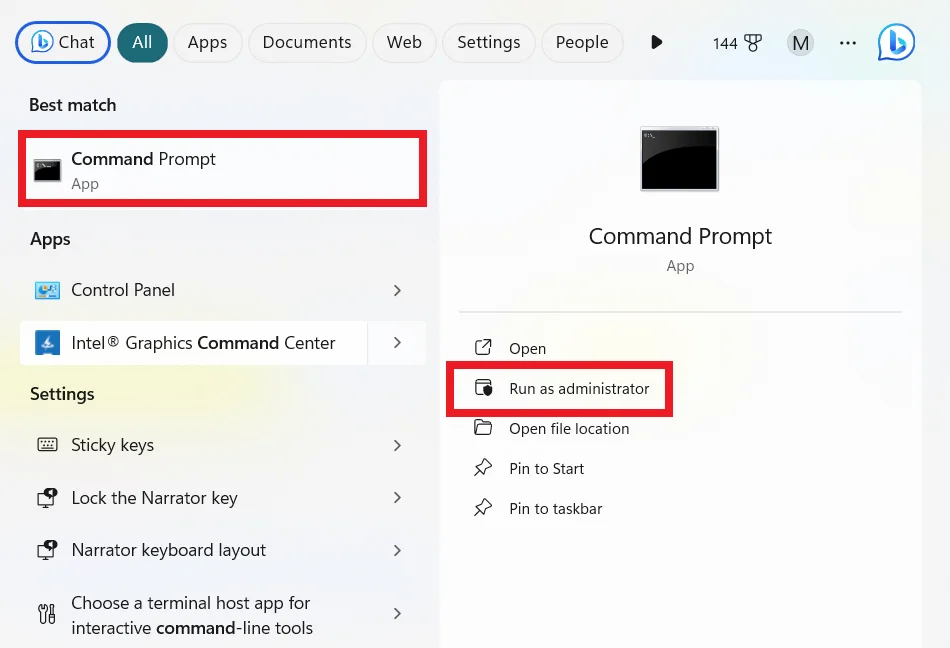
- Type the following command in the prompt and hit Enter:
ipconfig/flushdns
That’s it! You should get a notification indicating the cache has been successfully flushed.
If the issue is on the server instead of the local machine, you can still use Command Prompt to clear the DNS cache, but with a different command. In that case, the command would be:
dnscmd /clearcache
Method 2: Clear DNS Cache using Windows PowerShell
You can also flush the DNS cache using Windows PowerShell. Depending on the type of cache you want to clear, you have a few options to implement:
- To clear the local DNS server cache, use the command line:
Clear-DnsServerCache
- To clear the client cache, use this command:
Clear-DnsClientCache
How to Disable DNS Cache in Windows 10
If, for any reason, you wish to disable the DNS cache on your Windows 10 PC, you can use the “Service Controller” tool to stop the service:
- Press the Win + R keys, type in
services.msc, and press Enter or click OK.
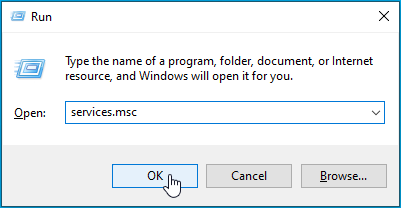
- Locate the DNS Client service (or Dnscache on some computers) and double-click it to open its Properties.
- Change the Startup Type to Disabled.
- To re-enable the service, repeat the steps above and change the Startup Type to Automatic.
Alternatively, you can deactivate the DNS Client using Windows System Configuration:
- Press the
Win + Rkeys, type inmsconfigin the Run dialog box, and hit Enter or click OK.
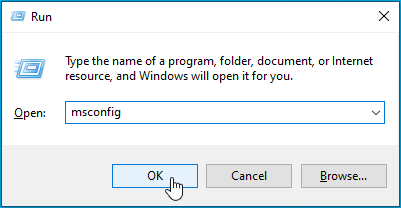
- Move to the Services tab and find DNS Client.
- Uncheck the box next to the service and click Apply > OK.
- To re-enable the service, repeat the steps above and tick the checkbox again.
Keep in mind that disabling this service will affect your computer’s overall performance. The network traffic for DNS queries will increase, so websites will load much slower than normal.
How to View DNS Cache on Windows 11?
Windows 11 has several substantial upgrades: performance optimization, bug fixes, new Taskbar and Start Menu placements, and more.
However, regarding basic functionality, Windows 11 works like Windows 10.
If you are trying to view the DNS cache on Windows 11, you can use the methods mentioned above for Windows 10.
Namely, you can view the cache by running elevated Command Prompt or via Windows Powershell — simply go through the steps for both methods described above.
If you are looking to clear the DNS cache on Windows 11, you can also follow the same steps as listed above for Windows 10. You can clear the cache by running a command in Command Prompt.

You can also do the same via Windows PowerShell.
Follow the steps above to Clear the DNS Cache on Windows 10. You can also follow the same steps to re-enable the service.
Please note that if you decide to disable the DNS cache on Windows 11, your system’s overall performance will be affected.
The traffic for DNS queries will substantially increase, and you will notice that many of the websites you visit frequently take much longer to load.
If you choose to disable the DNS cache on your PC, you will also lose the option to view the cache if you need to diagnose an issue on your system.
Extra Tip: Always Protect Your Privacy
In 2022, a staggering 493 million ransomware attacks were detected worldwide, with phishing attacks still remaining the most common type of cybersecurity threat. Globally, the average damages associated with data breaches amounted to $4.35 million in 2022. These are scary facts – but they are a good illustration of why you should always protect your privacy.
While clearing the DNS cache is important for protecting your privacy and preventing instances of hacking, it won’t remove all traces of sensitive information.
These details include activity history, login details, profile data, and traces of visits to adult websites. Even if you didn’t open them knowingly, you might have been redirected without your knowledge. To effectively remove such sensitive data and protect your privacy, you need a reliable program like Auslogics BoostSpeed.
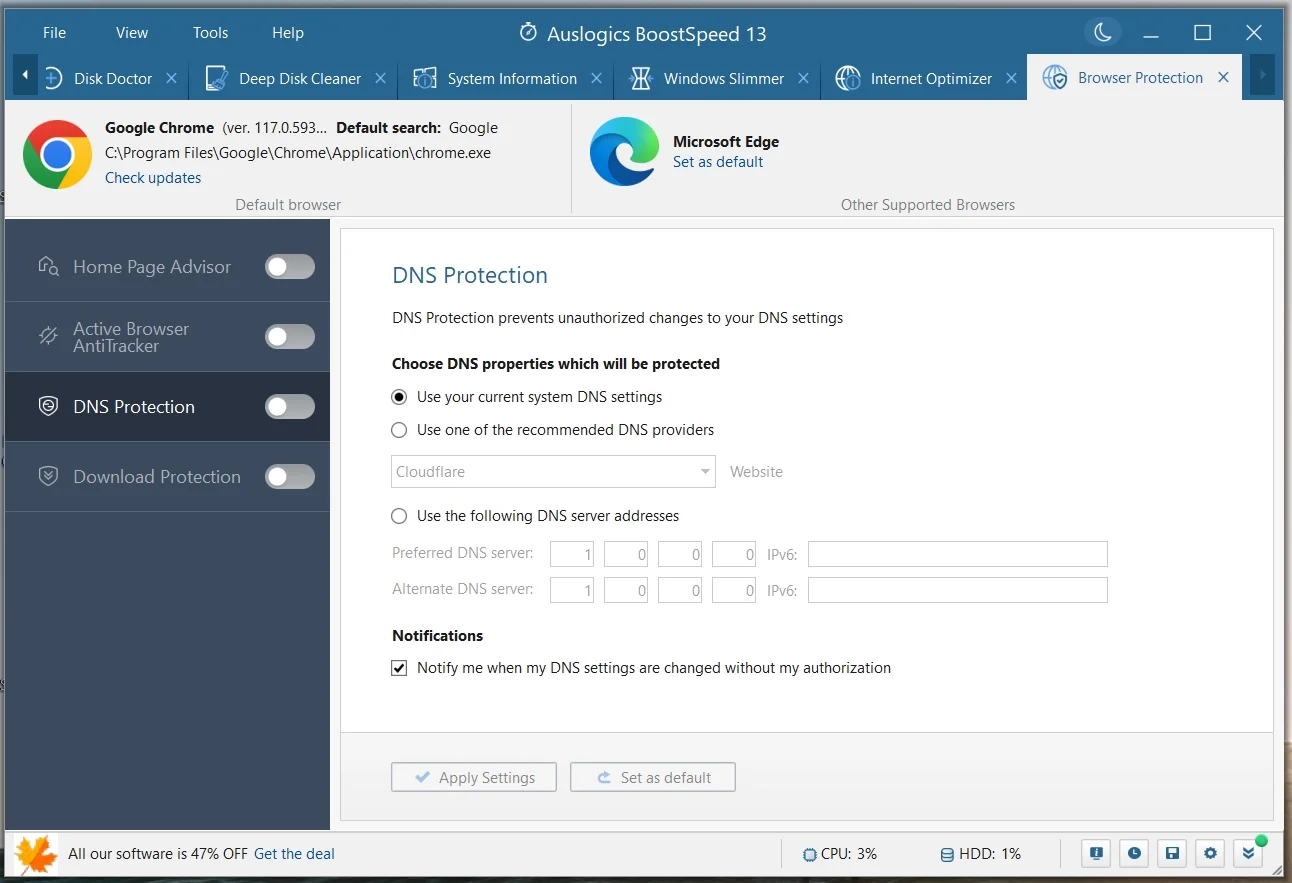
The tool helps to clear any kind of confidential information that you wouldn’t want anyone to find. BoostSpeed has all the functionality you might need to keep your PC performing at optimal speeds and protect privacy. You will especially find the features under the “Browser Protect” tab quite useful.
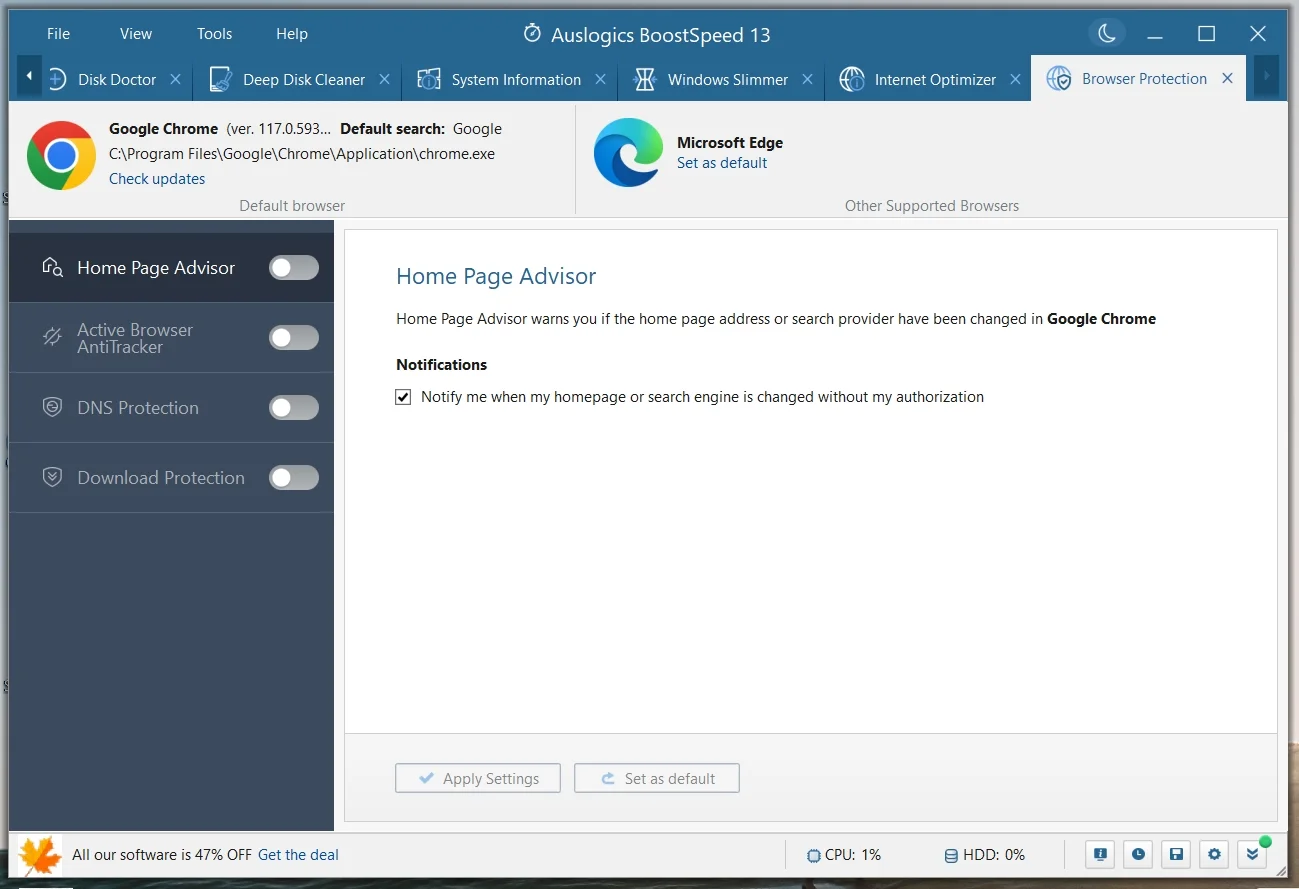
Apart from clearing traces of your activities in your web browsers, system files, and applications, there is also an option to protect your DNS from unauthorized changes.
This way, you won’t be worried about DNS spoofing, where attackers alter your DNS records to redirect traffic to fraudulent websites.
If you enable Active Browser AntiTracker, your browsing data will be cleared after every browsing session, safeguarding your privacy.
We recommend cleaning up your PC regularly, depending on your usage. Since it’s easy to forget to run maintenance, you can activate an automated scan and choose how often you want the scan to run.
Conclusion
Managing your DNS cache on Windows 10/11 is a straightforward process that can improve your internet experience.
Viewing the cache lets you see which domain names have been resolved recently. Clearing it can help resolve connectivity issues, ensure privacy, and keep your system up-to-date.
Following the simple steps outlined in this guide, you can easily view and clear your DNS cache, ensuring a smoother and more secure online experience.
FAQ
To check your DNS settings in Windows 10, follow these steps:
- Right-click on the Start button and select Network Connections or Network & Internet Settings.
- Click on Change adapter options.
- Right-click on your active network connection and choose Properties.
- Scroll down and find Internet Protocol Version 4 (TCP/IPv4) or Internet Protocol Version 6 (TCP/IPv6) depending on your network.
- Click Properties to view and edit your DNS settings.
ipconfig /displaydns or Clear-DnsClientCache.The DNS Resolver Cache stores information related to domain name resolutions, including the domain names and their corresponding IP addresses.
It may also contain information about recent network connections and domain-related settings.
The duration for which DNS cache entries last can vary. DNS records have a time-to-live (TTL) value, set by the domain’s authoritative DNS server.
Cache entries typically expire when the TTL value reaches zero, or when the cache is manually cleared. Common TTL values range from a few minutes to several days, depending on the domain and its configuration.