- What to Do if Media Streaming Isn’t Working in Windows 10?
- How to Fix Media Streaming Not Working
- Solution 1: Fix the missing Media Feature Pack
- Solution 2: Check if the “Automatically allow devices to play my media” option is enabled
- Solution 3: Enable Windows Search Indexing
- Solution 4: Check related services
- Solution 5: Change Local Group Policy settings
- Solution 6: Replace the Media Player cache folder
- Media Streaming Not Working on Windows 10: Fixed
Although there are third-party streaming solutions you can install on your computer, most users prefer using the built-in Windows Media Streaming feature.
Not only do you have one less piece of software to download on your PC, which may slow down your system speed, the built-in DLNA feature in Windows 10 is also much more reliable.
What to Do if Media Streaming Isn’t Working in Windows 10?
It may happen that this feature is not working for you on your Windows 10 PC. When you go to the Turn on media streaming button, it is either greyed out or does not respond when you click on it. If you are experiencing this issue, there are a handful of things you can do to fix it. Find them listed below:
- Fix the missing Media Feature Pack,
- Check if the Automatically allow devices to play my media option is enabled,
- Enable Windows Search Indexing,
- Check related services,
- Change Local Group Policy settings,
- Replace the Media Player cache folder.
How to Fix Media Streaming Not Working
Solution 1: Fix the missing Media Feature Pack
If you are using a Windows 10 N variant, media streaming will not be available. Windows N is the version of the Windows 10 operating system that does not have a media player or media functions.
The “N” stands for “no media features.” This means that Windows Media Player, which is a primary requirement for media streaming, is not installed on your PC.
Also, it could be that you have the Media Feature Pack but it is turned off.
Whatever the case may be, there are ways you can enable media features on your Windows 10 PC.
Move on to the next solution if Windows Media Player is functional on your computer.
However, if you need solutions on how to fix Media Feature Pack not working, there are 3 things you can do:
- Go to Windows Features and enable Media Features.
- Download the Media Feature Pack.
- Create a registry key.
Enable Media Features
- Press the
Windows logo key + Ron your keyboard to open the Run dialog. - Type optionalfeatures.exe in the text box. Click OK or hit Enter on your keyboard to open the Windows Features dialogue box.
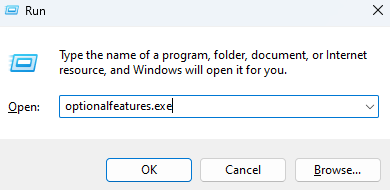
- In the window, under Turn Windows features on or off, scroll down to the Media Features entry and tick the checkbox.
- Click OK. Wait for a few moments for Windows 10 to turn on Windows Media Player and other media features.
Download the Media Feature Pack
If you don’t have the Media Feature Pack installed on your computer, you can download it from Microsoft.com.
Make sure you select the correct system architecture (x64 or x86) when prompted. After you’ve downloaded it, double-click the file and follow the on-screen instructions.
Create a registry key
It is important that you create a system restore point before you go ahead and attempt this.
When Registry Editor is not used correctly, it can cause serious system-wide issues that will require you to reinstall your Windows operating system before they are corrected.
There’s also no guarantee that any problem that may occur by editing your registry can be fixed.
After you have created a restore point, follow these steps to edit the registry:
- Open the Run dialog box by pressing
Windows logo key + Ron your keyboard. - In the text box, type regedit, and then click OK or press Enter on your keyboard.
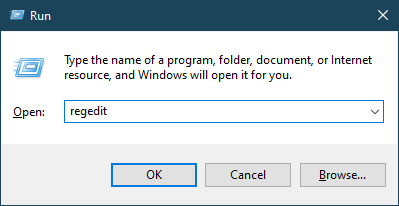
- Navigate to the path:
Computer\HKEY_LOCAL_MACHINE\SOFTWARE\Microsoft\Windows\CurrentVersion\Setup\WindowsFeatures\WindowsMediaVersion
- Change Value data of the WindowsMediaVersion key from 0 to 1. If it does not exist, you may have to create it. If there’s something like 12.0.17134.48 as Value data, it could be your Windows Media Player’s version number. Write it down somewhere and then change it to 1.
If this solution does not work, change Value data to the default value you wrote down or restore your system to the restore point you created earlier.
Solution 2: Check if the “Automatically allow devices to play my media” option is enabled
You need to enable the automatic play option before you can cast or stream any multimedia file using Windows Media Player.
This only requires a simple procedure to get your media streaming working in no time.
Here’s what you have to do to enable automatic streaming in Windows Media Player:
- Launch Windows Media Player.
- On the Menu bar, you will see the Stream drop-down menu. Click on it.
- From the options under Stream, choose Automatically allow devices to play my media.
- Restart your Windows Media Player and check whether media streaming now works.
Also read: How to Fix Multimedia Audio Controller Driver Errors in Windows 10?
Solution 3: Enable Windows Search Indexing
Media streaming is linked to Windows Search Indexing and can be affected by it. If you have disabled Windows Search Indexing for some reason, you have to re-enable it before media streaming will start working.
Follow these easy steps to enable Windows Search Indexing:
- Go to Control Panel. To do this, press
Windows logo key + Ron your keyboard to open the Run dialog box. Type control panel and click OK or press Enter.
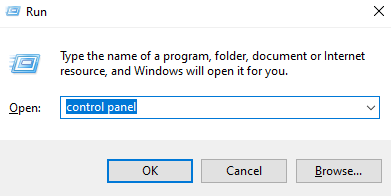
- In Control Panel, select Programs and Features.
- From the left pane, click on Turn Windows Features on or off.
- Select the Windows Search checkbox to enable it.
- Click OK and restart your PC to apply the changes.
Check to see if media streaming now works.
Solution 4: Check related services
Just like every other Windows component, there are several related services that govern how media streaming functions.
After you’ve enabled media streaming, the status of these services will change to Active by default. However, in some cases, some of them may be permanently disabled.
This prevents media streaming from working.
To ensure that related services are up and running, observe the steps below:
- To open Services, go to the Windows Search bar and type
services.msc. - Locate the UPnP host service in the list and right-click on it. Click on Properties from the menu.
- Set the Startup type to Automatic.
- Click on Stop > Start to restart the service.
- Click OK.
- Navigate to the Windows Media Player Network Sharing Service. Right-click on it, select Properties, and then repeat steps 3 to 5.
- Close Services and see if you can now use media streaming.
Solution 5: Change Local Group Policy settings
Local Group Policy is used for the management and configuration of certain permissions in your computer.
To prevent unauthorized streaming, there are some protective permission settings that are active. You have to disable them in order to resolve the “media streaming not working” issue.
This procedure requires administrator permission.
To disable the protective permission settings in the Local Group Policy Editor, follow these easy steps:
- To open the Local Group Policy Editor, go to the Windows search bar and type gpedit.msc.
- Navigate the path: Computer Configuration > Administrative Templates > Windows Components > Windows Media Player.
- Right-click on Prevent Media Sharing. Click on Edit.
- Click on Disabled.
- Confirm changes.
- Restart your PC and try to use media streaming now. It should be working.
Solution 6: Replace the Media Player cache folder
Corrupted or incomplete Windows Media Player cache files and configuration data in the AppData directory can cause several issues, including media streaming not working.
To fix this problem, you can either rename the Media Player folder or delete it along with the files it contains.
When you next launch Windows Media Player, the folder will be re-created and the problem solved.
To rename the folder, observe this procedure:
- Copy the path:
%userprofile%\appdata\local\microsoft - Go to your Windows search bar and paste it.
- In the window that opens, scroll down to Media Player and rename it to Media Player Old.
- Restart your PC and launch Windows Media Player. The media streaming issue should be resolved.
We hope you find these solutions effective in getting media streaming to start working on your PC.
This tool will safely repair any glitches or crashes you may be experiencing while trying to use media streaming on Windows 10.