![[FIXED] “Your DNS Server Might Be Unavailable” Error On Windows 11](https://www.auslogics.com/en/articles/wp-content/uploads/2023/08/FIXED-Your-DNS-Server-Might-Be-Unavailable-Error-On-Windows-11-568x359.png)
- What Is a DNS Server?
- What’s the Difference Between “DNS Server Not Responding,” “Can’t Reach DNS,” and “DNS Server Unavailable” Errors?
- Why Is Your DNS Server Not Responding or Unavailable?
- Fixes That Work for Both “DNS Server Not Responding” and “DNS Server Might Be Unavailable” Errors
- Preliminary checks: Test other devices and browsers
- Fix 1: Clear your browser’s DNS cache
- Fix 2: Ensure your browser is set to use your system’s DNS settings
- Fix 3: Clear your browser’s cookies, cache, and other temporary internet files
- Fix 4: Restart your computer and router
- Fix 5: Temporarily disable your antivirus and firewall
- Fix 6: Turn off proxy and VPN connections
- Fix 7: Change to a public DNS server
- Advanced Fixes for the “Your DNS Server Might Be Unavailable” Error on Windows 10/11
- DNS Server Not Responding or Unavailable: Manufacturer- and Expert-Recommended Fixes
- DNS Server Not Responding? Fixed!
- FAQ
You’re trying to get online, maybe open a website or refresh your inbox. Then, out of nowhere, you see an error like “DNS address could not be found.” Sometimes, the Windows Network Diagnostic tool pops up to tell you the DNS server is not responding or your DNS server might be unavailable. It can be a real headache, but there’s a silver lining.
Regardless of the error you get, both messages usually mean the same thing: your computer isn’t connecting properly to something called a DNS server, which helps you reach websites. If you don’t know what that means, it’s easy to feel stuck.
That’s what this guide is about. We’ll break down what DNS is, what the errors mean, their causes, and how to fix them step by step, even if you’re not a tech person.
If you’re ready, let’s get into it.
- 🧹 Reset DNS and networking via the Command Prompt and Settings
- 🌐 Change router DNS to Google or Cloudflare
- 🧩 Undo problematic Windows updates
- ❌ Disable IPv6 and conflicting Group Policy or registry settings
- 🔄 Restart the DNS Client service or boot into Safe Mode for diagnostics
- 🏷️ Apply brand-specific fixes for Dell, HP, ASUS, Lenovo, and more
These methods are tested, explained step-by-step, and cover both software- and hardware-related causes of DNS issues. If one fix doesn’t work, the next one might—so keep going until you’re back online!
What Is a DNS Server?
Imagine looking for “Astrophysics for People in a Hurry” by Neil deGrasse Tyson in a library. You go to the library catalog, and instead of searching for the book title, you get something like QB982.T97 2017. That’s basically how the Internet works, except DNS servers make it easier.
DNS stands for Domain Name System, and it’s like the phonebook of the Internet. It converts website names (like www.google.com) into IP addresses like 142.250.64.78, which helps computers to locate and load websites.
Here’s how it works:
⇢ You enter a website name in your browser.
⇢ Your computer asks the DNS server for the IP address of that website.
⇢ The DNS server searches its records or asks other DNS servers if it doesn’t know.
⇢ Once the DNS server finds the correct IP address, it sends it back to your computer.
⇢ Your browser then connects to the website using that IP address, and the page loads.
If the DNS server is not responding, your computer can’t look up those addresses, and that means no websites, email, or streaming. Basically, your internet feels broken even if you’re technically still connected.
What’s the Difference Between “DNS Server Not Responding,” “Can’t Reach DNS,” and “DNS Server Unavailable” Errors?
Let’s clear this up: although these messages sound different, they all point to the same core issue—your device can’t reach the DNS server, which means it can’t translate domain names into IP addresses.
The only real difference is how and where the error is being reported—whether by your browser, your operating system, or a troubleshooting tool.
- The DNS server isn’t responding: This message can show up, depending on the browser you use, but mostly appears in later versions of Windows 10 when the Windows Network Diagnostics troubleshooter checks for network problems.
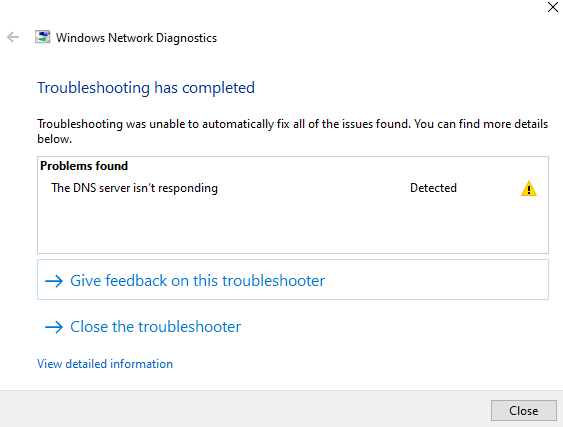
- Your DNS server might be unavailable: This is one of the reports issued by the Windows Network Diagnostics troubleshooter in relatively earlier versions of Windows 10.
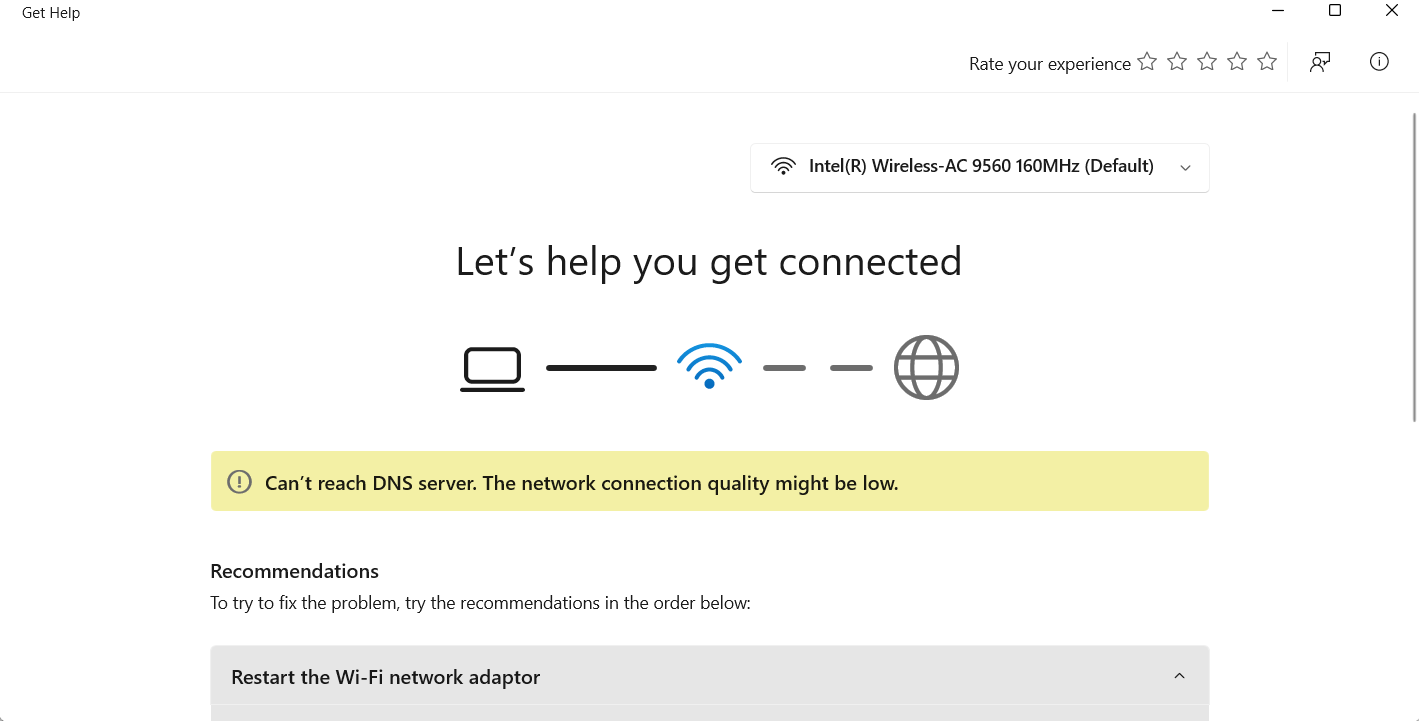
- Can’t reach DNS server: This is a newer, shorter message that some users have seen in Windows 11 after troubleshooting the network connection.
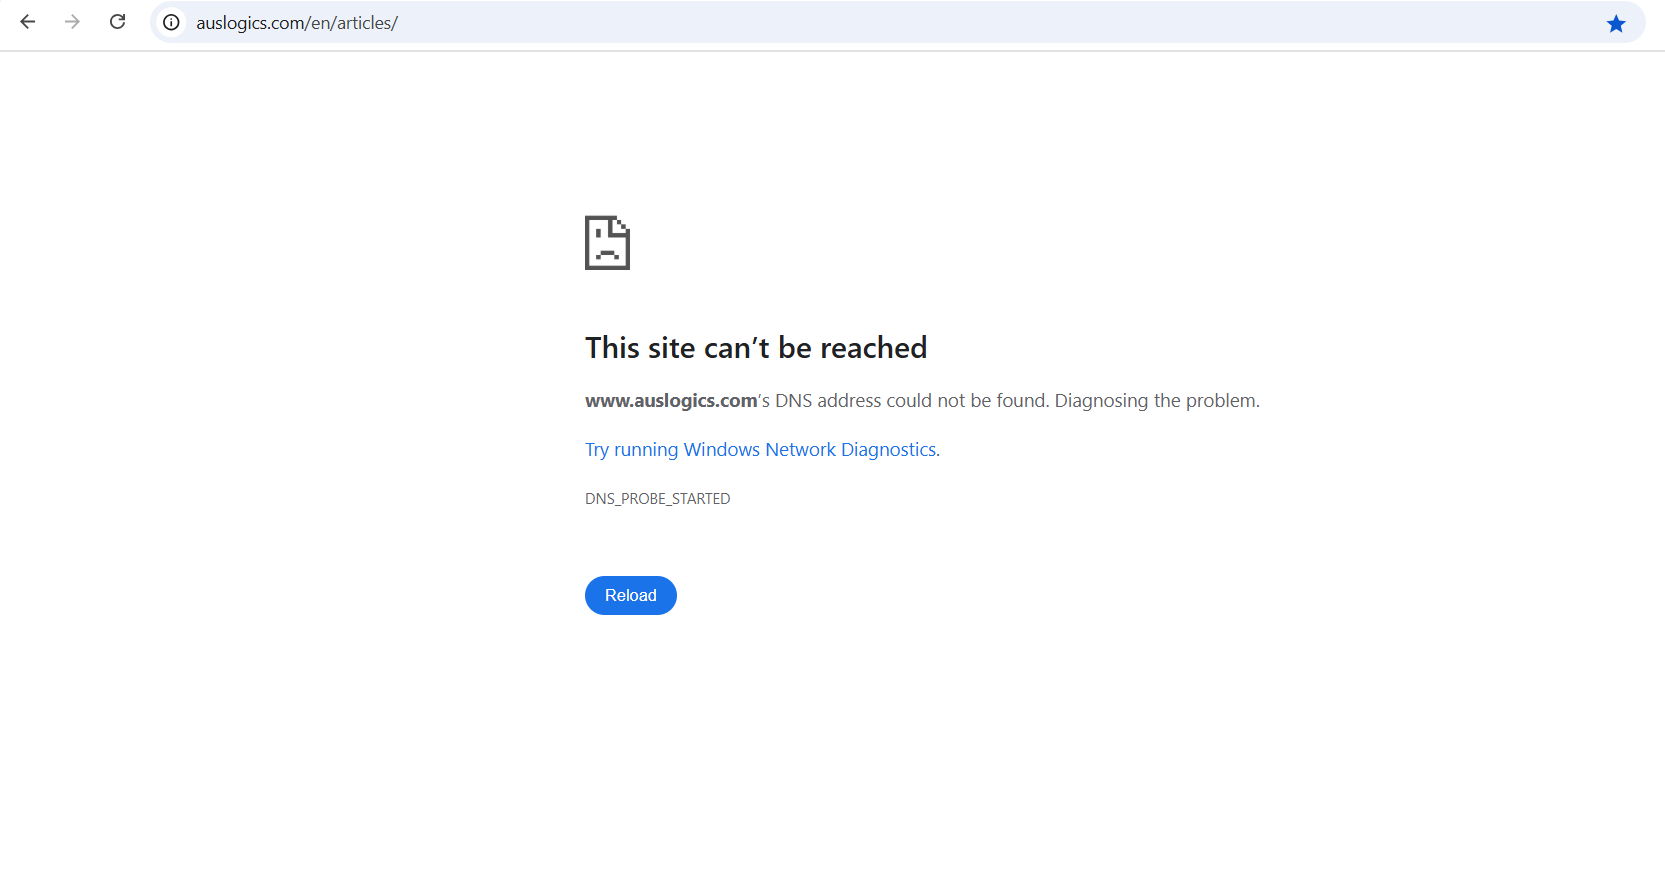
Chrome might say something like “[website’s] DNS address could not be found,” which means it couldn’t translate the domain into an IP address.
These errors are saying the same thing. It’s just that one is the browser giving up after several attempts, and the other is Windows trying to help (but not always doing a great job at it).
Why Is Your DNS Server Not Responding or Unavailable?
There are a few common reasons why a DNS server isn’t responding or is unavailable. Below is a quick rundown of what could be causing the problem:
| Causes | What’s going on |
|---|---|
| Router or modern issues | Routers can glitch just like computers, and issues like conflicting IP addresses can trigger the error, but a quick reset can solve more than you’d think |
| Incorrect DNS server settings | You might be using a DNS server that isn’t working right now |
| Antivirus or firewall interference | Some security software can block DNS traffic, even if you’re just trying to browse |
| VPN or proxy settings | These tools reroute your traffic, and if they’re misconfigured, DNS lookups can fail |
| ISP problems | Sometimes, it’s not you; it’s your internet service provider (ISP) having DNS issues |
| Corrupted DNS cache | Your PC might be trying to reuse bad DNS data that’s no longer valid |
| Network adapter issues | A buggy or outdated network driver can affect DNS communication |
| Windows networking glitches | Sometimes Windows can have glitches, especially after updates or settings changes |
| Faulty Windows updates | Updates can mess with DNS settings or services |
| Group Policy or registry changes | Advanced settings may have been tweaked, even by other software, causing DNS errors |
Fixes That Work for Both “DNS Server Not Responding” and “DNS Server Might Be Unavailable” Errors
Before jumping into the fixes, it’s important to understand that DNS issues don’t always point to a single cause. So, these fixes are arranged from simple to more advanced because sometimes a quick restart does the trick, and other times you need to reset core network settings.
Preliminary checks: Test other devices and browsers
Before tweaking any setting, it’s smart to check if the issue is local to your PC, one browser, or one website.
For example, if your phone or another PC on the same Wi-Fi works fine, the issue is likely with your PC.
On the other hand, if Firefox and another browser can open the same website but Chrome doesn’t, you have to focus on Chrome.
This saves you from wasting time fixing things that aren’t actually broken. So:
- Open a different website to confirm that your IP address is not blocked from viewing the website that returns the error, or that the website is not down.
- Next, test the same webpages on a different browser.
- If that fails, use another device, like your tablet or phone, connected to the same network.
Your results will tell you where to look based on our recommendations after the nslookup command guide.
Test DNS with nslookup or ping commands
You can use the nslookup query in the Command Prompt to confirm whether your DNS server isn’t responding to requests or if something else is going on.
These commands let you see whether the issue is with your DNS server, your internet connection, or even a specific domain. It’s a fast and reliable way to narrow down the root cause without having to change settings blindly.
Here’s how to do it:
- Open the Start menu, type CMD, and click Run as administrator.
- Type nslookup google.com and hit
Enter.

- If you get a non-authoritative answer, DNS is working. But if you see Timed out or Server can’t be found, DNS isn’t responding.

- You can also test specific DNS servers using this command: nslookup google.com 8.8.8.8.
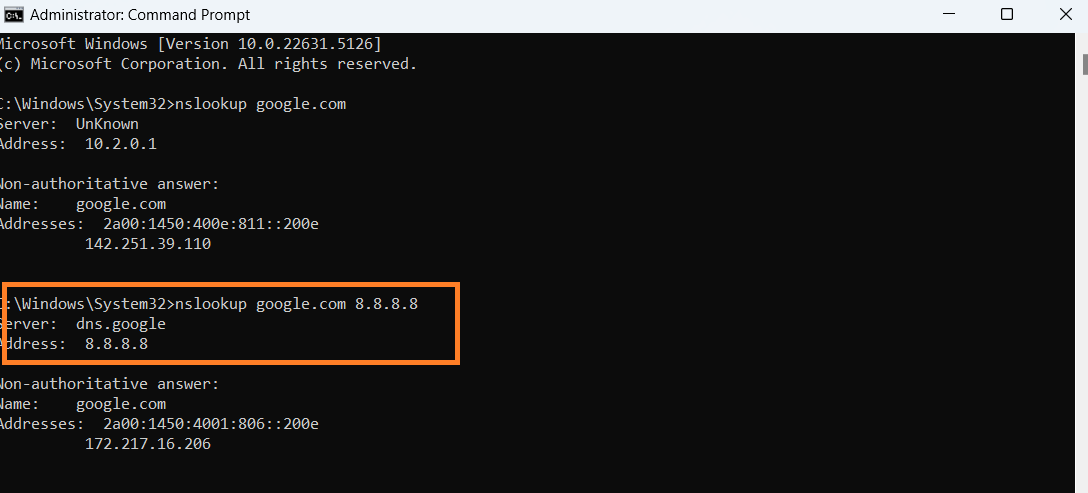
This checks Google’s public DNS. If this works but the default one doesn’t, you know your system’s DNS is the problem.
However, if you still see Timed out even after adding Google’s public DNS, then something beyond your system’s DNS server is the issue. You can follow our guide on fixing various internet connection problems instead.
You should note that there are instances where you can get a non-authoritative answer but still experience the “DNS not available” error. For example, if the issue is specific to your browser, Command Prompt’s tests will turn out fine. The same can happen if a specific site is offline.
Depending on where you face the issue where your DNS server is not available or not responding, follow these steps:
| Browser only | PC only | Entire network |
|
Fix 1: Clear your browser’s DNS cache
Browsers, especially Chrome and Edge, often store DNS information to speed up page loading. This is separate from your system’s DNS cache.
But if this browser-level cache becomes outdated or corrupted, it can cause your browser to act as if DNS is broken, even if your system’s DNS is working fine.
When you delete the browser DNS cache, it forces the browser to fetch fresh DNS info the next time you visit a site. This can instantly resolve issues like websites not loading or appearing offline, especially if only one browser is affected.
Here’s how to do it on popular browsers:
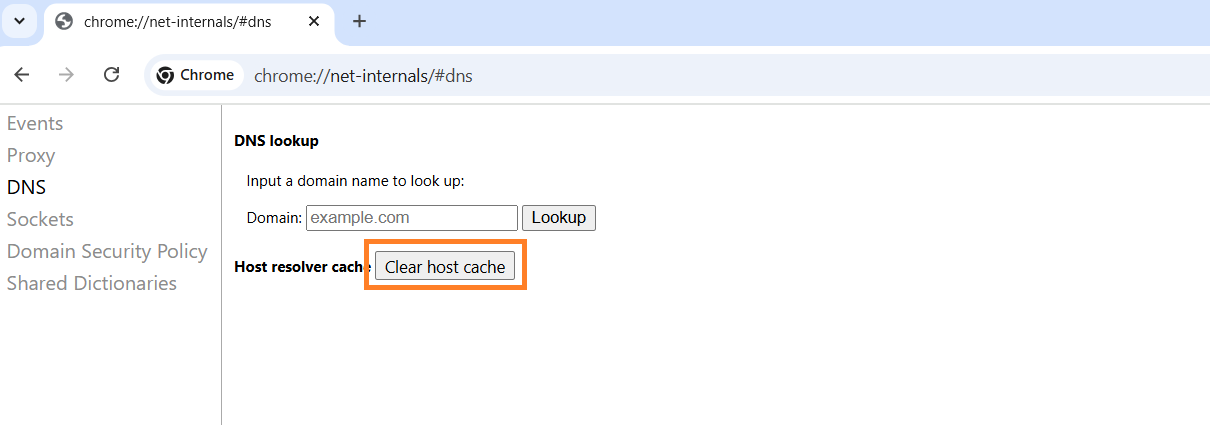
Chrome
- Open Chrome.
- Type chrome://net-internals/#dns into the address bar.
- Click Clear host cache.
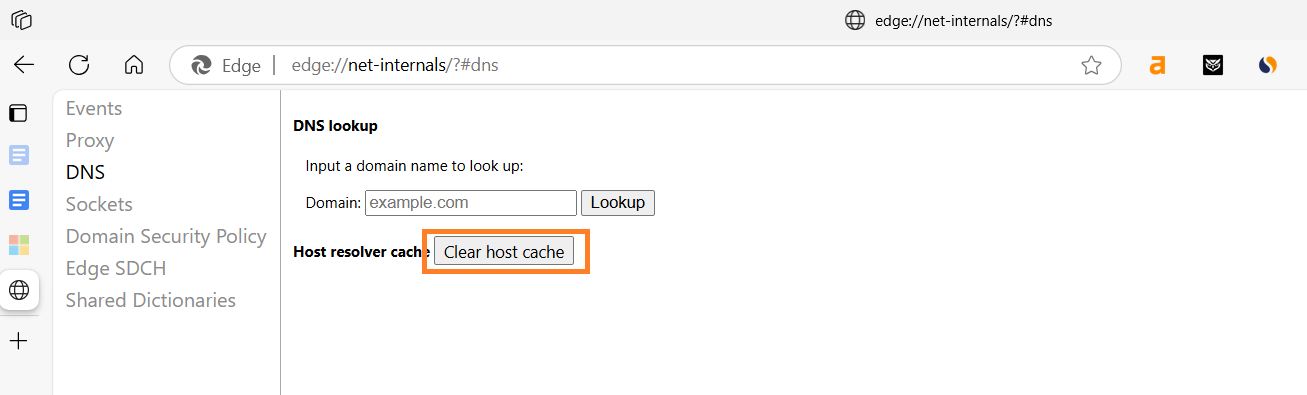
Microsoft Edge
- Open Edge.
- Type edge://net-internals/#dns into the address bar.
- Click Clear host cache.
- Below are the steps to reset DNS for other popular browsers:
| Browser | Steps to clear the DNS cache |
|---|---|
| Mozilla Firefox |
|
| Opera |
|
Fix 2: Ensure your browser is set to use your system’s DNS settings
If the issue is limited to a specific browser, check whether it overrides your system’s DNS settings to ensure it uses the same server as other browsers and applications on your computer.
Here are the steps for Google Chrome:
- Click the menu (three dots) in the top-right corner of your browser and select Settings.
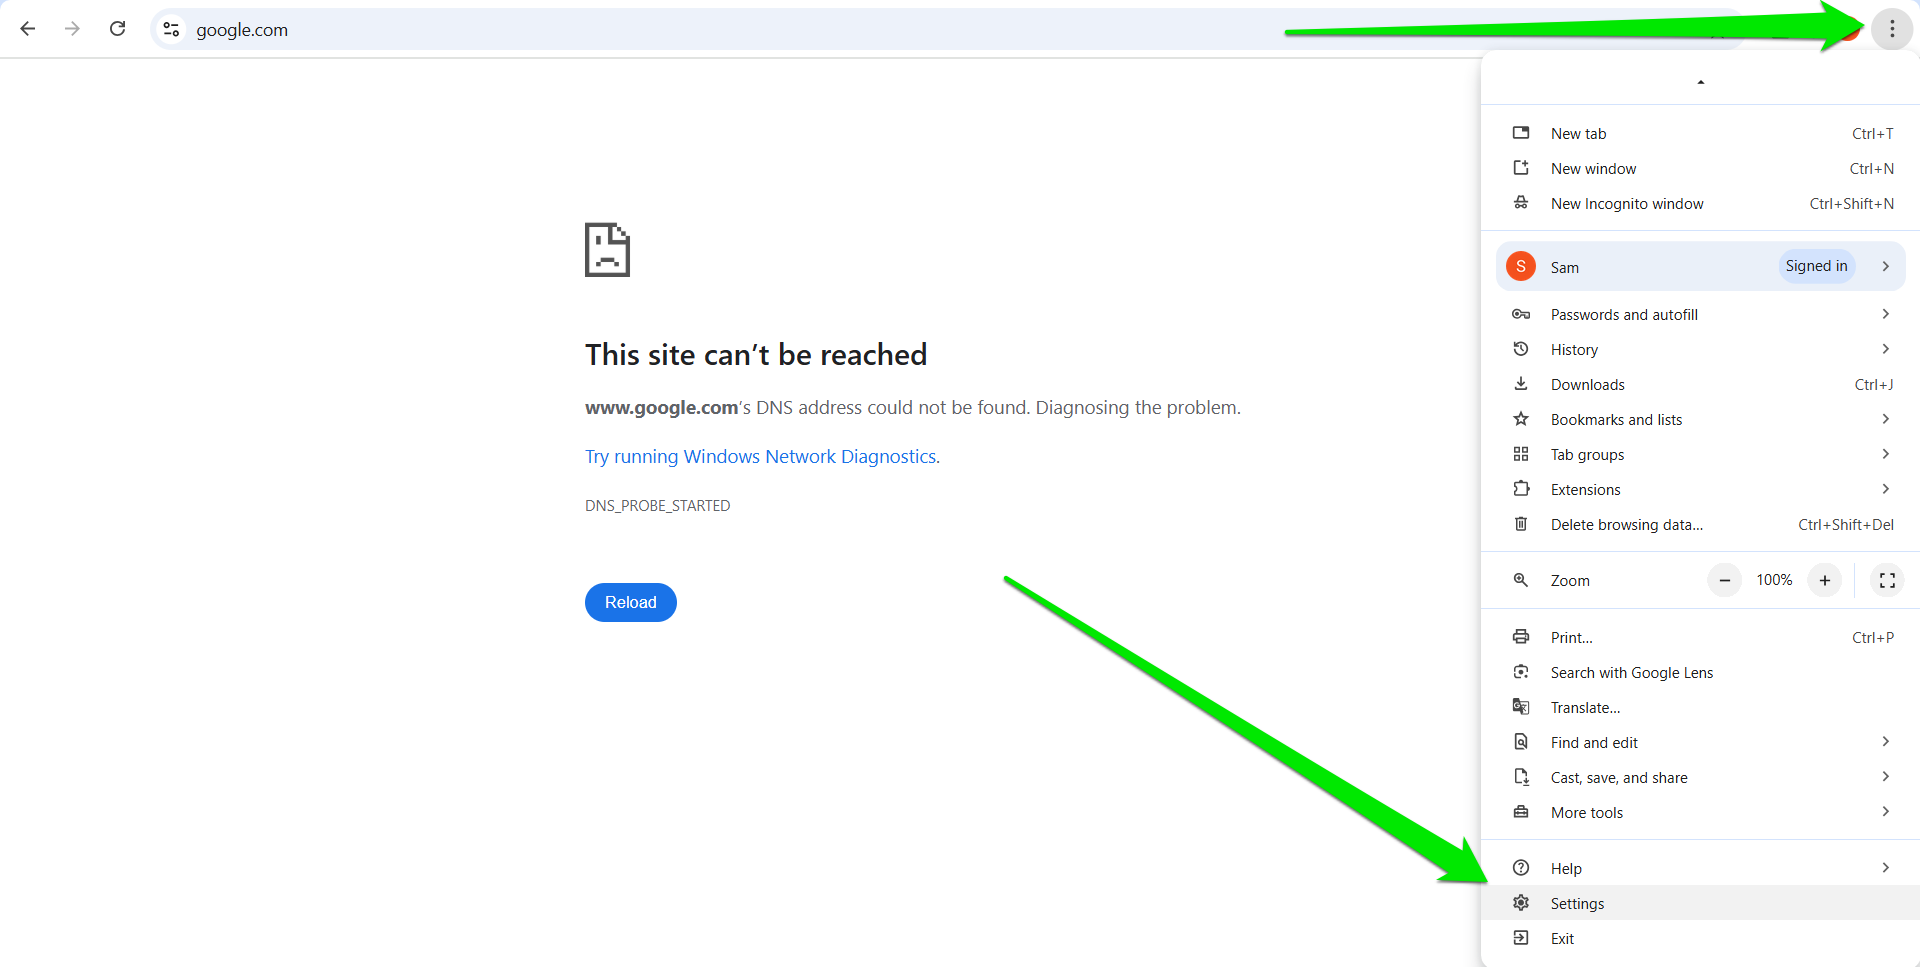
- Click Privacy and security in the left pane.
- Select Security on the main page.
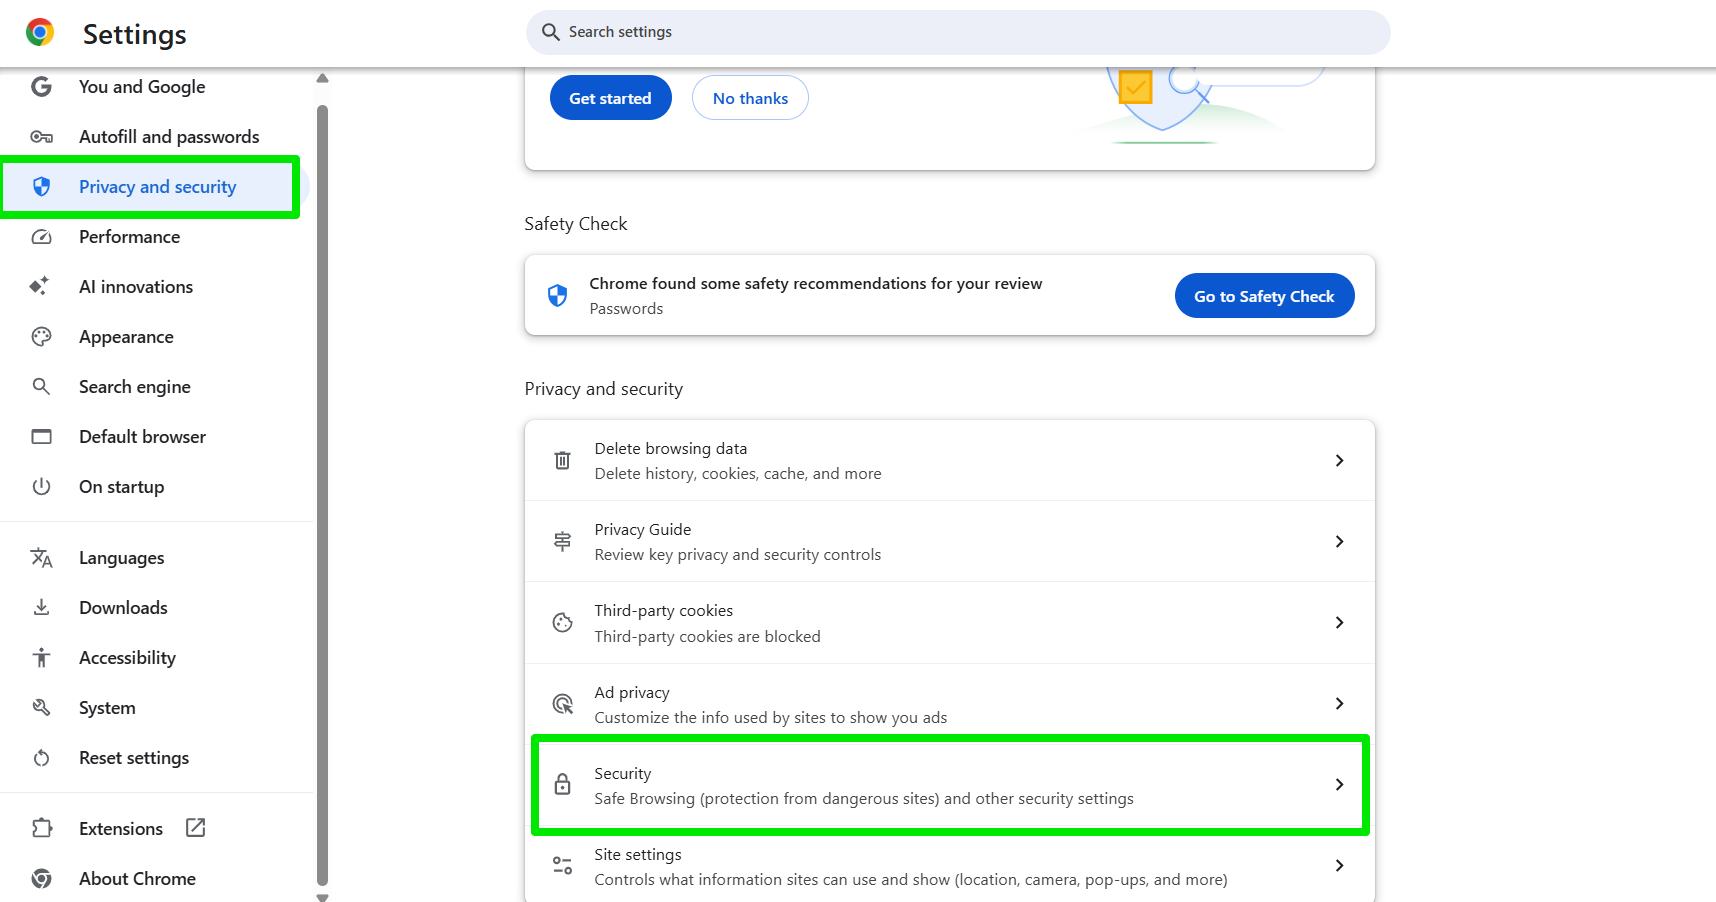
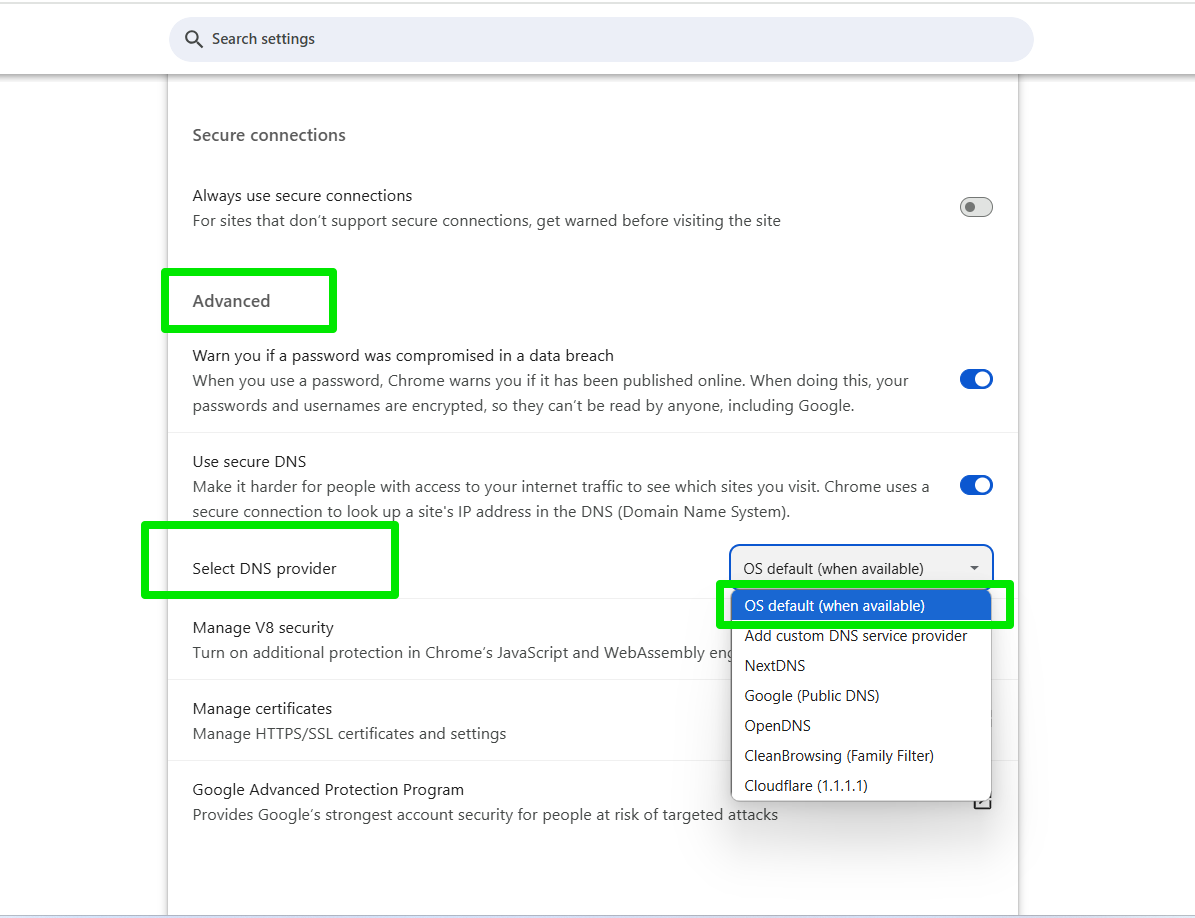
- Scroll to Advanced and choose OS default (when available) from the drop-down menu beside Select DNS provider.
Here’s what to do if you use other web browsers:
| Browser | Method |
|---|---|
| Mozilla Firefox | Click the menu (three lines in the top-right corner) > Settings > DNS over HTTPS and choose Default Protection. |
| Microsoft Edge | Click the menu (three dots in the top-right corner) > Settings > Privacy, search and services > Security and select Use current service provider. |
| Opera | Type opera://settings in the address bar and hit Enter. Select Browser > System and turn off the switch for Use DNS-over-HTTPS instead of the system’s DNS settings. |
Fix 3: Clear your browser’s cookies, cache, and other temporary internet files
Some files and data, such as cache and cookies, saved by your browser, can affect the specific browser’s internet connection. You can follow our guide on removing temporary internet files to delete these items and check if the issue goes away.
Fix 4: Restart your computer and router
Temporary network glitches are surprisingly common. Your router or PC might hold on to a bad DNS assignment or IP configuration. A simple restart can clear cached settings and reinitialize your connection from scratch.
Here’s what to do:
- Shut down your computer completely. Don’t just restart. Go for a full shutdown.
- Unplug your router and modem from power.
- Wait 30 seconds, then plug them back in.
- Power on your PC and check if the error is gone.
If nothing happens, go to the next fix.
Fix 5: Temporarily disable your antivirus and firewall
Sometimes your security software gets a little too protective and blocks legitimate network traffic, including DNS lookups. Temporarily disabling your antivirus or firewall can help you test whether it’s interfering with DNS resolution.
If it is, you can adjust the settings without removing the protection altogether.
Here’s how it’s done:
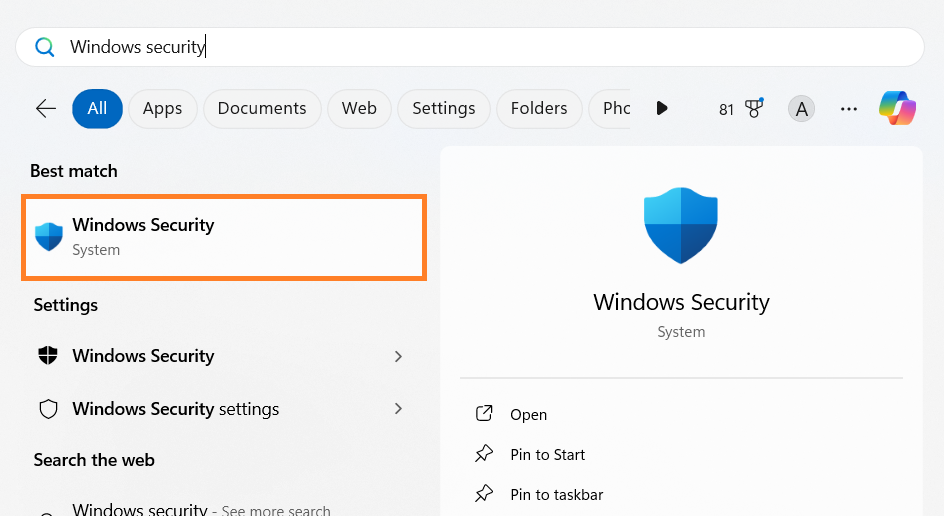
- Open Windows Security by searching for it in the Start menu.
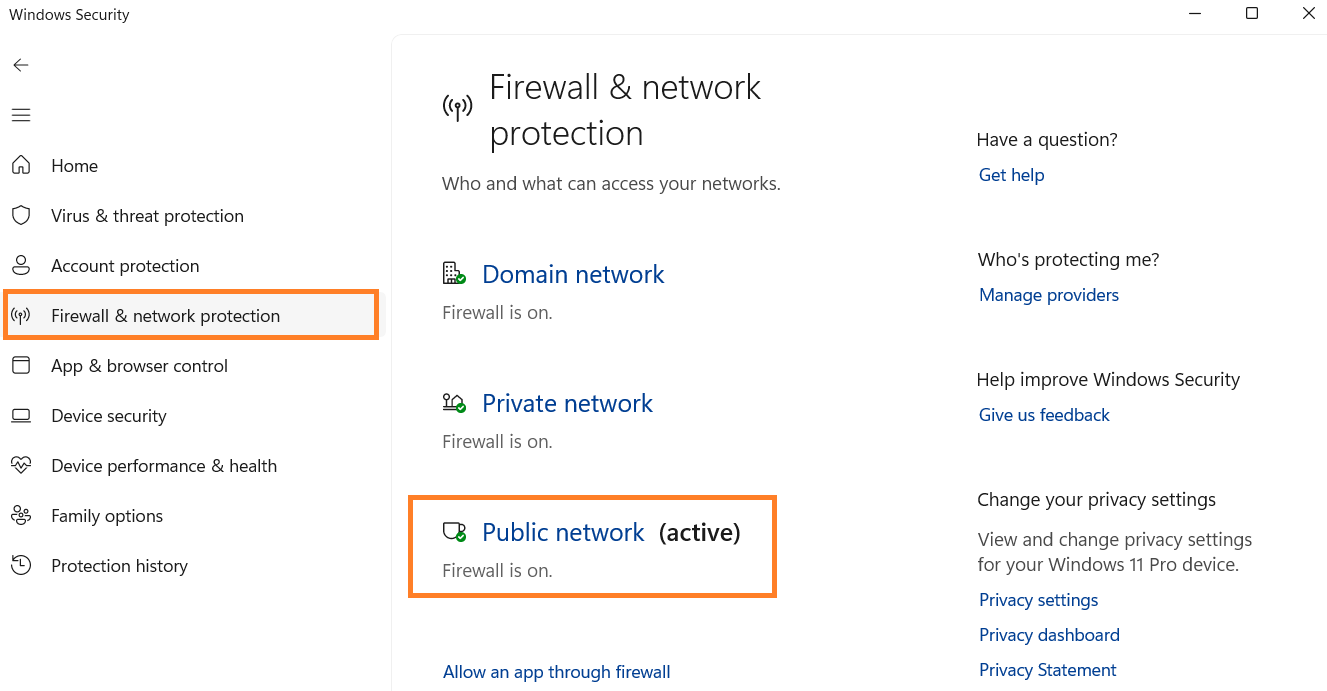
- Go to Firewall & network protection.
- Click on the active network.
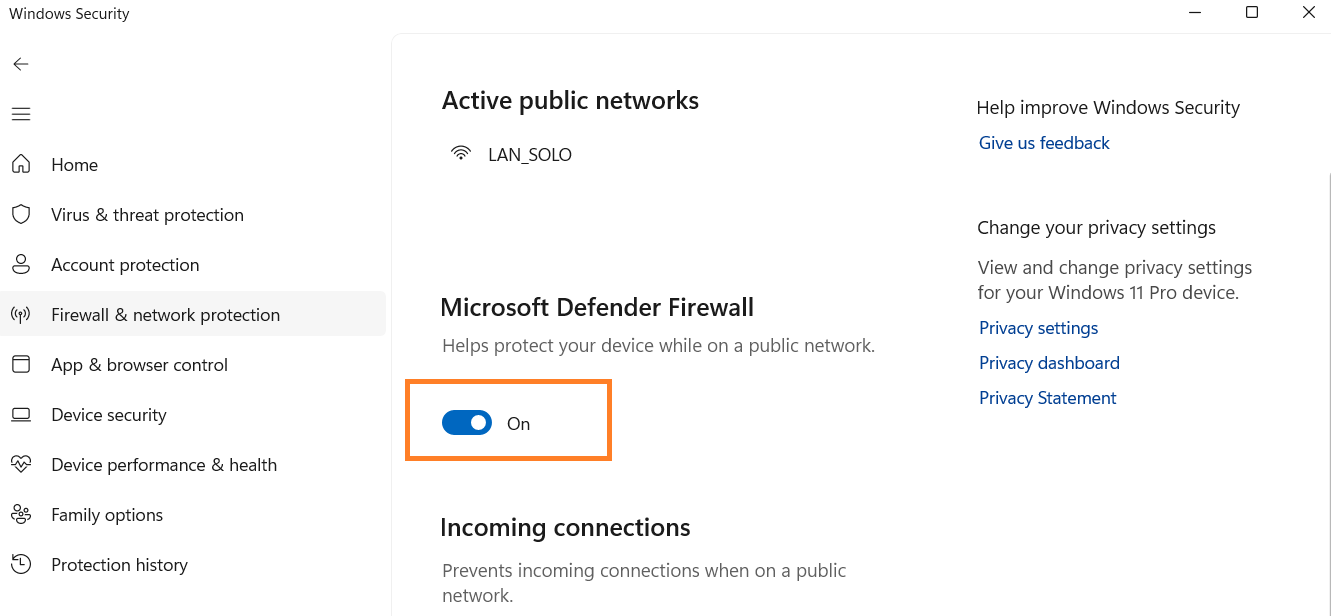
- Toggle Microsoft Defender Firewall to Off.
- If you have third-party antivirus software, open it and disable the firewall or internet protection temporarily.
Fix 6: Turn off proxy and VPN connections
VPNs and proxies reroute your internet traffic, and if they’re misconfigured or slow, they can prevent your computer from properly reaching DNS servers. When you disable these connections, it’ll temporarily allow your PC to connect directly and rule out any rerouting problems that might be triggering the “DNS server unavailable” error. Here are the steps to disable VPN and proxies:
- Open Settings, go to Network & internet, and select Proxy.
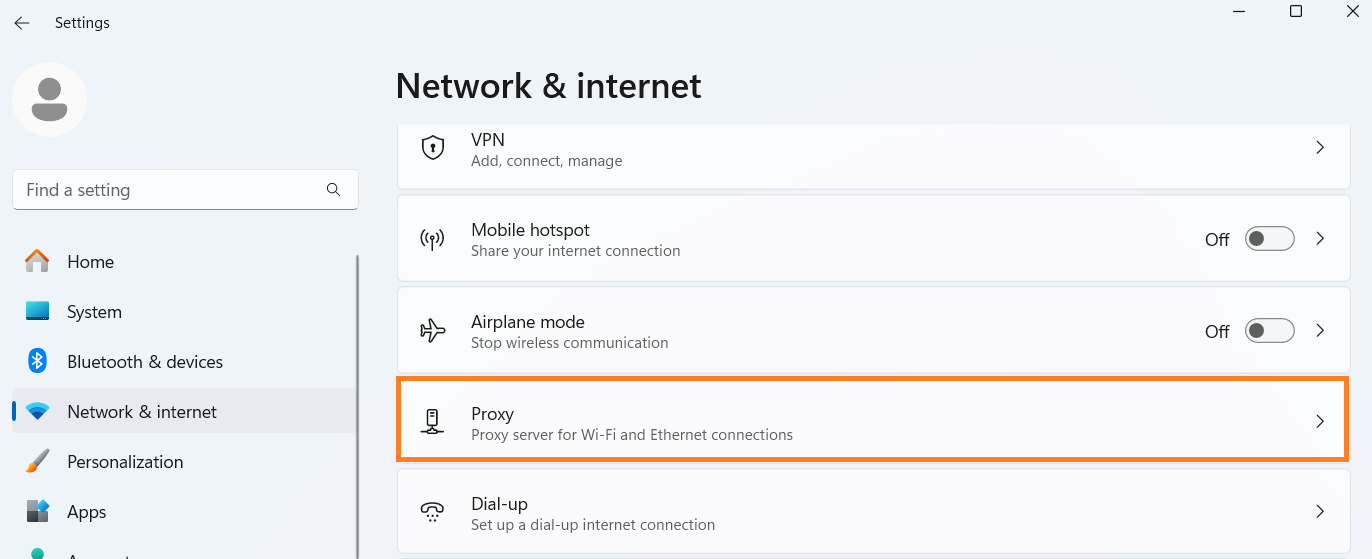
- Under Manual proxy setup, toggle Use a proxy server to Off.
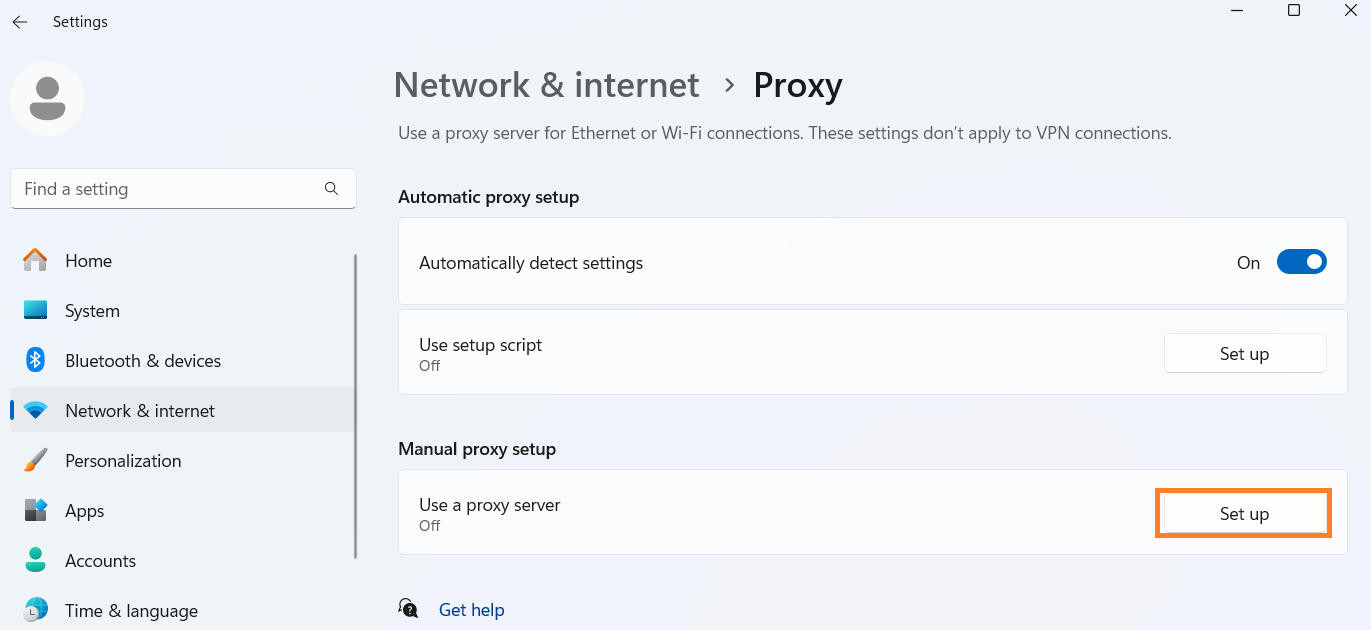
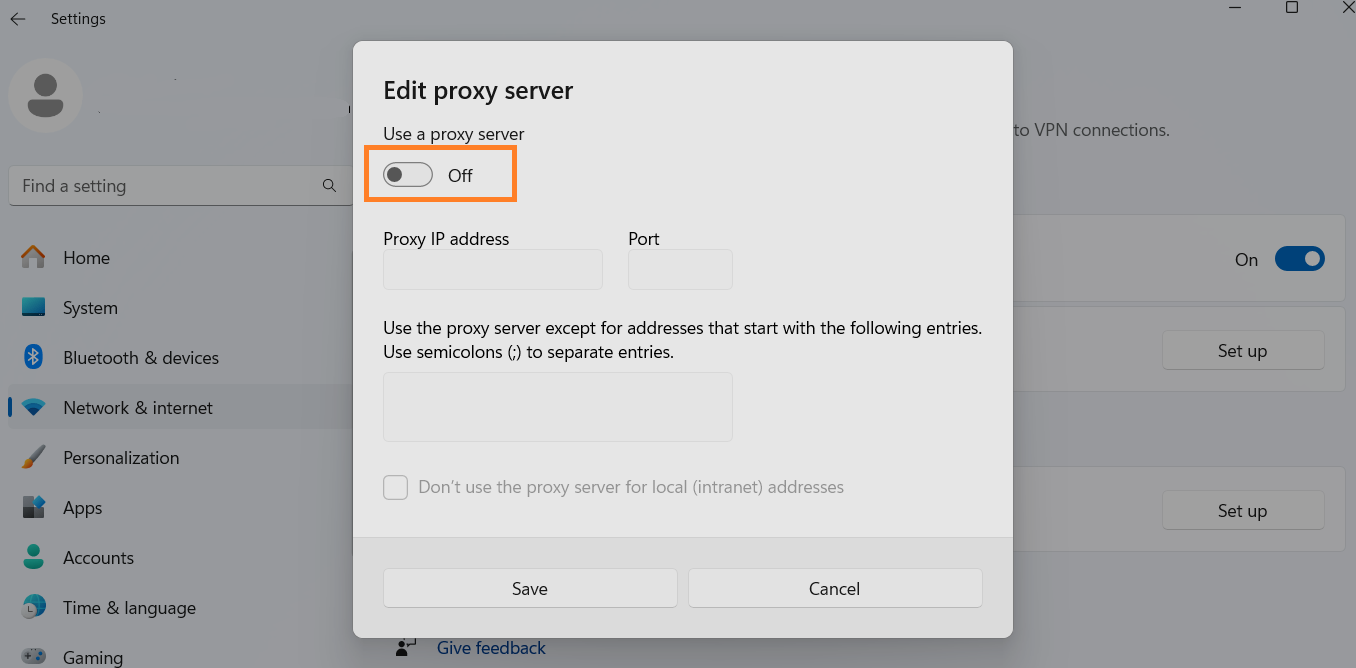
- Go back and click VPN, then disconnect any active VPNs or turn off any VPNs currently enabled.

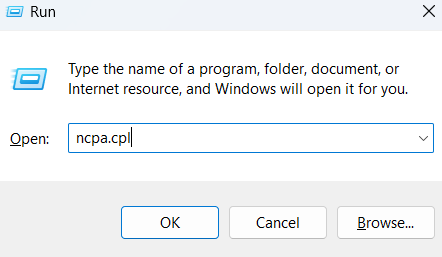
Fix 7: Change to a public DNS server
If a website can’t reach the DNS server assigned by your internet service provider, you’ll see errors like “DNS address could not be found.”
Try switching to a trusted public DNS like Google or Cloudflare to immediately fix the problem by giving your PC a faster, more reliable DNS path. Follow the steps below:
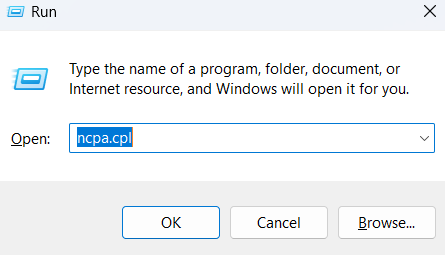
- Press
Win + Ron your keyboard to open the Run dialog, type ncpa.cpl and hitEnter.
- Find your active connection, right-click on it, and select Properties.
- Scroll down and select Internet Protocol Version 4 (TCP/IPv4), then click Properties.
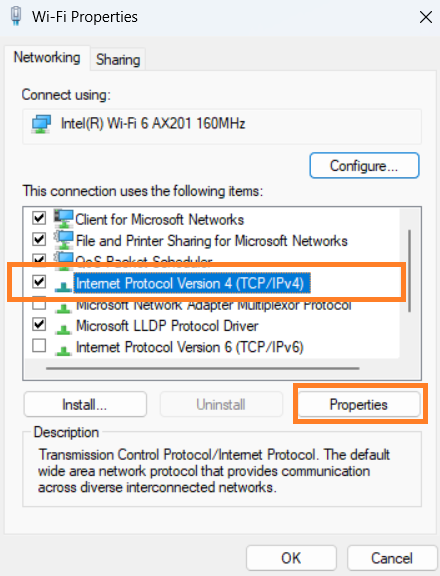
- Choose Use the following DNS server addresses, and enter Google server addresses:
- Preferred DNS server: 8.8.8.8
- Alternate DNS server: 8.8.4.4
- Alternatively, use Cloudflare servers:
- Preferred DNS server: 1.1.1.1
- Alternate DNS server: 1.0.0.1
- Click OK to save the changes.
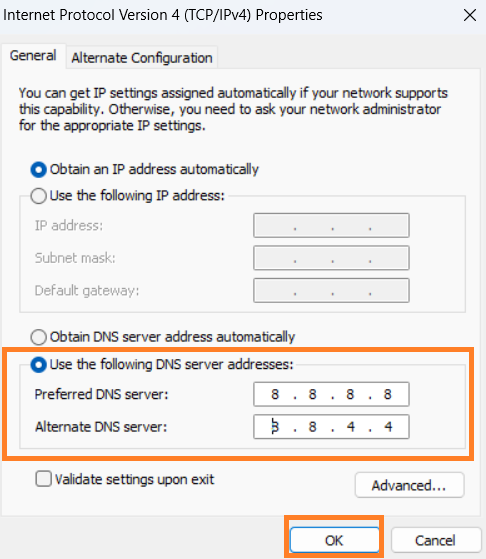
- You can now check if websites load normally.
Advanced Fixes for the “Your DNS Server Might Be Unavailable” Error on Windows 10/11
The methods below take you to more advanced areas of your computer and browser to tackle the “DNS server not available” error. Apply them if you have not yet fixed the problem. Despite their relative difficulty, I’ve broken down each method into easy-to-follow steps.
Fix 1: Run DNS reset commands in CMD
If your PC’s networking stack is misbehaving, sometimes the only fix is a full reset. These CMD commands clear out DNS cache, release and renew your IP address, and reset critical network components.
It’s like hitting the “factory reset” button for your network settings. It’s highly effective for persistent DNS unavailable errors.
First, let’s start with the easier method through the Settings app.
- Go to Settings by pressing
Windows + Iand select Network & internet. - Then, scroll down and click Advanced network settings.
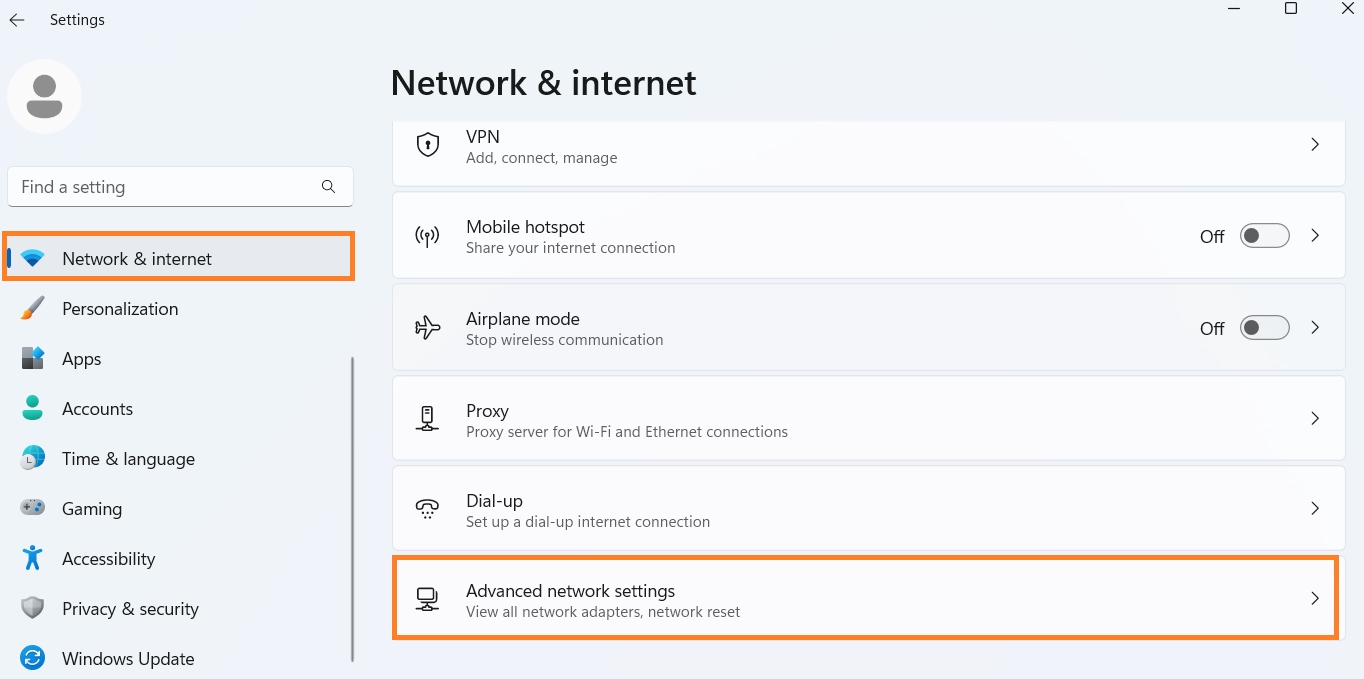
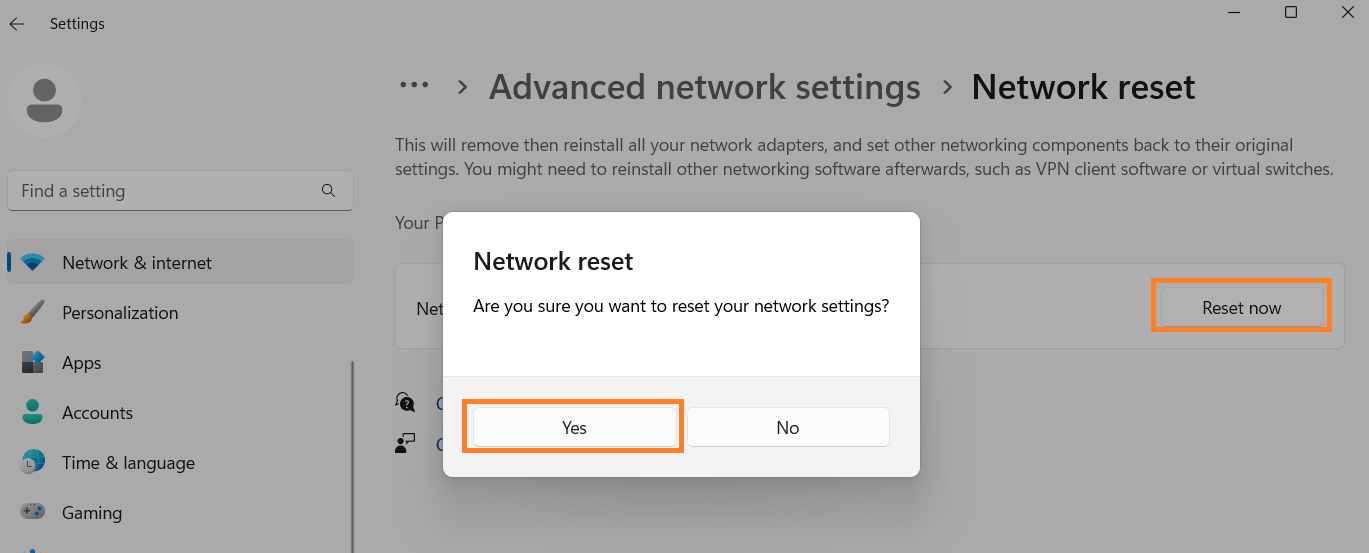
- Under More settings, choose Network reset.
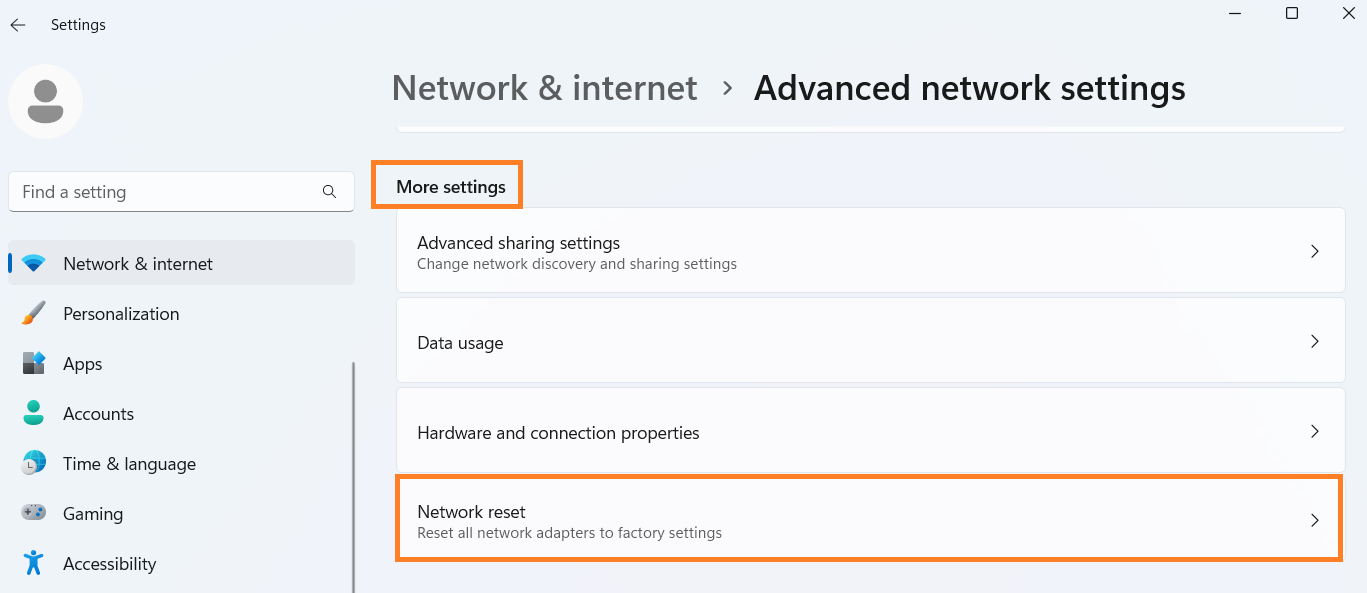
- Click Reset now and confirm.
If going through the Settings app does not resolve the problem, here’s how to use the Command Prompt:
- Press
Windows + S, search for Command Prompt, and select Run as administrator.

- Type these commands one by one, pressing
Enterafter each:
ipconfig /flushdns

ipconfig /release

ipconfig /renew

netsh int ip reset

netsh winsock reset

Restart your PC afterward and check if the DNS error has been fixed.
Fix 2: Check your router’s DNS settings
Your computer often gets its DNS server settings from the router. If the router is set up to use an unreliable or outdated DNS, your system won’t be able to load websites. You can resolve the problem by entering the router’s settings and changing its server.
Follow the steps below:
- Open a browser and enter your router’s IP address (usually, it’s 192.168.0.1 or 192.168.1.1). You can find this info on the router label or the manufacturer’s website.
- Enter the admin username and password. This is usually admin and admin unless changed.
- Look under sections like Internet Settings, WAN, or Network Settings.
- You’ll see Primary DNS and Secondary DNS fields. In some cases, you only have to click the DNS option.
- Change the DNS servers using the below information:
- Use Google DNS: 8.8.8.8 and 8.8.4.4
- Alternatively, use Cloudflare DNS: 1.1.1.1 and 1.0.0.1
- Save settings and reboot the router.
Fix 3: Uninstall recent Windows updates
While rare, your DNS server might be unavailable on Windows 11 or 10 because of a Windows update that caused unexpected network issues. If you started noticing the problem right after an update, it’s worth rolling back or uninstalling the most recent one.

You can run a system restore just like the user did to roll back an update. Just choose a restore point that immediately predates the update. However, note that other programs you installed after the restore point will be affected. That is why it is better to uninstall the specific update. [/sc]
Here’s how:
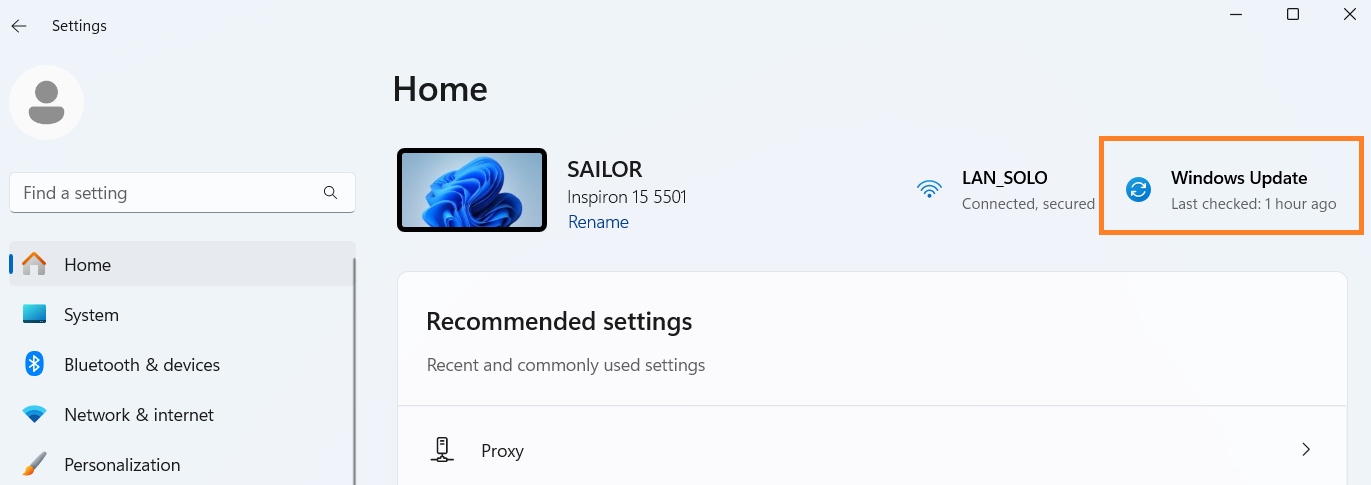
- Go to Settings and click Windows Update. If you’re running Windows 10, select Update & Security.
- Click Update history. Select View update history if you’re running Windows 10.
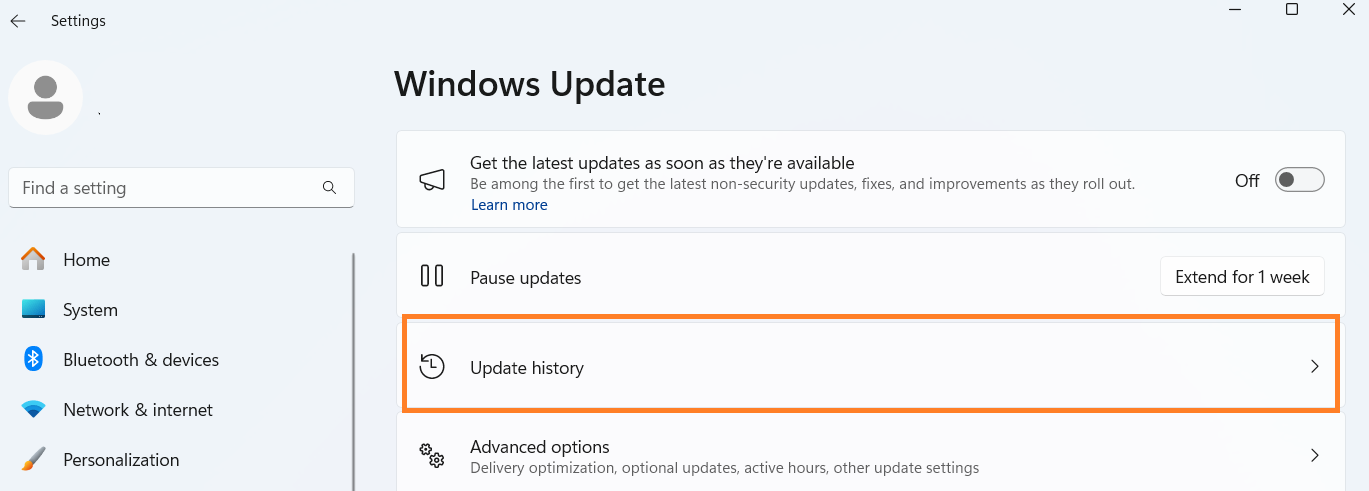
- Click Uninstall updates under Related settings.
- Select the most recent update and click Uninstall.
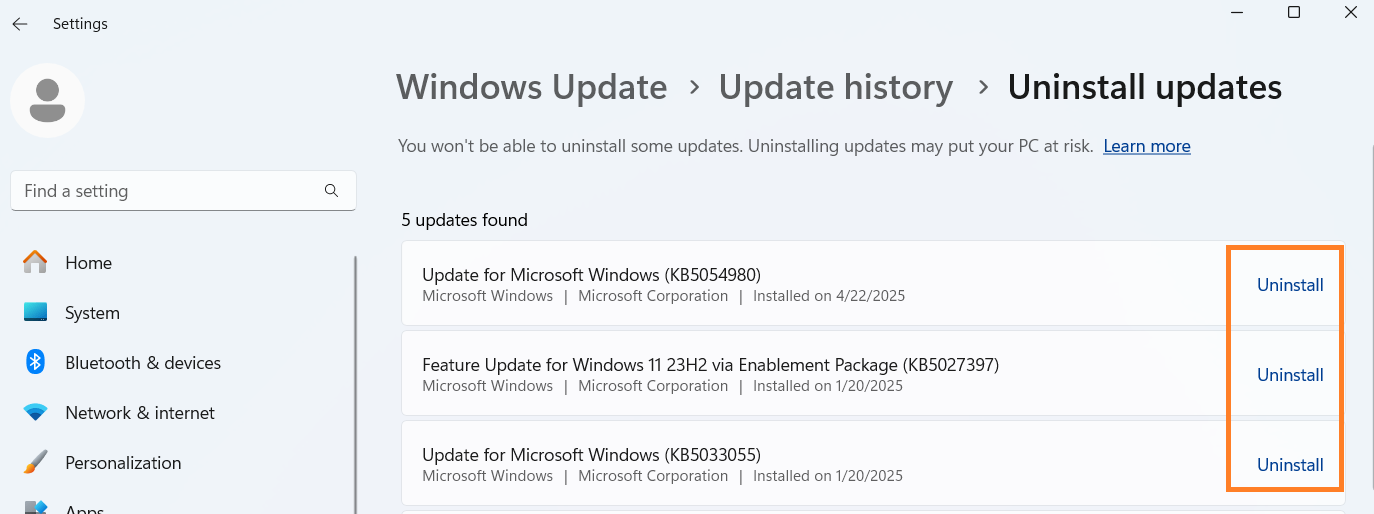
Don’t worry if you see the message, “You won’t be able to uninstall some updates. Uninstalling updates may put your PC at risk.” If you can’t delete a particular update, look up its update number online to see if others have found a workaround.

Fix 4: Temporarily disable IPv6
Some routers, particularly older or budget models, don’t fully support IPv6, even though Windows tries to use it by default. This mismatch can make the DNS server unavailable.
Here are the steps:
- Press
Windows + R, type ncpa.cpl, and pressEnter.
- Right-click your active network adapter and select Properties.
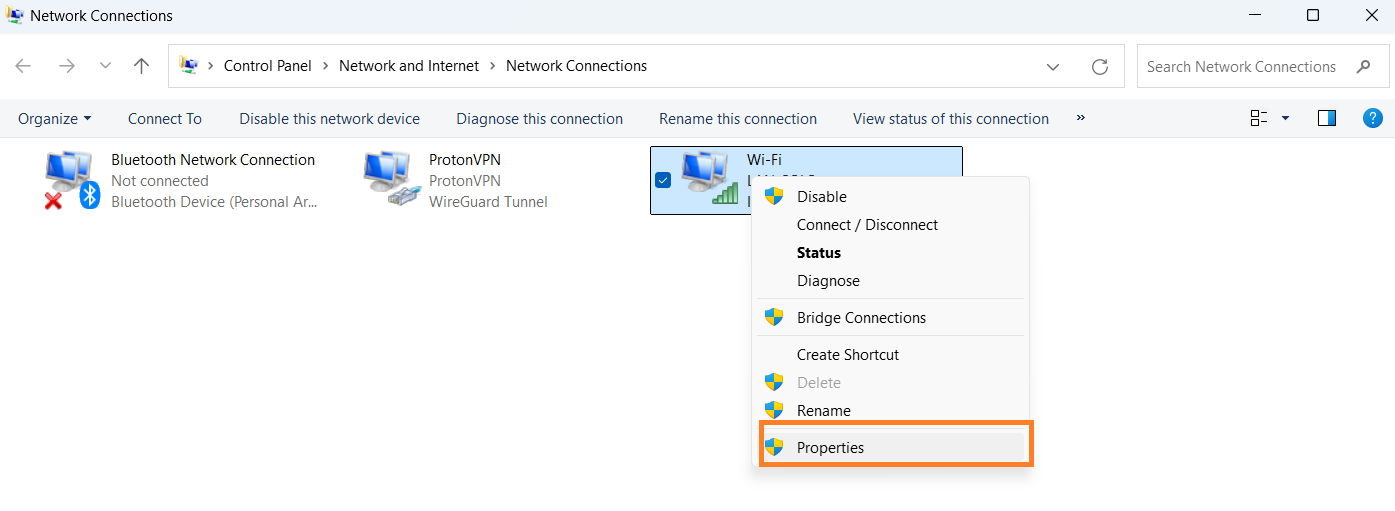
- Uncheck Internet Protocol Version 6 (TCP/IPv6).
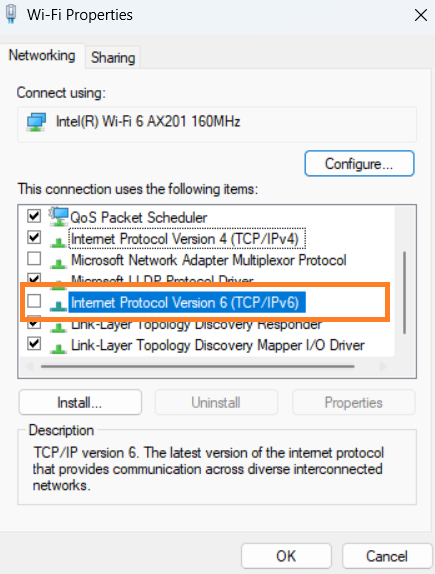
- Click OK, then restart your PC.
If this doesn’t resolve your issue, you can always re-enable IPv6 later.
Fix 5: Review modified registry or Group Policy settings
If you’ve tweaked DNS or network behavior via Group Policy or the Windows registry in the past, for example, to optimize speed or apply custom DNS rules, these settings might be backfiring now. Conflicting or overly restrictive settings can stop your system from reaching out to DNS servers the right way. The best way is to reset those areas to default and restore functionality. Here’s how to go about it:
- Press
Windows + R, type regedit, and hitEnterto launch the Registry Editor.
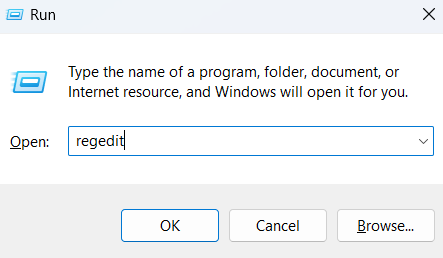
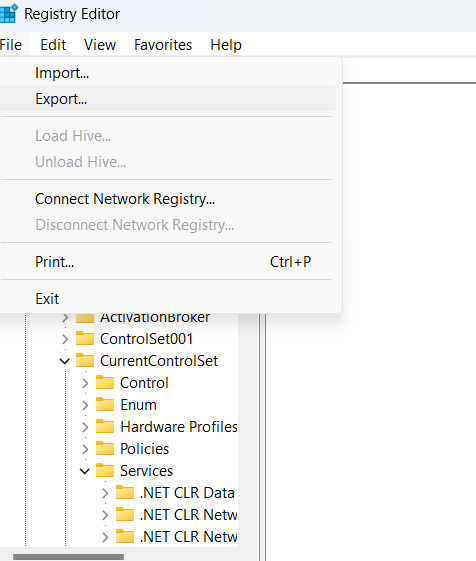
- Back up your registry before proceeding (yes, it’s really important). Go to File, select Export, and choose your preferred destination. Make sure All is selected under Export range.
- Navigate to: HKEY_LOCAL_MACHINE\SYSTEM\CurrentControlSet\Services\Tcpip\Parameters
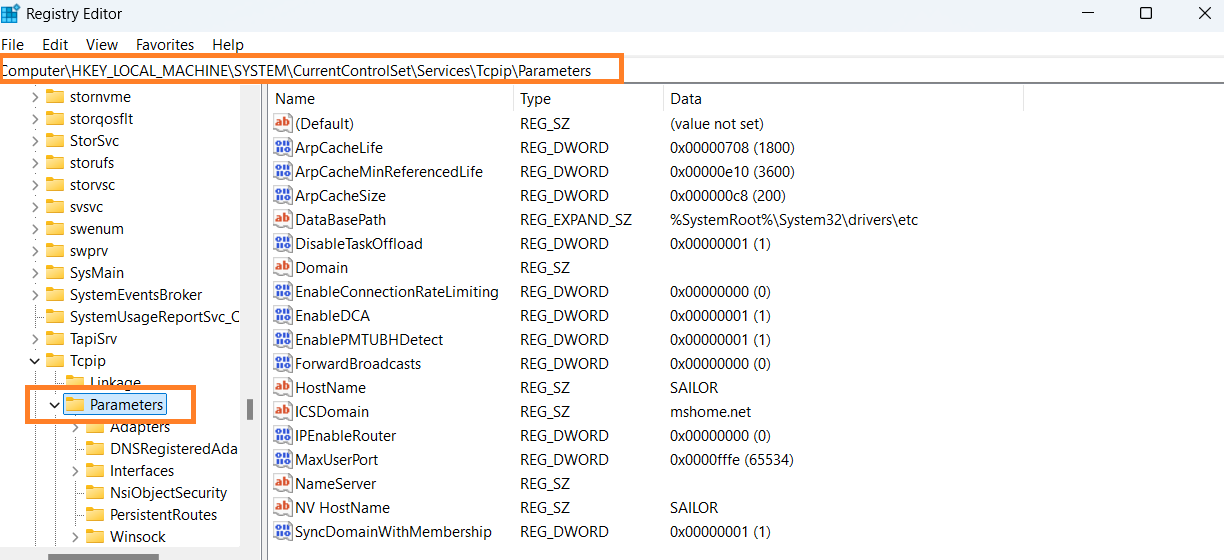
- Look for the NameServer and DhcpNameServer entries.

NameServer stores DNS server addresses that are set manually. If a value is present, Windows will use it instead of any DNS settings provided by DHCP.
DhcpNameServer, on the other hand, holds DNS server addresses assigned by a DHCP server. If a device is set to obtain DNS automatically, this entry will contain the assigned DNS servers.
- To restore default DNS behavior:
- Delete NameServer by right-clicking the entry and selecting Delete to force Windows to stop using manually specified DNS servers.
- Leave DhcpNameServer as is.
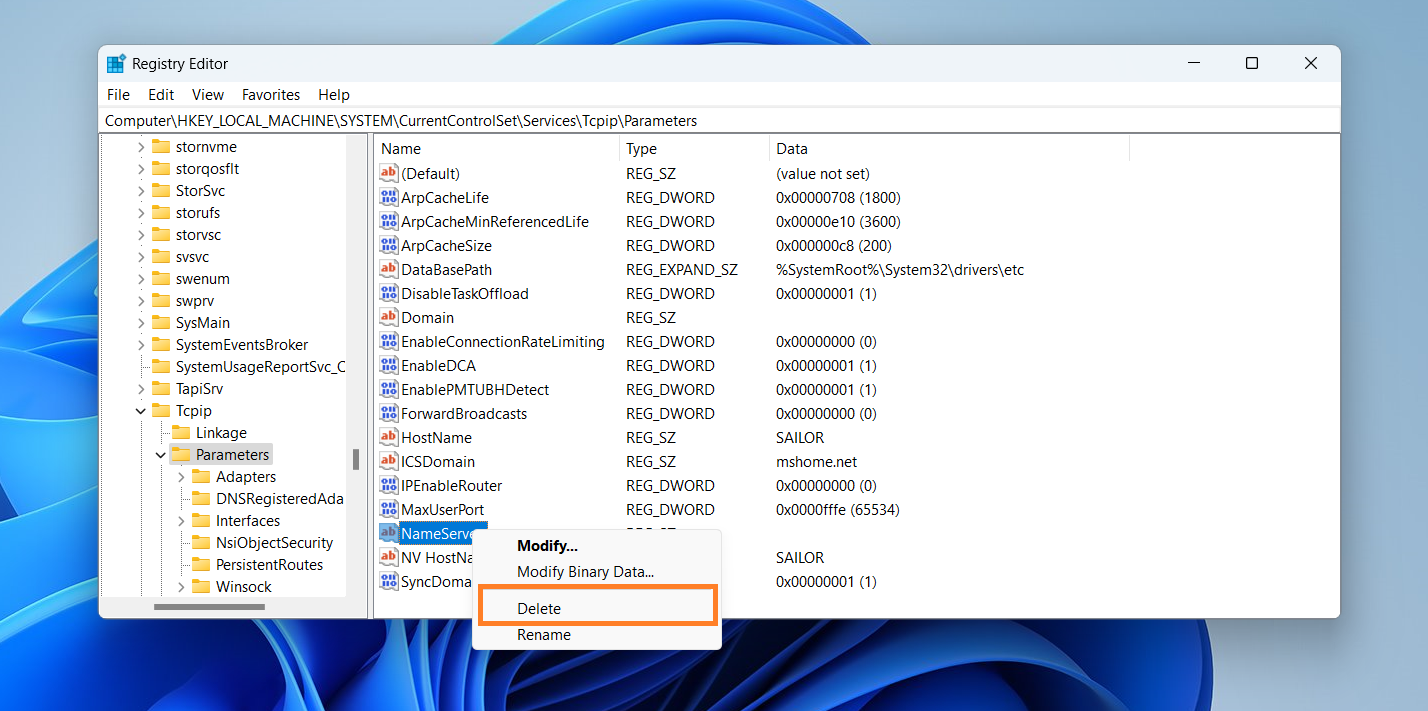
- Restart your PC for the changes to take effect.
If you’ve edited Group Policy:
- Press
Windows + R, type gpedit.msc, and pressEnterto open the Local Group Policy Editor.
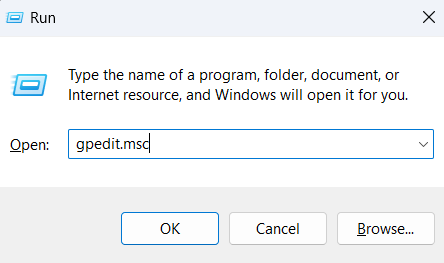
- Navigate to: Computer Configuration > Administrative Templates > Network > DNS Client.
- Search for all DNS-related settings, like DNS servers or DNS suffix search list, right-click each, and select Edit.
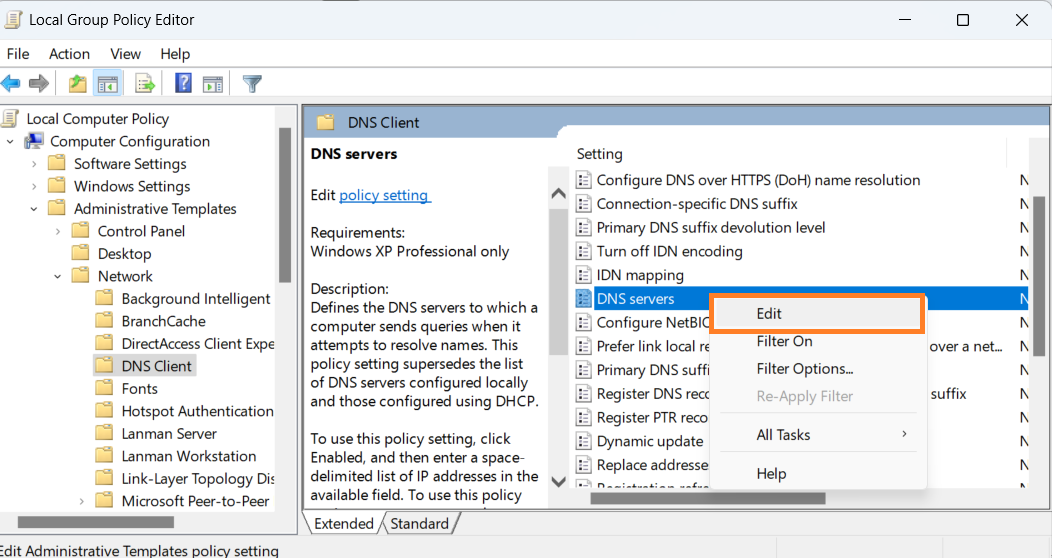
- Set it to Not Configured and click OK.
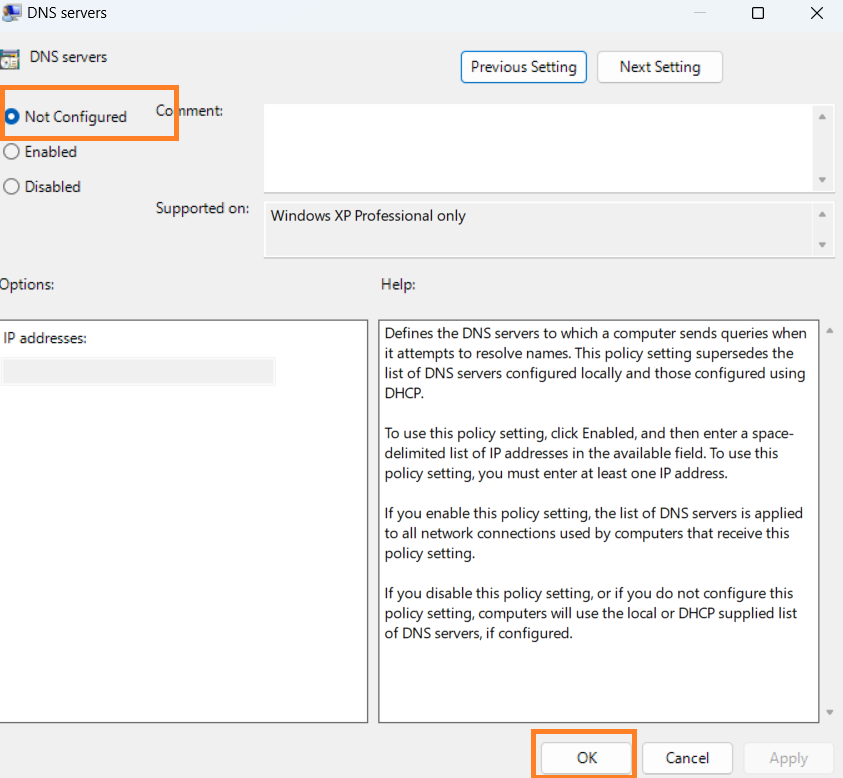
- Restart your PC for the changes to take effect.
Fix 6: Restart the DNS Client service
Windows runs a background service called DNS Client to manage and cache domain name lookups. If this service stalls or becomes unresponsive, it can stop DNS from working entirely.
Restarting it can force a refresh, which can correct any stubborn DNS issues without deeper changes. Here’s how to do it:
- Press
Windows + R, type services.msc, and hitEnterto open Windows Services.
- Scroll down to DNS Client, right-click it, and select Restart.
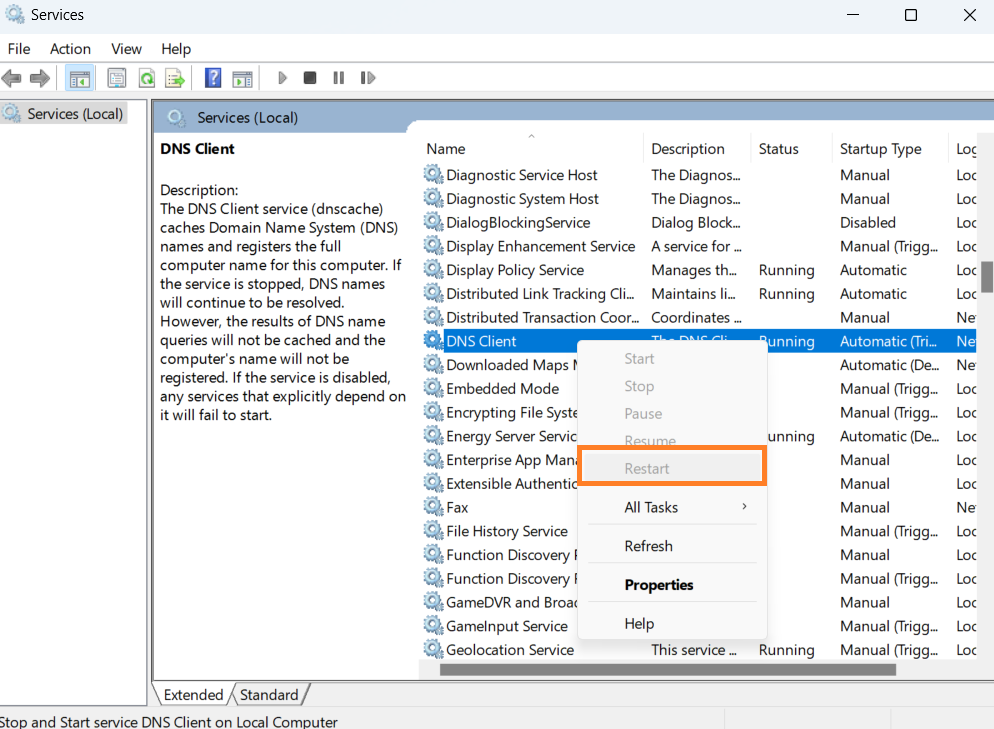
If Restart is grayed out like in the screenshot above, do this:
- Open the Command Prompt as an administrator.

- Run the following commands one by one, pressing
Enterafter each:
net stop dnscache

net start dnscache

Fix 7: Boot into Safe Mode with Networking
Safe Mode is a stripped-down version of Windows that loads only the essential drivers and services. When you boot into Safe Mode with Networking, it enables basic network functions while keeping everything else turned off.
How does this help? It allows you to test whether third-party applications, like firewalls, antivirus tools, VPNs, or even misconfigured drivers, are blocking your DNS traffic.
However, since you’ve applied these fixes, Safe Mode may point to an application conflict: something you installed is interfering with DNS resolution under normal conditions. I’ll show you what to do after you confirm. Let’s go into the steps:
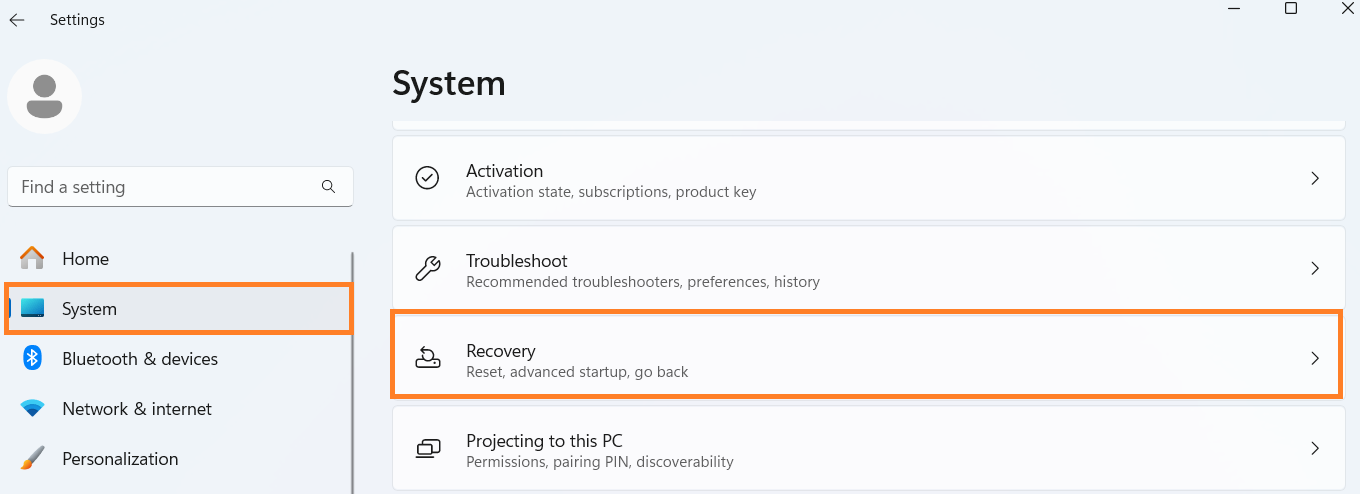
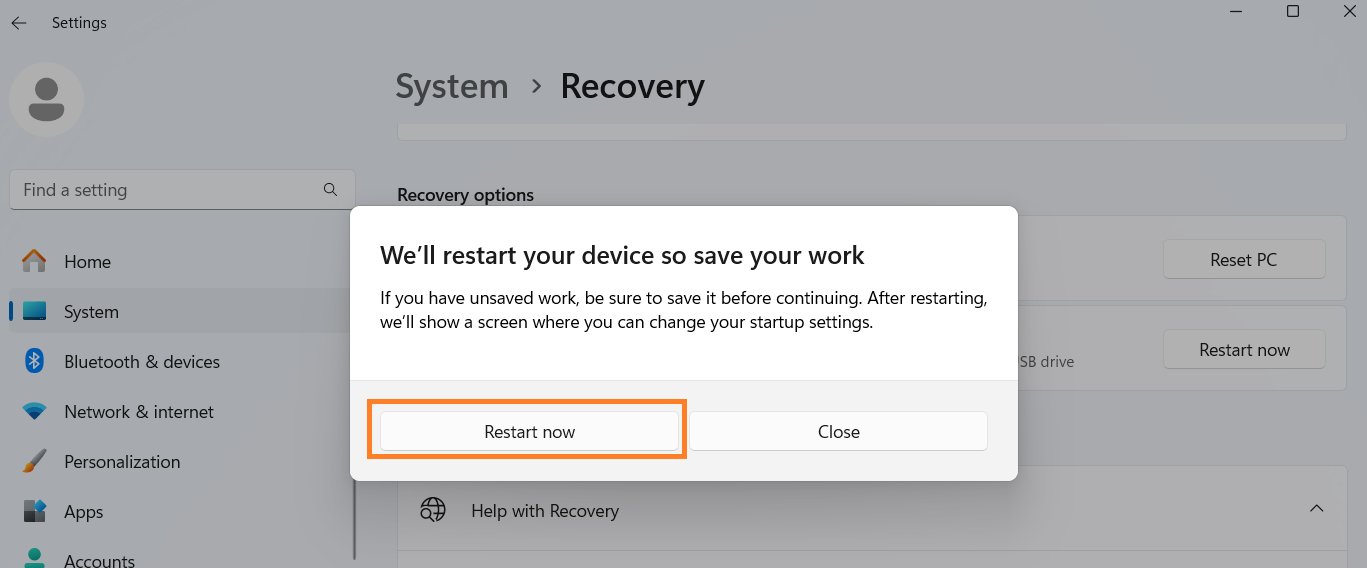
- Open the Settings app, go to System, and select Recovery.
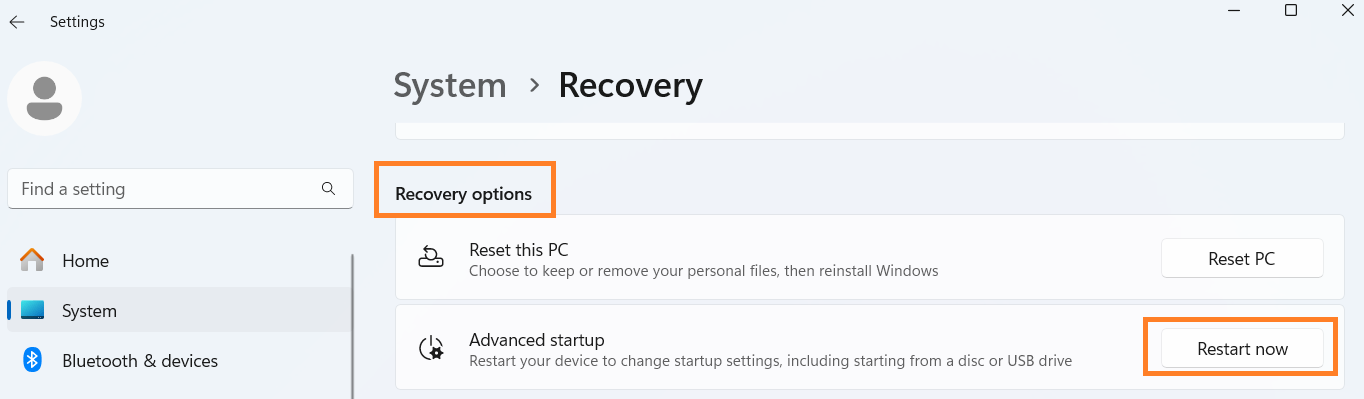
- Click Restart now beside Advanced startup under Recovery options.
- A prompt will display telling you to save your work before continuing. After that, click Restart now.
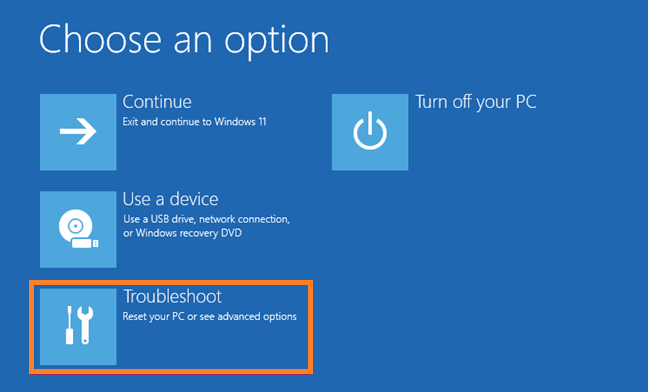
- On the blue screen that appears, choose Troubleshoot.
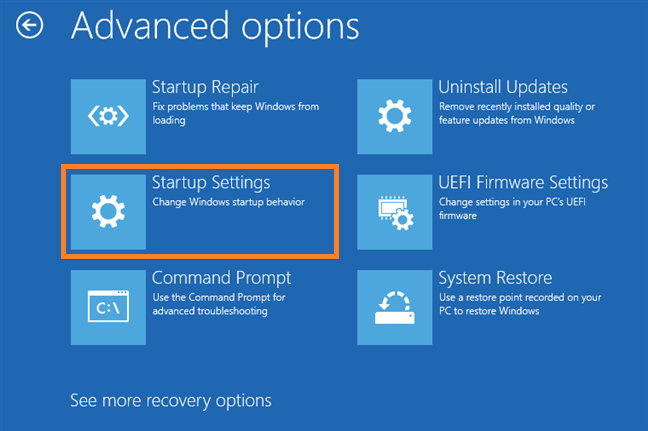
- Go to Advanced options.

- Then, select Startup Settings.
- For the last step, click Restart.
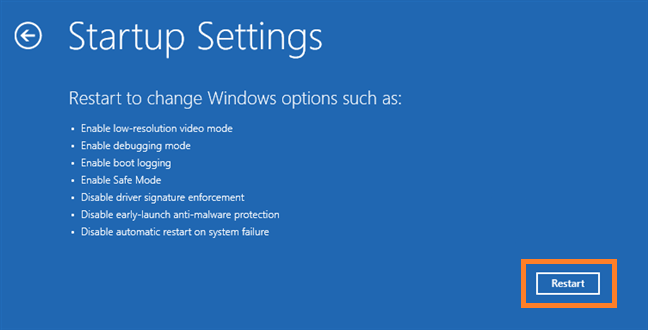
- When Windows restarts, different boot options will display. Choose Enable Safe Mode with Networking or just press
5orF5on your keyboard.
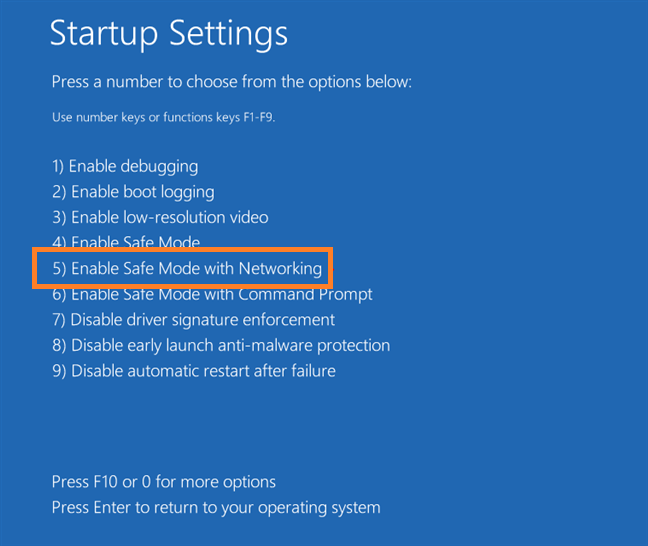
Windows will restart and boot directly into Safe Mode with Networking. Open a browser and visit a website to check if DNS is working. If your internet works in Safe Mode but not in normal mode, a third-party program might be interfering.
If that’s the case for you, go through these steps:
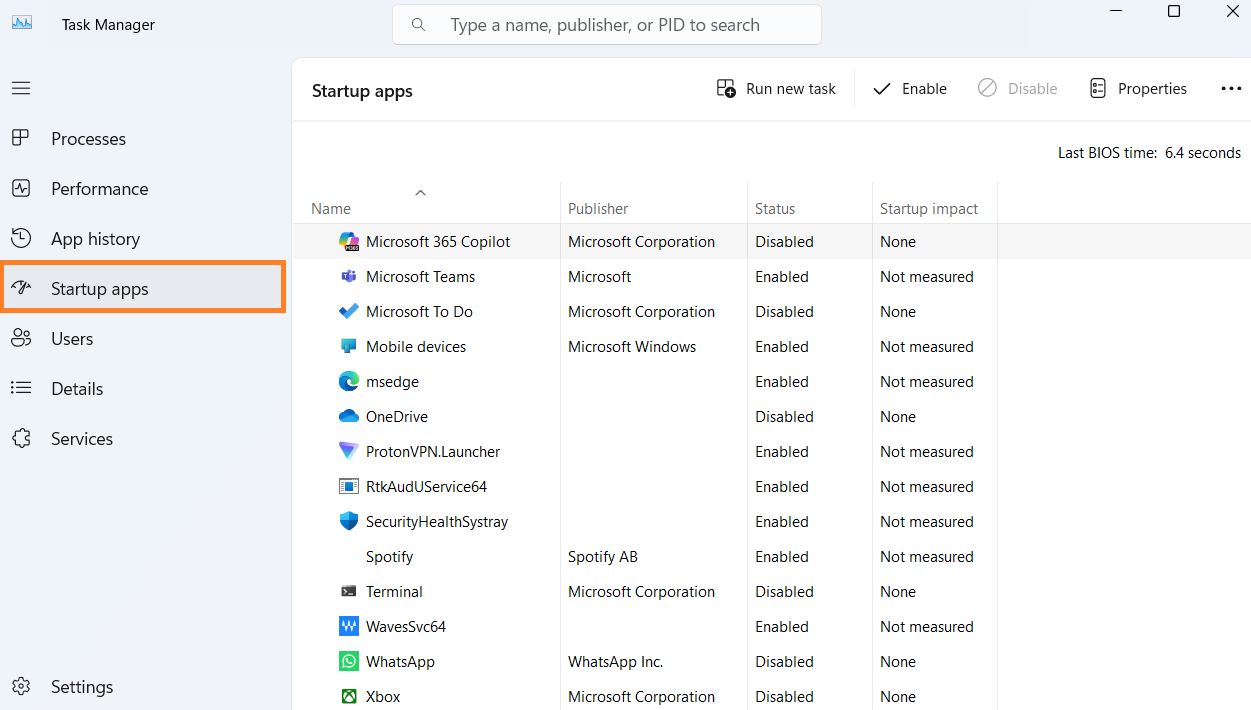
- Open Task Manager (
Ctrl + Shift + Esc), go to the Startup apps tab, and disable unnecessary apps that might affect networking.
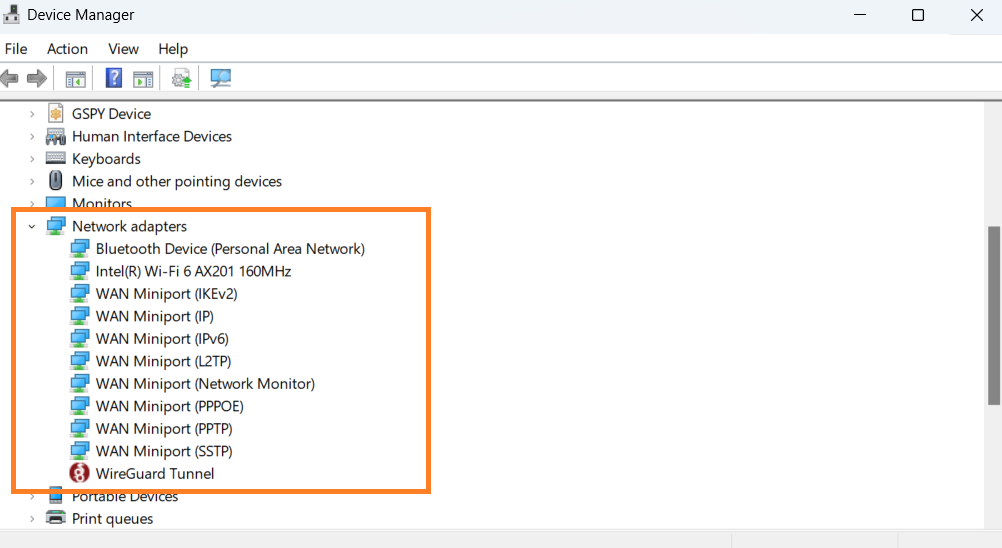
- If it doesn’t help, check for driver issues. To do that, open Device Manager, expand Network adapters, and ensure no drivers are showing errors.
- If the DNS server still isn’t responding, delete any apps you recently installed.
DNS Server Not Responding or Unavailable: Manufacturer- and Expert-Recommended Fixes
Below is a list of extra steps that have been shared by tech experts, computer makers, and community users. These are known to work in specific situations or with specific models:
| Brand | Fix recommended by experts or manufacturer support |
|---|---|
| Dell |
|
| HP |
|
| ASUS |
|
| Lenovo |
|
| Acer |
|
| MSI |
|
| Microsoft Surface |
|
| Generic/custom PC |
|
DNS Server Not Responding? Fixed!
DNS problems can be frustrating, but now you’ve got both the general fixes and manufacturer-specific DNS solutions at your fingertips. Whether your issue lies in your computer’s network settings, browser, or router, you now have a detailed roadmap to follow.
Remember: if one method doesn’t work, don’t be discouraged. DNS issues are layered; the solution might be the next step you try. If you’ve found this article helpful, share it with your friends and comment below which ones helped you!