
- What Is a Memory Leak in Windows?
- What Causes a Memory Leak?
- Signs Your PC Has a Memory Leak
- How to Check for Memory Leaks Using Built-In Windows Tools
- Quick Fix: What to Do First if You Suspect a Memory Leak on Windows 10/11
- How to Fix Memory Leaks on Windows 10/11: Next Steps
- How to Fix Memory Leaks in Specific Applications
- Memory Leaks: Explained and Resolved
- FAQ
A memory leak is a common cause of slow computer performance, gradually consuming system memory and potentially leading to crashes or significant delays. The issue is often tricky to detect, as it develops over time and may go unnoticed until the system is under prolonged strain.
For instance, it might seem unlikely that Chrome would use up 5GB of RAM. However, one Reddit user discovered that after opening 50 tabs across three windows, the browser had indeed consumed that much memory. The real issue, however, emerged when he closed a good number of the multiple tabs and discovered the browser was still using up to 3GB. This lingering memory consumption, despite reduced activity, was a telltale sign of a memory leak. Luckily, there’s a way to fix it.
In this article, we’ll explore important questions like “What is a memory leak?” what causes this problem, and how to fix it. Let’s begin.
What Is a Memory Leak in Windows?
A memory leak means a program or an app is holding onto memory it no longer needs. This doesn’t reduce the physical capacity of your RAM, but it creates a shortage of free memory for new programs. Over time, this slows down the system or leads to errors because the operating system struggles to allocate memory efficiently.
This memory issue typically occurs in two forms:
- Software-related memory leaks
Your CPU relies on RAM (random-access memory) to temporarily store and access data from active programs and system processes. The more free RAM available, the smoother your system runs.
To ensure that programs have enough RAM to run efficiently, software companies design their applications to release memory once it’s no longer needed to make space for other apps. However, some programs fail to do this properly, holding onto memory unnecessarily. This is called a software-related memory leak.
As the program continues to consume RAM without freeing it, available system memory gradually decreases. If the leak persists, your computer may slow down, experience crashes, or struggle to open new applications.
- Hardware-related memory leaks
When the RAM becomes full, whether due to excessive programs running or a software-related RAM leak, Windows compensates by using a portion of your hard drive as virtual memory.While using virtual memory helps prevent immediate slowdowns, it is not as fast as RAM. As such, you might experience a drop in performance.
Just like RAM, virtual memory should be freed when it’s no longer needed. However, if a program keeps occupying virtual memory without releasing it, a hardware-related memory leak occurs, causing issues such as high disk usage and slow performance because the OS relies on the paging file (stored on the disk) to manage memory.
Over time, excessive disk activity from heavy paging file usage may contribute to wear on storage drives, especially SSDs.
However, the impact is generally small unless the issue is persistent.
What Causes a Memory Leak?

Some applications fail to release memory after use due to coding errors or poor optimization by developers. When software is not properly optimized, it mismanages system resources, leading to excessive memory consumption. Over time, this can slow down your system, cause unresponsiveness, or even result in crashes.
If you notice an application consuming too much RAM, try updating it. Like with the Mozilla case, developers often release patches to fix memory leaks and improve performance.

Windows and third-party applications run background processes to manage updates, notifications, and system functions.
Cloud storage apps like OneDrive or Google Drive usually run in the background, syncing files even when no changes are made.
If these processes are not well-optimized, they can use more RAM than needed, which might cause memory leaks. You can use Task Manager (Ctrl + Shift + Esc) to monitor your background processes.
If there is any unnecessary app consuming too much memory, consider disabling it.

Device drivers act as a bridge between your hardware and the operating system, ensuring smooth communication. Windows loads them into memory when needed. If these drivers become faulty, outdated, or corrupted, they might block other programs from using memory properly. Similarly, certain Windows updates can introduce software conflicts that prevent memory from being released properly.
For example, many users on various forums have reported that Windows 11’s File Explorer has experienced memory drain, causing increased RAM usage even after closing windows. To fix the issue, device manufacturers and Microsoft often release updates.
Like in this case, Microsoft acknowledged the issue in a Feedback Hub post and made changes in the next build (22454). So, it’s best to check for driver updates and Windows updates.

Startup programs are configured to run whenever Windows boots. These processes are the first to get a share of the system memory because they are loaded onto the memory after your PC starts.
Memory leaks can happen if the startup programs continue to hold on to their allocation, causing problems for the computer.
A startup program is likely the cause of the issue if you are experiencing agonizing system slow-downs after turning on your computer. Disabling these startup apps can fix the problem.

Sometimes, the issue may not come from traditional programs. There are cases where unexpected sources like the following can also mismanage system memory:
- Browser extensions: A rogue browser extension may continuously consume RAM even when it’s not in use, leading to memory drain over time. You have to delete the suspected extension to resolve the issue.
- Security software: Some antivirus programs run real-time scans and background processes that leak memory, especially if installed from unofficial or untrusted sources. Deleting and reinstalling reliable software can fix the leak.
- Malware: Malicious software can cause memory leaks by running hidden background processes that constantly consume memory without releasing it. Such processes may include spying, stealing data, or running dangerous tasks without your knowledge. It often exploits flaws in system software to bypass proper memory management, which prevents unused memory from being freed. Scanning your system with reliable anti-malware usually resolves the issue.
The tool helps your PC perform better by clearing out unneeded files, optimizing your drives, and cleaning your registry—ensuring your system runs more efficiently. BoostSpeed also stops background programs from using too much memory and disables unnecessary startup apps, which can help prevent problems like memory leaks.
Signs Your PC Has a Memory Leak
The following are some of the typical symptoms to look out for:
- Slow performance and frequent freezes: If your computer slows down significantly with use or frequently freezes, it may be due to a memory leak. There is a possibility your system is struggling to allocate RAM to new tasks.
- High RAM usage without running heavy applications: It’s normal for RAM usage to spike when running resource-intensive tasks like high-demand gaming or video editing. However, if your system is using a large amount of memory while running simple applications like a text editor, it could be a sign of a RAM leak.
- Programs that fail to release memory even after being closed: If you close an app, its memory usage should drop the next time you reopen it. If you notice in Task Manager that the memory usage remains high when you reopen the app, it may not be properly freeing up RAM.
- “Out of memory” (OOM) errors: If left unchecked, an application consuming excessive memory might exhaust all available system resources. When that happens, you might get an OOM error. If you constantly get this error message, it might be a sign of a memory leak.
Therefore, if you notice these signs, it’s important to run diagnostic tests to confirm if this is the cause or if other factors are contributing to the problem. I’ll show you how to do it in the next section.
How to Check for Memory Leaks Using Built-In Windows Tools
Before taking action, here are some built-in diagnostic tools you can run to see if the problem is actually a resource leakage or something else:
1. Use Task Manager
Task Manager provides you with a relatively easy way to check RAM usage, which might indicate a memory leak. Here is how to use it:
- Press
Ctrl + Shift + Escto open Task Manager. - Go to the Processes tab and look at the Memory column to see how much memory each app is using.
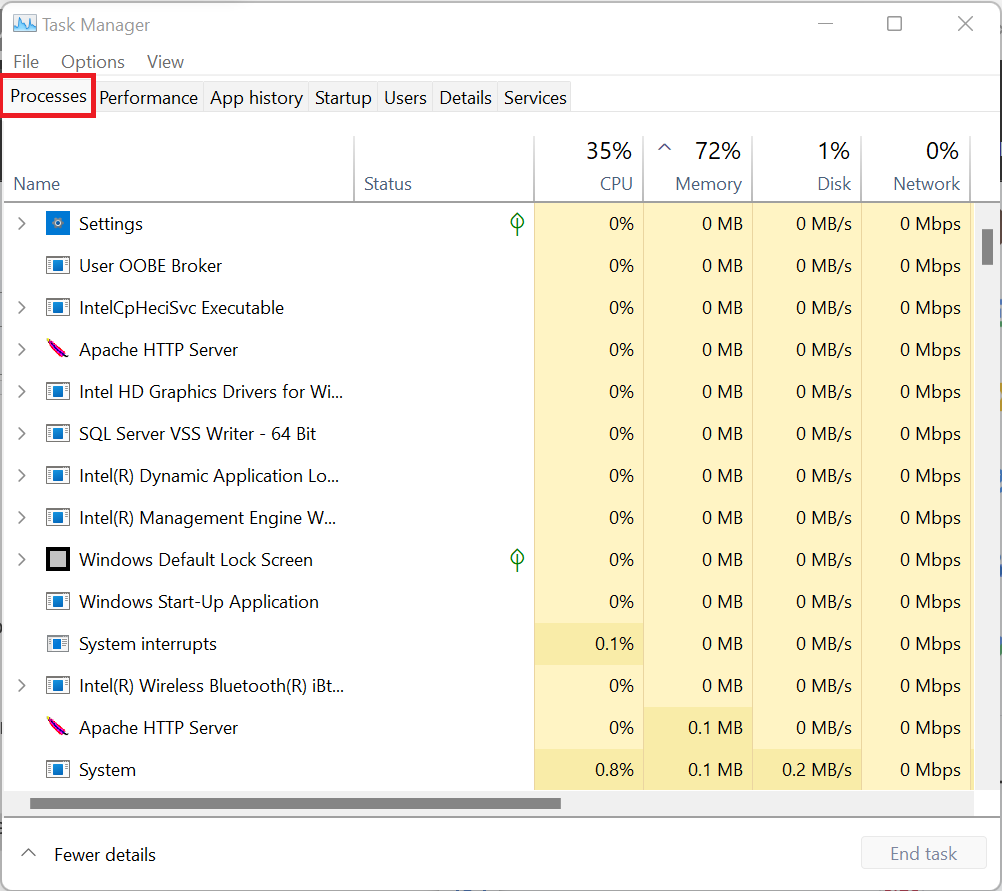
- Click the Memory header to sort apps by memory usage.
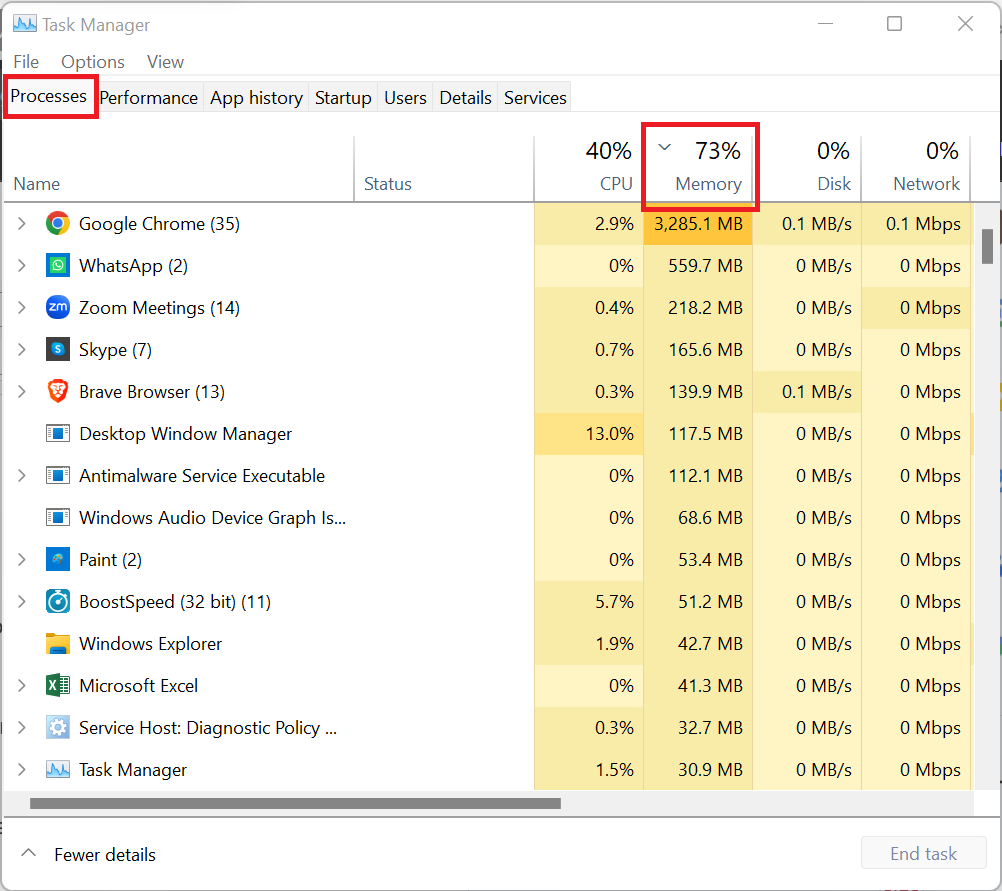
A high memory spike doesn’t always indicate a leak. For instance, Chrome here using 3GB of RAM could be due to multiple open tabs, extensions, or heavy web content. To confirm if it’s a memory leak, I need to monitor the app over time. If I close the memory-consuming tabs and memory usage continues to rise without being released, it may signal a leak.
The problem with this method is that Task Manager doesn’t display memory usage trends. As such, you need to manually record memory usage, which can be time-consuming. However, it’s a good place to start, as it shows you the suspects.
2. Diagnose with the Resource Monitor
The Resource Monitor is a more detailed alternative to Task Manager. It allows you to see memory usage trends for the processes currently running on your computer. Here is how to use it
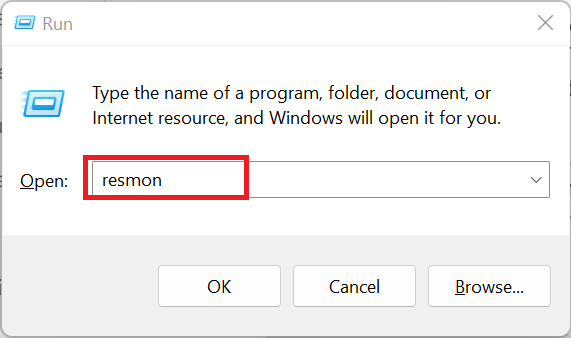
- Press the
Windows key + R, type resmon, and hitEnter.
- Click on the Memory tab to view which processes consume the most RAM. Check the Physical Memory section for overall memory usage and the Processes table for a list of processes and their associated memory usage.
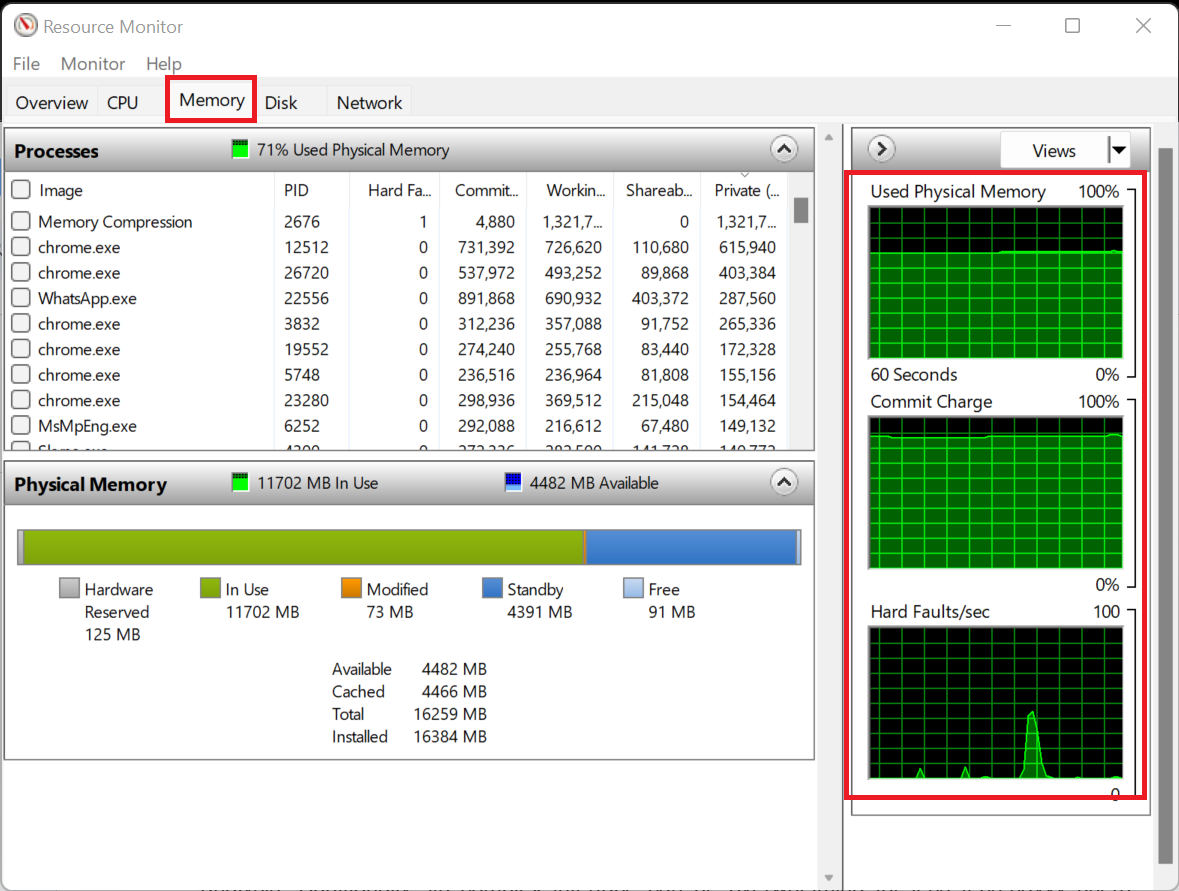
- To spot potential RAM leaks in the Resource Monitor, look for a process that consistently uses more memory under Private or Working Set in the Processes table. In the Physical Memory section, check for a rise in In Use memory while Free memory decreases.

The downside of the Resource Monitor is that it retains data for only 60 seconds, so it’ll take several hours of observation. This limitation makes it unsuitable for long-term analysis.
Below are a few pointers to note:
- Hard Faults/sec: This shows instances where each process has to fetch memory blocks (units of storage that hold data) from the virtual memory space on the hard drive.
- Commit: This displays the amount of virtual memory in kilobytes (KB) that Windows has reserved for the process.
- Working Set: This section refers to the amount of physical memory (actual RAM) in KB that the process is currently using.
- Shareable: This part displays the amount of physical RAM that the application or process can share with other processes and programs.
- Private: Displays the amount of physical memory that the app or process is currently keeping to itself and can’t be used by any other process.
3. Use the Performance Monitor
The Performance Monitor is a more advanced tool that helps track memory usage over time, making it useful for detecting slow leaks in your memory. Here’s how to use it:
Step 1: Press Windows + R, type perfmon, and press Enter.
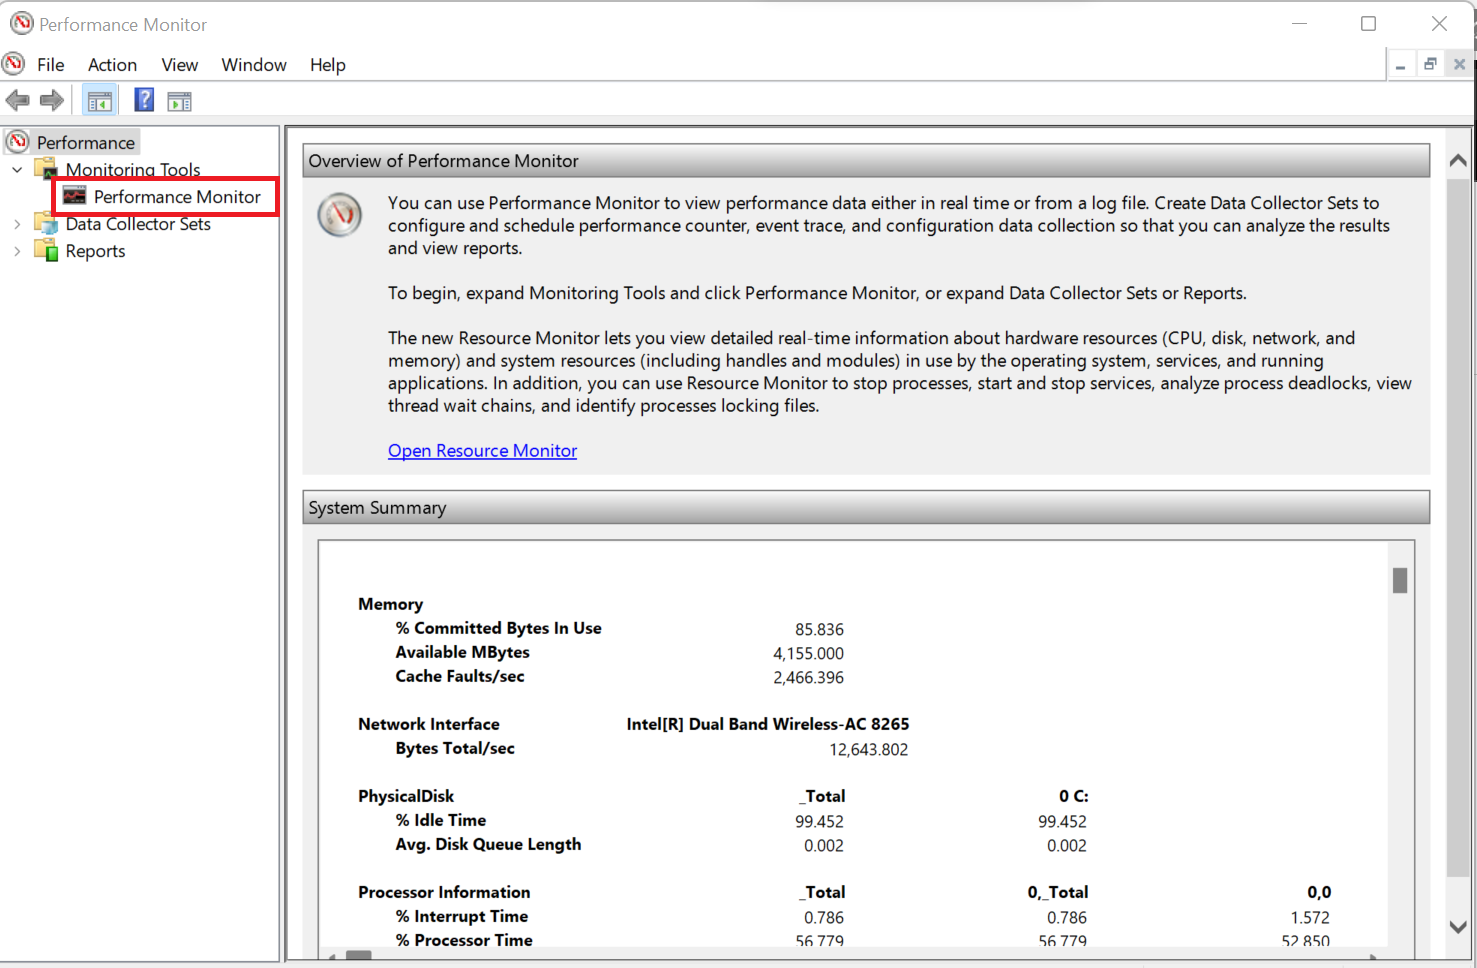
Step 2: In the Monitoring Tools section, select Performance Monitor.
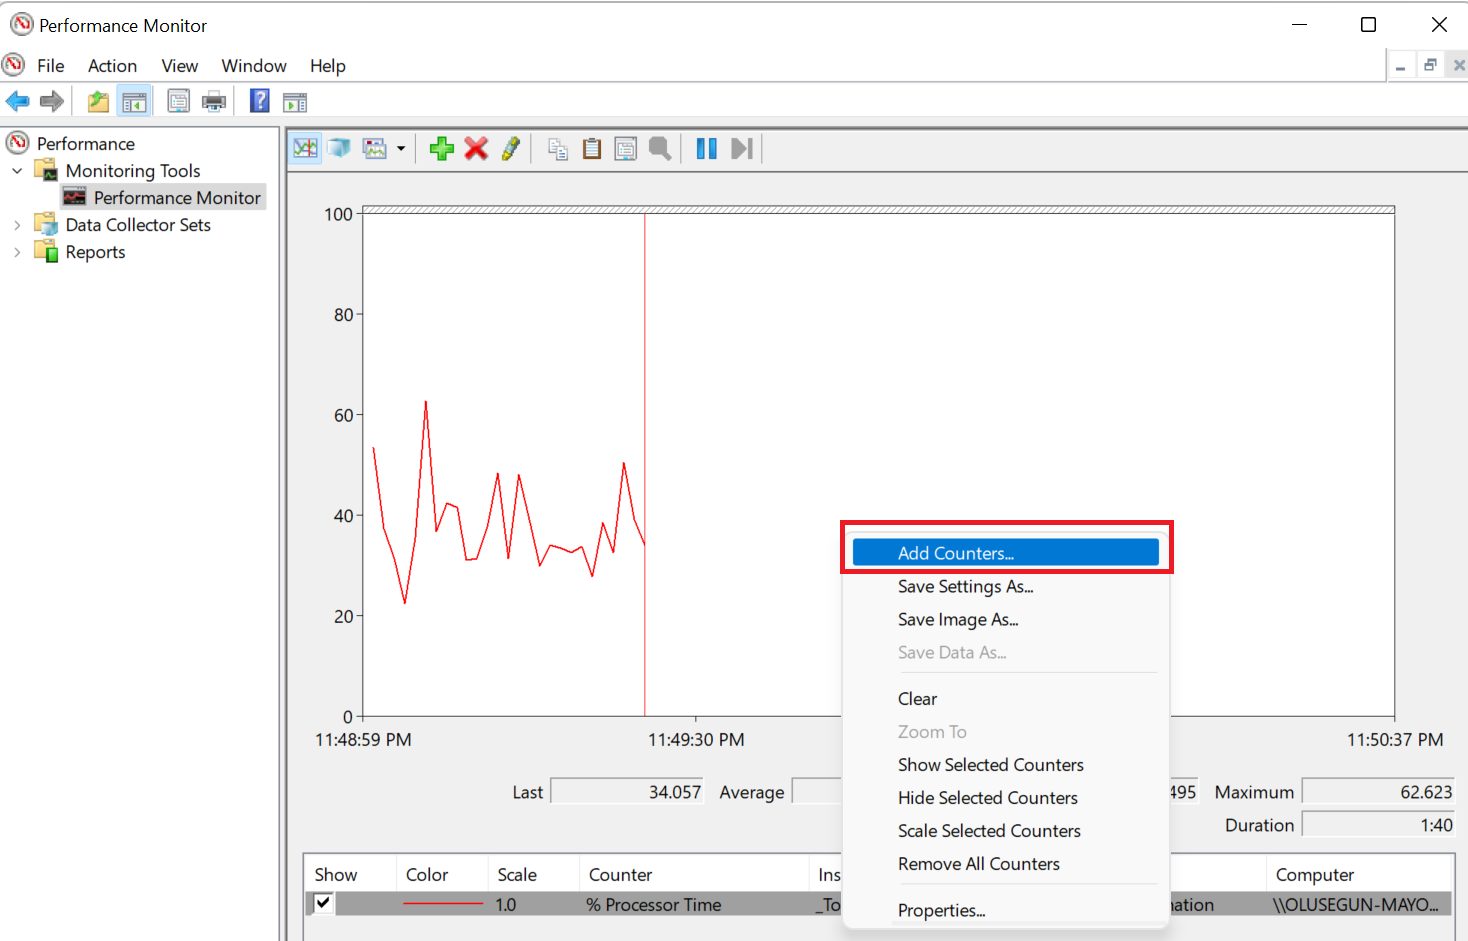
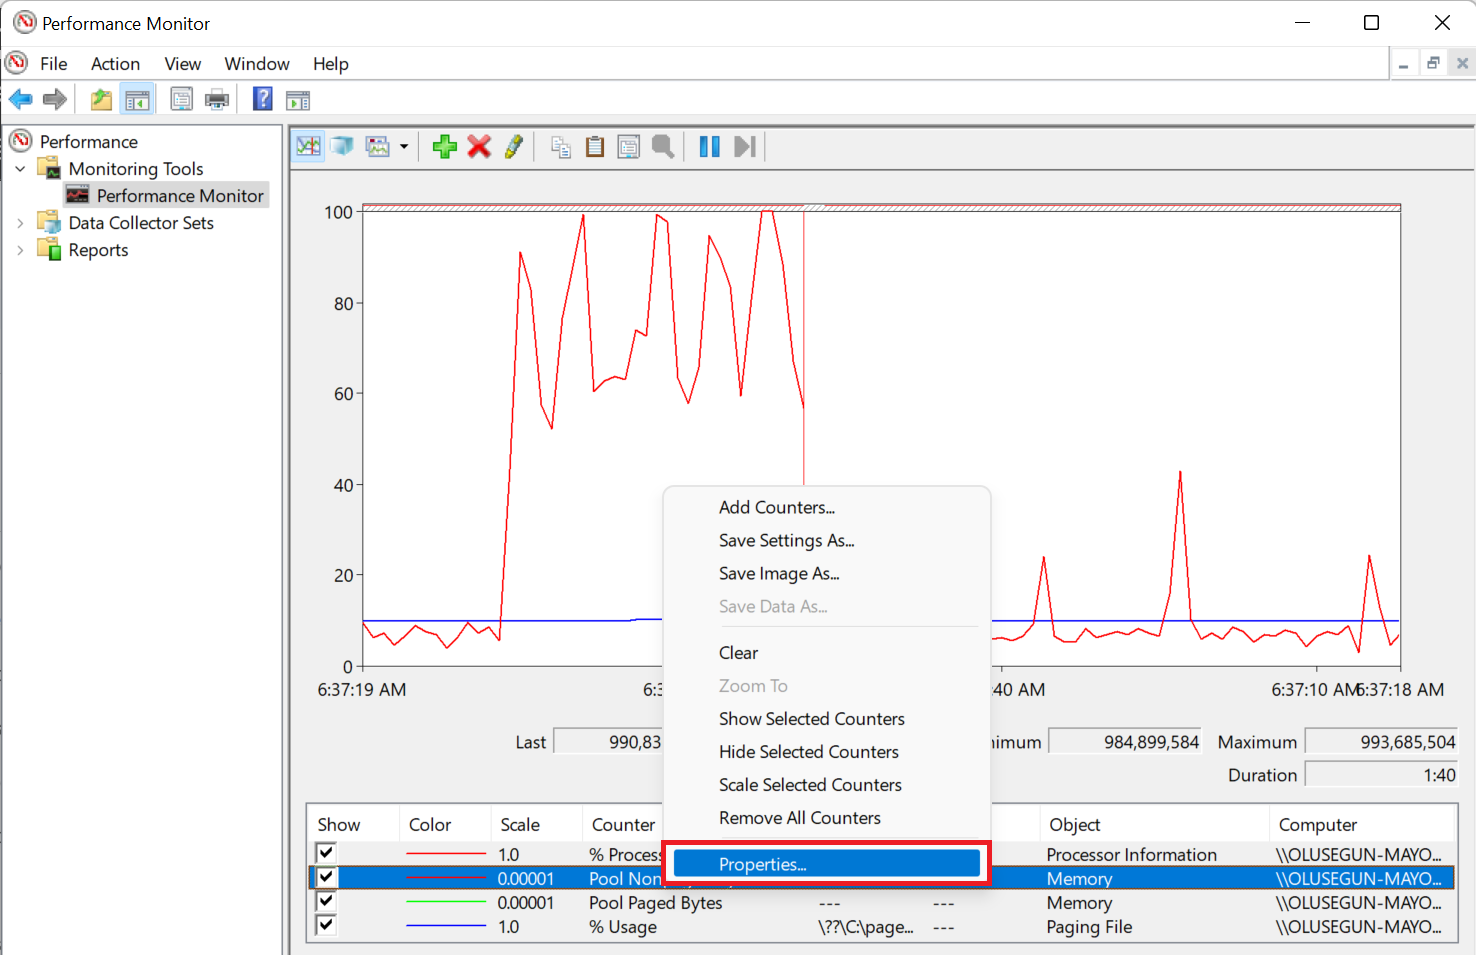
Step 3: Right-click on the graph area and click Add Counters.
Step 4: Scroll down to Memory and click to expand it.
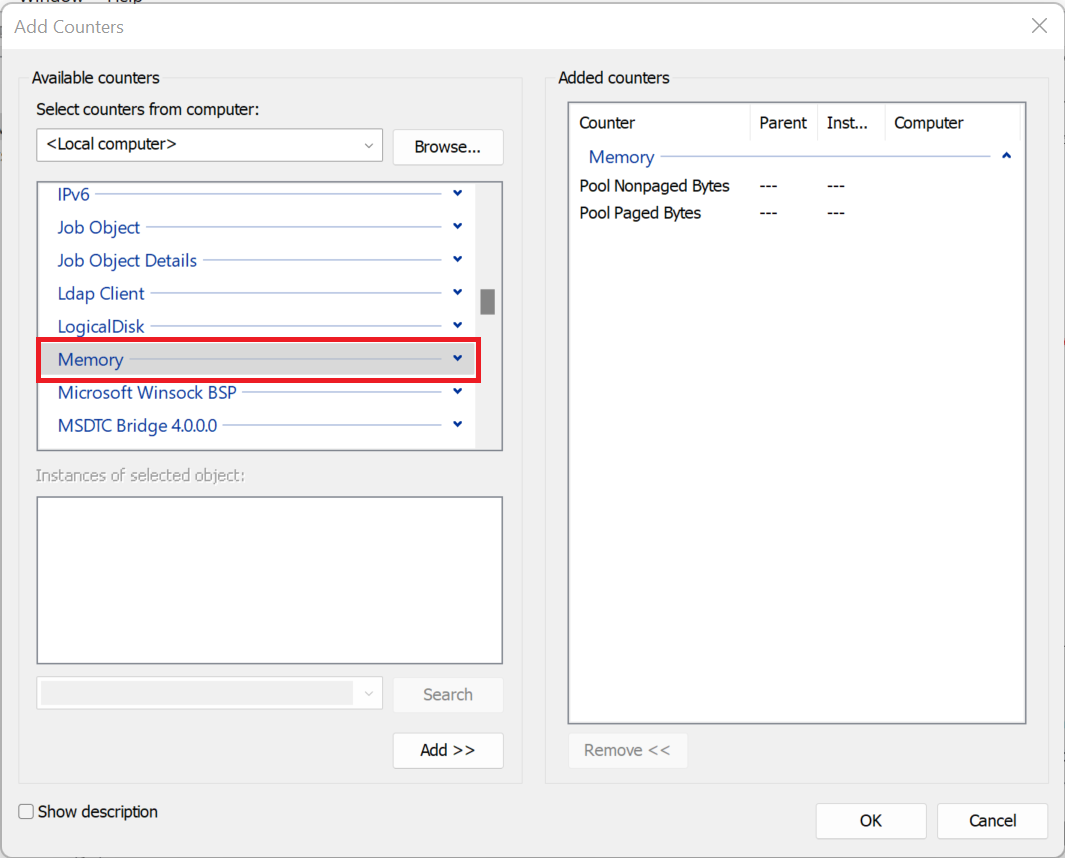
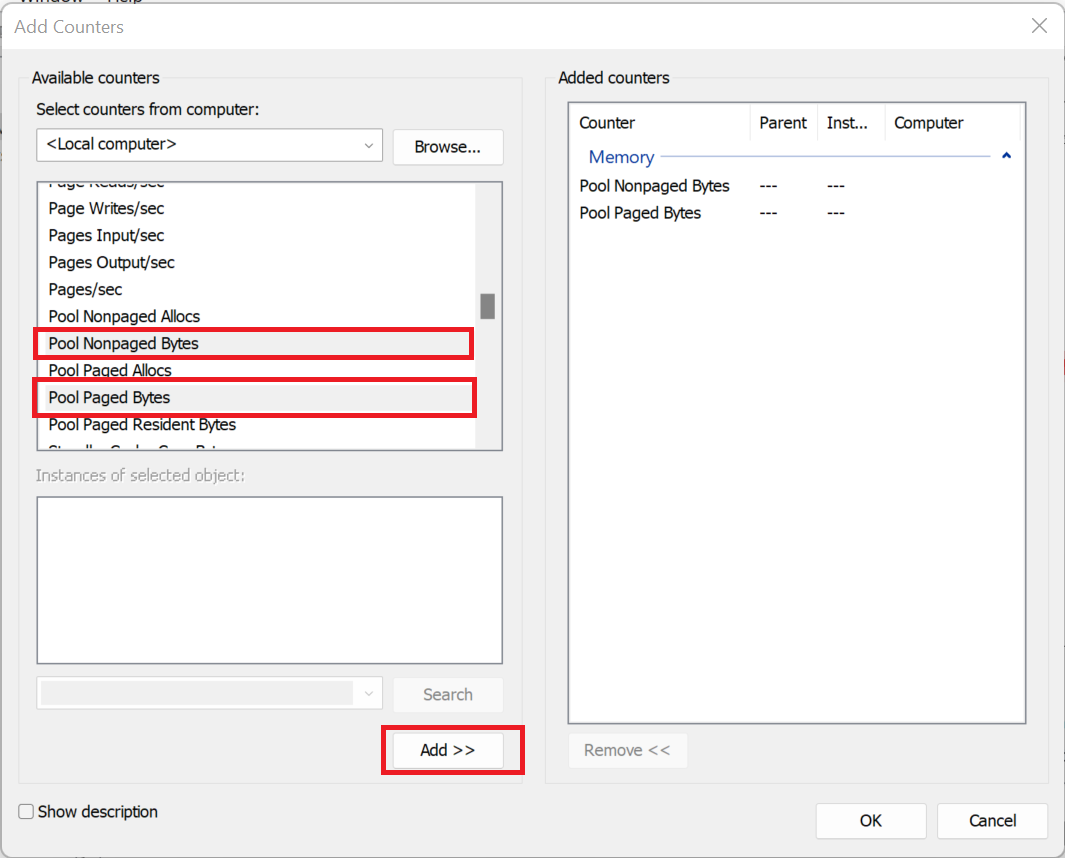
Step 5: Under Memory, find the following, click on them one at a time, and click Add :
- Pool Nonpaged Bytes
- Pool Paged Bytes
Step 6: Scroll down to Paging File, and under it, add the following as well:
- % Usage

Step 7: Right-click on each of the counters you just added and select Properties.
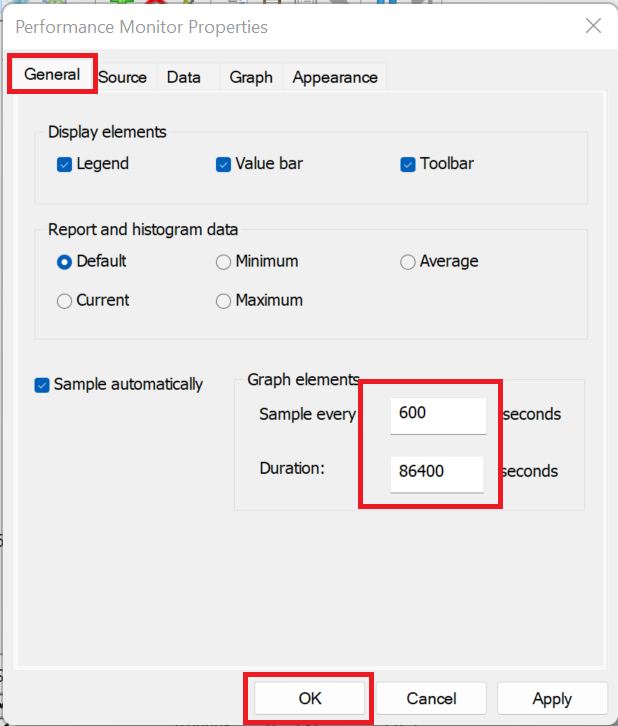
Step 8: In the General tab, set Sample every to 600 seconds for better long-term analysis. Adjust Duration based on how long you want to monitor (e.g., 86,400 seconds for 24 hours). Repeat steps 7 and 8 for all three counters.
Step 9: Start the program or process that you suspect. Let it run undisturbed for several hours, as leaks often develop slowly. Observe the counters over time. If memory usage keeps increasing without stabilizing, it may indicate a leak.
You can skip the manual method and use third-party tools to check for leaks in your PC memory. Tools like RAMMap, Valgrind, and Application Verifier are designed to analyze memory usage, detect inefficiencies, and identify memory leaks in real time or during app testing.
They provide detailed insights into memory allocation to help you locate leaks and pinpoint applications or processes causing the issue.
Quick Fix: What to Do First if You Suspect a Memory Leak on Windows 10/11
The following are simple and quick fixes that can solve a memory leak problem and get your computer running faster.
1. Restart your computer
If you suspect a memory anomaly, restarting your computer can be a helpful first step. When you restart, all running processes are stopped, and your system clears its memory. This can help you check if high RAM usage was just a temporary issue or something more serious.
If the problem comes back after reopening your usual apps and using your computer for a while, it’s a sign that a RAM leak might be the cause. In that case, you can move on to more detailed troubleshooting methods in the next section to fix the issue.
This step helps narrow things down before diving into advanced solutions.
2. Check for malware
If a virus or other malicious software has affected your computer, it may be using a lot of memory and refusing to release it. Some of these threats do this on purpose as part of their harmful actions. For malware infections, you will need more than a restart to solve the problem.
You can run a scan with your updated antivirus to help detect and remove the malware and try to fix the issue. These steps will show you how to run the scan using Windows Security:
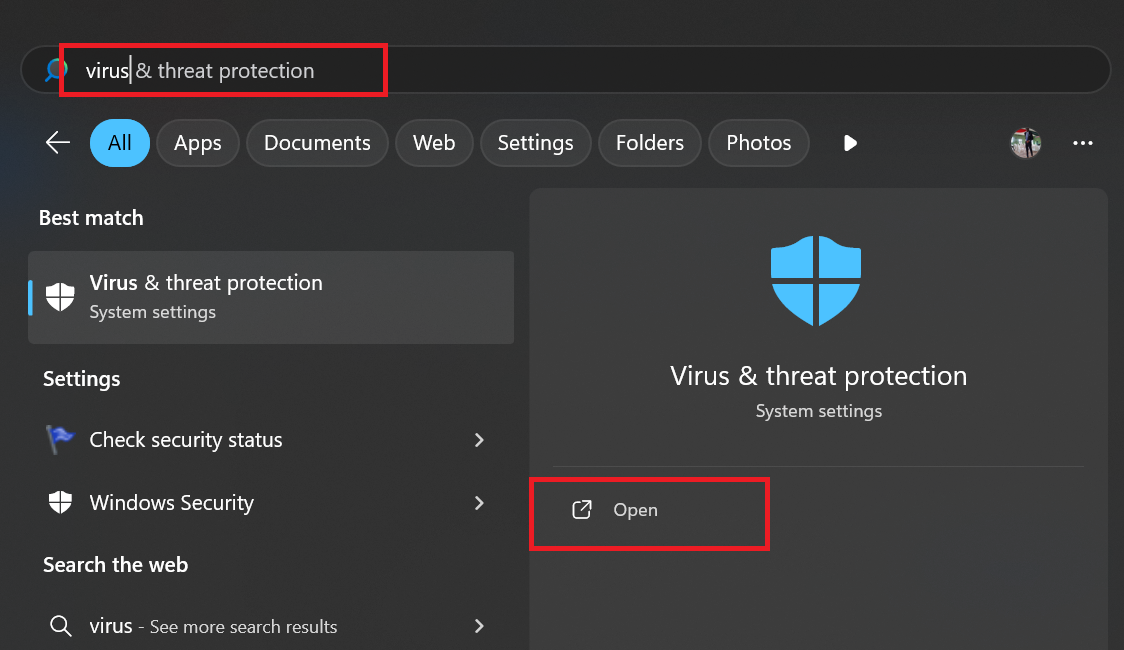
- Open the Start menu and type virus. Click the Virus & threat protection result.
- Select Scan options under the Current threats overview.
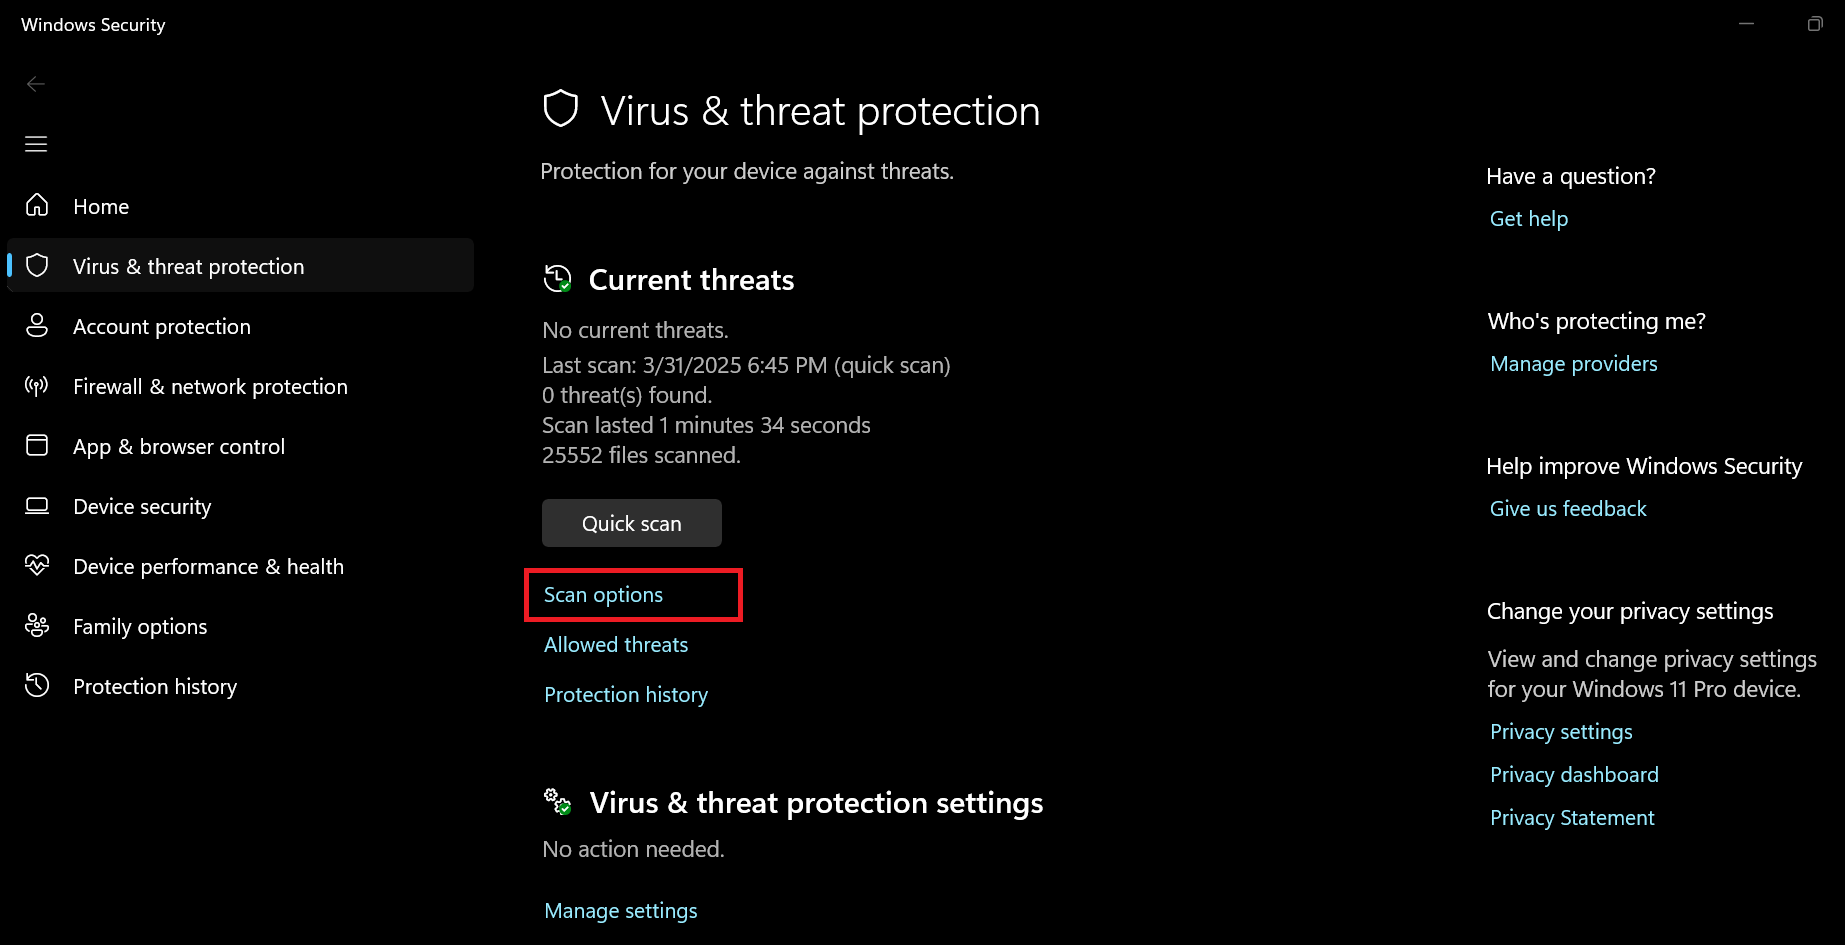
- Choose Full dcan and start the process by clicking Scan now.
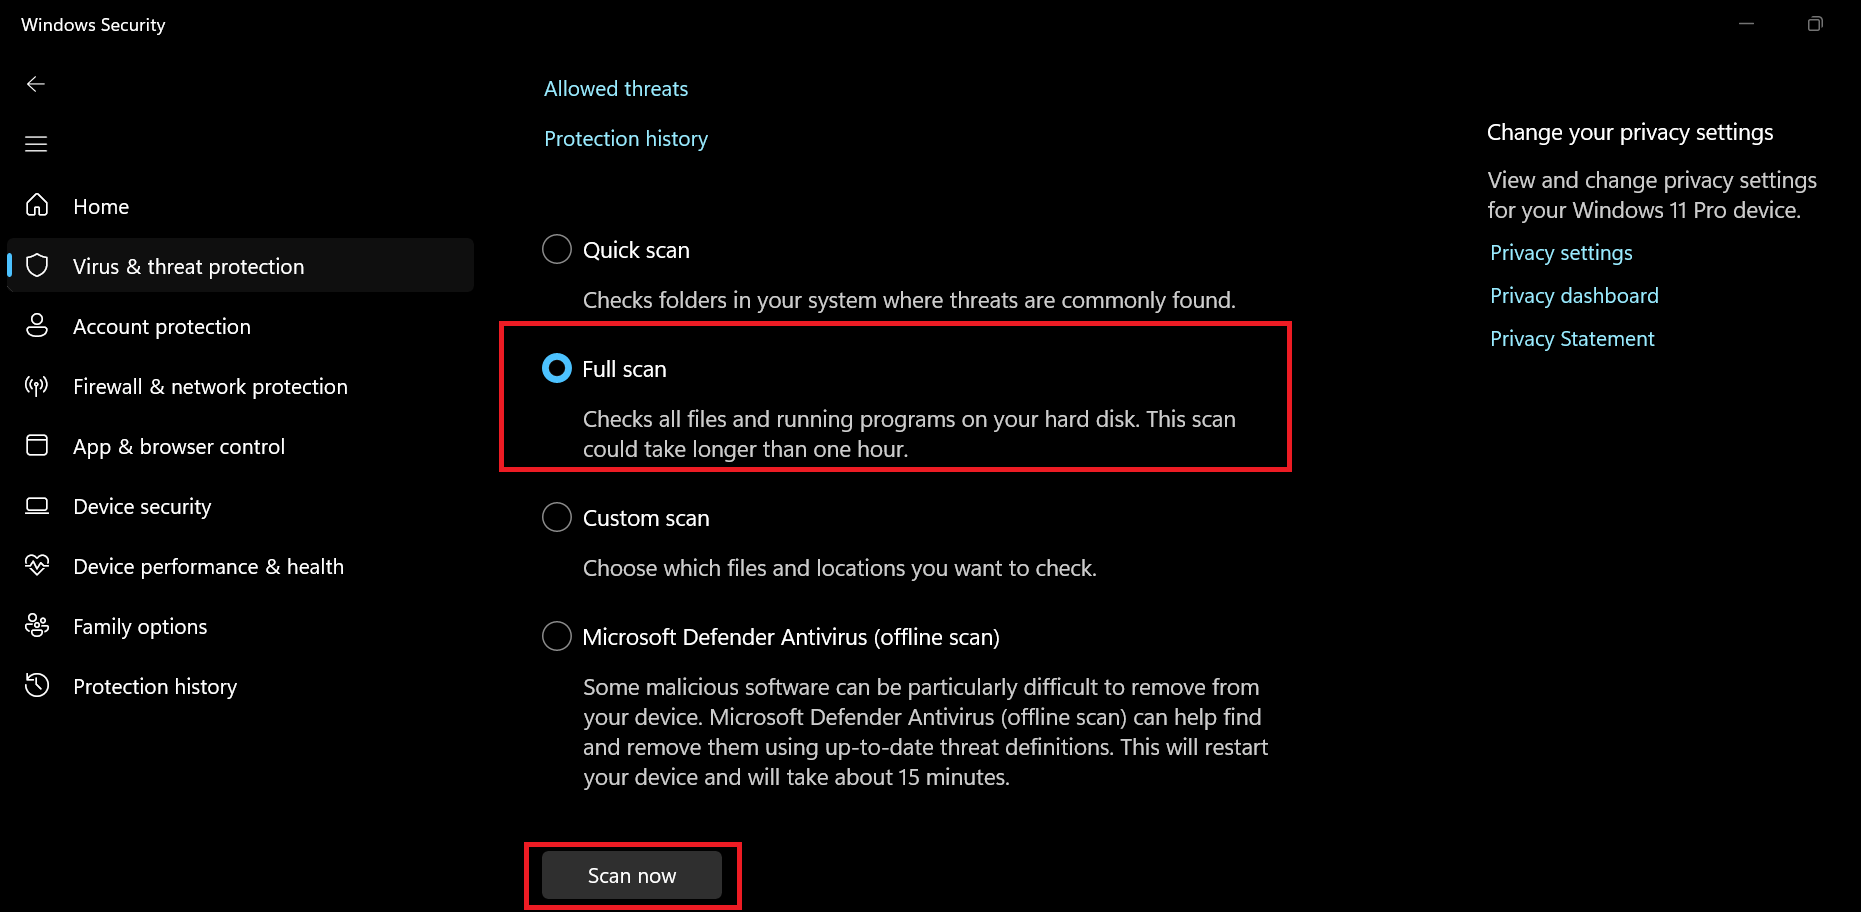
The scan may take a while as it will scour both user and system files in search of malicious programs. Once it’s done, apply recommended fixes, restart, and see if the problem is solved
For comprehensive, all-round protection, consider pairing it with trusted third-party malware tools like Auslogics Anti-Malware . This tool offers advanced features to detect and eliminate threats that Microsoft Security might miss, ensuring your computer remains safe and optimized.
3. Check for memory issues
You might not want to entertain the idea of having a bad RAM stick. But it’s time to face that reality. Since leaks in the RAM or virtual memory are memory problems, it makes sense to check the hardware behind the system memory.
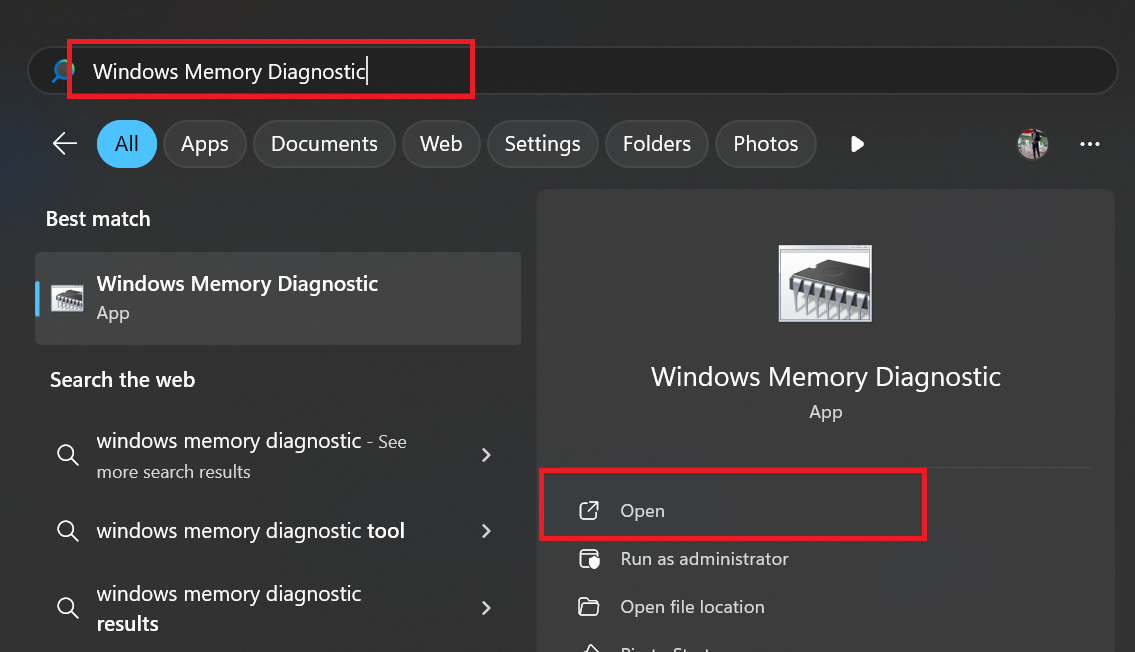
You can use the Windows Memory Diagnostic tool to run a test and check if there are issues with your RAM module.
Here is how to check the RAM module for errors:
- Type Windows Memory Diagnostic in the Start menu and run the tool.
- Choose Restart now and check for problems. Your computer will restart and scan for memory issues.
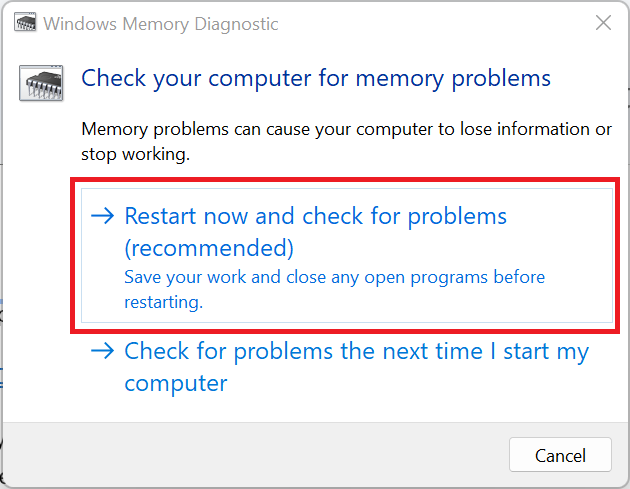
If you find any issue with any RAM stick, you should discuss with a technician to know the way forward. In most cases, you may need to replace the faulty RAM module.
While replacing a defective RAM module can resolve hardware-related leaks, adding more RAM won’t stop software-related leaks—it may only delay the symptoms.
The real fix for software-related leaks is to identify and repair the faulty program or driver responsible for the problem.
How to Fix Memory Leaks on Windows 10/11: Next Steps
If, after trying the quick fixes above, the problems persist, you need to try the following solutions.
Method 1: Update Windows
You should start here since Windows updates often include important patches and bug fixes for both the operating system and hardware drivers. Here is how to check for Windows updates:
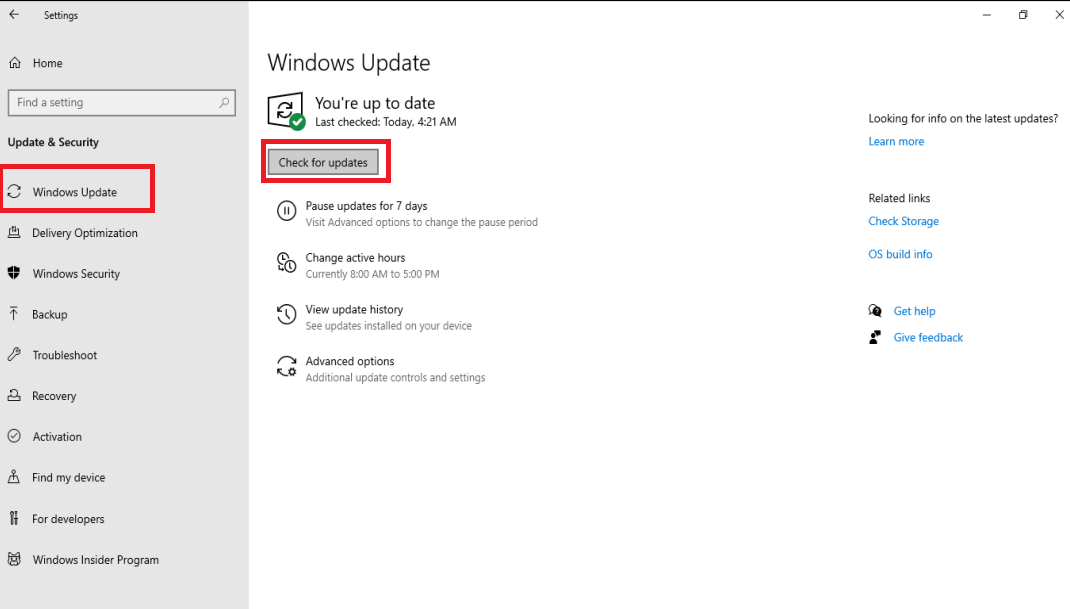
For Windows 10:
- Go to Settings and click Update & Security.
- Select Windows Update from the left panel. On the right, click Check for updates.
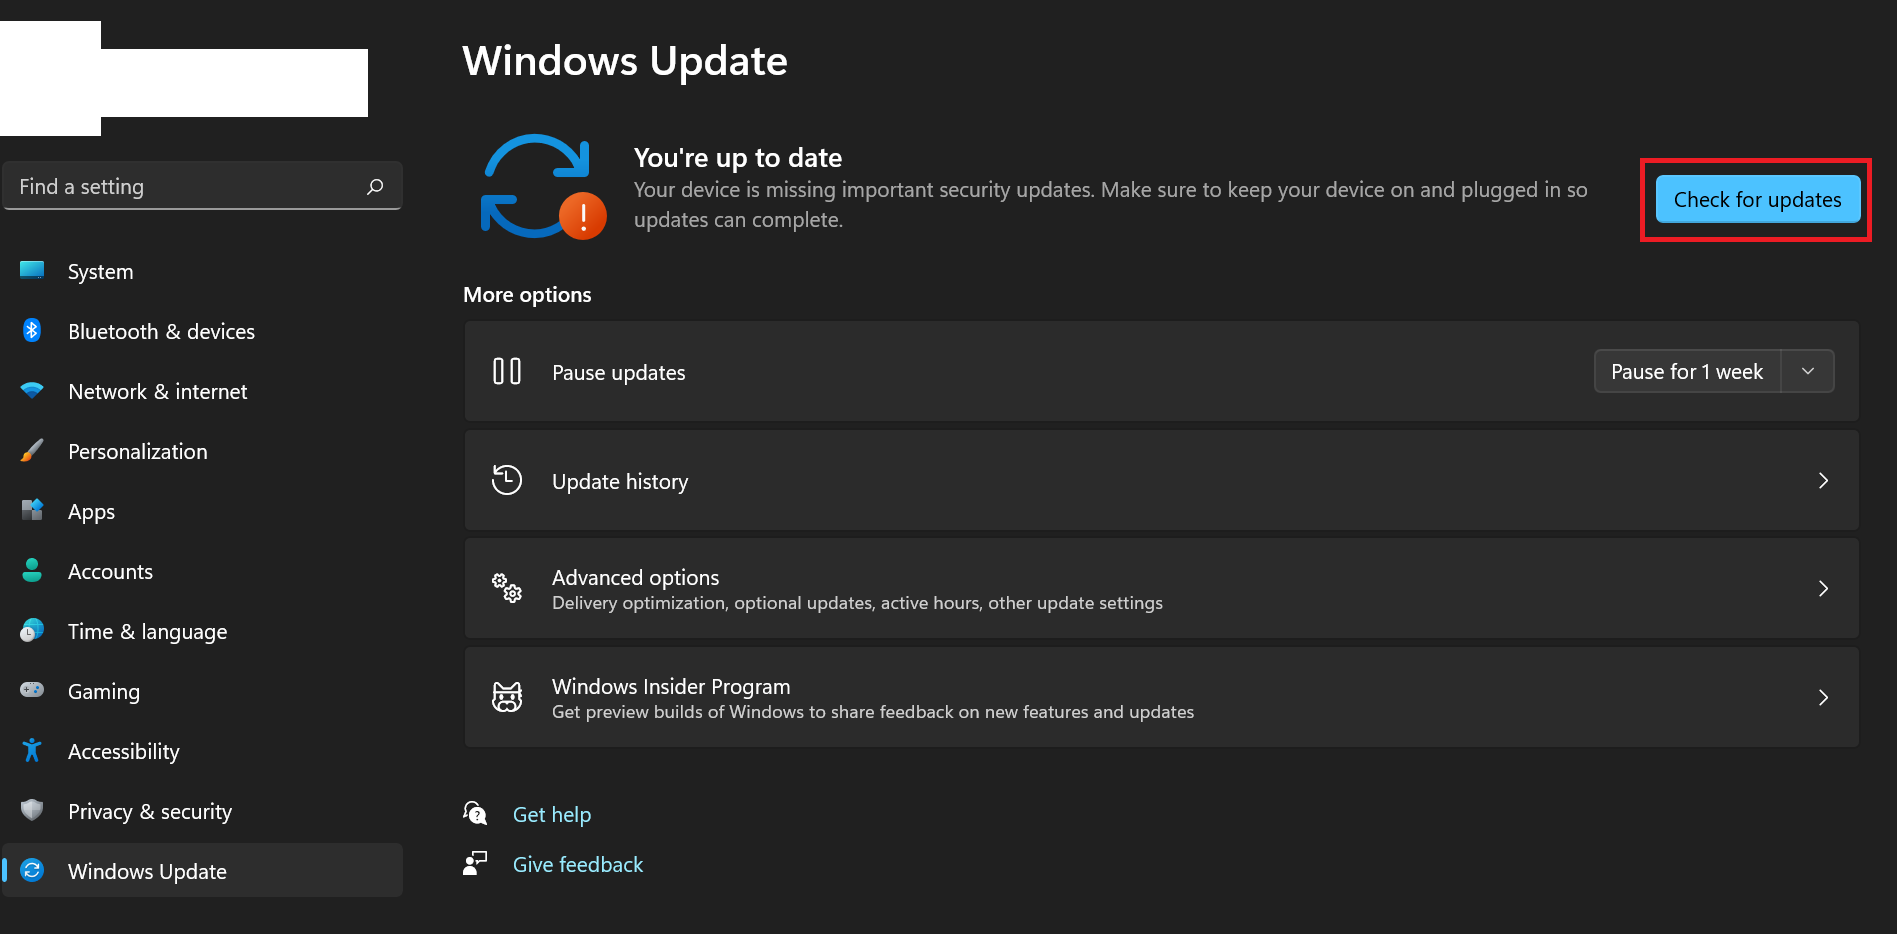
For Windows 11:
- Press the Windows button and type Windows update settings.
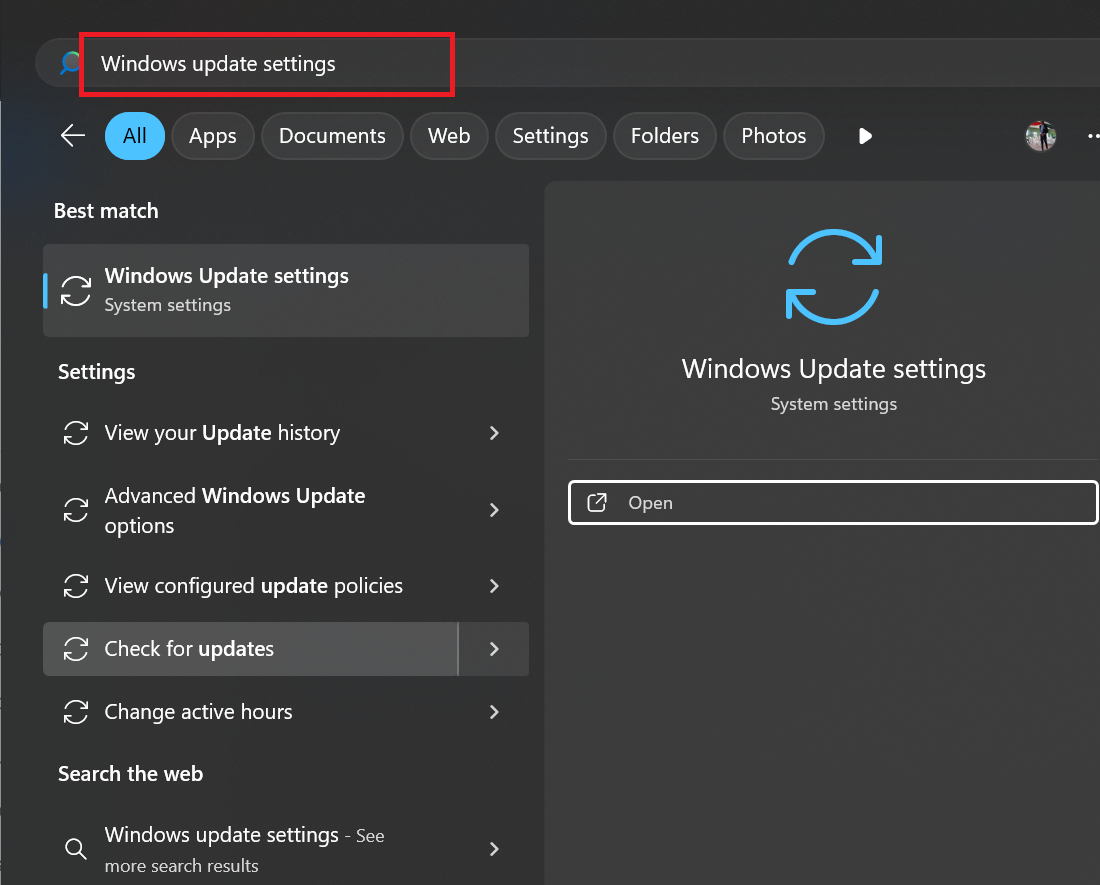
- In the right-hand panel, click Check for updates.
Restart your computer after the update is complete. After restarting, monitor the system’s behavior. Note the boot speed and check for improvements. If there are none or they are insignificant, try the next solution.
Method 2: Update your drivers
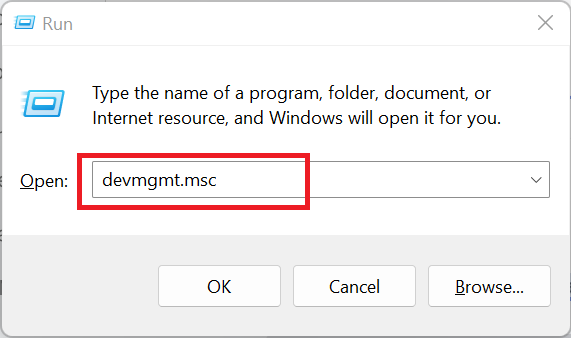
Follow the steps below to update your drivers if you’re sure you’re having leaks in your memory:
- Press
Windows + Rand enter devmgmt.msc to open Device Manager.
- Expand categories such as Display adapters, Network adapters, and System devices.
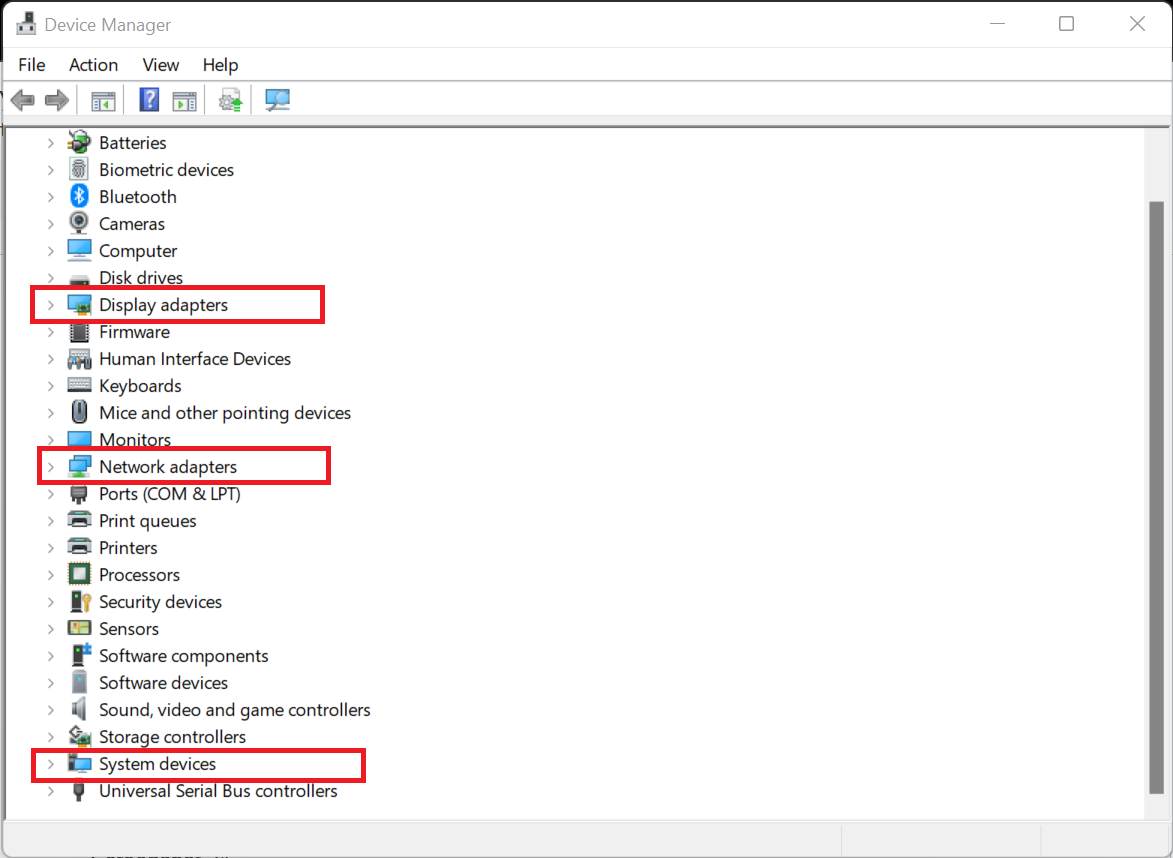
- Right-click on each device under each of these sections and select Update driver.
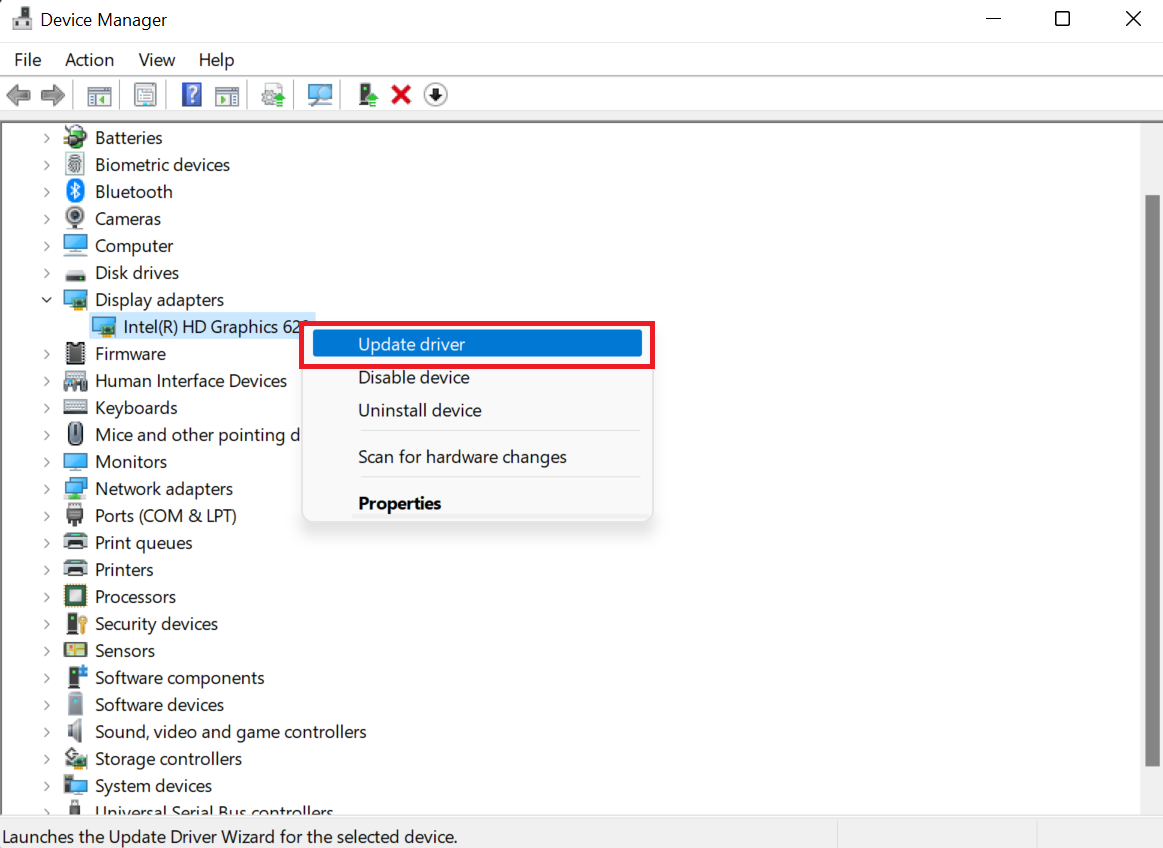
- Choose Search automatically for drivers to let Windows find the latest version. Restart your computer after updating to apply changes.
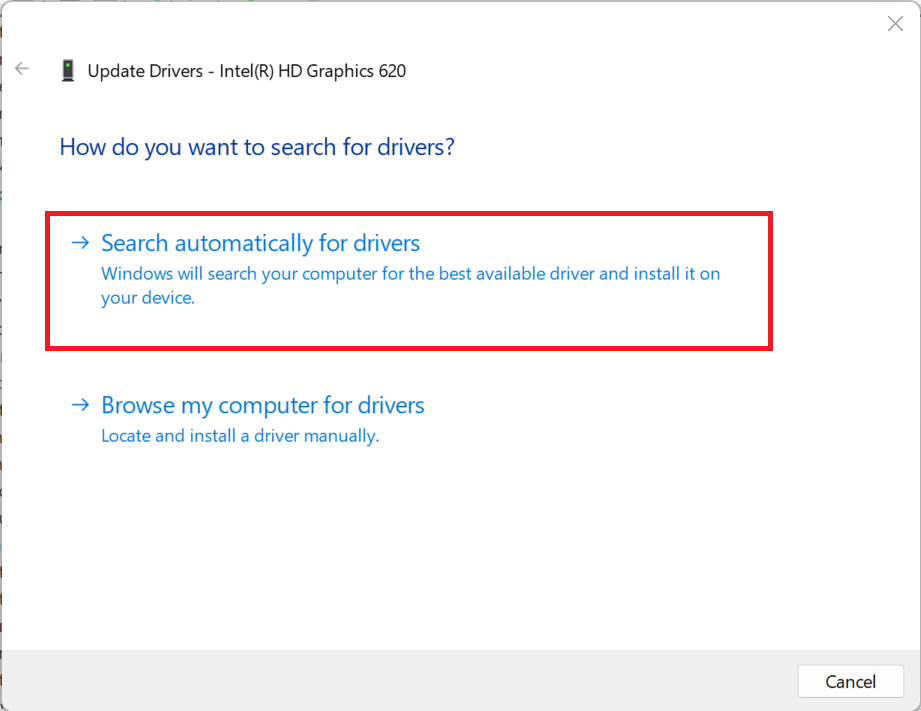
If issues persist, visit the manufacturer’s website, like NVIDIA, Dell, AMD, or Intel, and download and install the latest drivers manually.
A better solution is Auslogics Driver Updater . It automatically scans your PC for outdated drivers and downloads the latest versions directly from the manufacturer’s site.
With just one click, you can fix memory leaks caused by driver issues without the risk of installing incorrect drivers. It’s fast, reliable, and easy to use—ensuring your system runs smoothly without extra hassle.
Method 3: Disable problematic startup programs
If you’re experiencing memory leaks along with slow boot times, or if you notice a steady increase in RAM usage even when almost nothing is running, it could be due to problematic startup programs. These programs may be consuming resources in the background right from the start, leading to performance issues.
In these cases, disabling unnecessary or problematic startup apps can help improve both your boot time and memory usage. Here’s how to disable them:
- Press
Ctrl + Shift + Escto open Task Manager. - In the Task Manager window, click on the Startup tab. Here, you’ll see a list of programs that run automatically when your computer boots up.
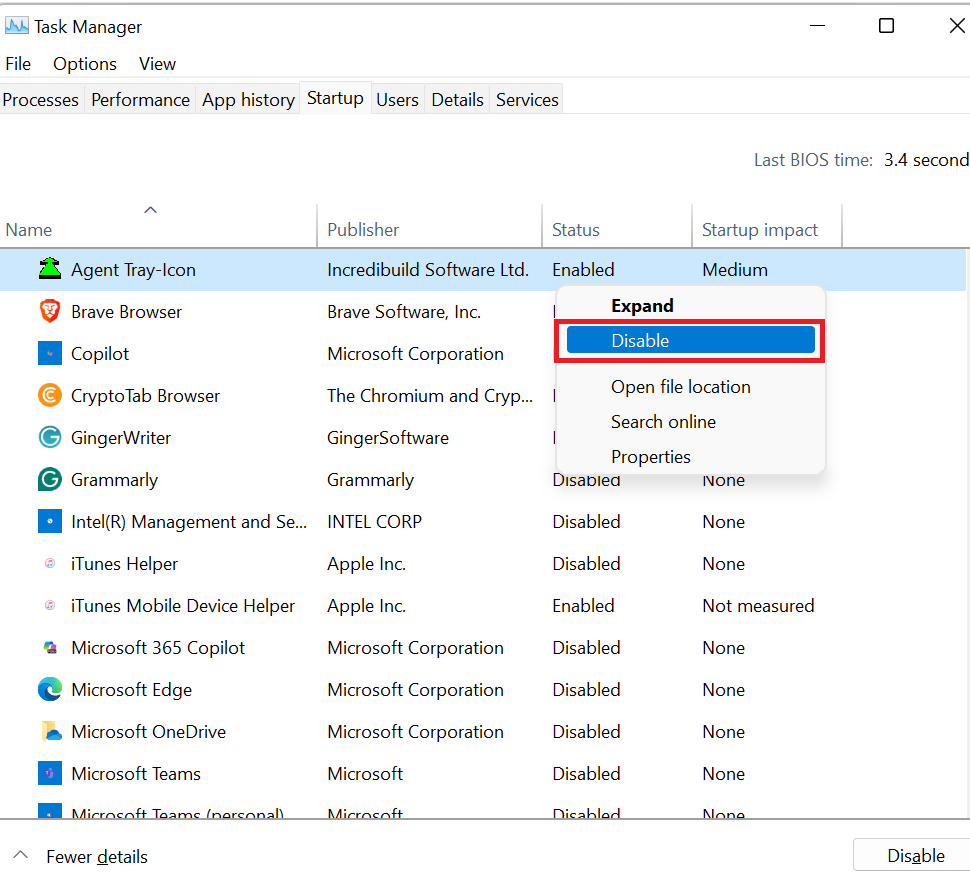
- Look through the list and identify programs that have high startup impact. Also, look for programs that you don’t need running at startup, like software you rarely use or tools that can be manually launched later.
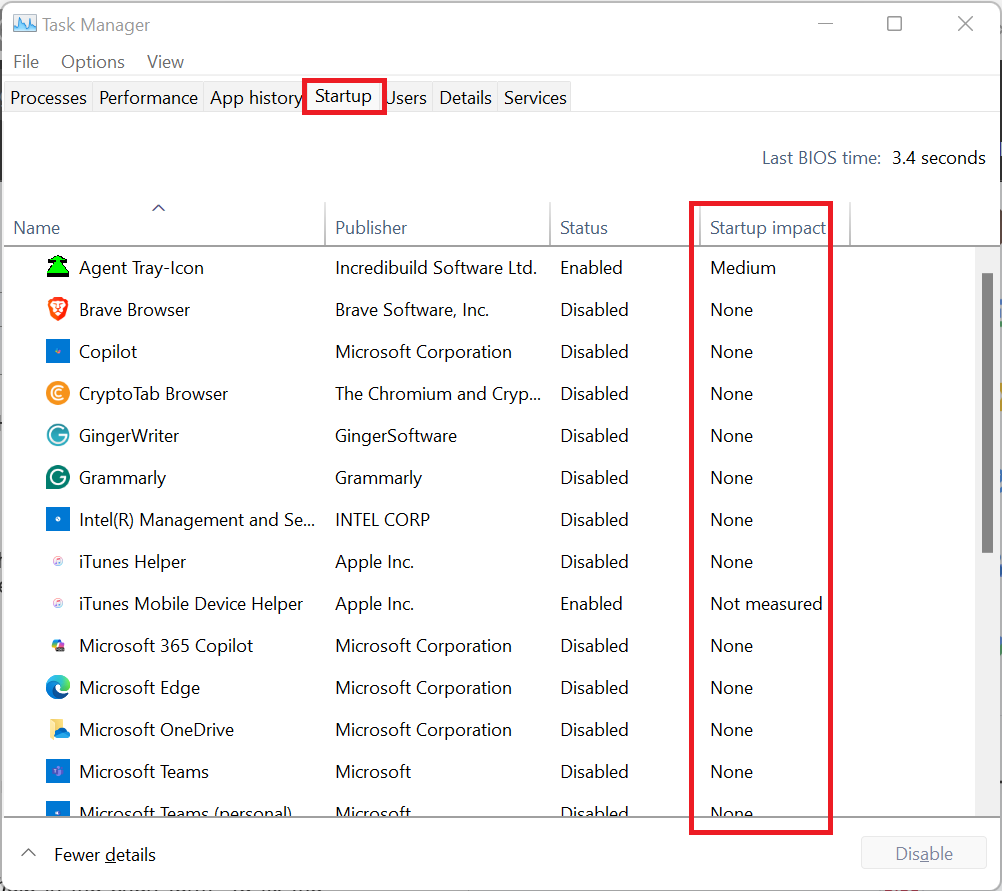
- Right-click on such a program and select Disable. This will prevent the program from running during startup.
After disabling unwanted startup programs, restart your computer to see if there are any improvements in boot time and memory usage.
Method 4: Adjust your computer for best performance
This solution allows you to free up space in the system memory by cutting graphics-related features that make your operating system pop.
It can permanently solve the problem if the aesthetic components that are being disabled are responsible.
Follow these steps for Windows 10 or 11:
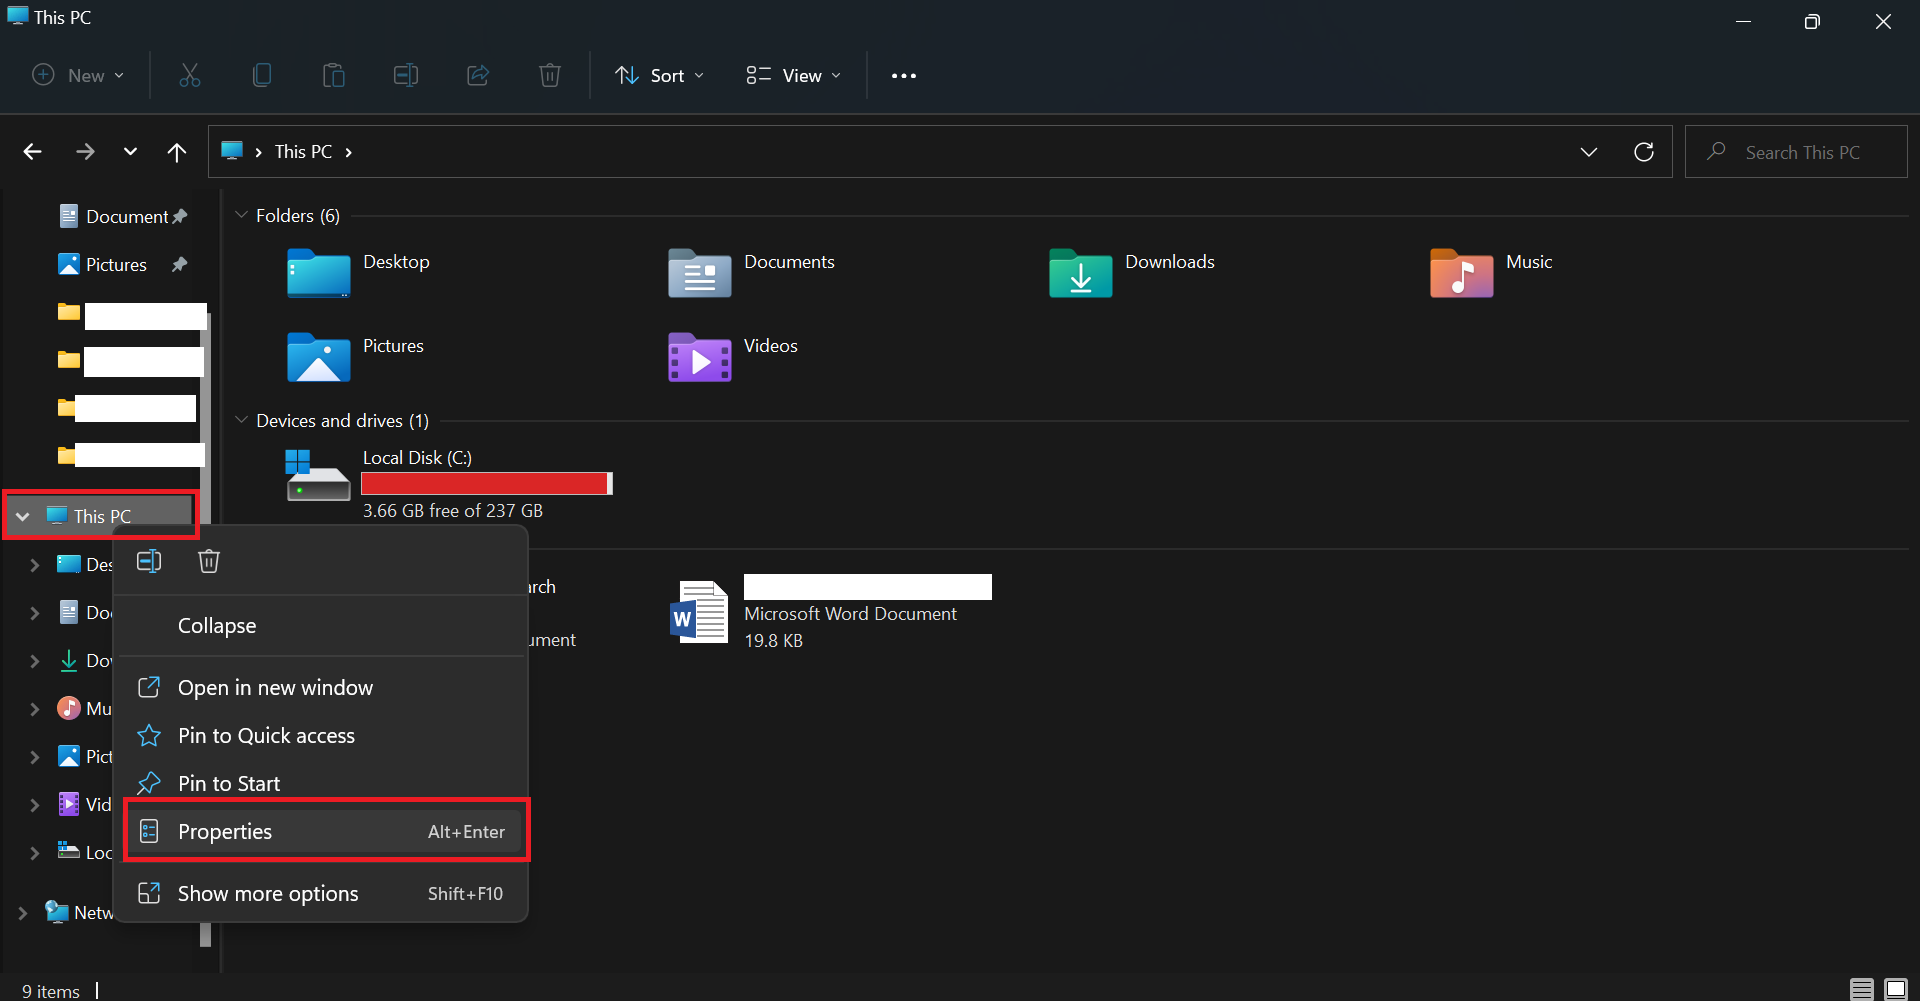
Step 1: Open File Explorer using the Win + E keyboard shortcut.
Step 2: Right-click This PC in the left navigation pane and select Properties.
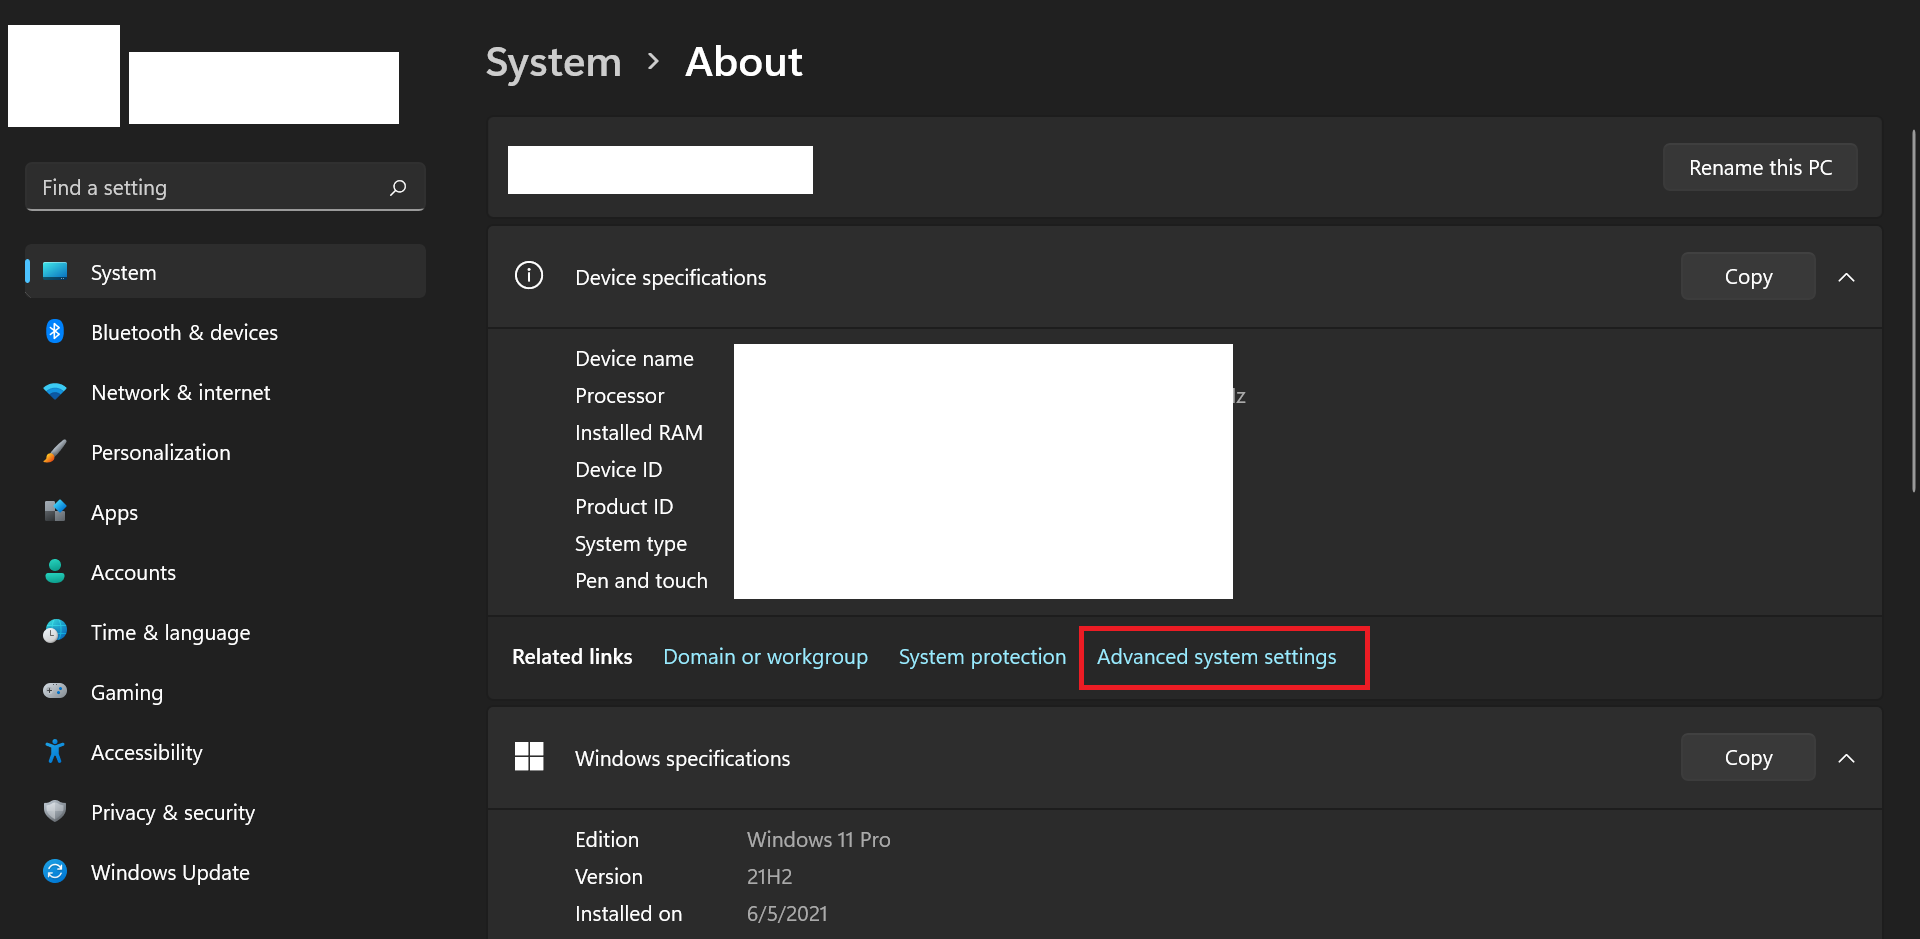
Step 3: In the Properties window, scroll to the Device specifications section and click Advanced system settings.

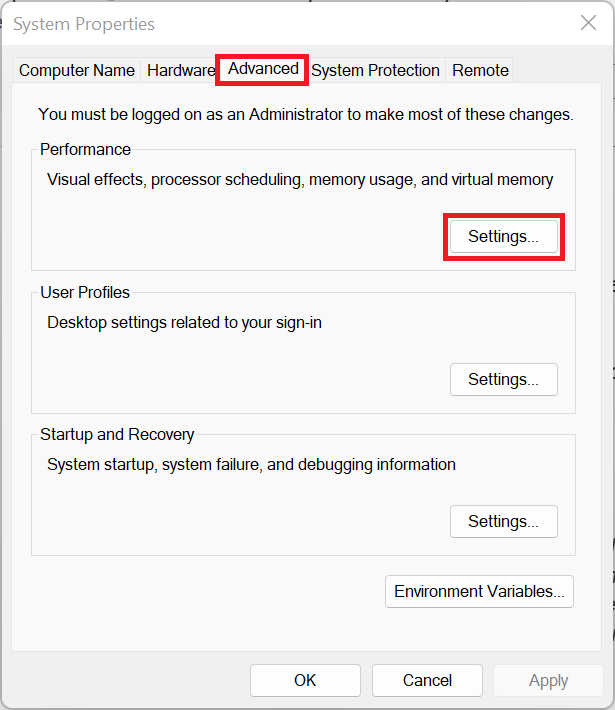
Step 4: In the System Properties window, go to the Advanced tab and click Settings under the Performance section.
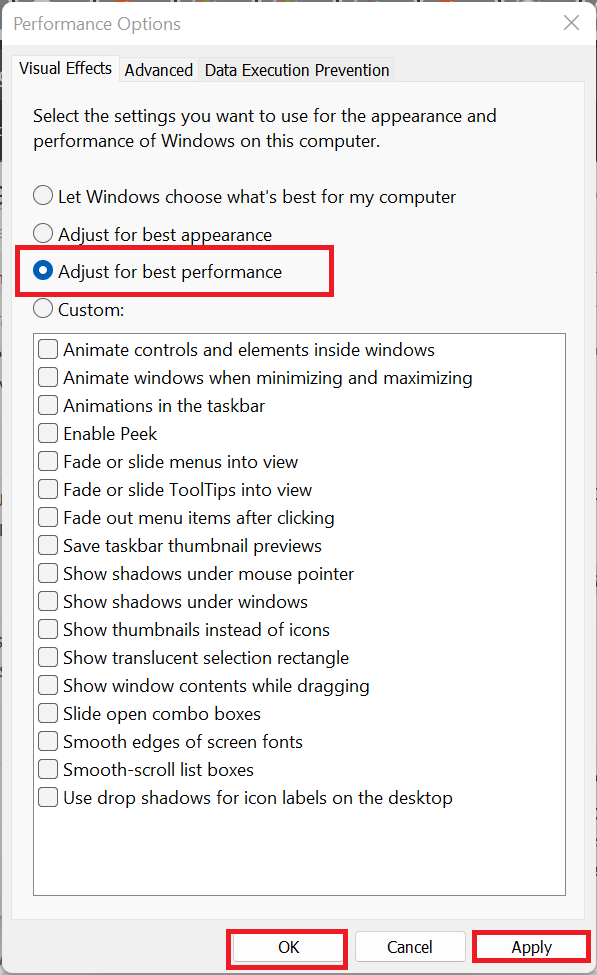
Step 5: In the Performance Options window, go to the Visual Effects tab and select Adjust for best performance. After that, click Apply, then OK to save your changes.
Remember that this method is essentially the same for Windows 10 PCs, with slight differences. But you should be able to go through the steps without any issues.
If readability or usability is affected, you can restore specific visual elements by selecting Custom in the Performance Options window and enabling the features you need.
Method 5: Clear your paging file
Clearing your paging file can resolve memory issues by removing corrupted or outdated data. This allows Windows to create a fresh paging file, which can improve system stability and performance.
Follow these steps on Windows 11 (the steps are similar if you’re using Windows 10, so you should be able to follow the steps regardless):
- Open File Explorer using the
Win + Ekeyboard shortcut. - Right-click This PC in the left navigation pane and select Properties.

- If you’re running Windows 11, click Advanced system settings under Device specifications.
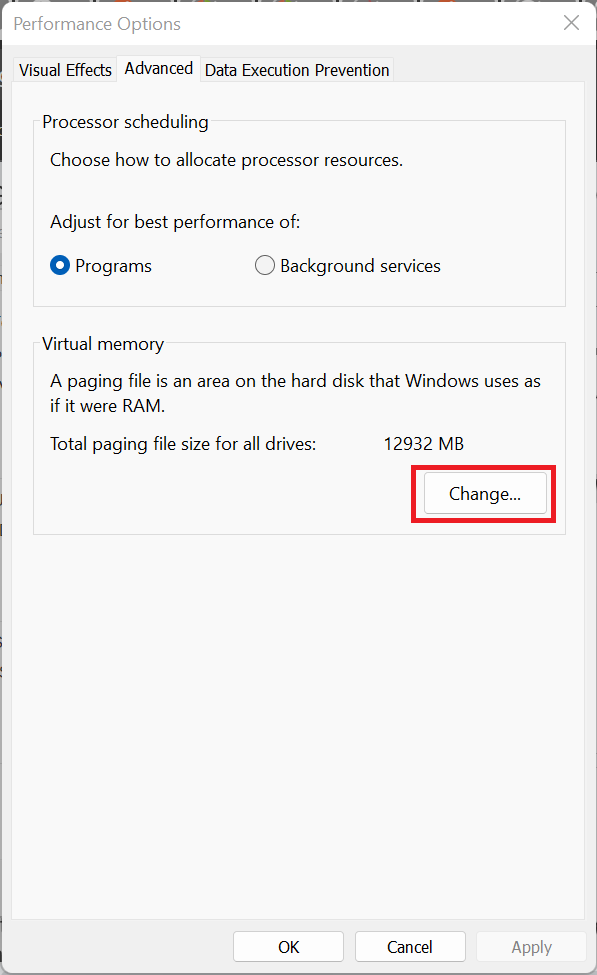
- Go to the Advanced tab and click Change under Virtual memory.
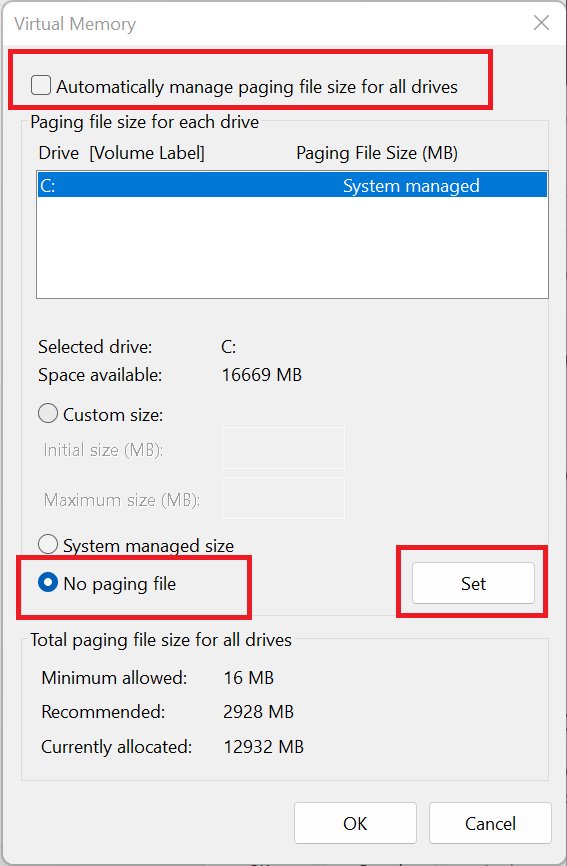
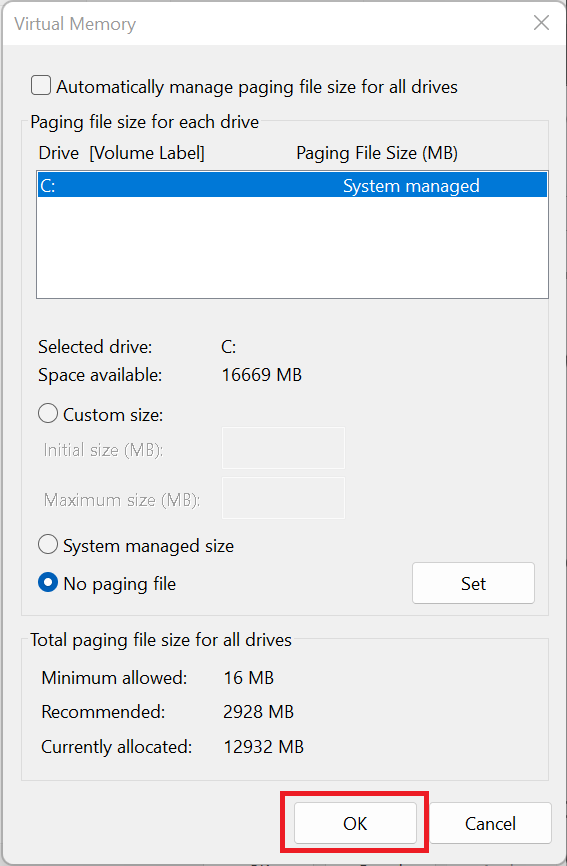
- Uncheck the box next to Automatically manage paging file size for all drives. After that, select the No paging file radio button and click Set.
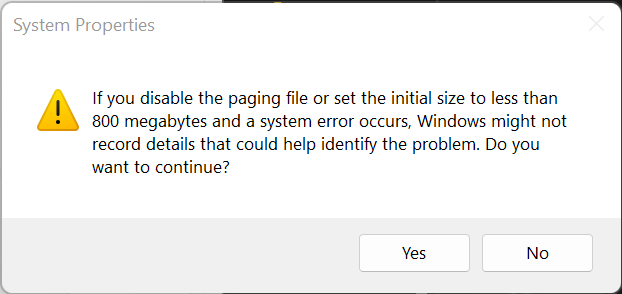
- You will get a warning, click Yes to continue.
- Click OK and restart your computer.
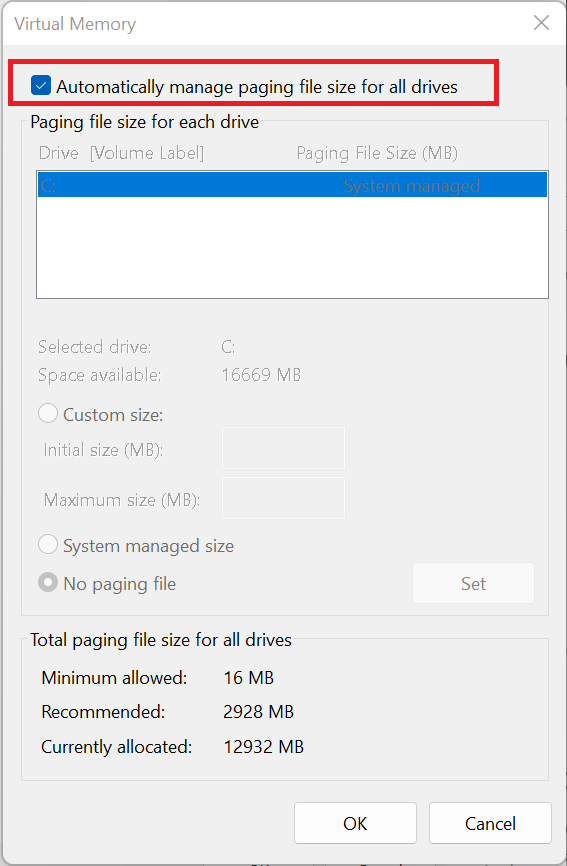
- Now, return to the Virtual Memory dialog and allow Windows to automatically manage the paging file size.
The application is packed with a plethora of system optimization tools that can declutter your computer and boost its performance.
How to Fix Memory Leaks in Specific Applications
The above methods work for general issues on RAM leaks. However, if you are experiencing this with gaming or certain applications, you may need to take specific action tailored to the apps where the problem is coming from.
1. Memory leaks during gaming
Games naturally consume lots of memory, but if you notice your game starts to consume more RAM than usual, it might be suffering from a memory leak. There are many reasons why this might happen, including poor optimization by the developers, outdated drivers, and game settings. To fix the problem, try the following:
- Update the game: If the fault is on the developers’ side, there is a good chance they are already working on it. So, visit the game’s website to check for patches or updates addressing memory issues. Before installing the update, ensure you read the release notes or check online forums to be sure the update addresses the memory issue.
- Update graphics drivers: Next, ensure your GPU drivers are up to date. Depending on your machine type, you can use NVIDIA GeForce Experience or AMD Radeon Software.
- Adjust in-game settings: Adjust in-game settings by lowering graphics quality and disabling overlays, like Discord and Steam.
- Close background apps: The problem might not be with the game itself like you think. Sometimes, it might be background apps that are causing issues. So, use Task Manager to shut down unnecessary processes consuming RAM.
2. Clear cache and manage browser extensions
Browsers like Chrome, Firefox, and Edge also consume a lot of memory if you open lots of tabs at the same time. However, if this memory consumption becomes excessive or continues to rise even after you close those tabs, you might want to check your extensions and cached data:
- Use the browser’s Task Manager: Press
Shift + Escin Chrome to check which tabs or extensions are using the most memory and close them. Also, close any other unnecessary tabs. - Clear browser cache and cookies: Sometimes, temporary internet files like cookies can cause memory leaks. In a new browser tab, press
Ctrl + Shift + Delete. Select Cached images and files and Cookies and other site data, then click Clear data to delete temporary internet files and free up memory. Ensure you do this regularly to avoid junk file buildup and improve browser performance. - Limit extensions: In a new tab, enter about:extensions and disable or remove unnecessary extensions as they can consume memory in the background.
3. Software-specific memory leaks
Certain applications are known for high memory leaks, often due to inefficient memory management. Here’s how to address them:
- Photoshop: Go to Edit > Preferences > Performance, increase scratch disk space, and reduce history states to free up RAM. Also, allocate more RAM under Memory Usage for better performance.
- Discord: Disable hardware acceleration by going to User Settings > Advanced, then toggle Hardware Acceleration off. This prevents Discord from using extra GPU resources, reducing memory usage. If there are servers you don’t use, right-click on them and select Leave Server. Fewer active servers mean fewer background processes, lowering memory usage. You can also open File Explorer, type %AppData%\discord\Cache in the address bar, and delete all files in the folder. This removes stored temporary data that can build up and use extra RAM.
- Antivirus software: Some antivirus programs consume excessive memory due to real-time scanning and background processes. To optimize performance:
- Adjust scanning settings: Open your antivirus software and configure it to scan less frequently or exclude non-essential files and folders.
- Disable unnecessary features: Many security suites offer extra features like VPNs, password managers, and performance optimizers that run in the background. Disable any you don’t need.
- Update or switch software: Outdated antivirus programs may have memory inefficiencies. Ensure you’re using the latest version or consider switching to a lighter alternative.
- Limit background scans: Some antivirus tools perform automatic scans at inconvenient times. Schedule them during idle periods to reduce memory strain.
Memory Leaks: Explained and Resolved
A memory leak is not a sign that your computer is out of memory but rather that memory usage needs optimization. To optimize your system’s memory usage, you need to find the applications that are causing problems and update them. You should also update your drivers and keep Windows up to date.
If these steps don’t fix the issue, the problem could be faulty RAM. In such cases, replacing the RAM might be necessary. For this, you might need to see a certified technician.
What are your thoughts or experiences on this issue? Share in the comments!
FAQ
A memory leak, however, happens when a program keeps using more memory without giving it back. Unlike memory errors, leaks in RAM or virtual memory don’t always crash a program right away, but they can make performance worse over time.