![[FIXED] How to Fix “Reboot and Select Proper Boot Device” Error for Windows 10/11](https://www.auslogics.com/en/articles/wp-content/uploads/2023/03/FIXED-How-to-Fix-Reboot-and-Select-Proper-Boot-Device-Error-for-Windows-1011-568x359.png)
- What Is a Boot Device?
- What Can Cause the “Reboot and Select Proper Boot Device” Error on Windows 10/11 and Earlier Versions
- How to Fix the “Reboot and Select Proper Boot Device” Error on Windows 11/10/8/7/XP
- Fix 1: Check and adjust the boot order and sequence in the BIOS
- Fix 2: Check and reconnect your drive’s cable
- Fix 3: Run the diagnostics to test your hardware
- Fix 4: Update the BIOS or firmware
- Fix 5: Temporarily disable Secure Boot
- Fix 6: Disable Fast Startup
- Fix 7: Repair boot files
- Fix 8: Run Automatic Repair
- Fix 9: Activate the inactive partition
- Fix 10: Reinstall the operating system
- The “Reboot and Select Proper Boot Device” Error: Fixed
- FAQ
Despite what the error message says, deciding to actually reboot and select the proper boot device on a Windows 10/11 PC may not directly resolve the problem.Boot device errors can be the most time-wasting errors that Windows users can encounter.
This is because these errors are triggered by the smallest things, such as corrupted system files or even outdated drivers. But these errors could prevent you from accessing your Windows, as you are stuck on the login page or just before.
Fixing the “Boot device not found” and other similar errors is not a difficult process. With a sufficient grasp of what boot devices are, you can easily resolve the issues associated with them.
But if you follow through with the instructions in this article, 10 times out of 10, you will be able to repair your PC and fix the problem with boot devices.
If your PC stops you with a black screen saying “Reboot and select proper boot device” (sometimes worded “or insert boot media in selected boot device and press a key”).
Fastest proven fixes (start here):
✅ Check the BIOS boot order and set the correct drive first
✅ Reseat or reconnect the drive’s cables (external or internal)
If the error persists, move on to these solutions:
🧰 Run built-in or manufacturer hardware diagnostics
🔄 Update the BIOS/UEFI firmware
🔐 Temporarily disable Secure Boot or ⚡ disable Fast Startup
🩺 Repair boot files (bootrec /fixmbr, /fixboot, /scanos, /rebuildbcd) or 🛠️ run Automatic Repair from Windows installation media
🗂️ Activate an inactive system partition
💿 As a last resort, reinstall Windows
Tip:
Always power off and unplug before opening your PC, and back up data when possible.
What Is a Boot Device?
A boot device is an actual device that contains the information (boot files) that a computer needs before it can launch an OS for your use. With the distinct operational characteristics of this piece of hardware and the software associated with it, boot devices are special.
There is no alternative for them on Windows, Mac, or any other existing OS.
- Hard disk drive (HDD): HDDs are one of the most common boot devices. The operating system is typically installed on the hard drive, allowing the computer to load the OS during startup.
- Solid-state drive (SSD): Increasingly popular as a boot device due to its fast read/write speeds. Operating systems installed on SSDs boot significantly faster than on HDDs.
- CD/DVD drive: Often used in older systems for booting installation media, such as operating system installation disks. Many live CDs or recovery disks use this method for booting.
- USB drive: Commonly used for bootable live environments (e.g., Linux distributions) or for installing operating systems. Can also be used for recovery or diagnostic tools.
- Network boot: Allows computers to boot from an image or operating system stored on a network server, often used in large enterprise environments or for diskless workstations.
With boot files stored on a boot device, your computer can initiate a sequence that enables it to start and run effectively. Each of the cited bootable devices has its own characteristics.
For example, even though HDD and SSD drives fall under the hard drive category, the “Boot device not found” and “Reboot and select proper boot device” errors are more frequently associated with HDDs.
That tells you that one way to permanently fix boot device issues is to swap your HDD for an SSD. But the latter is more expensive and not without its own batch of issues.
Related: SSD vs. HDD: What’s the Difference and What to Choose
Now that you know what boot devices are, let’s find out the possible causes of the error you’ve run into.
What Can Cause the “Reboot and Select Proper Boot Device” Error on Windows 10/11 and Earlier Versions
The error message can show up due to various reasons. Moreover, these reasons may vary from OS to OS. For instance, Secure Boot (disabling which can potentially resolve the error) was implemented by default starting from Windows 8, so it’s less likely to be the culprit if your PC is running an earlier Windows version.
Here’s the list of the most common reasons for the missing bootable drive error:
- Incorrect BIOS settings: The device you want to boot from may not be set as a primary boot device in your BIOS.
- A loose connection or a faulty drive: Your HDD cable may be loose or your boot device may be failing.
- An outdated BIOS: An outdated BIOS version might not support newer hardware configurations.
- Corrupted boot files: The boot files your OS needs to start may be corrupted.
- UEFI and Secure Boot conflicts: Modern systems using UEFI with Secure Boot enabled might encounter this error if the bootloader isn’t properly signed.
- Fast Startup issues: The Fast Startup feature might cause boot conflicts, especially after a power outage or improper shutdown.
- Software corruption: Windows updates or software installations can sometimes lead to corrupted boot records, causing this error.
How to Fix the “Reboot and Select Proper Boot Device” Error on Windows 11/10/8/7/XP
If Windows prompts you to reboot and select a proper boot device or insert boot media in the selected boot device and press a key, sometimes you really just need to perform these actions, and the problem will be fixed. Other times, you need to be a bit more technical.
Fix 1: Check and adjust the boot order and sequence in the BIOS
As long as you fix this boot order in the BIOS and get Windows to recognize bootable devices in the right order, the issues should be fixed. This fix will work for all Windows OS versions. To check and adjust the boot order in the BIOS, follow the subsequent suggestions:
- Restart your computer.
- Keep pressing the function key on your keyboard that enables Windows to initiate the BIOS menu. The correct function key depends on the model of your computer. But the main options are the
F2,F8,F10,F12,Esc, orDeletekeys. - Navigate to the Boot tab.
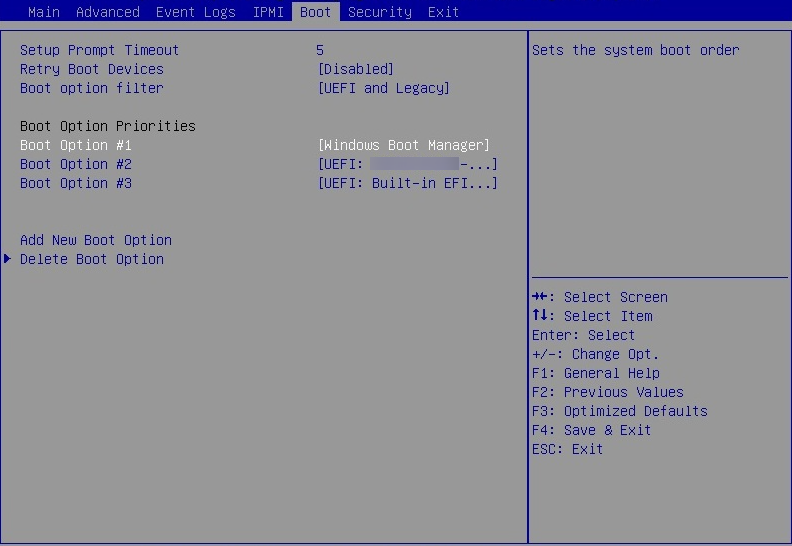
- Adjust the boot order so that the drive with your OS comes first.
- Close the BIOS page after saving the changes (usually by pressing
F10).
After this, your computer would restart, and you should no longer see the error message.
Fix 2: Check and reconnect your drive’s cable
Here are the steps to take:
- Power off your PC.
- If you’re using an external boot device, unplug the cable from the PC and the drive, then plug it back in.
- If you’re trying to boot from the internal drive, you need to open the computer case and physically check if the drive is connected properly and reconnect it if needed.
Power on the PC and check if you’re still getting the “Reboot and select proper boot device” error message.
Fix 3: Run the diagnostics to test your hardware
If the boot problem is the result of hardware issues, having diagnostic tools on hand can help fix it. Different computer brands and models have special tools for analyzing hardware and fixing problems associated with them.
Here’s a quick closer look at the different tools you can use to check your hardware.
| Tool | What it tests | When to use it | How to use it |
|---|---|---|---|
| Windows Memory Diagnostic | Checks the RAM for errors. | If you suspect RAM problems: random crashes, blue screens, or the boot device error appears after a recent RAM change. If you suspect RAM problems: random crashes, blue screens, or the boot device error appears after a recent RAM change. |
|
| MemTest86 | More thorough RAM testing (standalone, can test longer, often from USB). | If Windows Memory Diagnostic indicates a possible memory issue or if you want a deeper RAM test. |
|
| Built-in manufacturer diagnostics | Tests disk (HDD/SSD), motherboard, sometimes power supply, etc. | If the error “Reboot and select proper boot device” persists, especially if the BIOS or diagnostics show the drive isn’t detected. | For many brands (Dell, HP, etc.), you can trigger diagnostics from the boot screen:
|
| Disk health tools (SMART tests, etc.) | Checks whether the disk is failing: bad sectors, degraded performance, etc. | If the boot device is detected sometimes, but the boot is inconsistent or slow, or you hear unusual noises from the HDD. |
|
Fix 4: Update the BIOS or firmware
The BIOS is the software engine that helps you start and run your Windows OS. But it can also become outdated, leaving you with boot issues. If you are certain that your BIOS is outdated, all you would need to do when faced with these messages is update it. Updating it can often solve the problem—but only if you truly need the update.
Here’s how to check and proceed safely.
Find your current BIOS version
- Press
Windows + R, type msinfo32, and pressEnter.
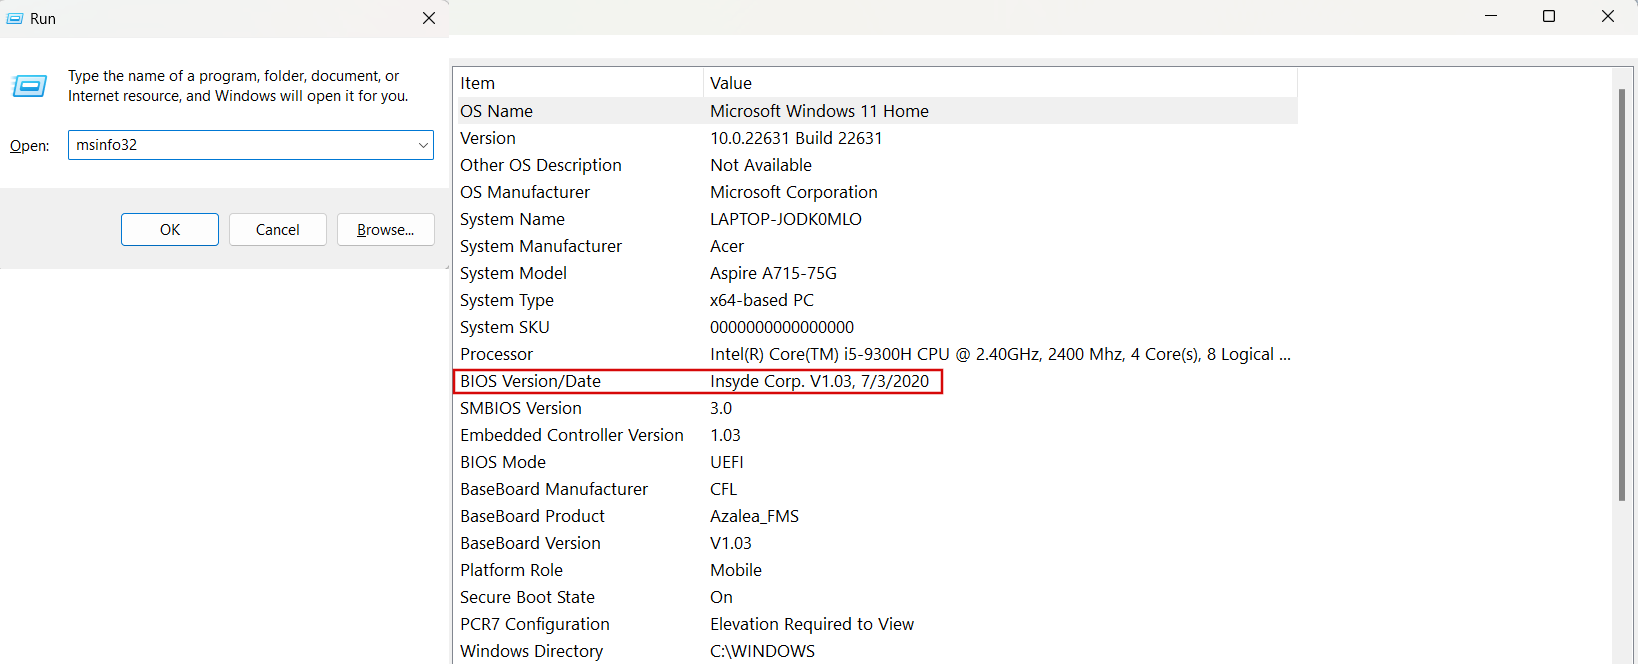
- In the System Information window, look for the field BIOS Version/Date.
- It will look something like Dell Inc. 1.12.3, 4/10/2024.
- If the date is more than a year old and your PC model has newer firmware listed on the manufacturer’s support site, that’s a strong sign an update is available.
- Search for your PC’s make and model plus the word “BIOS” (e.g., Dell XPS 13 BIOS download). If the listed version number is higher than yours, an update exists.
- Manufacturers often list fixes (like “improves system stability” or “resolves boot issues”) that tell you whether the update is relevant.
⚠️ Tip: Don’t update the BIOS just to be current—only when there’s a clear benefit such as fixing boot or stability issues.
If you’ve decided that your BIOS needs an update, here’s how to proceed
First, prepare for a safe update:
- Back up important files to an external drive or cloud storage.
- Plug in your laptop or connect your desktop to a reliable power source (preferably with a UPS) to avoid interruptions.
- Close any open programs.
Next, proceed to the update itself:
- From the support page, download the BIOS update file that exactly matches your model.
- If the download is a Windows executable (.exe), double-click it and follow the on-screen prompts. Your PC will reboot and flash the new BIOS automatically.
- If it’s an ISO or other bootable image, create a bootable USB using the manufacturer’s instructions, restart your PC, and boot from the USB to perform the update.
- After the process completes and Windows loads, open System Information again to ensure the BIOS Version/Date field now shows the latest release.
With the BIOS updated, you should no longer see any boot-related error messages.
Fix 5: Temporarily disable Secure Boot
If the bootloader, for some reason, is not properly signed, disabling Secure Boot can help you bypass the “Reboot and select proper boot device” error on Windows 11, 10, and 8.
Yes, this fix is not for all and will only work for later OS versions.
Here’s how you can disable Secure Boot:
- Restart your computer and enter the BIOS/UEFI settings.
- Navigate to the Boot or Security tab.
- Find the Secure Boot option and set it to Disabled.
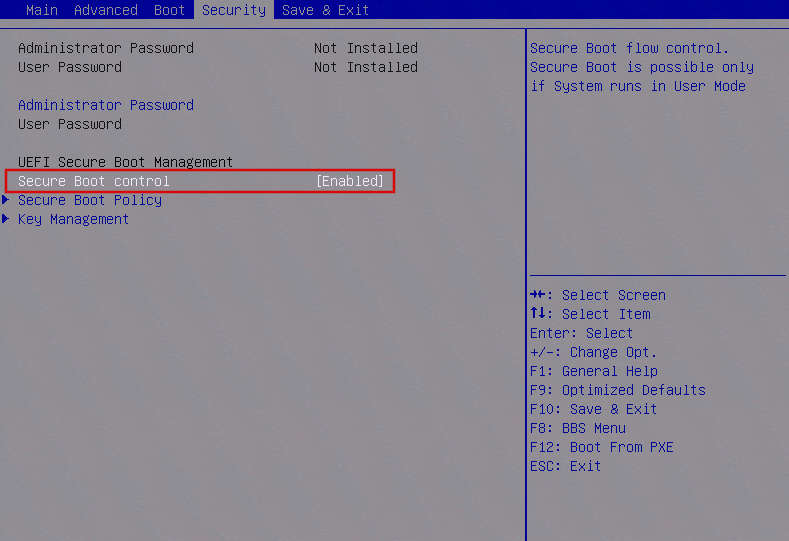
- Save changes and exit the BIOS/UEFI.
Fix 6: Disable Fast Startup
In simple words, the Fast Startup feature allows your PC to load the OS faster by putting it into hibernation mode instead of shutting it down fully. Although Fast Startup is not that common to trigger the missing bootable drive error, it’s still worth a shot.
The feature was first introduced in Windows 8, so the fix will suit those who are running this or an older OS version.
Follow these steps:
- Open Control Panel and go to Power Options.
- Click on Choose what the power button does.
- Click on Change settings that are currently unavailable.
- Scroll down to Shutdown settings and uncheck Turn on fast startup.
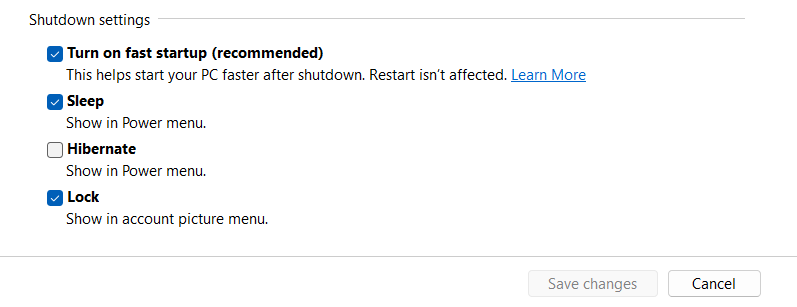
- Click Save changes and restart your computer.
Fix 7: Repair boot files
For this fix, you’ll need a Windows installation media to boot from. But it’s definitely worth a shot since it can not only fix the missing bootable drive error on Windows 10 and 11 but also on Windows XP, 7, and 8 as well.
What you will need
Windows installation media—a USB drive or DVD that contains the Windows setup files and recovery tools.
Where to get it:
- Go to Microsoft’s official download page (or Windows 10/8/7 equivalents).
- Use the Media Creation Tool to create a bootable USB (8 GB or larger) or burn a DVD.
Here’s how to repair boot files:
- Boot from your Windows installation media.
- Choose your language settings, and click Next.
- Click Repair your computer.
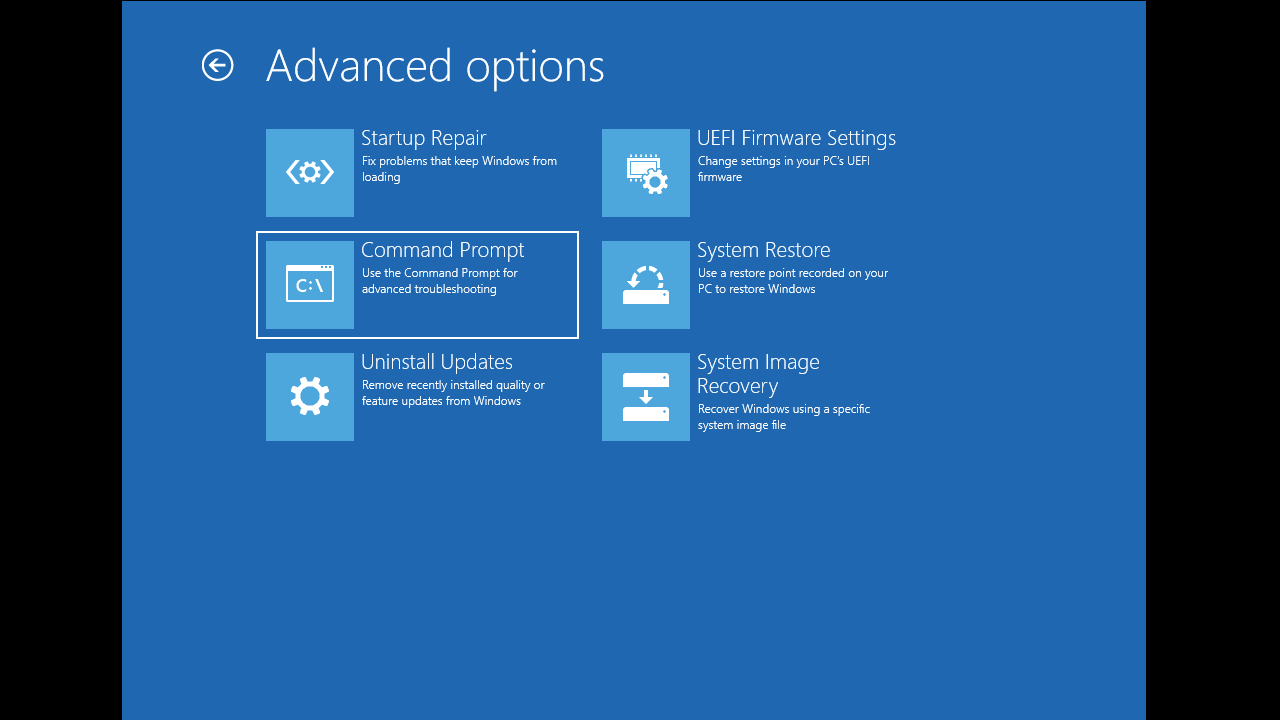
- Select Troubleshoot > Command Prompt.
- Type these commands one by one, pressing
Enterafter each:
bootrec /fixmbr

bootrec /fixboot

bootrec /scanos

bootrec /rebuildbcd
Restart your computer and see if the issue is resolved.
Fix 8: Run Automatic Repair
This fix also requires the installation media, and it’ll help you fix the invalid boot device error on Windows 11, 10, 8, and 7. However, if you’re running Windows XP, don’t worry; it has its own repair tool. To run Automatic Repair:
- Insert your Windows installation media and restart your computer.
- Press any key when prompted to boot from the installation media.
- Select your language preferences and click Next.
- Click on Repair your computer.
- Choose Troubleshoot > Advanced options > Startup Repair.
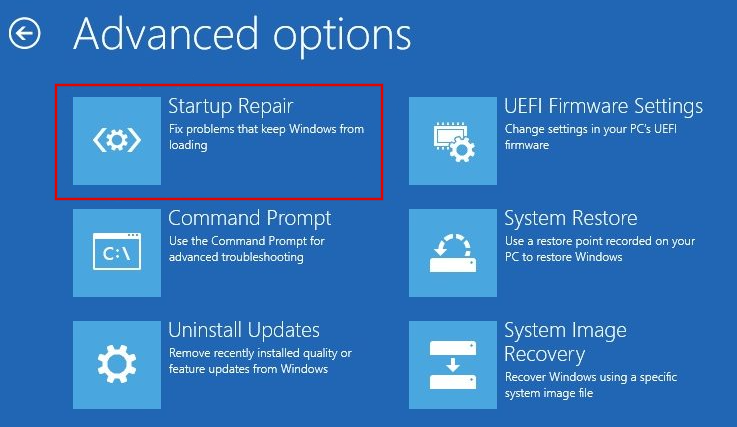
- Select your Windows installation and let the tool attempt to fix the issue.
Also read: Help! What to Do if Automatic Repair Couldn’t Repair Your PC
Fix 9: Activate the inactive partition
An inactive partition might cause the “Reboot and select proper boot device” error because the system cannot find a bootable drive. Follow these steps:
- Boot from Windows installation media and access the Command Prompt.
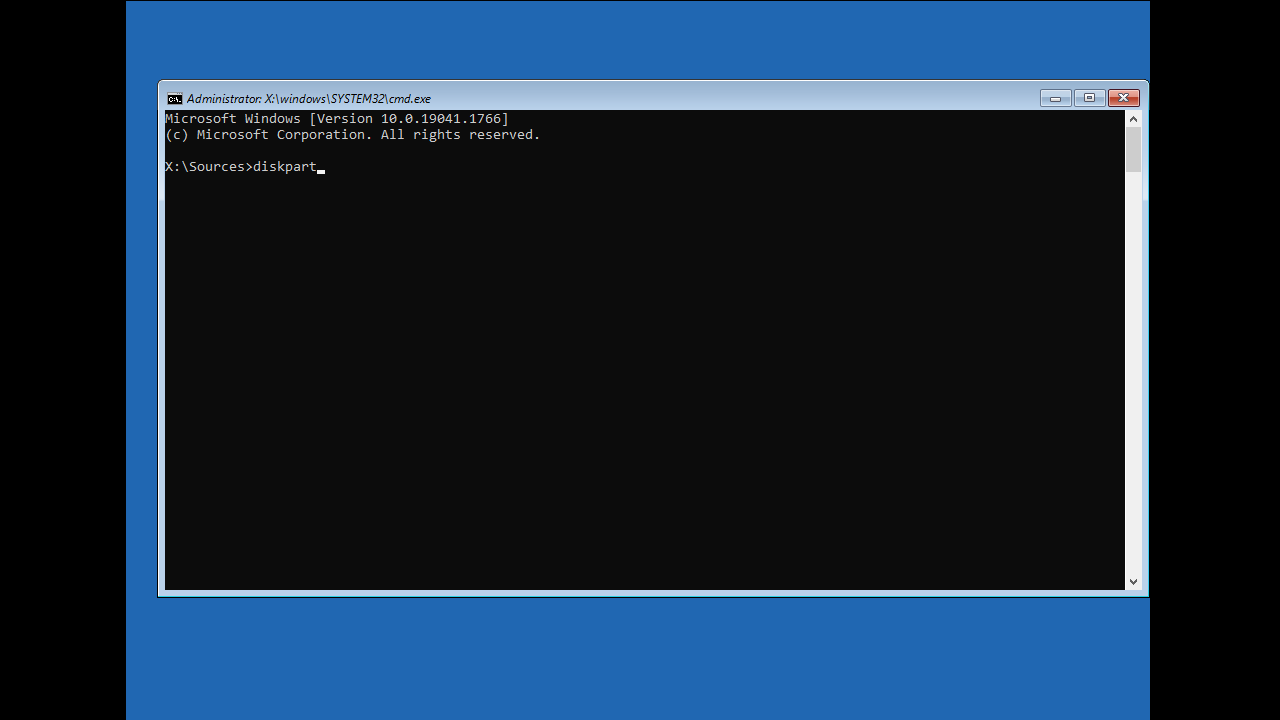
- Type diskpart and press
Enter.
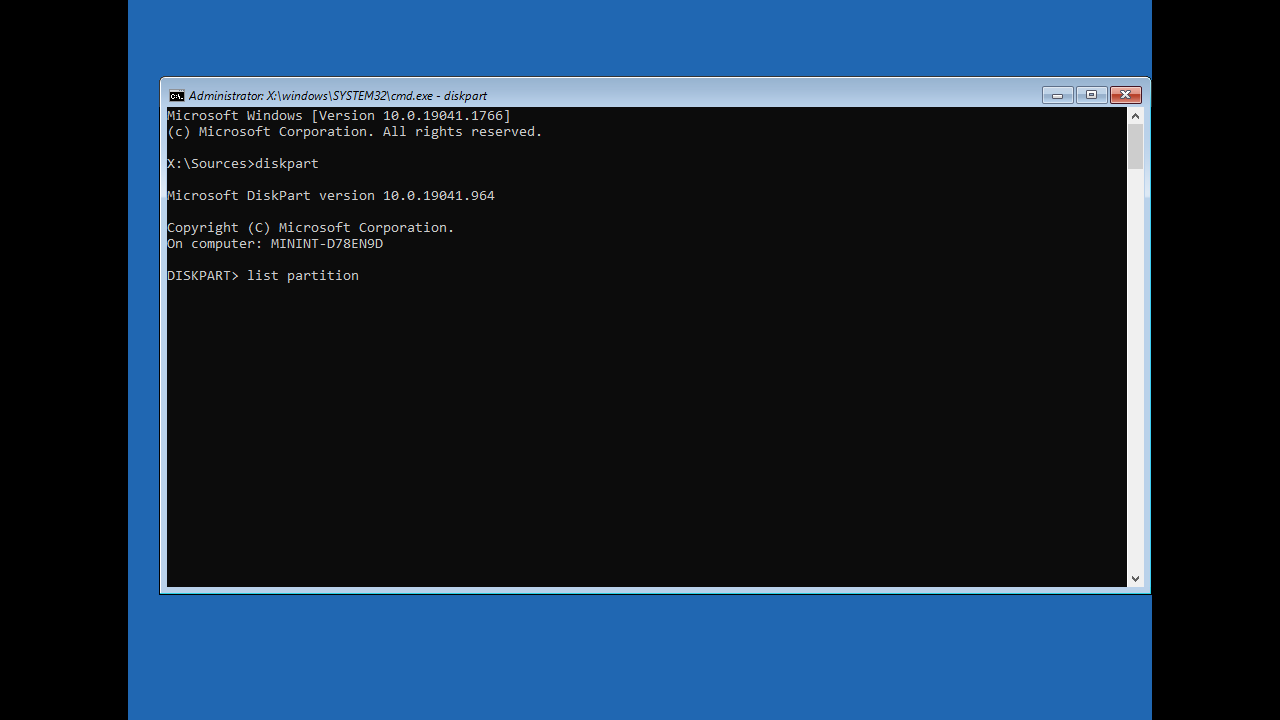
- List all partitions by typing list partition.
- Select the partition you wish to activate by typing select partition X (replace X with the partition number).
- Type active to mark the partition as active.
- Exit the Command Prompt and restart your computer.
Fix 10: Reinstall the operating system
The last thing you can do to fix the error (and most of the others) is to reinstall your Windows OS. You should only do this when repairing or refreshing the OS does not work.
The “Reboot and Select Proper Boot Device” Error: Fixed
As you can see, there are several solutions to the “Reboot and select proper boot device” error. We suggest you start by checking and adjusting your BIOS settings and reconnecting your drive’s cables.
These solutions seem to be the most effective, according to user forums. But if this doesn’t fix the error for you, move on to other solutions.
You can run hardware diagnostics, update your BIOS, temporarily disable Secure Boot, disable Fast Startup, repair corrupted boot files, run Automatic Repair, and activate the inactive system partition.
Finally, if none of these fixes are successful, reinstalling your operating system can be a very effective last resort solution. To prevent these problems from cropping up in the future, make sure to run hardware and software diagnostic tests frequently.
You can also use the Auslogics Essential Tools software pack to keep your computer healthy. Which fix has worked for you? Let us know in the comments!
FAQ
- Boot from Windows installation media and access the Command Prompt.
- Type diskpart and press
Enter. - List all partitions by typing list partition.
- Select the partition you wish to activate by typing select partition X (replace X with the partition number).
- Type active to mark the partition as active.
- Exit the Command Prompt and restart your computer.