
When your computer is booting randomly, freezing, or crashing, it might indicate a memory issue. However, you can use the Windows Memory Diagnostic tool to see if the problem is with the memory rather than changing your computer or memory. If the memory passes the test, you can rule out this being the issue’s root. If it fails, you may need to replace one of your RAM modules. This guide will show you how to run Windows Memory Diagnostic and check its results. Let’s begin.
What is Windows Memory Diagnostic?
The memory diagnostic tool is a program that comes pre-installed with the Windows operating system from Microsoft. Its main objective is to help you find and diagnose problems with your computer’s Random Access Memory (RAM). RAM is a crucial part of a computer that stores data that the Central Processing Unit (CPU) needs to carry out various operations. So, what does Windows Memory Diagnostic do ? Let’s find out:
1. Memory Testing
The tool runs several checks on the RAM in your computer to look for any potential issues or mistakes to get the Windows Memory Diagnostic results. These tests involve reading from and writing to various RAM locations to ensure the RAM operates correctly.
2. Identifying Memory Issues
You’ll get the Windows Memory Diagnostic results after the test if any problems are discovered. These issues could involve faulty memory sectors, data corruption, or other issues with memory.
3. Diagnostic Reports
It gives you a report that includes a summary of the tests’ findings, any memory-related issues, or if Windows Memory Diagnostic detected hardware errors.
4. Options for Advanced Testing
A basic test and an extended test are also available. The shorter basic test usually meets the needs of most users, whereas the extended test conducts a more thorough analysis of your RAM.
When Should You Use Windows Memory Diagnostic?
There are several indications to know when you should perform a memory diagnostic. Let’s go through them:
1. Frequent PC Crashes and Freezes
Frequent system freezes, or crashes are one of the most obvious indicators to use memory diagnostic. These sudden breaks in activity can be a sign of RAM problems.
Your computer may crash, become unresponsive, or even restart without warning when your RAM doesn’t function as it should. Using the diagnostic tool, you can determine whether the problem is with the RAM.
Related:How to Clear RAM and Reduce RAM Usage in Windows 10
2. Application Errors
Applications on your computer that frequently crash or shut down unexpectedly could indicate that you have memory issues. Applications can behave unpredictably, and data corruption can result from faulty RAM.
If your RAM is causing these issues, memory diagnostic can help identify the problem.
3. Blue Screen of Death (BSOD)
The feared Blue Screen of Death (BSOD) clearly indicates that your computer is malfunctioning. Memory problems can occasionally be the root of BSOD faults. You can use the Windows Memory Diagnostic results to check whether your RAM is the cause.
Related: Windows Stop Code: How to Check Causes of Windows BSOD?
4. Slow Performance
Memory issues may also cause a slowdown in your computer’s general performance, such as prolonged application loading times or slow response. RAM issues can cause ineffective data handling, which slows down your computer.
The diagnostic program can show you if your RAM isn’t operating at peak efficiency.
Related: Why Is My Computer So Slow? – Improve Computer Performance
5. After Hardware Upgrades
It’s a good idea to run a memory diagnostic if you just updated or installed new RAM modules on your computer. Memory-related issues can result from incompatible RAM modules or improper installation.
After a hardware upgrade, you can run the utility to help you ensure your new RAM operates properly.
Also Read: Why Is My Computer Glitching?
6. Routine Maintenance
The long-term health of your computer depends on routine maintenance. Even if you haven’t noticed any problems, you may run Windows Memory Diagnostic as part of this routine.
This approach might help you spot and address any memory issues before they become more serious problems.
Running Windows Memory Diagnostic
Here’s how to run a memory diagnostic:
Method 1: Using the Windows Interface
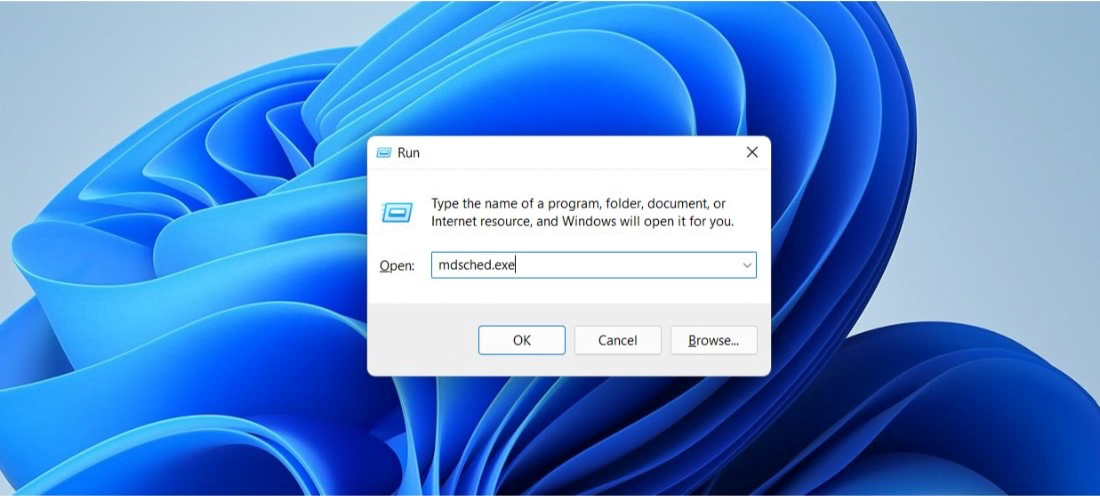
- Press the
Windows log + Rto open the Run dialog box - Enter
mdsched.exein the search field to launch the Windows Memory Diagnostic tool.
![]()
You now have two options for running the utility when your PC boots up. The first option is to restart your computer right away. The diagnostic will automatically run when the PC starts again. Alternatively, you can schedule the utility to launch when your PC restarts.
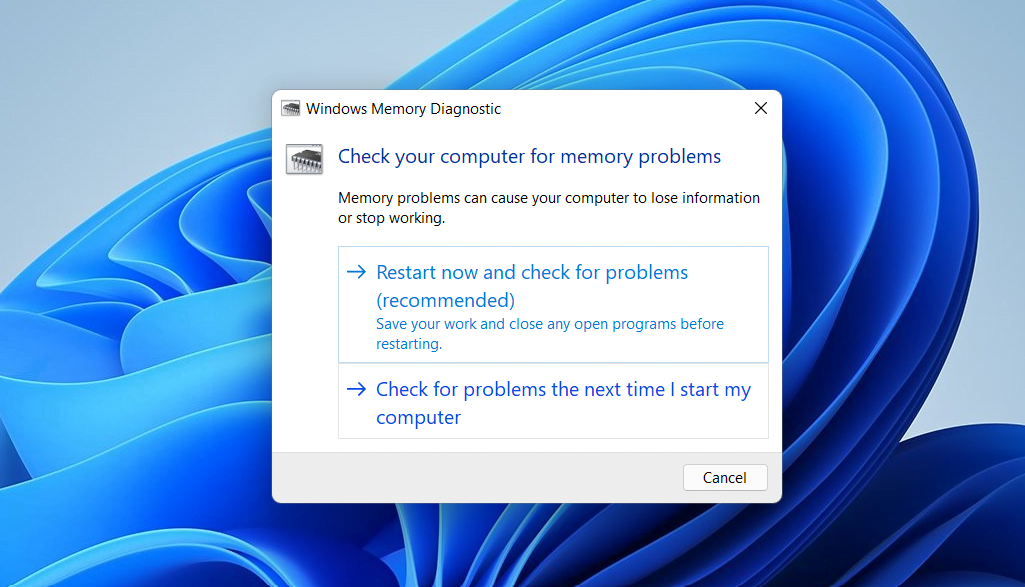
When your computer restarts, the tool checks your memory immediately for any potential problems. The memory diagnostic tool launches by default in Standard mode, which includes eight consecutive memory tests.
Each of these tests uses a unique algorithm to look for different faults. The Standard tests can run until finished when Windows restarts.

You also have the option to use the F1 key at any time while the test is running. By doing this, you’ll be redirected to a different screen where you can choose the precise type of scan you want. The utility offers the Basic, Standard, and Extended scan options.
You can configure the Pass Count, which indicates how many times each test will be run. Two is the default value, which is usually sufficient for seeing any possible problems. Simply hit the F10 key to apply your options and begin the test after choosing your preferred option.
Method 2: Running from the Command Prompt
Running the memory diagnostic from the command prompt is easy. Here’s how to run Windows Memory Diagnostic from command prompt :
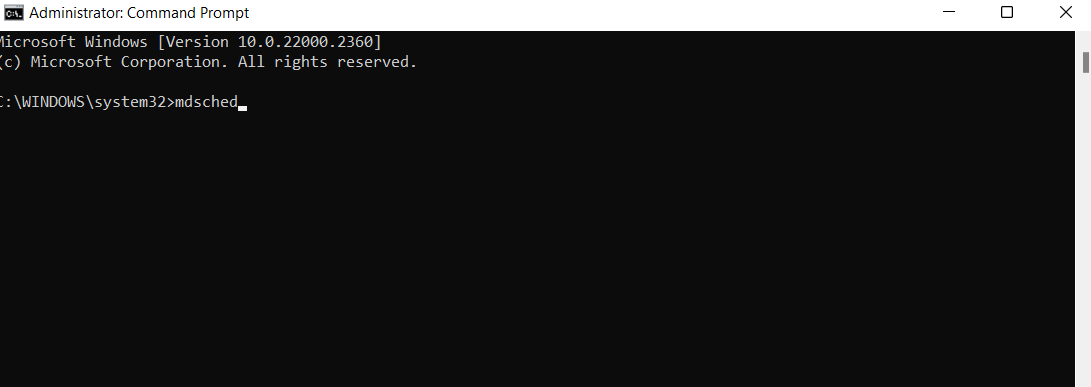
- Type
command promptin the search bar, right-click, and select Run as administrator.
![]()
- Type
mdschedand pressEnter.
![]()
- Click the Restart now and check for problems(recommended) option from the pop-up window.
![]()

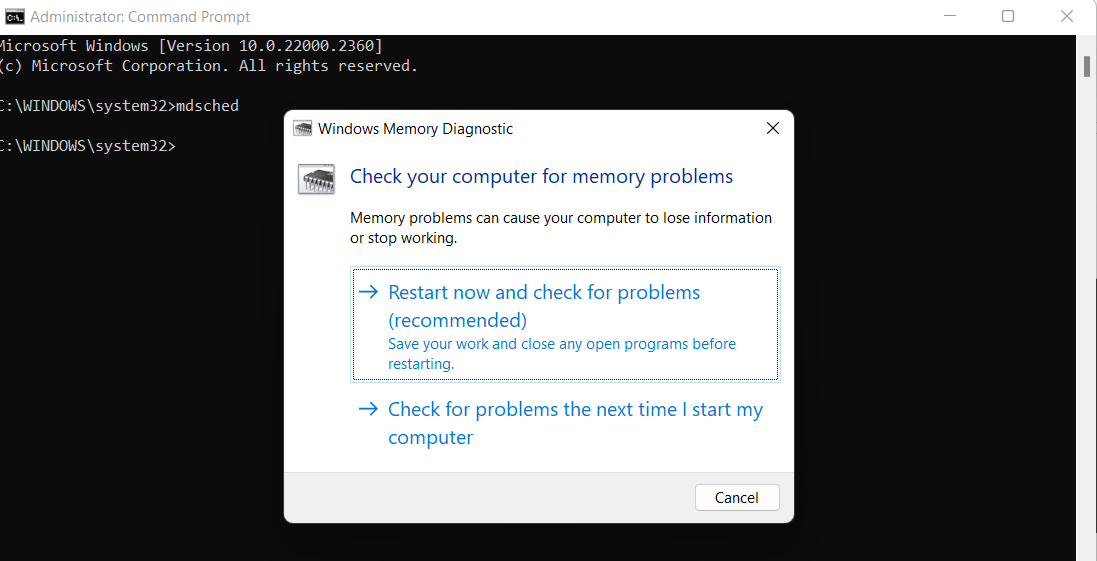
Your computer will launch the memory diagnostic tool after restarting. This utility will start scanning the memory of your computer right away, and it’ll let you know if it finds any issues. After the test, your computer will immediately reboot and return to the Windows desktop.
Related: Windows Command Prompt: Most Useful Commands
Where to Find Windows Memory Diagnostic Results
Here’s how to see results of Windows Memory Diagnostic :
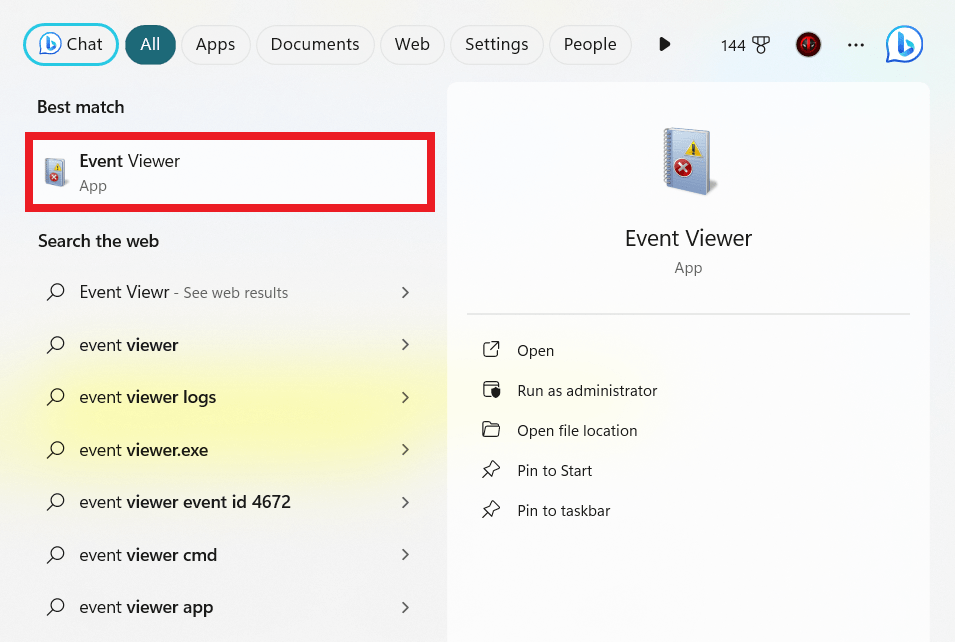
- Type
Event Viewerin the search bar and click to open.
![]()
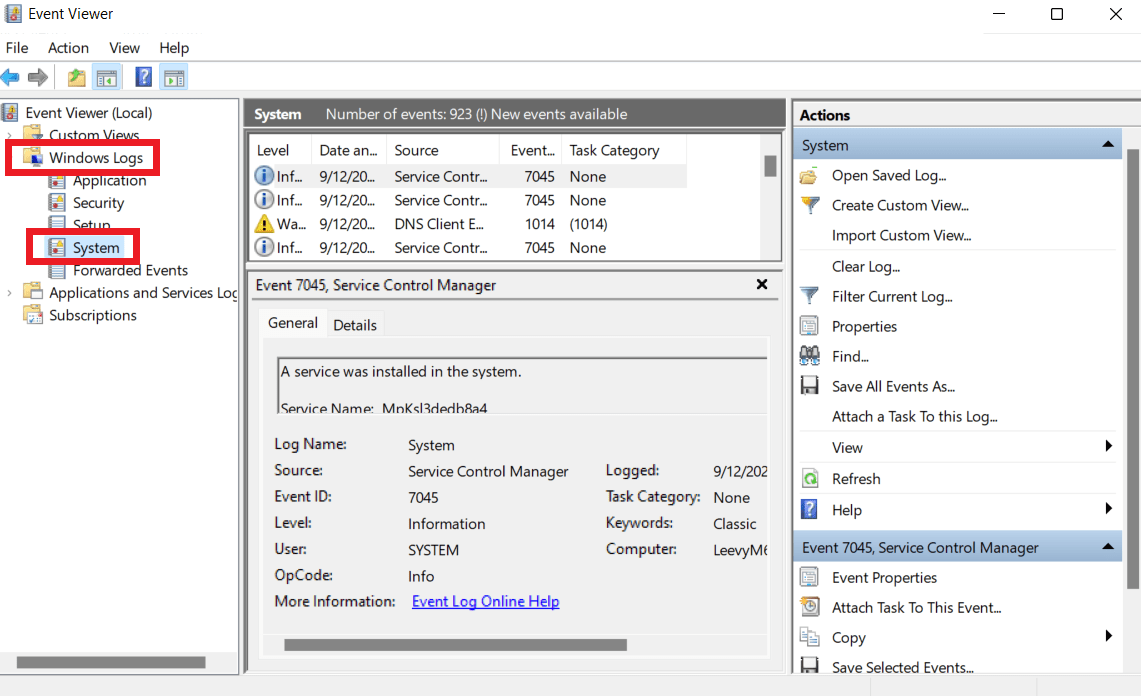
- Expand Windows Logs and select System in the left panel.
![]()
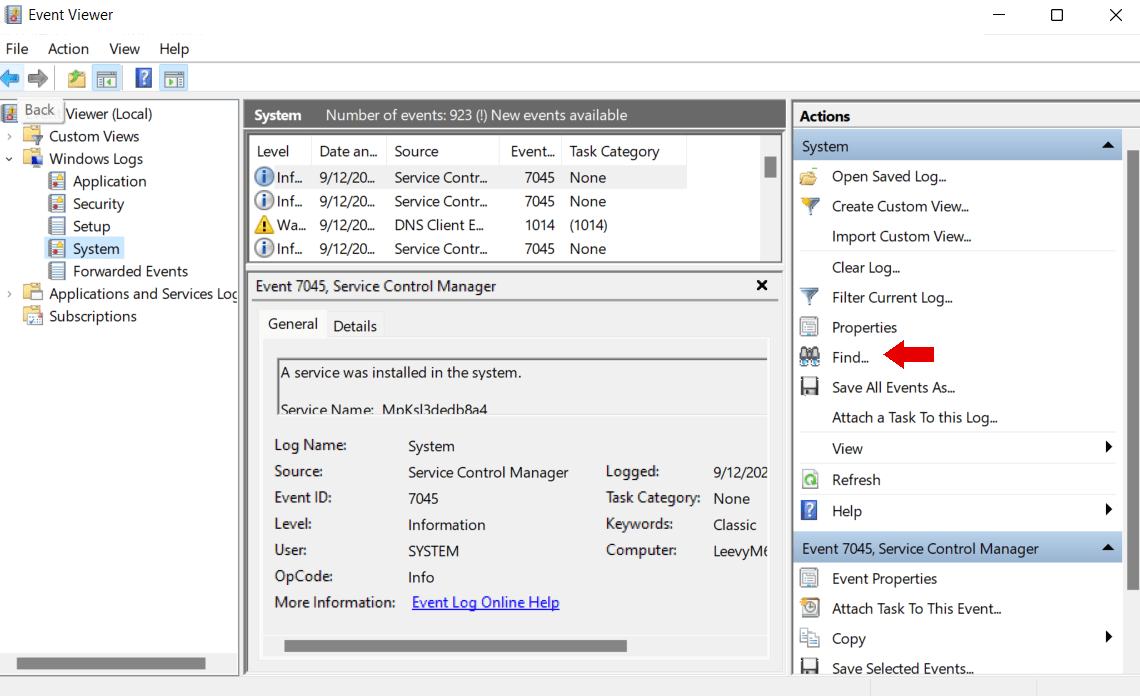
- Click the Find button on the right-side panel. Alternatively, press
Ctrl + Fto open the Find tool.
![]()
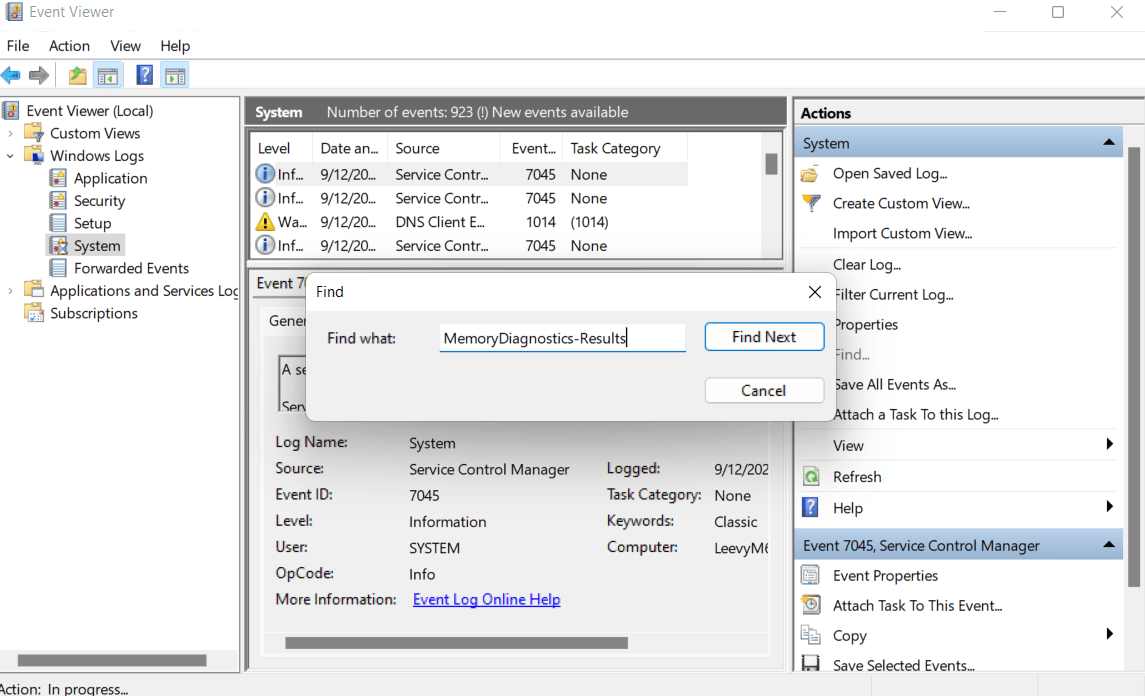
- Type
MemoryDiagnostics-Resultsin the Find what field, and click Find Next.
![]()
- Close the Find window. You’ll see the first highlighted entry in the middle column. Double-click on it.
You can learn more about the tests from the scan results. You can rule out memory as the problem’s source if you receive a message, ”
The Windows Memory Diagnostic tested the computer’s memory and detected no errors.”
How to Check Windows Memory Diagnostic Results: Interpreting the Results
After the Windows Memory Diagnostic results , you’ll receive one of two messages: no errors detected or hardware errors detected. Let’s go through each of them:
No Errors Detected
A clean report from memory diagnostic shows that the issues you’ve been having are not most likely caused by your RAM. So you can focus on other areas causing the problem. Here’s what you should do:
1. Update Your Software
Even though memory problems might not be the main cause, updating your software is crucial. Check to see if the most recent versions of your operating system, drivers, and apps are installed.
Also, check for Windows updates. Outdated software can cause incompatibility issues and instability. You can use Auslogics Driver Updater to automatically check and install updates with just one click.
This software installs the manufacturer-recommended drivers, ensuring it’s always compatible with your devices.
Learn more here: Auslogics Driver Updater: New Drivers in One Click!
2. Check the HardwareIt’s a good idea to check other hardware parts if your computer still has problems. For example, system instability can result from overheating. Verify that the cooling system on your computer is operating correctly and that there isn’t excessive dust accumulation.
Related: Enjoy a Dust-Free PC: Expert Tips on How to Clean a Computer
3. Scan for MalwareMalicious software occasionally imitates the signs of memory issues. Run a complete malware scan with reliable anti-malware software like Auslogics Anti-Malware to ensure your system is malware-free.
Related: How to Remove Virus and Other Malware from Windows
Hardware Errors Detected
If there’s a problem after the memory diagnostic test, you’ll get one of two error messages: “Hardware problems were found” or “Physical Address Limit Exceeded.”
These error messages warn that one or more memory modules in your computer may be defective. Here are some troubleshooting methods you can use if you run into these error messages to fix the problem:
1. Don’t Overclock the System
The error message could appear if you overclocked your Graphics Processing Unit (GPU), CPU, or RAM to the limit. Think about turning off overclocking and returning your BIOS/UEFI settings to the default settings.
2. Re-insert Memory Modules
Memory modules may not be inserted correctly in their slots. Open the computer’s case, turn off the power, and unplug it. Ensure all memory sticks are completely seated by carefully removing and replacing the RAM modules in their slots.
3. Test Each Module Separately
If you have more than one memory module, check each one separately. Run the diagnostic tool, remove all but one, and record the outcomes.
For every RAM module, repeat this process. This method can help identify which RAM module is responsible for the faults experienced.
Conclusion
Memory issues can be annoying, but the Windows Memory Diagnostic tool provides a helpful solution. You can go through this guide and use the methods discussed to run the tool properly.
You can troubleshoot and fix memory-related issues by being aware of its capabilities and how to interpret its findings. This can help your computer to run more smoothly.
You’ll be well-equipped to handle any memory difficulties you run across, ultimately improving your PC performance.
FAQ
If the issue still exists, use an alternative memory diagnostic program or contact a professional because it can point to more severe hardware problems.
Consider regularly running the diagnostic on your computer as part of routine maintenance, possibly once every few months, if used for necessary tasks or work.