![[SOLVED] Hardware Problems Detected by Windows Memory Diagnostic Tool](https://www.auslogics.com/en/articles/wp-content/uploads/2023/09/shutterstock_1928496218-568x359.jpg)
Users generally run the Windows Memory Diagnostic tool when they suspect system memory failures.
The computer can also advise PC owners to run the utility when it experiences issues with the RAM. If you run the tool and see the “ Hardware problems were detected …” error, there’s a chance you have a malfunctioning Random Access Memory.
That said, the issue may be related to other system components affecting the RAM. This article covers the Windows Memory Diagnostic tool’s “Hardware problems were detected” status report and how to resolve the problem.
Also read: How to Check How Much RAM You Have on Windows 10 PC and MAC
What Are the Signs of Memory Problems?
Your RAM feeds your CPU tasks from the operating system and third-party applications. For example, your web browser loads most web pages you view onto the RAM.
You will notice different glitches and PC malfunctions when your RAM starts failing. These problems serve as warning signs to take a close look at the piece of hardware and run a Windows memory check.
But, as mentioned earlier, other PC hardware and software issues can also affect your system memory.
Let’s go through the signs one after the other.
Slow and Unresponsive Performance
A noticeable slowdown in your computer’s overall performance, even during routine tasks, will become too regular. System services may struggle to function, respond sluggishly, or freeze. That’s because the RAM is not adequately providing the CPU with the required threads to process data.
Application Errors and Unusual Behavior
Software applications may fail to respond , freeze, display error messages, and exhibit other erratic behavior. These issues often occur when the RAM fails to accept data from these programs or feed them to the CPU.
Unexpected and Frequent Crashes
RAM issues can trigger sudden crashes and reboots, often starting with Blue Screen of Death (BSOD) errors.
Also read: Windows Stop Code: How to Check Causes of Windows BSOD
Startup Failure
In some situations, your computer may fail to start or end its boot sequence with a blue screen. You may be redirected to the Windows Recovery Environment, only to be faced with another startup failure.
Also read: How to Speed Up Windows 10 Startup and Make Your PC Boot Faster
System Beep Codes
On some computers, a series of beep codes during startup can indicate RAM and other hardware problems. You can check your computer’s documentation or manufacturer support page for the specific meaning of these beep codes.
For example, in some Dell Inspiron models, the battery LED can indicate RAM hardware failure by flashing different color sequences. These codes can show you how to fix hardware issues like Windows Memory Diagnostic errors.
Inconsistent or Incorrect Data
Data corruption or incorrect calculations within files or applications can occur when the system memory is not functioning correctly. This might lead to documents, images, or videos displaying unusual content or failing to open. The issue may result in the Windows File Explorer failing to respond.
Running the Windows Memory Diagnostic Tool
You can use the Windows Memory Diagnostic Tool to check the health of your PC’s RAM. As mentioned earlier, the computer may suggest running the RAM diagnostic if it encounters too many problems with the system memory.
You may see the “Hardware problems were detected” error message after running the tool. If that happens, don’t panic. We’ll show you all the steps to take later on to confirm whether your RAM module is really the problem.
We’ll also show you how to fix other issues that may be triggering the error report.
How to Interpret Windows Memory Diagnostic Report
The “Hardware problems were detected” message is one of the possible reports you’ll get from the Windows Memory Diagnostic tool. The utility usually displays its results after it runs a check on your system memory before your PC completely boots up. You can also go through the event viewer to view a log with details of the diagnostics.
Also read: All You Need to Know: How to Check Windows Memory Diagnostic Results
How to Fix the “Windows Memory Diagnostic Detected Hardware Errors” Issue
If you’re sure that you don’t have defective RAM sticks, then there are steps you can take to make the error go away.
1. Start Your PC in Safe Mode
Windows loads minimal drivers and applications when it starts your computer in Safe Mode. This way, you can confirm whether other applications, drivers, and services are causing the error.
You can launch your computer in Safe Mode through the System Configuration window. Follow these steps:
- Start the Run dialog window by tapping the
Windows and Rkeys together. - Type
msconfigin the text box and hitEnter.
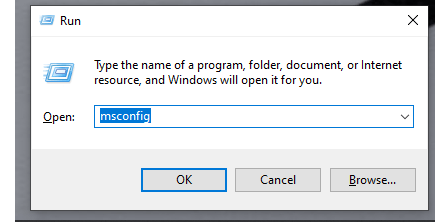
- Go to the System Configuration’s Boot tab and select Safe Boot.
- Choose Minimal and click OK.
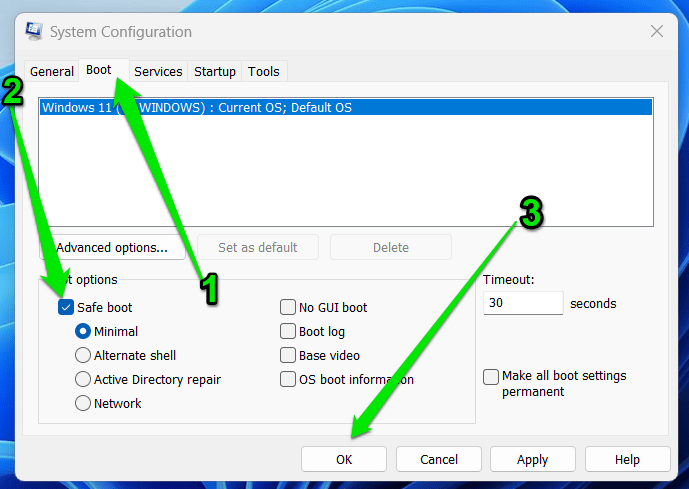
- Allow Windows to restart your computer.
You can also launch your system in Safe Mode through the Windows Recovery Environment:
- Turn off your computer.
- After turning it on, turn it back off immediately Windows starts to boot. Repeat this action twice.
- Allow Windows to open the automatic repair interface on your next boot.
- Now, select Troubleshoot, click Advanced Options, and click Startup Settings.
- Choose the Safe Mode option.
After your PC boots in Safe Mode, confirm whether the problem continues. You can try other troubleshooting methods if you do not notice any issue with your RAM.
2. Stop Overclocking Your PC
Manually overclocking your CPU or GPU is risky. While it can result in faster FPS and general performance, it is generally not recommended.
Also read: Winning Strategies: How to Optimize Your PC for High-Performance Gaming
Whenever you unnaturally increase the clock speeds of your CPU or GPU, you’re putting them and other components at risk. That’s because the faster they run, the hotter your PC gets, and heat is bad for your RAM and other pieces of hardware. So, if you’re using third-party applications or your BIOS to overclock your computer, that could explain the error. Try reverting your changes and allow your PC to run at normal speeds.
3. Run the Hardware and Devices Troubleshooter
The Hardware and Device Troubleshooter is a holdover from previous Windows versions designed to check for hardware-related problems and attempt to fix them. While it isn’t available through Settings in the latest Windows versions, you can still run it through the Run dialog window.
Follow these steps:
- Tap the
Windows and Rkeyboard buttons simultaneously. - Enter the following text into the Run box and hit
Enteror click OK:
msdt.exe -id DeviceDiagnostic
- The utility will now appear.
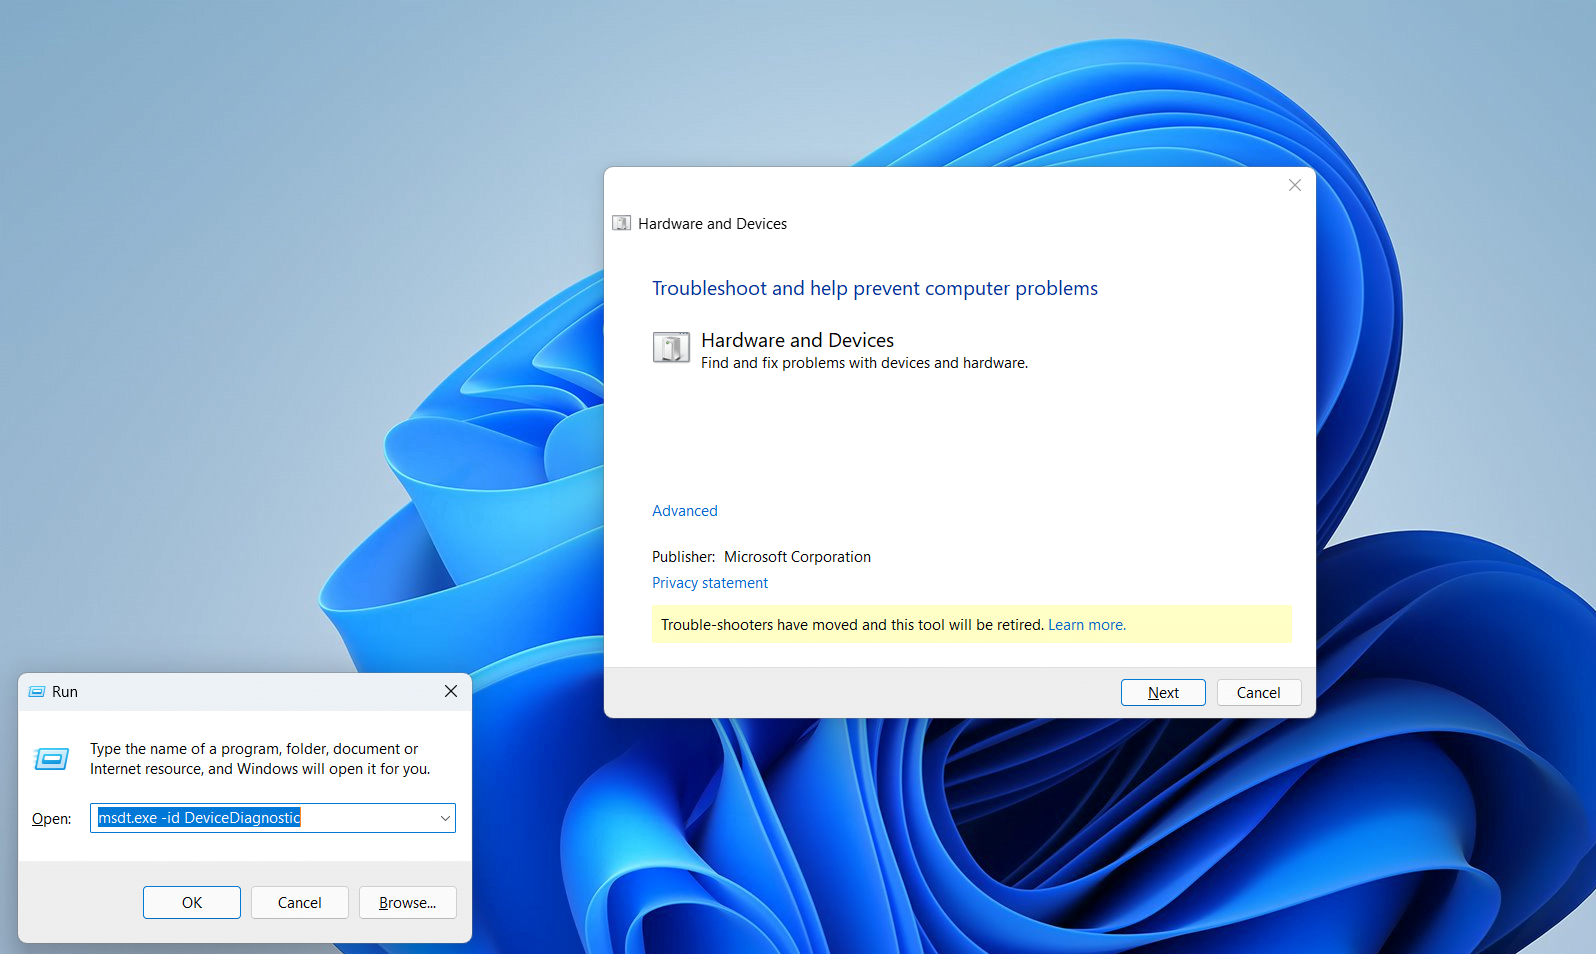
- Click Advanced and choose whether you want to apply repairs automatically.
- It will start scanning for problems after you click Next.
- The tool will propose an action if it finds any issue.
4. Perform a System Restore
There is a chance some recent changes are triggering the Windows Memory Diagnostic tool to flag a hardware problem.
You can return your computer to a previous state to confirm that OS changes are responsible for the issue.
A system restore changes different settings to what was available at whichever date you choose. It removes installed applications, updates, and drivers. It also changes system settings and restores the system registry.
You can follow this guide to restore your Windows PC.
Related: [FIXED] System Restore Not Working in Windows 10
5. Update Windows
If your PC is outdated, you may be experiencing performance problems that may lead to the error. Consider updating Windows and check if that will resolve the problem.
Type update in the Start menu and select the Check for Updates result.
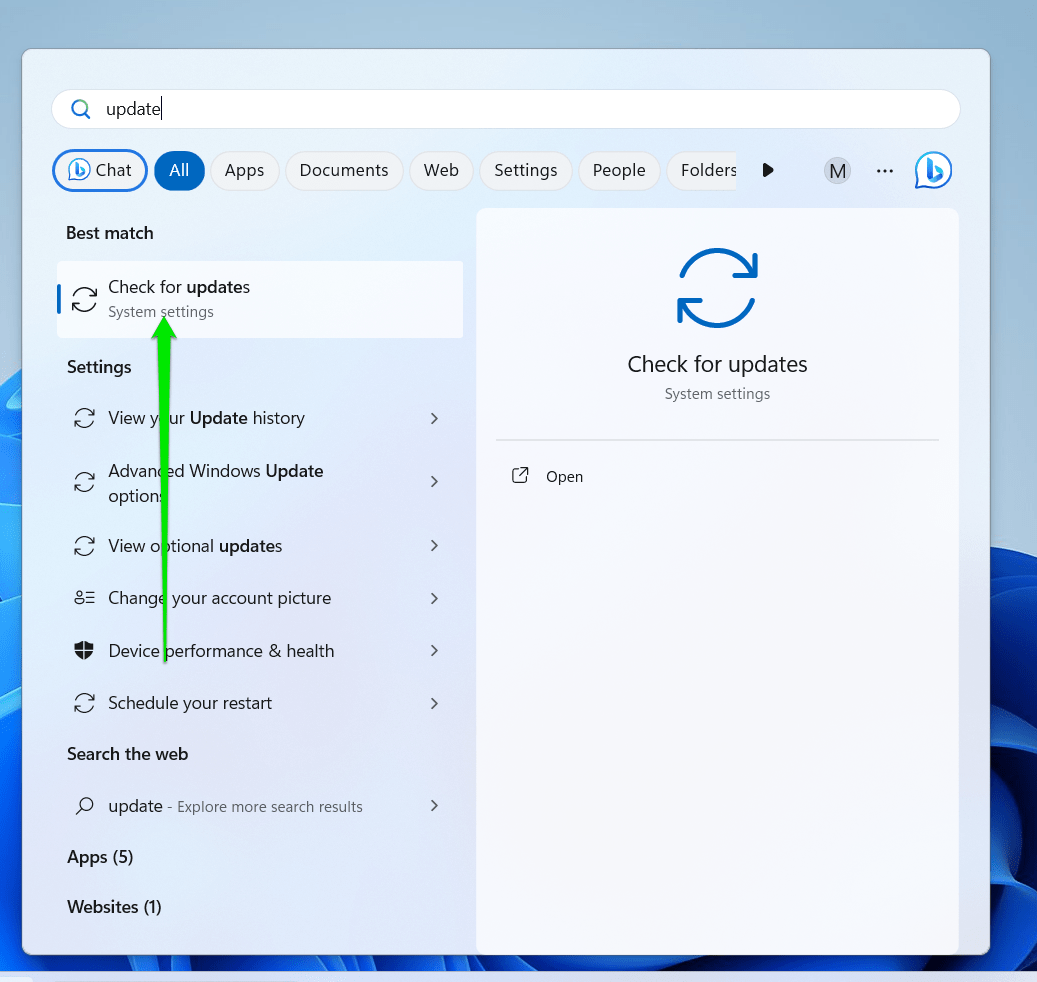
Allow Windows to download the updates and restart your computer to reinstall them.
Related: Ultimate Guide: How to Manually Check and Install Windows Updates
6. Update Device Drivers
Device drivers are another reason you may be experiencing the “Hardware problems were detected” issue.
When drivers are corrupt, out of date, or missing, there’s a communication breakdown between different components. Your operating system will fail to get the correct response from different devices, resulting in errors.
So, update all your device drivers before opening up your computer.
Instead, it's better to use a utility that will check for malfunctioning and outdated drivers automatically. Auslogics Driver Updater can help you do that with ease and install official driver updates.
The tool can also help you prevent a repeat of the problem as it regularly scans for driver updates. That way, your system will only run on the best manufacturer-developed drivers.
7. Run the System File Checker
Corrupt or missing system files can cause the Windows Memory Diagnostic tool to present a false positive report. They make the operating system miscommunicate with the RAM when system files malfunction, leading to inaccurate readings.
Running the System File Checker tool will help you fix the problem for good.
The utility scans protected Windows files, services, and registry entries to find and fix integrity violations. It replaces the bad system files using replacement files provided by the DISM (inbox Deployment Image Servicing and Management) tool.
Follow these steps:
- Start an elevated Command Prompt by typing
command promptafter opening the Start menu and select Run as Administrator under the Command Prompt result. - Agree that Command Prompt should make changes to the system when the UAC prompt appears.
- Now, use the following command to run the DISM tool to provide replacement files:
DISM.exe /Online /Cleanup-image /Restorehealth
- After that, type
sfc \scannowand tap theEnterkey. - Allow Windows to run the diagnostics and repair bad system files.
Related: [Fixed] “Windows Resource Protection Cannot Perform the Requested Operation”
8. Run a Full Malware Scan
You cannot write-off malicious applications when faced with such an issue. These programs can wreak serious havoc to the point that your system memory is affected.
Also read: Signs of Malware: How to Know if Your Computer is Infected
Use the Full Scan option in your antivirus program to check every corner in your operating system for malware. Follow these steps to run the full scan using Windows’ native antivirus tool:
- Tap the
Windows logoon your keyboard. - After the Start menu pops up, type
Virus. - Click Virus & Threat Protection.
- Select Scan Options when you see the Virus & Threat Protection page.
- Select the Full Scan option and click the Scan Now button.
The anti-malware tool is often updated with virus definitions that other antivirus programs may not be equipped with. It will give the extra layer of protection necessary to keep your PC malware-free.
Also read: How to Remove Virus and Other Malware from Windows
9. Change or Swap RAM Sticks
If nothing works, consider troubleshooting your RAM sticks. It’s time to start accepting the possibility that your RAM module may be faulty.
If you can, open up your computer and remove a RAM module if you have two sticks. Restart your PC and check for the problem.
If the problem doesn’t show up again, run Memtest86+ to check for problems with the module. Do that same thing for the second stick.
If you have only one RAM stick on your PC, try using another working module to check for the issue.
If you cannot open your computer, take it to a repairer or contact an expert to assist you.
10. Use a System Optimisation Tool
Keeping your computer healthy helps you avoid system memory problems and other errors on your Windows PC. There are many routine performance tricks that you can perform to achieve this.
But there’s so much you can do. Going to complex areas within the system and using numerous utilities will consume the time you need for more important things.
Instead, you can use Auslogics BoostSpeed: an effective system optimization tool that keeps millions of computers healthy.

The program offers different tools that can be automated to rid your computer of junk and corrupt files, problematic registry keys, and harmful elements that can badly affect system resources.
Best Ways to Use the Tool
You can refer to our guide on how to get the most out of Auslogics BoostSpeed’s free trial.
The tool’s full version allows you to run the best utilities for your PC. You can configure the scheduler to run specific scans and perform optimization tasks during specific periods.
To use the Scheduler, switch your dashboard to Advanced Mode and click My Scheduler.
After enabling automatic maintenance, you can instruct the program to run scans daily, weekly, monthly, or when the PC is idle. You can then choose the types of scans you want it to run.
You also have the option of using any of its utilities at your convenience. For example, you can run the Duplicate File Finder when you want to clear space on your hard drive.
The program’s All Tools tab also gives you access to numerous tools that allow you to clear empty folders, defragment your disk, boost startup speeds, and safely clear unneeded Windows files.
Further reading: Speed Up Slow Computer as a Pro – Introducing Auslogics BoostSpeed 13
Conclusion
While the Windows Memory Diagnostic tool is a competent utility, it is not foolproof. That’s because it can report a RAM problem when something else is wrong.
So, take your time to go through the methods explained earlier before purchasing replacement RAM modules.
Remember to always keep your PC optimized and free of malicious programs to avoid this problem in the future.
FAQ
memory and select Windows Memory Diagnostic in the result. You can then choose whether you want to restart your computer now or run the test the next time you turn on the system.
