- Why Won’t My Computer Turn On?
- How to Fix a Computer That Won’t Turn On?
- Check basic external connections
- Confirm that your power supply unit isn’t faulty
- Check your laptop power adapter
- Check your laptop battery
- Confirm that your monitor or screen is not problematic
- Disconnect peripherals
- Check internal connections and components
- Check internal power connections
- Check your RAM
- Disconnect other internal components and test
- Check your power button
- Check BIOS options
- Restore Windows
- Run Startup Repair
- Check the hard drive for corruption
- Scan and fix corrupt system files
- Reset Windows
- Computer Not Turning On: Fixed
- FAQ
Computers are electronic devices, and they can suddenly stop responding due to electrical, hardware, or software problems. However, the issue may manifest in various ways.It’s normal to panic when you realize that Windows is no longer booting properly or your PC won’t turn on at all. This article will show you different variants of the “ PC not turning on ” issue and cover how to fix a computer that won’t turn on .
Why Won’t My Computer Turn On?
Several hardware, software, and power supply issues can prevent a computer from turning on. These issues could stem from disconnected wires, defective hardware, overheating, inadequate power, malfunctioning buttons, electrical overload, corrupt system files, and driver problems.
People asking “Why is my PC not turning on?” don’t all face the same type of problem. There are different variants of the “My computer won’t turn on” issue, and they include:
- Computer has power but won’t turn on;
- Computer does not have power;
- Computer has power but Windows does not boot;
- Computer turns on, makes some noises, and turns off again;
- Laptop won’t turn on;
- Laptop showing lights but won’t boot.
How to Fix a Computer That Won’t Turn On?
Knowing the specific cause of the problem can help you find the solution almost immediately. In some cases, you can pinpoint the underlying issue by observing how the computer responds when you press the power button.
However, in other situations, you may not know where to start.
We’ll be showing solutions for various “PC not turning on” problems. You can jump to the solution that corresponds with your specific issue below:
Your PC or laptop has no power and shows no power indicators:
- Check basic external connections
- Check your power supply unit
- Check your laptop power adapter and battery
- Check internal power connections
- Check your power button
Your PC or laptop has power but won’t turn on:
- Check your power supply unit
- Check internal components, including RAM, hard drive, and GPU
- Troubleshoot your BIOS
- Confirm that your monitor or screen isn’t problematic
- Disconnect your peripherals
- Check your power button
Your PC or laptop turns on but Windows does not boot:
- Change BIOS options
- Check the hard drive for errors
- Check for faulty RAM modules
- Restore Windows to an earlier state
- Run startup repair
- Repair corrupt system files
- Reset Windows
Check basic external connections
Proper wiring and connections are among the most overlooked things for most PC users. So, let’s start by checking whether everything on the outside is plugged and connected correctly.
Follow these steps:
- Ensure the wall outlet where you plug your PC still dispenses power. You can plug in another electronic device to confirm or plug the computer into another socket.
- If you use a desktop PC, ensure your PC’s power cable is properly connected to the power supply unit (PSU).
- If you use a laptop, check that your charger’s light indicator is on and that it is properly plugged into your laptop.
Confirm that your power supply unit isn’t faulty
Testing your PSU is the next step after confirming that your external connections are correct. If the unit is faulty, your PC won’t turn on, may crash from time to time due to power loss, may restart now and then, and may frequently display blue screen errors . As mentioned earlier, you can check if the switch behind the unit is not turned on. That said, there are other ways to check for a faulty PSU:
- Use a different, functional power cable to plug the PSU into the wall socket to confirm that you do not have a defective cable.
- Use a different PSU to test whether your current unit is faulty.
- Use a PSU tester.
- Jump your PSU if you do not have a spare unit or tester.
Check your laptop power adapter
If you’re asking, “Why won’t my laptop turn on?” there’s a chance your power adapter or charger may be faulty, especially when your battery is drained. Try using another charger or adapter to confirm.
Check your laptop battery
You may have to drain any residual electrical charge from your motherboard and other internal components to power your laptop. To do that, first remove your battery and unplug your power adapter. Next, press your power button for about 30 seconds.
After that, plug in your power adapter without your battery and try turning on your computer. If your laptop turns on, shut down your PC properly, insert your battery again, and turn your system back on.
Confirm that your monitor or screen is not problematic
If your PC or laptop’s LED indicators, such as keyboard and power button lights, show that it’s receiving power, it may be turning on correctly but not displaying on your monitor. Check that your monitor cables are properly connected, then confirm that the monitor is turned on.
You can also try using a different monitor to confirm whether the “computer not turning on” issue is tied to a faulty display.
If you use a laptop, try connecting to an external display to check whether your computer is booting properly.
Related: [FIXED] Second Monitor Not Detected on Windows 10 PC
Disconnect peripherals
Peripheral devices, such as external mice, keyboards, webcams, and other devices connected via USB, can prevent Windows from booting up due to certain conflicts. In such situations, you may notice that your PC receives power but can’t get to the Windows boot process.
So, disconnect these devices and try starting your computer.
If your computer boots without issues, you can try plugging in the components one after the other to identify the specific device causing the problem.
Check internal connections and components
Improper connections and malfunctioning cables and components within your PC’s build are also part of the possible reasons your computer may not be turning on. Your next steps should be checking these connections and components to write off each item as the culprit.
Start by disconnecting your computer from the external socket, opening its case, and unplugging your PSU from your motherboard.
Check internal power connections
Most components in your PC’s case draw power from the PSU. If their power cables are not connected properly, they may malfunction and disturb your computer’s boot process.
After safely opening your case, inspect and secure connections from your power supply to each internal component (like your hard drive, GPU, and motherboard). If you have a modular PSU (a unit with detachable cables on both ends), you should also verify that each cable is properly seated on the PSU side.
You can now connect the PSU back to your motherboard and wall socket and turn on your PC to check if it powers on.
Check your RAM
Faulty Random Access Memory (RAM) modules can cause various problems, including frequent reboots, BSODs , and power glitches. If you have two RAM sticks, consider unmounting each and turning on your computer. That way, you can confirm whether one RAM stick is preventing the boot process. While it’s rare for multiple memory modules to be faulty at the same time, it’s not impossible. You can detach a RAM stick from a functioning computer and install it in yours to confirm that you’re not experiencing a memory problem.
Helpful read:[SOLVED] Hardware Problems Detected by Windows Memory Diagnostic Tool
Disconnect other internal components and test
Suppose the problem persists after checking your RAM sticks and internal power connections. In that case, you have to check whether a specific hardware device or internal component is causing the problem.
This time, you have to turn off each component, except your CPU, by disconnecting their power cables.
You should also detach each component’s connection to the motherboard except the CPU. They should include your GPU, hard drive, and other internal devices.
Now, power on your PC to check for signs of life, such as fan movement or lights. If successful, then one of the disconnected internal components is the cause of the problem.
You can now systematically reconnect your hardware devices one at a time to identify the problematic hardware.
Check your power button
If your computer shows through LED indicators that it receives adequate power, you should check that your power button is functioning as it should.
Power buttons are typically connected to a section on the motherboard called the power switch header through wires. These wires or the button itself may be faulty.
You can try turning on your system without the power button to check whether the button is the issue. Do that by using a metal screwdriver to lightly touch the two pins in the motherboard’s power switch header.
You can identify power switch headers in most motherboards by the PWR SW label with the + and – symbols.
If the computer comes on after contact, replace your power button and the wires.
Check BIOS options
Some misconfigurations in the BIOS may be preventing your computer from loading Windows. Resetting your BIOS will likely resolve the problem. There are different ways to enter the BIOS environment, as it varies for each PC make and model. It could be F10, F12, F1, F2, DEL, or Esc. After opening the BIOS environment, you can look around for instructions on which key to press to restore default settings.
Restore Windows
Your system may be unable to boot because you recently installed a driver, Windows update, or another software application that is causing conflicts with Windows’ boot process. You can restore your operating system through the Windows Recovery Environment since Windows does not boot.
Entering the Windows Recovery Environment in this case involves using a Windows bootable drive. You can easily create a Windows USB installation media on another computer using Microsoft’s Media Creation Tool .
After creating the media, insert it into your computer and power it. Make sure the USB device is selected as the first boot device. You can go through your BIOS to change your boot order . Now, follow these steps:
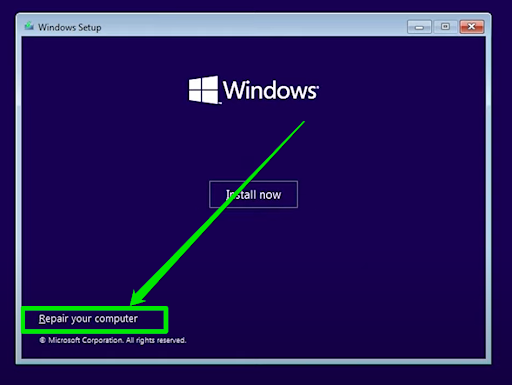
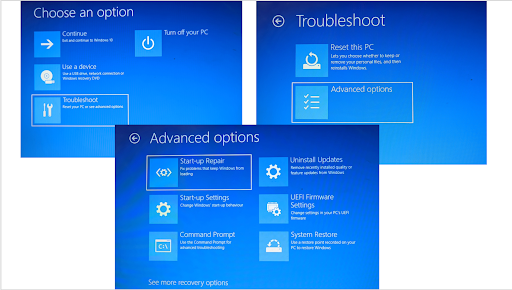
- Once your computer boots from the USB drive, click Next and select Repair my computer.
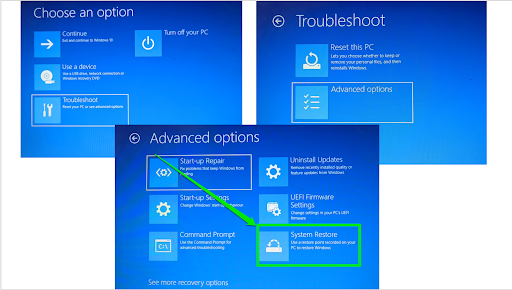
- Next, click Troubleshoot and select Advanced options.
- Click System Restore.
- Allow Windows to restart and bring up the System Restore dialog.
- Click Next, select a restore point, and click Next.
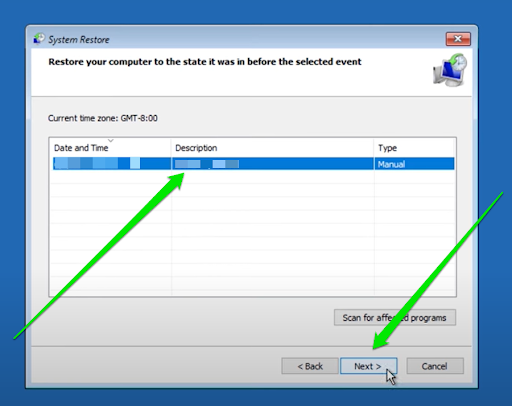
- Click Finish.
Further reading: Ultimate Windows Recovery Guide: How to Restore Your Windows System
Run Startup Repair
Whenever a computer starts and goes beyond the power-on self-test (POST) process, the firmware (BIOS) will check the hard drive for the master boot record (MBR) to start Windows. The operating system will then load certain files to kickstart the boot process.
Related: Fixing Windows MBR Without Installation Disk: Step-by-Step Guide
You may have to repair these files if you see your OEM’s logo and Windows still doesn’t boot. Follow these steps:
- Insert the installation media, click Next after the installation environment opens, and select Repair my computer.
- Click Troubleshoot and choose Advanced options.
- Now, click Start-up Repair.
- Select your operating system and provide your login details when prompted.
Check the hard drive for corruption
Files in your hard drive’s boot sector are responsible for booting Windows. If this sector becomes problematic, Windows will not be able to access these files and start the boot process if that sector is corrupt.
You can fix the problem here by running the CHKDSK tool to find and repair faulty sectors.
- Select Command Prompt in the Advanced options interface.
- Type the following in the Command Prompt interface and tap your Enter keyboard key:
chkdsk C: /f /r /x
- Allow Windows to find and attempt to repair faulty hard drive sectors, then check if your computer can now turn on after the process completes.
Scan and fix corrupt system files
You can also run the System File Checker through Command Prompt in the Advanced startup environment to find and replace faulty system files. Select Command Prompt in the Advanced options interface and type sfc /scannow in the Command Prompt window to run the repair process.
Further reading: How to Find and Fix Corrupted Files in Windows 10?
Reset Windows
Resetting Windows is like reinstalling the operating system. However, it allows you to save personal files while removing all the applications you installed. Try this process if nothing has worked so far.
You also have to go through the Windows Recovery Environment to reset your computer. Here’s how:
- Select Reset this PC after clicking Troubleshoot on the Choose an option page.
- Prompt Windows to keep or remove your files, depending on your preference, and then allow the reset process to complete.
Read more: Easily Reset Your PC: How to Factory Reset a Windows 10 & 11 Computer
Computer Not Turning On: Fixed
Now you know what to do if your computer won’t turn on. Replacing the malfunctioning component, fixing the software glitch, or resolving basic problems like wrong connections and installation can bring the system back to life.
Please go to the comments section to let us know if you need further help on how to turn on a PC that won’t respond.