![[QUICK SOLUTION] How to Find Out the Cause of BSODs Using the Event Viewer](https://www.auslogics.com/en/articles/wp-content/uploads/2023/07/QUICK-SOLUTION-How-to-Find-Out-the-Cause-of-BSODs-Using-the-Event-Viewer-568x359.png)
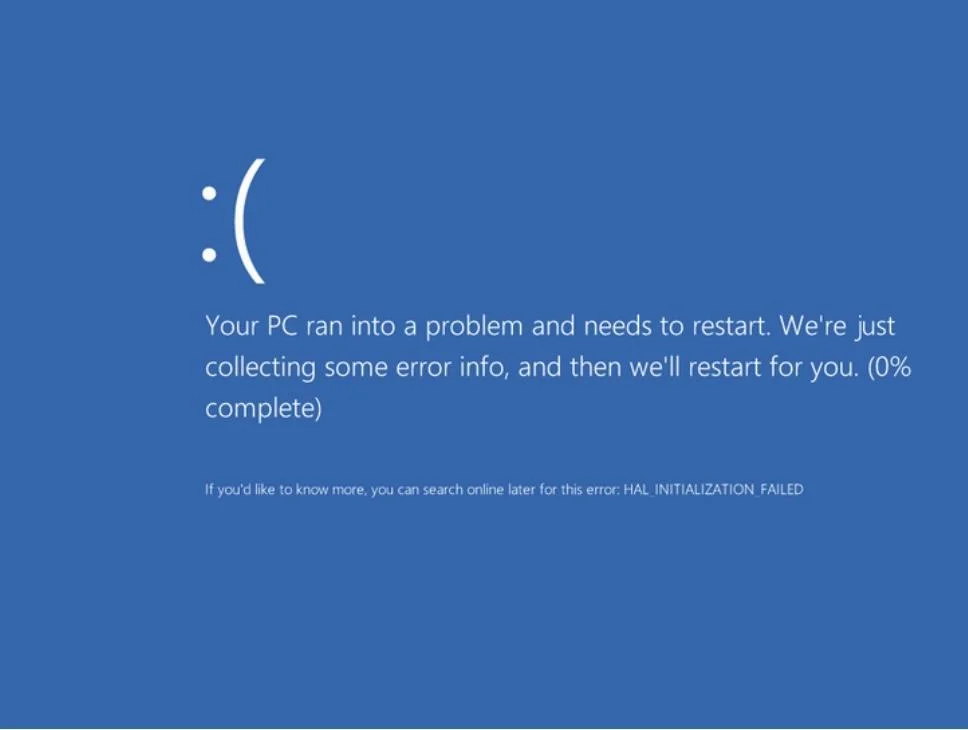
BSODs are fairly common on Windows PCs. Usually, they indicate some serious trouble with your hardware that your operating system can’t handle . However, it could also be software problems, such as those with device drivers or system file corruption .
While some can happen due to minor glitches and be fixed rather easily, others may signal serious underlying problems and require closer attention and maybe even professional help . And trust me, fixing these BSODs can be pretty hard, especially when you don’t know the cause.
But don’t worry , that’s what we’re here for, right? In this article, I’ll be showing you how to use the Event Viewer (and a couple of other ways) to find out the reason behind a BSOD.
How to Find Blue Screen Error Logs in the Event Viewer on Windows 10
Follow these steps:
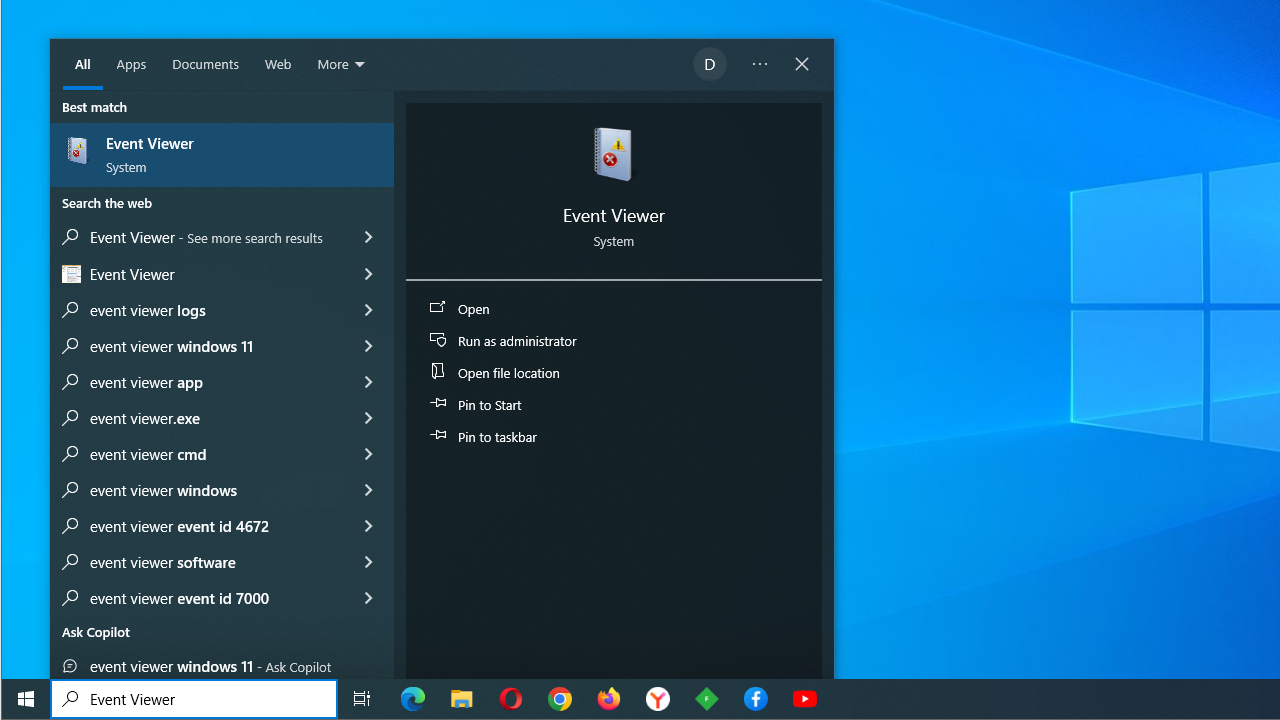
- Click on the magnifying glass in the taskbar to open the search box. You can also press
Windows + Sto summon the search function. - Once the search box opens, type
Event Viewerand click on the first search result.
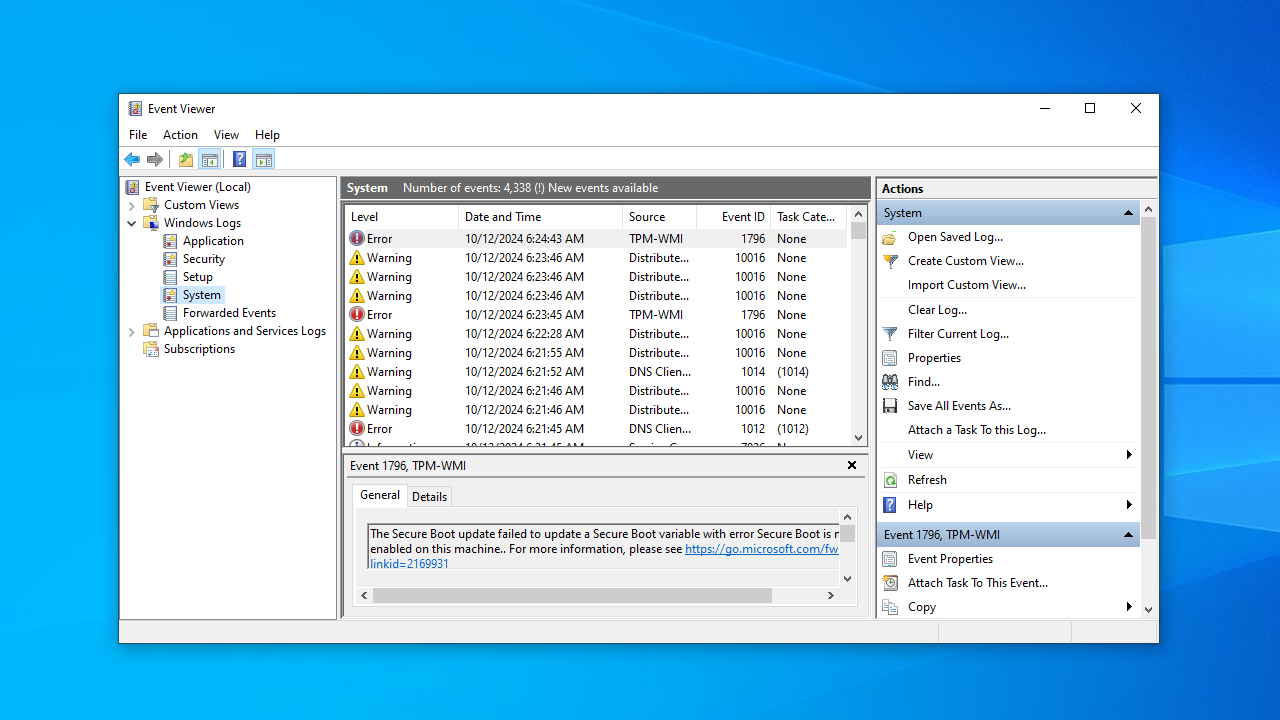
- Once the Event Viewer opens, go to the left pane and expand Windows Logs .
- Under Windows Logs , click on System .
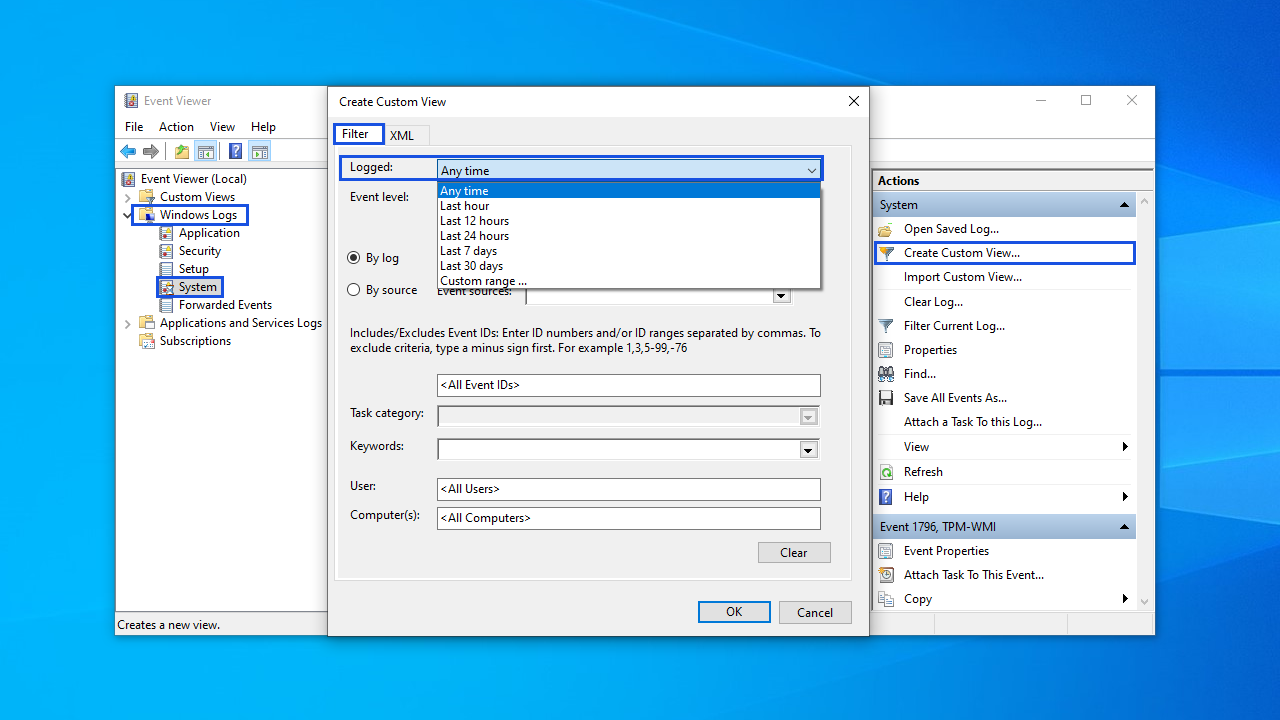
- Go to the right-hand side of the window and click on Create Custom View under System .
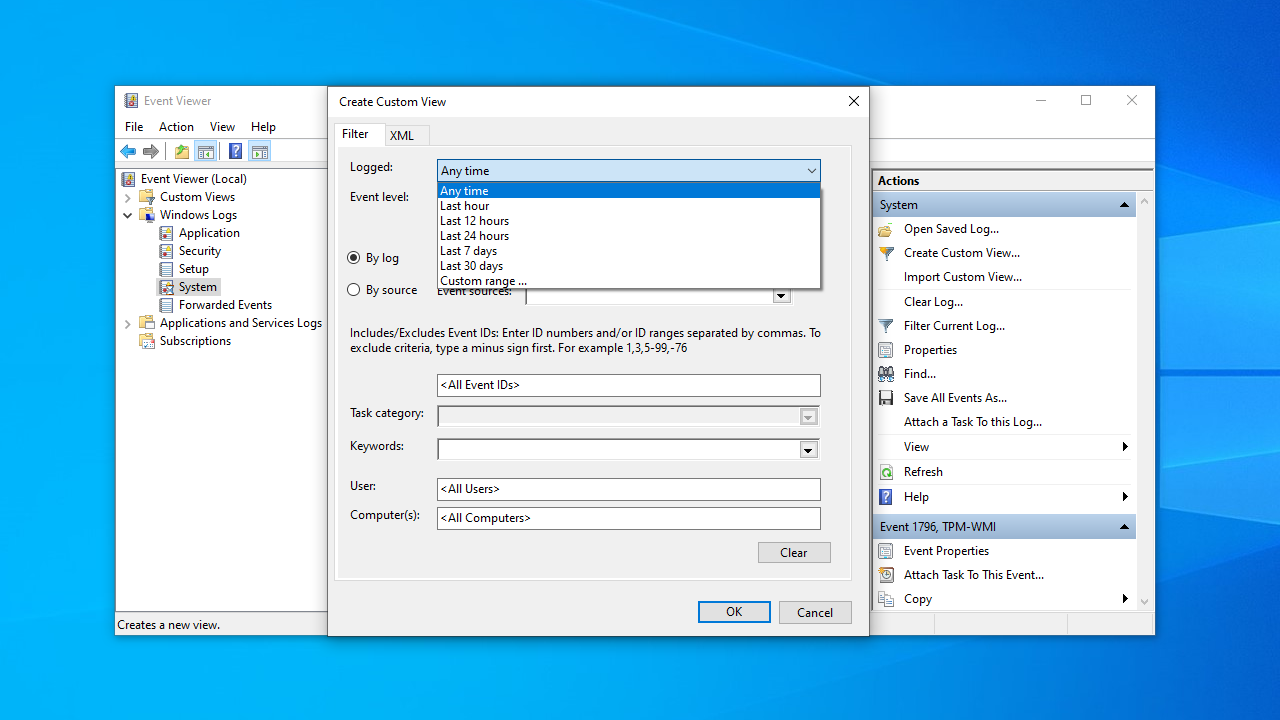
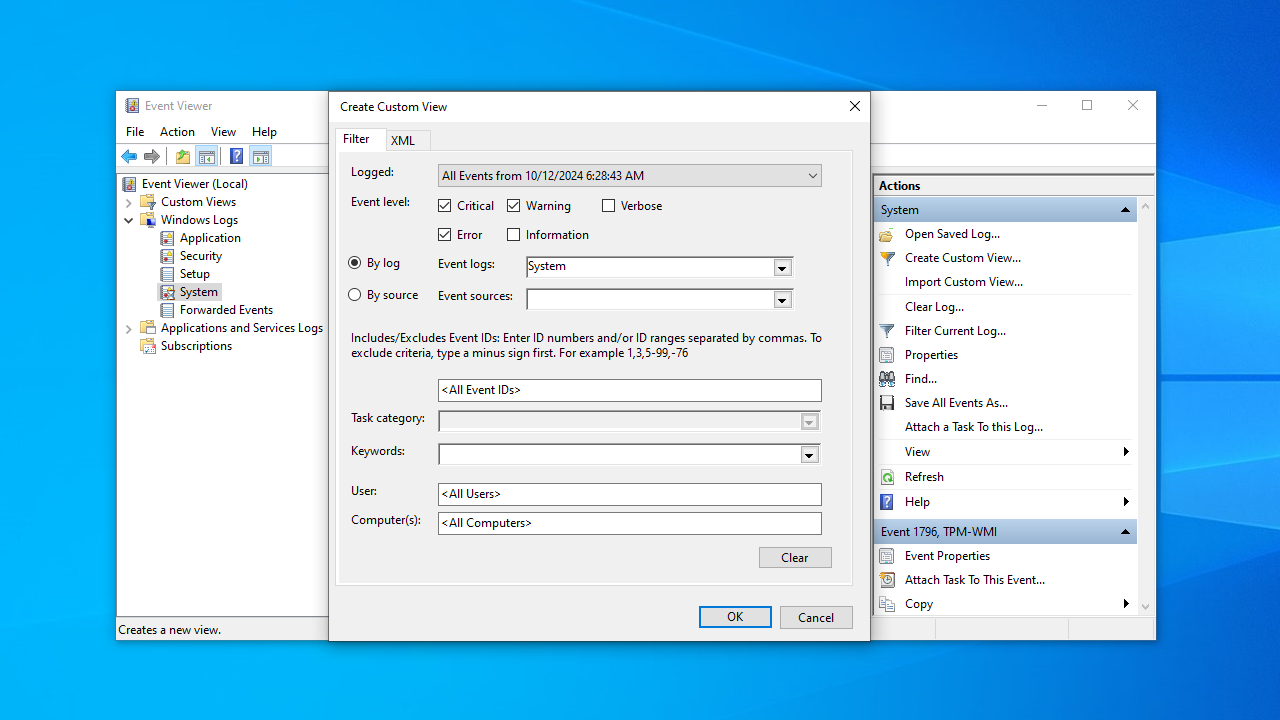
- Once the Create Custom View window appears, stay in the Filter tab.
- Go to the Logged drop-down menu and select Custom range .
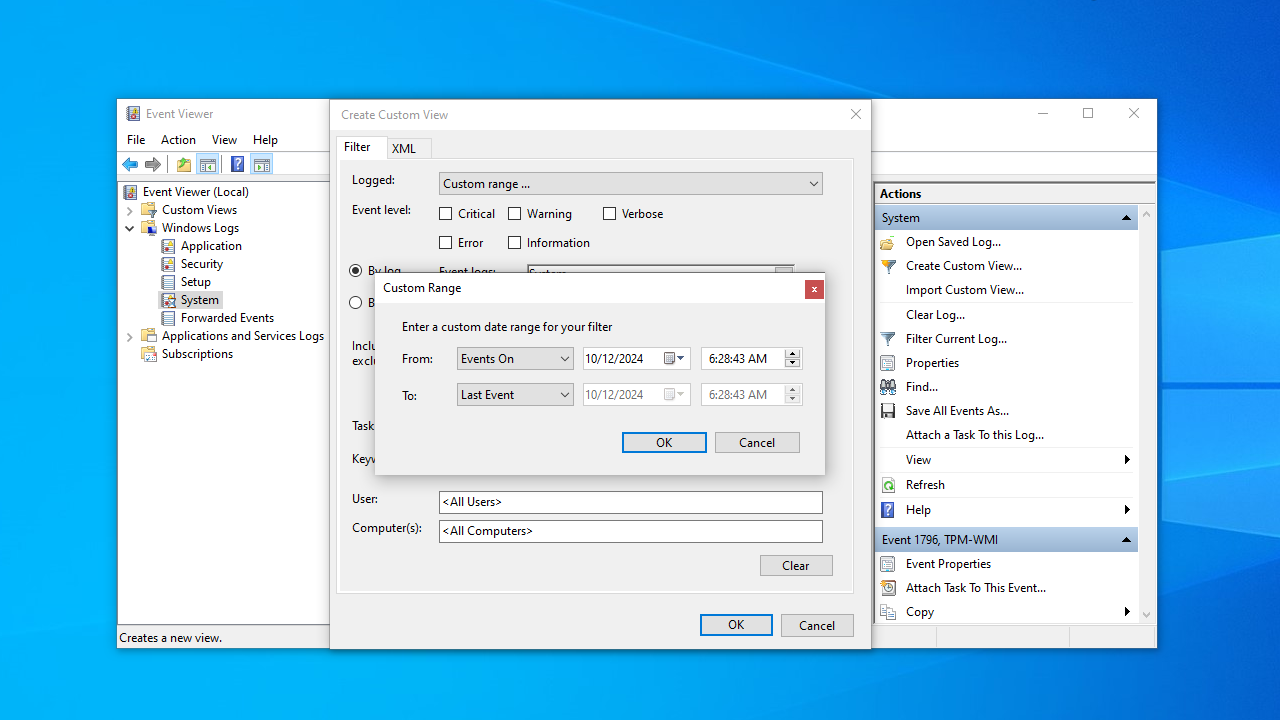
- Next, choose the date and time range the BSOD occurred once the Custom Range dialog shows up.
- Click OK in the Custom Range dialog box.
- Go to Event level in the Create Custom View dialog window and check the boxes for Critical, Warning, and Error .
- Click on OK , enter a name for the custom view you just created, and then click on OK again.
- In the main Event Viewer window, you’ll now see the list of Warning, Critical, and Error events that occurred in the time range you selected.
- Double-click an event log and refer to the Details tab to check the details of that event.
If you don’t understand the description of the event ID, google it, and you’ll find help with what to do.
How to View a BSOD Error Log in the Event Viewer on Windows 11?
Alright, getting access to your Event Viewer BSOD error logs on Windows 10 —check . Now, how do you do the same on Windows 11? After all, the new OS comes with a number of upgrades and changes.
For instance, Windows 11 comes with new designs for the Start menu and taskbar. As with most Windows upgrades, you also have fixes for some of the most commonly reported bugs and, therefore, a generally smoother performance.
However, when it comes to viewing BSOD error logs, the steps you will need to take on Windows 11 are not essentially different from what you need to do on Windows 10.
But let’s recap and check out how to see the Event Viewer logs in Windows 11:
- First, use the
Win + Skey combo on your PC to bring up the search feature. - Run a search for “Event Viewer” and select the first result.
- In the Event Viewer, navigate to the left pane and go to Windows Logs .
- Once here, click System .
- Next, go to the right side of the window and select Create Custom View (you will find this option under System ).
- Make sure to stay in the Filter tab.
- Next, head to the Logged drop-down menu and click Custom range .
- Select the date and time range for which you want to see your Event Viewer BSOD logs.
- When ready, press the OK button in the Custom Range dialog box.
- In the Create Custom View dialog, head to Event level . Make sure to check the boxes for the following options: Critical, Warning, and Error .
- Click OK .
- Type in the name for the custom view you’ve just made.
- Click OK .
- Next, go back to the Event Viewer main window.
- Here, you will see a full list of events that occurred during the specified period. They will be categorized into Warning, Critical, and Error events.
- Double-click the event log and go to the Details tab to see more information.
By the way, we have a great article on startup and shutdown logs listing the most common reboot and shutdown event IDs.
What if Your System Is Always Restarting?
Some blue screen errors will throw your PC into an infinite loop of reboots. Your best course of action in this scenario is to check the reason for the BSOD in the Event Viewer in Safe Mode.
You have two ways to get into Safe Mode :
1. Go through the Automatic Repair environment
This method involves tricking your computer into believing that something has gone wrong with the boot process to trigger the Automatic Repair feature.
BSODs typically don’t affect the early boot process. So, Windows will likely not realize that anything is wrong until it’s time to load your startup applications.
Follow these steps to enter the Windows Recovery Environment (WinRE):
- Press and hold your power button to force your PC to shut down.
- Turn on the computer and force it to shut down again after your system’s manufacturer logo shows up.
- Repeat the previous step twice, and you’ll see the Please wait message. If you don’t see the message, repeat the steps. If nothing happens, skip to the next section to use bootable media.
- When you see the Automatic Repair screen, click on the Advanced options button.
- On the Choose an option screen, click on Troubleshoot .
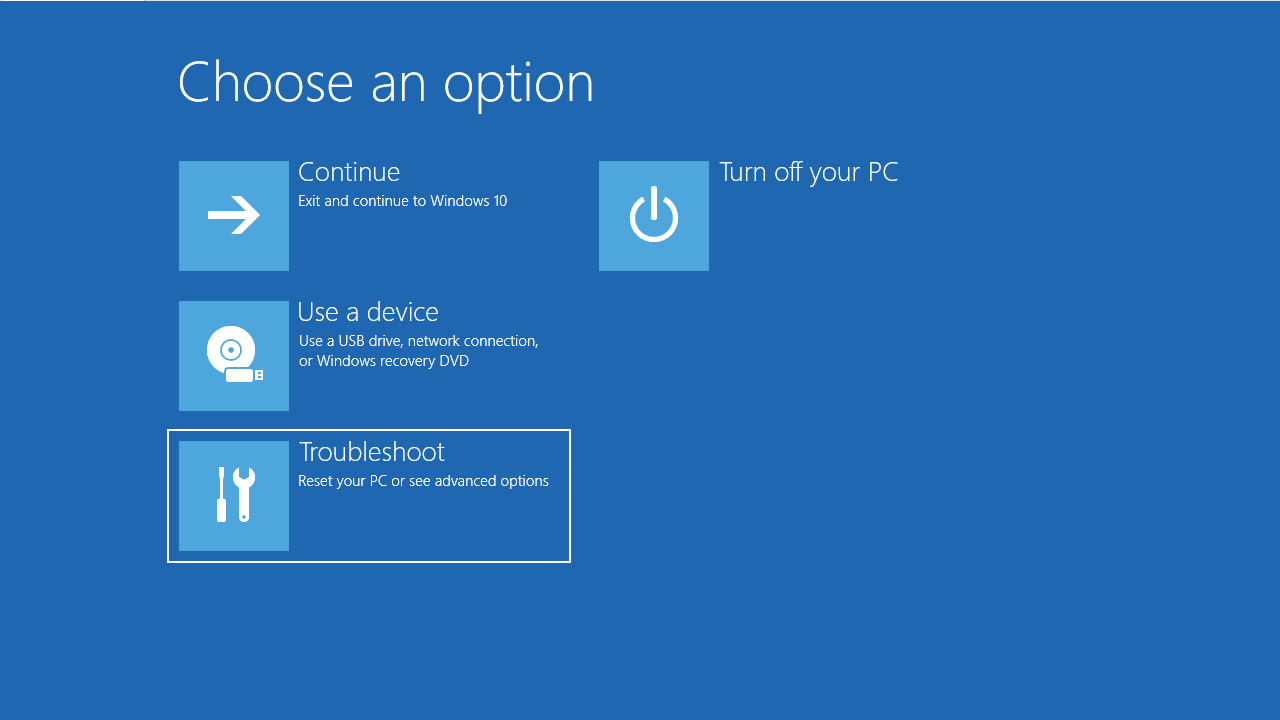
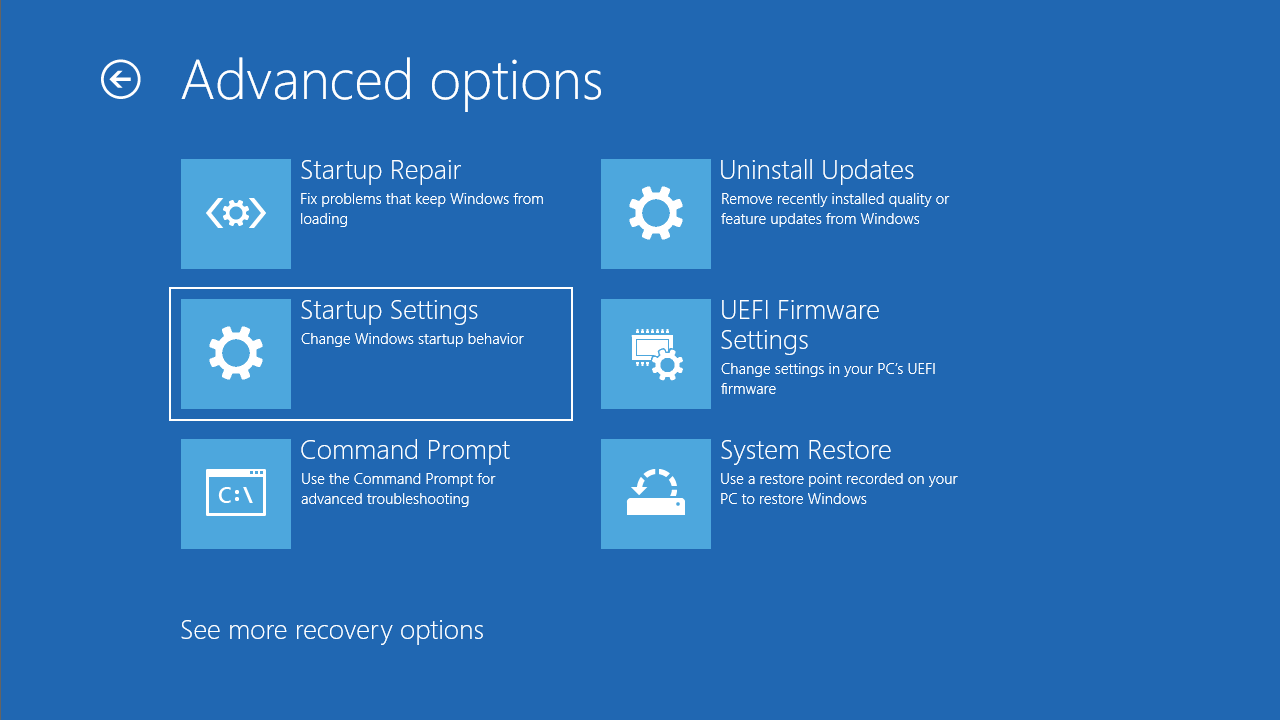
- Now, click on Advanced options under Troubleshoot .

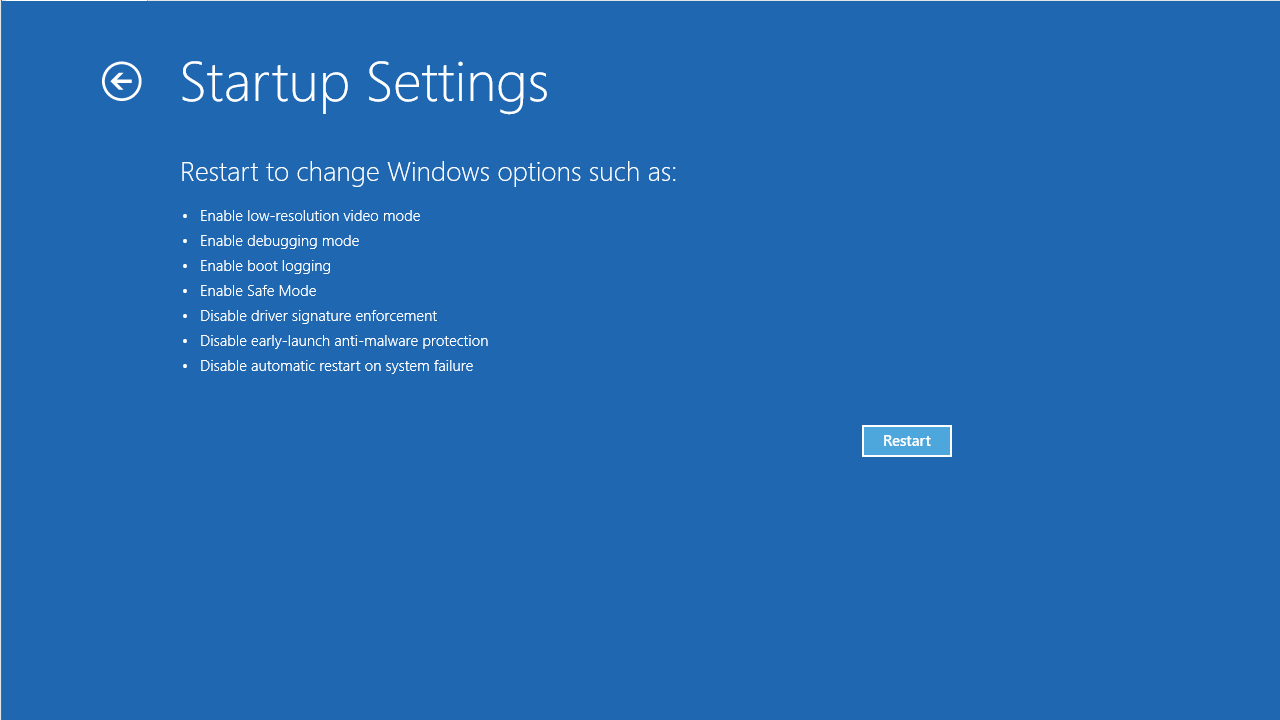
- Then click on Startup Settings once the Advanced options screen opens.
- Click the Restart button on the Startup Settings screen.
- When your system reboots to the Startup Settings page, hit the number beside Safe Mode or Safe Mode with Networking (if you want to use the internet).
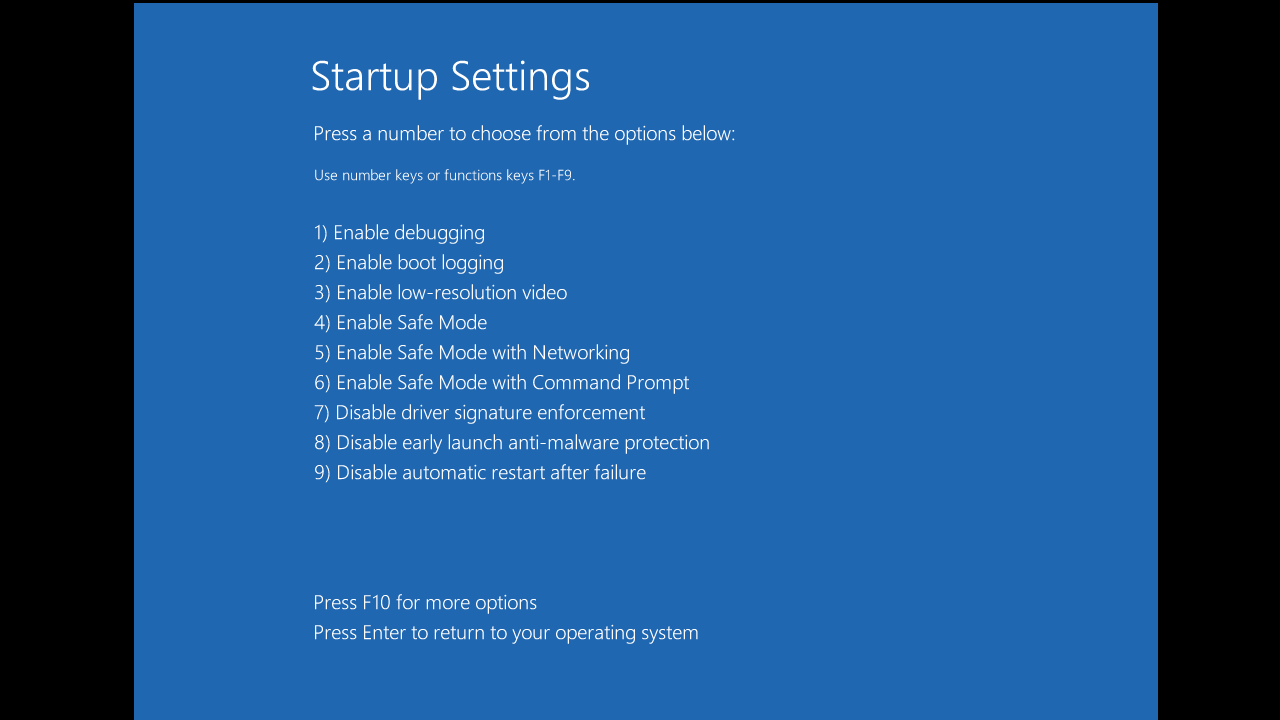
Once your PC boots into Safe Mode, you can check the Event Viewer BSOD error logs to find out its causes.
2. Use bootable media
Even the Automatic Repair feature can be broken . In such a case, you’ll have to use bootable media.
Bootable media allows you to load the Windows installation and repair environment even if your system isn’t booting. It could be a USB flash drive or DVD. If you don’t have a Windows 10 /11 DVD, you can use another computer to create bootable media.
You can use a third-party tool—Rufus—or Microsoft’s Media Creation Tool . We’ll show you how to use both programs.
Creating a bootable Windows USB using Rufus
Rufus is a free third-party program for creating bootable media. All you need is your USB flash drive and the latest ISO image file of Windows 10 or Windows 11 , which you can download from Microsoft’s website.
Follow these steps:
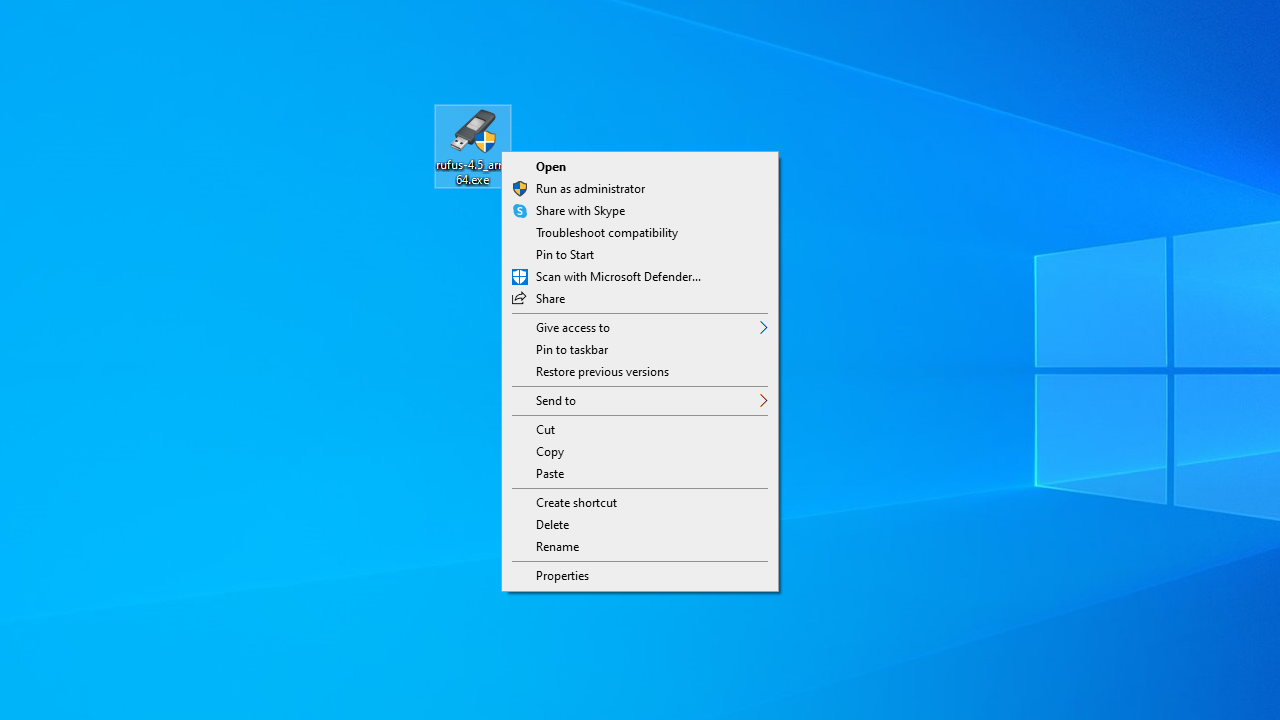
- Download Rufus from the Internet.
- Right-click on Rufus.exe and run it as an administrator. The application will automatically detect the drive that is connected to your computer.
- Make sure the name of your USB flash drive is displayed under the Device drop-down.
- Choose Disk or ISO image from the Boot selection drop-down and then click on the Select button.
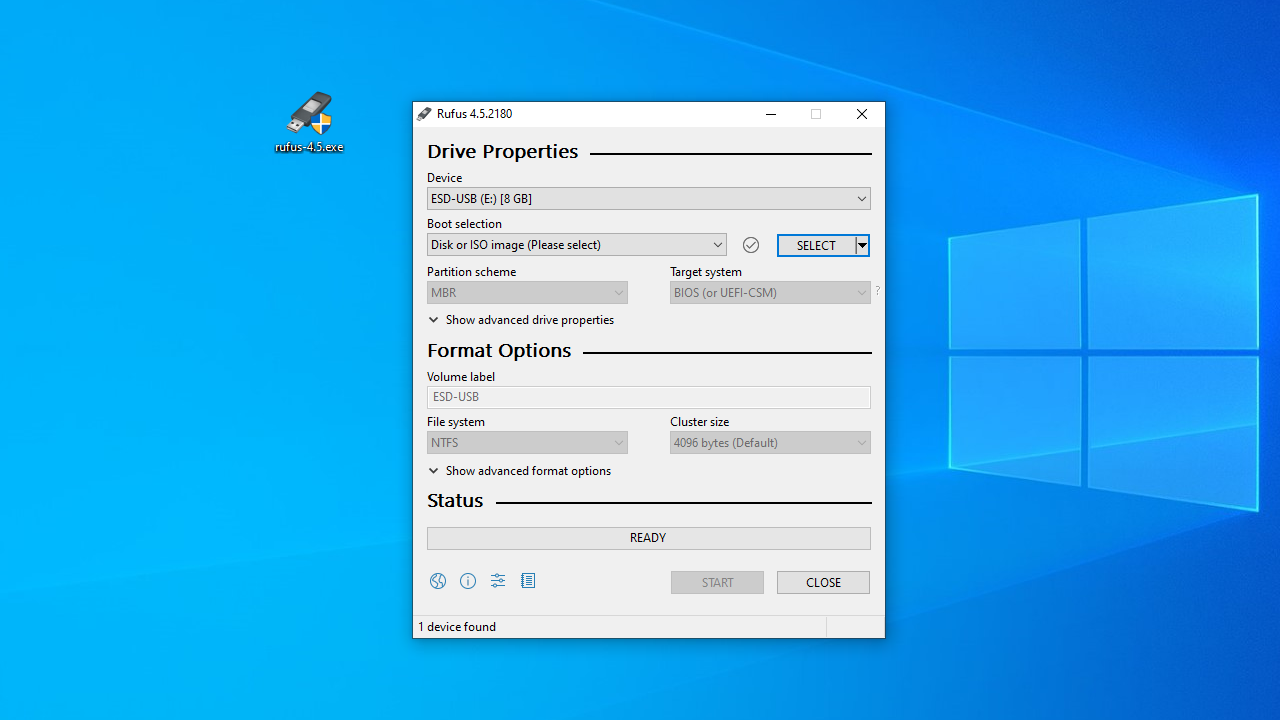
- Navigate to the directory where your ISO file is located, click on the file, and then click on the Open button.
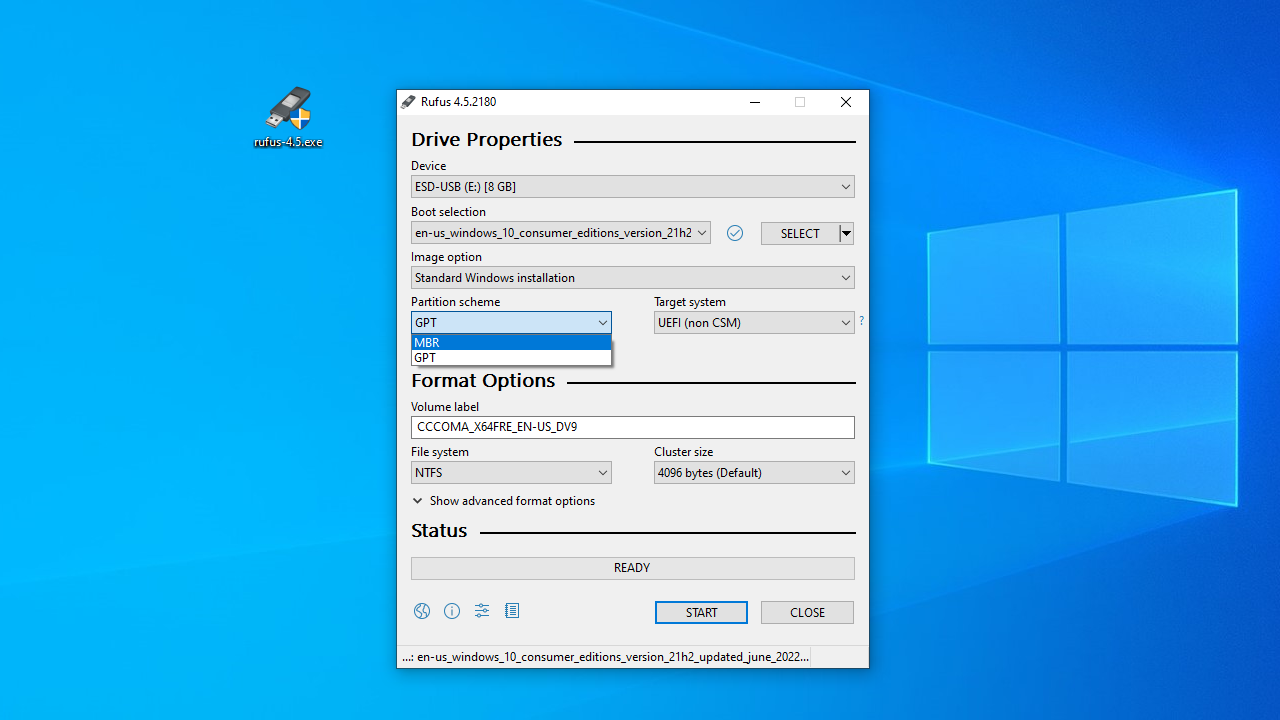
- Next, choose MBR from the Partition scheme drop-down, then select BIOS or UEFI under Target system .
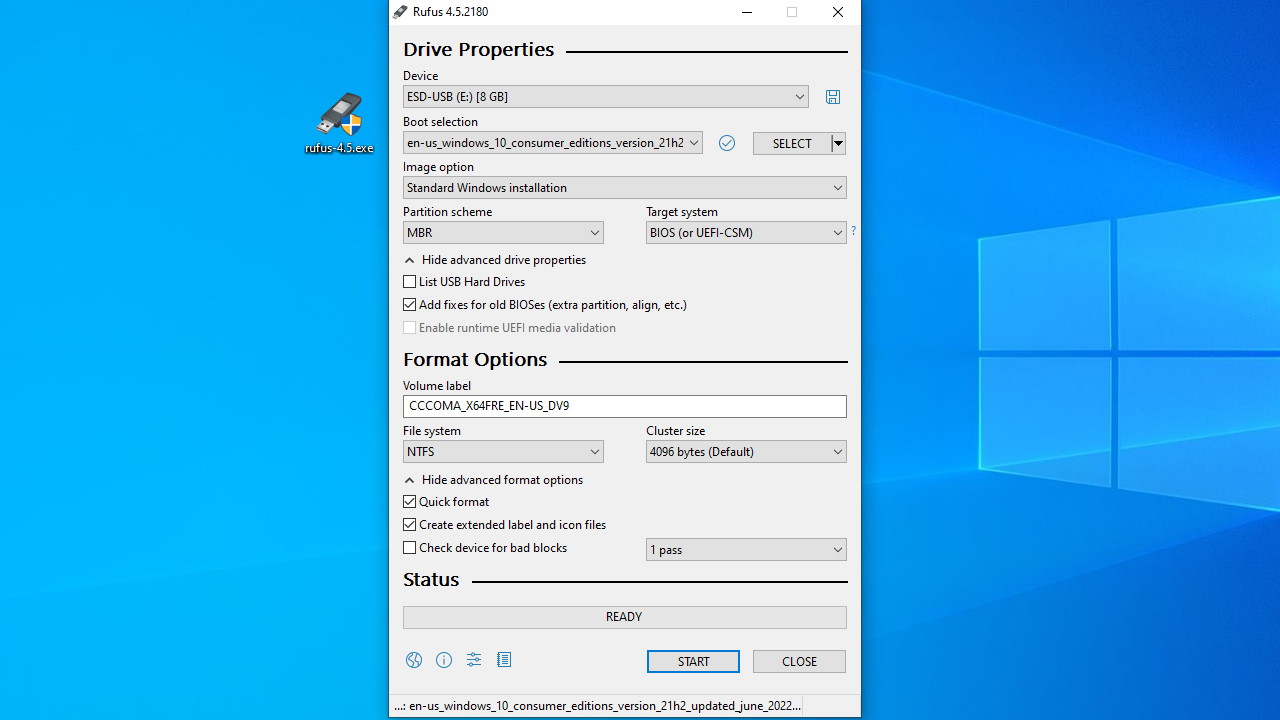
- Now, under Advanced Drive Properties , check the box associated with Add fixes for old BIOSes .
- Extend the Show advanced format options drop-down in the Format Options segment and tick the Quick format and Create extended label and icon files checkboxes.
- Click on the Start button and follow the progress bar under Status .
- The progress bar will show a ready message once the process is complete.
Using the Windows Media Creation Tool
Follow these steps to create the bootable media using the Media Creation Tool:
- Head to Microsoft’s website and download the Media Creation Tool.
- Run it on your computer.
- Select the Create installation media for another PC radio button when the Windows Setup window opens, and then click Next .
- On the next page, choose your language, Windows edition (Home, Pro, or Enterprise), and operating system architecture (64-bit or 32-bit).
- Select the USB flash drive option under Choose which media to use, and then click Next .
- Allow the tool to complete the process.
After creating the bootable USB, insert it into your system and reboot. Make sure you change your boot order accordingly. Once your computer comes up, press any key if you’re prompted.
When the Windows Setup screen appears, click on Repair your computer in the lower-left corner.
The Choose an option screen should now open. Click on Troubleshoot . Once the Troubleshoot screen appears, click on the Advanced options tile.
Now, click on Startup Settings once the Advanced options screen opens. Click on Restart . After your computer boots into the Startup Settings screen, tap the number beside Safe Mode and wait for your PC to reboot into Safe Mode.
You can now check the cause of the BSOD in the Event Viewer in Safe Mode.
Other Ways to Check the Causes of Blue Screen Errors
Did you know that using the Event Viewer for BSOD log checking is not the only way to find the reasons why your system crashes? You can also use the Windows Reliability Monitor or read a dump file with a built-in or a third-party app. Let’s briefly go over your options:
1. Using the Reliability Monitor
The Windows Reliability Monitor is a built-in app that tracks software issues and keeps a detailed log of events, especially when a crash occurs. The interface is user-friendly and works quite well on both Windows 10 and 11.
You can learn more about using the Reliability Monitor from our article on how to view reliability history . We also have a detailed guide on how to check for BSOD causes , where the peculiarities of using this tool to pinpoint these causes are laid out comprehensively.
2. Reading a dump file
If your system crashes, Windows creates a dump file in the system memory where you can find apps that were running before the crash occurred. There are two main ways to analyze the dump file to check for causes of blue screen errors: using the WinDbg tool and using a third-party, free-to-use program such as BlueScreenView.
We have a great article on how to open and read .dmp files after a BSOD that covers both methods, so make sure to check it out. The information you find there could help you troubleshoot the blue screen without the Event Viewer, especially if a program is triggering it.
Checking Causes of BSODs Using the Event Viewer: Explained
And there you have it—a step-by-step guide on how to find out the cause of a BSOD in the Event Viewer (and even a little bit more). Now go out there and conquer, be it getting Event Viewer BSOD error logs, checking out the info in the Reliability Monitor, or reading a dump file.
Did you like this article? Think it might be useful for someone else? Then do not spare a thumbs up and share it! Cheers!