![[FIXED] How to Fix “Windows 10 Won’t Boot” Problem Easily](https://www.auslogics.com/en/articles/wp-content/uploads/2023/06/shutterstock_1830070235-568x359.jpg)
- How to fix a Windows 10 computer that won’t boot?
- Method 1: Ensuring that the POST Process Has Completed Successfully
- Method 2: Disconnecting External Devices
- Method 3: Finding the Right Solution for the Specific Error Message
- Method 4: Booting in Safe Mode
- Method 5: Resetting your Computer
- Method 6: Performing a System Restore
- Method 7: Performing Automatic Repair
- Method 8: Booting in Safe Mode with Networking
- Method 9: Uninstalling Recent Updates and Drivers
- Method 10: Rebuilding the Boot Configuration Data (BCD)
- Extra Tips
- Conclusion
- FAQ
It can be frustrating when you need to get some tasks done but your computer won’t boot . Windows not booting is a persistent problem that users often encounter after upgrading to Windows 10. In this article , you will learn how to fix Windows 10 boot issues.
How to fix a Windows 10 computer that won’t boot?
Method 1: Ensuring that the POST Process Has Completed Successfully
In most cases, Windows 10 will not boot if the POST process has not completed successfully. So, the next time you boot your computer, make sure that the POST bar fills up entirely until it disappears.
Method 2: Disconnecting External Devices
It is possible for hardware to interfere with the normal Windows boot process and lead to Windows not booting . As such, it is advisable to disconnect all the external devices. You can keep your monitor, mouse, and keyboard plugged. Then disconnect your computer from the power outlet and detach the laptop battery. Press the Power button for 10 to 15 seconds. After that, plug your unit into the power outlet and restart your computer.
Method 3: Finding the Right Solution for the Specific Error Message
Take note of the specific error message that shows up when you try to log into your system and your computer won’t boot . One of the most common problems related to booting issues is the Blue Screen of Death (BSOD) error. So, if you want to fix the Windows 10 won’t boot issue, you should learn how to troubleshoot BSOD errors.
Here at Auslogics, we have compiled a list of articles that will guide you on fixing the most common BSOD errors on Windows 10. You can click the links below to find the appropriate solution.
How to fix Bcmwl51.sys Blue Screen Errors (BSOD)?
NO_MORE_IRP_STACK_LOCATIONS Blue Screen Errors (0x00000035) fix
How to fix ndis.sys Blue Screen Error on Windows?
Resolving tcpip.sys Blue Screen of Death on Windows 10/7/8
Resolving tcpip.sys BSOD: Fix Windows 10/7/8 Blue Screen Error
Method 4: Booting in Safe Mode
By booting into Safe Mode, you are able to launch your system with limited files and drivers. So, this option might help you troubleshoot the Windows 10 not starting issue. To boot into Safe Mode, follow the instructions below:
- On your keyboard, press
Windows Key+S. - Type Settings, then hit
Enter. - Select Update & Security.
- Go to the left-pane menu, then click Recovery.
- Click the Restart Now button under the Advanced Startup section.
- Once you get to the Choose an Option screen, select Troubleshoot.
- Click Advanced Options.
- Go to Startup Settings, then select Restart.
- Once your PC restarts, you will see a list of options.
- You can launch your unit in Safe Mode by pressing
4orF4.
Steps to Exit Safe Mode:
- Right-click the Start button.
- From the list, select Run.
- Type
msconfig, then hitEnter. This should open the System Configuration window. - Click the Boot tab.
- Make sure that the Safe Boot option box is not selected.
- Restart your PC.

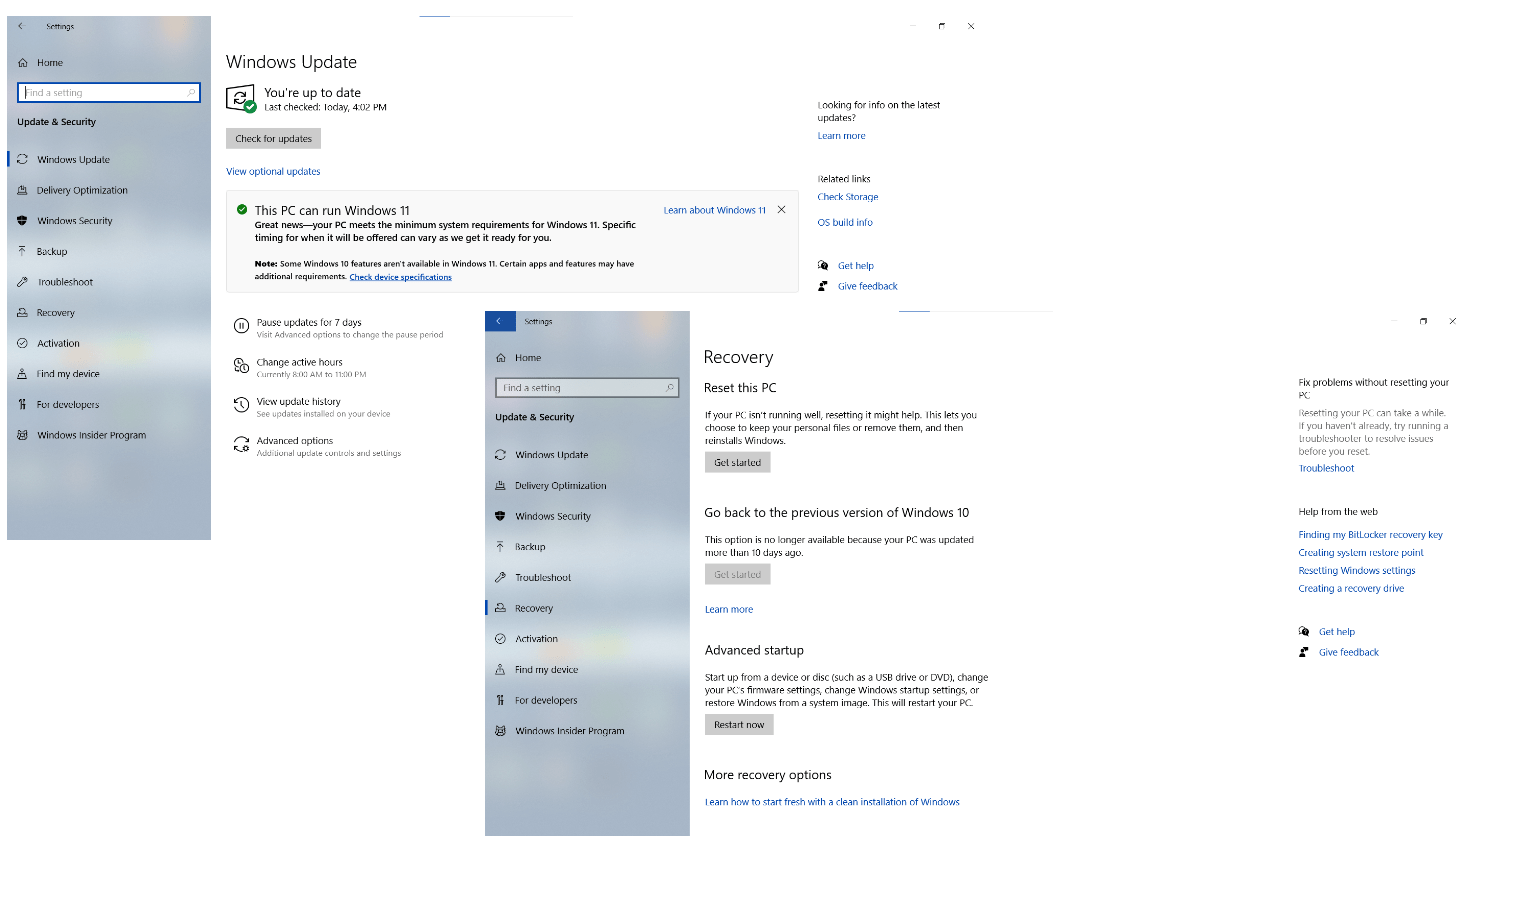
Method 5: Resetting your Computer
You can also try resetting your PC to fix the Windows 10 won’t boot issue. This will allow you to reinstall your system. To reset your device, follow the steps below:
- Click the Search icon on your taskbar.
- Type
Settings, then pressEnter. - Select Update & Security.
- Go to the left-pane menu, then choose Recovery.
- Click the Get Started button under the Reset this PC section.
Keep in mind that this option will delete all your personal files, apps, and customizations. Only the default apps offered by Windows will be reinstalled on your computer.
Method 6: Performing a System Restore
If your computer won’t boot after upgrading to Windows 10, you can try to perform a system restore. It would help if you create a restore point in Safe Mode whenever you install new apps, Windows updates, or drivers. That said, you can go back to a restore point by following the instructions below:
- On your keyboard, press
Windows Key+S. - Type
System Restore. - Select Create a Restore Point from the results.
- Submit your administrator password. If you are prompted to give permission, click Yes.
- The System Properties window should show up.
- Click the System Restore button, then select Next.
- Choose a restore point that you created before the problem occurred.
- Click Next, then select Finish.
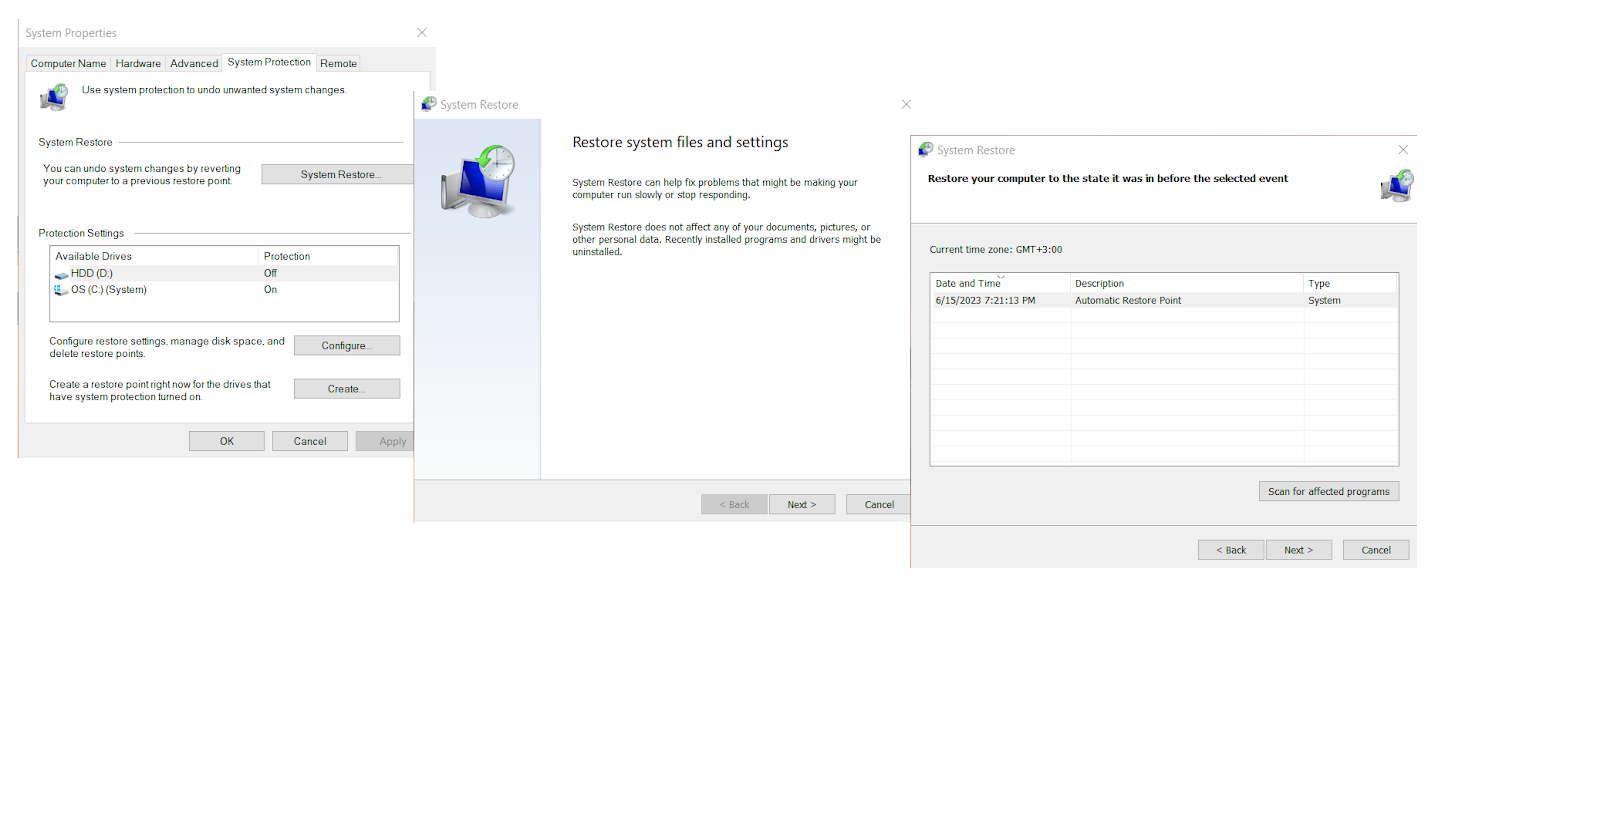
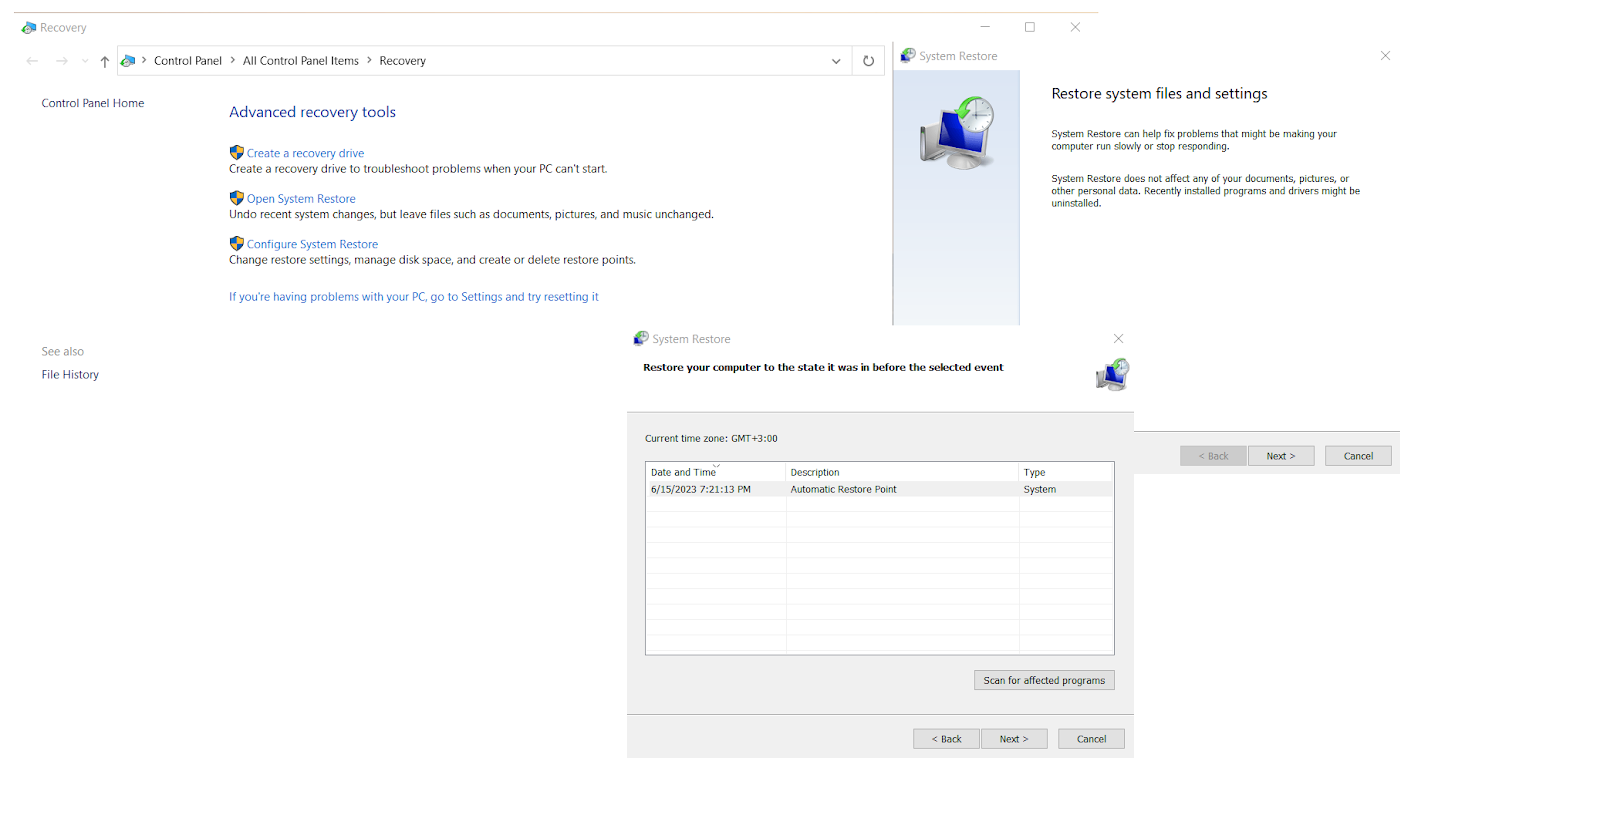
Rolling your system back to a restore point shouldn’t affect your personal files. However, all the apps, updates, and drivers you installed after the restore point will be removed. Here’s another way of going back to a restore point:
- Click the Search icon on your taskbar.
- Type
control panel, then hitEnter. - Go to the Search box, then type Recovery.
- Select Recovery from the results.
- Click Open System Restore, then click Next.
- Select the appropriate restore point.
- Click Next, then click Finish.
Method 7: Performing Automatic Repair
To fix your Windows not booting problem with this method, you need to use a different computer. You must download Windows 10 ISO to make a Media Creation tool. Once you have the installation media, follow these instructions:
- Plug the Windows Installation media, then restart your PC. You will be prompted to press any key to boot from your USB drive or disk.
- Once the Install Windows page is up, select Repair Your Computer. This should launch Windows Recovery Environment (WinRE).
- Once you’re in WinRE, go to the Choose an Option screen, then follow this path:
Troubleshoot ->Advanced Options ->Automatic Repair
Also Read:How to Get And Use Windows 10 Media Creation Tool
If you are not prompted to press any key to boot from your installation media, you must go to your BIOS settings and change the boot order. You must ensure that your system will start from your installation media. However, before you proceed, you must know that incorrectly changing the BIOS settings may prevent your PC from booting properly. So, proceed with caution.
Keep in mind that BIOS should only be updated when necessary. Here are the steps to changing the boot order:
- While your system is restarting, look for the instructions on how you can interrupt the regular startup process.
- Press the appropriate key for entering BIOS Setup Utility.
- Once you are inside BIOS Setup Utility, look for the Boot Options, Boot Order, or Boot tab.
- Go to Boot Order by using the arrow keys.
- Press
Enter. - Look for the removable device on which the Media Creation tool is installed.
- Drive that option upwards by using the arrow keys. Make sure that it becomes the first option in the Boot list.
- Press
Enter. - Now that you’ve changed your boot order sequence, press
F10to save the changes. This should also allow you to exit BIOS Setup Utility. After doing this, your PC will restart. - Let the scan run for a couple of minutes to ensure that any malware infecting your PC is removed.
- Click Next, then select Repair your Computer.
- Select Windows 10 as the operating system you wish to repair.
- Click Next.
- Once you get to the Choose an Option screen, select Troubleshoot.
- Choose Advanced Options, then click Startup Repair or System Restore.
Once the repair process is complete, check if you can boot into your system properly.
Method 8: Booting in Safe Mode with Networking
If your Windows 10 won’t boot or you keep running into another Windows 10 not starting issue, entering Safe Mode with Networking can help you. Safe Mode with Networking allows you to boot Windows with the services and drivers necessary in accessing the Internet.
- Restart your PC.
- Once you see the sign-in screen, hold the
Shift keywhile clicking Power. Select Restart from the options. - Your computer should restart to the Choose an Option screen.
- Follow this path:
Troubleshoot ->Advanced Options ->Startup Settings ->Restart
- You will see a list of options when your PC restarts. Select
F5 or 5for Safe Mode with Networking.
After entering Safe Mode with Networking, you should be able to run SFC and DISM scans. These will help you repair issues on your system that might be causing the booting problem. The System File Checker (SFC) allows you to check the protected system files automatically. It will also replace the incorrect versions with the ones Microsoft officially released. On the other hand, the Deployment Image Servicing and Management (DISM) tool fixes corrupted files in Windows Update and service packs.
How to Perform an SFC Scan
- Press
Windows Key+Son your keyboard. - Type
CMD. - Right-click Command Prompt from the results, then select Run as Administrator.
- Type
sfc/scannow, then pressEnter. - Wait for the process to complete. After that, restart your PC.

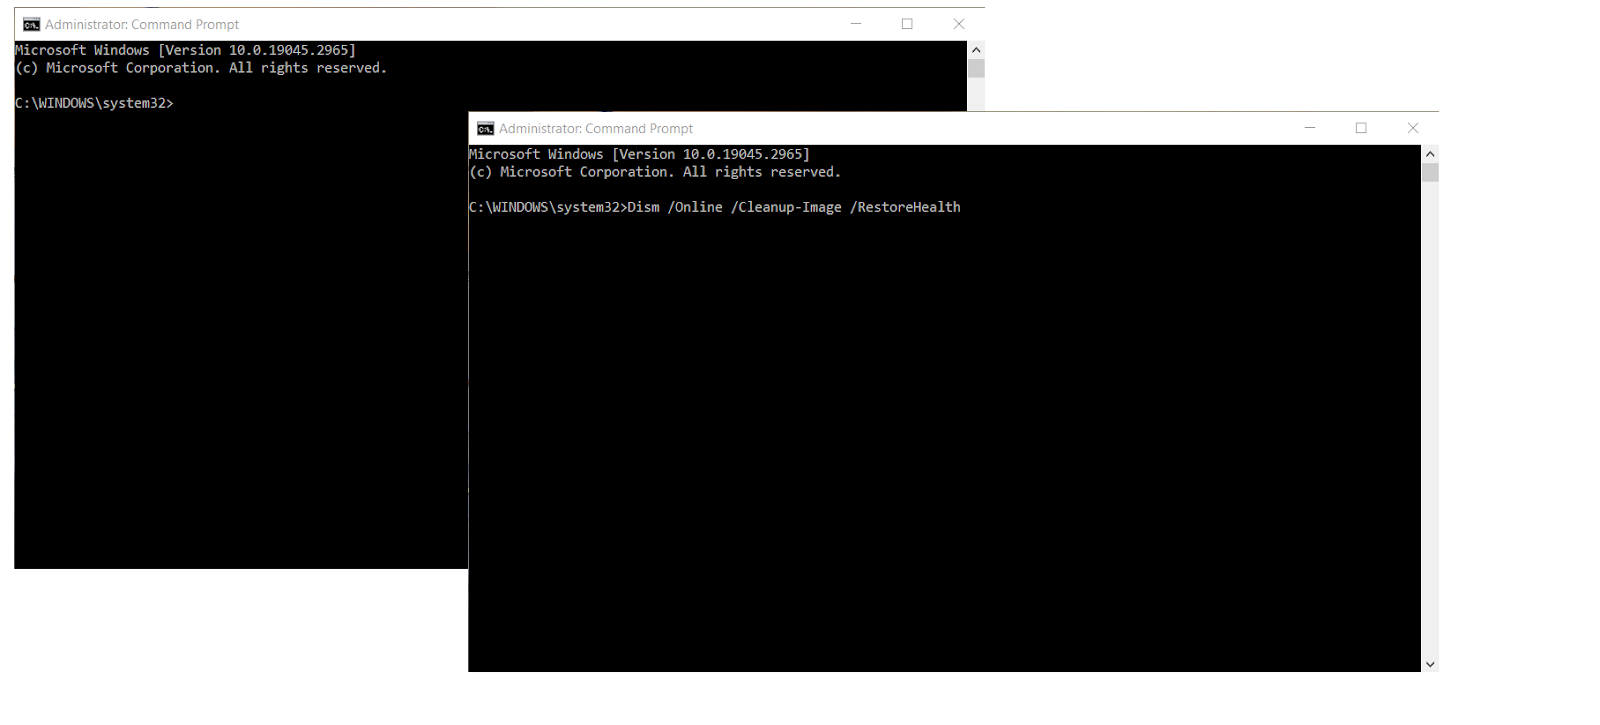
How to Perform a DISM Scan
- Go to your taskbar and click the Search icon.
- Type
CMD. - You will see Command Prompt from the results. Right-click it, then select Run as Administrator.
- Type
Dism /Online /Cleanup-Image /RestoreHealth, then pressEnter. - Once the process is complete, restart your computer. Check if you can boot Windows 10 with no issues.
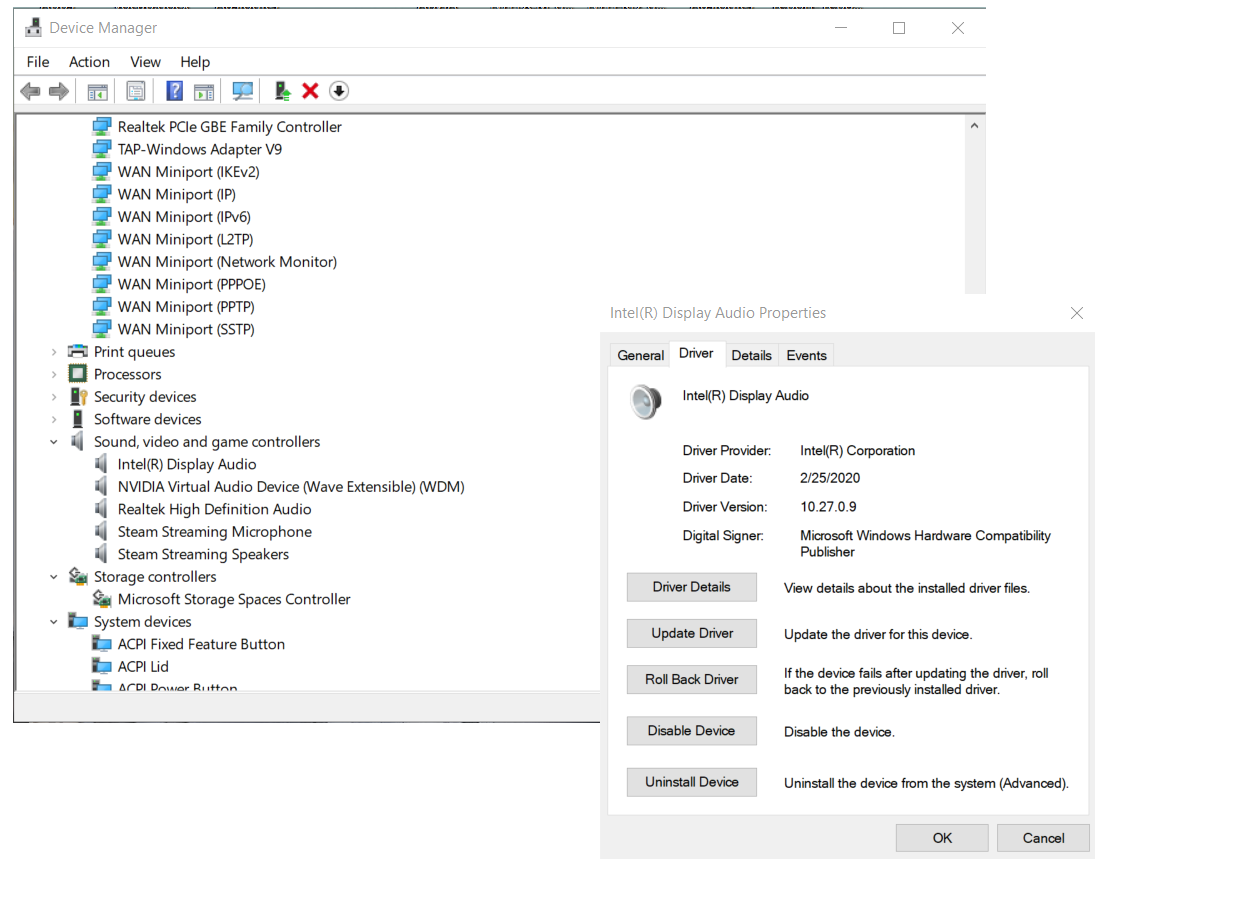
Method 9: Uninstalling Recent Updates and Drivers
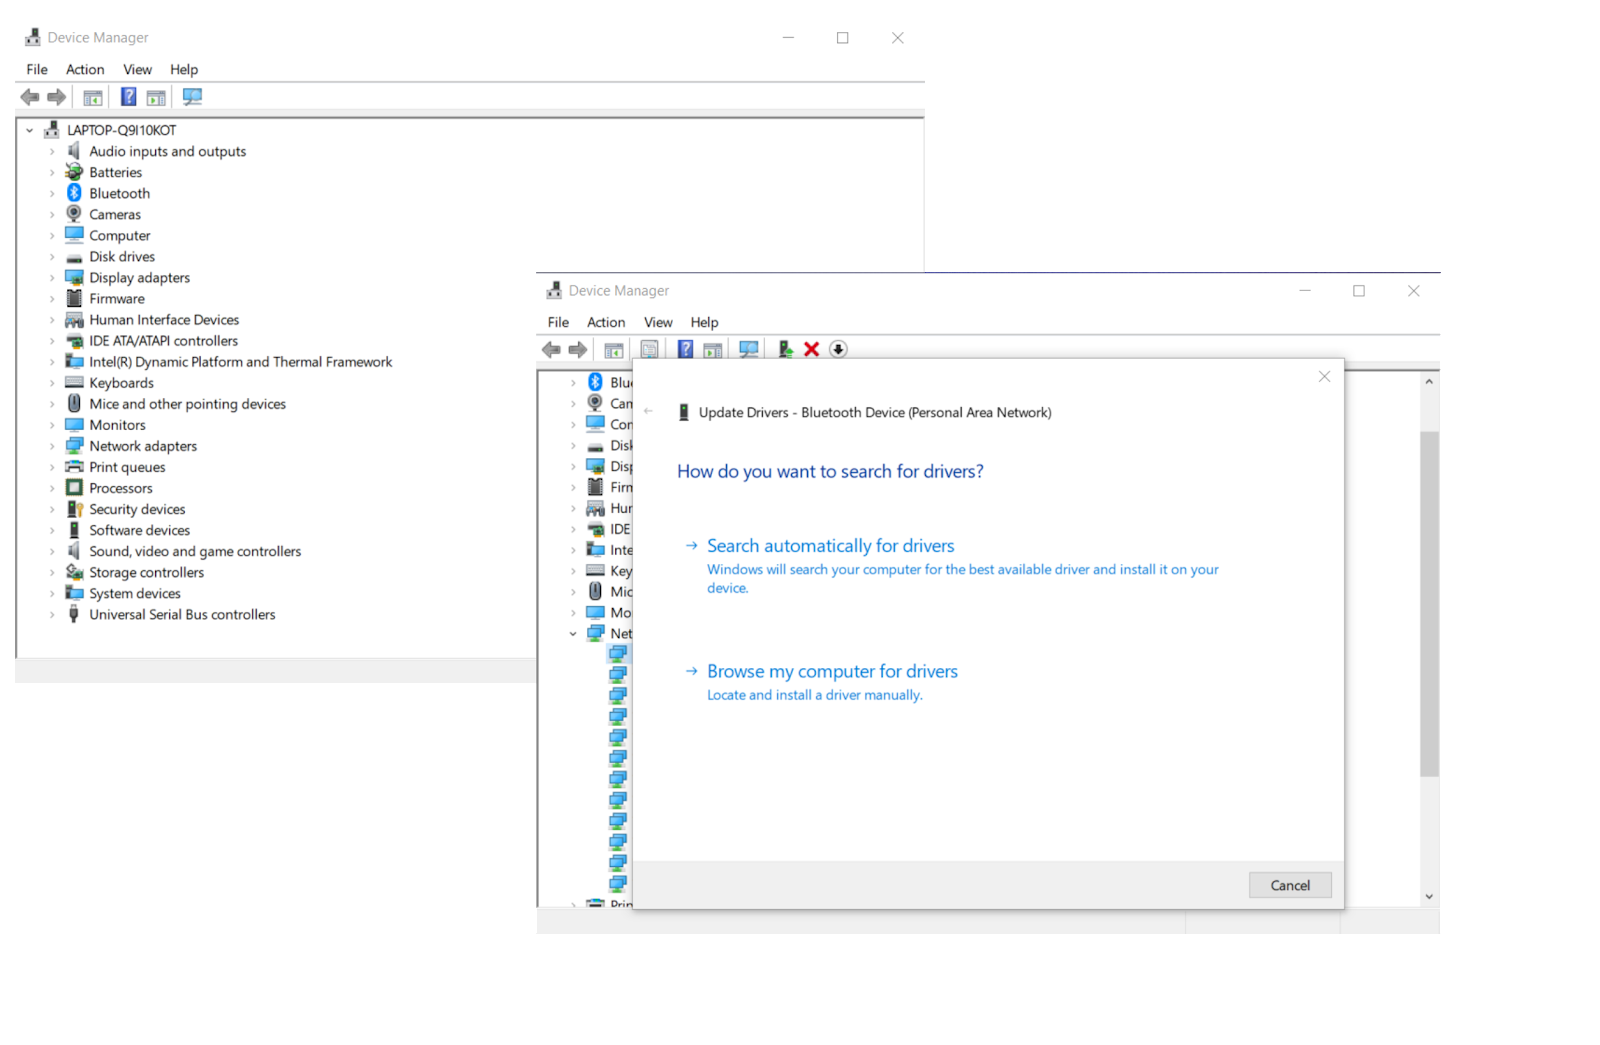
In some cases, a Windows computer won’t turn on after installing software updates or drivers. For instance, Windows 10 will not boot after an update that is corrupt or buggy. We recommend you to uninstall a suspicious update if Windows 10 will not boot on your PC. Buggy or corrupt drivers can also lead to Windows 10 not starting . If your computer won’t boot after a recent driver update, try uninstalling the new driver version:
- Open Device Manager by pressing
Win + X. - Locate the device whose driver you’ve recently updated.
- Right-click the device, click Properties and navigate to the Driver tab.
- Select Roll back the driver.
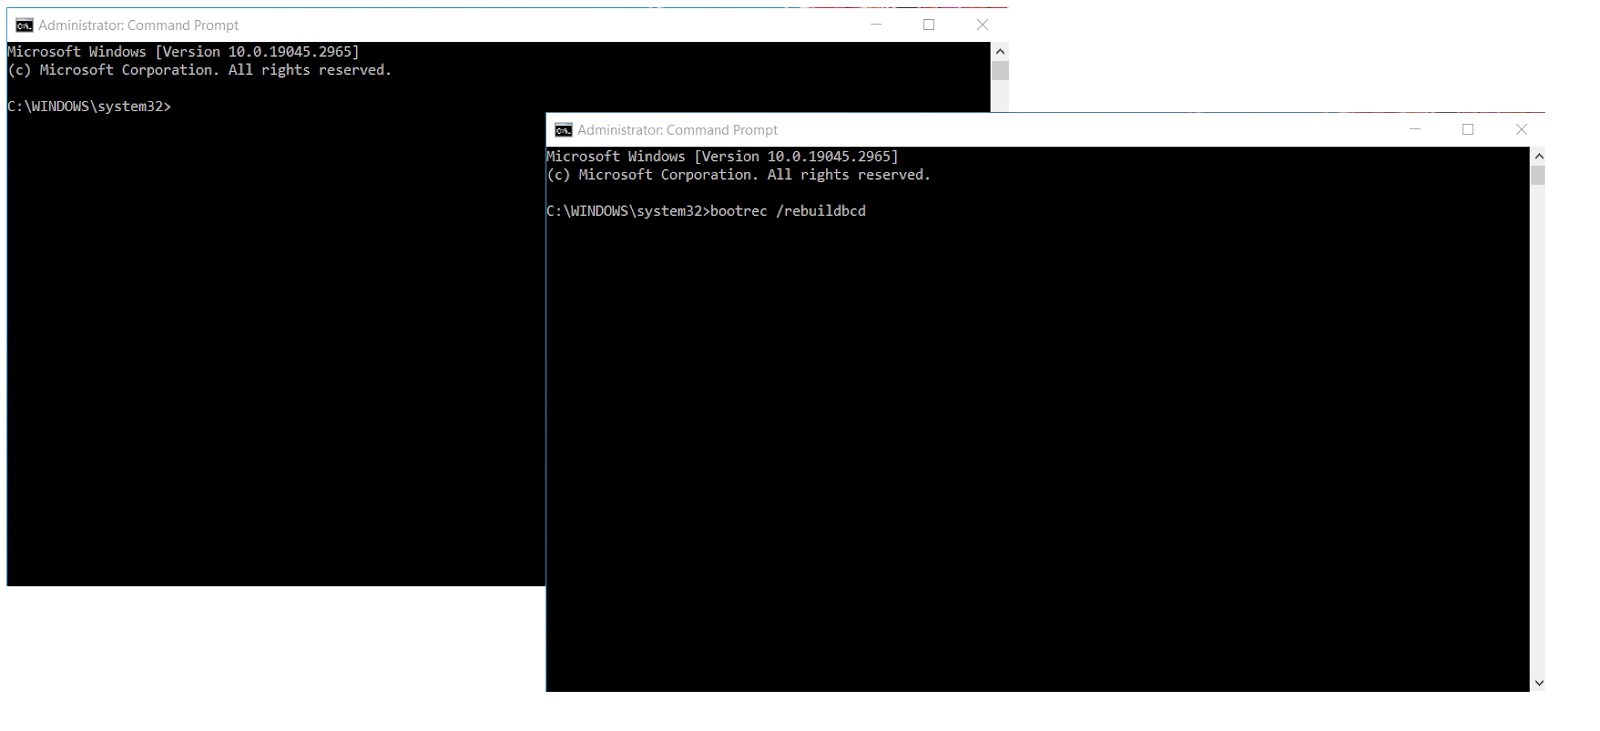
Method 10: Rebuilding the Boot Configuration Data (BCD)
If all your efforts have been to no avail and Windows 10 won’t boot , consider rebuilding the Windows boot configuration data (BCD) with the bootrec command. Doing so is quite straightforward and can effectively fix Windows 10 boot problems:
- Go to Settings > Update & Security > Recovery and start Advanced Startup Options.
- Proceed to Troubleshoot > Advanced options and select Command Prompt.
- Type
bootrec /rebuildbcdand pressEnter.
Extra Tips
To keep issues like your PC not booting or Windows 10 not starting at bay, you need to take good care of your computer. The following tips will help you prevent Windows not booting problems:
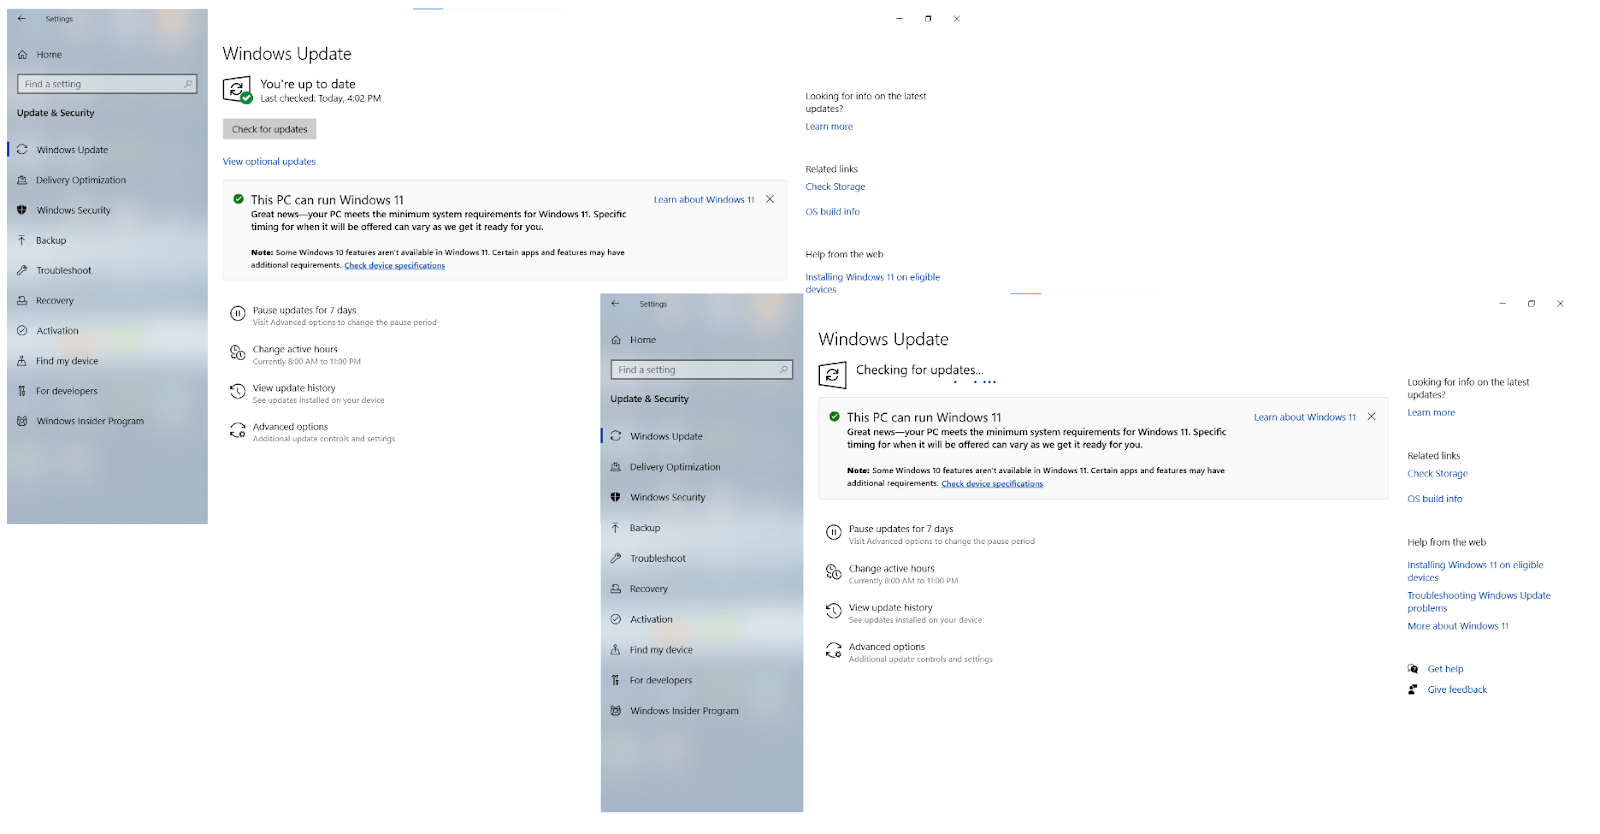
Keep your software up to date
Software updates often arrive with improvements, fixes and patches, so you need to install them timely to prevent your PC not booting to Windows . Unfortunately, Windows 10 feature updates won’t be here too long. Which is why you need to get the most out of them today to avoid Windows 10 not starting issues:
- Press
Win + Ito open Settings and select Update & Security. - If Windows Update offers you updates, agree to install them.
- Otherwise, click Check for Updates and let Windows Update check for available updates.
- Examine the updates offered and agree to install them.
Update your drivers
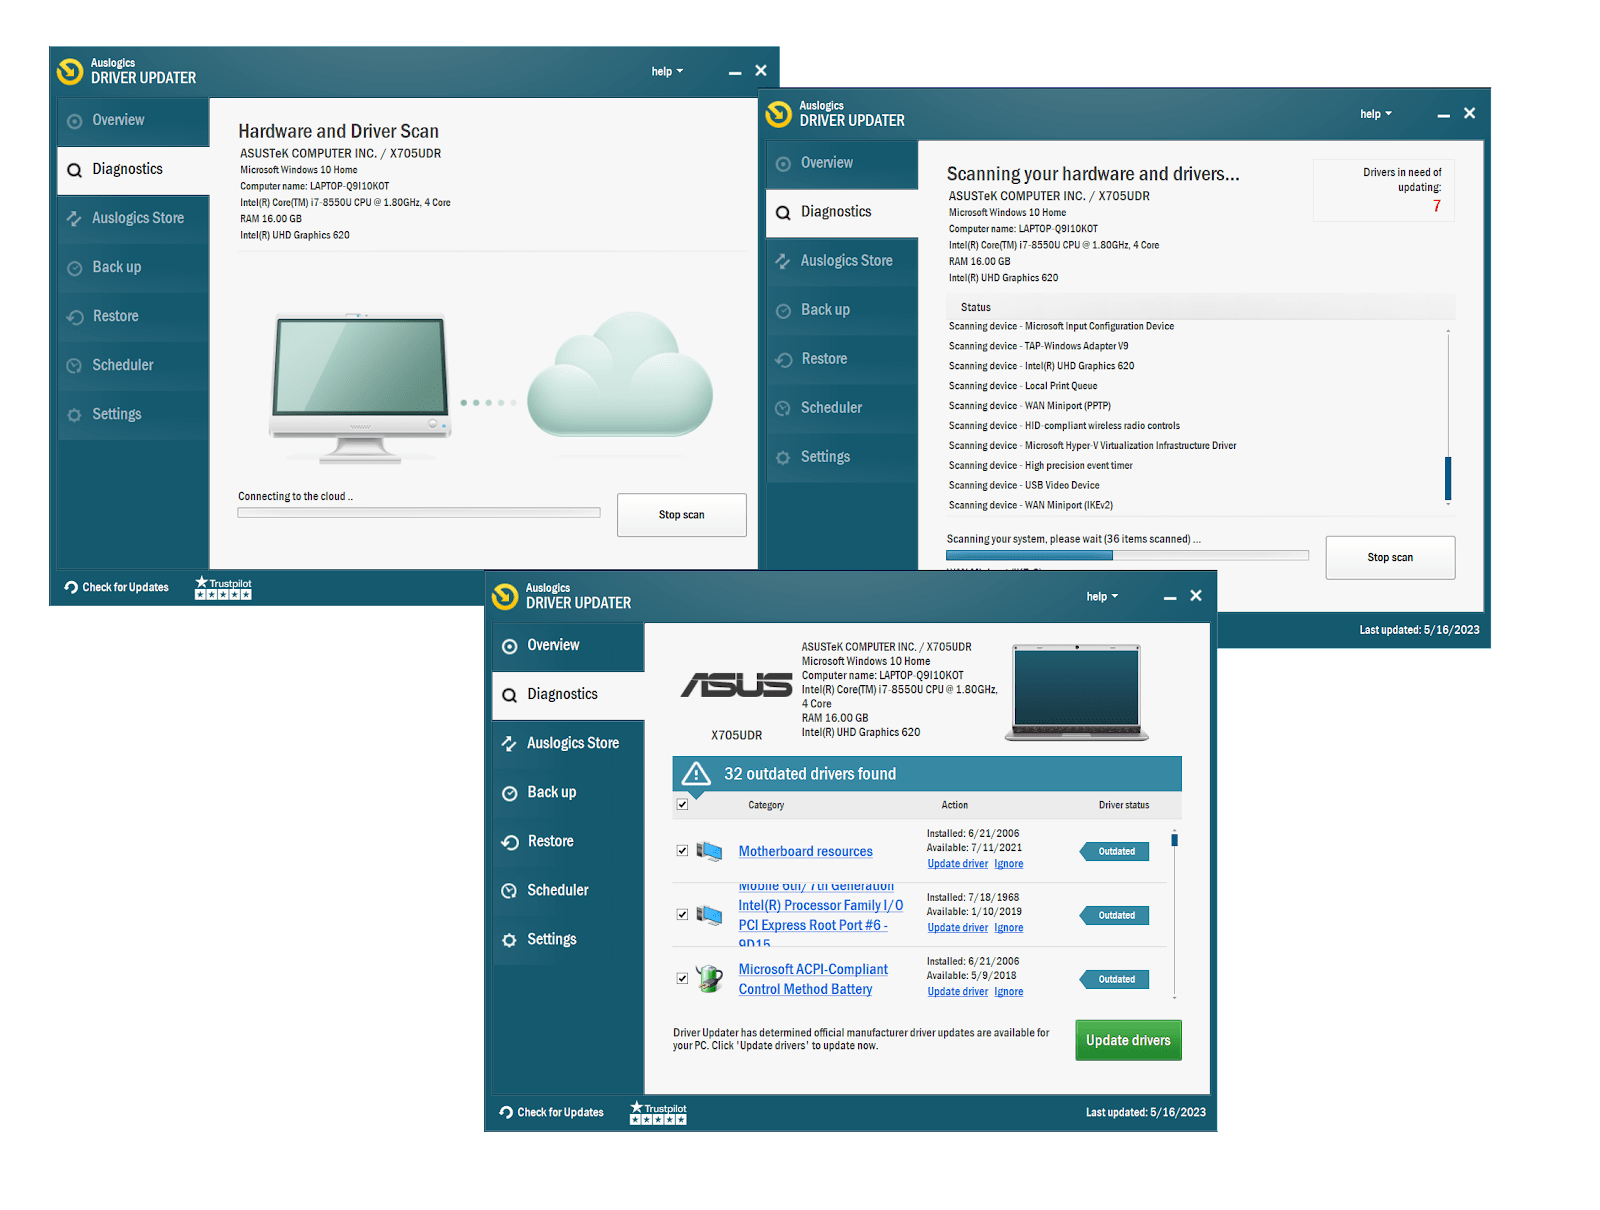
In many cases, Windows 10 won’t boot if your driver software is out of date, so you need to know how to update drivers
. You can download driver updates for your devices from their manufacturers’ websites, yet this process is time-consuming. An alternative is using Device Manager: press Win + X, select Device Manager, right-click a device, and click Update Driver.
Unfortunately, Device Manager sometimes fails to find the latest updates. To get them, you can employ a dedicated tool like Auslogics Driver Updater. It installs multiple driver updates in one click, making your PC less prone to issues like Windows not booting :
- Download and run Auslogics Driver Updater. The tool will immediately start scanning your PC for driver issues.
- Wait until the scan is over.
- Click Update drivers to get all the drivers updated.
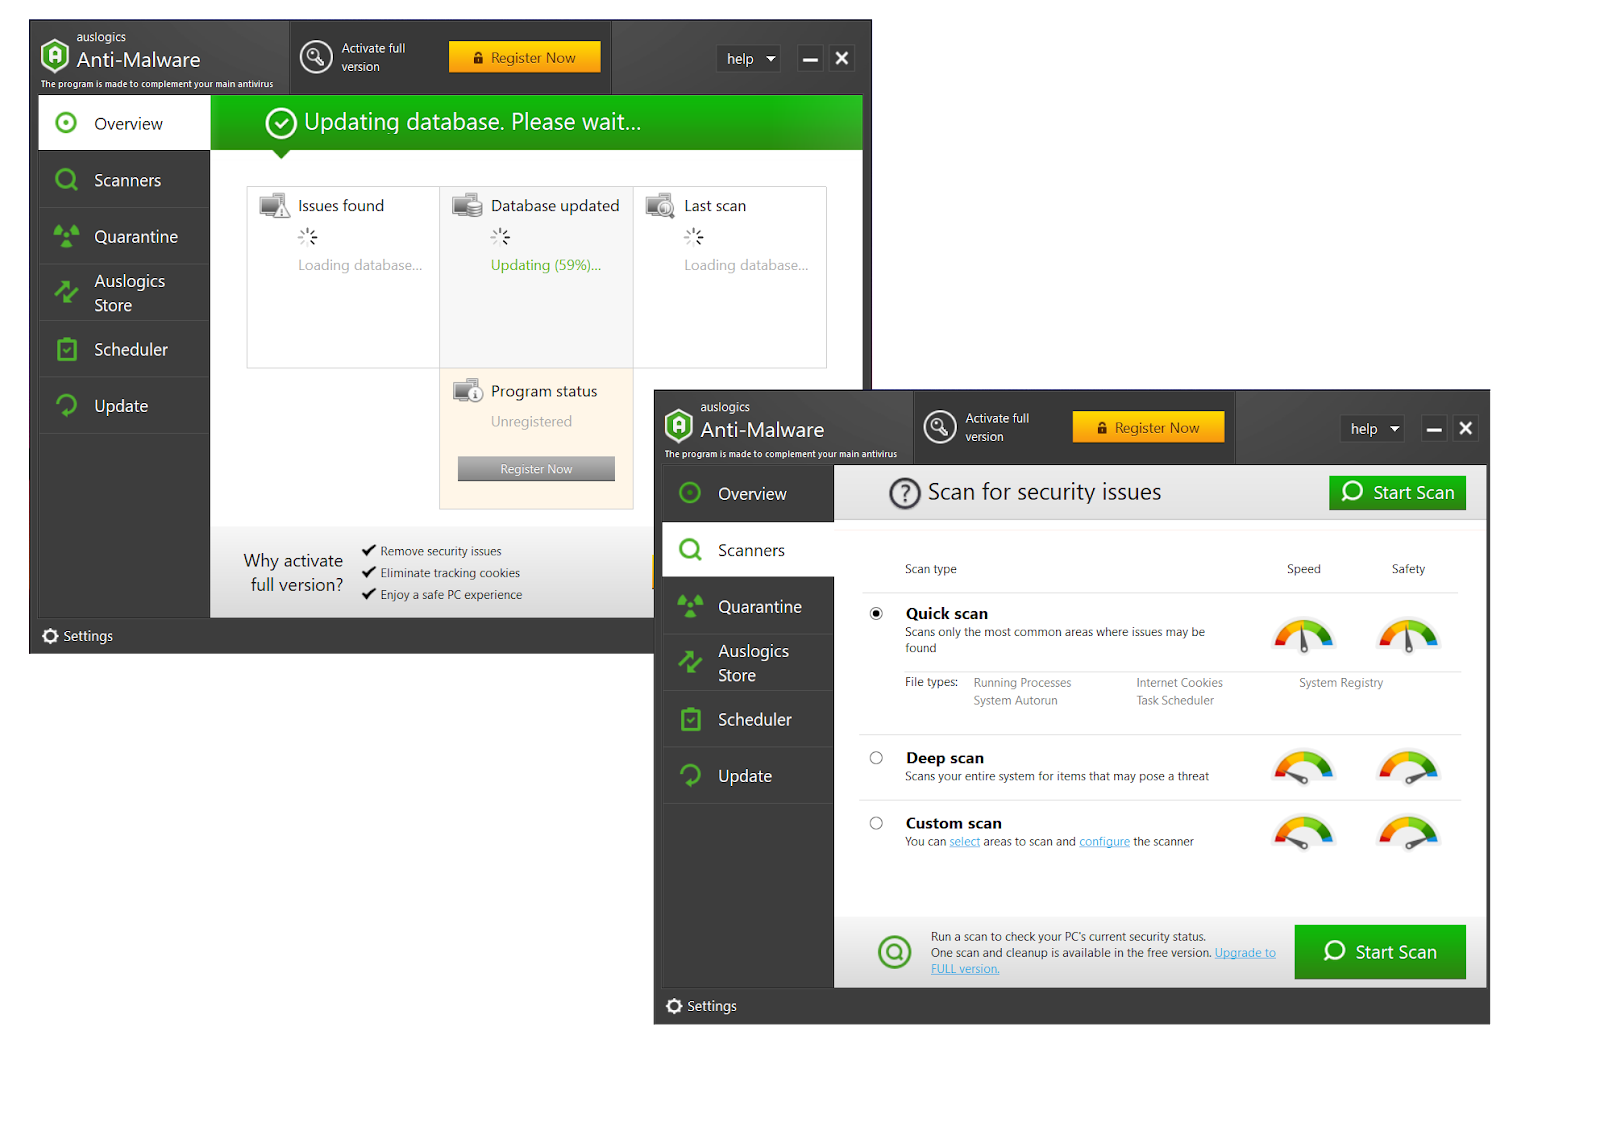
Install antivirus software
A PC not booting to Windows often means malware is at play. The number of malware attacks is incredibly high, meaning you should be vigilant. Windows 10 is protected with the built-in Windows Security tool (Settings -> Update & Security -> Windows Security), yet it may not be enough since malware becomes more sophisticated. A powerful tool like Auslogics Anti-Malware can help you:
- Download and run Auslogics Anti-Malware.
- Wait until the app’s database is updated.
- Navigate to the Scanners tab, select the type of scan you want to run and click Scan.
- Once the scan is over, check whether any threats have been found and let the tool deal with them.
Perform regular maintenance
Regular PC maintenance procedures can help avoid Windows not booting issues and make Windows 10 not starting a thing of the past. Removing clutter, eliminating software conflicts and fixing errors, among other things, will make your system stable and fix Windows 10 boot issues. Doing that manually can be hard, yet you can use Auslogics BoostSpeed to automate PC maintenance procedures:
- Download Auslogics BoostSpeed and install it on your PC.
- Run the app, open File and select Settings.
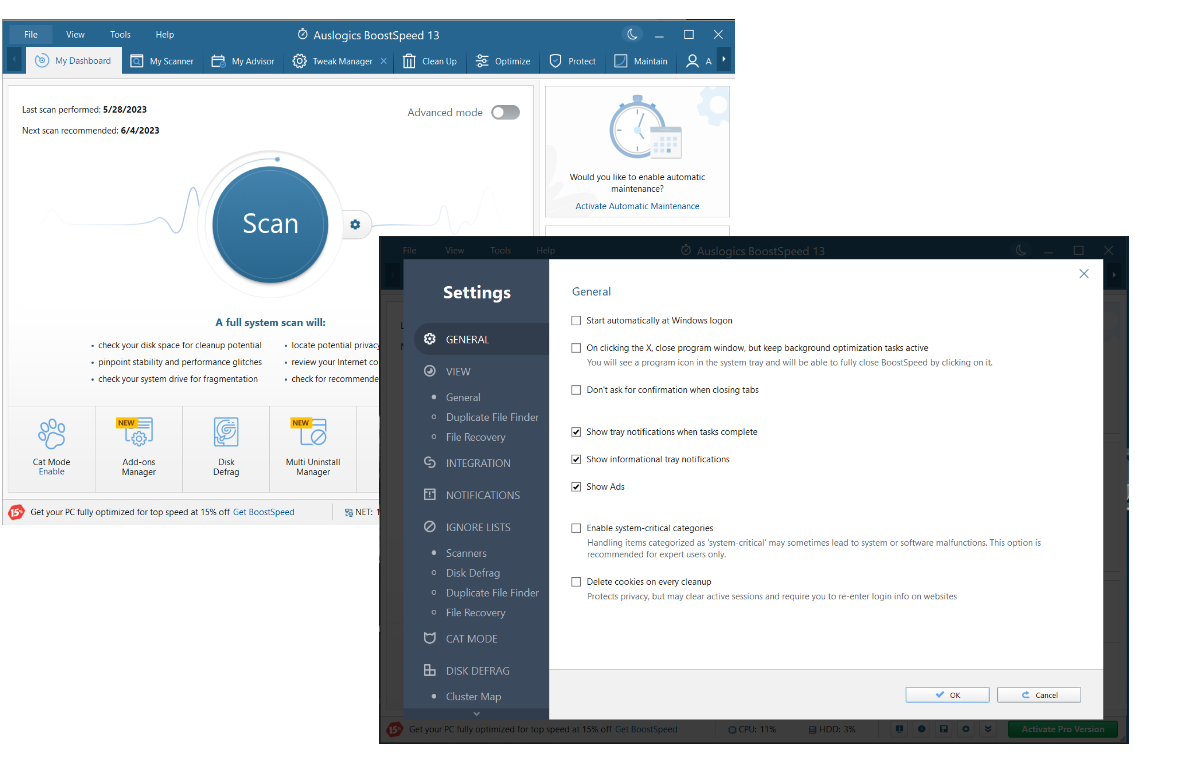
- Proceed to Scheduler -> My Scanner.

- Check Enable Automatic Maintenance and decide when and how often the app should check and optimize your PC.
- Click OK to apply your selections.
Conclusion
Windows not booting is an irritating issue that can stem from hardware malfunctions, software conflicts, system file corruption, and outdated drivers, to name but a few. Your computer won’t boot unless you figure out what is to blame and fix it. Luckily, from updating your drivers to performing automatic repair, there are quite a few ways to get the PC not booting to Windows issue resolved.