
By default, every PC is programmed to boot from its internal hard disk drive or solid-state drive. However, this might not be ideal in some cases, and you’ll need to know how to change the boot order to prioritize a specific device for booting. Instances like upgrading or reinstalling your operating system require you to use a USB bootable media.
For this to work, you must change the boot order to start the PC from the bootable media. The boot order is the sequence in which your Windows computer tries to find and load an operating system as set in BIOS or UEFI Firmware in modern PCs.
If your computer has multiple operating systems installed, you can change the boot order to specify which one you want to start with. In this article, we’ll explore how to change the boot order in BIOS for Windows 10 and Windows 11.
What is BIOS?
BIOS, which stands for Basic Input/Output System, is a firmware interface that is present in most personal computers. It’s the first software that runs when you power on your computer, initializing hardware components such as the CPU, memory, and storage devices.
Its primary function is performing a Power-On Self-Test (POST) to check the hardware components and ensure they function properly. It then loads the operating system into the computer’s memory and transfers control to it, allowing the operating system to take over and continue the boot process.
Now that you have a basic understanding of what BIOS is and what it does, let’s proceed to learn how to change the boot order .
How to Change Boot Order in BIOS
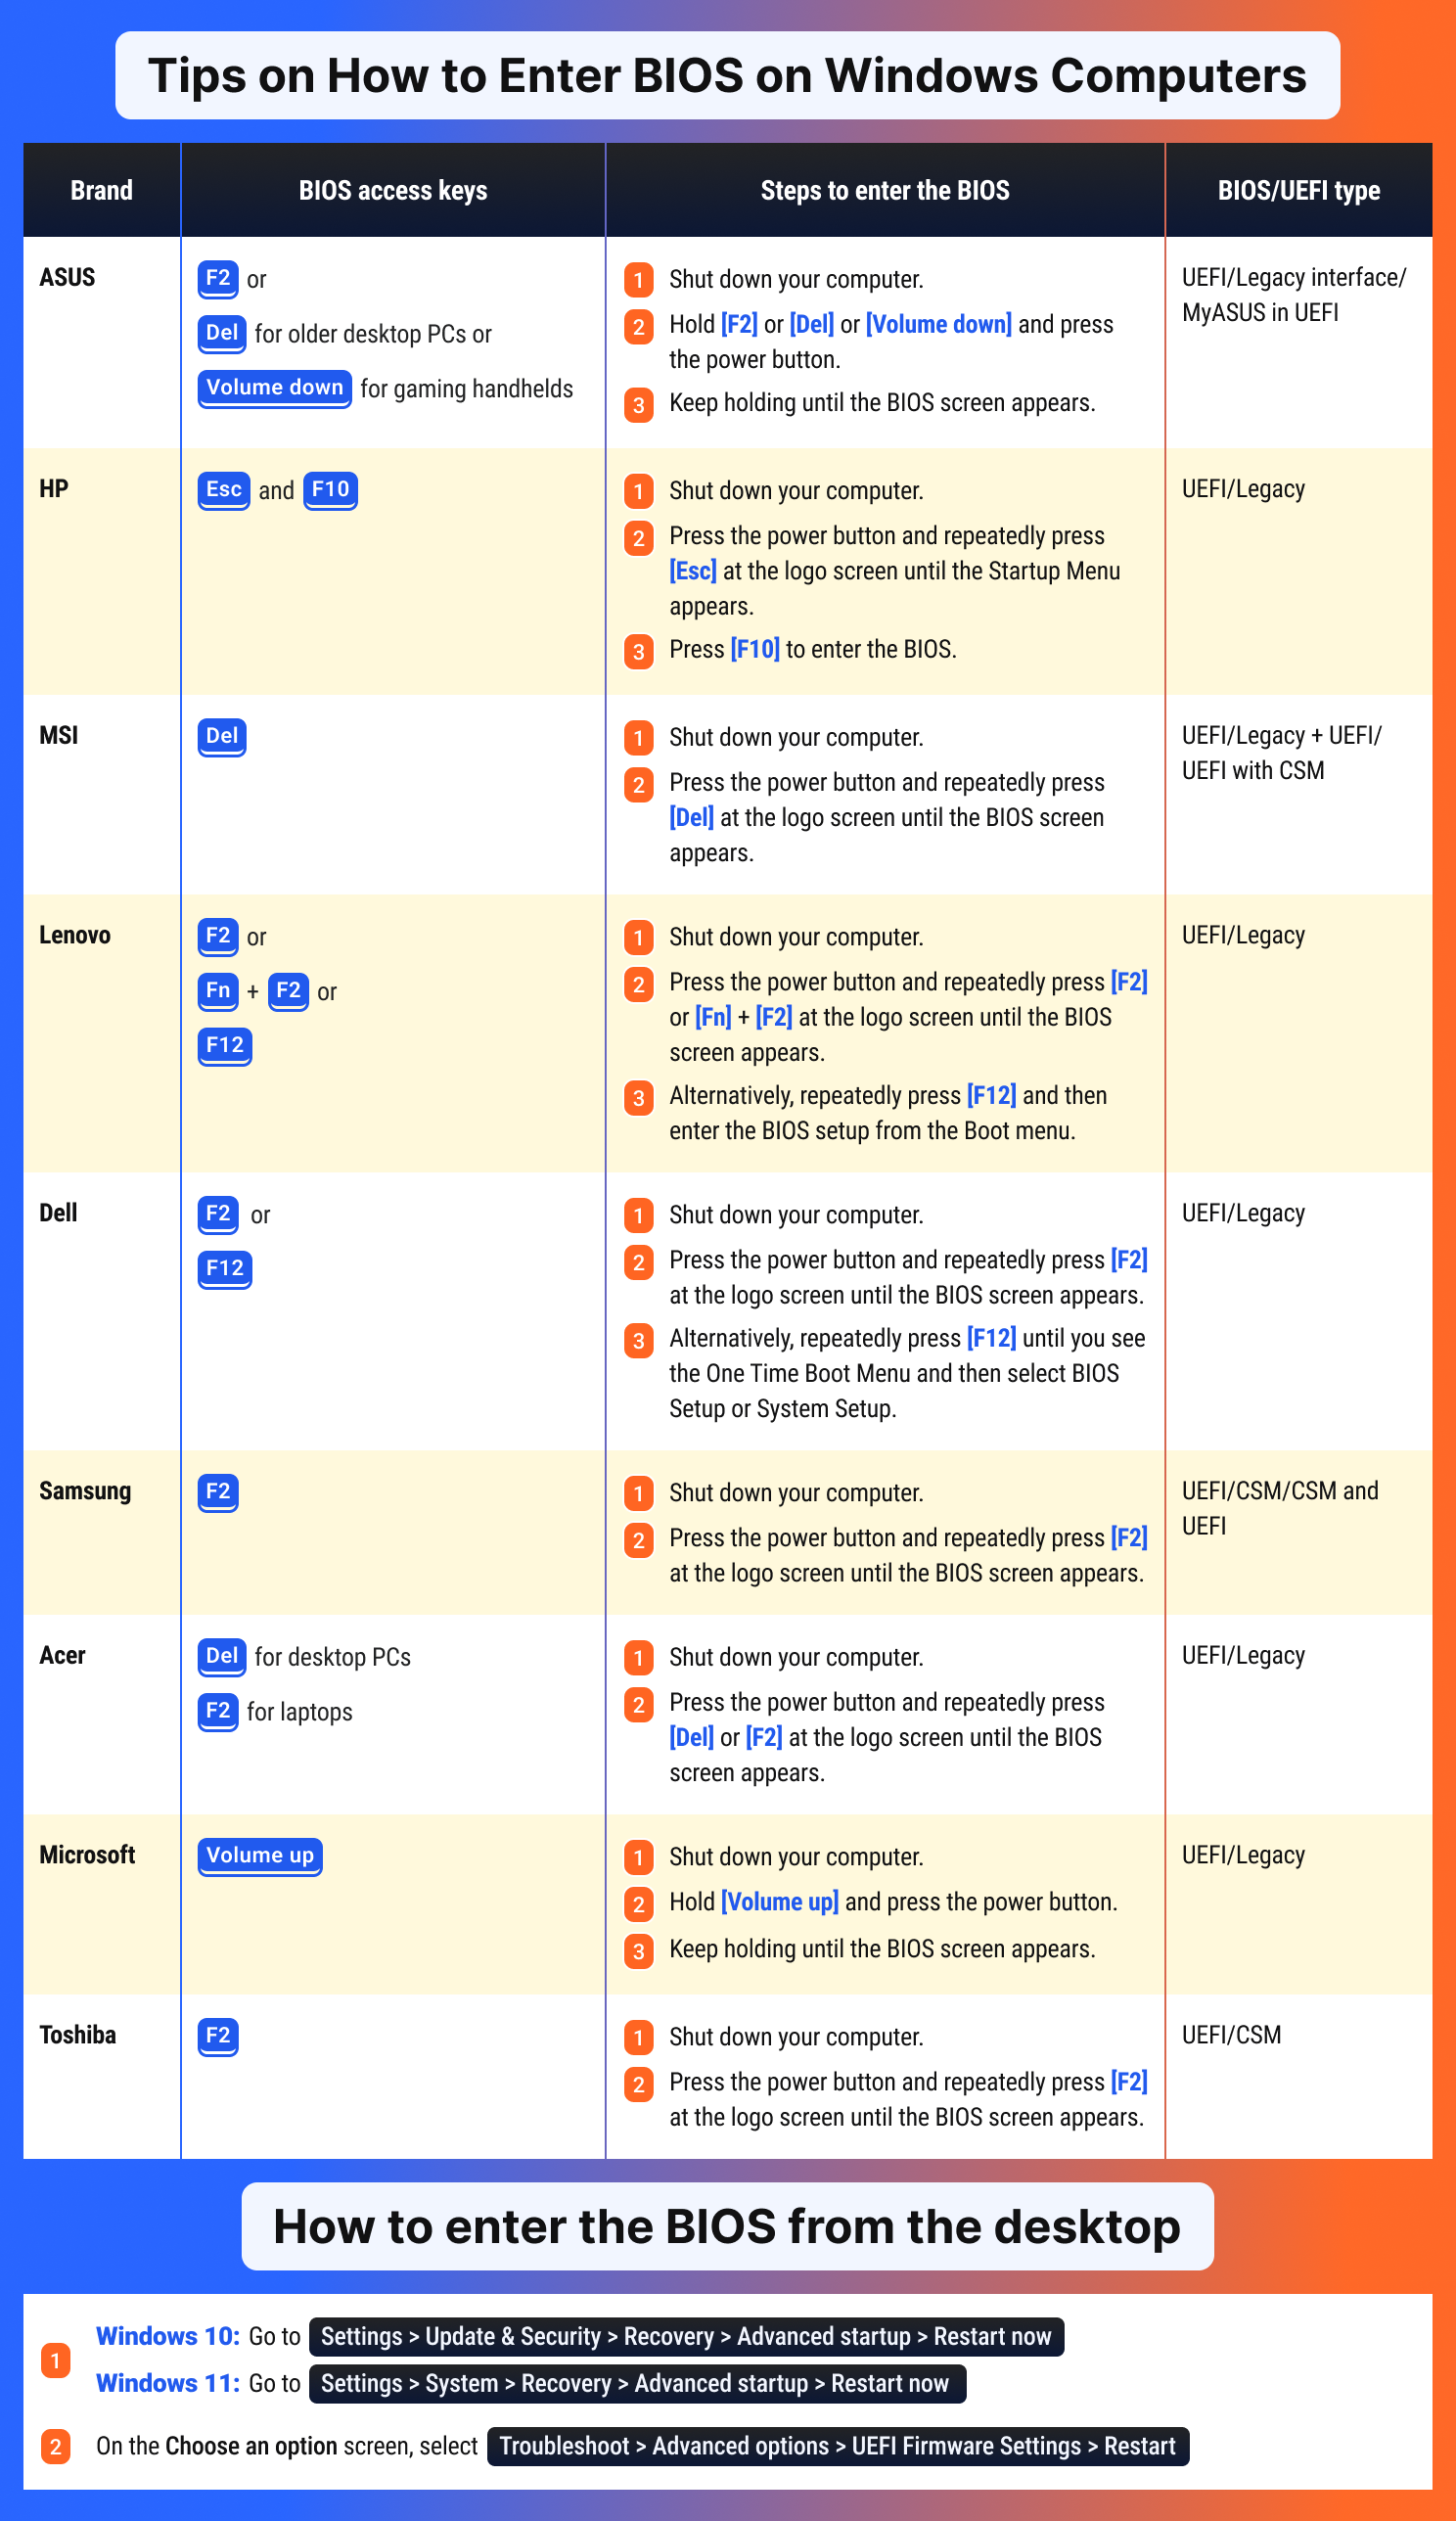
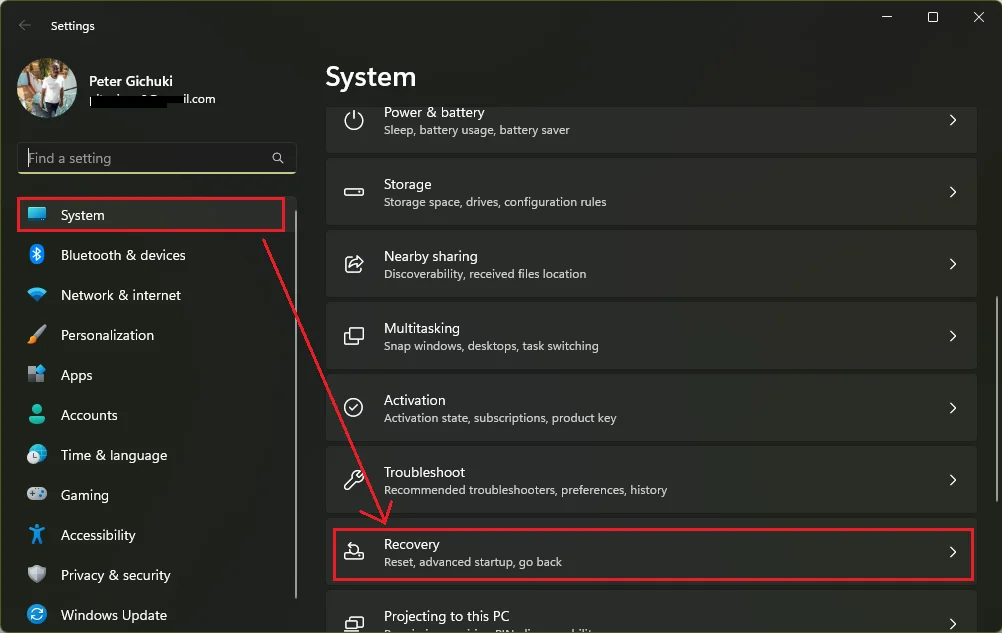
Before we get into the details, you need to know how to access the BIOS settings. To do so, you’ll be required to instruct your PC to load the UEFI/BIOS interface by pressing a specific key multiple times at startup.
The key to press varies from one motherboard manufacturer to another. But basically, the most common keys are F2, F9, F10, F11, or Esc. Check your computer’s manual or search online for the specific key to use on your computer model.
With that out of the way, here’s how to change the boot order in BIOS :
Step 1: Switch off or restart your PC
- First, you’ll need to load the BIOS setup utility. As mentioned above, identify the key to initialize the BIOS setup. This will usually be shown on the screen during startup.
- Next, restart your PC and press the function key multiple times to enter the boot menu. Be sure to hit the key when a message appears during POST. If you’re late, let the PC restart and switch it off before starting the process again.
Step 2: Access the BIOS utility
Once you press the correct keyboard command, you’ll access the BIOS Setup Utility. The BIOS utilities will vary from one computer model to another.
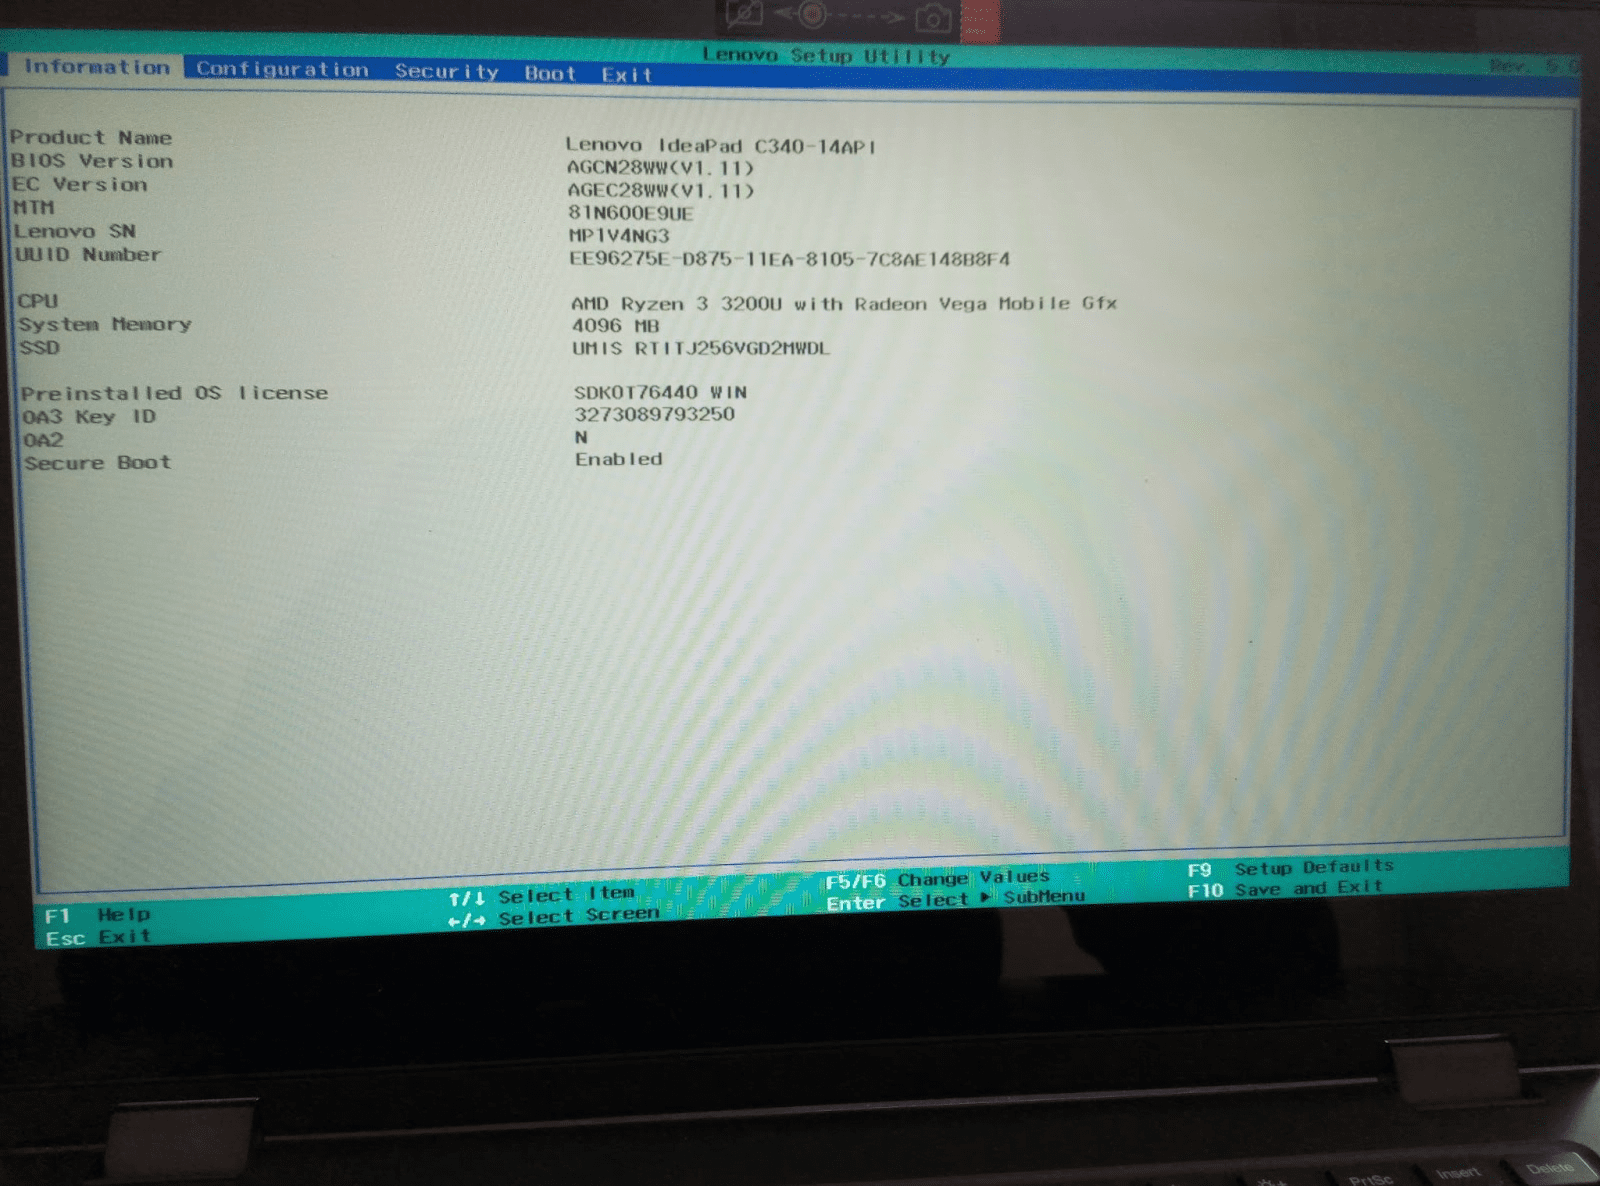
Step 3: Change the boot order
Find the Boot tab on the BIOS Setup Utility window and select it.
Here, you’ll see a list of devices in the order in which your PC will boot. By default, the computer will first try to boot from devices it considers hard drives – usually the internal hard drive containing the operating system.
If it finds no hard drives, it will look for the next bootable media, like a CD-ROM drive. If it doesn’t find it, it will look for the next bootable media attached, such as a USB flash drive.
Lastly, it will try to boot from the network.
To change the order the computer boots from first, use the arrow keys on your keyboard to select your desired device. Usually, there’s a + sign next to the selected device, or it will be highlighted.
Step 4: Saving And Exiting BIOS
Knowing how to change boot order in Windows 11 or 10 isn’t complete if you don’t save your changes since your preferences won’t take effect. To do that, follow the instructions provided in your BIOS Utility.
For example, you may be required to press F10 to Save and Exit the BIOS Setup Utility.
Now, once you confirm your changes, go on and start your computer. It will boot in the boot order you specified in the BIOS Setup Utility.
If the device isn’t bootable, BIOS will attempt to boot from the next device on the list, and so on.
Related: [FIXED] How to fix the Inaccessible Boot Device Error in Windows 10?
Booting from USB in Windows 10/11
Now that you know how to change boot order , let’s explore further and learn how to boot from USB in Windows 10/11. First, you’ll need to create a bootable USB flash drive. This will burn the Windows ISO files to the USB flash drive. Once the bootable media is ready, follow these steps to boot Windows from the USB flash drive.
Method 1: If PC starts normally – from Settings
If your PC starts normally, you can change the boot order to instruct BIOS to load from the bootable flash drive. Here’s how to change boot order when you can access your PC:
- Insert the bootable USB flash drive that contains the Windows ISO files into the computer.
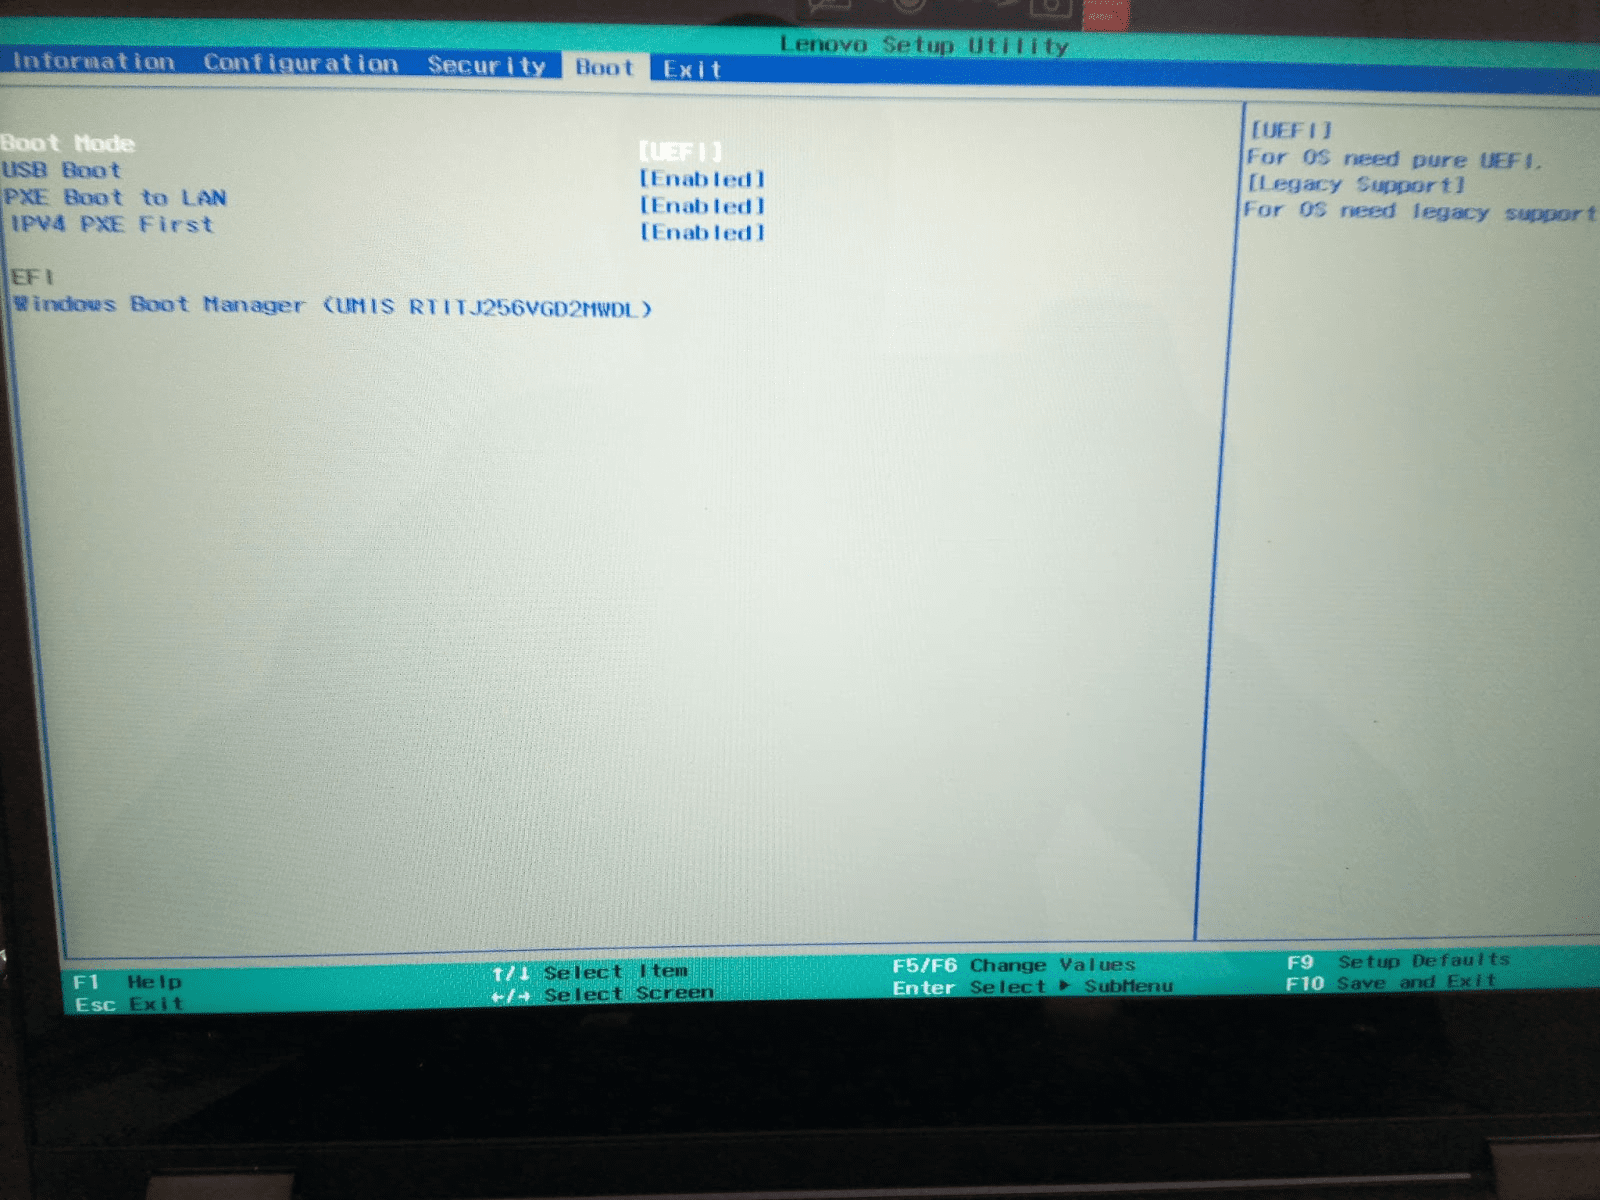
- Use the Win + I hotkeys to bring up the Settings app, then select System > Recovery. On Windows 10, open Settings > Update & Security > Recovery.
- Select the Restart Now button to the right of Advanced Startup.

- Your PC will restart and load into the recovery environment. On the Choose an option window, select Use a device. If you don’t see that option, it means the USB flash drive you created isn’t bootable.
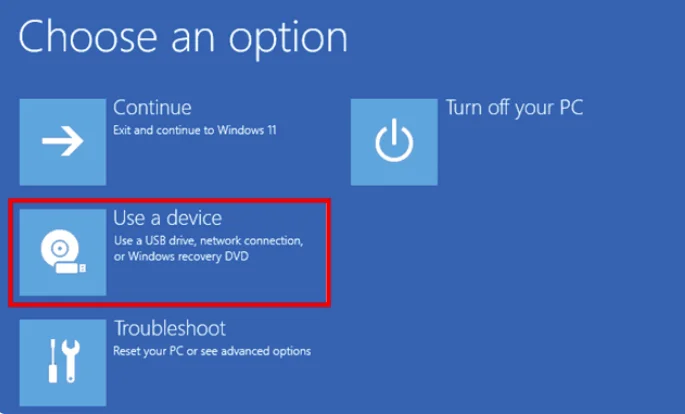
- Choose the USB flash drive from the list of bootable devices.
- Your PC will reboot and boot from that USB device.
Related: How to fix Windows 10 errors when mounting ISO files?
Method 2: If the PC won’t start normally
If, for some reason, your Windows PC fails to start normally, your only option is to access BIOS to boot from the USB flash drive. First, connect the bootable USB flash drive to your computer and power it up. Just when it starts to load, press the designated keyboard command (usually specified in your motherboard manual) repeatedly until you enter the BIOS setup. As explained above, change the boot order so that
Removable Devices is the first option. This means that BIOS will first attempt to boot from the USB device.
Remember to save and exit BIOS Setup Utility to save your preferences.
Booting from DVD in Windows 10/11
Say your computer has thrown a startup error like the Srttrail.txt error. You’ve decided to reinstall Windows or upgrade to a newer version. This calls for starting your system using boot media. Now, like with USB booting, you can boot from DVD on your Windows 10/11 PC. Here’s :
- Start by burning an ISO image to the DVD.
- Insert the DVD and restart your computer. Make sure to change the boot order so the BIOS boots from the DVD.
- You may be prompted to press any key to boot from the CD or DVD. You’ll only have a few seconds to do so. Failure to press any key will cause your PC will go to the next device in the boost sequence lists, which is more likely to be the hard drive.

Troubleshooting Boot Issues
Usually, Windows will boot without issues. However, in some cases, you might encounter a black screen with an error message, such as Status: 0xc0000605 Info: A component of the operating system has expired. Obviously, this isn’t a good thing, but it’s not the end of your PC either. When your Windows won’t boot, you can try a few troubleshooting steps:
Step 1: Turn off Fast boot
Windows PCs have a setting inside your BIOS or UEFI known as Fast Boot, which allows the system to start faster by preloading drivers. However, if Windows Update has compatibility issues, Fast Boot won’t work.
Luckily, turning off Fast Boot can rectify the matter. To do so:
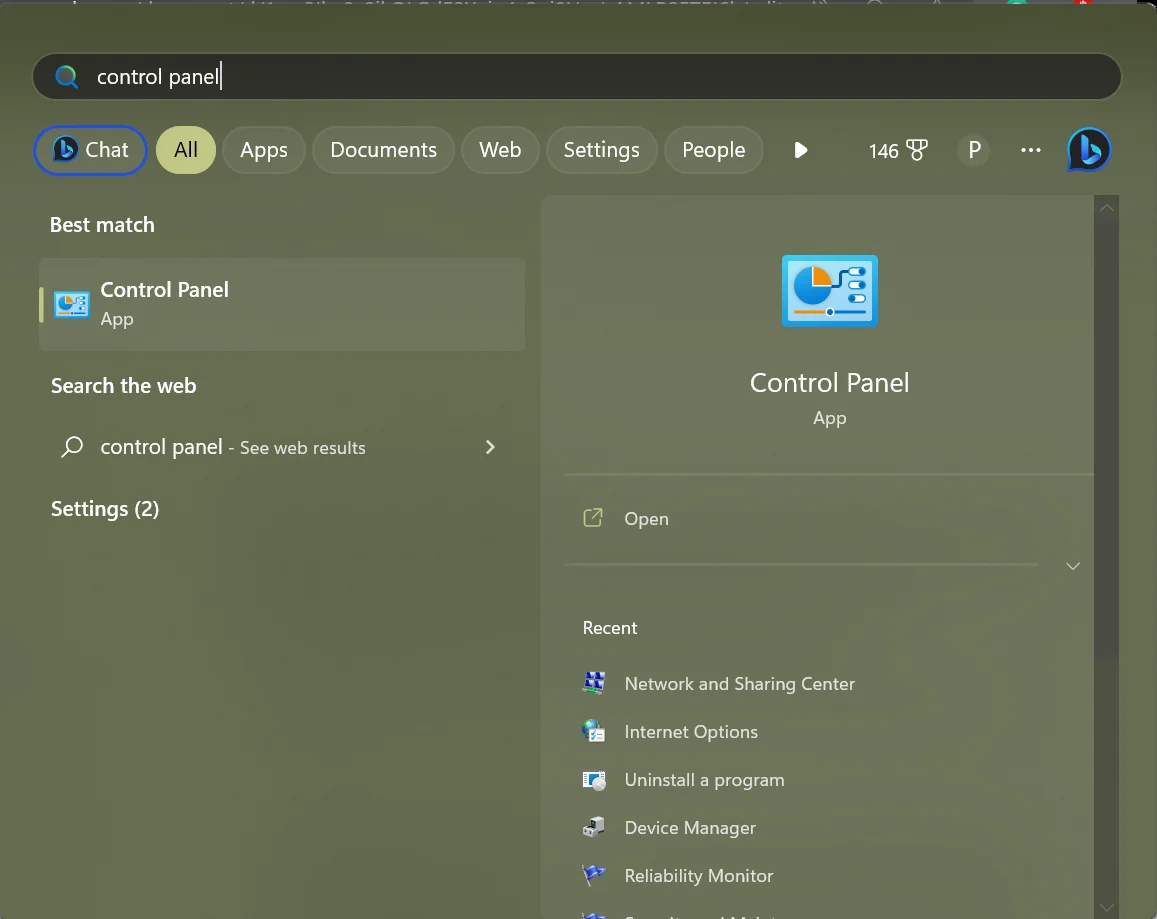
- Press the Windows logo on your keyboard, type Control Panel, and hit Enter.
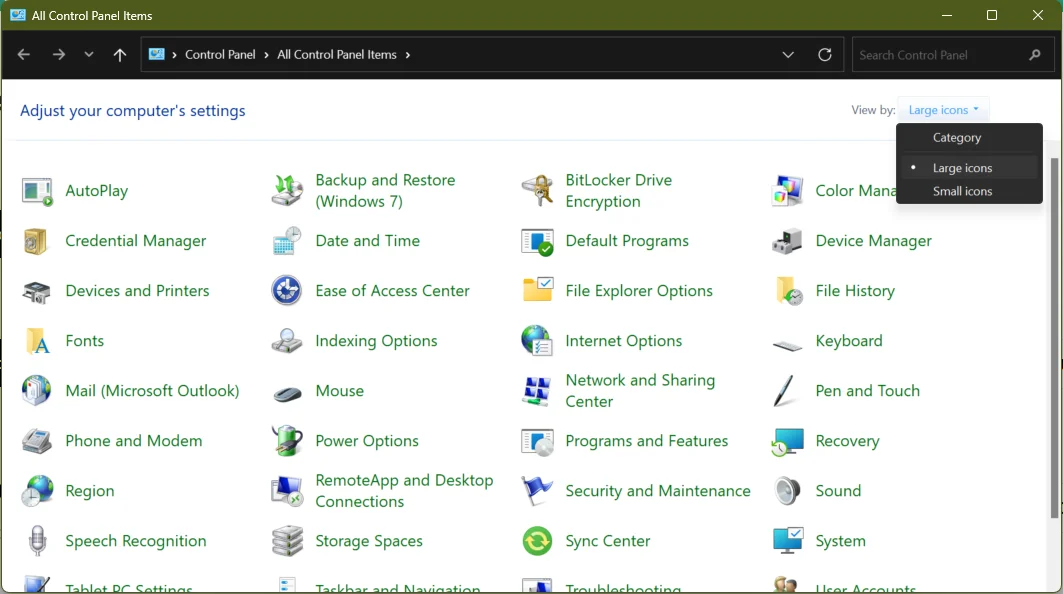
- Change the View by option in the far right corner to Large icons or Small icons.
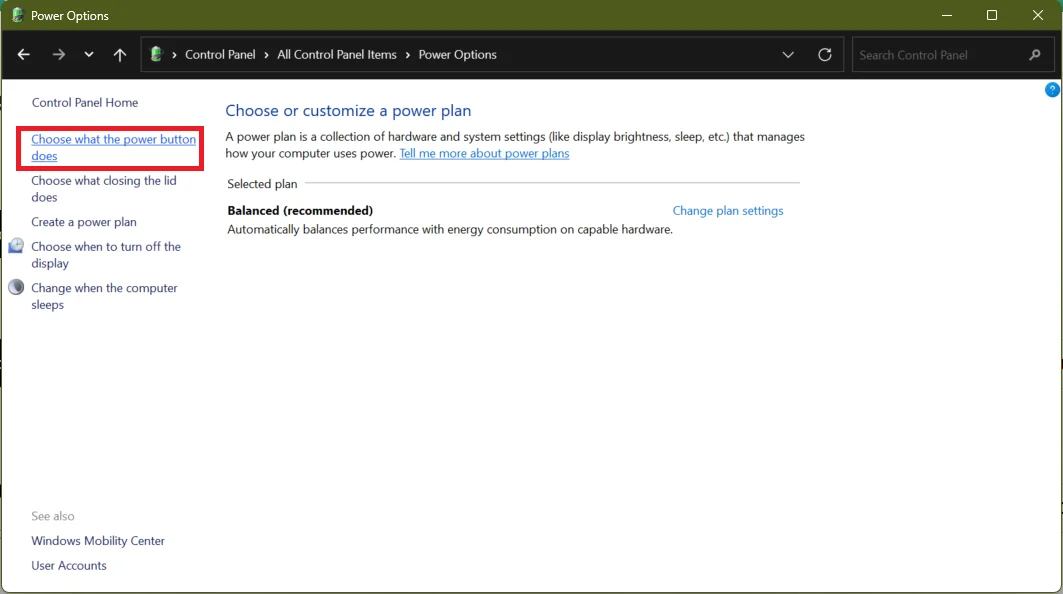
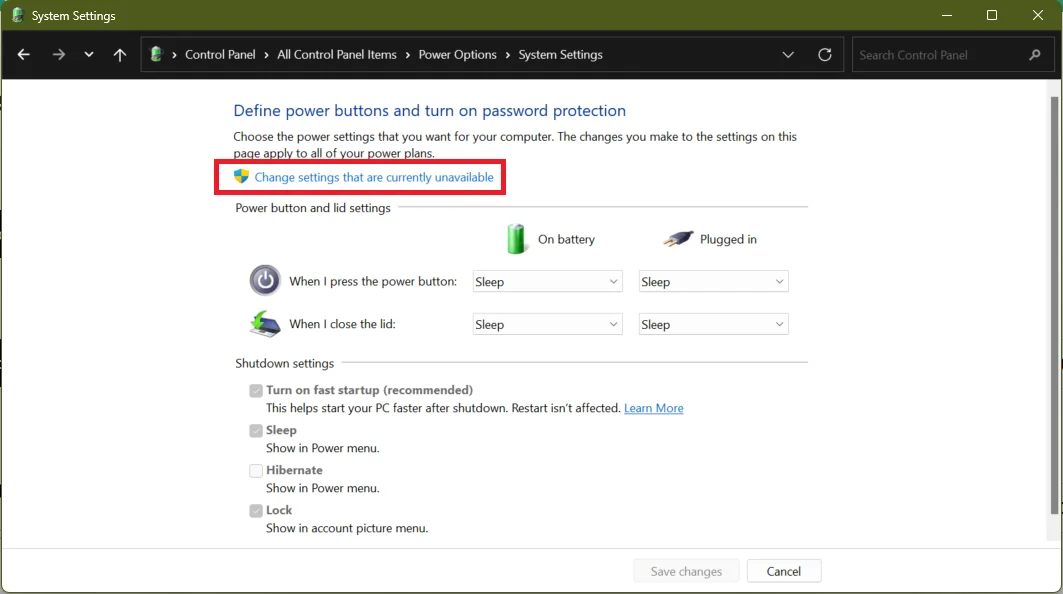
- Select Power Options and click on the Choose what the power button does link.
- Select the link that says Change settings that are currently unavailable.
- Under the Shutdown settings option, uncheck Turn on fast startup (recommended).
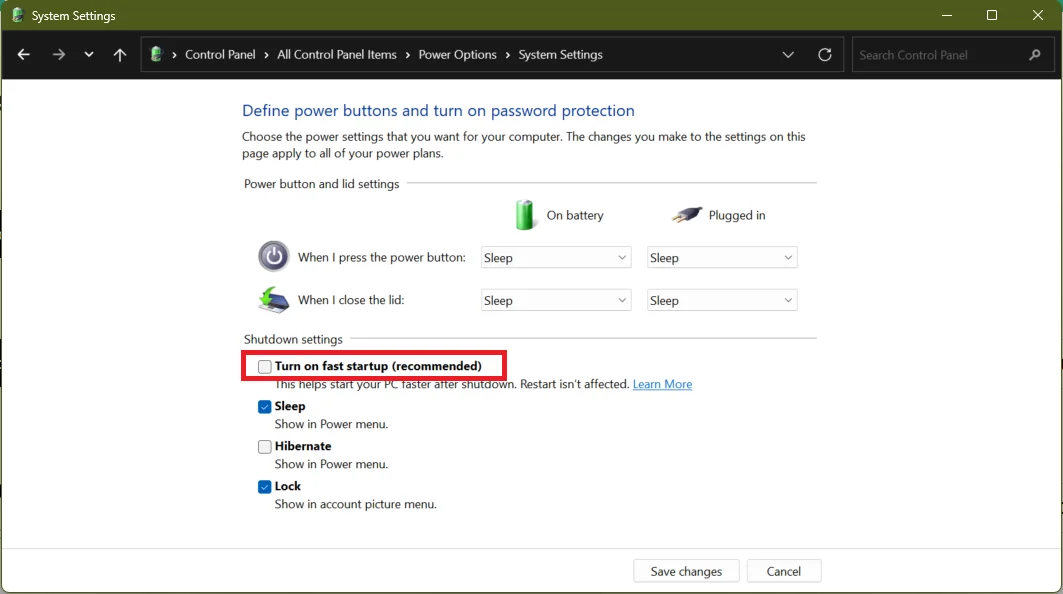
- Click Save changes at the bottom of the page to confirm your preferences.
Also read: How to Turn Off Fast Startup in Windows 10/11
Step 2: Check your BIOS settings
If your BIOS settings are misconfigured, your computer won’t boot correctly. To check these settings, you must access BIOS and then check:
Secure Boot
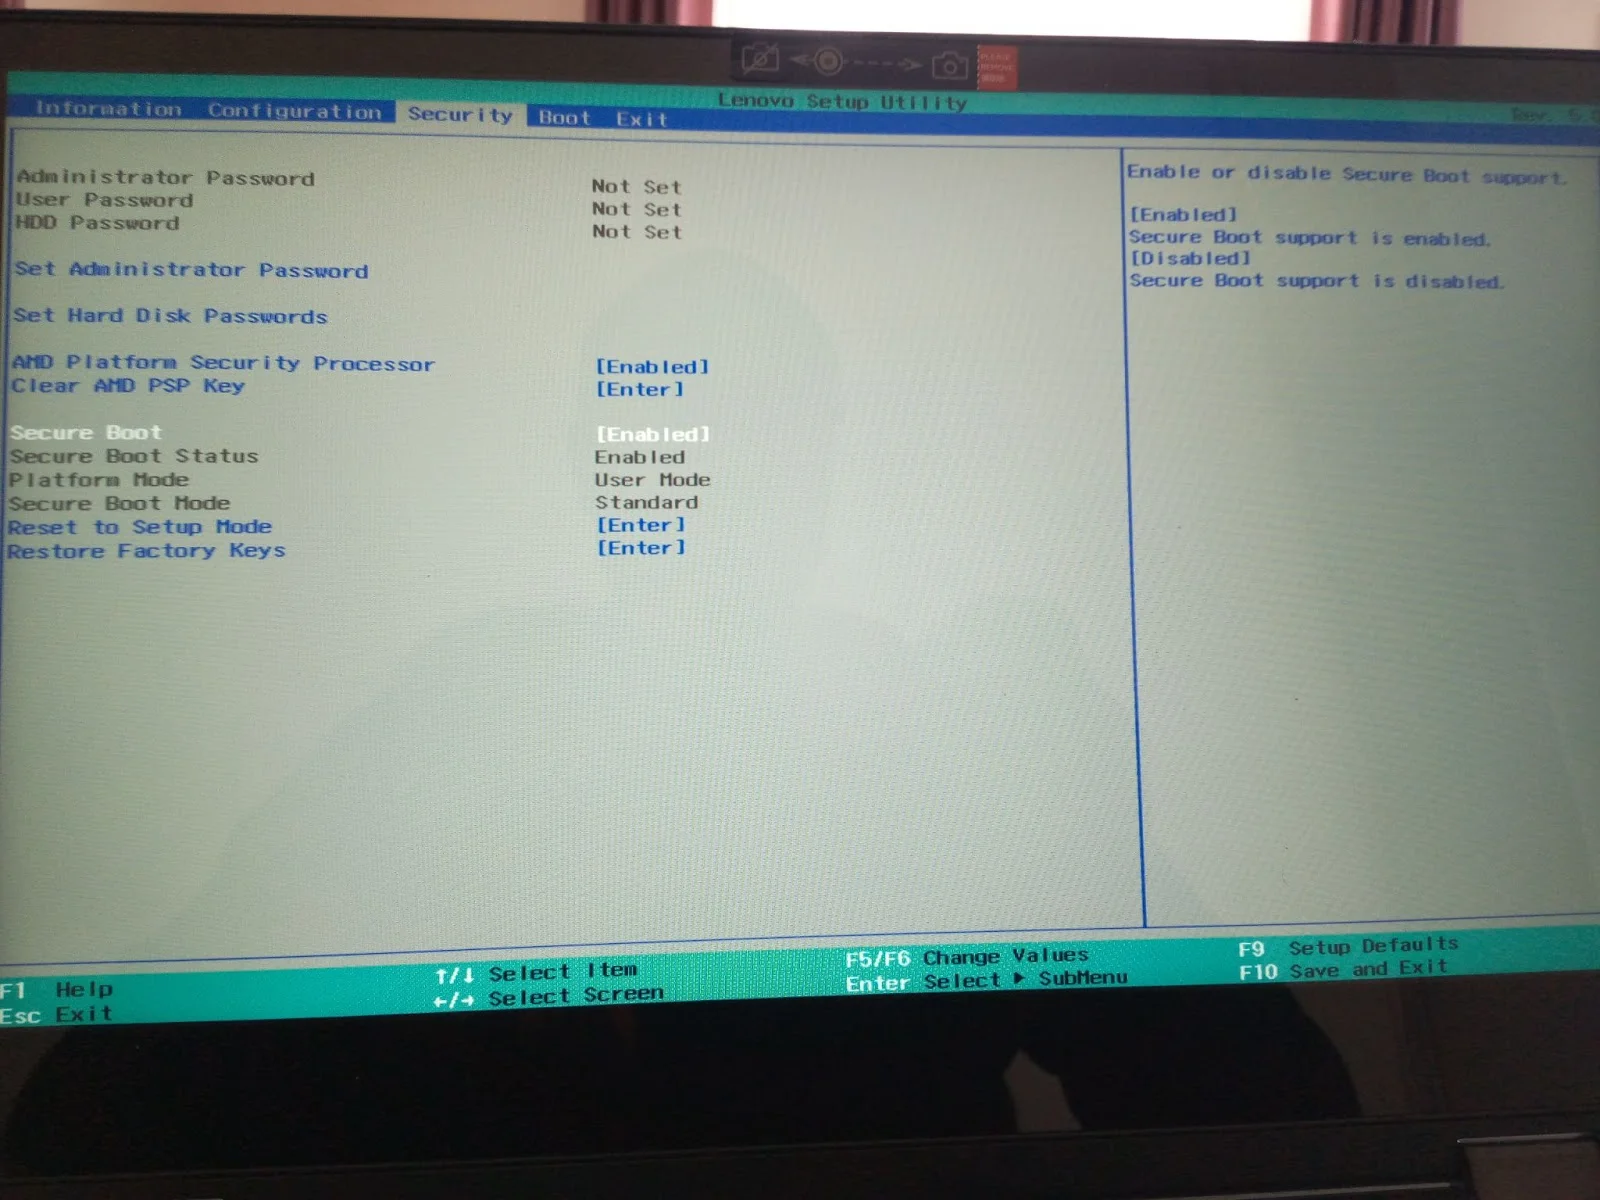
Secure Boot is programmed to protect your system against malware. It checks drivers and hardware loaded by Windows 10 or 11 at startup.
It might generate an error at boot if it doesn’t recognize any driver or hardware component.
You can disable Secure Boot, but this may mean resetting your BIOS or Windows to factory default.
You may also want to reset your BIOS configuration. More on this below.
Step 3: Scan your system for Malware
Another solution to Windows boot issues is scanning your computer for malware and viruses. These entities are known to delete files or alter crucial system settings, causing errors and malfunctions.
The best method for dealing with viruses and malware is to use a trusted tool like Auslogics Anti-Malware.This tool performs a thorough scan of your system, ensuring that any suspicious files or programs are quarantined to await further action from you.

The software identifies malware your main antivirus program might have missed, protecting your system from online threats.
Read: Auslogics Anti-Malware: Features and Reviews
Step 4: Perform a Startup repair
Startup Repair is an effective solution that can come in handy when your PC refuses to start correctly. To use it:
- Turn your PC off. Press the power button to turn it. While booting, turn it off when you see the Windows logo. Repeat these two more times. On the third time, Windows will boot into the recovery environment.
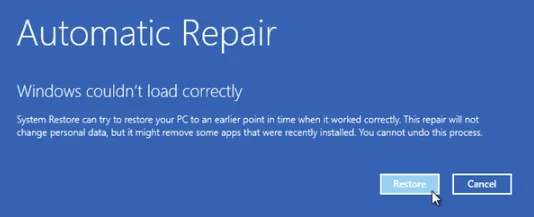
- After the diagnostics mode loads, you’ll see a notification that says Windows 10 failed to boot and is now running Startup Repair.
Related: How to Speed Up Windows 10 Startup
Step 5: Restoring BIOS to default settings
Restoring the BIOS to its default settings can be a useful troubleshooting step if you’re experiencing boot issues with your computer.
Note that resetting the BIOS to default settings will revert any customizations you may have made, such as overclocking settings or boot order changes.
Remember, the steps to restore the BIOS to default settings may vary slightly depending on the manufacturer and model of your computer or motherboard.
Therefore, always consult the documentation or support resources provided by the manufacturer for specific instructions.
To reset your BIOS:
- Turn on the PC.
- Press the F2 for Lenovo laptops (or the specific key to enter BIOS Mode for your PC model) multiple times before the PC loads.
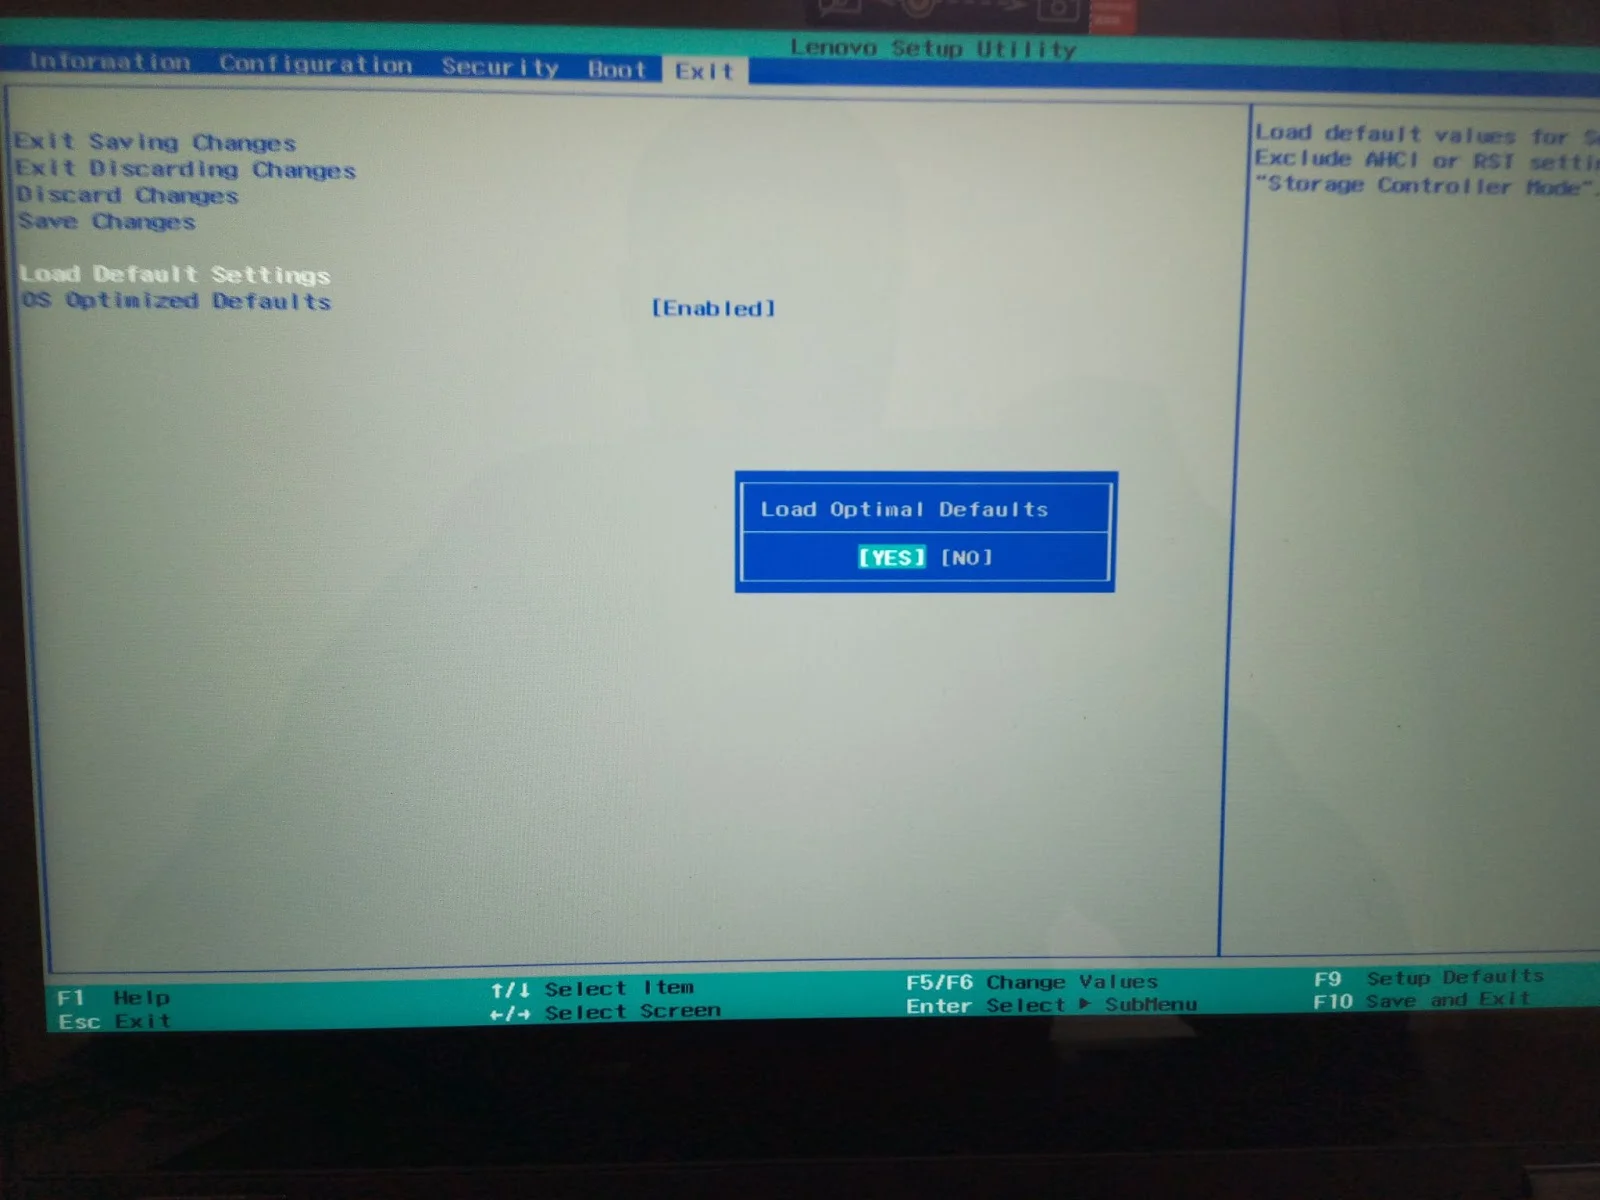
- Press the F9 or F5 key to bring up the Load Defaults option.
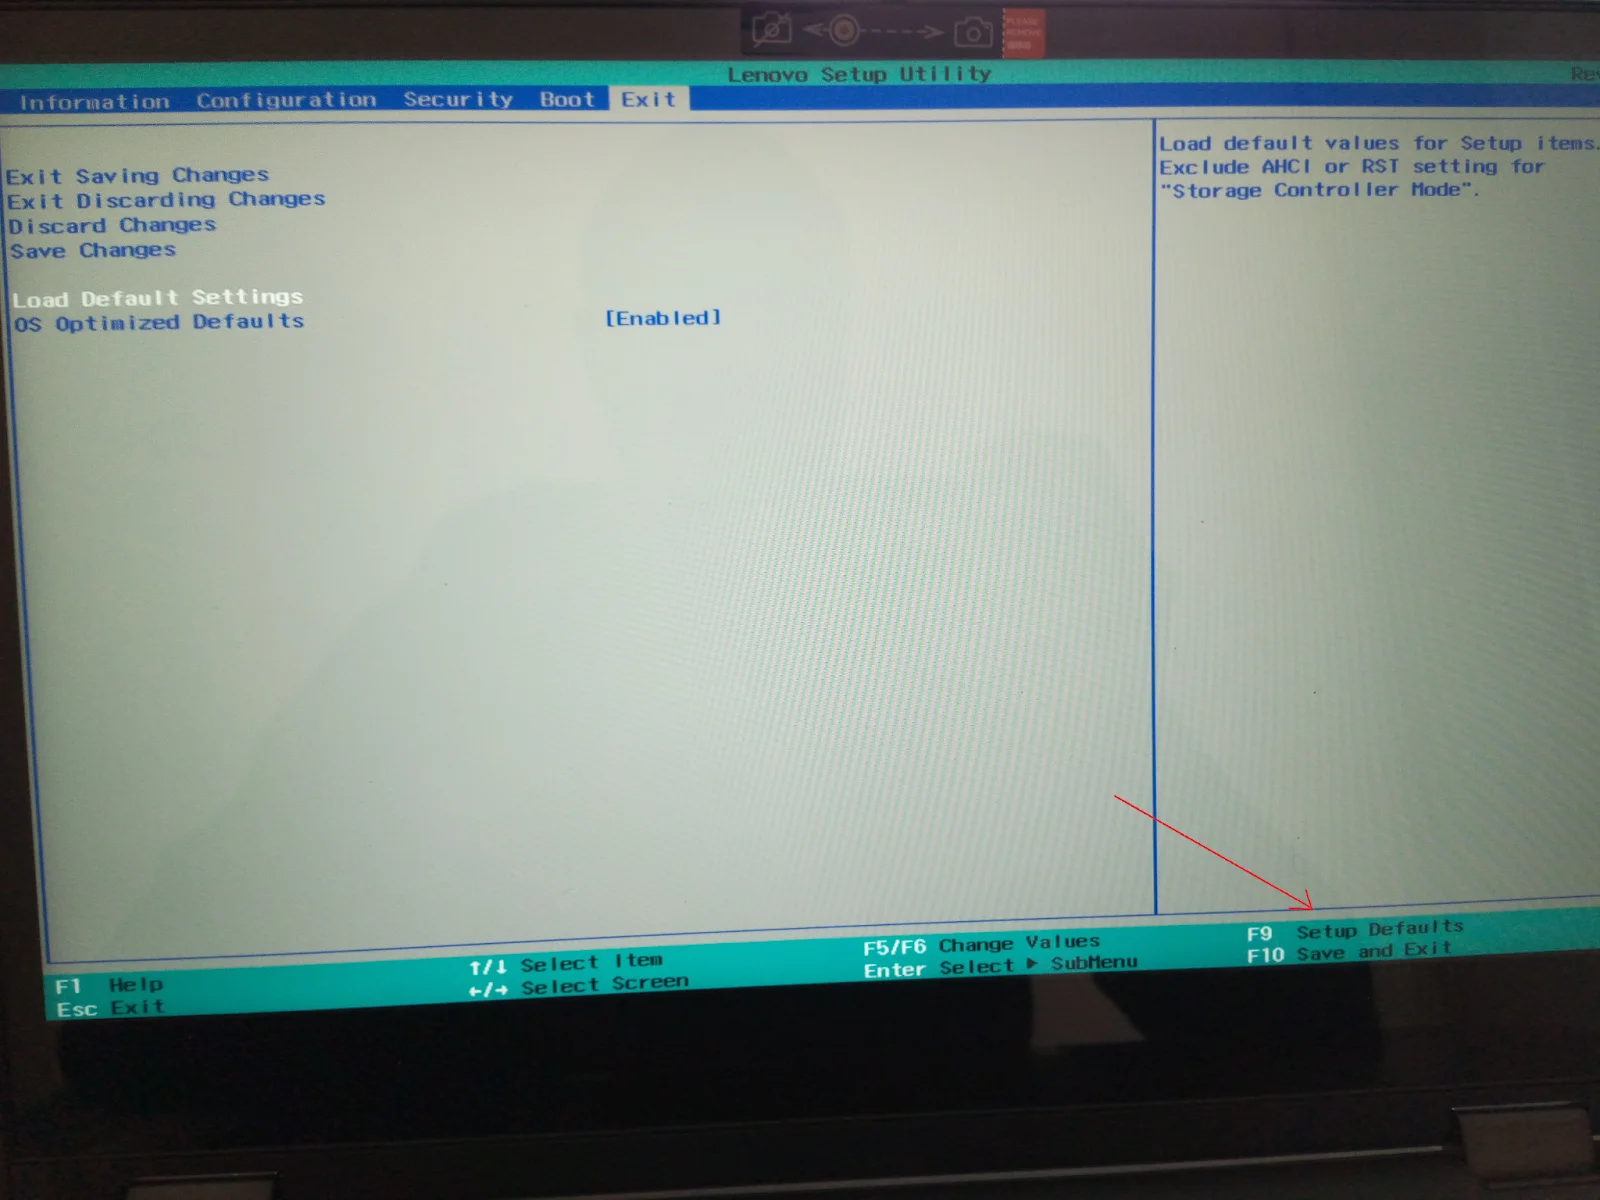
- Select Yes to restore BIOS to default settings.
- On laptops like HP, you can find the Restore Defaults option under the File tab.
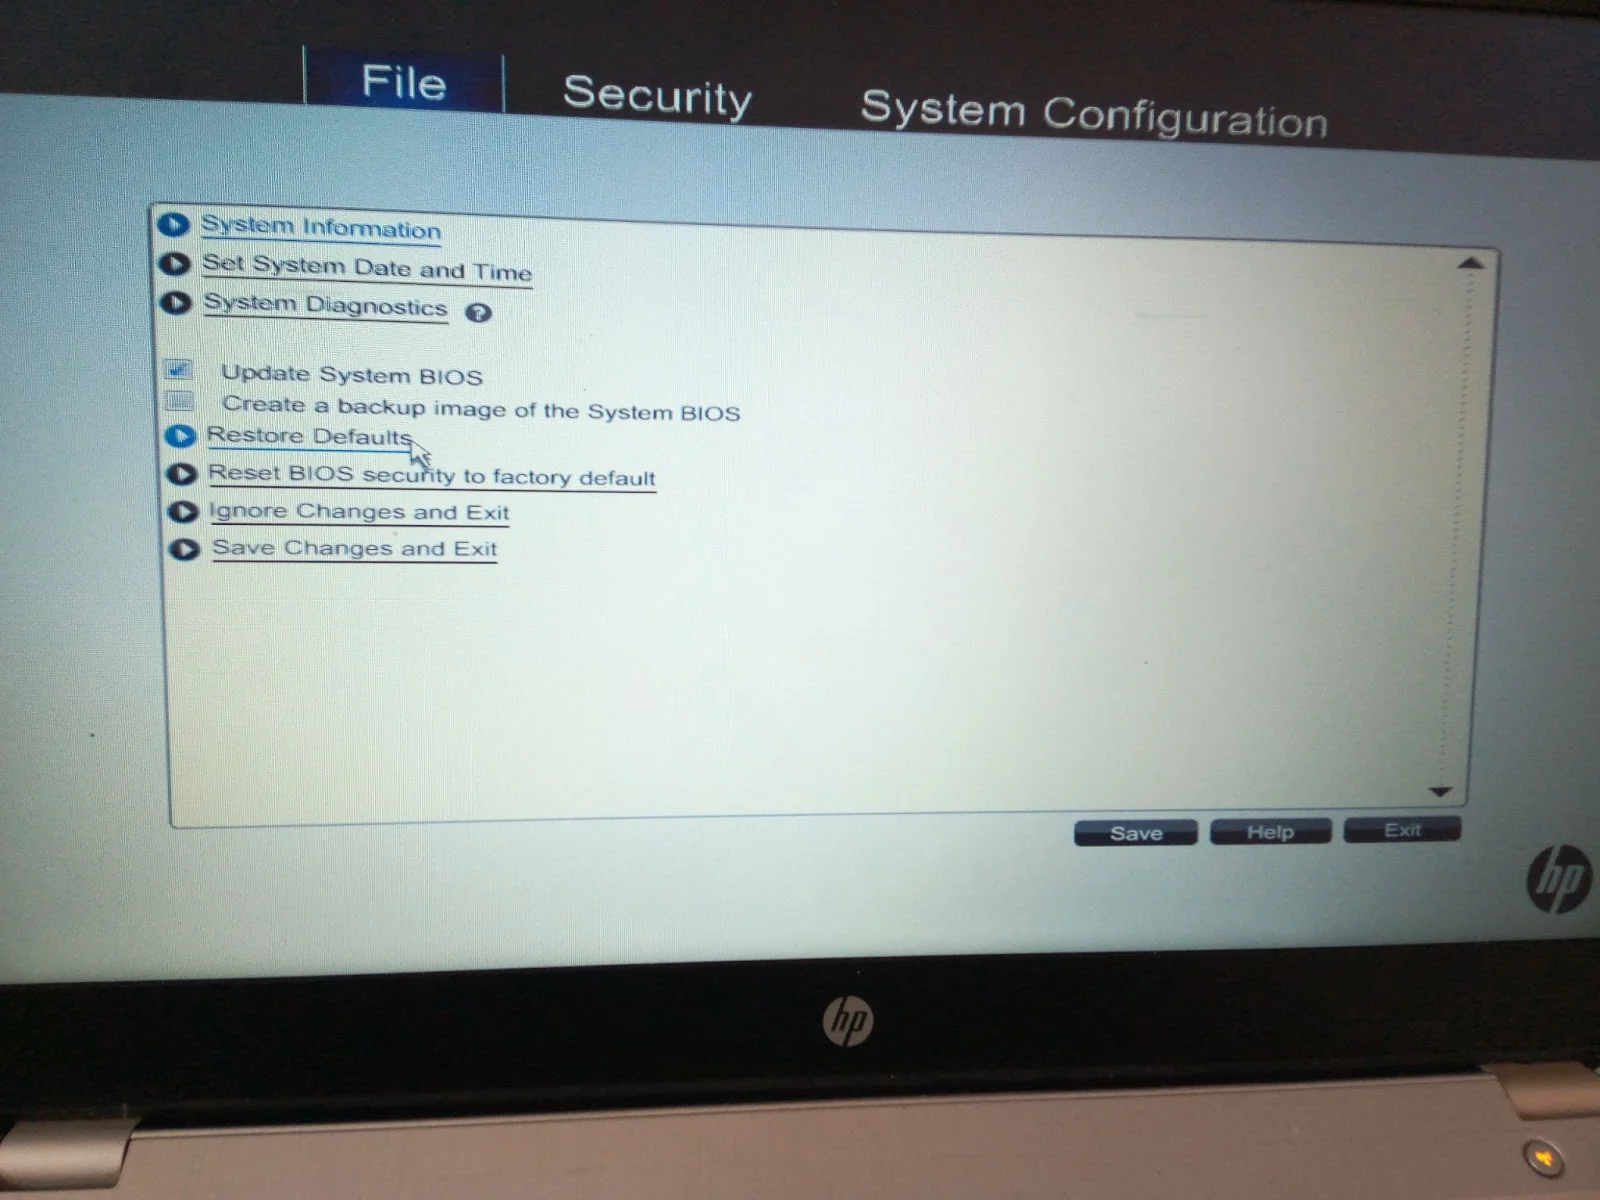
- Click Save > Exit.
Your computer will restart with the changes saved.
Final Thoughts
There you have it! Those are solutions on how to change boot order in BIOS on Windows 11 and Windows 10. Keep in mind that, your computer will check the first boot device to load the operating system from, based on your boot order.
If it doesn’t find any bootable media, it will look for the next device on the list that it can boot into. Remember, you can easily change the boot order at any time from the BIOS or UEFI and set your preferred device as the first boot device.
And, if your Windows 10/11 PC starts to become sluggish, we recommend using a robust and reliable PC optimizer like Auslogics BoostSpeed. Apart from tweaking performance settings, the tool keeps your PC lean to ensure it runs optimally every time you use it.
FAQ
If you can’t access BIOS:
- Restart your PC and try again.
- Make sure you’re using the correct keyboard command. Different motherboard manufacturers use different keys to enter BIOS. The most common ones include F2, F10, Esc, or Delete.
- Check your keyboard. If you’re using a wireless keyboard, switch to a wireless one and try again.
- Clear CMOS.
- Seek professional assistance.