![[FIXED] Second Monitor Not Detected on Windows 10 PC](https://www.auslogics.com/en/articles/wp-content/uploads/2024/01/FIXED-Second-Monitor-Not-Detected-on-Windows-10-PC-1-1-e1729141967867-568x359.jpg)
Installing a second screen should be easier than setting up a printer or as easy as plugging a Bluetooth adapter. However, some users have to go through extra troubleshooting steps to get their second displays working. Add that to the hassle of figuring out the best workspace setup, and the situation becomes all the more frustrating. That said, you won’t experience this setback for long as this article will show you effective ways to resolve the “ computer not recognizing second monitor ” issue.
Related: Expert Tips: How to Fix Monitor Ghosting
Using Hardware Troubleshooting Techniques
In most cases, Windows 10 can’t detect the second monitor because of software issues. However, it is still possible that a connection problem is preventing you from using your other monitor. So, before you try updating your drivers or modifying your device settings, we suggest performing these hardware troubleshooting steps:
Related: How to Keep Your Software Up to Date
- Ensure the physical cable connection from the display to the video port on your laptop, PC, or tablet has no issues.
- Confirm that your graphics card can support dual monitors. While you can tell by the presence of display ports on your system or graphics card, it is a good idea to check the manufacturer’s specifications to find out. That way, you can confirm the kind of configurations it supports.
- Check if the “ laptop not detecting monitor ” issue results from an incorrect power connection by confirming whether the monitor is properly plugged in.
- If the monitor doesn’t turn on, try changing its power cables.
- It is possible that the problem is caused by a bad pin or cable in the connector. So, it is advisable to try a different cable and see if this fixes the issue.
- If your monitor has multiple inputs, ensure that you selected the correct one.
- Use different connection cables, such as HDMI and standard VGA cables. Also, ensure you’re using the right cable configuration, as some monitors aren’t compatible with certain connectors.
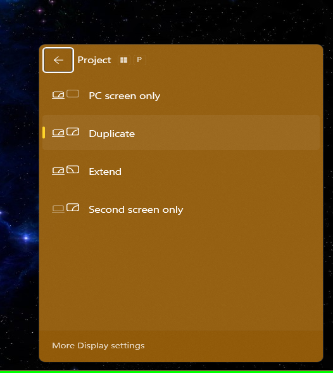
- Use the Windows screen projection command to confirm your display is not set to view on the PC screen only. Press the Win + P hotkey and choose Duplicate.
- Are you using a high-definition display as your second monitor? Try updating its firmware to resolve compatibility issues and bugs. If this is the case, visit the manufacturer support website of your display to learn how to acquire the latest firmware update.
- The issue may have something to do with the output port on your device or the input port on the monitor. Try switching ports and restarting your computer to check if that resolves the problem connecting to the second monitor.
- Try connecting your second display to a different device. If it still doesn’t work, then the problem is with the display itself. You should also connect another monitor to your computer if you can to confirm that the issue isn’t associated with your PC.
If you’ve tried all the troubleshooting steps above and your external monitor still does not work on Windows 10, it is time to try the advanced solutions. We will teach you how to fix the “ computer not detecting second monitor ” problem using display settings and other practical and easy-to-follow methods.
Method 1: Using the Settings App
If there are no problems with the physical connection, then you must get Windows to manually detect your external monitor. You can do this by using the Settings app.
How to force your system to detect your second display
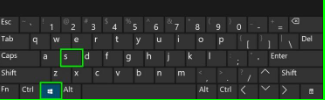
- Use the
Win + Scombo to open Search.
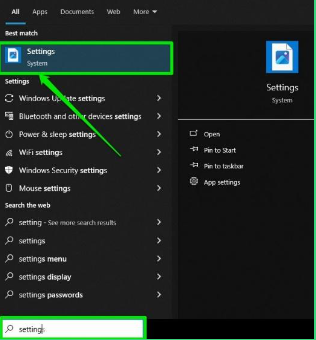
- Type
settingsinto the search box and select Settings from the results.
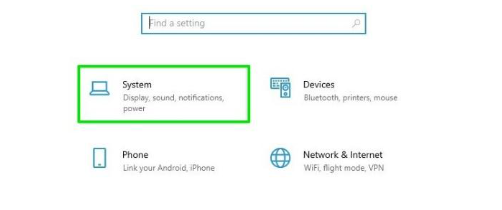
- Click System after the Settings interface appears.
- Go to the left sidebar and click Display.
- Scroll to the Multiple displays section and click the Detect button.
Related: [FIXED] “Unable to Save Display Settings” Issues on Windows
You can check to confirm whether the “ second display not detected ” issue has been fixed.
How to connect to a wireless display
If you’re trying to connect to an external wireless display, follow the steps below:
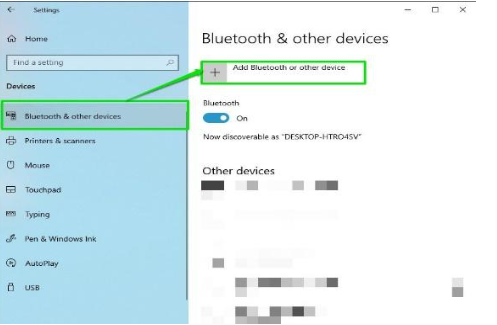
- Right-click the Start icon and click Settings.
- Select Devices once the Settings window opens.
- Click the Add Bluetooth or other device button.
- Select the Wireless display or dock option.
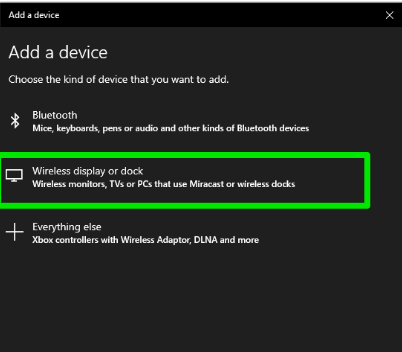
- Ensure your wireless display is discoverable.
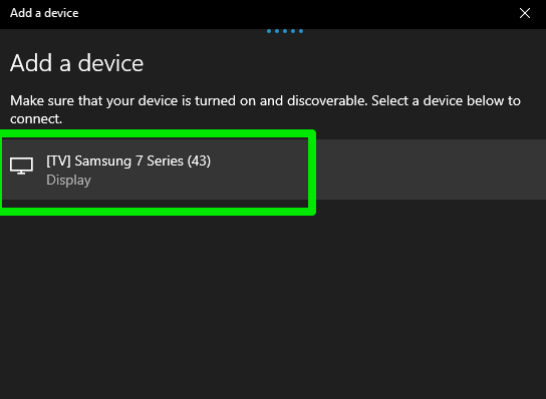
- Choose the display from the list.
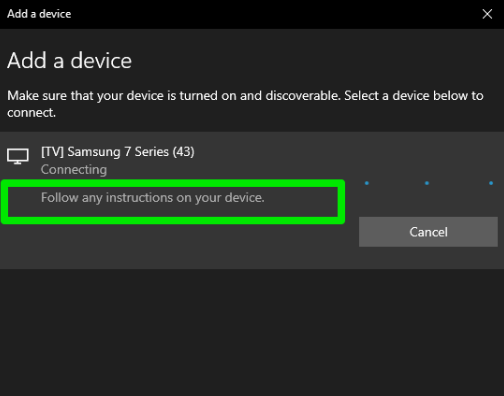
- Follow the on-screen instructions.
Move on to the next step if the “ PC not detecting second monitor issue ” persists.
Method 2: Reinstall the Graphics Card Driver
A corrupt graphics card driver may be responsible for the “external monitor not detected” problem. You can start by reinstalling the driver to fix corrupt files. Follow these steps:
- Press
Windows key + Xand select Device Manager. - Go to the Display adapters category and expand its contents.
- Right-click the device, then select Uninstall device.
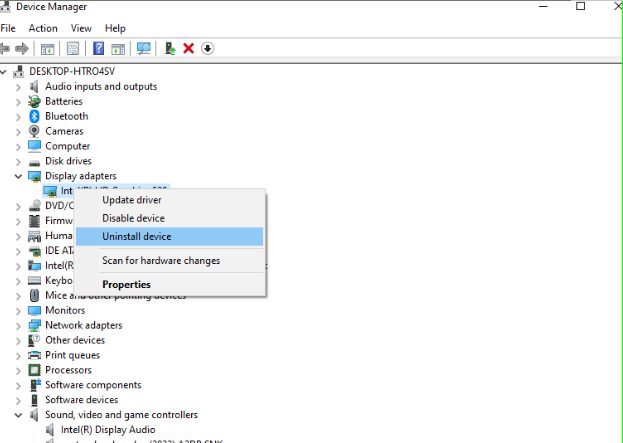
- Click Uninstall again, but make sure that the Delete the driver software from this device box remains unchecked.
- Restart your computer and allow Windows to automatically reinstall it.
In some cases, Windows may only install generic drivers. Move on to the next fix to install the driver’s latest version.
Windows 10/11 (8, 7, Vista, XP)
Method 3: Updating Your Graphics Card Driver
In some cases, Windows 10 cannot detect the external monitor because of corrupted, outdated, or incompatible graphics drivers. So, we recommend updating or reinstalling your drivers.
The best and most convenient way to update the graphics card driver is by using Auslogics Driver Updater. The tool automatically detects your video adapter’s specifications and fetches its official update.
It will continue to keep the driver up to date so that you can avoid display issues in the future. That way, you don’t have to manually check for video drivers now and then.
Further Reading: Auslogics Driver Updater: Update Your Drivers in One Click!
There are other methods for updating the graphics card driver, including using the Device Manager, manually downloading and installing the driver, and using automated tools from GPU manufacturers. Note that you have to update both GPUs if your computer has integrated and discrete graphics cards. Here’s how to use the Device Manager:
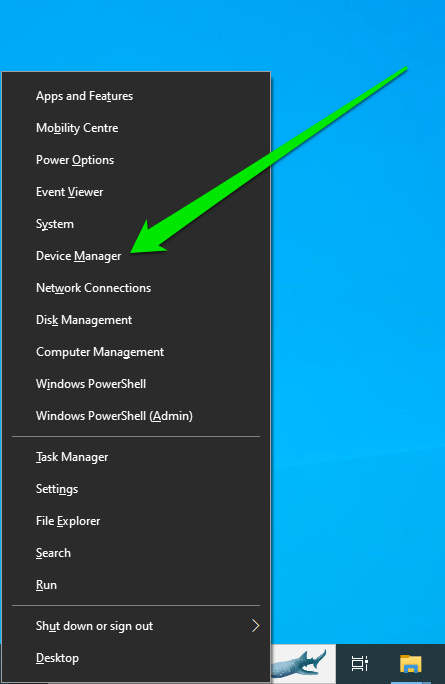
- Go to your taskbar and right-click the Windows icon.
- Select Device Manager from the list.
- Once the Device Manager is up, look for the Display adapters category and expand its contents.
- Right-click the adapter and choose Update driver.
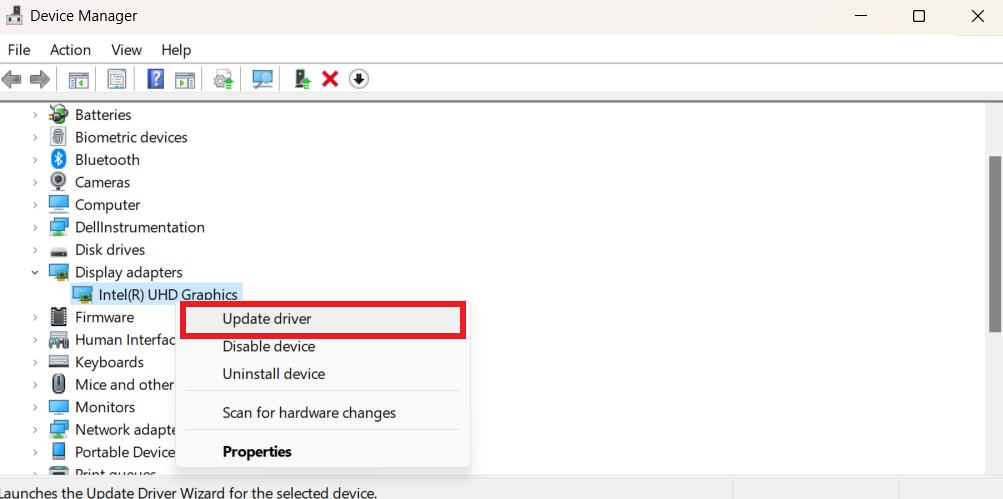
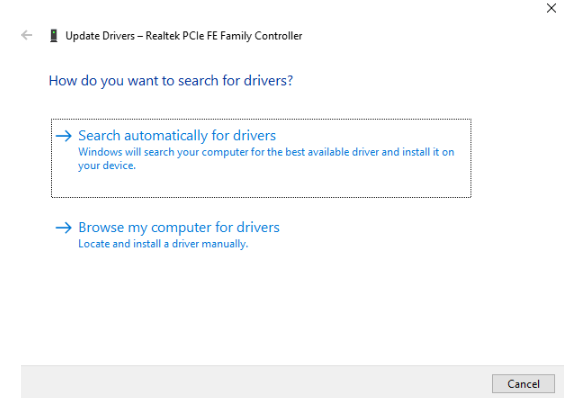
- Click the Search automatically for drivers option.
After following the steps above, restart your PC and check if your system now detects the external monitor.
Updating Through the GPU Manufacturer
GPU manufacturers, such as Intel, AMD, and NVIDIA, provide regular driver updates to improve their graphics cards and fix bugs and glitches. Most times, these updates are first available through their platforms before anywhere else.
You can go to their websites to download and install the latest update. You should be able to find drivers in the Download or Drivers section. Sometimes, you may have to go through the website’s Support section.
Make sure you choose your device and the correct operating system specifications.
You can also use the software applications provided by these manufacturers to install the right graphics driver. They are:
Method 4: Using Previous Versions of Your Graphics Drivers
It is possible that the problem has something to do with the newer driver you recently installed. If you see a yellow exclamation mark in the adapter, we recommend rolling the driver back to its previous version. Here are the steps you need to follow:
- Press
Windows key + Xon your keyboard. - Select Device Manager from the options.
- Look for Display adapters and expand its contents.
- Right-click the device, then choose Properties.
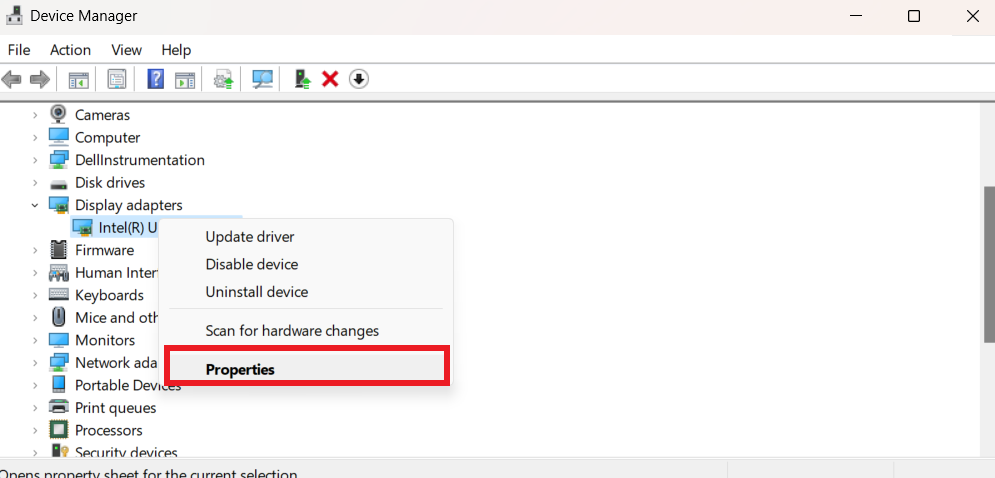
- Go to the Driver tab and click the Roll Back Driver button.
- Provide the reason why you want to return to an older version of the driver.
- Click Yes.
Read More: How to Roll Back any Driver in Windows 10
Method 5: Uninstalling Windows Update
If you have a setup that’s been working until you installed a Windows update, consider uninstalling that update. The update you installed may not be compatible with your graphics card driver. In some situations, Microsoft may also deploy buggy updates that cause problems. Follow these steps to remove the Windows update:
- Open the Start menu, search for Control Panel, and open the application.
- Once the Control Panel window opens, click Uninstall a program.
- Next, go to the left side of the Programs and Features window and click the View installed updates link.
- Select the last update you installed and remove it.
Restart your computer and check if the “second monitor not working” issue has been resolved.
Related: Windows Update Troubleshooter: Easily Fixing Windows Update Issues
Method 6: Restoring Your BIOS to Default
In some cases, users reported that restoring default settings in their BIOS resolved the problem. This fix is particularly helpful for users who have Intel chipsets with the Intel Virtual Technology option in the BIOS. Changing the virtualization settings may mess up your external display configuration. These steps will show you what to do:
- Open the Start menu and click the Power button.
- Next, hold the
Shiftbutton on the keyboard and click the Restart option. - Click Troubleshoot once the Choose an option screen appears.
- Select Advanced options and click UEFI Firmware Settings.
- Once you see your computer’s BIOS environment, navigate to the page that allows you to restore defaults. You can also tap the shortcut for restoring default settings.
- Confirm your settings and restart your computer.
Turning off the Virtualization Technology option should also work. You can now check if the issue has been resolved.
Windows 10/11 (8, 7, Vista, XP)
Interesting: How to Set a Dual Monitor Wallpaper on Windows 10 and 11?
Conclusion
That’s how to resolve the “Windows 10 not detecting second monitor” problem. You should now be able to expand your visual workspace without fuss.
Please use the comments section below to tell us how you resolved the issue and if you need further assistance.