
You can back up and restore your computer using Windows’s useful System Restore tool. When you encounter a problem on your PC that you can’t fix, you can use System Restore in Windows 10 to return to a previous state where there were no issues.When your operating system encounters issues or becomes unstable, it’s crucial to have tools and methods to restore it to a working state.
This guide will show you how to restore your computer using System Recovery in Windows 10.
Let’s begin.
What is s System Restore?
System restore is a built-in function from Microsoft Windows that protects your computer’s system and software. When System Restore is running, it periodically takes a snapshot of your computer’s important system-related data.
This includes installed software, the Windows registry, system files , and Windows settings. These images are kept as Restore Points, allowing you to return your system to a working condition if a problem occurs on your PC.
Let’s find out how to create a restore point in Windows 10 and other essentials you need to know.
Related: The Ultimate Guide to Windows 10 Backup and Restore
How to Do a System Restore on Windows 10 and 11
Here’s how to create a system restore in Windows 11 and 10. You can go through the steps and choose the method that works best for you.
Method 1: Create a System Restore Point
One reliable backup method is System Restore. It provides an easy way to regularly protect your system image and essential files. Use System Restore to start a PC backup by doing the following easy steps:
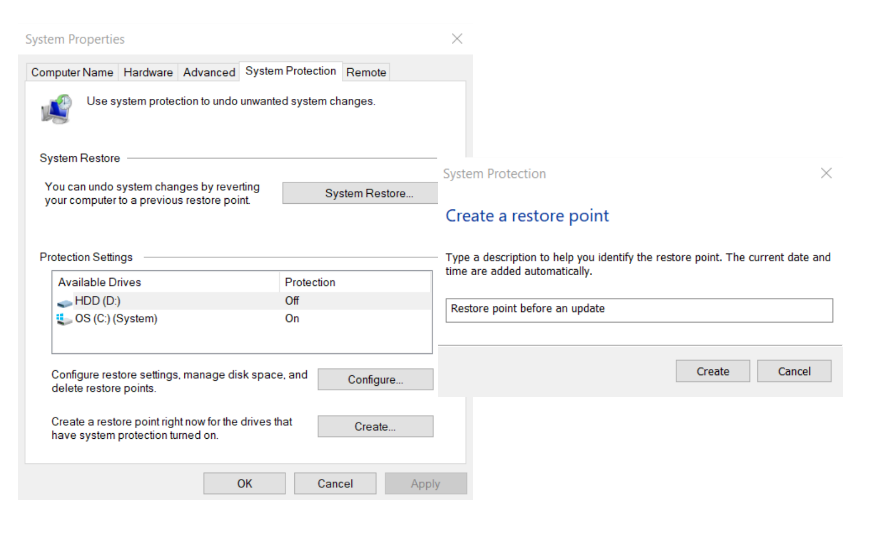
- Enter
create a restore pointin the search box and choose the result from the list.

- Click Create to create a system restore point. Name the restore point in a pop-up window that opens.
If you start having issues with your PC, you can use the system restore you created for Windows 11 recovery . That means you can revert your computer to a point where it is running smoothly. Here’s how to do it:
How to Use a Restore Point
- Type
Control Panelin the search box and click on it to open.
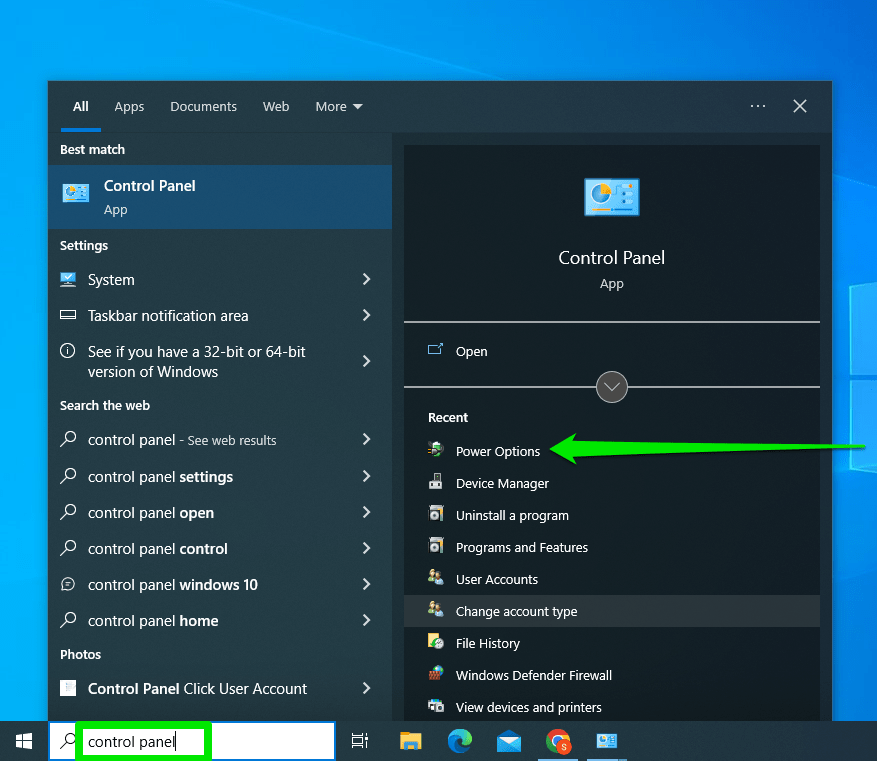
- Make sure the View by is set to Small or Large icons and click on Recovery.

- Click on Open System Restore.

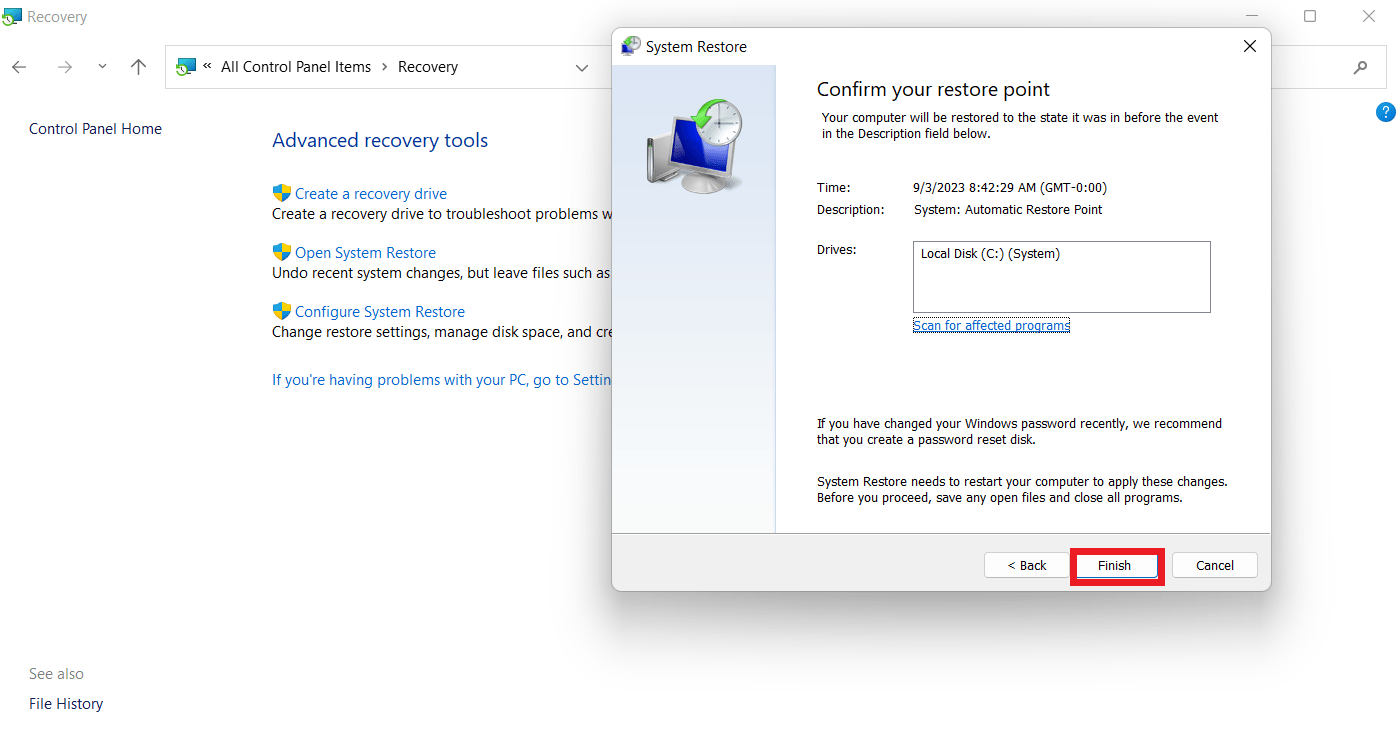
- Click Next on the pop-up window. You’ll get a list of various restore points that have been created. Choose the one you want.
- Click on Scan for affected programs. This will scan for programs and show you the ones that will be deleted, including the programs that will be restored. Then, click Next.

- Click Finish to start the system restore process.
Related: [FIXED] System Restore Not Working in Windows 10
Method 2: Use the System Image Backup
You can create the system recovery Windows 10 using the System Image Backup, even though Microsoft has stopped supporting it. It’s still one of the best ways to restore Windows. We’ll show you how to create a system image and use it in a few simple steps:
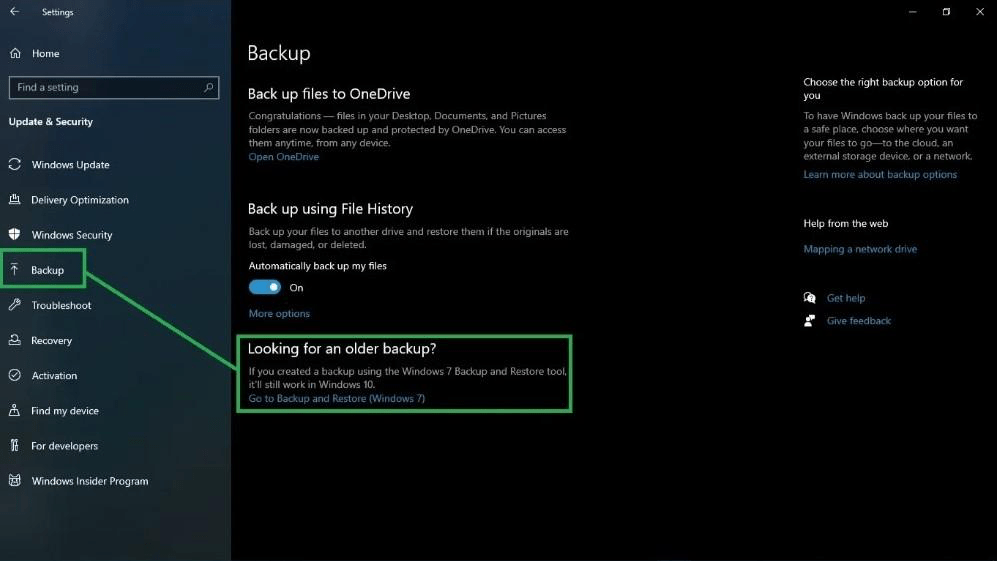
- Press
Windows key + Ito open the Settings window. - Select Update & Security, then Backup.
- Next, click Go to Backup and Restore (Windows 7) under Looking for an older backup?
- Click the Create a system image link on the left sidebar in the Control Panel. Your PC will scan for backup devices.

- Choose the storage medium on the Where do you want to save the backup page. Select On one or more DVDs and use a Windows 10 recovery drive to back up.
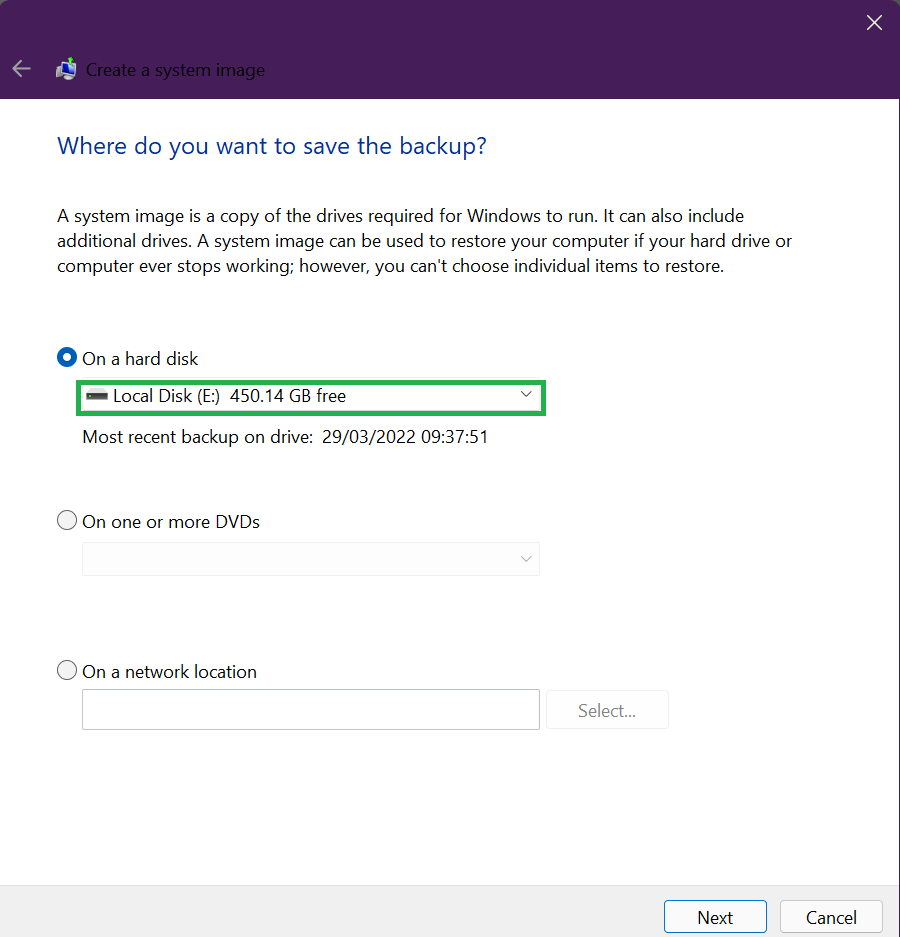
- Click Next.
- Then, select the Start backup button after confirming your selections. The system will begin the process and start the backup.

Using the System Image Backup
If your computer becomes unresponsive or keeps crashing, you can use the system image backup to restore your PC health. Here’s how to do it:
- Press
Windows logo + Ito open the Settings window. - Click on Update & Security and proceed to Recovery.
- Click Restart now in the Advanced startup section .
Your PC will restart. From there, follow the prompts for a Windows system restore . Remember that you can create Windows 10 recovery USB to restore your computer. So you should have the disk or USB plugged in when you restart your computer.
Method 3: Reset the PC
Another way to perform a system restore in Windows 10 is by resetting your computer. Follow the steps below to reset your PC to its default state:
- Type
Settingsin the search bar to open the Settings window . - Select Update & Security and click on Recovery.
- Click on Get Started under Reset this PC.
Creating a system restore in Windows 11 is a bit different than in previous versions:
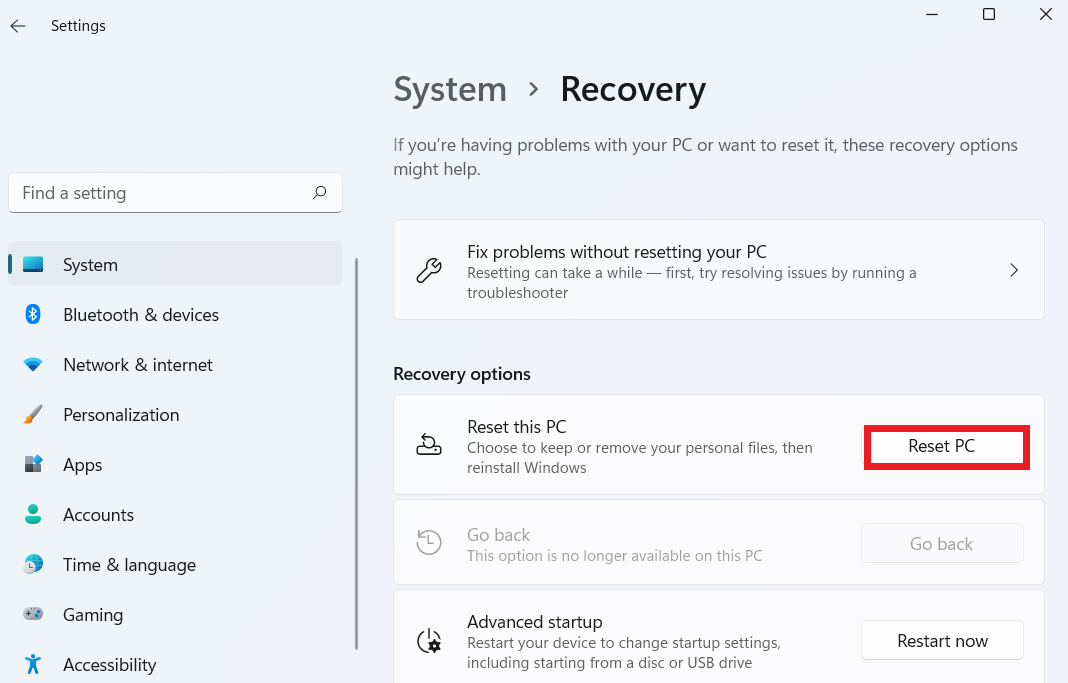
- Press
Windows key + Ito open the Settings window. - Click on Recovery under System.

- Next, click Reset PC in the Recovery options.
The rest of the process is similar.
You have two options: ” Keep my files” and ” Remove everything.” If you choose ” Keep my files,” Windows will be restored to its default settings, wiping out all installed applications and configurations while keeping your private files.
However, if you select ” Remove everything,” Windows will delete your files.

Selecting ” Keep my files” is the best option to keep your files while maintaining a brand-new Windows system. On the other hand, the ” Remove everything” option is the best option if you want to sell your computer or give it to someone else.
Your personal information will be deleted, and the system will be reset to factory settings. It’s crucial to back up your files before using this feature, regardless of your choice.

When reinstalling Windows, you have two options: get a brand-new copy directly from Microsoft or use the tools currently installed on your PC. Your requirements should determine whether you use a cloud download or a local reinstall.
The cloud download is a hassle-free option with no drawbacks if you can access fast internet and no data cap worries.
Click through the subsequent pages until you reach the ” Ready to Reset this PC” page. Then click the ” Reset” button to start the process.
Method 4: Windows Update Troubleshooter
When you experience problems with your PC, a Windows recovery tool you can use to resolve the problem is the Windows Update Troubleshooter program. Its main goal is to identify and fix the issues preventing Windows from updating properly.
You can launch the program by going to the “Update & Security” settings and choosing “Troubleshoot” from the sidebar. This software can preserve your PC health because it can assist in locating and fixing numerous update-related issues.
Here’s how to run the Windows update troubleshooter:
- Click
Windows logo + Ito open the Settings window. - Click Update & Security.
- Click Troubleshoot in the left panel.
- Click on the additional troubleshooters.
- Click the Windows Update button, then select Run the troubleshooter.
- Restart your computer.
Related: How to Fix Windows Update Error 0x80092004?
Method 5: Use the Repair Installation
Let’s go through how to do a system restore on Windows 10 and Windows 7:
Repair Installation for Windows 7
When trying a repair upgrade using an RTM CD, you can run into a problem if you initially installed Windows 7 using an RTM disc and later updated it to Service Pack 1.
This is because the installed version is more recent than the disc version. Follow the below steps to uninstall Service Pack 1:
- Select Start from the menu.
- Type
view installed updatesin the search bar and clickEnter. - Search for KB976932.
- After selecting it, choose Uninstall.
After that, your PC will restart to the initial RTM version of Windows 7. You can skip this section if you haven’t updated to Windows 7 Service Pack 1. You can also use a Windows 7 retail DVD if you can find one with the SP1 upgrades compatible with your current edition. Here’s how to do a repair update to restore Windows:
- Start by launching Windows 7 on your desktop.
- Place your Windows 7 installation DVD in the drive and select Install Now.
- The setup will start copying the files. Any damaged operating system files that might interfere with Windows’ normal operation will also be replaced during this stage.
Your installed applications and personal files are preserved. This is very helpful for fixing problems with damaged operating system functions. For example, the repair upgrade can successfully fix difficulties if certain features are disabled and can’t re-enable. It’s important to keep in mind that since the repair upgrade essentially replaces particular applications, you’ll need to reapply any updates. When all methods fail, this is a dependable way for the Windows system restore .
Repair Installation for Windows 10
The next system recovery method for Windows 10 involves using the Media Creation Tool for an in-place update. This method allows you to update your copy of Windows 10 to the most recent version without leaving your computer.
Also Read: How to Get And Use Windows 10 Media Creation Tool
You don’t need an ISO file for this upgrade. However, you need a strong internet connection to download the necessary files. Ensure that you have administrator rights and are logged in before moving on with the instructions below. Here’s how the in-place upgrade works:
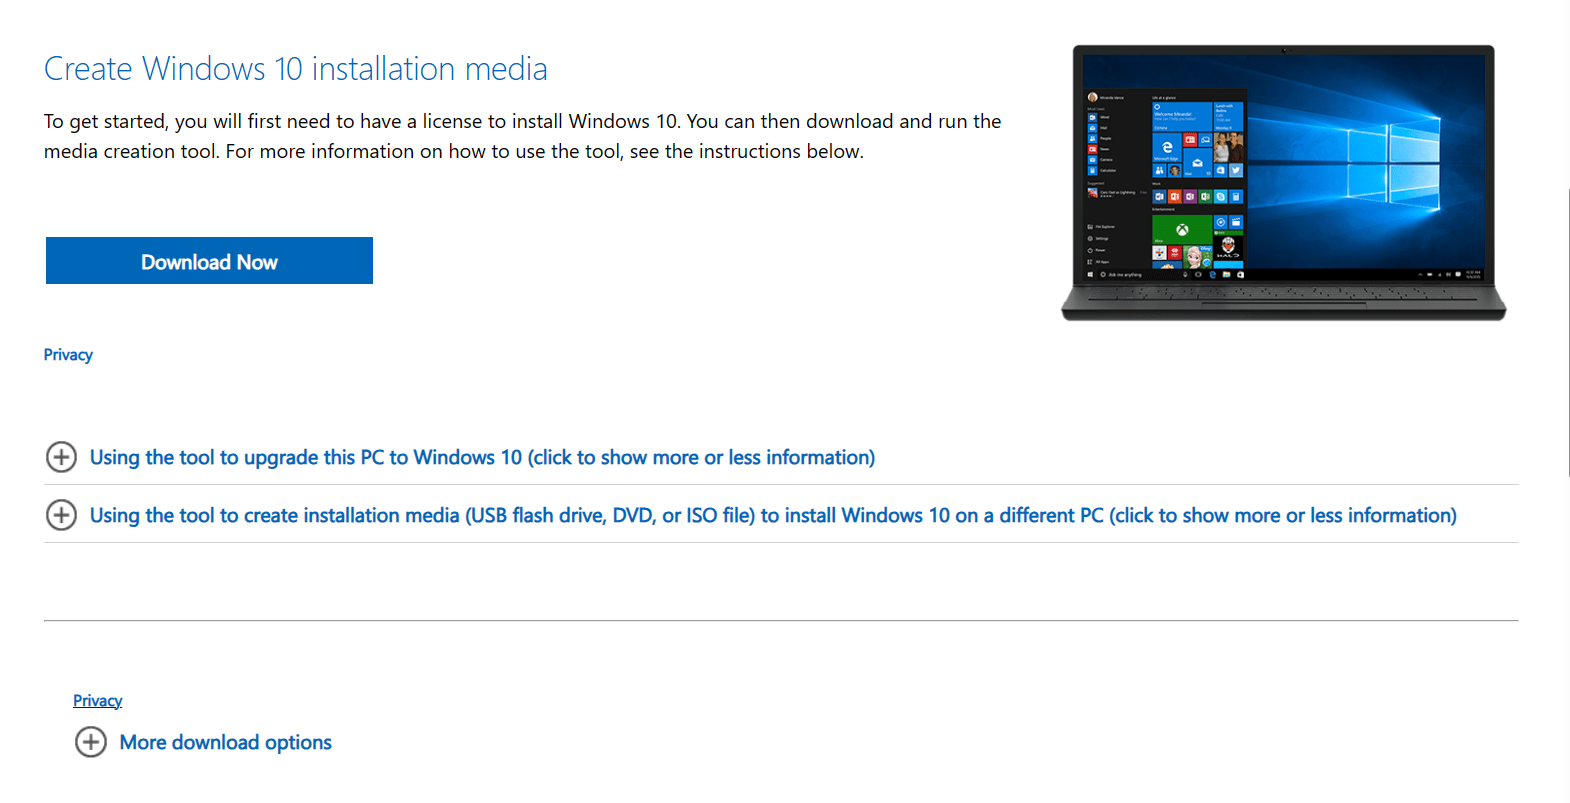
- Go to the Windows 10 official download page.
- Search for the Download now option on the page. Click on it to start the download.
Follow these steps after the file has been downloaded successfully:
- Double-click on the downloaded file.
- Read the Microsoft license terms carefully before clicking Accept to continue the process. You’ll be directed to the Getting Ready screen.
- The program will analyze your computer and give you an option to Upgrade this PC right away or make installation media (a USB flash drive, DVD, or ISO file) for a different PC.
- Choose the Upgrade this PC now option. Next, click Next to start downloading the required files.
- After downloading, you’ll have an option to maintain your files or reset your computer. You can choose to keep your files to secure your files.
Your computer will restart multiple times. Just wait for it to finish this process. When the upgrade is complete, you can log into your account. A Privacy screen will appear. You can choose the options that best suit your needs.
Method 6: New Installation using USB
The way to install new Windows is to use a USB flash drive. To proceed, you must first create Windows 10 recovery USB and make a bootable USB drive using programs like Rufus, the Media Creation Tool, or Command Prompt
.
It’s also essential to ensure your computer can boot from a USB drive. So, it’s necessary to change the BIOS or UEFI settings.
Remember that these settings can differ between various devices. So consult your manufacturer’s support website for detailed and device-specific information.
Here’s how to install Windows:
- Start your computer with the Windows 10 USB flash drive.
- Press any key to continue.
- Click the Next button.
- Click the Install now button.
- If you’re doing a reinstallation, click the I don’t have a product key option. If your Windows is activated, it’ll automatically reactivate.
- Select the Windows edition your license key activates, if applicable.
- Select the I accept the license terms option and click Next.
- Check the Custom: Install Windows only (advanced) option to perform a clean install.
- Select the partitions on your hard disk where you want to install Windows 10, then click the Delete button to prepare for the Windows 10 installation.
- Select the hard drive to install Windows 10.
- Click the Next button.
- Follow the prompts to complete the new installation.
- When you complete the steps, Windows 10 will apply the settings and complete the setup.
Conclusion
You now have access to several solutions for system recovery on Windows 10 using this guide successfully. This guide has covered several methods to ensure your system is back in working order, whether you’re having problems with Windows 10 or 11 problems.
We’ve looked at several ways to restart your PC, including using System Restore and building and using restore points. We also explored the System Image Backup, which is a useful technique.
You can also restore your PC to its factory settings. So, check out this guide if you want to know how to create a restore point in Windows 10.