![[FIXED] Discord Stuck on “RTC Connecting”: Best Fixes and Tips to Try](https://www.auslogics.com/en/articles/wp-content/uploads/2024/12/FIXED-Discord-Stuck-on-RTC-Connecting-Best-Fixes-and-Tips-to-Try-568x359.webp)
- What Is “RTC Connecting” in Discord?
- What Causes the Discord “RTC Connecting” Issue?
- How to Fix Discord Stuck on “RTC Connecting”: First Fixes to Apply
- Do this first!
- Fix 1: Restart your devices
- Fix 2: Check your internet connection
- Fix 3: Check your VPN
- Fix 4: Update your network driver
- Fix 5: Temporarily disable your antivirus program or Windows Defender Firewall
- Fix 6: Change your DNS server
- Fix 7: Flush your DNS cache and reset your IP settings
- Fix 8: Clear browsing data and disable extensions
- Fix 9: Set a different server region on Discord
- Fix 10: Disable QoS on Discord
- Fix 11: Change the audio subsystem in Discord
- Discord Stuck on “RTC Connecting”: Fixed
- FAQ
The Discord “RTC Connecting” issue frustrates users seeking seamless communication. This problem can disrupt voice chats and hinder interactions.
This guide will explore the possible causes and provide effective solutions to restore Discord’s communications.
Whether it’s a network or configuration glitch, we’ll help you troubleshoot and resolve the “RTC Connecting” Discord problem so you can communicate without interruptions.
Discord stuck on “RTC Connecting”? This error typically means your network is struggling to establish a voice connection. Try these fixes:
✅ Restart your system, router, and modem to refresh your IP
✅ Check internet stability or call your internet service provider (ISP) if needed
✅ Use a VPN with UDP support—Discord requires it
✅ Update your network drivers manually or with a tool like Auslogics Driver Updater
✅ Temporarily disable antivirus/firewall to check for interference
✅ Switch to a reliable DNS (like Google’s 8.8.8.8) and flush your DNS cache
✅ Clear browser cache and disable extensions if using Discord in a browser
✅ Change the server region in Discord’s voice channel settings
✅ Disable QoS in Discord’s Voice & Video settings
✅ Switch Discord’s audio subsystem to Legacy for better compatibility
If nothing works, reinstall Discord or contact Discord Support.
What Is “RTC Connecting” in Discord?
RTC is short for real-time communication. As such, the “RTC Connecting” error indicates that Discord is trying and failing to connect to its RTC server. This issue happens when the app attempts to start a voice call or establish chat services.
Discord uses the Web Real-Time Communication protocol (or WebRTC) to facilitate concurrent communication, which means the problem is network-related.
However, other issues connected to Discord and your computer could also trigger the problem.
📌 Also read: Discord Overlay Not Working? Let’s Fix It
What Causes the Discord “RTC Connecting” Issue?
- Unstable internet connection: If your internet connection is not reliable enough, that can lead to unending RTC connection attempts.
- Dynamic IP: Discord does not perform well when your VPN keeps changing your IP address.
- VPN without UDP: Discord does not support a VPN without a User Datagram Protocol (UDP).
- Discord quarantined by your antivirus: Your antivirus program might identify a Discord file as potentially harmful and quarantine it, preventing your connection from succeeding.
- Server problems: If your region’s server is unable to create a connection, then you cannot join a chat on Discord.
Now that we know what causes the voice connection issue, let’s learn how to fix this problem in Discord.
📌 Can be useful: How to Fix Discord Green Screen Camera Issue?
How to Fix Discord Stuck on “RTC Connecting”: First Fixes to Apply
Do this first!
Let’s start by checking if the “RTC Connecting” issue is on your side or on the side of the network. So, before we dive into deeper troubleshooting, let’s check if your system is even capable of establishing a real-time connection. Here is how:
- Visit the WebRTC testing website.
- Click the Start Test button to initiate the test.
- Wait for the process to complete.
- When the results appear, see if you can resolve any of the detected errors.
If any errors show up, that might be the root of your “RTC Connecting” Discord issue—and the rest of this guide will help you address them.
Fix 1: Restart your devices
This simple idea is what most users employ to resolve the Discord connection issue. You may as well give it a try before jumping into more aggressive solutions. The “RTC Connecting” problem could be due to a dynamic IP.
As already mentioned, Discord does not do well with an IP that changes from time to time.
How do you resolve this? Restart your system, modem, and router through these steps:
- Click the Start button in the bottom-left corner of your screen.
- Click the power icon and click on Shut down.
- Remove the battery from the computer (if your battery is removable) and unplug it from the power source.
- Unplug the power cords on the back of your router and modem.
- Wait for about three minutes and turn the devices back on. Plug the cords in and check that the indicators are showing.
- Put the battery back into your computer and power it on.
- Open your browser and make sure that your internet connection is active.
Check if Discord can now make a connection. If the error no longer occurs, then it means that it was caused by dynamic IP. To prevent the problem from happening again, you can do the following:
- Request a static IP address from your ISP.
- Use a dynamic DNS service that works in real time to update your new IP address and other details automatically.
Fix 2: Check your internet connection
You must be sure that you do not have any internet issues. You must have a strong connection before you can expect Discord to function as it should without running into the Discord “RTC Connecting” issue.
You can contact your ISP to help you resolve any connectivity issues you might be having. Once you are sure that your internet is reliable enough, you can proceed to the other fixes below.
Fix 3: Check your VPN
Although a VPN configuration can improve your overall internet experience, it changes your IP address, which can cause the Discord RTC connection problem.
However, Discord works well with VPNs with UDP support.
UDP stands for User Datagram Protocol. It’s one of the core ways that data is sent over the Internet—kind of like a shipping method for information.
There are two main “shipping methods” for internet traffic:
- TCP (Transmission Control Protocol): Think of it as certified mail—you get delivery confirmation, but it’s slower because each packet of data is tracked, acknowledged, and resent if lost.
- UDP (User Datagram Protocol): This is more like a postcard—fast, lightweight, and no need for confirmation. It just gets sent, and that’s it.
UDP establishes a connection that eliminates delays in data sharing. It, therefore, gives you a much faster connection than TCP.
If your VPN does not have UDP, uninstall it and restart your system before starting Discord.
📌 Also read: Ultimate Guide: How to Fix Wi-Fi Not Working with a VPN?
Fix 4: Update your network driver
The “RTC Connecting” Discord issue can also be related to network driver issues.
To ensure that your internet connection has not taken a hit, check whether your network adapter drivers are up to date. You can visit the website of your PC manufacturer to obtain the latest driver software for your device.
Make sure that you get the correct version that is compatible with your computer. It is also imperative that you do not try downloading your drivers from an unofficial source.
They can harm your PC or introduce malware into the system.
You can also use the Device Manager to update your network driver.
Follow these steps:
- Press the
Windows + Rkeyboard combination to invoke the Run dialog. - Type or copy and paste devmgmt.msc and click OK to open the Device Manager window.
- Scroll through the list of devices to locate the Network adapters entry. Double-click on it or click the arrow on the left-hand side to expand the option.
- Right-click on your network adapter and select Update driver.
- Click Search automatically for drivers and wait for the process to complete.
Fix 5: Temporarily disable your antivirus program or Windows Defender Firewall
Your antivirus software or firewall may be simply blocking Discord’s real-time voice traffic. While these tools are essential for your security, they sometimes get overprotective.
Try temporarily disabling them to see if Discord connects properly.
To turn off Windows Defender Firewall:
- Press
Windows + R, type control firewall.cpl, and hitEnter. - In the left pane, click Turn Windows Defender Firewall on or off.
- Select Turn off Windows Defender Firewall for all network types.
- Click OK, then relaunch Discord and test the connection.
If you’re using a third-party antivirus, check its settings or temporarily disable it. After testing Discord, don’t forget to re-enable your protection software.
Fix 6: Change your DNS server
When Discord gets stuck on “RTC Connecting,” it’s often a sign that something is interfering with its ability to establish a stable voice connection. One common culprit? Misconfigured or slow DNS settings.
Switching from your ISP’s default DNS to a more reliable option like Google DNS (8.8.8.8 and 8.8.4.4) or Cloudflare DNS (1.1.1.1 and 1.0.0.1) has helped many users resolve the “RTC Connecting” Discord issue. These DNS providers are known for their speed, uptime, and security, making them a solid choice for smoother Discord voice connectivity.
To test this fix, simply change your DNS settings and then restart Discord to see if the issue clears up.
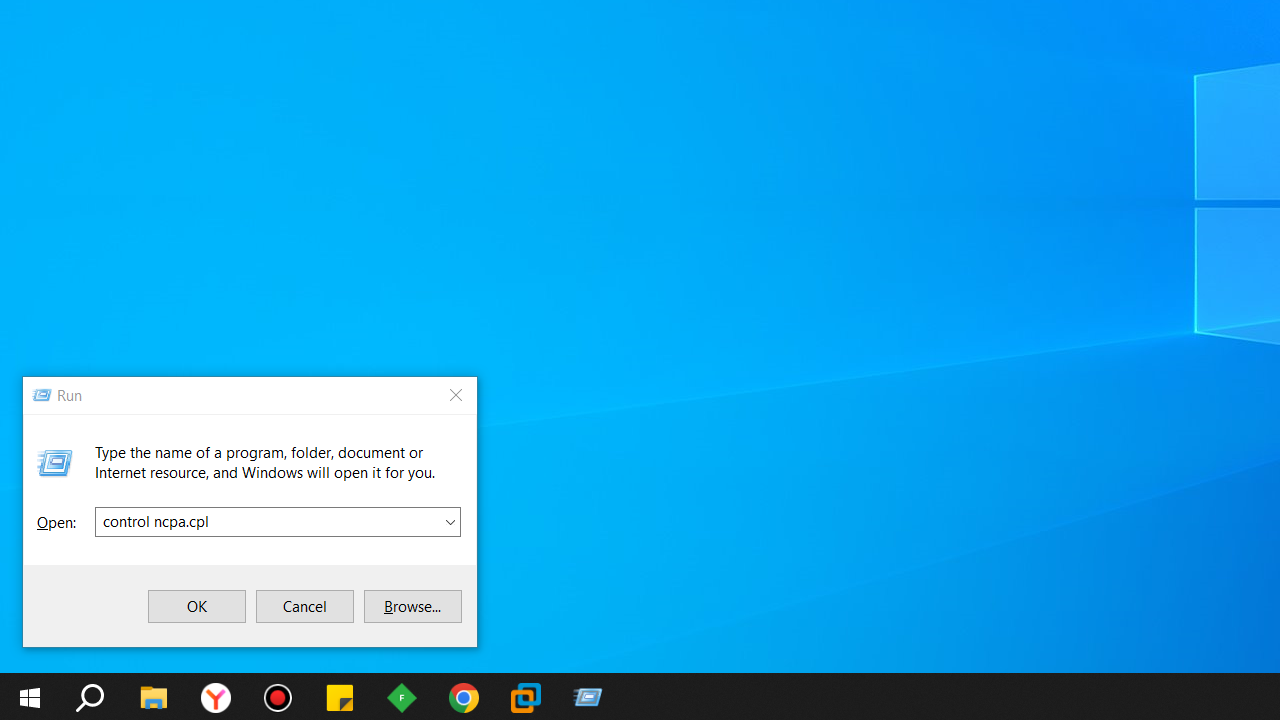
- To open the Run dialog box, press the
Windows + Rkeyboard combination. - Type or copy and paste control ncpa.cpl into the text field and click the OK button on the dialog, or hit
Enteron your keyboard.
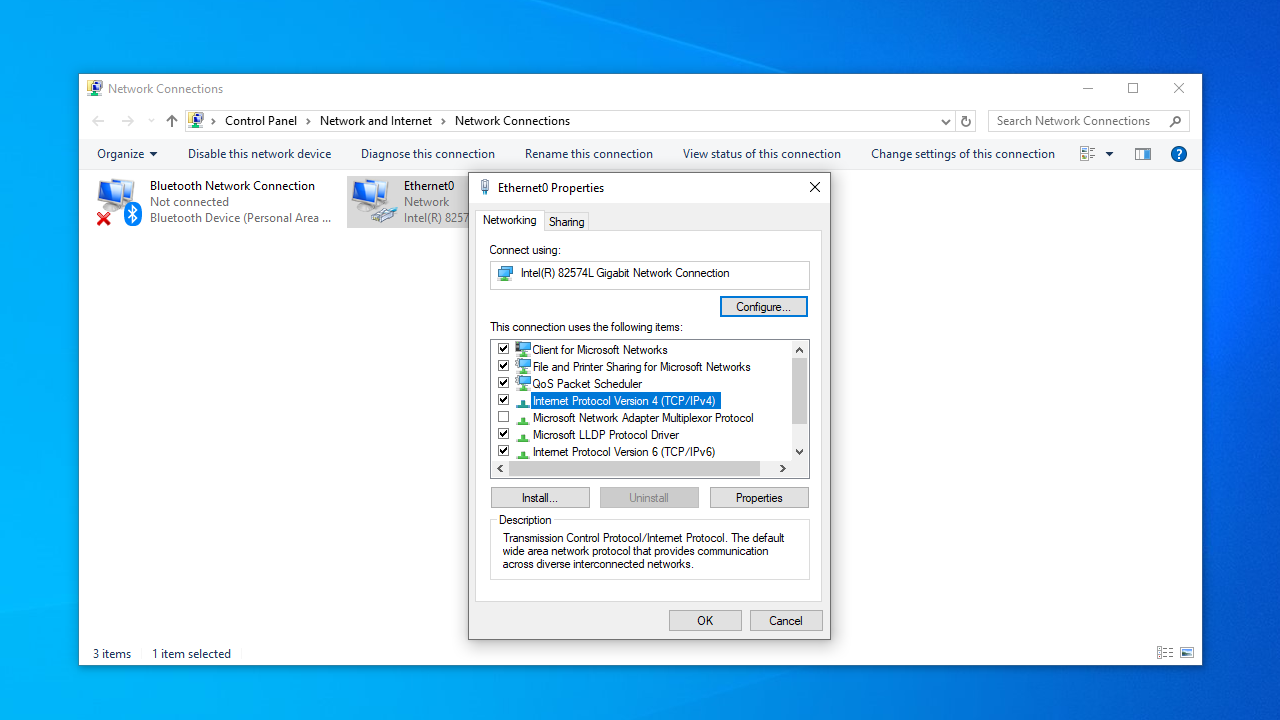
- Right-click on your network connection and click on Properties from the context menu.
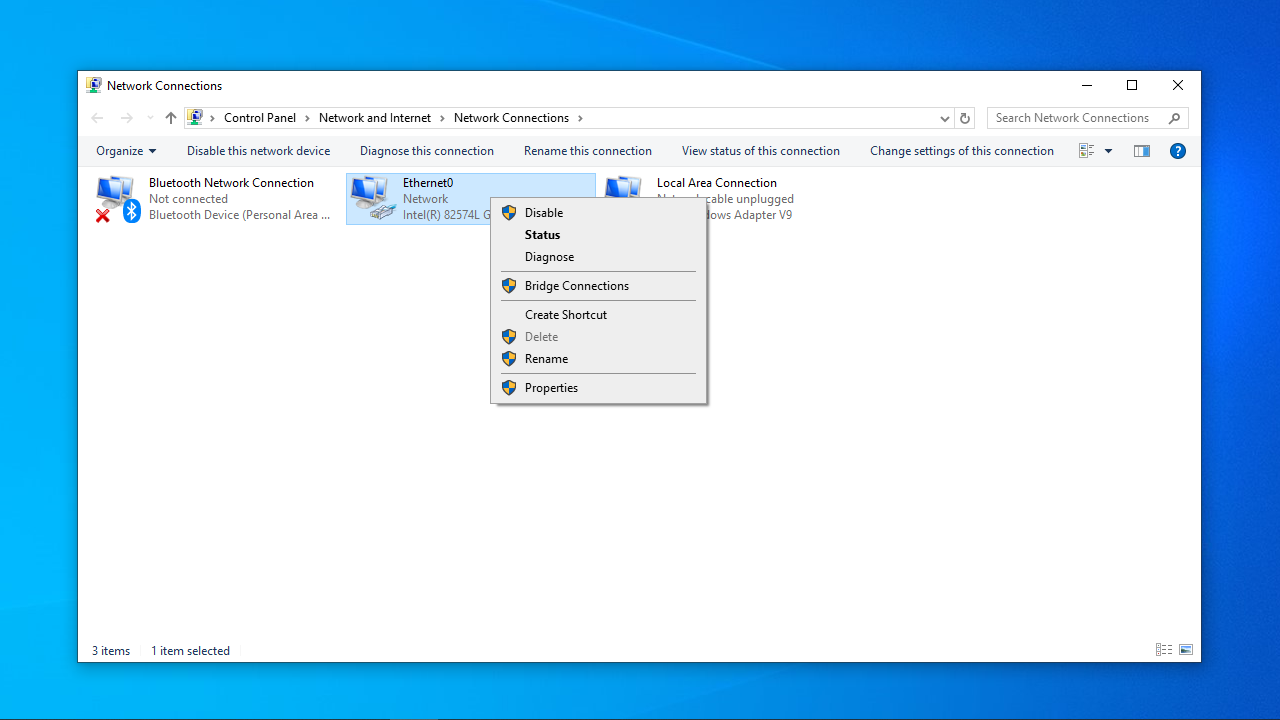
- Locate Internet Protocol Version 4 (TCP/IPv4) in the list and double-click on it to open its properties.
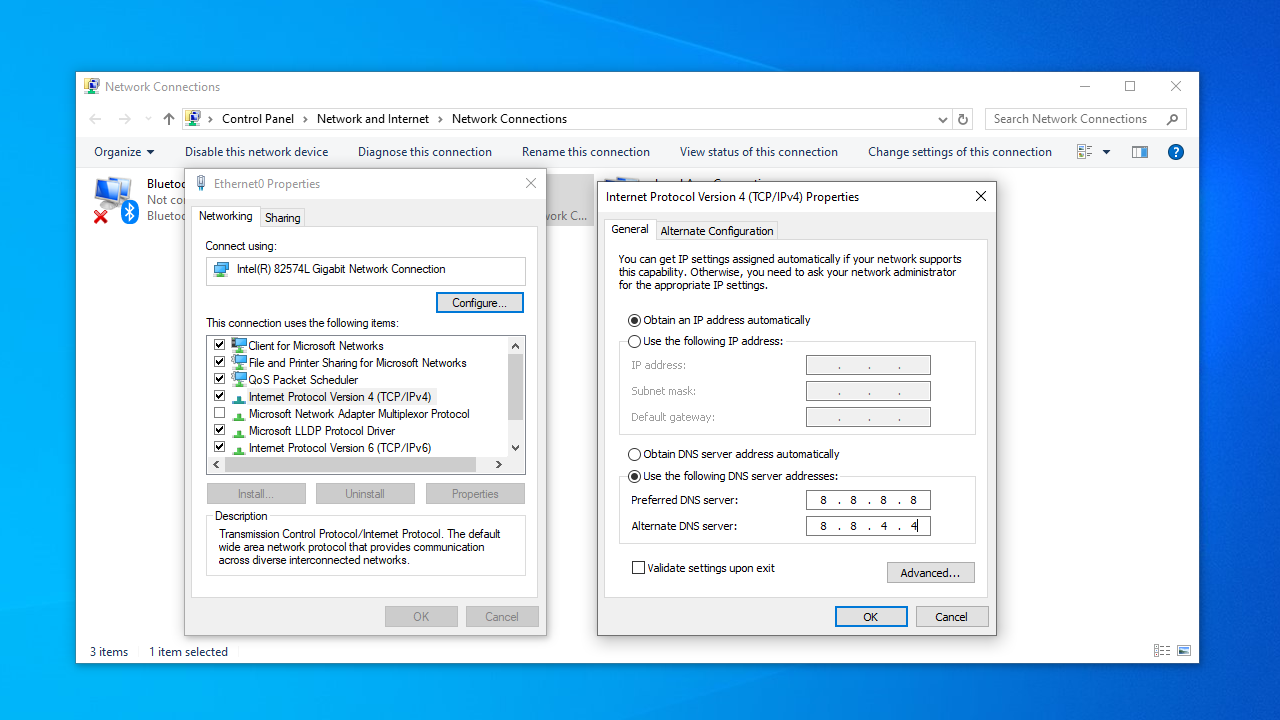
- Switch from Obtain DNS server address automatically to Use the following DNS server addresses.
- Enter the following values:
Preferred DNS server: 8.8.8.8
Alternate DNS server: 8.8.4.4
- Click OK to save the changes.
Fix 7: Flush your DNS cache and reset your IP settings
If you’ve already switched to a more reliable DNS provider but Discord is still stuck on “RTC Connecting,” the next step is to clear out any old or conflicting network data by flushing your DNS cache and resetting your IP settings.
This clean slate can often resolve the “RTC Connecting” Discord problem by allowing your computer to establish a new, unhindered connection to Discord’s servers.
- Click the Start button in the lower-left corner of your screen.
- Once in the Start menu, go to the search bar and type command prompt or cmd.
- Right-click on Command Prompt in the search results and click on Run as administrator.
- Once in the Command Prompt window, enter the following commands one after the other and press
Enteron your keyboard after each one:
ipconfig /flushdns
ipconfig /all
ipconfig /release
ipconfig /renew
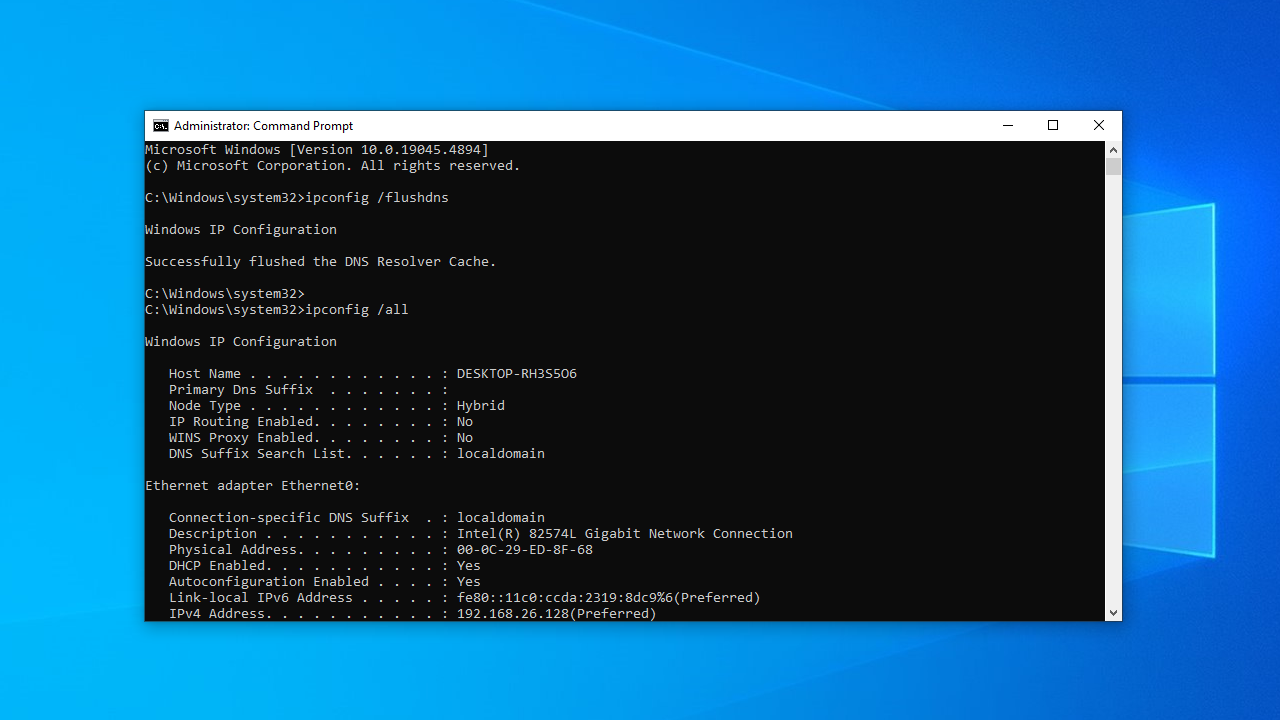
After running all the commands, close the Command Prompt window and restart your computer. You can then relaunch Discord and see if the error is gone.
Fix 8: Clear browsing data and disable extensions
Your browser might be the reason why you cannot join a chat on Discord. You may have conflicting plugins installed, and the browser cache might also be causing the Discord website to misbehave.
📌 Also read: Fixing “This Plugin Is Not Supported” Error in Windows 10/11
To fix this, you need to clear your browsing data and then disable all extensions. Afterward, try rerunning Discord. If the issue persists, switch to another browser and see if you can start a chat without getting stuck at “RTC Connecting.”
Clear browsing data on Chrome, Firefox, and Edge:
| Browser | Steps to clear browsing data |
|---|---|
| Chrome |
|
| Firefox |
|
| Edge |
Note
For added control, you can set Edge to prompt you to choose what to clear each time you close the browser and specify which data types should be cleared.
|
Disable extensions on Chrome, Firefox, and Edge:
| Browser | Steps to disable extensions |
|---|---|
| Chrome |
|
| Firefox |
Note
Some extensions might prompt you to confirm before disabling. Follow any on-screen instructions if prompted.
|
| Edge |
|
📌 Also read: How to Fix Discord Streaming Not Working in Chrome Browser?
Fix 9: Set a different server region on Discord
It could be that you are looking at the “RTC Connecting” issue on Discord because of your server region. Choose a different one (which could be closer to your actual location) and try initiating a VoIP chat again. Follow these steps:
- Launch Discord and select the voice channel’s server.
- Hover your mouse over the voice channel and click the settings icon. You can also right-click the voice channel and select Edit Channel from the drop-down menu.
- Now, scroll through the Overview page to the Region Override drop-down and select your server.
- Click the Save Changes button and restart Discord.
Fix 10: Disable QoS on Discord
You might be able to fix the “RTC Connecting” Discord issue by disabling the QoS settings on your account.
Follow these steps to turn off the feature:
- Launch Discord and click Settings in the bottom-left corner of the window. A cog icon represents the option. It is displayed next to your Discord name.
- Click on Voice & Video under the App Settings section in the left pane.
- Scroll down to the Enable Quality of Service High Packet Priority option and click the toggle to turn it off.
- Restart the app.
You can now check whether the Discord “RTC Connecting” problem has been resolved.
Fix 11: Change the audio subsystem in Discord
Although “RTC Connecting” sounds like a purely network-related issue, Discord’s audio subsystem can also play a role. Discord uses real-time voice protocols that depend on smooth coordination between your network, hardware, and software audio drivers.
The Standard audio subsystem in Discord is optimized for modern systems and advanced audio hardware. However, it can sometimes run into compatibility problems—especially on:
- Older machines
- Devices with outdated or quirky audio drivers
- Systems with virtual audio software installed (like Voicemeeter or virtual soundcards)
When you switch to the Legacy audio subsystem, Discord uses a simpler, more broadly compatible audio interface. This can help stabilize the app and resolve hidden audio initialization errors that might be interfering with real-time voice connections—ultimately clearing up the dreaded “RTC Connecting” screen. Here are the steps to take:
- Launch Discord.
- Click Settings (displayed as the cogwheel) in the lower-left corner of the page.
- On the left pane, click on Voice & Video in the App Settings section.
- Set Audio Subsystem to Legacy.
- Re-launch Discord and try making a voice call.
📌 Related: Can’t Hear Anyone in Discord: How to Fix It?
Discord Stuck on “RTC Connecting”: Fixed
The steps above explain how to fix the “RTC Connecting” Discord problem. You should now be able to engage in Discord voice chats without hiccups. If the issue persists, try contacting Discord’s support.
Now that you know how to fix it, which one has worked for you? Let us know by sliding into the comments section. We’d love to hear from you!
FAQ
- Check if Discord’s servers are operational
- Ensure you have a stable Wi-Fi or mobile data connection
- Disable any active VPN or proxy
- Restart the Discord app
- Update the app to the latest version
- Clear the app cache (via phone settings)
If all else fails, uninstall and reinstall the app.