
- Why is the System Using 100% of the Disk?
- How to Fix 100% Disk Usage on Your Computer
- Fix 1: Update Windows
- Fix 2: Maintain your PC to avoid high disk usage
- Fix 3: Check your PC for malware infection
- Fix 4: Disable Your Main Antivirus Program Temporarily
- Fix 5: Disable Windows Search Indexer
- Fix 6: Clear temporary files
- Fix 7: Turn off SuperFetch
- Fix 8: Disable Windows tips, tricks, and suggestions
- Fix 9: Check your disk for errors
- Fix 10: Switch to the high performance power plan
- Fix 11: Update your Drivers
- Fix 12: Run System File Checker
- Fix 13: Perform a clean boot
- Fix 14: Reset your computer’s virtual memory
- Fix 15: Upgrade your Random Access Memory (RAM)
- Fix 16: Fix your Microsoft AHCI driver
- Fix 17: Reinstall your OS
- Conclusion
- FAQ
Every Windows user’s knee-jerk reaction to performance problems, glitching apps, and frozen screens is launching the Task Manager. The legendary End Task button almost always lives up to its reputation as it effectively shuts down buggy apps, whether they are responding or not.
But it’s usually a different story when you look to the right and see the Disk column flashing the dreaded 100%. It means your hard drive is overburdened, and closing one or two applications is often not the solution.
You can restart your computer, but you’ll experience the same problem occurring again.
This guide will show you what to do if you’re currently dealing with the “ 100 percent disk usage ” issue.
Why is the System Using 100% of the Disk?
Whenever there is high disk usage, both Windows 10 and Windows 11 generally experience performance drops. The issue is usually the result of too many apps and processes using the disk.
However, other problems, such as Windows glitches, problematic system files, malfunctioning drivers, disk errors, and malware infections, may be behind the 100% disk usage that Windows 10 is currently trying to shake off.
If you’re wondering why your computer is slowing down, you can use the Task Manager to confirm whether the notorious ‘100 percent disk usage’ problem is the cause.
The Task Manager can also show you the apps and processes driving up your disk usage. Follow these steps:
- Right-click the Start button or press the
Windows + Xshortcut. - Select Task Manager in the Power User menu.
- After the Task Manager appears, check under the Disk column to see which app or process is contributing to the 100% disk usage problem.
In most cases, it will be one system process or the other. However, Task Manager may be unable to offer you the real culprit. We’ll show you different troubleshooting steps that will teach you how to fix 100% disk usage on your PC.
How to Fix 100% Disk Usage on Your Computer
Fix 1: Update Windows
Using an older version of Windows may be the real reason your hard disk usage keeps spiking. Microsoft releases updates to fix bugs of this kind and improve how your computer works.
Running Windows Update is easy. Type update in the Start menu and click Check for updates.
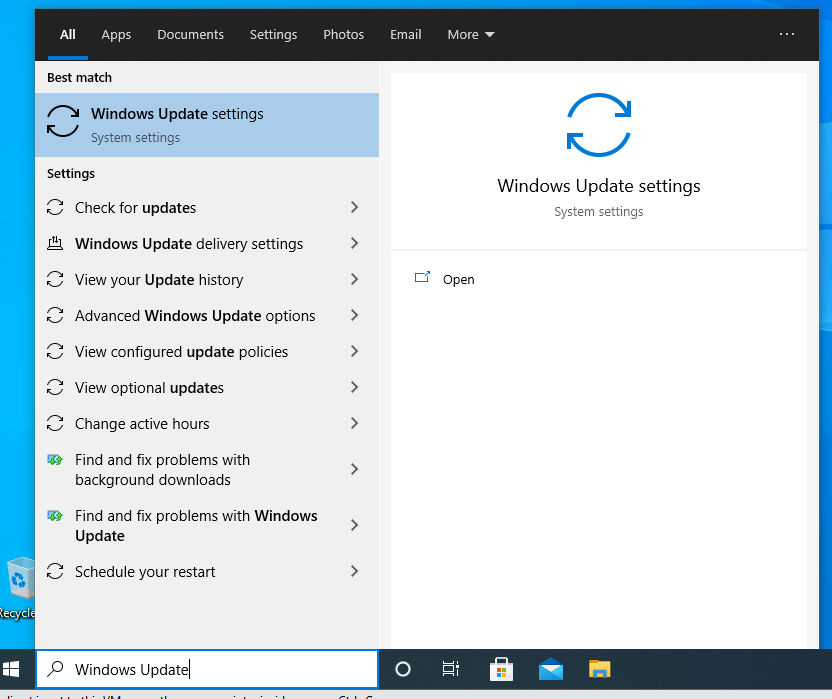
Allow the Windows Update client to download and install all the available updates.
Restart your computer when the client requests a reboot to complete the installation.
After Windows reboots, check if the “ System high disk usage ” issue persists.
📌 Also read: Ultimate Guide: How to Manually Check and Install Windows Updates
Fix 2: Maintain your PC to avoid high disk usage
You can take proactive measures to reduce or even eliminate the chances of experiencing a high disk usage problem. The first step is making sure Windows is always up to date.
The next step involves ridding your computer of junk, duplicate, and corrupted files; broken and leftover registry entries from uninstalled applications; unneeded applications; and unhelpful browser add-ons and plugins.
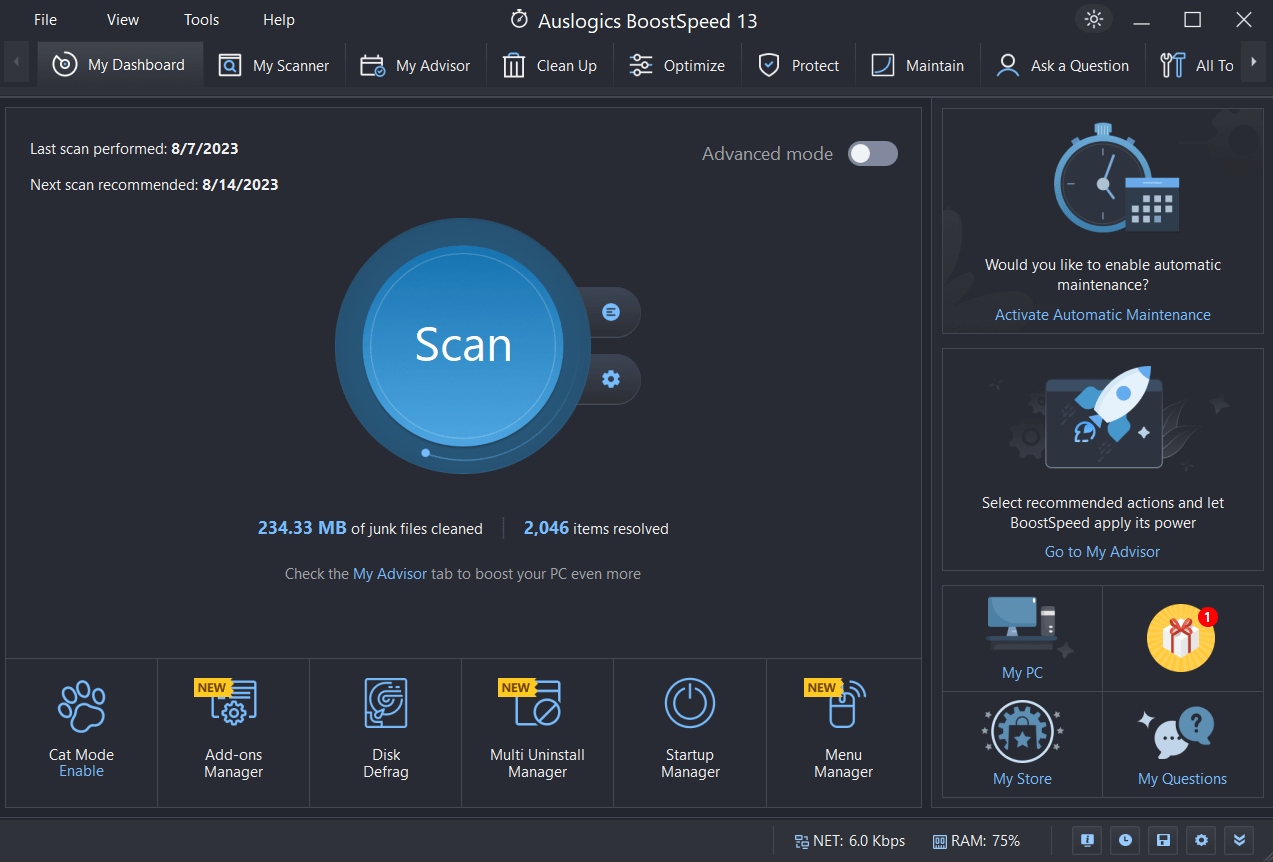
These steps may seem like a lot of work, but it will be easy and effective when you use Auslogics BoostSpeed.
The program is designed to keep computers in tip-top shape to ensure users do not experience problems like 100% disk usage.
It’s a complete PC maintainer packed with many basic features and advanced tools to improve performance, enhance security, and ensure computer longevity.
Upon downloading and installing Auslogics BoostSpeed, you’ll see your Dashboard in its basic view, which includes a button to perform a full system scan, showing everything the scan will achieve.
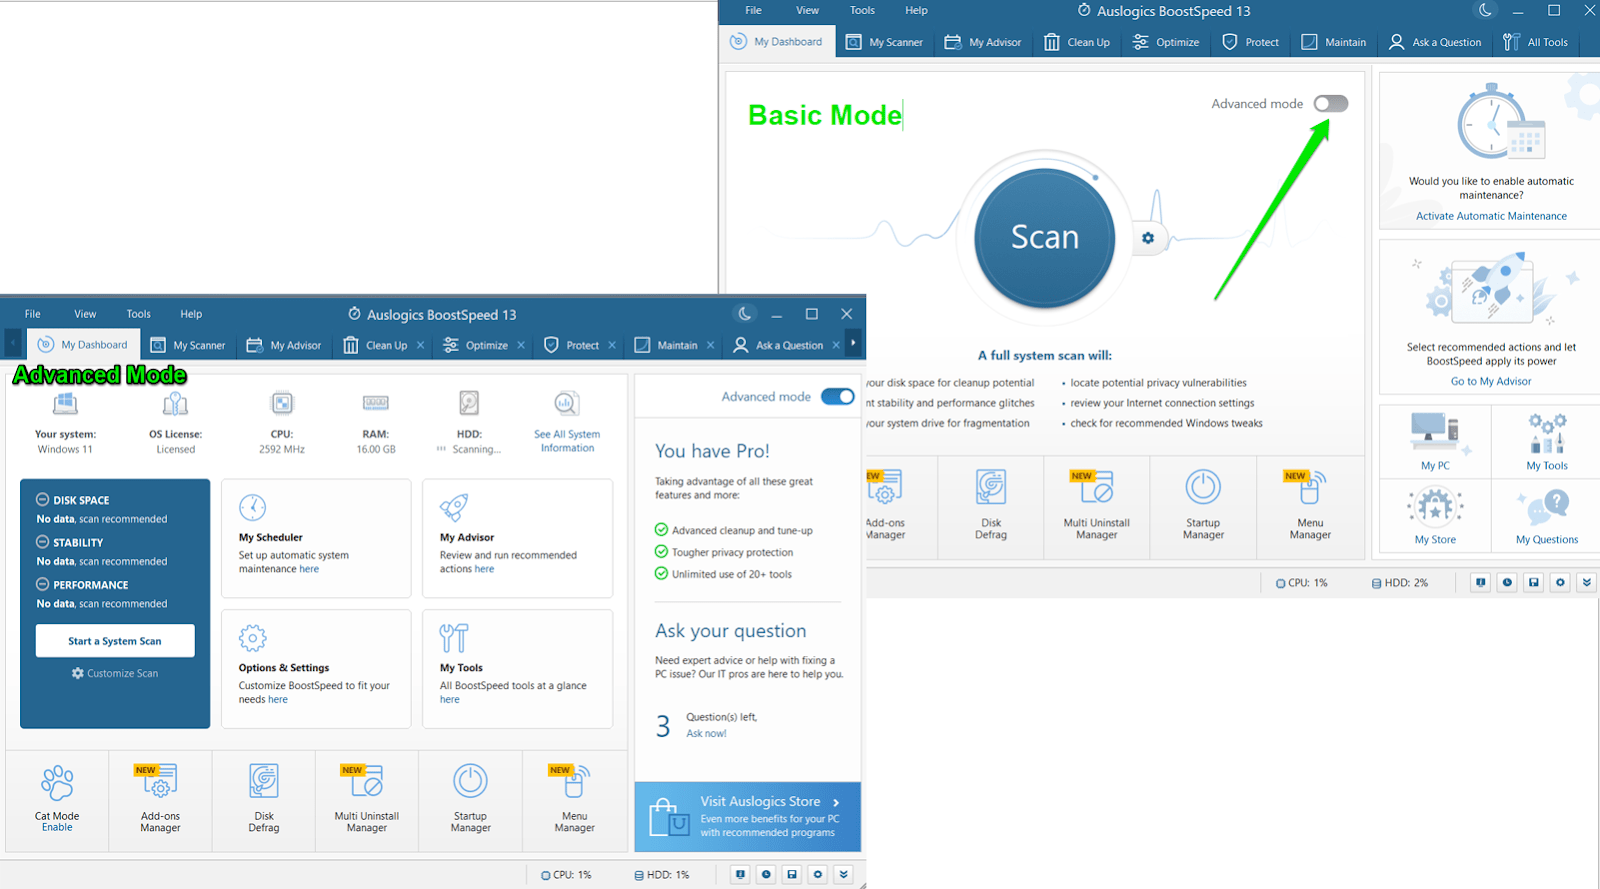
When you switch on the Advanced Mode, you’ll unlock advanced tune-up and cleanup functionalities and have access to more than 20 tools that can help you keep you hard disk healthy and maintain other PC areas.
To prevent the 100% disk usage problem, we recommend that you use the following:
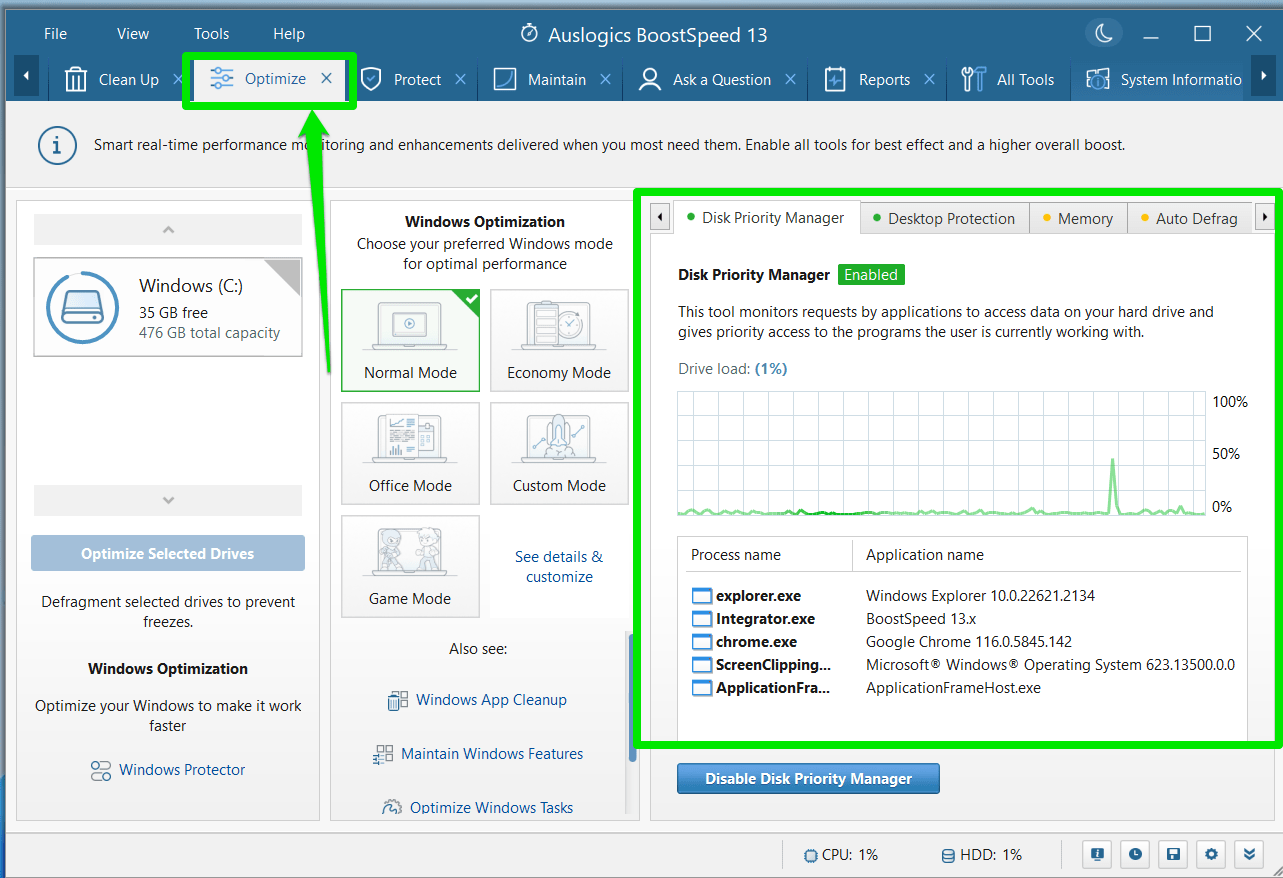
The Optimize Tab: Turn on features, such as Disk Priority Manager and Processor Optimizer to regulate and optimize how apps and files use system resources, including your Disk and CPU.
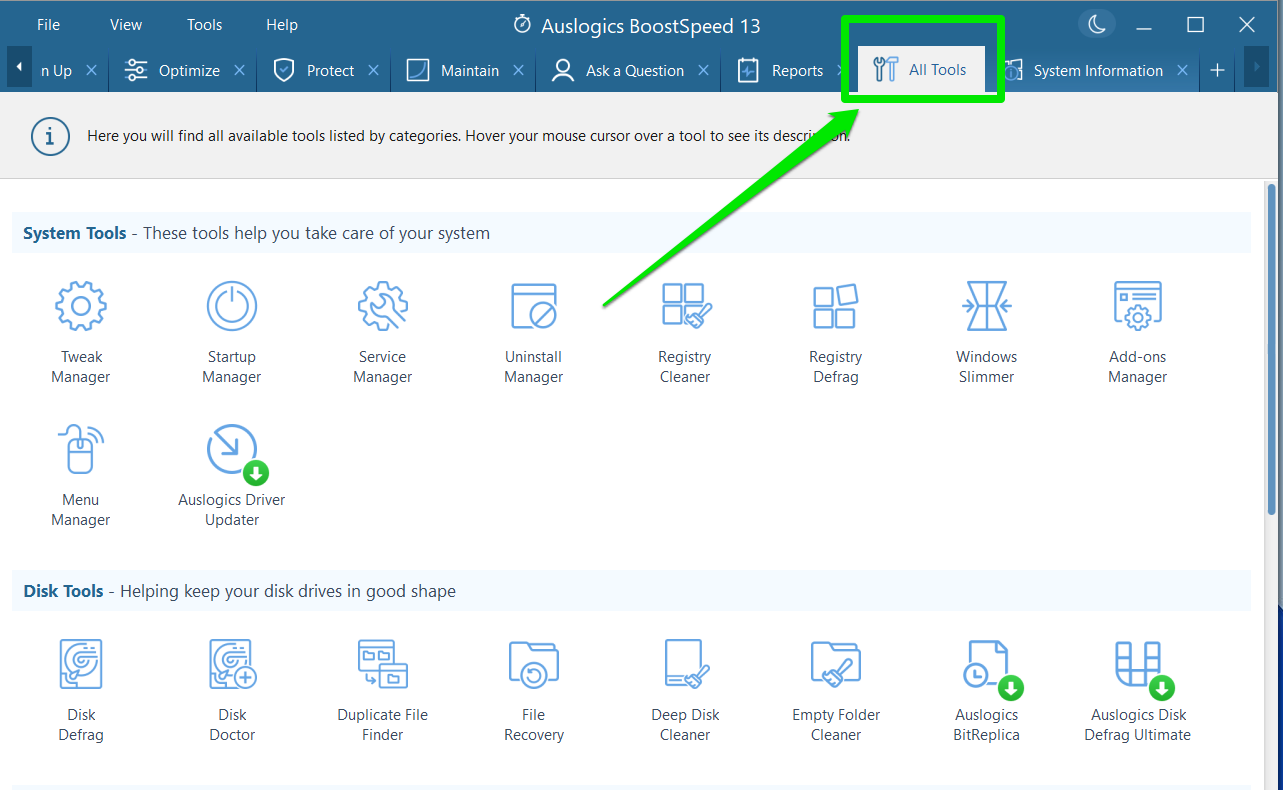
System and Disk Tools: Go to the All Tools tab to use tools that will help you remove unwanted files, fix disk errors, and defragment your hard disk to improve PC health.
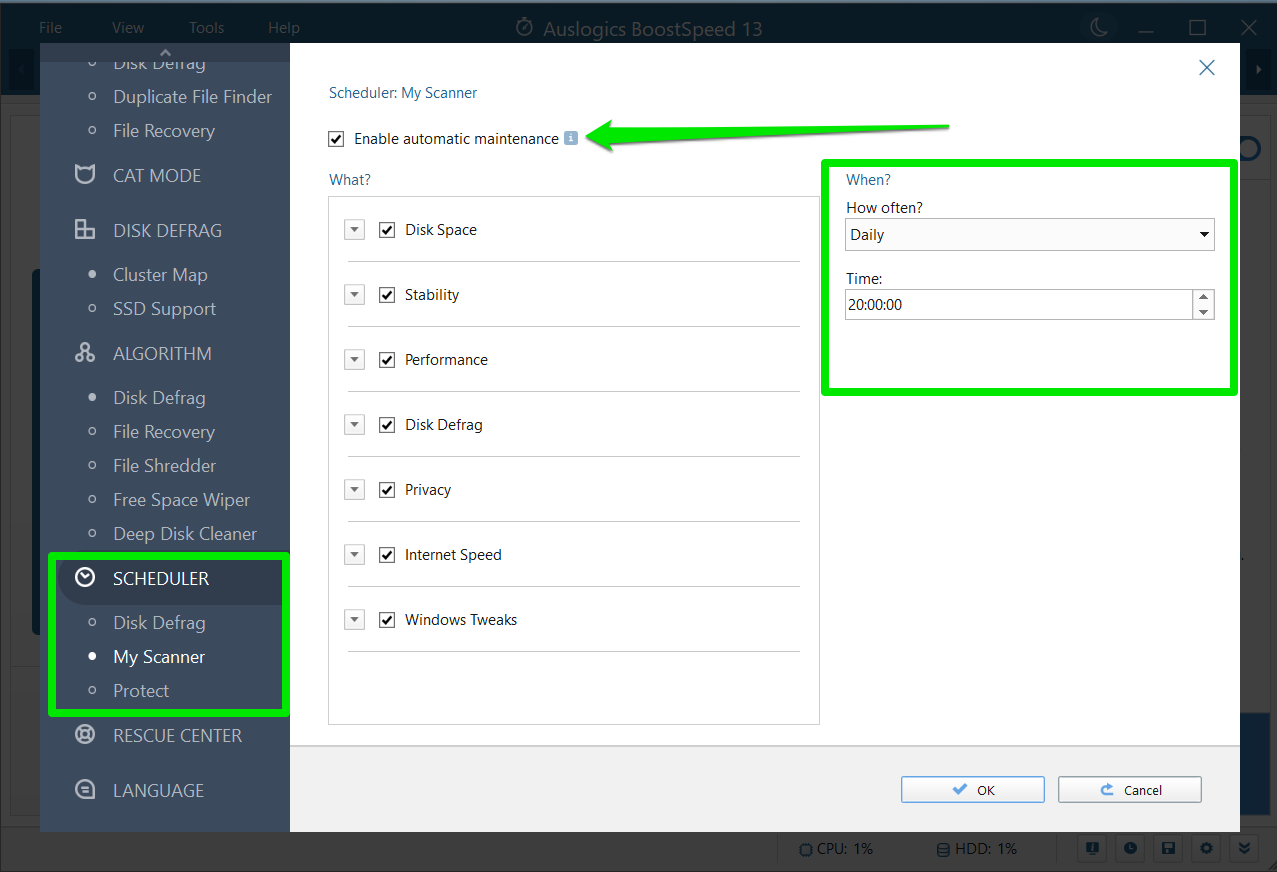
Automatic Maintenance: You can configure the tool to run any cleanup process on a strict schedule. Go to File and select Autmoatic Maintenance.

Choose the scans and maintenance tasks you want to run under Scheduler, then select how often you want them to run.
📌 Also read: Speed Up Slow Computer as a Pro – Introducing Auslogics BoostSpeed 13
Fix 3: Check your PC for malware infection
If your drive is constantly working at or near 100% for no apparent reason, this might mean your computer is malware-infected.
Some malicious applications, such as spyware, adware, and even mining software, may have made their way to your computer. They usually work in the background and use up your system resources.
You can run a full scan using your antivirus program to get rid of the problem.
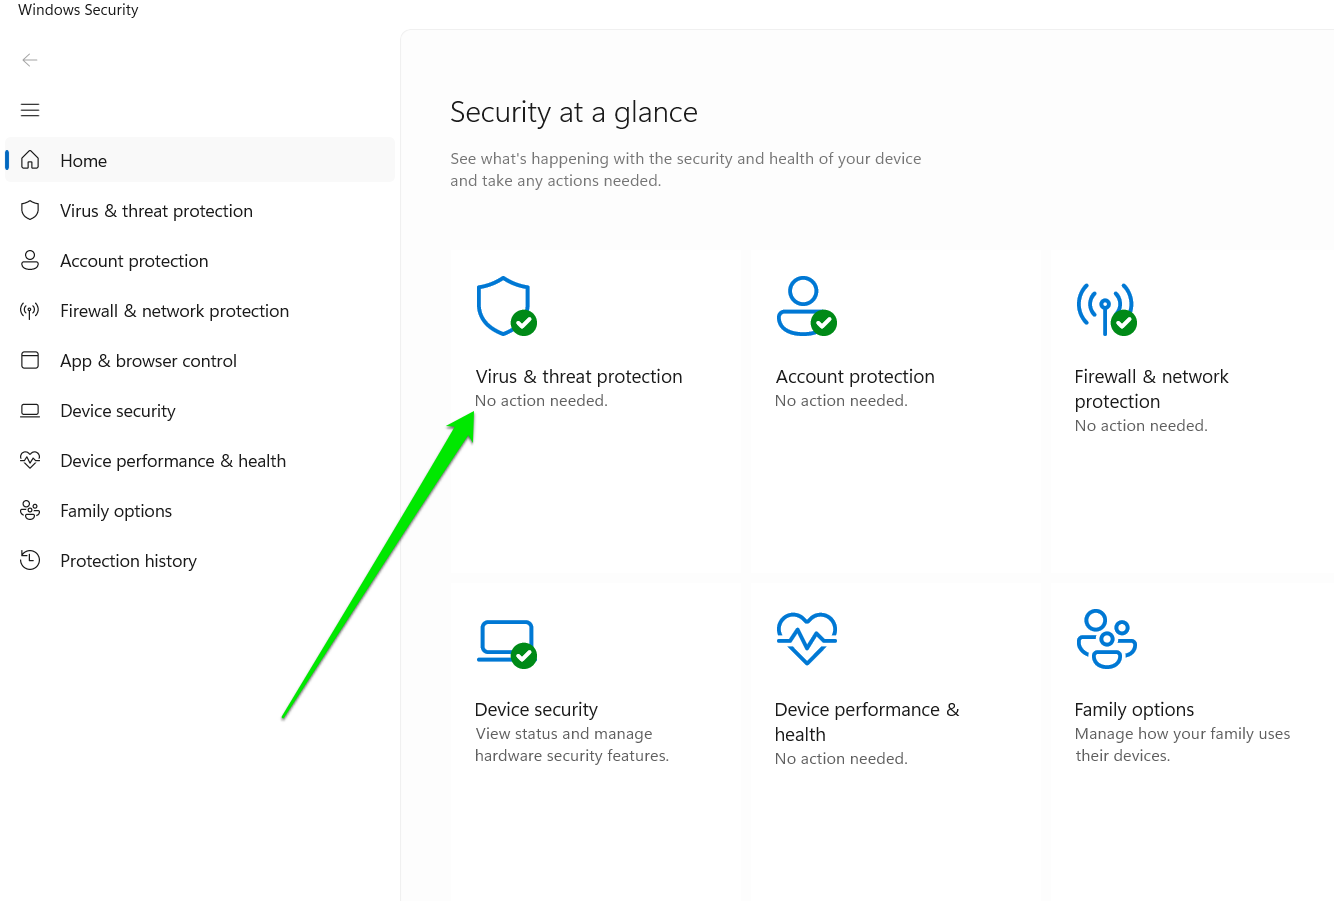
The Microsoft default security solution Windows Defender will scan your system for malware issues and do its best to make them cut and run:
- Go to the System Tray (where your time and date are displayed) and click the upward-facing arrow.
- Select the blue or white shield.
- Click Virus & Threat Protection when the Windows Security app opens.
- Select Scan Options under Current Threats.
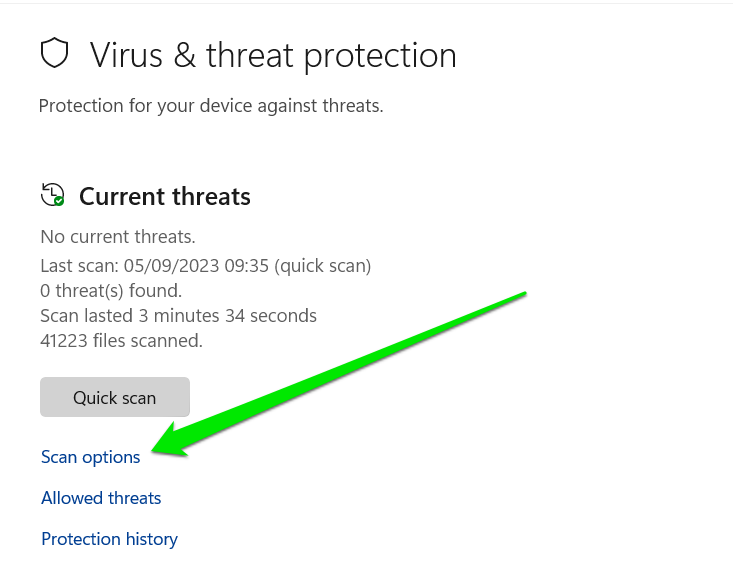
- Select Full Scan and click Scan Now.
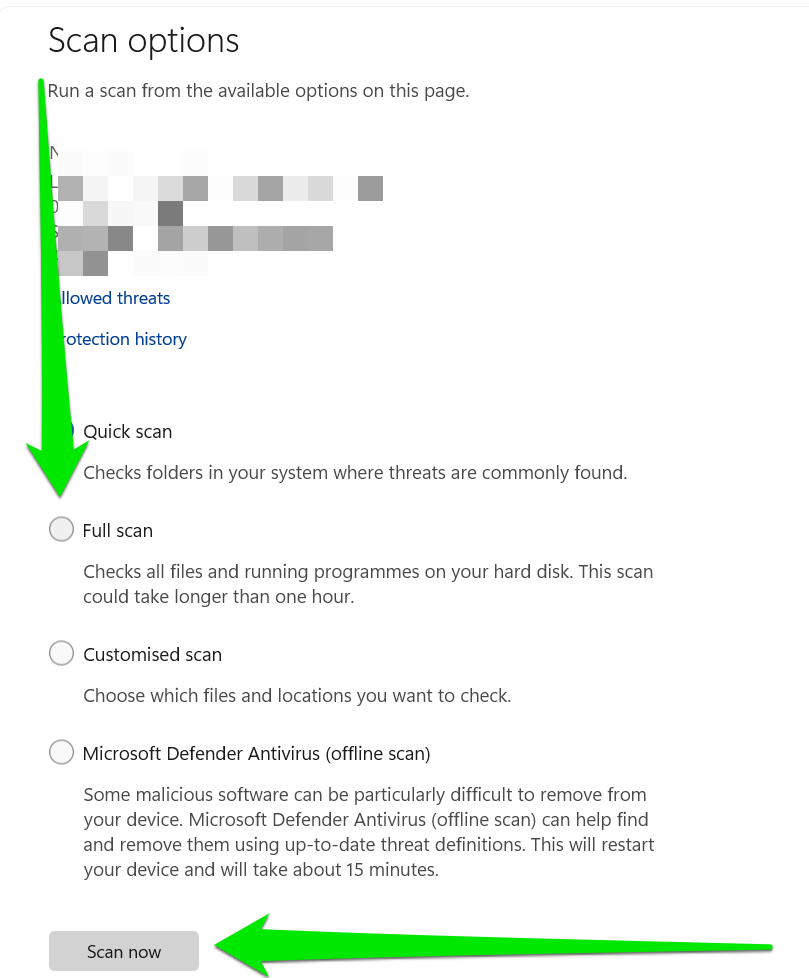
- Note that the scan may take longer than one hour as it goes through personal and system files.
Using Your Main AntivirusIf you have a trustworthy antivirus program installed, let it do its job. You can use its Full Scan option to try and root out deep-lying malware applications that may have evaded detection for so long.
You should also update your anti-virus program since updated malware definitions are released regularly to detect newly introduced malicious applications.
Using A Special Anti-Malware ToolYour main antivirus is not omnipotent. You should back it up by any means whatsoever to protect your computer from irreversible damage. Consider using a special anti-malware tool to trace and remove the issues your main security solution may miss.
For instance, Auslogics Anti-Malware is ready to help you. The tool does not interfere with Windows Security or your third-party antivirus program. It provides an extra layer of security to catch malicious software that may escape your main antivirus.
📌 Also read: How to Remove Virus and Other Malware from Windows
Fix 4: Disable Your Main Antivirus Program Temporarily
Your main antivirus might be responsible for consuming 100% disk resources on your computer. Therefore, try disabling it temporarily to determine whether it is to blame for your drive going to full capacity.
You needn’t worry about your safety: Windows Security can guard your system while your main antivirus is not at work.
If your computer’s disk usage returns to normal when your main security solution is off, you should report this issue to your vendor.
Turn Off Windows Security
Windows Security, your native OS anti-virus, may also be why you see your disk running at 100 % from time to time, especially when it starts performing impromptu malware checks.
It might also collide with your main antivirus program to cause the problem.
If you suspect such a conflict, try disabling Windows Security. Follow these steps:
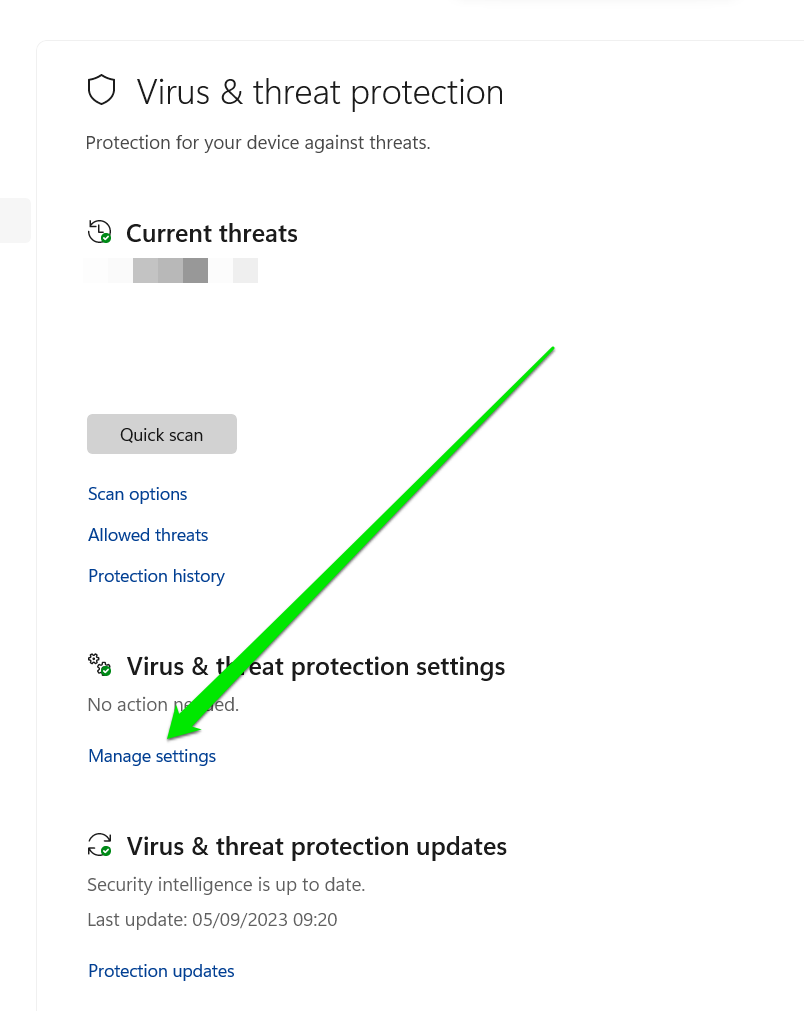
- Go to the System Tray (where your time and date are displayed) and click the upward-facing arrow.
- Select the blue or white shield.
- Click Virus & Threat Protection when the Windows Security app opens.
- Go to Virus & Threat Protection Settings and click Manage Settings.
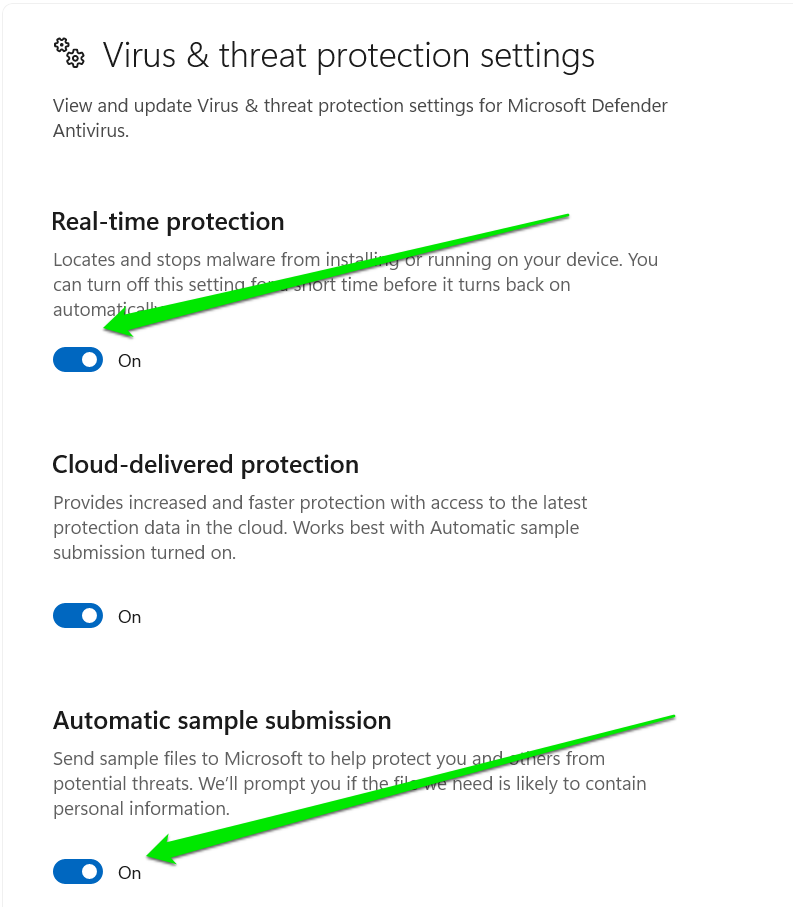
- Turn off Real-Time Protection and Automatic Sample Submission.
Fix 5: Disable Windows Search Indexer
Windows Search Indexer might cause the frustrating 100% disk usage problem. Its job is to analyze every content on your hard drive and compile them to a single location so that you can see search results quickly when you search for files, applications, commands, or processes.
Although this feature helps you find your files quickly, you can limit how it works by excluding specific folders from indexing.
Follow these steps:
- Open the Start menu and type
indexing. - Click Indexing Options.
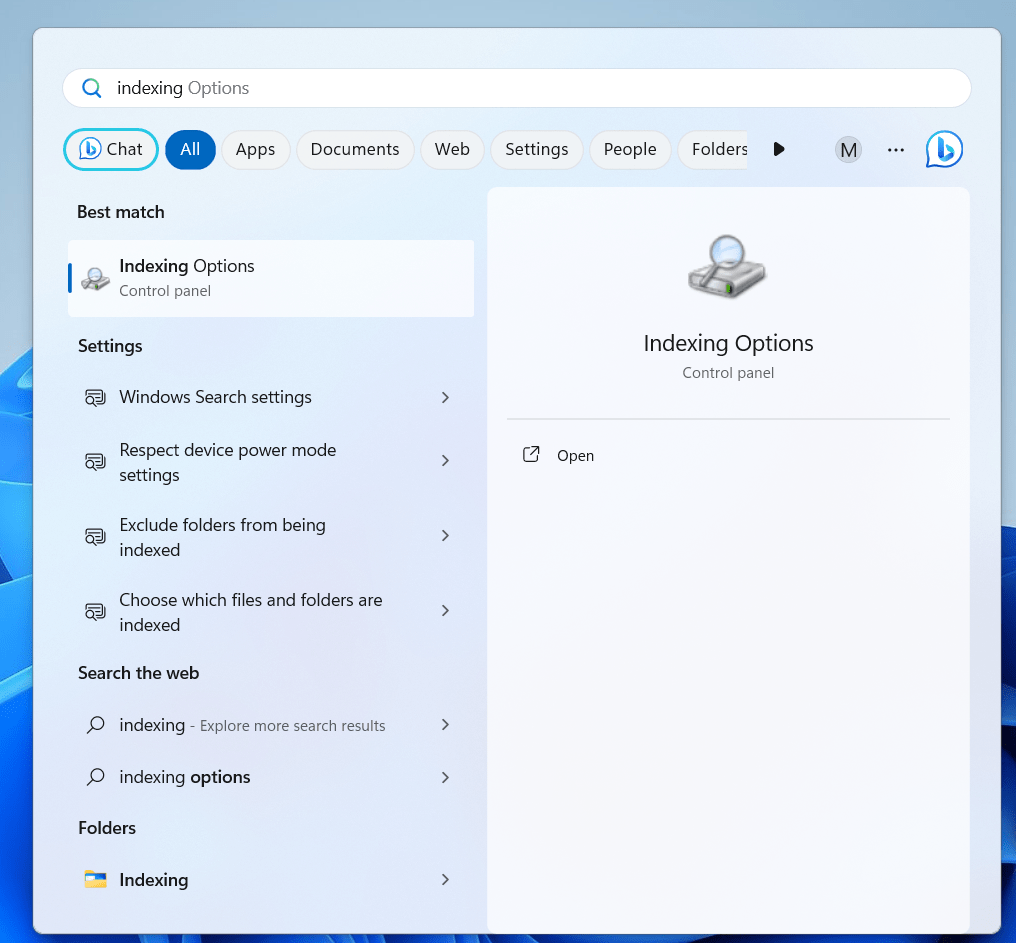
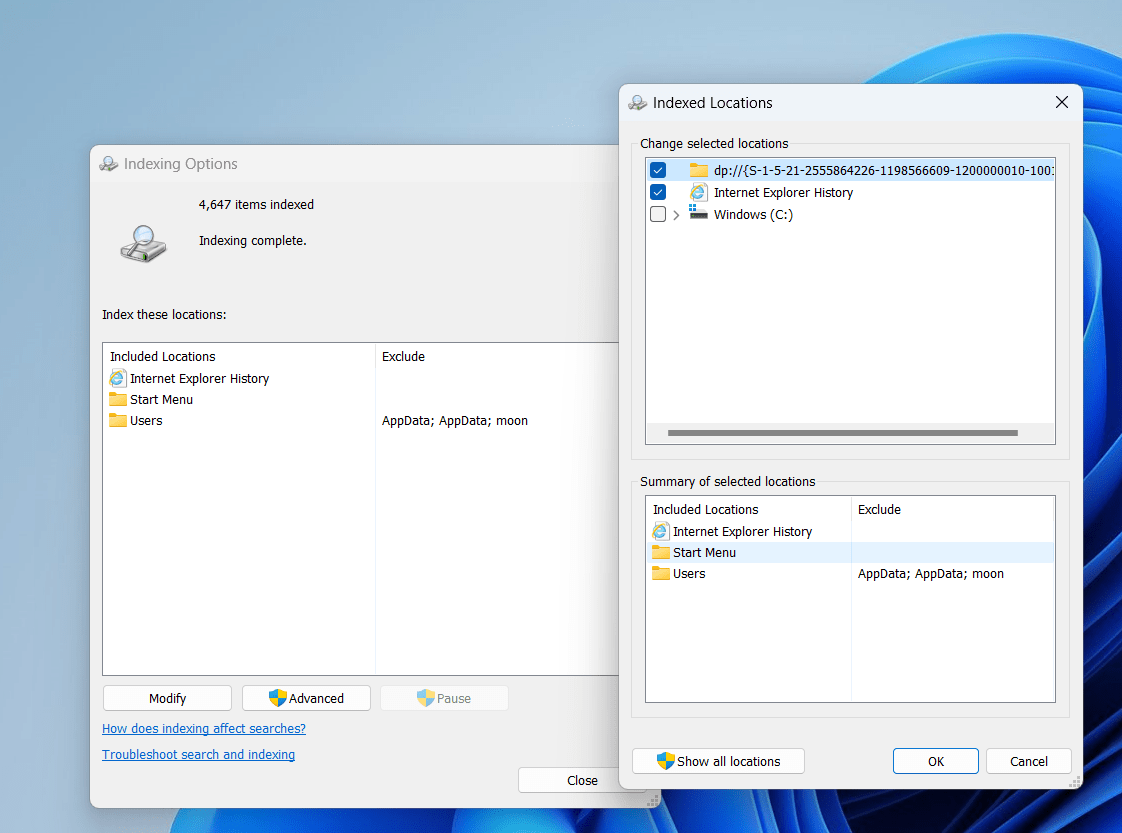
- After the Indexing Options dialog opens, select Modify.
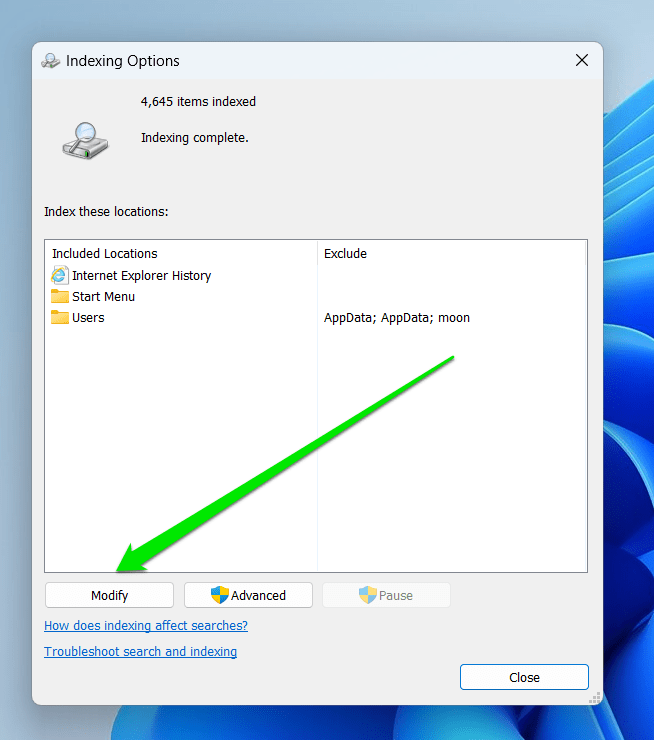
- You can now change the locations that Windows Search can index.
You can also disable Windows Search to stop indexing and check if that will resolve the problem. Follow these steps:
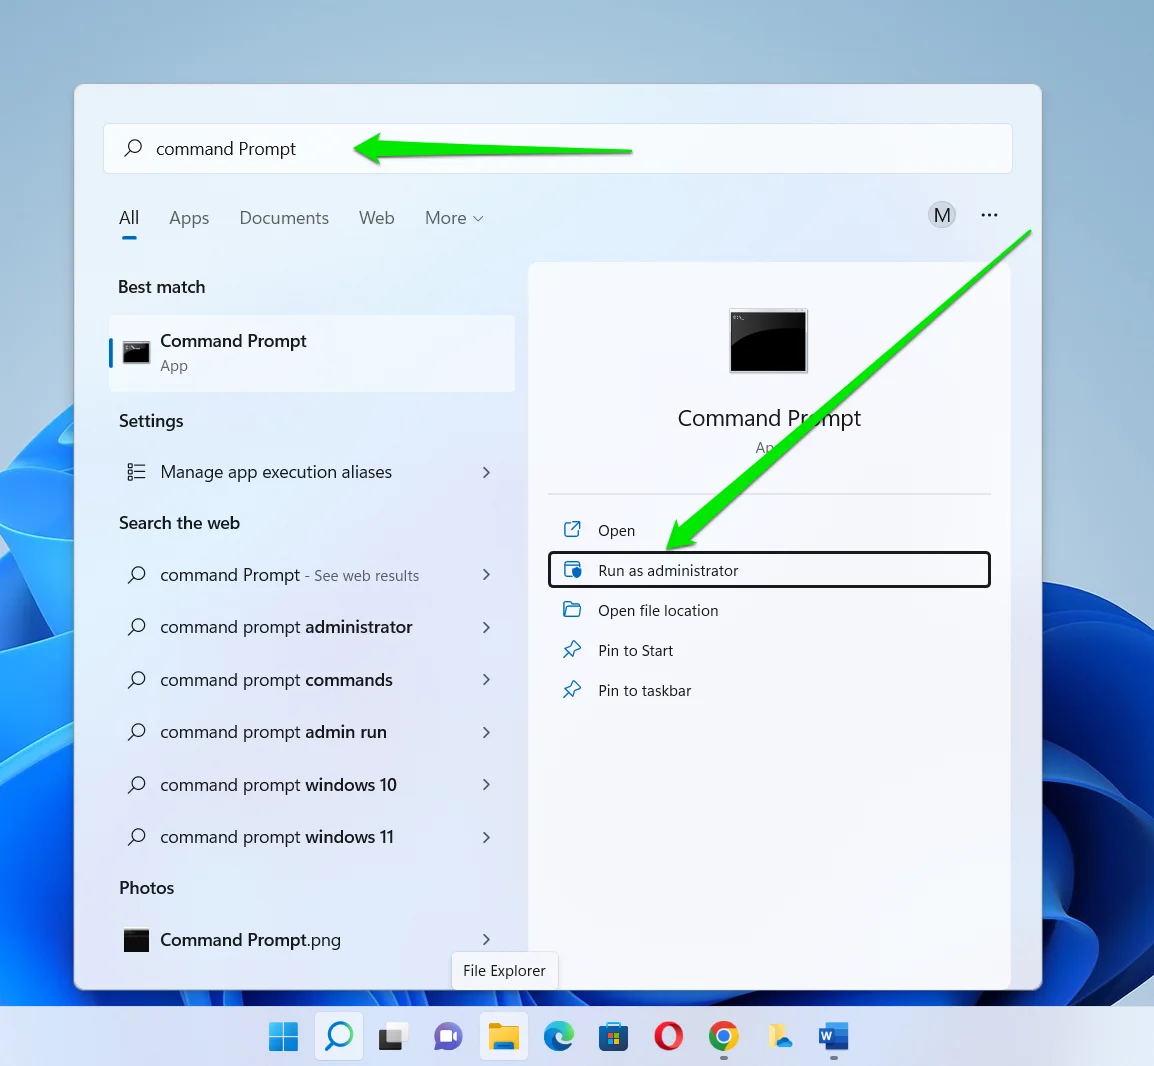
- Open the Windows Start menu and type
CMD. - Click Run as Administrator under Command Prompt and click Yes in the UAC prompt.
- After the Command Prompt opens, type the following and tap the
Enterkeyboard button:
net.exe stop “Windows search”
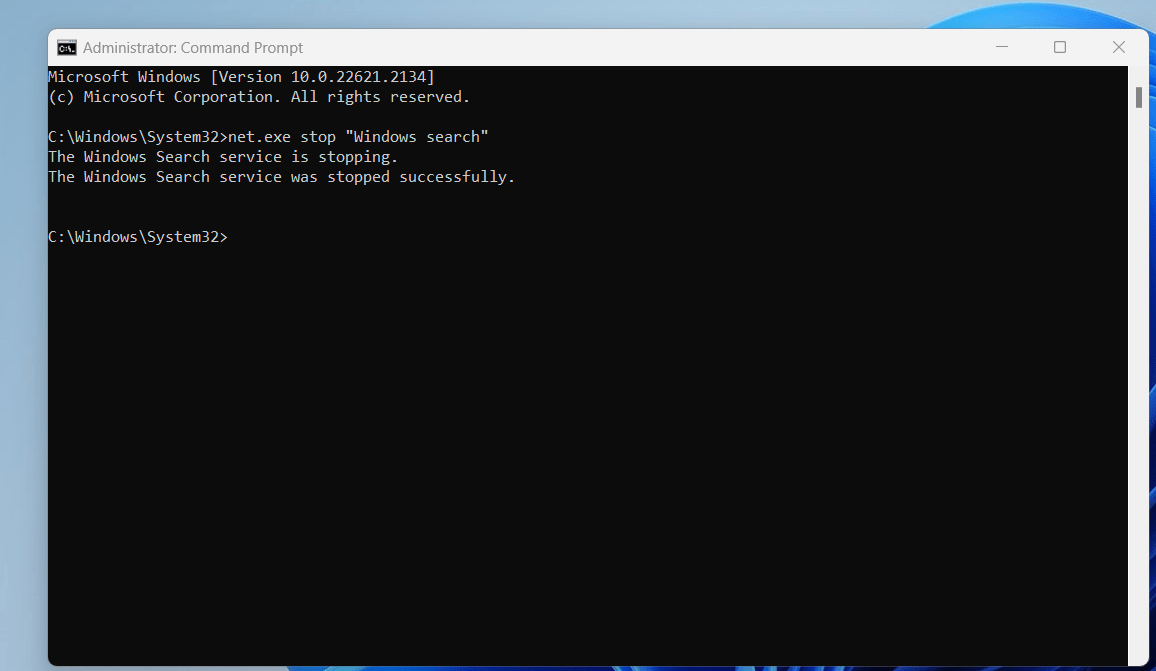
Can you observe a reduction in disk usage now?
If not, Windows Search cannot be blamed for the 100 % disk usage scenario.
In this case, feel free to enable Windows Search:
- Go to Command Prompt again -> Type
net.exe start “Windows search”and hit theEnterkey
However, if your disk works properly after you turn off Windows Search, consider permanently turning off the Windows Search feature.
Fix 6: Clear temporary files
Third-party applications and system programs on Windows regularly create temporary files to help speed up various processes. For example, web browsers create cache files to load websites faster.
These temp files accumulate over time and become problematic, often causing the 100% disk usage issue.
You can clear your computer’s temporary files through Settings.
These steps will show you how to free up space on your PC to stop the high disk usage problem:
- Launch the Settings app and click System.
- Select Storage in the left pane.

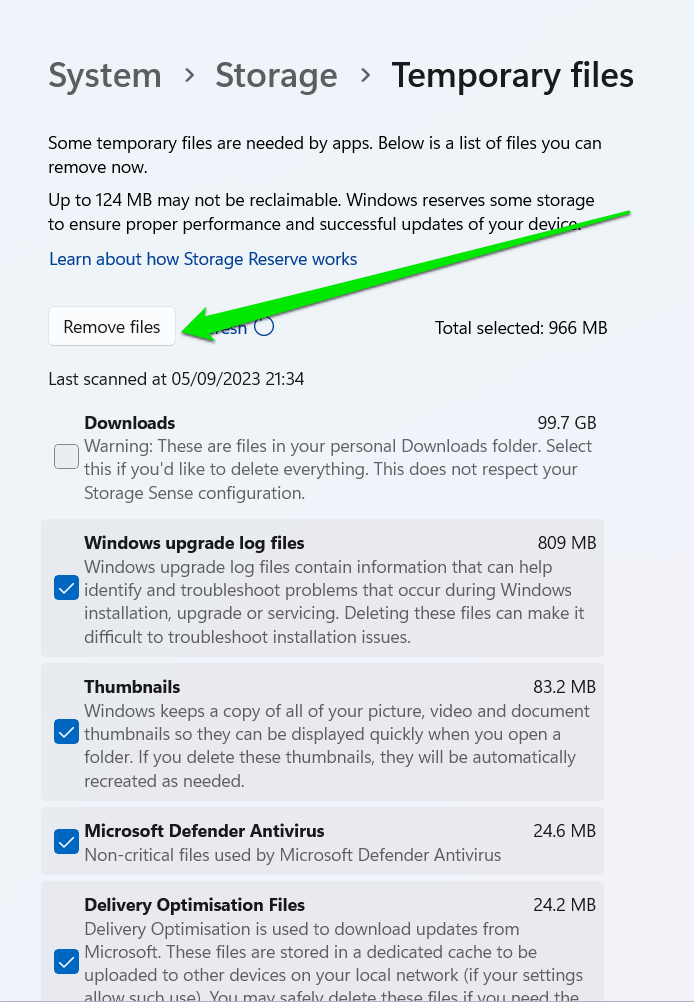
- Click Temporary Files under your hard drive.
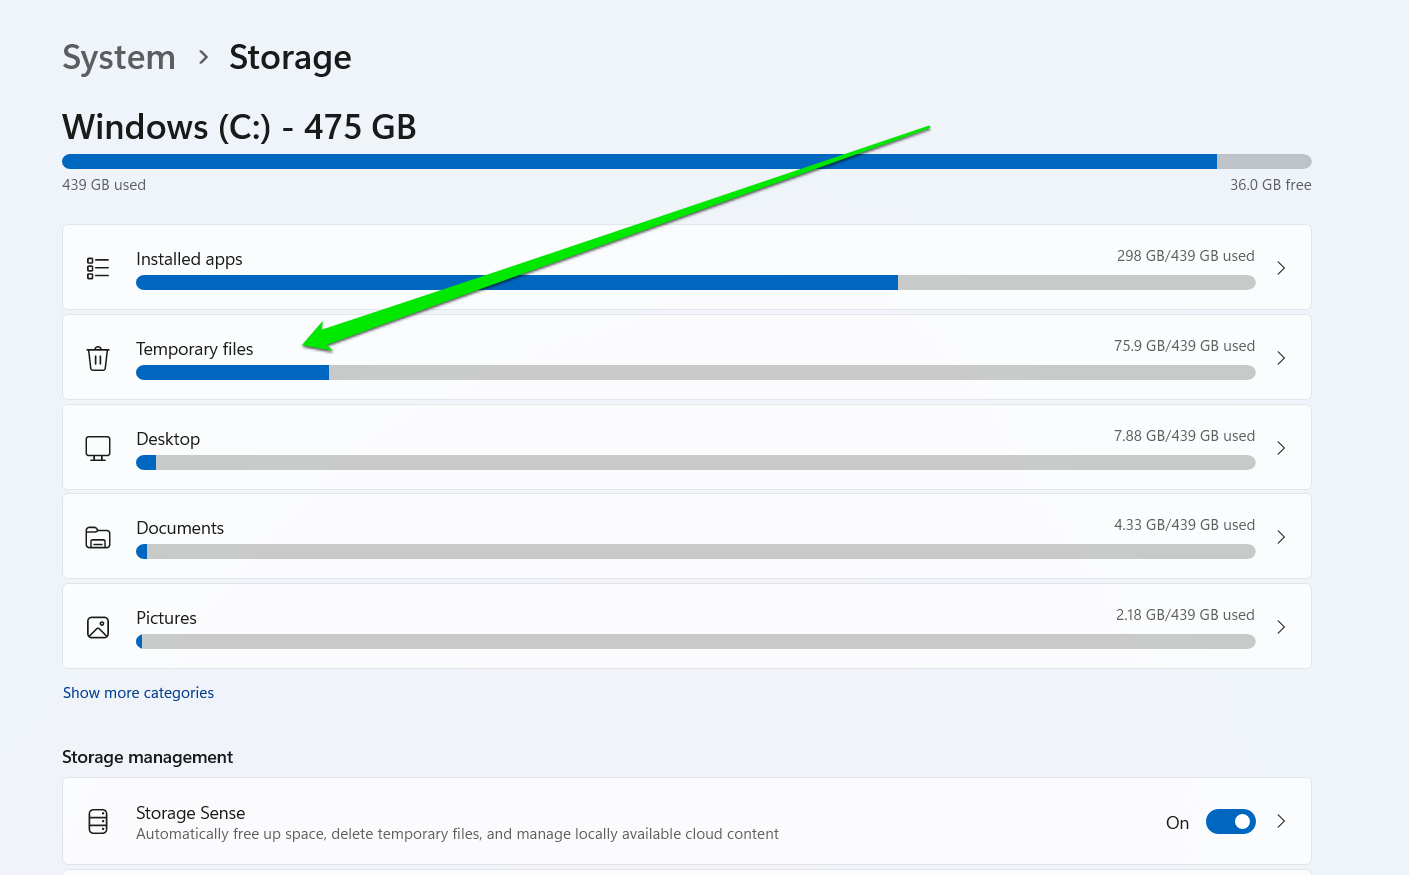
- Windows will scan the temp files on your drive and list them in different categories.
- Select the temporary files you want to delete and click Remove Files.
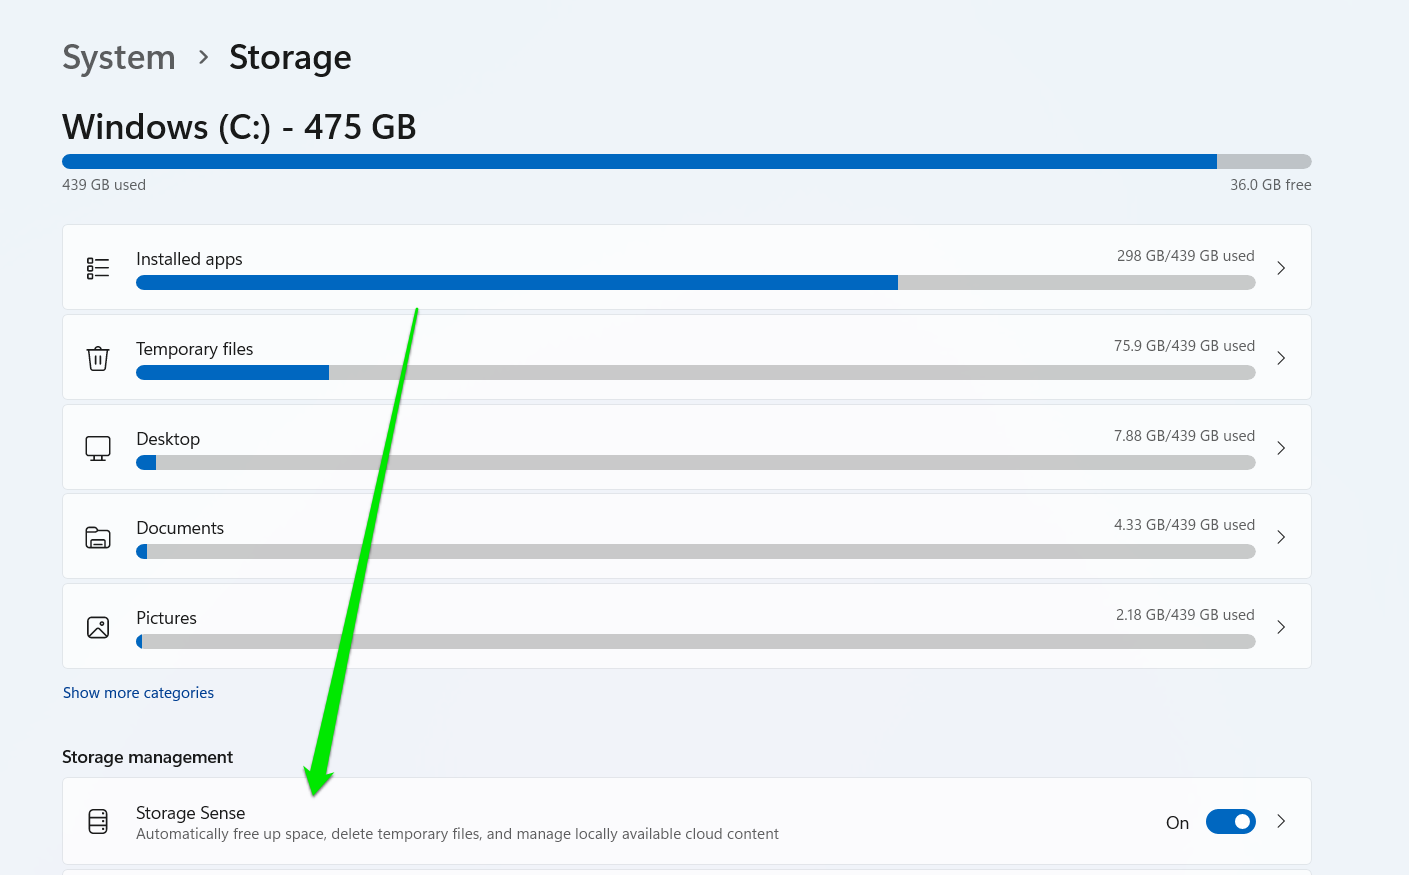
You can also turn on the Storage Sense option to enable Windows to remove temporary files and free up space automatically.
Click the Storage Sense option on the Storage page and choose how you want Windows to do that.
If you want the best storage and system performance management, use Auslogics BoostSpeed as we mentioned earlier.
The program tracks your system’s health and ensures you don’t experience performance problems.
📌 Also read: How to Delete Temporary Internet Files?
Fix 7: Turn off SuperFetch
The SuperFetch service – now known as SysMain – aims to improve system performance by analyzing your frequently used apps and helping you preload them. This way, you can experience faster load times and smooth app performance.
However, SuperFetch may lead to 100% disk usage when it preloads too many programs, causing your system to slow down.
Try disabling SuperFetch to sort out the Windows 10 disk usage problem:
- Open the Windows Start menu and type
CMD. - Click Run as Administrator under Command Prompt and click Yes in the UAC prompt.
- After the Command Prompt opens, type the following and tap the
Enterkeyboard button:
net.exe stop sysmain
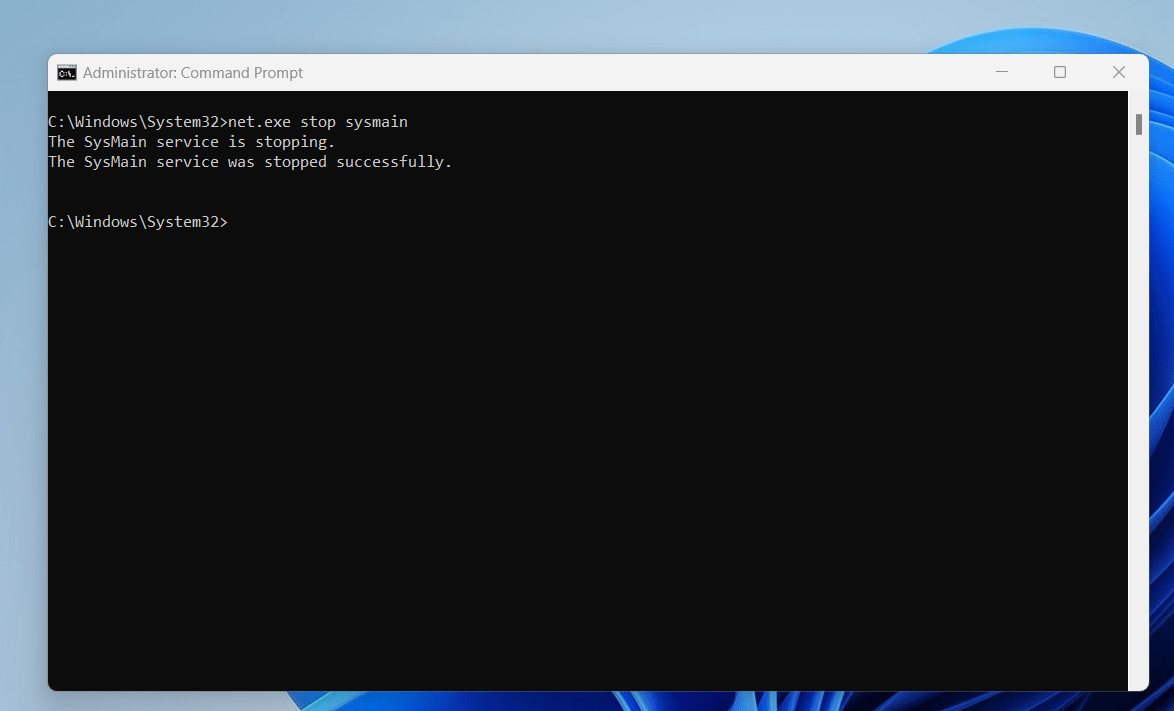
Has your computer started to perform better?
If not, proceed to the following tip.
Fix 8: Disable Windows tips, tricks, and suggestions
Some tips and suggestions can slow down your PC instead of accelerating its performance.
If you are sure you can do without Windows 10 tips and tricks and don’t need suggestions on how to set up your PC, feel free to prevent your system from displaying them.
Follow these steps to turn it off on Windows 10:
- Launch the Settings app.
- Click System.
- Go to Notifications & Actions in the left plane.
- Go to the Notifications section and uncheck the boxes for tips and suggestions you do not want to see.
Fix 9: Check your disk for errors
Sometimes, hard disk drives may contain faulty sectors, and Windows may begin to use up all your disk resources when trying to retrieve files from those areas on the disk. This problem usually leads to the 100 percent disk usage.
You can fix the problem by running the Chkdsk utility and promoting it to find and fix errors. Follow these steps:
- Open the Windows Start menu and type
CMD. - Click Run as Administrator under Command Prompt and click Yes in the UAC prompt.
- After the Command Prompt opens, type the following and tap the
Enterkeyboard button:
chkdsk.exe /f /r
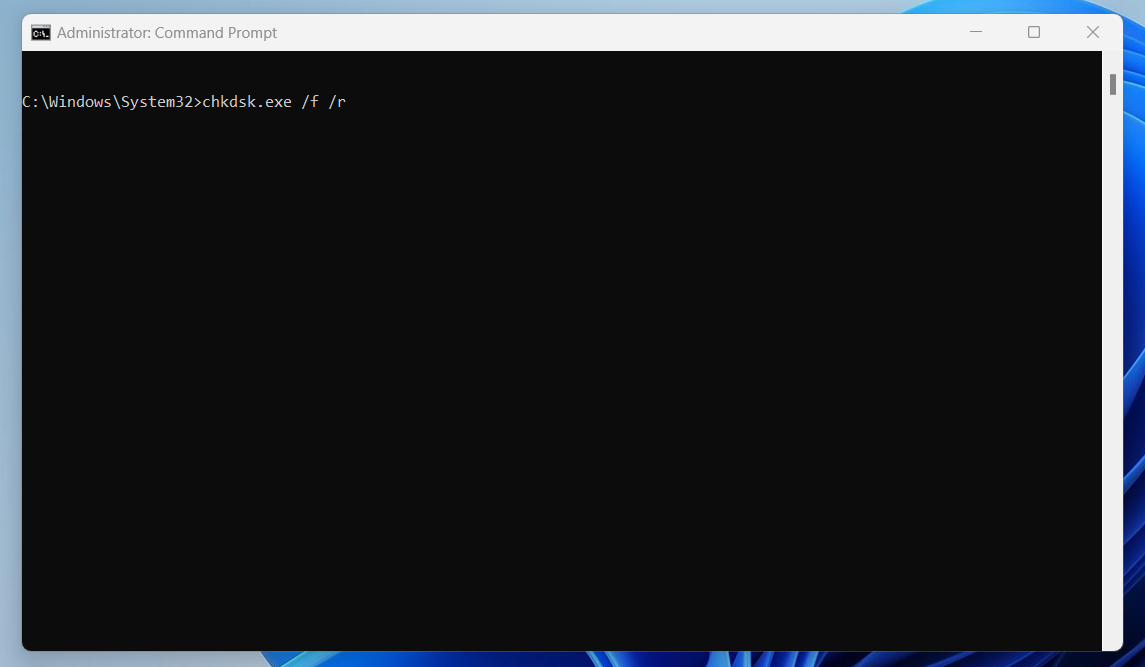
The /r switch tells it to attempt to recover readable information in bad sectors.
Please note that the program might run for a long time if you have a lot of files saved on the disk.
- If you choose to run the command after restarting your PC, close all your apps and restart your computer.
You can also learn how to defragment your disk to rearrange how Windows writes files to your hard drive. When files become too fragmented, Windows takes time to write and read files because pieces of each file will be scattered across the disk, driving up disk usage.
📌 Also read: How to Run Hard Drive Diagnostics on Windows PC?
Fix 10: Switch to the high performance power plan
Your computer’s current power plan may be the cause of the problem. That’s because power plans tend to regulate when the hard disk is active. Many users noticed that switching to the High Performance mode resolved the issue. Here’s how to do that:
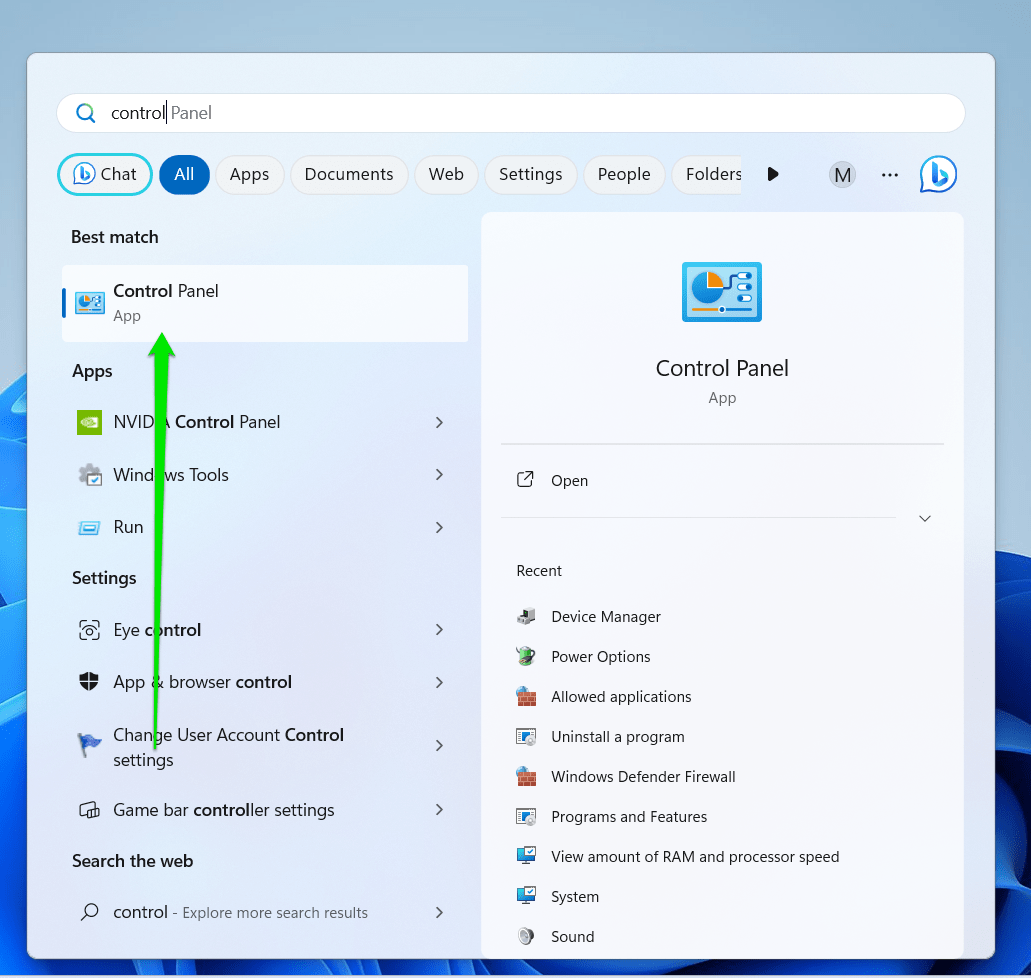
- Open the Start menu, type
Control, and click Control Panel.
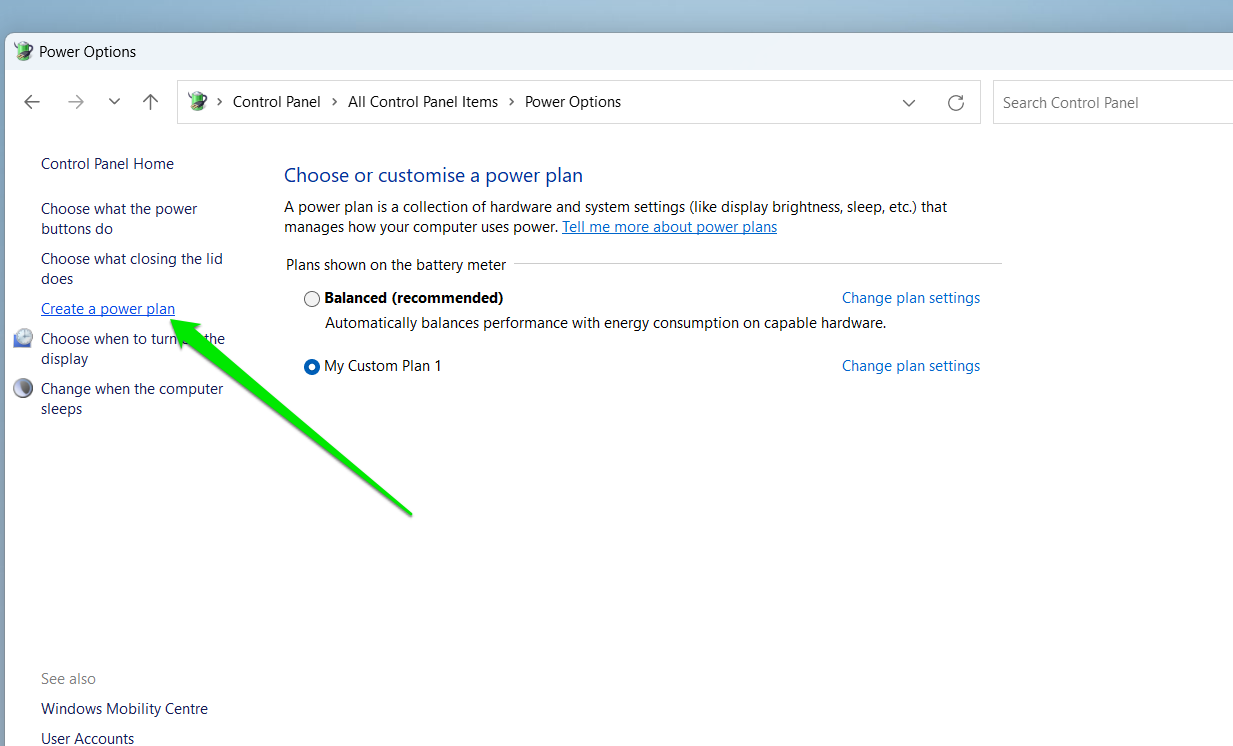
- Go to the top-right, choose Large Icons beside View by, and select Power Options.

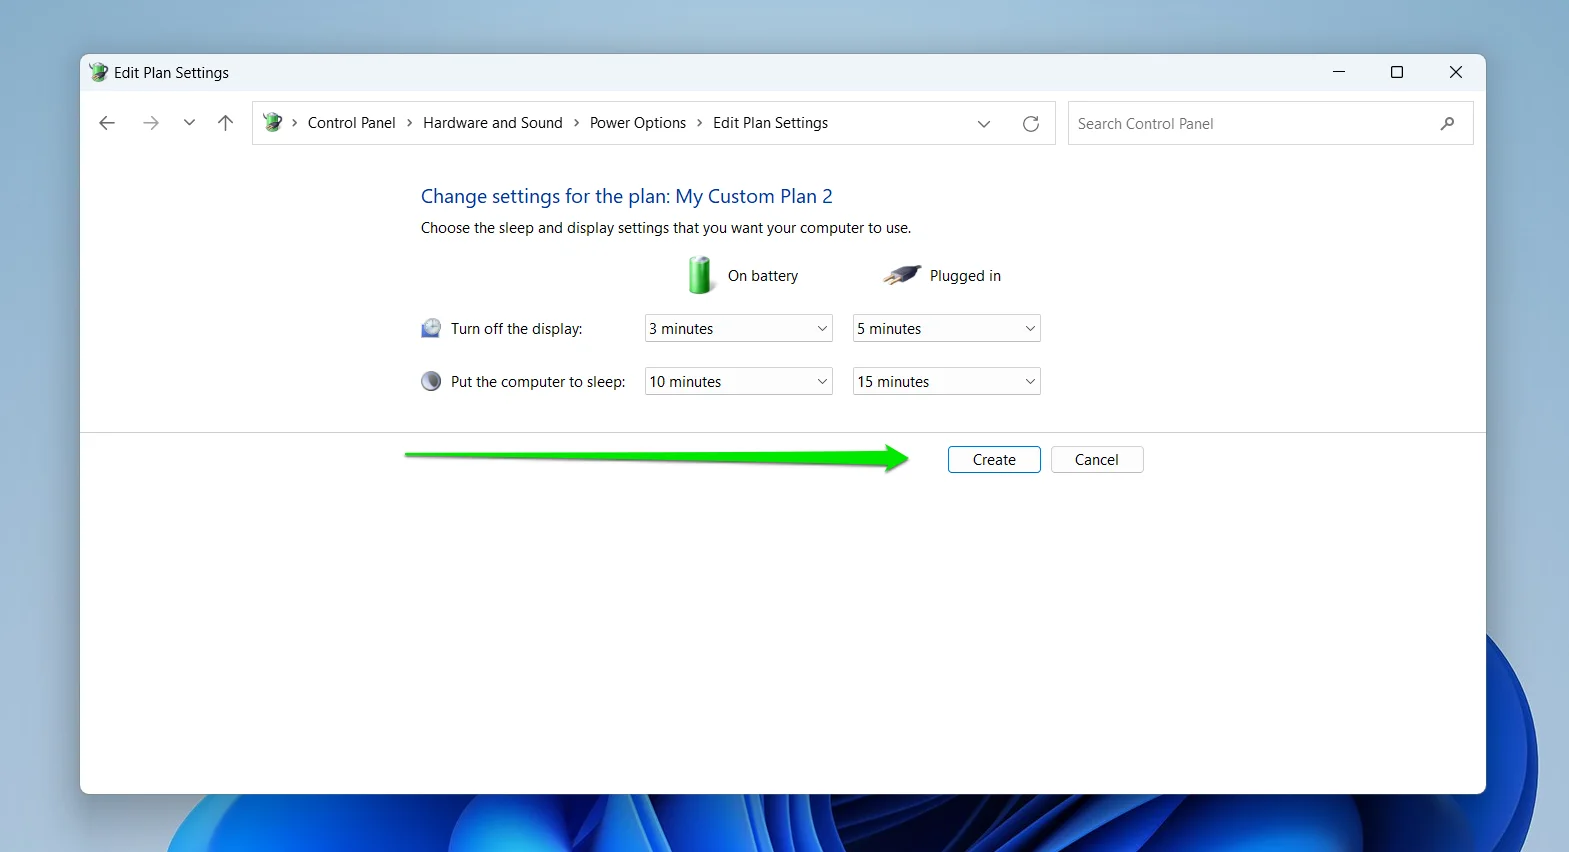
- Go to the left side of the screen and click Create a power plan.
- Now, choose High Performance and select your plan name.
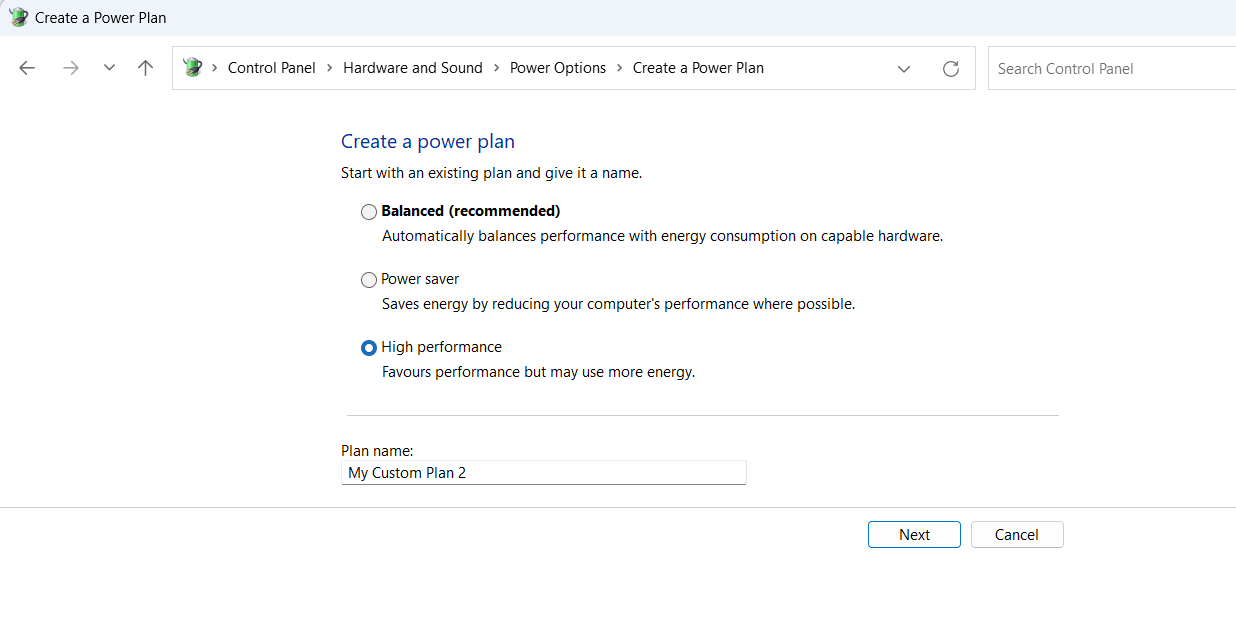
- Click Next and select Create.
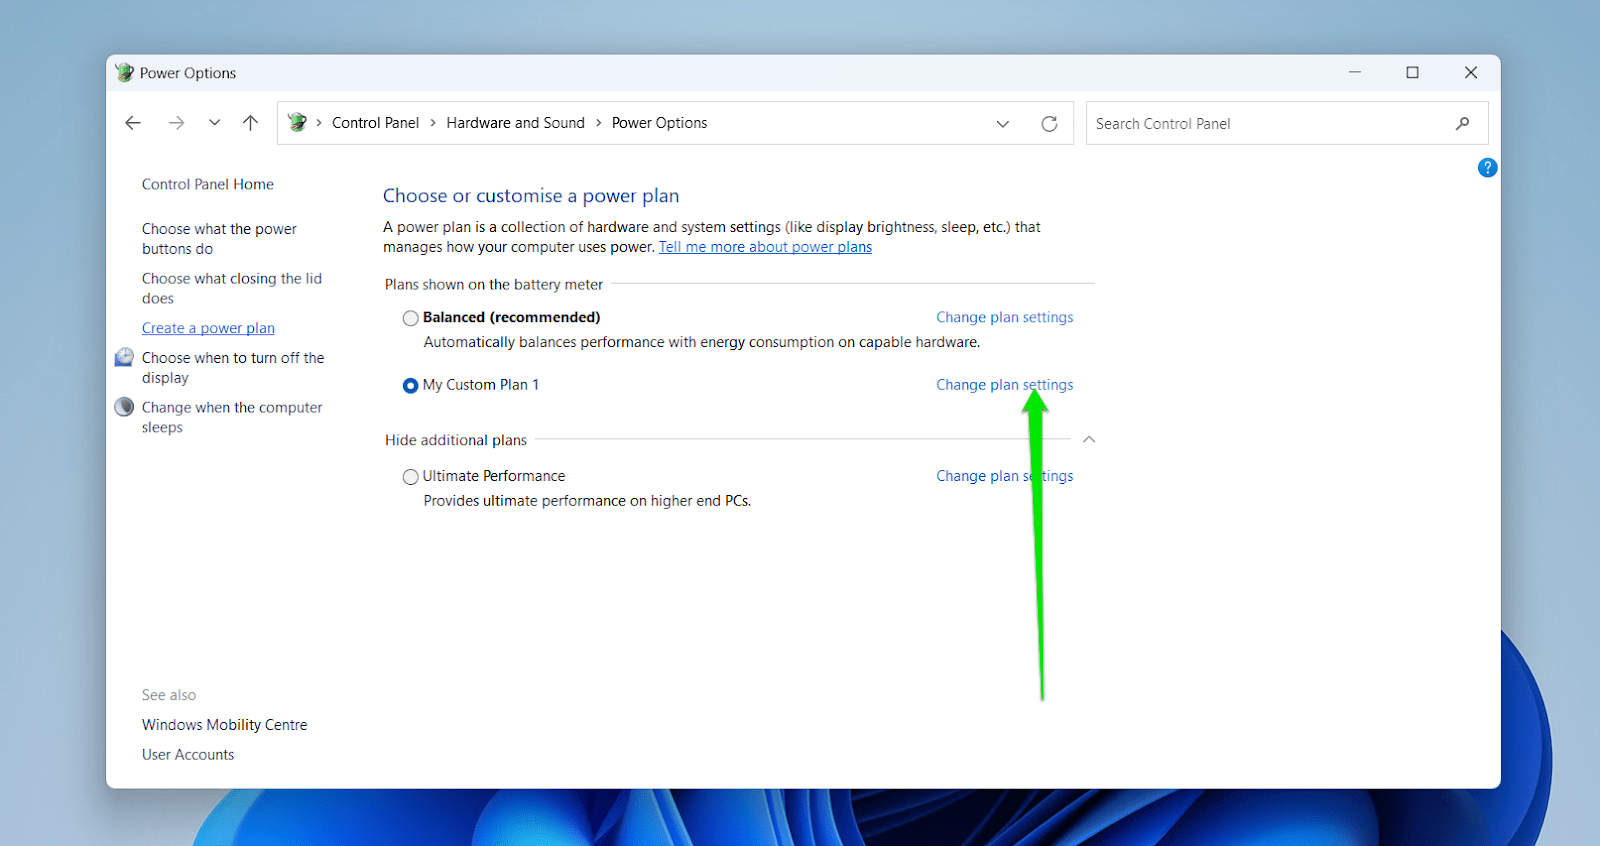
After creating the plan, change its settings to ensure Windows never turns off your hard disk. Follow these steps:
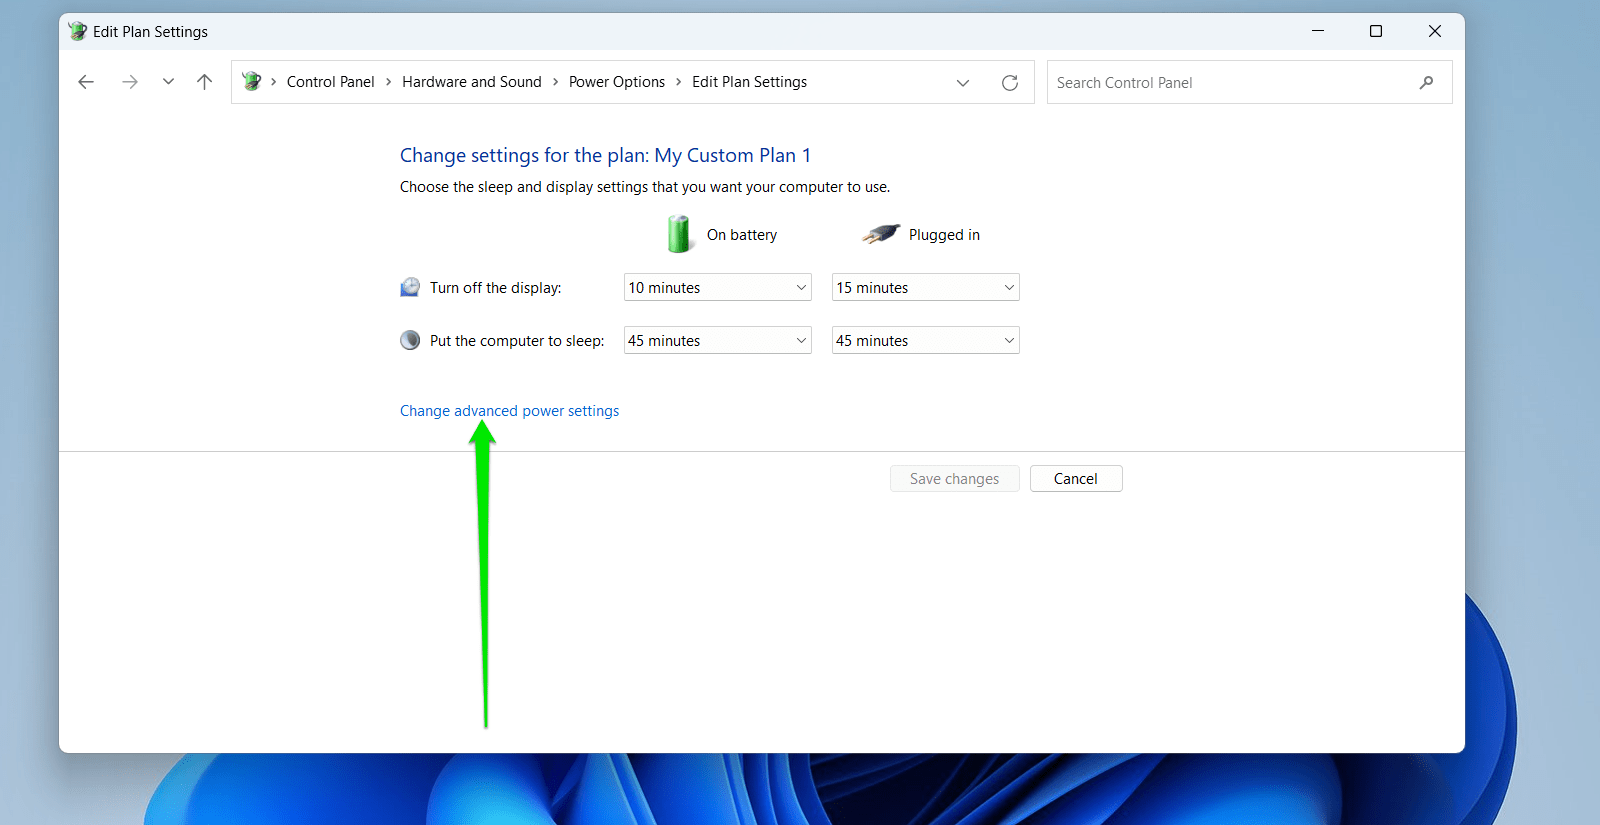
- Click Change Plan Settings next to the newly created power plan.
- Select Change Advanced power settings.
- Under Hard Disk, select Turn off hard disk after and reduce the time next to On Battery and Plugged In until you see Never.
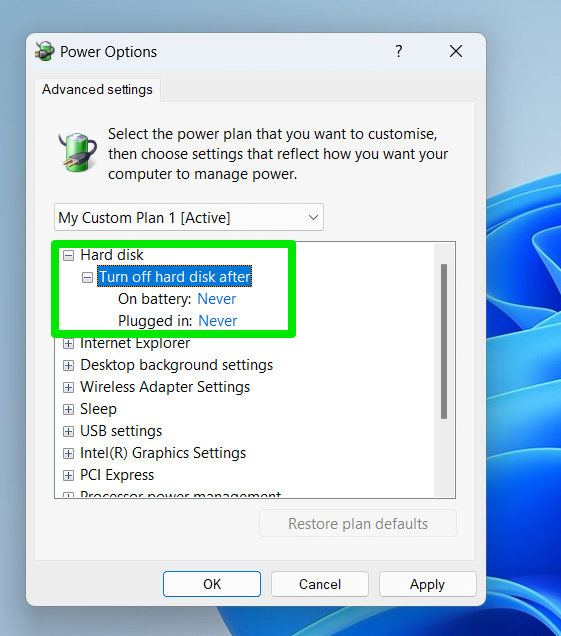
This will prevent your disk from switching to the low-power state or powering down.
Related: Pro Tips: Mastering Advanced Power Settings in Windows 10
Fix 11: Update your Drivers
Out-of-date or faulty drivers are a potential cause of disk performance issues in Windows 10. You can use different methods to update your drivers, including going through Windows Update, using the Device Manager, and downloading drivers from device manufacturers.
Use a Special Tool
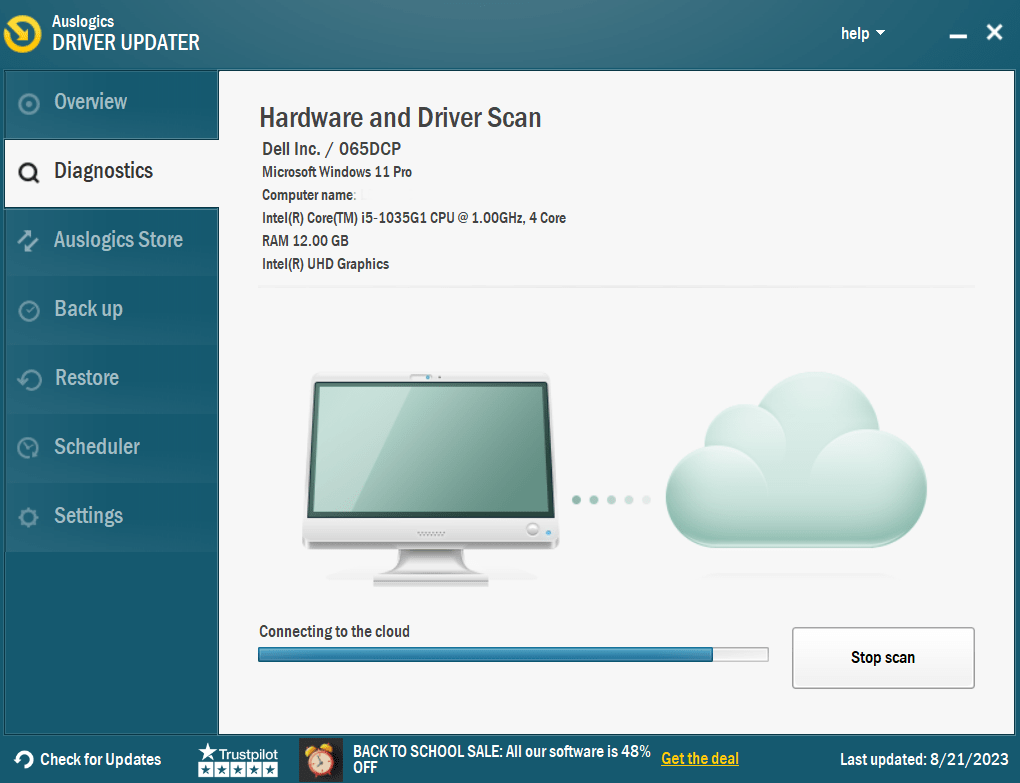
You can also fix all your driver issues in a fast and straightforward way using A special driver updating tool, such as Auslogics Driver Updater. It can save you a lot of time and effort as it automatically detects faulty drivers and allows you to download multiple updates simultaneously.
Fix 12: Run System File Checker
Missing or corrupted system files can cause your drive to work at or near 100 percent. Fortunately, you can use the System File Checker to find and repair bad system files. Follow these steps :
- Open the Windows Start menu and type
CMD. - Click Run as Administrator under Command Prompt and click Yes in the UAC prompt.
- After the Command Prompt opens, type the following and tap the
Enterkeyboard button:
DISM.exe /Online /Cleanup-image /Restorehealth

Next, run the following command:
sfc /scannow
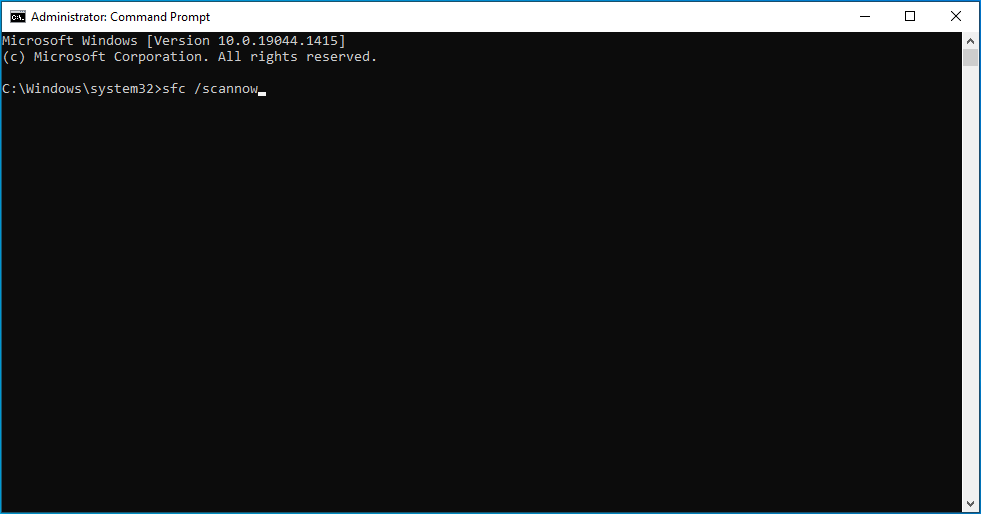
- Wait for the system scan to finish, then reboot your computer.
Fix 13: Perform a clean boot
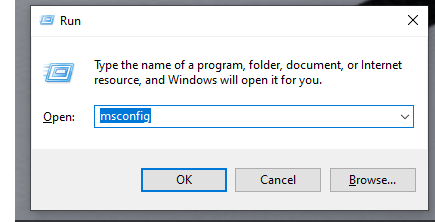
Try performing a clean boot to determine what makes disk usage touch 100%. It will load your operating system with the fewest startup programs and drivers and help you find the culprit. The process also involves stopping all your startup applications. These steps will show you how to perform a clean boot:
- Press
Windows + Rto open Run, typemsconfigin the text box, and tapEnteror click OK.
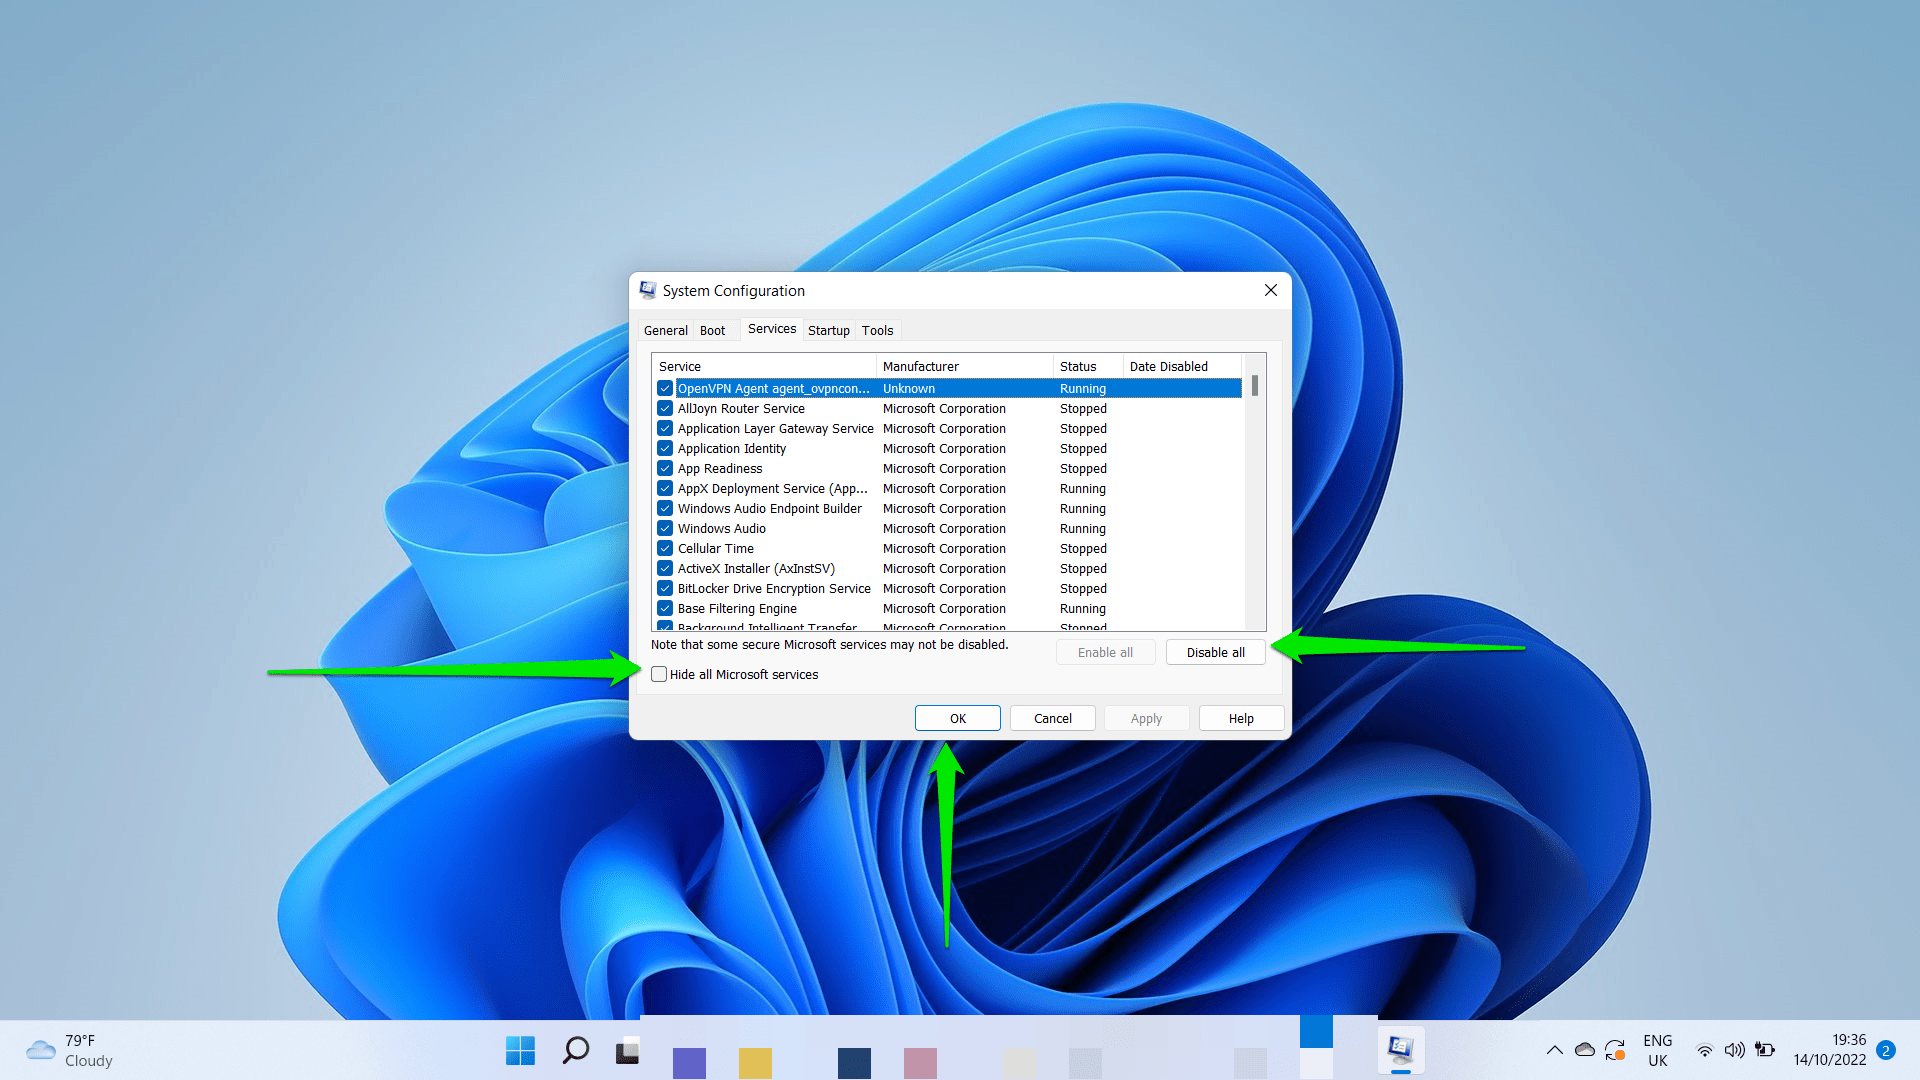
- When the System Configuration window opens, go to the Services tab, check the Hide all Microsoft Services box, and click Disable All.
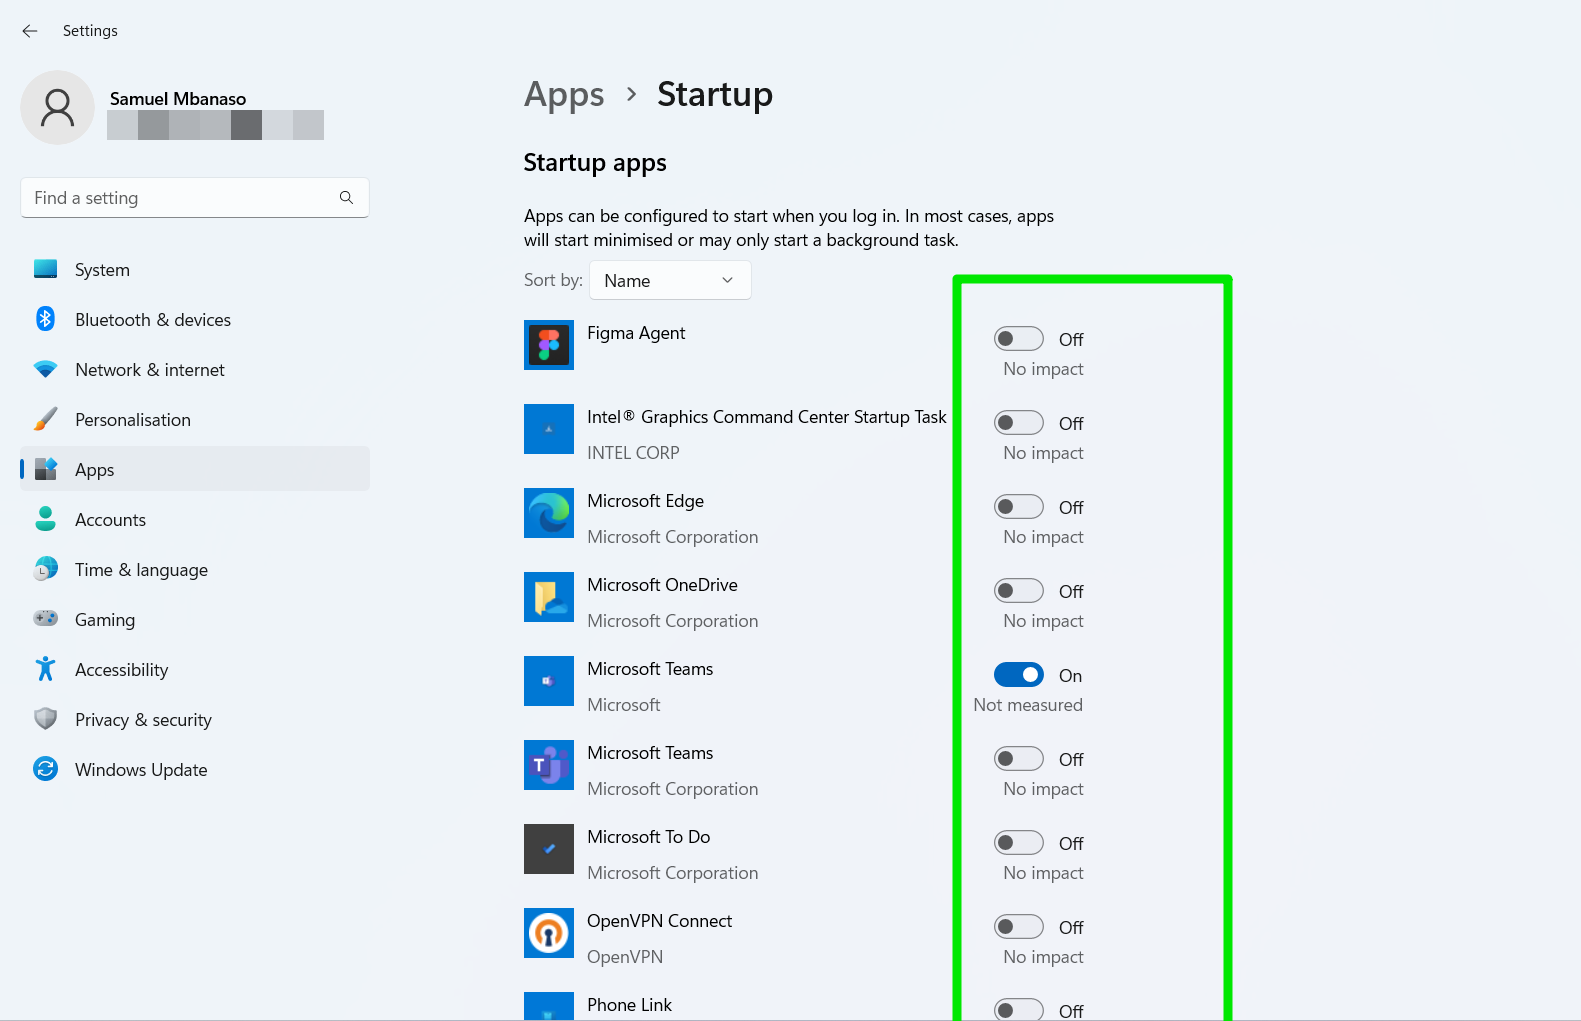
- Next, open Settings (use
Windows + I), go to Apps, select Startup, and turn off every app under Startup Apps.
- Restart your PC.
You can now use your PC to check for the 100% disk usage problem. If the issue persists, move on to the next solution. However, if your disk usage reduces significantly after stopping all your startup apps and services, then one of them is the culprit. Follow these steps to find the app or services increasing the disk usage:
- Return to the System Configuration‘s Services tab.
- Check half of the services from the top and click Enable All. This allows you to enable half of the startup services to confirm whether one of them will trigger the problem.
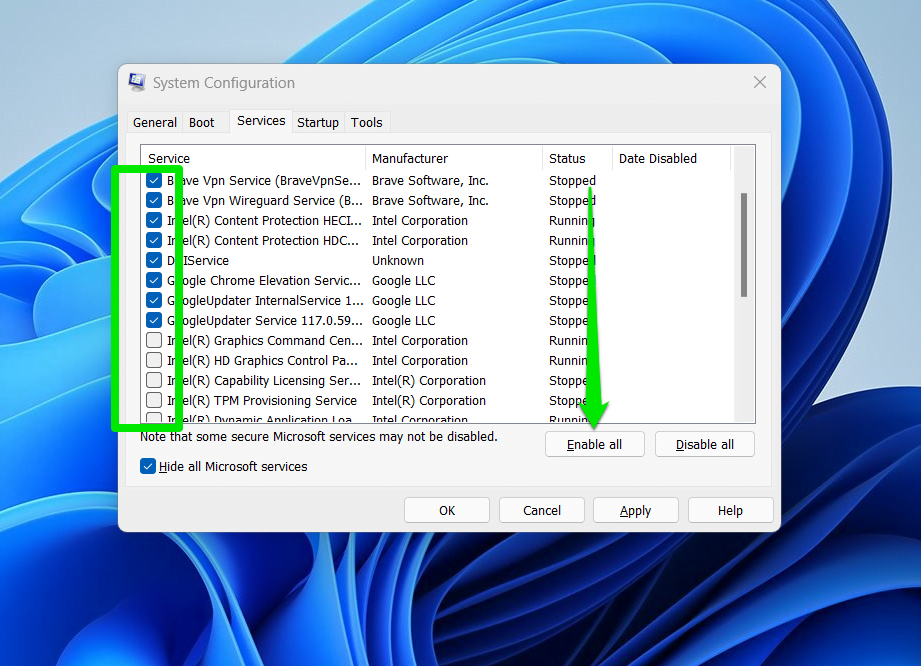
- Restart your computer and check for the 100% disk usage issue. If the problem doesn’t show up, move on to the other half of the services.
- When the disk usage issue starts after enabling the first or second half of the startup services, check the services one by one from the half that triggered the problem until you isolate the lone culprit.
- If no startup services are responsible, go to the Startup Apps page in Settings. Now, enable one startup app and restart your system to check for the problem. Keep going through the apps on the list until you find the culprit.
You can now permanently disable the app causing the problem once you find it.
Fix 14: Reset your computer’s virtual memory
Windows uses a “page file” on the hard disk as virtual memory. The file allows the OS to expand your memory whenever your RAM no longer has sufficient space to hold programs for your CPU.
📌 Also read: How to Clear RAM and Reduce RAM Usage in Windows 10
The page file may become unstable and drive up your disk usage, resulting in the 100% disk usage issue. Resetting it, in this case, will resolve the problem. Follow these steps:
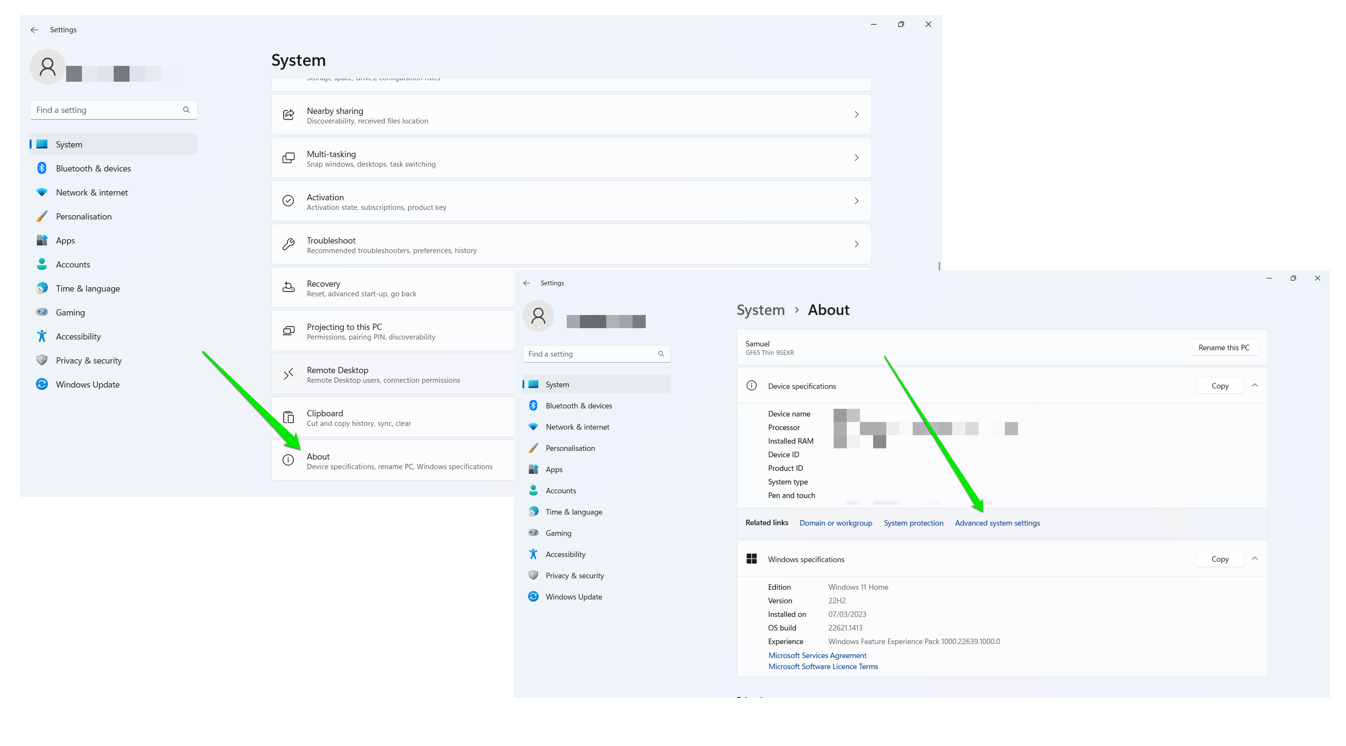
- Open the Setting app, scroll down, click About, and click Advanced system settings.
- After the System Properties dialog opens, click Settings under Performance.
- Go to the Performance Options and Advanced tab and click Change under Virtual Memory (you’ll see the current size of your paging file).
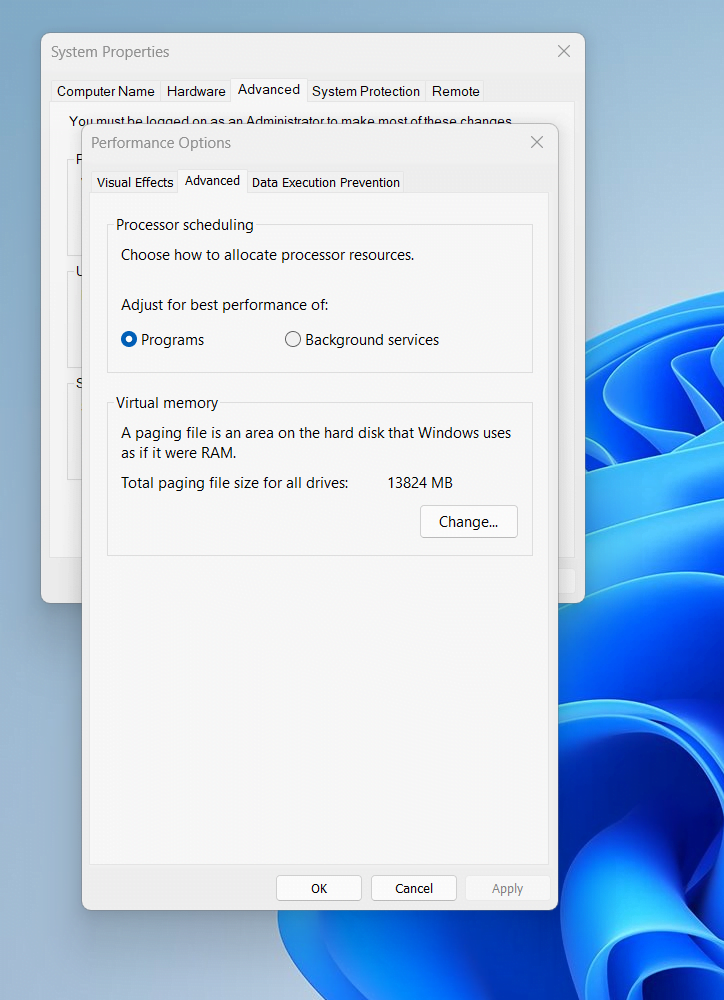
- Uncheck the box beside Automatically manage paging file size for all drives.
- Next, select No paging file and click Set.
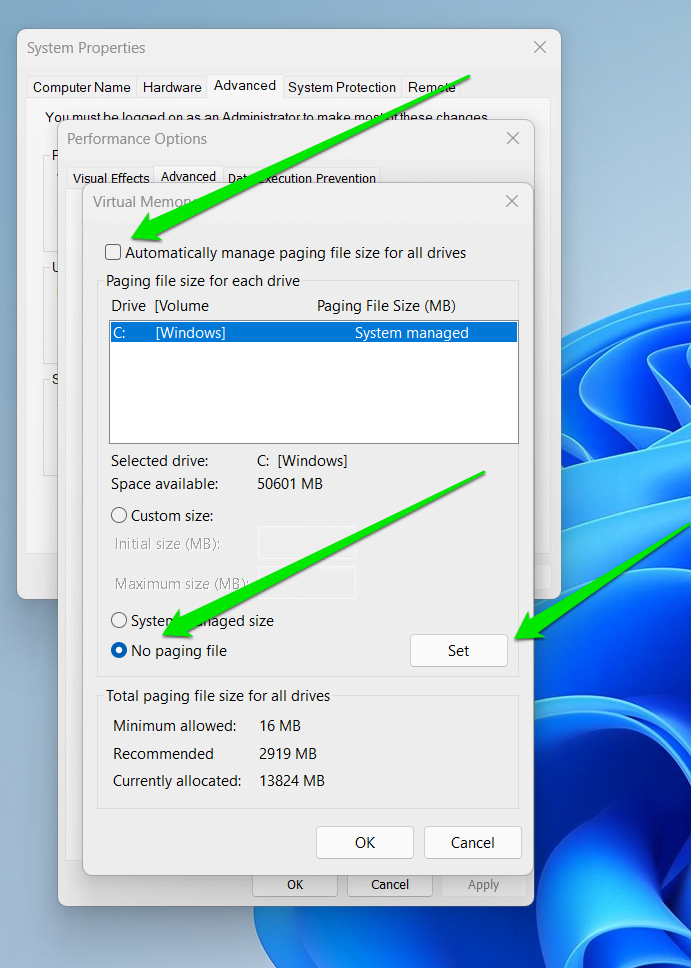
- Click OK.
- Restart your system.
- After your computer restarts, check the “Automatically manage paging file size for all drives” box in the Virtual Memory dialog window.
📌 Also read: What Is Windows Virtual Memory and How to Increase It?
Fix 15: Upgrade your Random Access Memory (RAM)
If your machine is old, it might need more RAM to run smoothly. This may result in 100 % disk usage. Ensure your device has no less than 8 GB of RAM (to be honest, the more, the better).
Go this way to take a look at your current memory specs:
- Press
Ctrl+Shift+Escto start the Task Manager. - Click Performance.
- Select Memory.
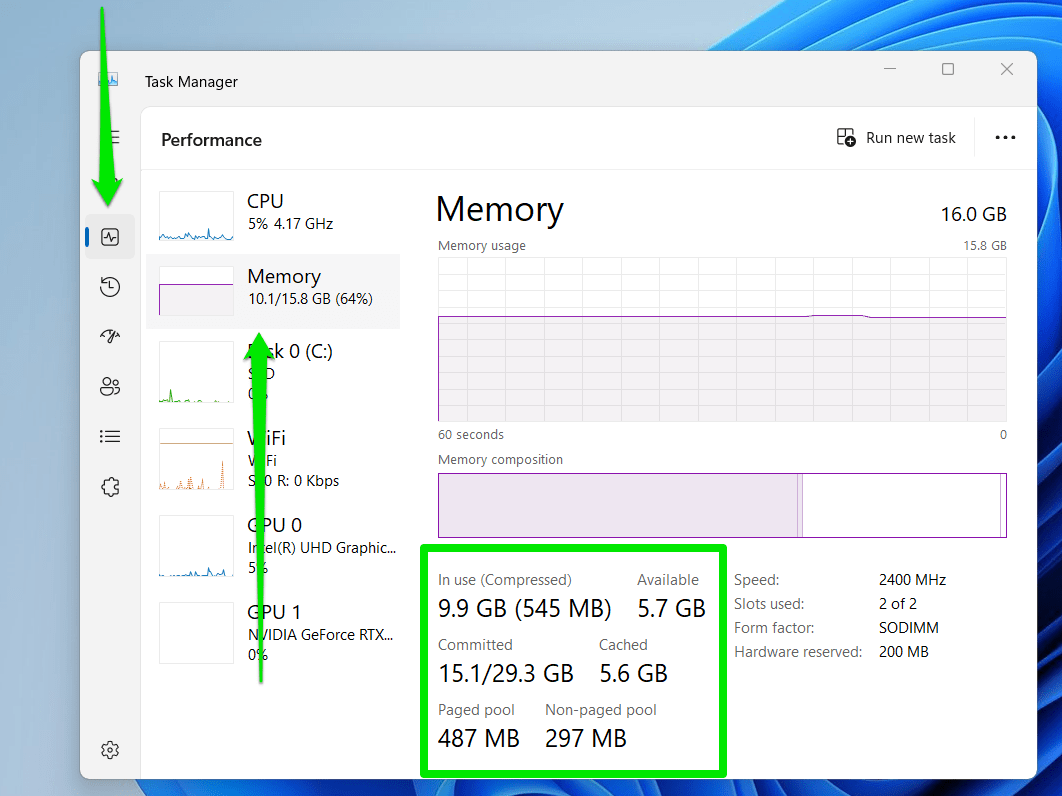
If you notice that your available memory is low, it’s time to upgrade your PC’s RAM.
📌 Also read: How to Check How Much RAM You Have on Windows 10 PC and MAC
Fix 16: Fix your Microsoft AHCI driver
The firmware bug associated with the StorAHCI.sys driver can cause your computer’s “100% disk usage” problem. Here are easy steps to resolve this issue:
- Press the
Windows logo key + Xand click Device Manager.
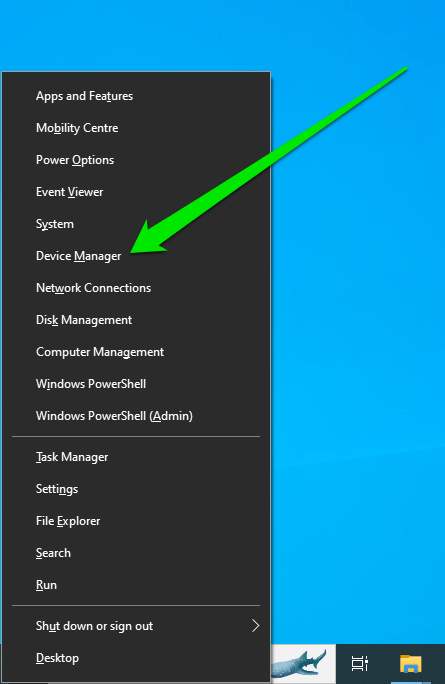
- Go to the IDE ATA/ATAPI Controllers when the Device Manager opens and double-click IDE ATA/ATAPI Controllers.
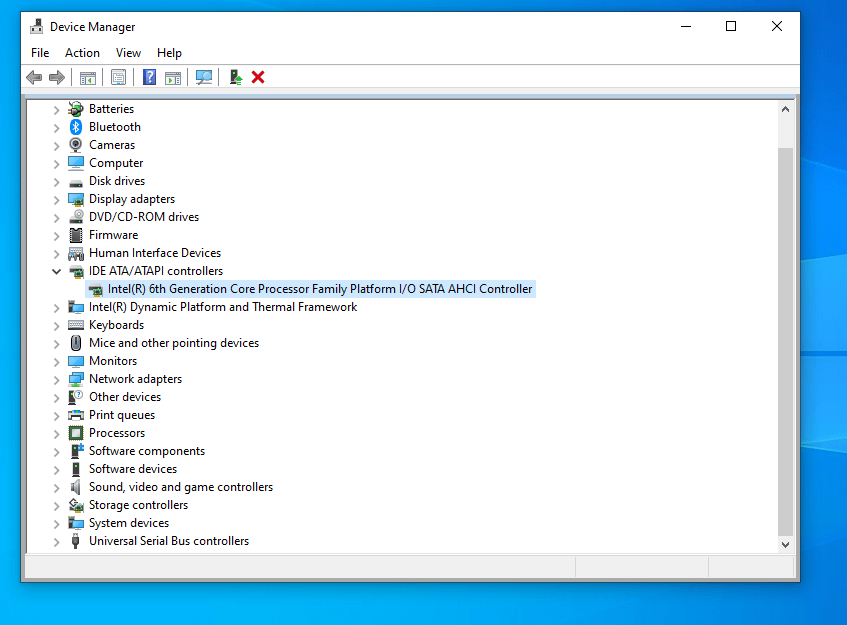
- Click Driver Details under the Driver tab.
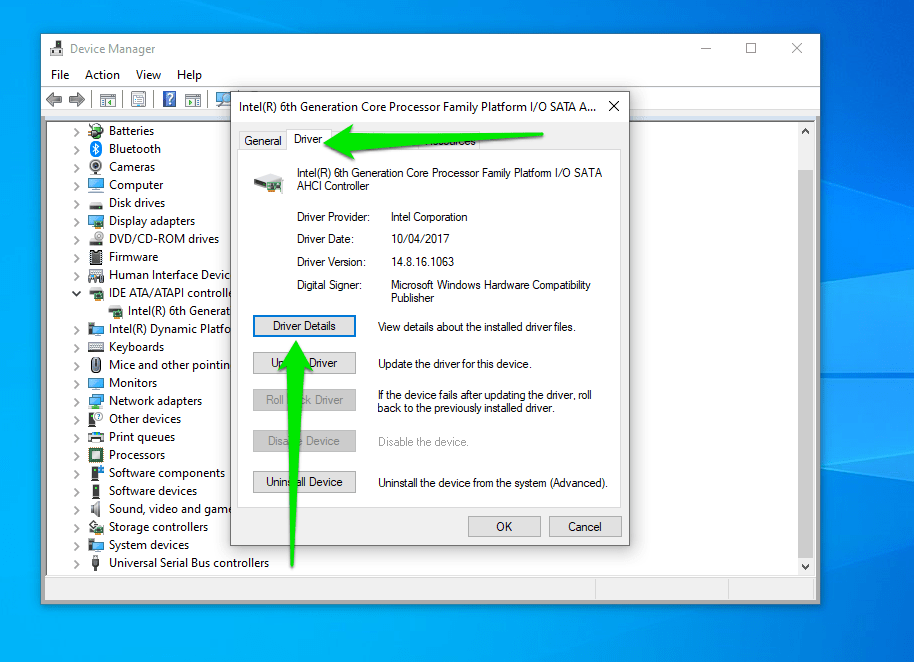
- If you can see storahci.sys under driver files, it is time to fix the bug.
- Close the Driver File Details and switch to the Details tab.
- Select Device Instance Path in the Property drop-down menu.
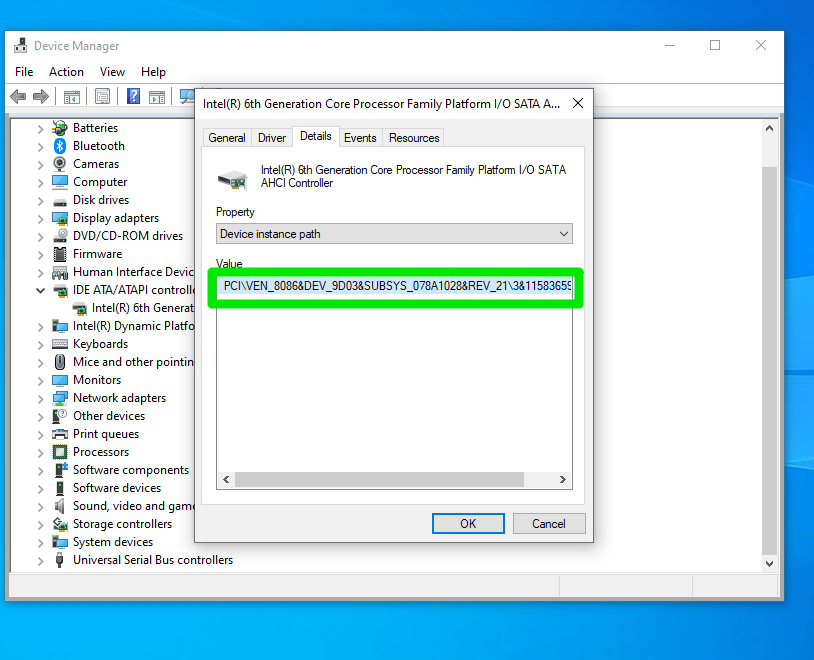
- Write down/copy the path starting from “PCI\VEN.”
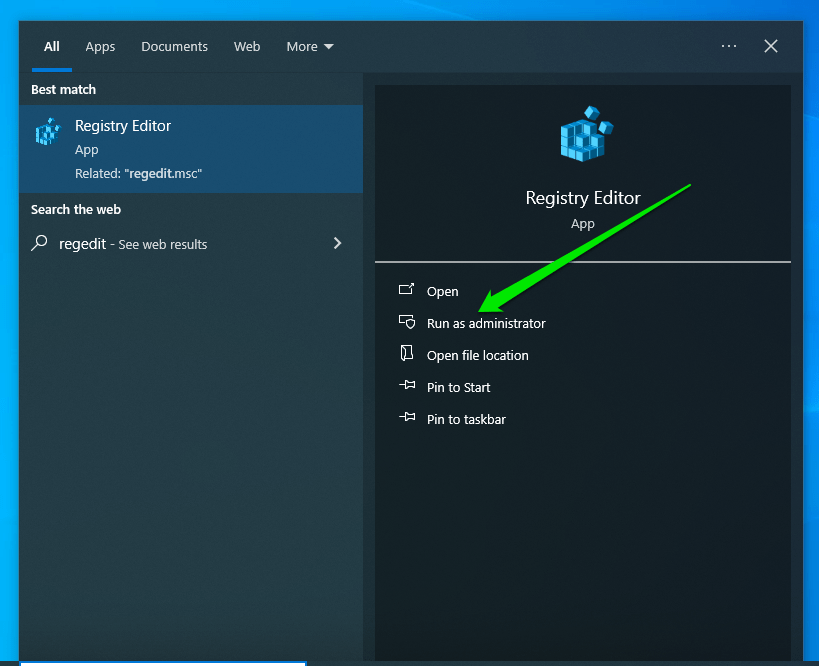
Important: The steps that follow involve modifying your system registry. Please back up the registry and follow the steps carefully, as making mistakes can destabilize your PC.
- Open the Start menu, type
regedit, and click Run as Administrator under Registry Editor.
- After the Registry Editor opens, proceed to HKEY_LOCAL_MACHINE\System\CurrentControlSet\Enum\PCI\<AHCI Controller>\Device Parameters\Interrupt Management\MessageSignaledInterruptProperties (<AHCI Controller> refers to the path from Step 4)
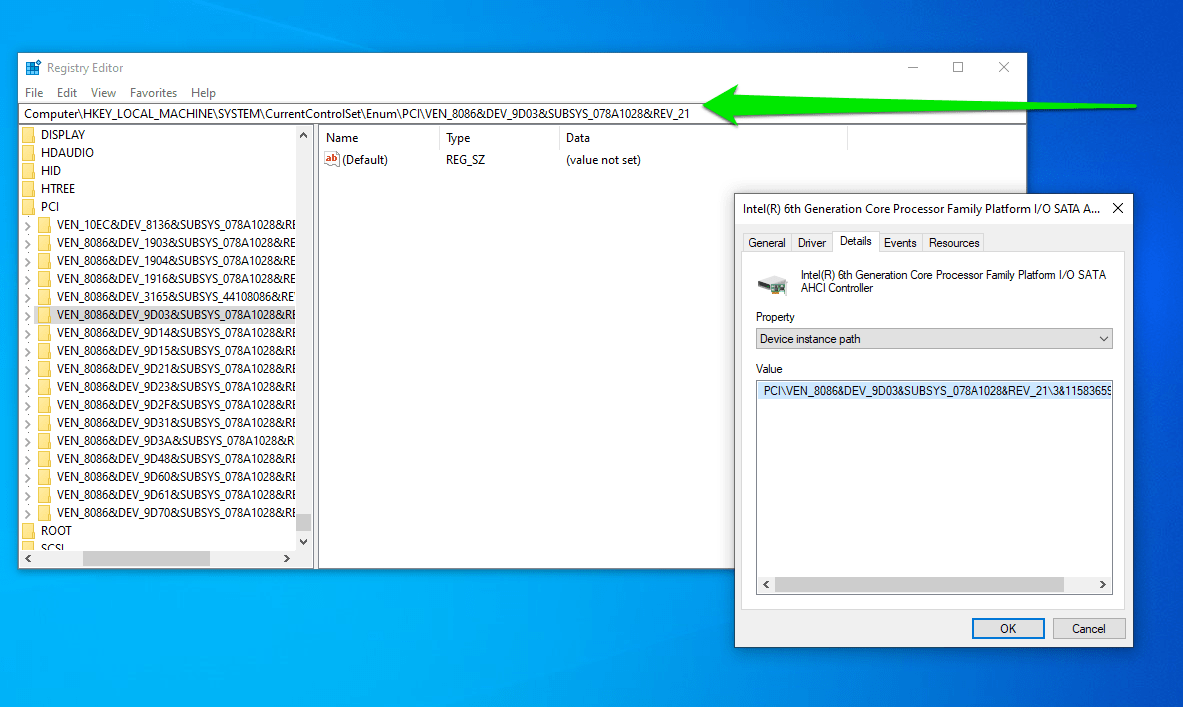
- Go to MSISupported key and Set its value to “0.”
- Restart your computer.
Does the 100 percent disk usage issue persist? If yes, do not let this get you down too much – you still have a few tricks up your sleeve.
Fix 17: Reinstall your OS
If the above tips have taken you nowhere, consider reinstalling your operating system. While you can preserve personal files during this process, you will lose the non-Windows apps you installed.
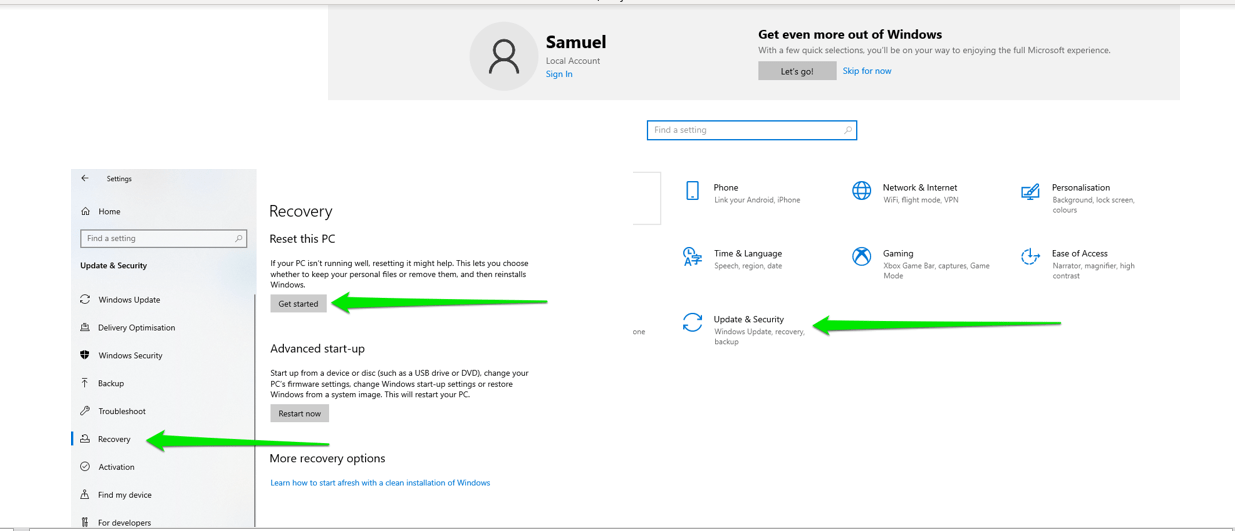
If you’re running Windows 10, go to Settings, click Update & Security, switch to the recovery page, and click Get Started under Reset this PC.
- If you’re using a Windows 11 computer, go to Settings, scroll down under System, click Recovery, and select Reset this PC.
- When the installation wizard appears, choose Keep My Files and follow the subsequent instructions.
📌 Also read: How to download and install Windows 11
Conclusion
The 100% disk usage issue is completely fixable, and we believe one of the solutions above helped you clear the problem.
You can avoid the problem in the future by performing routine maintenance, keeping your system up to date, and protecting your PC against malware.
Remember that will be a lot easier to keep up with these maintenance duties when you use a tool like Auslogics BoostSpeed.