- What Are Advanced Power Management Settings in Windows 10?
- How to Open Advanced Power Settings in Windows 10?
- How Should I Set Up Power Settings on My PC?
- Rundown of Advanced Power Settings on Windows 10
- 1. Hard Disk Power Management
- 2. Tweaking Your Web Browsing Experience
- 3. Desktop Background Slideshow
- 4. Wireless Adapter Power Management
- 5. Configuring Sleep and Hibernate
- 6. USB Selective Suspend Setting
- 7. Graphics Performance Optimization
- 8. Intel Dynamic Platform and Thermal Framework Settings
- 9. PCI Express Settings
- 10. Processor Power Management
- 11. Display Power Management
- 12. Multimedia Settings Optimization
- 13. Battery Life Management
- Conclusion
- FAQ
Windows 10 may no longer be Microsoft’s shiniest operating system, but it still packs quite a great deal in terms of performance, battery life, and features. It’s no surprise even the most demanding users are choosing to stick with it.
One of the many great aspects of the OS is that you can tweak it to get more out of your computer regarding performance and power management.
So, if your system’s current speed leaves more to be desired or you want a longer battery life, you should stick around.
This article will show you how to open and change advanced power settings in Windows and fine-tune your computer’s performance as you see fit.
What Are Advanced Power Management Settings in Windows 10?
These are handy options that allow you to set up and enjoy the right balance between performance and battery life on your computer. By tweaking them, you can favor performance over battery life and vice versa.
In addition, they enable you to switch between power plans, choose what closing the lid and pressing the power button leads to, react to a critical battery level, etc.
How to Open Advanced Power Settings in Windows 10?
Advanced power settings on Windows 10 can be easily accessed. Here is what you should do to find them:
- Tap the
Windows logoon your keyboard or click the Start button in your taskbar. - After the Start menu appears, type
Control paneland click on Power Options on the right side of the results page. If Power Options is not in the results, click Control Panel in the search results.
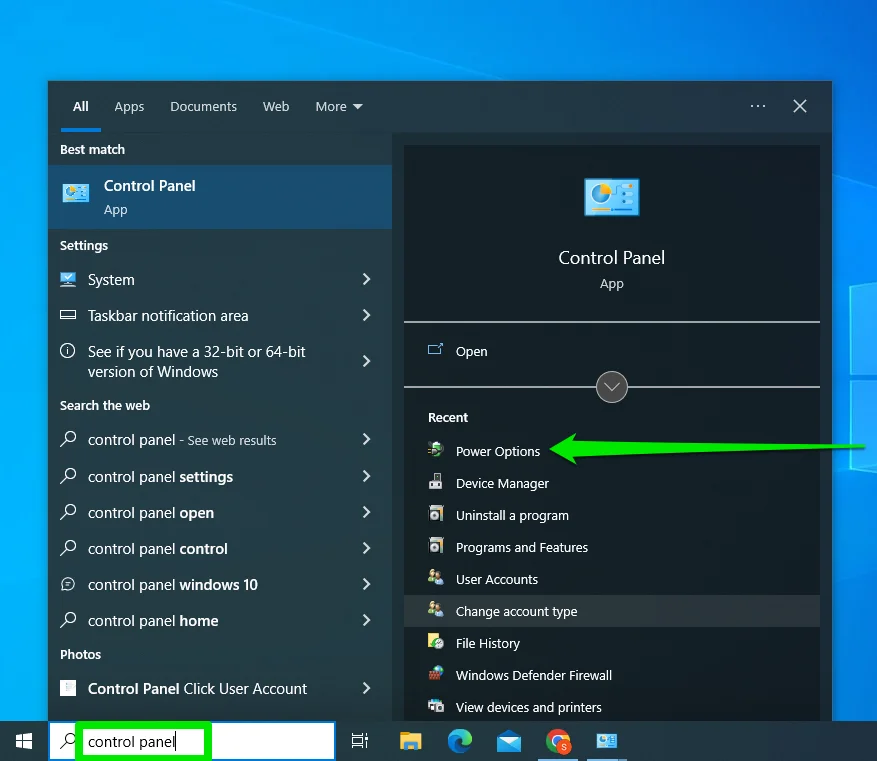
- Click Hardware and Sound once the Control Panel window shows up.
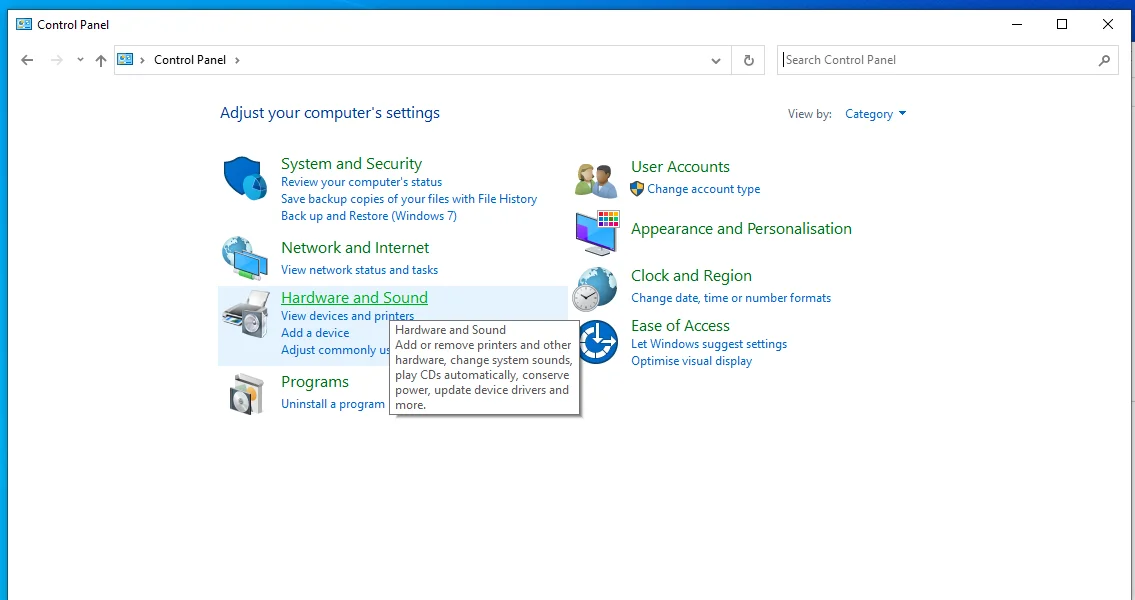
- Select Power Options.
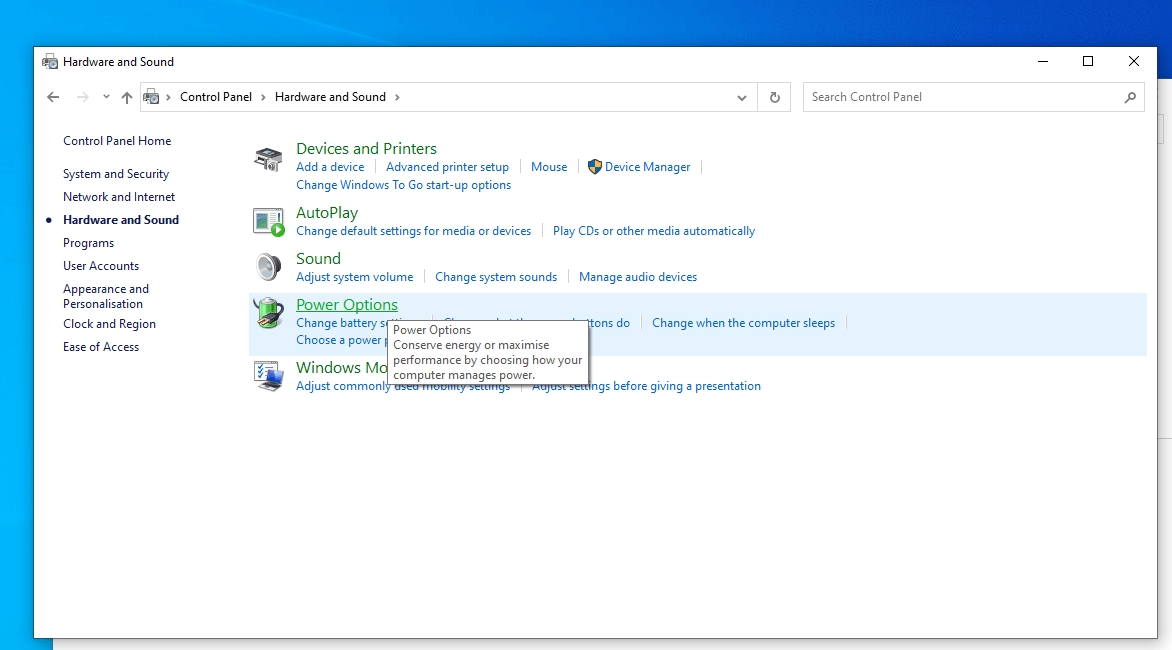
- Next, click Change plan settings beside your current power plan.
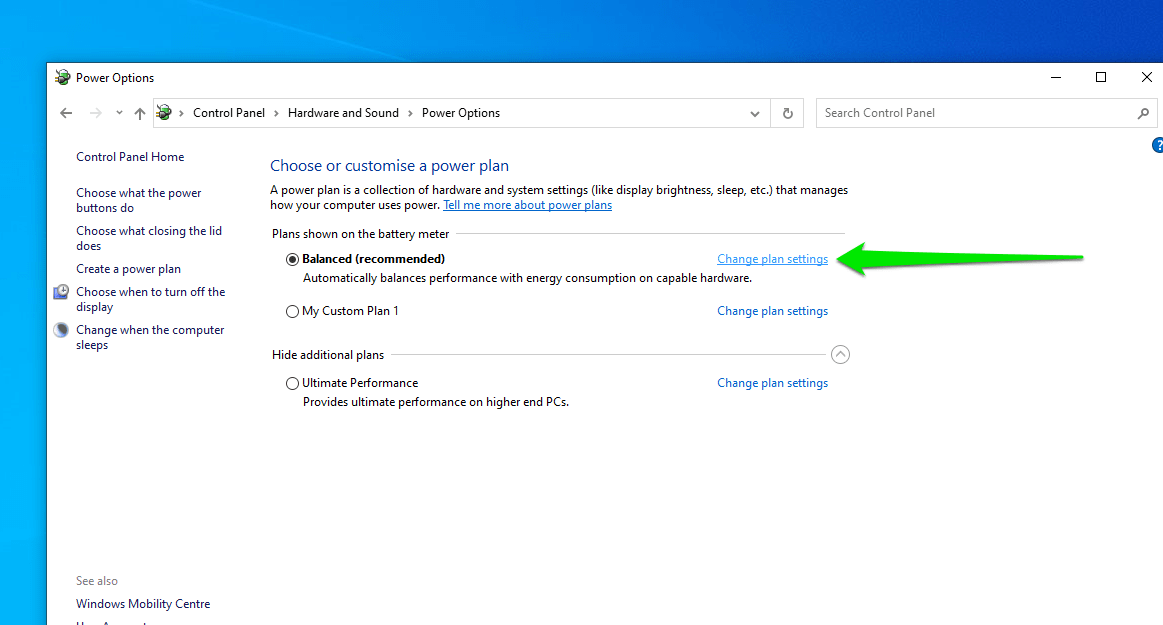
- Locate and click Change Advanced Power Settings.
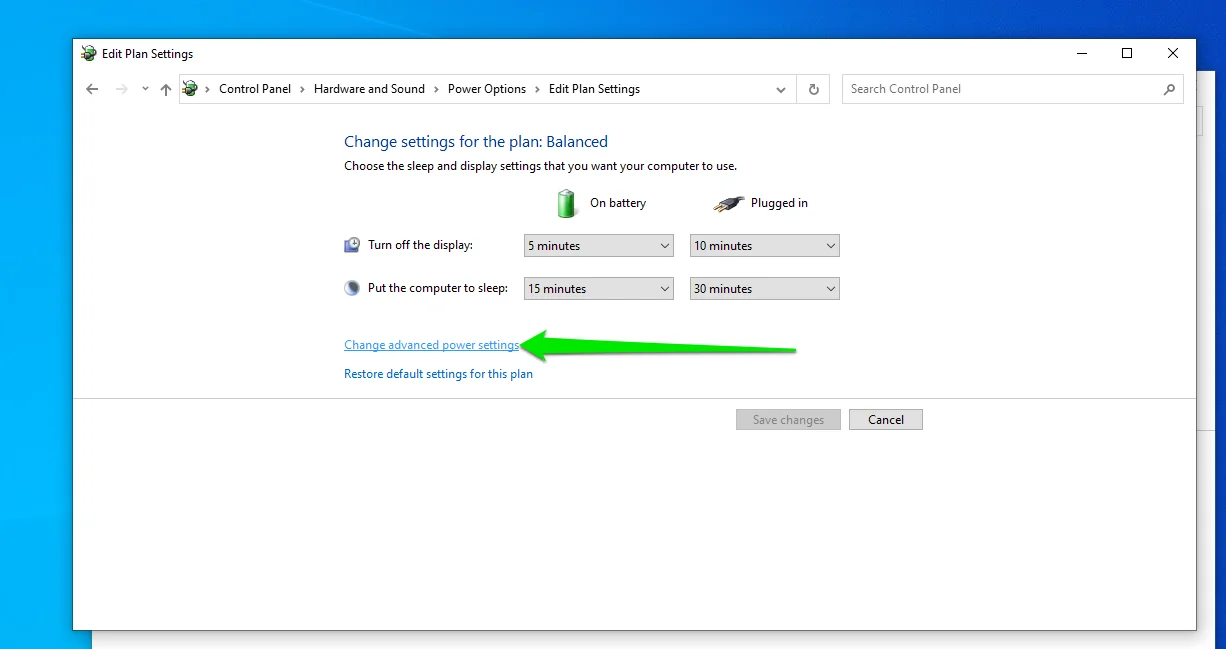
Now you can change the advanced power settings on your PC to what you want. Below is the list of possible tricks and tweaks you are welcome to give a try.
This intuitive software will do the job for you and force your Windows to work at its best.
The tool in view optimizes your system settings, removes all the junk present, and enhances your security so that you can get the most out of your PC.
How Should I Set Up Power Settings on My PC?
Understandably, there are no universal power settings that work for everyone. Since computer hardware configurations can differ, you must work with what you have and consider what you want.
For instance, some laptops are rich with multiple “On Battery” options, while Desktop computers typically lack them. Some laptops may also have a System Cooling Policy, while others do not.
There are also options exclusive to specific original equipment manufacturers (OEMs) and graphics/CPU manufacturers.
For example, HP users may see the “HP recommended” category, and laptops with Intel graphics cards and CPUs may have the Intel Graphics Settings and Intel Dynamic Platform and Thermal Framework options.
Another factor that should determine your power policy is the kinds of tasks you’re running on your computer.
If you run programs that require instant data access and high computing power, you may want to lean more toward the performance side of things.
Windows 10’s Ultimate Power Scheme may come in handy for you in this case.
If your tasks are not so demanding and you use your laptop on the go, saving battery life might be the best way to go.
All things considered, we recommend you sift through the power options laid out below and ensure that nothing gets left out.
This way, you can set things right and decide the best power policy for your device.
Rundown of Advanced Power Settings on Windows 10
1. Hard Disk Power Management
Whenever your PC is idle, your hard disk can be turned off after a specified period of inactivity to save power and prolong your battery life.
While this may initially seem a great policy, things could be more complex. It takes effort for your PC to power your hard disk on when waking up, which spoils your system performance.
Besides, if your hard drive is an old-timer, turning it on and off too often may cause its head to wear.
The best way to deal with this problem is to choose the right period of time of inactivity, after which your disk gets powered off.
This will let you strike a balance between your PC’s battery life and your Win 10 performance.
Related: Simple Guide: How to Restore Missing Power Plans Options on Windows
2. Tweaking Your Web Browsing Experience
Choosing between “Maximum Performance” and “Maximum Power Savings” in the JavaScript Timer Frequency menu allows you to speed up or slow down JavaScript performance on web pages when browsing with Internet Explorer.
Popular browsers now have JavaScript installed as part of their package by default. They also come with their own JavaScript policies.
That said, you can improve how your system’s JavaScript timer behaves to improve overall browsing speed and quality.
You must note, though, that setting the frequency to “Maximum performance” on battery means sacrificing battery life for browsing speed.
Also Read: Easy Steps to Enable Ultimate Performance Power Plan in Windows 10/11
3. Desktop Background Slideshow
Although a background slideshow on your desktop is quite an appealing feature, you might wish to pause it when you see it is time to start saving your battery life.
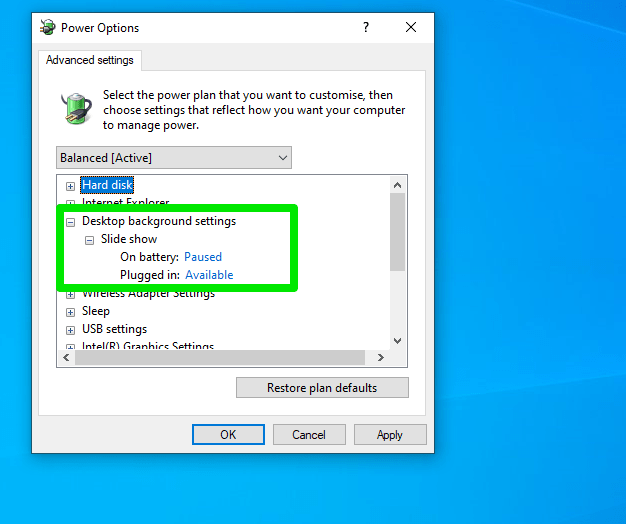
The option in view allows you to stop the slideshow when on battery and turn it on when your device is plugged in.
Some users choose to turn off the desktop slideshow entirely whether their computers are plugged in or running on battery.
That’s because the desktop slideshow can leave a mark on your system’s performance apart from draining battery life.
So, if you are looking to squeeze out all the power you can get, it is advisable to turn off the feature.
Also Read: How to Customize the Lock Screen on Windows 10 and 11?
4. Wireless Adapter Power Management
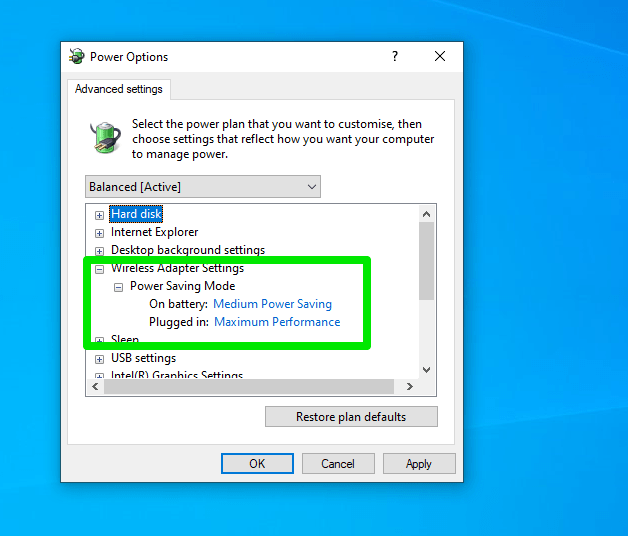
This is one of the power settings Windows 10 users find extremely handy when adjusting their wireless network strength and performance to their current power and work needs.
Selecting the Maximum Power Saving option allows you to improve battery life significantly.
However, there are four options here in descending order of performance:
- Maximum performance
- Low power saving
- Medium power saving
- Maximum power saving
You should remember that your wireless network’s performance drops as you go down the drop-down menu.
Generally speaking, the choice should depend on how much internet speed you want to work with.
So, you have to decide if having a stable connection outweighs keeping your laptop on longer and vice versa.
Feel free to switch to Maximum Performance if you want the best network connection over power battery life.
When your internet becomes terrible, even if you switch to the Low Power Saving Mode, you must use the “Maximum Performance” option.
In such a case, you must consider other options to eke out more battery life.
Related: Boost Internet on Your PC: Tips on How to Speed Up Your Internet Connection
5. Configuring Sleep and Hibernate
The Sleep power setting is one of the most valuable options for battery saving, performance, and even productivity.
Windows allows you to tweak how your computer behaves, depending on how long you stay away from it.
You can manage your sleep settings so your system can stay alert longer or shorter to keep everything running or preserve the battery.
Let’s go through the sleep options one after the other.
Sleep After
It often makes sense to let your PC go to sleep when you are not using it. Your computer can do that automatically if properly configured.
Just specify the period of inactivity before your PC enters a low-power state with most of its hardware turned off.
This setting is pretty convenient in that your PC resumes almost instantly when it is necessary.
However, it all depends on your activity and the kind of PC you’re using.
If you have long work spells, you might want to keep the computer running longer. Also, if your PC is the type that takes its sweet time to restart its hardware after going to sleep, preventing it from sleeping may be best.
You can also prevent your PC from ever going to sleep if it’s plugged in (or on battery). All you have to do is clear the box and click on another option in the dialog box, and the setting will change to Never.
Hibernate After
This option lets your PC hibernate when it stays inactive for a period you specify. This way, your power is saved, and your system state is stored in the hard disk – you can easily restore it from there and resume your work.
Allow Hybrid Sleep
Hybrid Sleep is a convenient combination of the sleep and hibernation states. It is designed to save your system state to your memory as well your hard disk and quickly wake up your machine when you need to resume your work.
This setting is especially useful for desktops because it prevents you from losing your work in case of a power outage.
Allow Wake Timers
Wake timers are settings that serve to wake up your PC at a specific time – for instance, when important updates have found their way to your system and are waiting to be installed.
That said, you might wish your computer to keep sleeping whatever is happening – for this, select Disable from the menu.
If you wish your PC’s sleep to be disturbed by nothing but Windows itself in case of an important event that is about to occur in your system, consider using the Important Wake Timers Only policy.
6. USB Selective Suspend Setting
The USB Selective Suspend Setting allows the operating system and USB hub drivers to selectively put USB devices into a low-power state to conserve energy.
Affected USB devices are those that are not actively being used for a while.
However, you should note that not all USB devices support this feature, and some devices might not work properly with it enabled.
7. Graphics Performance Optimization
Your graphics power settings can make or break your work, depending on what you use your system for. Your graphics card handles the visuals on your computer and other complex calculations.
The Intel(R) Graphics Settings focuses on your integrated GPU, which performs most basic graphics tasks. You will sacrifice battery life if you select Maximum Performance in the On Battery Graphics Power Plan drop-down menu.
So, it depends on how fast you want your PC to run while on battery life.
If you use a gaming computer and a dedicated graphics card, you may want to select the maximum battery life because you’ll already be used to higher speeds.
8. Intel Dynamic Platform and Thermal Framework Settings
The Intel Dynamic Platform and Thermal Framework (DPTF) is only available to some Intel-powered laptops. It’s one of the advanced options that Windows 10 users who need more or less power can adjust.
Intel developed the technology to manage and control an Intel computer system’s thermal and power characteristics. It is available for download as a driver via Microsoft’s catalog website.
It provides an optimized balance between power consumption, performance, and temperature.
While its main aim is to prevent overheating, it can also provide a better user experience and maintain consistent system performance.
DPTF operates by utilizing a combination of hardware and software components to monitor various system sensors, such as power, temperature, and utilization sensors.
It then uses the data it collects to dynamically adjust system parameters like CPU frequency, fan speed, and power consumption to ensure that your computer always functions within safe thermal thresholds and provides optimal performance.
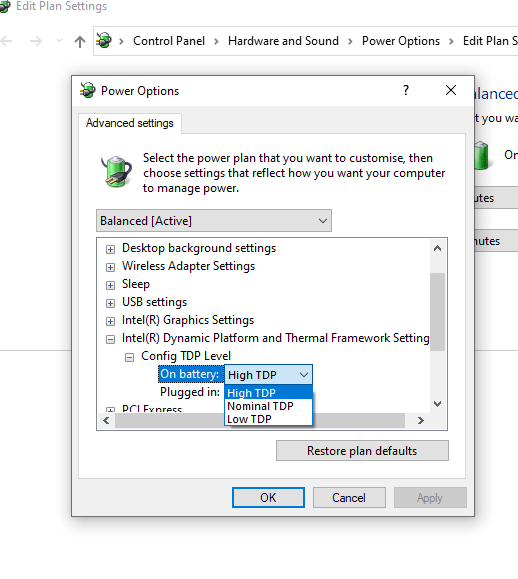
In this power option, you’ll be choosing between High, Normal, and Low TDP.
TDP (Thermal Design Power) is a measure of the amount of heat that GPUs and Processors generate. The higher the TDP, the more heat the computer creates and the better the system’s performance.
So, choosing the right setting here ultimately depends on your demands and your PC’s configuration. If you require heavy computing power and your computer has a capable thermal infrastructure, you can go for the high TDP option.
However, it is recommended that you stick to lower options when on battery.
9. PCI Express Settings
The PCI Express (PCIe) is a computer infrastructure that facilitates data transfer and communication between different PC components such as your sound, graphics, and network cards, and even your processor.
This setting allows you to control the Active State Power Management protocol designed for managing serial-based PCIe devices.
When you turn on the Link State Power Management Windows 10 will automatically make your system’s PCIe go into a low power state whenever it is idle.
Keeping the option on means you may suffer latency issues when the PCIe tries to wake up after being shut down.
Of course, keeping the power option turned off means the link between devices never goes off. However, this can cause increased power consumption.
So, you can choose to keep it at a moderate level if you want a balanced experience.
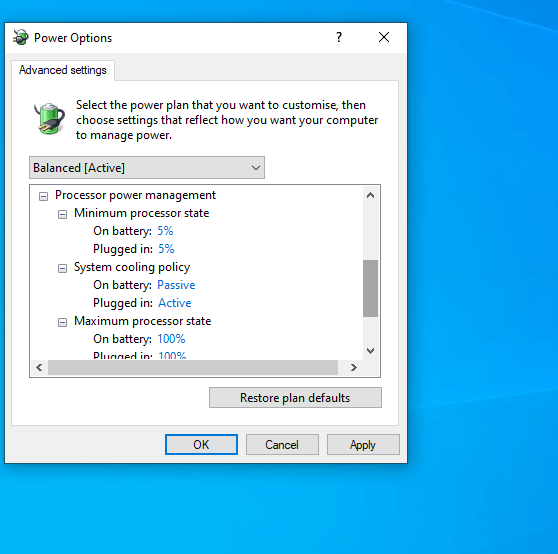
10. Processor Power Management
This is the CPU power manager Windows 10 PC owners use to determine how their CPUs operate at any given time.
This category also contains a cooling option for some laptops. Let’s go through the settings under Processor Power Management.
System Cooling Policy
This is one of those advanced power settings Windows 10 users may not see on their PCs, especially if they have the Intel Dynamic Platform and Thermal Framework settings.
However, if you find it in your Windows 10 advanced power settings, you can use it to shape how your system engages its cooling infrastructure.
Choosing the Active option means Windows will allow your system to work at full performance as long as it can run your fans at maximum speeds to cool your PC.
The Passive option allows Windows to regulate your system’s performance so that your fans don’t work too hard.
Maximum and Minimum Processor States
These settings are for adjusting the limits of your processor’s speed.
The maximum processor speed option allows you to cap the highest speed in GHz that your CPU can run at.
You can allow your CPU to run at the maximum 100% to get the best performance. But reducing the percentage allows you to prevent the processor from ever going beyond a particular level (to conserve power).
On the other hand, choosing a minimum percentage tells your CPU to never run below a specific speed.
If you want to set your PC at the absolute max performance level, you’ll change the maximum and minimum options to 100%.
This way, your CPU will always run at its maximum speed. This option consumes significantly more power.
11. Display Power Management
For the purpose of power usage reduction, your display can be turned off when not in use. It is up to you to decide the period of inactivity after which your display is powered off.
This setting is ideal as it doesn’t necessarily slow down the crucial components related to speed. So, in this case, it’s mostly about convenience.
12. Multimedia Settings Optimization
The Multimedia power settings only kick in whenever your computer starts handling media-related tasks, such as sharing and playing media.
When Sharing Media
When your PC is acting as a server, you can keep it awake by choosing the Prevent Idling to Sleep option.
On the contrary, the Allow the Computer to Sleep option will let your PC go to sleep even when you are streaming.
The Enter Away mode allows background media sharing and recording while your display is off and your sound is muted.
Video Playback Quality Bias
We know that video quality is extremely important for many users, but unfortunately, in certain scenarios, you have no other choice but to trade it off against power consumption.
Switching between video quality and power-saving is easy these days since this setting provides you with the Video Playback Performance Bias and Video Playback Power-Saving Bias options.
When Playing Video
Here, you can choose either to “Optimize Video Quality” or to “Optimize Power Saving” to meet your current needs while playing video.
Bear in mind that “Balanced” might prove the best option to reach a compromise.
13. Battery Life Management
Now, let’s look at one of the most critical Windows 10 power settings for people who use their laptops for work and on the go.
If you’re in this group, you likely need to preserve your laptop battery as much as possible.
The battery policy is important because it helps you make choices to improve battery health and prolong your battery lifespan.
Now let’s go through the different battery options.
Critical Battery Notification
This setting ensures you know it when your battery is running critically low. Critical Battery Notification is enabled by default, but you can turn it off if need be – even If there’s absolutely no reason to. The notification is a good reminder that you should plug in your system.
Critical Battery Action
To prevent your PC from dying suddenly when your battery reaches a critical level, you can configure your system to sleep, hibernate, or shut down properly when your battery is empty.
Critical Battery Level
This is where you can set what level of your battery should be considered critical. When your battery reaches it, Windows will take the action you specified in the Critical Battery Action section.
Low Battery Level
Here you can specify the battery level your system will consider low. When your battery reaches this value, you will be notified so that you can react appropriately.
Low Battery Notification
Turning this setting on allows Windows to notify you whenever your battery reaches the level you specified in the Low Battery Level option.
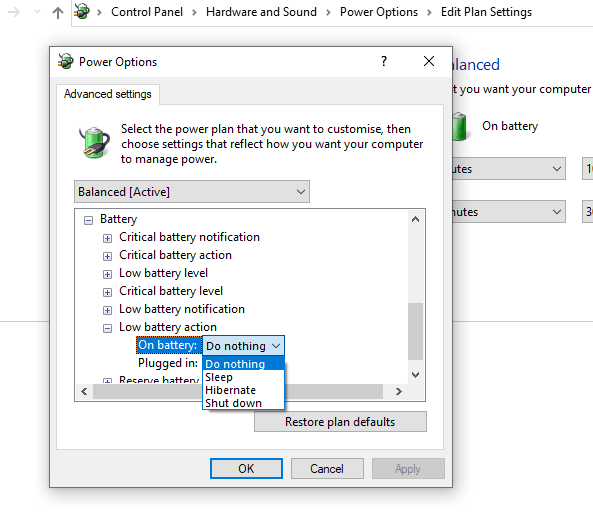
Low Battery Action
This is the menu where you can decide how your PC should act when the battery power gets low. Here are the possible options:
- Do Nothing
- Sleep
- Hibernate
- Shut Down
Reserve Battery Level
Here, you can specify the battery level where your system should reduce power consumption and focus on extending your battery life.
Conclusion
All in all, advanced power settings allow you to conveniently reach a compromise between your performance and battery life on Windows 10.
You can always create custom power plans and tweak their advanced power settings to fit your desired profile.
This way, you can switch between plans whenever you want to save battery or boost performance.
FAQ
Link State Power Management is a power-saving feature in Windows that manages the power state of PCIe (Peripheral Component Interconnect Express) slots and PCIe buses. It can be configured to put your system’s PCIe into a lower power state whenever it is not in use. This action saves energy but may cause system lags. Changing your Windows 10 performance settings involved going to the Power Options page, choosing “Change Plan settings,” and selecting “Change advanced power settings.” You can also create custom power plans and choose the advanced power settings that suit your needs.


