![[FIXED] A Breakpoint Has Been Reached (Error 0x80000003)](https://www.auslogics.com/en/articles/wp-content/uploads/2023/05/FIXED-A-Breakpoint-Has-Been-Reached-568x359.png)
- Effective Ways to Fix the “A Breakpoint Has Been Reached” Error
- Solution 1: Turn off automatic startup programs
- Solution 2: Run the DISM tools and the SFC scan
- Solution 3: Run disk checker
- Solution 4: Switch off any GPU overclocking
- Solution 5: Update your device drivers
- Solution 6: Perform a full malware scan
- Solution 7: Update your system
- Solution 8: Set the page file to automatic
- Solution 9: Reinstall the affected application
- Solution 10: Perform a system restore
- Solution 11: Remove Windows updates
- Solution 12: Repair game files
- Solution 13: Prevent your antivirus program from blocking the file
- Solution 14: Run the Windows memory diagnostic tool
- Solution 15: Create another administrator account
- Solution 16: Perform a clean boot
- A Breakpoint Has Been Reached Error: Conclusion
- FAQ
Windows has an almost infinite supply of errors. You’d think you’ve seen it all until another bizarre error message takes you by surprise. One such problem is the error “a breakpoint has been reached”.
The exception breakpoint error 0x80000003 is mainly the result of a Windows registry mix-up that leftover keys of uninstalled applications could trigger.
Other possible causes include the following:
- Malware attacks
- Problematic Windows updates
- Outdated device drivers
- Malfunctioning hard disk sectors
- Missing or corrupted system files
- Corrupt or missing game files
The error can occur when you run a program or boot your PC. This guide will help you fix the issue on Windows 10 and 11.
Let’s begin.
Effective Ways to Fix the “A Breakpoint Has Been Reached” Error
To fix the this error follow the steps below. If the first solution doesn’t work, go through it until you find the one that helps you.
Solution 1: Turn off automatic startup programs
The exception breakpoint error can sometimes occur when third-party apps launch during startup.
To ensure that this may be causing the problem, restart your computer with no startup programs running in the background.
Follow the steps below to disable startup apps on Windows. Remember to turn off only third-party apps unless you don’t need a specific Windows service:
- Click on
Win + Xto access the WinX menu. - Next, click on Task Manager to launch the program.
- Launch Startup apps from the Task Manager.
- If you click the Status column header, the table will sort so that the active apps appear first.
- Next, click the Disable button next to each program.
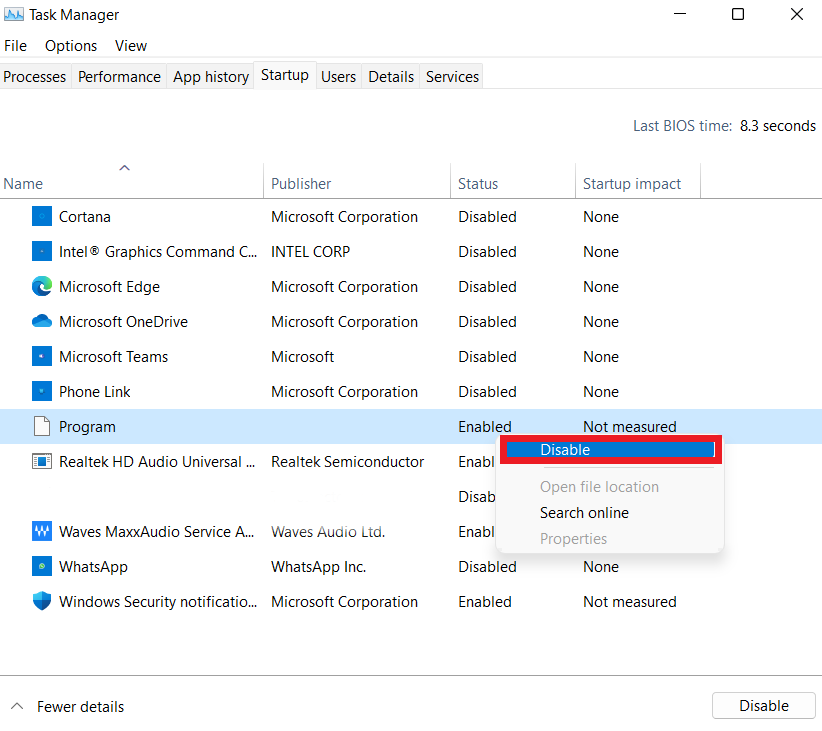
After that, try restarting your computer to see if the exception breakpoint error still appears. If that’s not the case, try turning on the apps again, one by one, until you identify the app causing the problem.
Solution 2: Run the DISM tools and the SFC scan
The Deployment Image Service Management (DISM) tool is command-line software that can diagnose and repair problems with your Windows image.
For example, you can use the tool to repair a damaged system image, which may be likely the cause of your issue.
Also, the System File Checker (SFC), like DISM, is a command-line tool integrated into Windows systems that scans for and replaces missing or corrupted system files.
We’ll show you how to use these tools to check for potential errors:
- Then, click on the search bar and type Command Prompt.
- Launch the Command Prompt as an administrator. Right-click the command prompt and choose run as administrator.
- Enter the following command in the Command Prompt window:
Dism /Online /Cleanup-Image /CheckHealth.
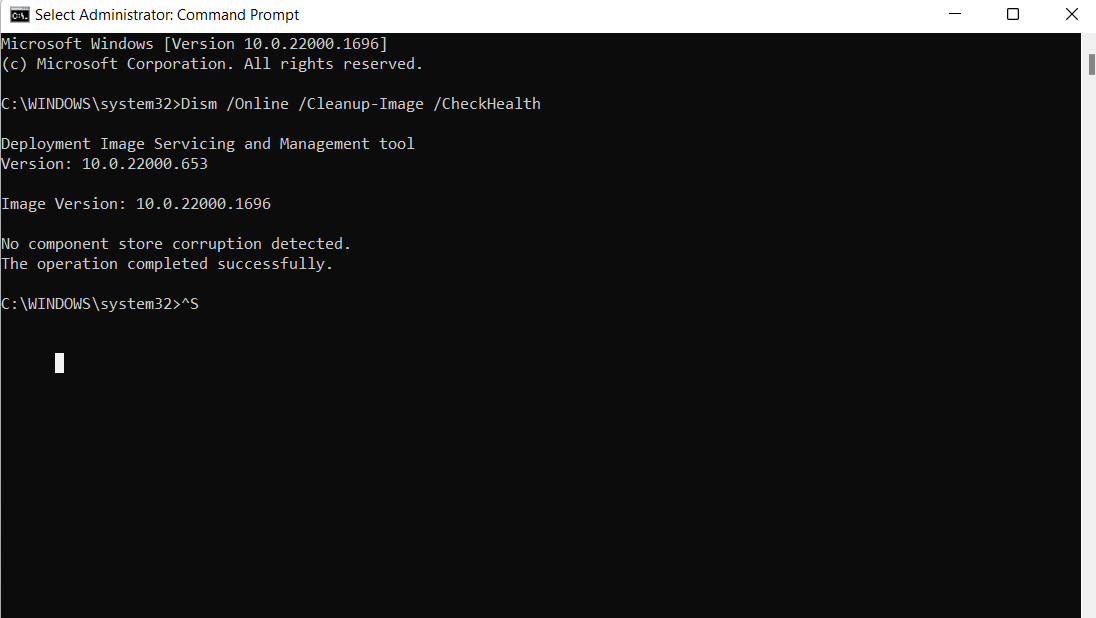
- After that, type
Dism /Online /Cleanup-Image /ScanHealthand enter to check your computer’s health. - Next, type
Dism /Online /Cleanup-Image /RestoreHealthto repair the system image. The process usually takes minutes to complete, so be patient until the test reaches 100%.
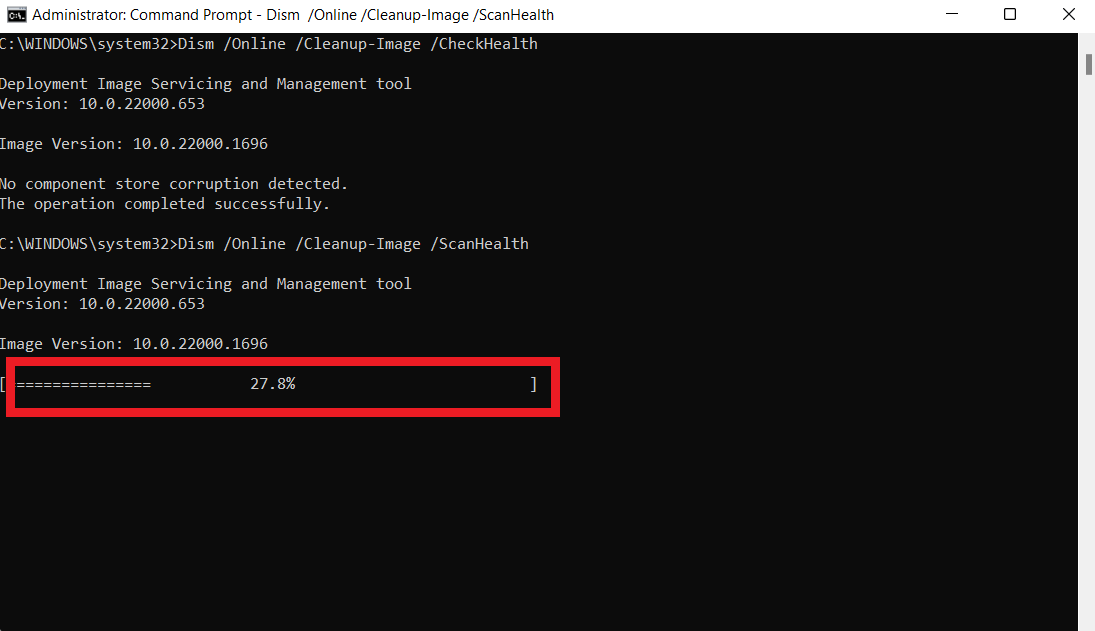
- After that, run the System File Checker by typing the following command:
sfc /scannow. The process takes several minutes to complete. After the scan, it’ll show the results and any actions it took.
Solution 3: Run disk checker
Sometimes, the Windows exception breakpoint error is caused by a malfunctioning or corrupted hard drive. Bad sectors can also cause this issue.
You can eliminate the problem by scanning your disk and fixing problems.
Here’s how to do it:
- First, launch the Command prompt as an administrator.
- Type Press
CHKDSK /f /r D:and press enter. Remember to check your disk letter and replace it accordingly.
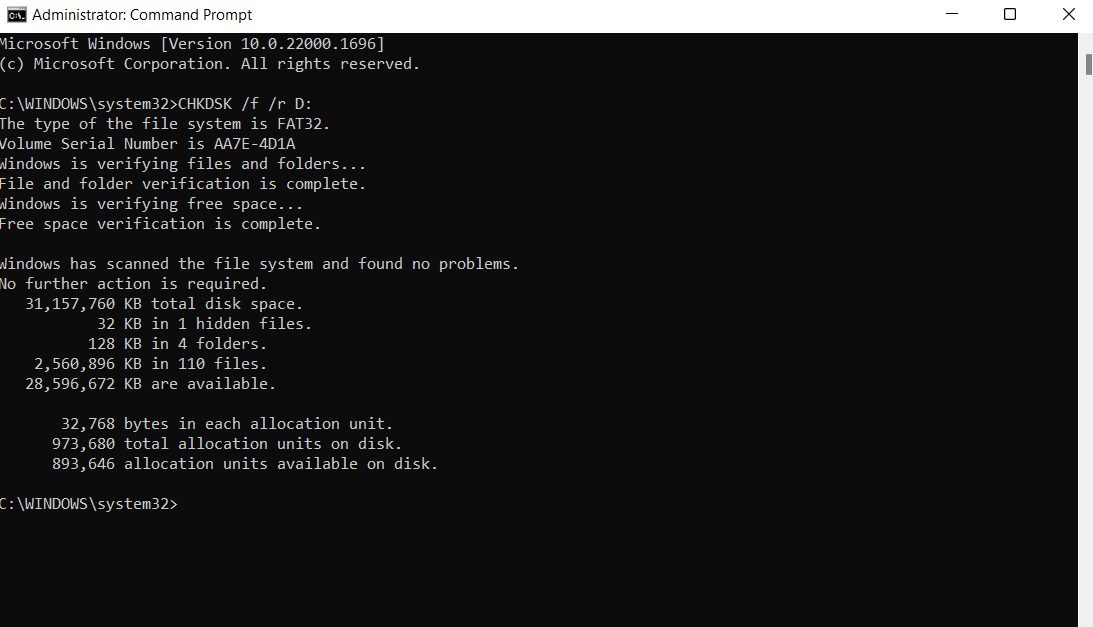
Wait for the process to complete. After completion, restart your computer to see if the problem is solved. If not, proceed with the other steps in this guide.
Solution 4: Switch off any GPU overclocking
If you get the exception breakpoint error during a graphics-intensive activity like playing games, an overclocked GPU may be the cause.
A properly overclocked GPU improves performance, but improper overclocking might crash your system and generate errors.
Revert any recent GPU overclocking you may have performed, whether with a third-party tool or a manufacturer-specific program, to see whether that resolves the issue.
You can check out top-tier GPU overclocking tools to help you solve the problem.
Solution 5: Update your device drivers
Device drivers control the communication between your hardware components and the operating system. Third-party applications also use drivers to interact with devices.
If a driver is corrupt or obsolete, the operating system will display an error when there’s a communication breakdown.
This especially happens when a third-party program tries to make contact. You can use Device Manager to find drivers and install their latest versions.
However, they don’t show outdated drivers or notify you when an update becomes available for driver software.
You can use Windows Update, but it’s only for Microsoft updates.
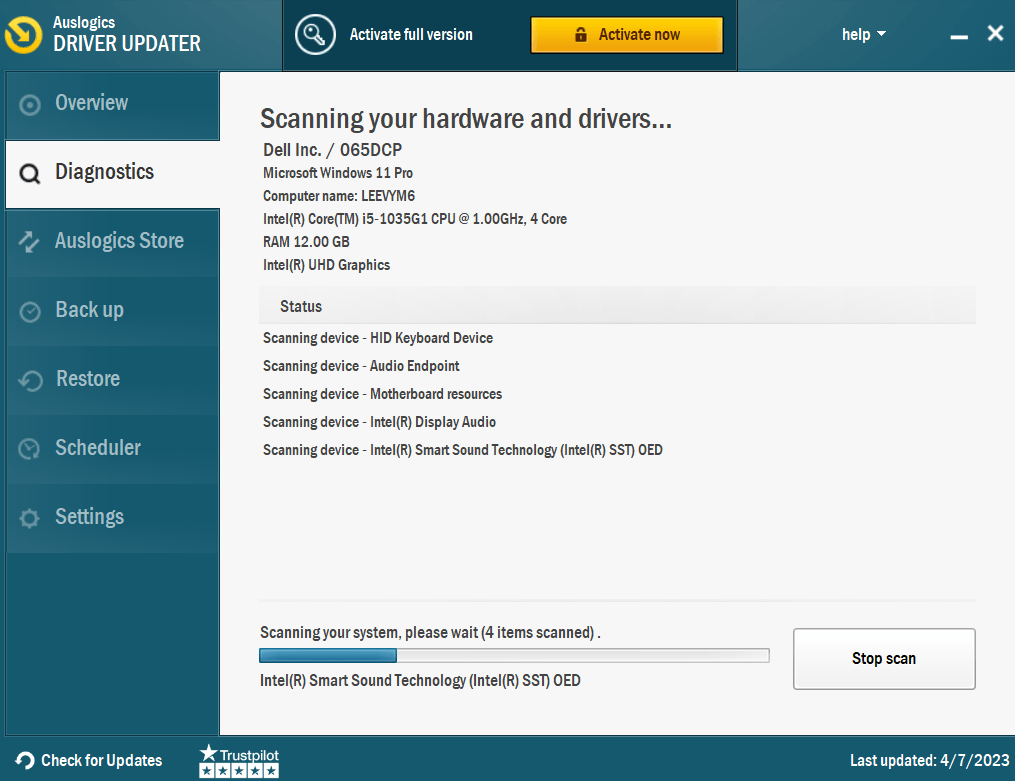
Use Auslogics Driver Updater
Auslogics Driver Updater can help you check for outdated and problematic drivers and install their updates automatically.
If you purchase the full version, you can update multiple drivers simultaneously with just one click.
The tool fetches driver software from trusted sources and keeps backups just in case.
It takes three steps to update your drivers:
- Download the Auslogics Driver Updater.
- Click on Click to install and check drivers.
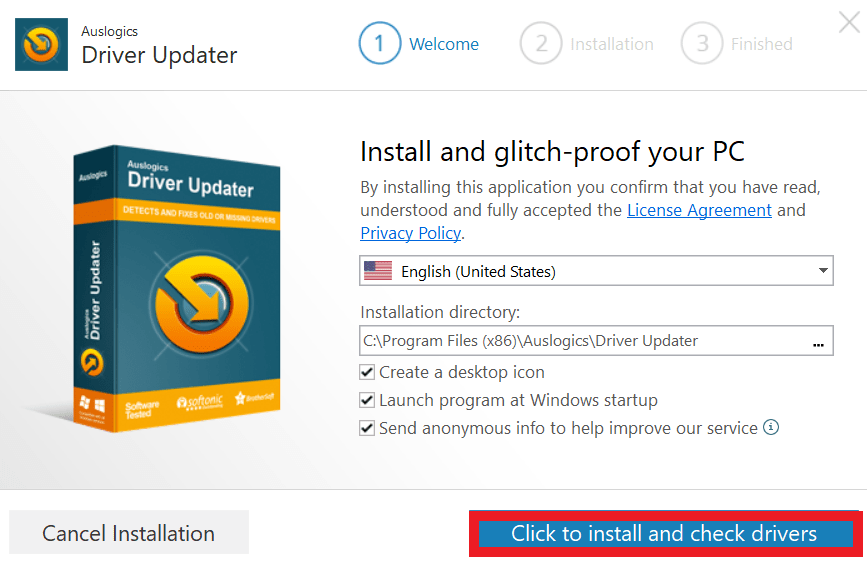
- After clicking Finish, the program will automatically scan your PC for drivers needing updating.
Solution 6: Perform a full malware scan
The problem could be appearing due to the operations of a malicious file or program. You can get rid of the malware file or application by using Auslogics Anti-Malware to run a deep scan.
A full scan is more thorough than your antivirus program’s regular scan as it will assess protected areas on your computer for viruses.
So, choose the Full Scan option in your antivirus scan and allow it to complete the process.
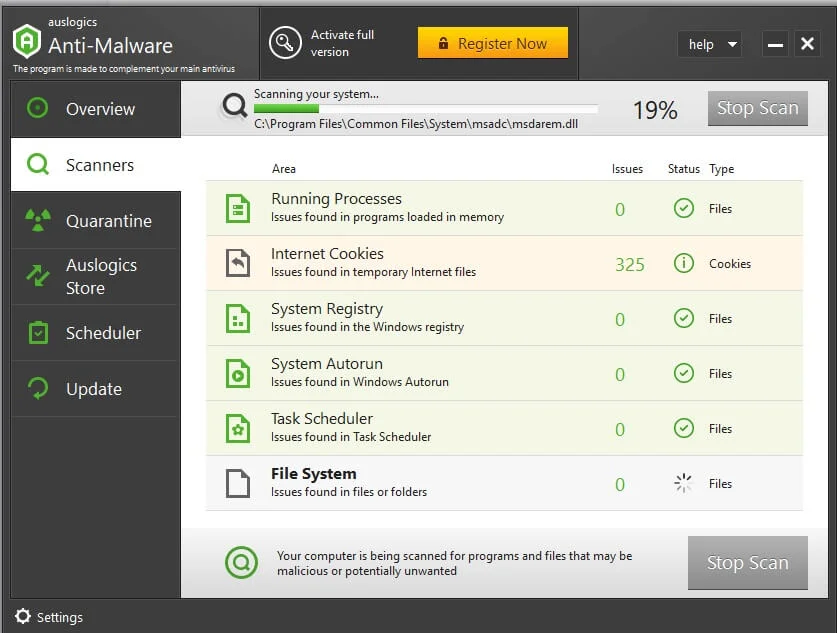
Note that this may take up more time than the usually scheduled scan.
Related: Auslogics Anti-Malware: Features and Reviews
Solution 7: Update your system
“A breakpoint has been reached” error could be popping up because your operating system is outdated.
Executable files interact with device drivers, system files, and other system components. If one or more system components are outdated, issues will occur.
Some underlying operating system bugs, which may have been fixed in an update, could also be responsible for the problem.
So, if you haven’t updated your system in a while, do that and check for the problem. If you don’t know how to, follow these steps:
- Press the
Windows key + Sto open the search box. - Type Windows update and click on Check for Updates.
- Click on Check for updates under Windows Update.
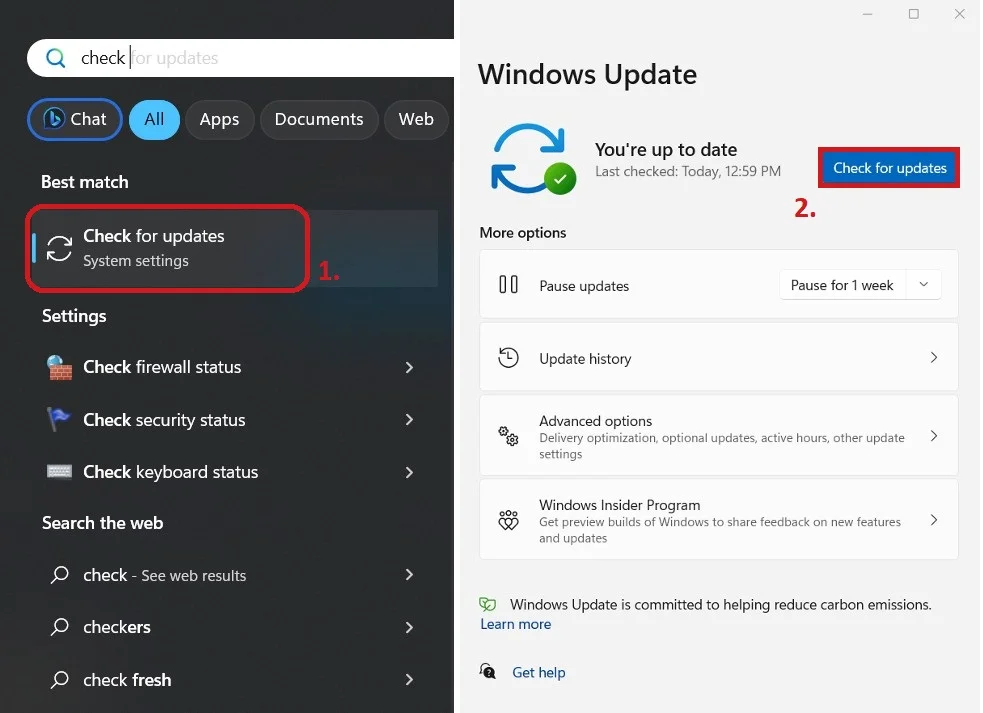
- Download and install available updates.
- Click on Restart now to install the updates.
Related: Ultimate Guide: How to Manually Check and Install Windows Updates
Solution 8: Set the page file to automatic
The page file is Windows’ way of expanding your system memory to accommodate more programs and processes.
It’s a portion of your hard drive that your operating system uses as a make-shift memory when your main memory is full.
Windows typically manages the file, but you may have changed the setting and applied a manual, static size for the page file.
There are two options here, and the one you choose depends on your current setting.
First, if Windows manages the page file automatically, you can switch it to manual and see if that solves the problem.
If you have a manual configuration, then switch the setting to automatic. Follow the steps below to change your virtual memory settings on Windows 10 and Windows 11:
- Launch the Start menu, type Advanced system settings, and open it.
- Click on the Settings button under Performance.
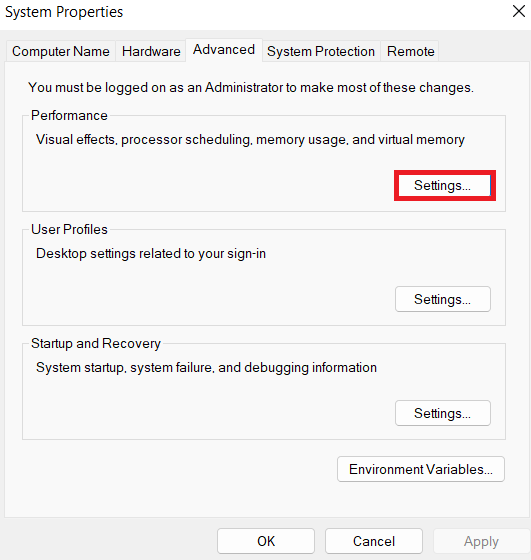
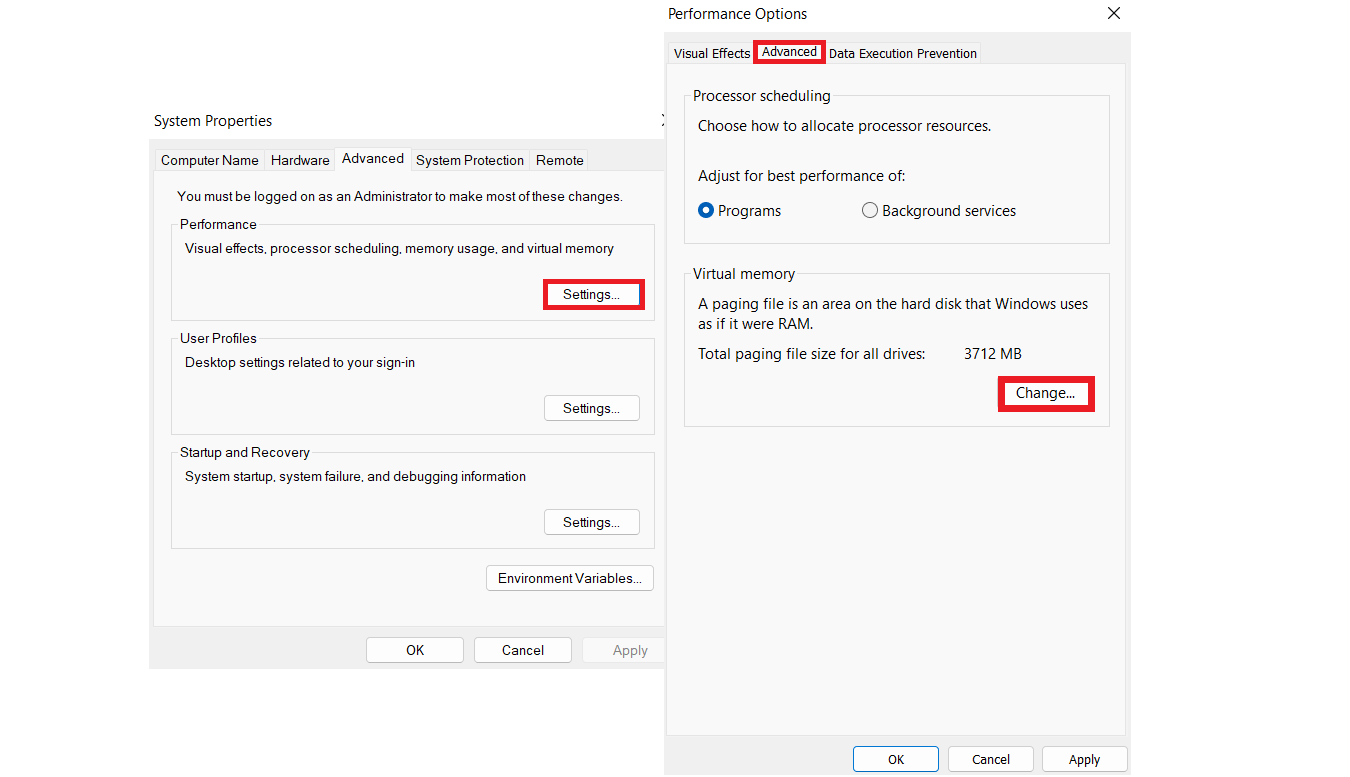
- Switch to the Advanced tab in the Performance Options dialog.
- Head to the Virtual Memory section and click the Change button.
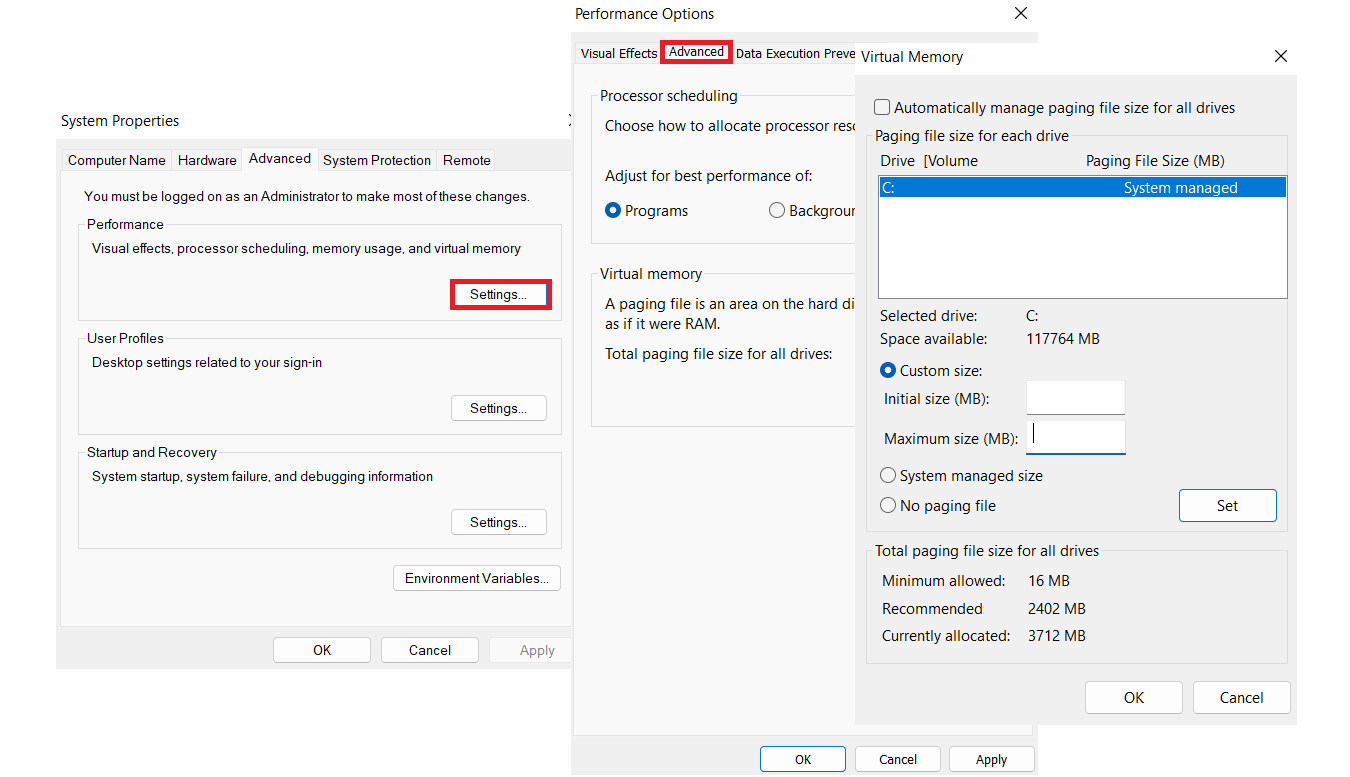
- If you currently use a customized paging file size, check the box next to Automatically manage paging file size for all drives and click the OK button.
- On the other hand, if the automatic option is already selected, uncheck the box and go to the Custom Size section to set a paging file size for your hard drive.
- You can set the size (in megabytes) to 1.5 times your system memory size. First, however, you use the recommended size at the bottom of the Virtual Memory window.
Solution 9: Reinstall the affected application
One problem that could cause the error is the program’s installation files. In this case, removing and reinstalling the program can eliminate the Windows exception breakpoint.
Let’s show you how to remove programs from a Windows 10 or Windows 11 PC:
- First, open the Start menu and type control panel.
- After the Control Panel opens, head to Programs and click Uninstall a Program.
- Once you see the Programs and Features list, scroll down to the app you want to remove and double-click it.
- Finally, confirm your decision to uninstall the program and follow the subsequent prompts.
Solution 10: Perform a system restore
“A breakpoint has been reached” error may be showing up due to some changes you implemented in your computer. These changes could include:
- A driver update
- A new application
- An uninstalled program
- Windows Update
Suppose you started seeing the error recently, especially after applying any of these changes. In that case, you can reverse them through the System Restore wizard and check if the error will disappear.
The restore process is similar for Windows 10 and 11, so these steps will guide you if you use any of the operating systems:
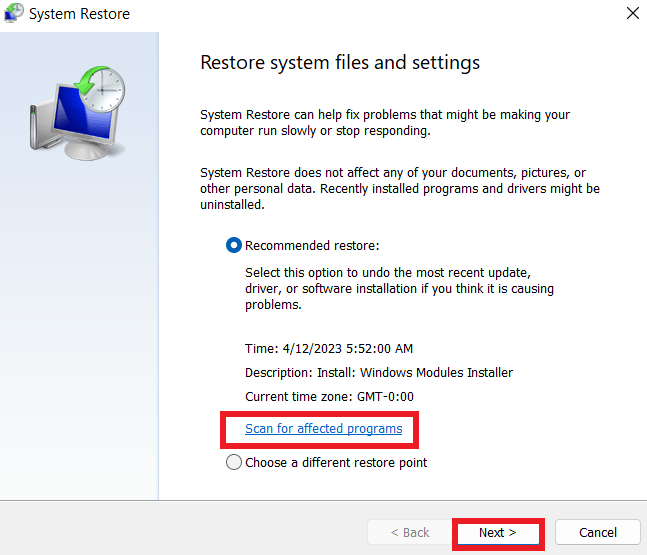
- Open the Start menu and type Restore.
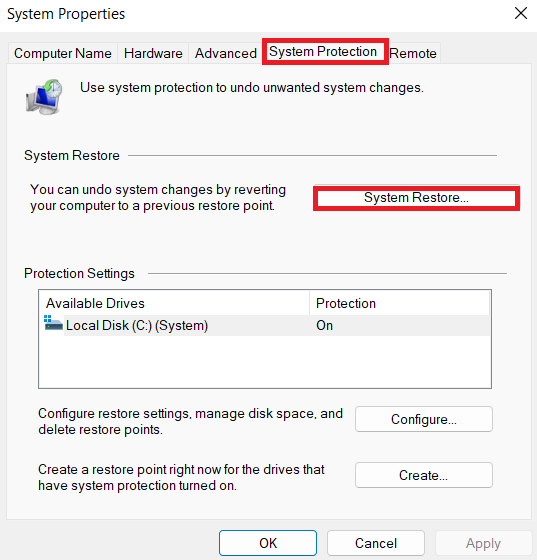
- Click on Create a Restore Point in the search results.
- After the System Properties dialog opens, click on the System Restore button under the System Protection tab.
- Click on the Next button after the System Restore window opens.
- Now, you’ll see the list of restore points you created or those automatically created by Windows.
- You can click the Scan for Affected Programs button to check the applications and drivers that the System Restore client will delete.
- After that, click on the Next button, then select Finish.
- Allow Windows to restore your computer.
Launch the program that triggers the error once your computer starts.
Also Read: How to Resolve Windows Update Error 0x800703e6?
Solution 11: Remove Windows updates
While updates are published to enhance your computer’s performance and make it more secure, they often cause problems.
Some updates may not be compatible with your PC and trigger the breakpoint error. If the error started showing up after you installed a major update, you can roll back the update and check if that solves the problem.
Follow these steps if you run Windows 10:
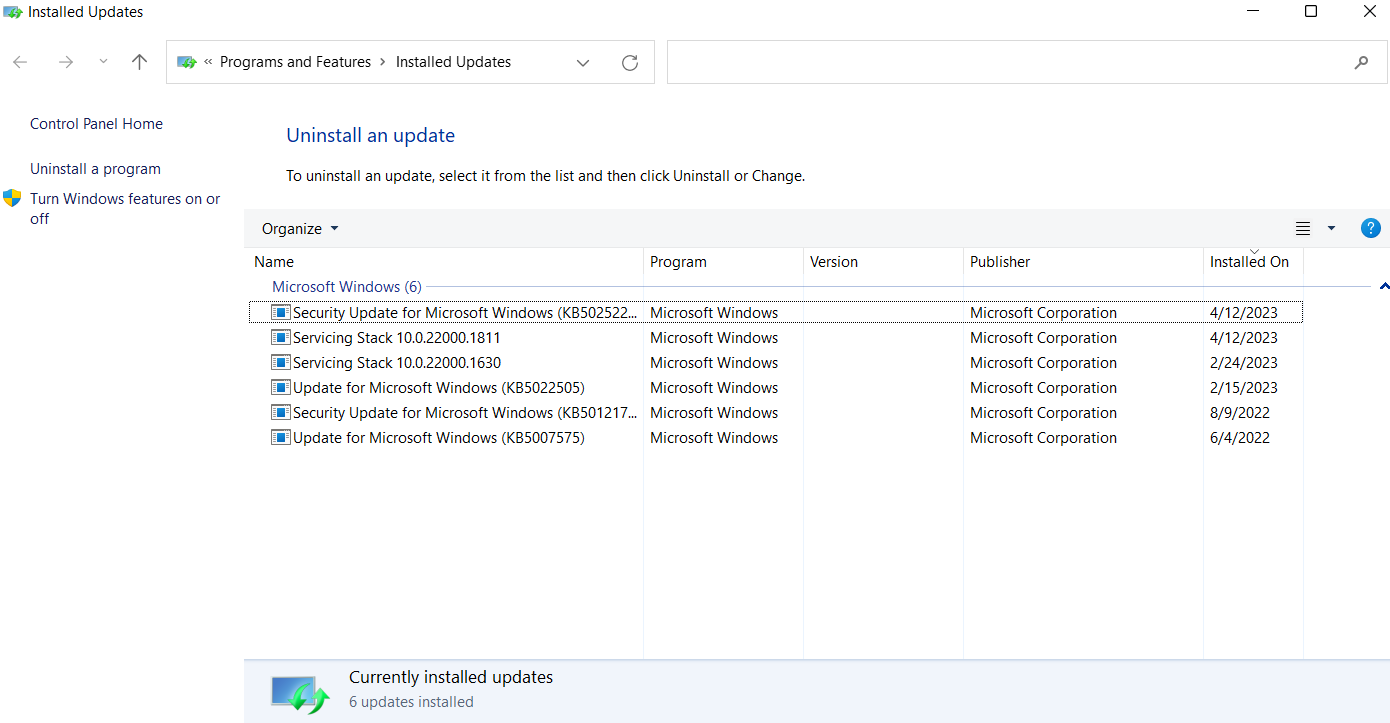
- Press the Windows and S keyboard buttons at the same time to open the search box beside Start.
- Type Updates into the text field and click on Check for Updates.
- Click View update history under Windows Update.
- When the View Update History page opens, take note of your installed updates and check their dates. You should also note their KB numbers.
- Go to the top of the View Update History page and click on Uninstall Updates.
- You’ll now see a list of recently installed updates.
- Identify the KB number of the update you want to remove and select it.
- Allow Windows to remove the update, then restart your computer.
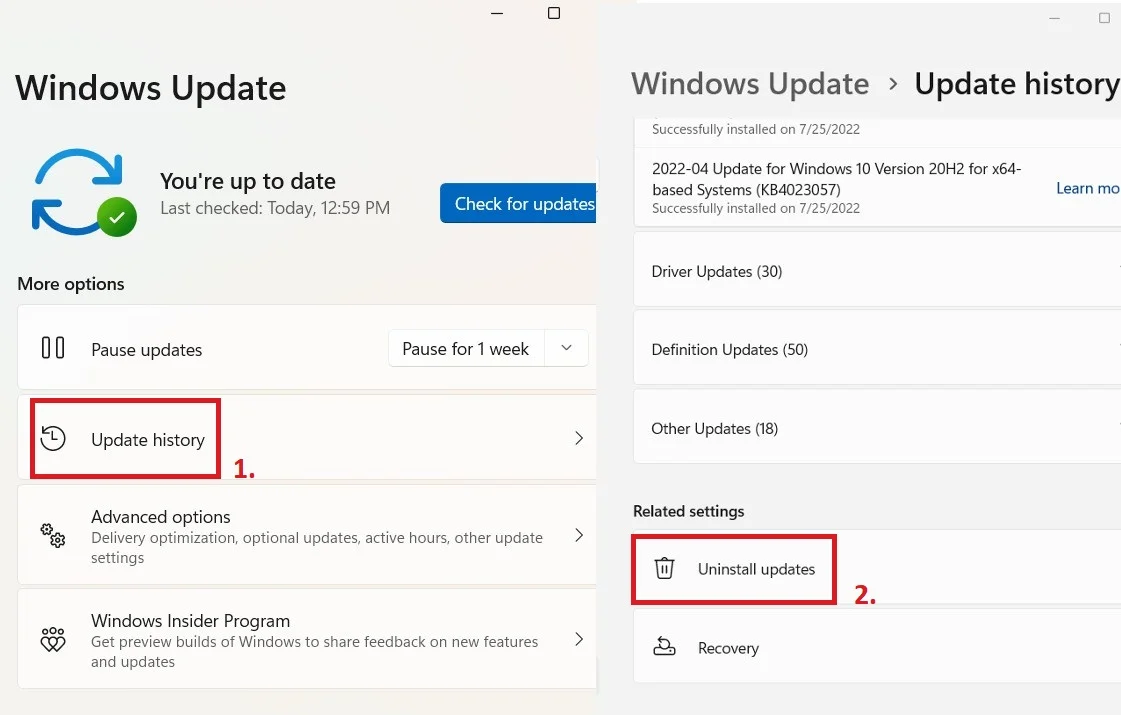
Follow these if you run Windows 11:
Press the Windows and S keyboard buttons at the same time to open the search box beside Start.
- Type Updates into the text field and click on Check for Updates.
- Select Update History once the Windows Update page opens.
- After the Windows Update > Update History page opens, scroll down or collapse the update history sections, and click on Uninstall Updates.
- You’ll now see a list of recently installed updates.
- Identify the KB number of the update you want to remove and select it.
- Allow Windows to remove the update, then restart your computer.
Also Read: Windows Update Troubleshooter: Easily Fixing Windows Update Issues
Solution 12: Repair game files
Game files may get corrupted due to a game crashing, an improper shutdown, or a malware attack.
When game files become damaged or go missing, you’ll start to experience in-game issues, startup problems, and errors like the breakpoint issue.
Thankfully, you can use your launcher to find and fix problematic game files. The application will scan a game’s installation folder and replace any file that isn’t up to date or working properly.
So, if you’re seeing the error whenever you open a game, use your launcher to verify game files.
Let’s show you how to do that on different launchers.
Epic Games:
- Launch the Epic Games Launcher.
- Head to your games library and right-click on the affected game. You can also click on the three dots beside the game.
- Select Manage once the drop-down menu appears.
- Now, click on the Verify option.
Steam:
- Reboot your Windows PC and start Steam.
- After Steam opens, go to your games library and right-click the affected game. You can also select the game and click on its settings icon on the far right.
- Choose Properties from the context menu.
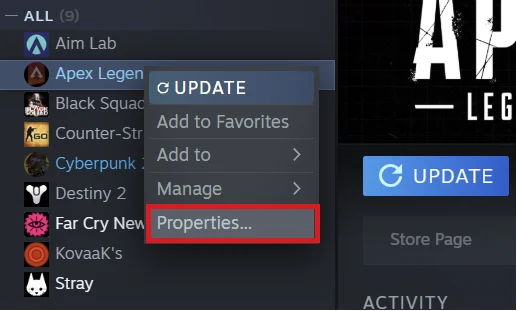
- After the Properties page shows up, click on Local Files in the left pane.
- Go to the Local Files tab and click on Verify Integrity of Game Files.
Origin:
- Launch Origin.
- Head to My Game Library.
- Now, locate the game you want to repair and right-click it.
- Select Repair from the menu.
Battle.net:
- Start the Battle.net application.
- Locate the game’s icon and click on it.
- Click on the cog icon beside the game’s Play button.
- Click on Scan and Repair once you see the context menu.
GOG Galaxy:
- Launch GOG Galaxy.
- Select the game you want to repair.
- Click on the game’s preferences button on the right side of the Play button.
- Next, hover your mouse pointer over Manage Installation and select Verify/Repair in the expanded menu.
Solution 13: Prevent your antivirus program from blocking the file
Your antivirus program will prevent a file from executing if it suspects a security threat. You should check and confirm that the file is safe if you’re getting reports from your security application.
In some cases, however, security programs tend to mistake legitimate files and applications for security threats. These cases are called false positives.
If you’re convinced that the file in question is safe, you can stop your antivirus from blocking it in the future.
To do that, add it as an exception or an exclusion. You can also add it to the program’s whitelist, depending on the antivirus suite you use.
If you use Windows Security, these steps will show you how to prevent it from blocking the file you’re trying to open:
- Press the
Windows + Skeyboard buttons at the same time to open the search box beside Start. - After the box appears, type Virus and Threat Protection.
- Click on Virus & Threat Protection in the search results.
- Once the Virus & Threat Protection window opens, go to the Virus & Threat Protection Settings section.
- Click on Manage Settings.
- Scroll down to Exclusions once you see the Virus & Threat Protection Settings screen, and click on Add or remove exclusions.
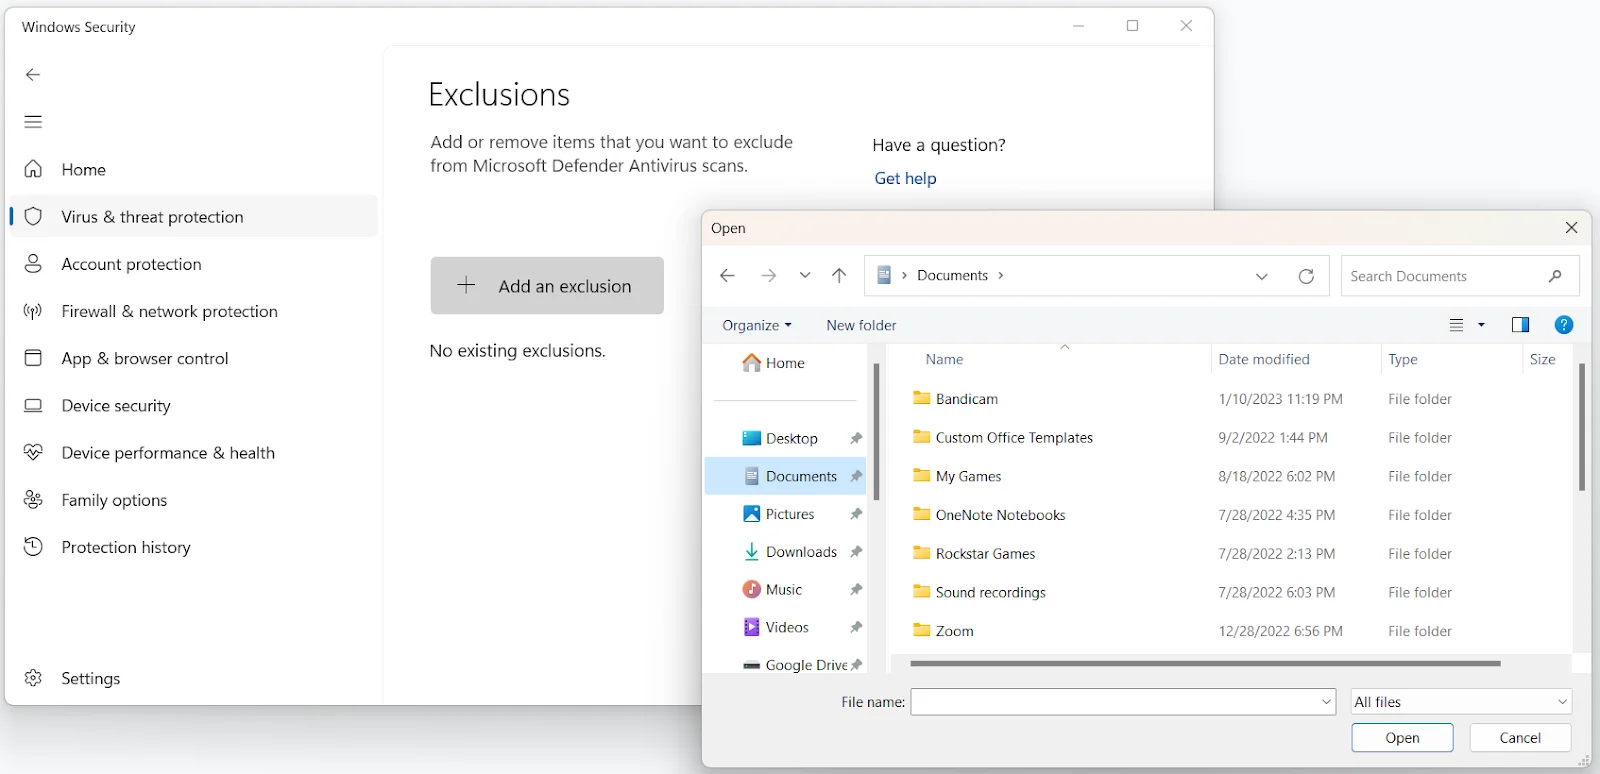
- Click on Add an Exclusion immediately you see the Exclusions interface.
- Choose File from the drop-down menu.
- Once the Select File dialog opens, navigate to the file and double-click it.
Related: [EXPLAINED] Does Windows 10 Need Antivirus?
Solution 14: Run the Windows memory diagnostic tool
Memory leaks are bad in any situation. They trigger different types of errors, including the “a breakpoint has been reached” error.
Memory leaks happen when your RAM fails to release unallocated memory. When this happens, new programs will likely not execute.
Memory leaks can be temporary or permanent. Rebooting your system should clear minor memory glitches.
However, if the issue is related to your RAM stick, you may need to change it. To test your RAM, run the Windows Memory Diagnostic tool.
These steps will show you how:
- Press the
Windows key + Rshortcut to open Run. - Once Run shows up, type
mdsched.exeand tap the Enter button. - Choose Restart now and check for problems (recommended) once the Windows Memory Diagnostic mini-window opens.
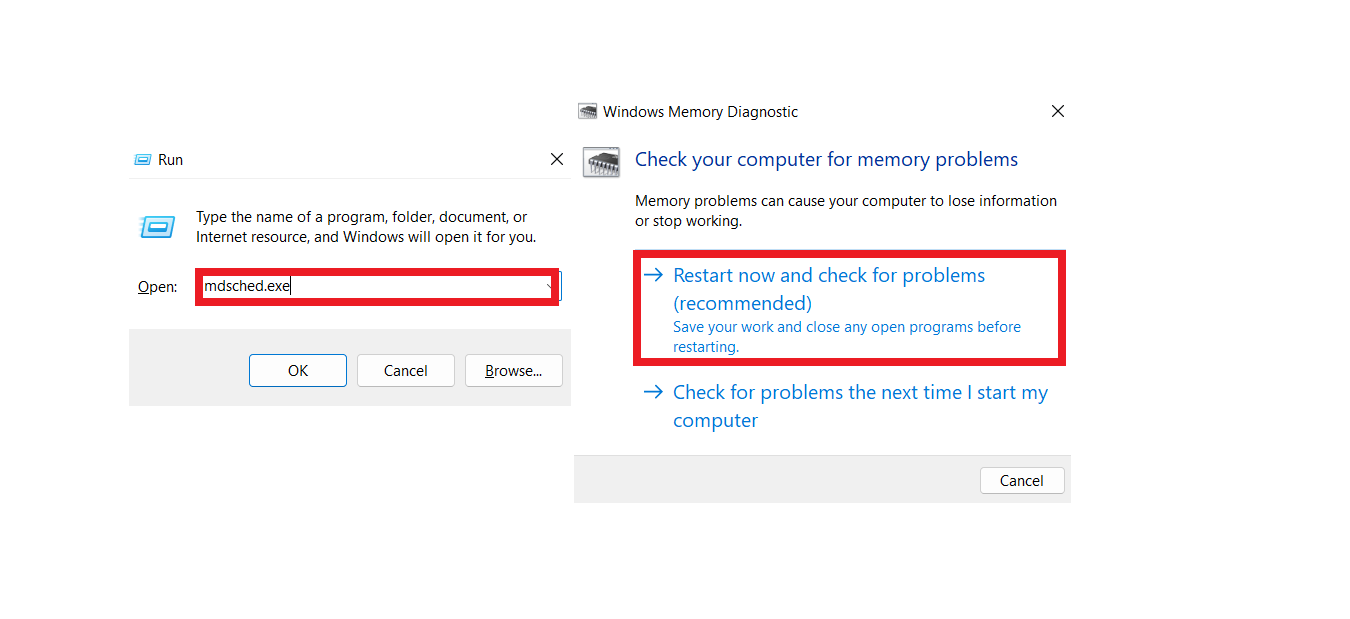
If you choose the Check for problems the next time I start my computer option, you’ll also lose access to your system on your next reboot.
Once your system boots up, the Windows Memory Diagnostic tool’s screen will show up and conduct the test. You should see the results in this interface.
How to check the test results
After the test is complete, the tool will automatically restart your computer and display the test results. However, If you can’t see the results, check the steps below:
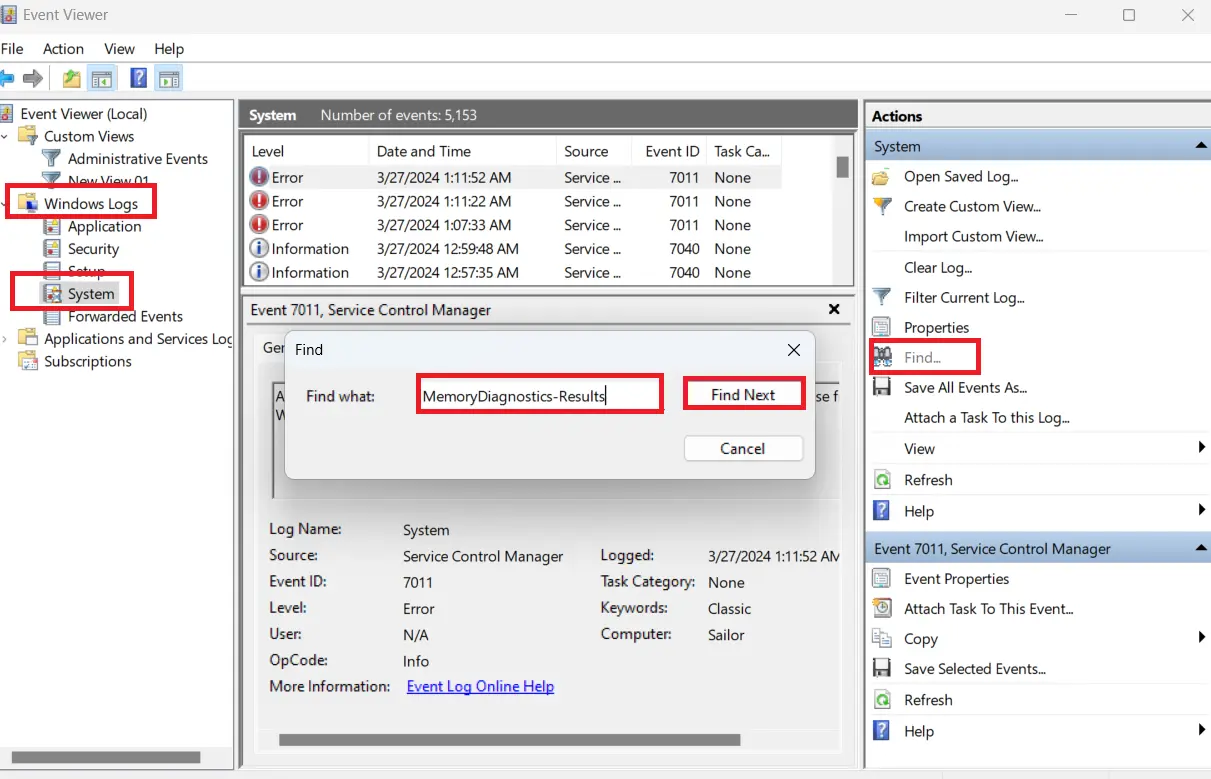
- Press the
Windows logo + Xkeyboard. - Click on Event Viewer in the menu that shows up on the left side of your screen.
- Once the Event Viewer window appears, navigate to the left pane.
- Expand Windows Logs, then click on System.
- In the Event Viewer’s middle pane, you’ll find different event entries.
- Go to the right pane of the window and click on Find.
- Type MemoryDiagnostics-Results and click on the Find Next button.
- The test results will be under General.
If the tool reports that your RAM is defective, you have to replace it. If your system has more than one RAM stick, open your RAM slot, remove one stick, run the diagnostic tool, and check if the error appears.
Then, try this for every other RAM stick and replace the bad ones.
Also Read: All You Need to Know: How to Check Windows Memory Diagnostic Results
Solution 15: Create another administrator account
The problem might be related to your user account, and creating another may remove the error for good.
Make sure you grant the new user account admin privileges.
Let’s show you how to create a new user account on Windows 10 and Windows 11:
- Launch the Settings application by right-clicking the Start menu and selecting Settings.
- When the Settings app opens, click on Accounts. On Windows 11, click on Accounts in the left pane of Settings.
- Next, click on Family & Other Users in the left pane and select Add someone else to this PC.”
Click on I don’t have this person’s sign-in information, then choose Add a user without a Microsoft account on the next page.
- Now, enter the account’s username and password. You can also add a password hint or select a few security questions to reset the password.
- Click on Next.
- After creating the account, head back to the Family & Other Users page and click on the account you just created.
- Select the Change Account Type option.
- Click on Administrator under Account Type.
- Now, restart your computer and sign in with the new account to check for the issue.
Solution 16: Perform a clean boot
Another program or service could be preventing the executable file from running and causing “a breakpoint has been reached” error. Some of your applications launch at startup and continue to run in the background.
In this case, you have to prevent every startup application from running and launch your system in a clean boot state to troubleshoot the problem.
If the file opens without issues while your system is in a clean boot state, it confirms that one of the startup items is responsible for triggering the error.
After you confirm that a startup app is responsible, you can isolate the culprit by starting your programs and services one after the other and opening the file.
Here’s how to perform a clean boot:
- Press the
Windows + Skeyboard buttons at the same time to open the search box beside Start. - After the box appears, type System configuration and click on the first result.
- The System Configuration dialog window will open.
- Head to the Services tab.
- Mark the checkbox for Hide all Microsoft services so that you don’t disable operating system services.
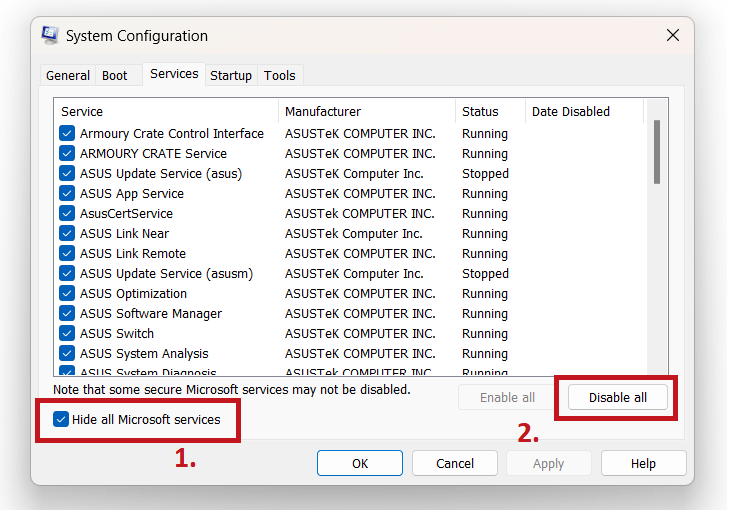
- Now, click on the Disable All button to prevent the selected services from running the next time Windows starts.
- After that, go to the Startup tab.
- Click on Open Task Manager.
- You’ll now see the Startup tab of the Task Manager.
- Disable every program by clicking on each and selecting Disable in the bottom-right corner.
- Next, exit the Task Manager, go back to System Configuration, and click on OK.
- Restart your device.
After your computer starts, open the file that triggers the error. If the file opens without issues, it’s clear that one of the startup programs has been clashing with it.
Head to the System Configuration window and enable one service. Restart your device and open the executable file.
If the error shows up, then the startup service you just enabled is the culprit. Use the same method to check other startup items and programs.
A Breakpoint Has Been Reached Error: Conclusion
The Windows exception breakpoint error can occur for various reasons, including registry issues, malware attacks, and outdated drivers.
We’ve provided several effective ways to solve the problem, including turning off automatic startup programs, running DISM and SFC scans, running disk checkers, and updating device drivers.
You can go through the solutions discussed in this guide to diagnose and fix the issue to improve your system’s performance and stability.
FAQ
The best driver updater to use is the Auslogics driver updater. It’s a cutting-edge tool that can help you maintain always-up-to-date drivers. It scans for updated drivers and makes it simple to apply them with a single mouse click.
The interface is also user-friendly. After downloading and starting the software, it’ll check for updates automatically.
For in-depth instructions on how to solve this, check out this guide: How to Fix Ghost Recon Breakpoint Crashing Problems.