When a BSOD error shows up, it is likely that there is a serious issue behind it. That said, there is no reason to panic. In this post, we are going to teach you how to fix the “A problem has been detected and Windows has been shut down” error message. It is likely that the culprit is a faulty HDD, but there are various possible reasons why this problem occurs. Make sure you run through our solutions until you discover the one that works best for you.
How to Fix “A Problem Has Been Detected and Windows Has Been Shut Down…”
Method 1: Checking your HDD
When the Blue Screen of Death appears, it is usually accompanied by an Ntfs.sys error. This is an indicator that there is something wrong with your HDD. It is likely that Windows is unable to access a certain portion of the system partition. In most cases, this is caused by bad sectors in the HDD or corrupted system files.
So, the first solution you should try is to check the condition of your HDD. If you find that the issue cannot be fixed, then you’ll need a replacement. Before we share the instructions, you need to create a Windows installation media. Once you have one, you can proceed to the steps below:
- Plug the Windows installation media into your PC.
- Restart your computer.
- Access the boot menu. Keep in mind that the key for accessing this varies depending on your motherboard. It is best that you check the owner’s manual to get the details.
- Select the Windows installation media.
- Hit Enter to exit the boot menu.
- Boot the Windows installation media by pressing any key.
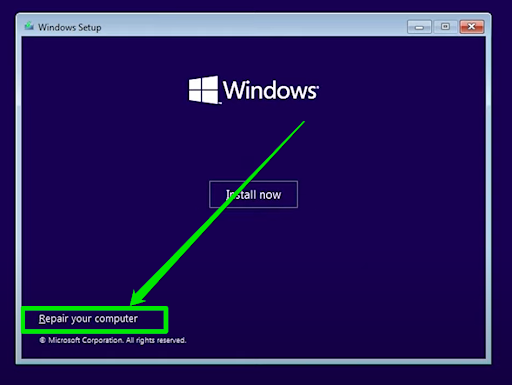
- Go to the bottom-left corner, then select Repair your computer.
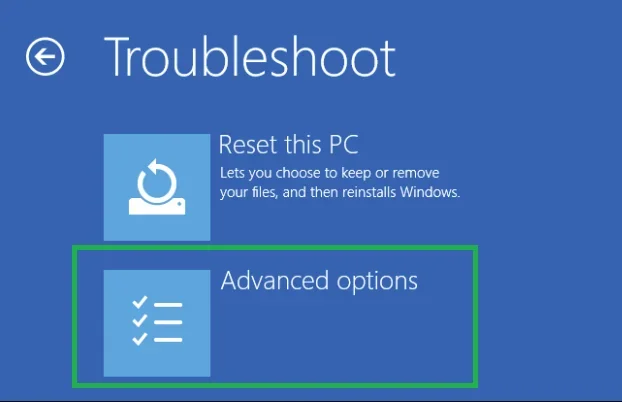
- From the menu, select Troubleshoot, then click Advanced options.
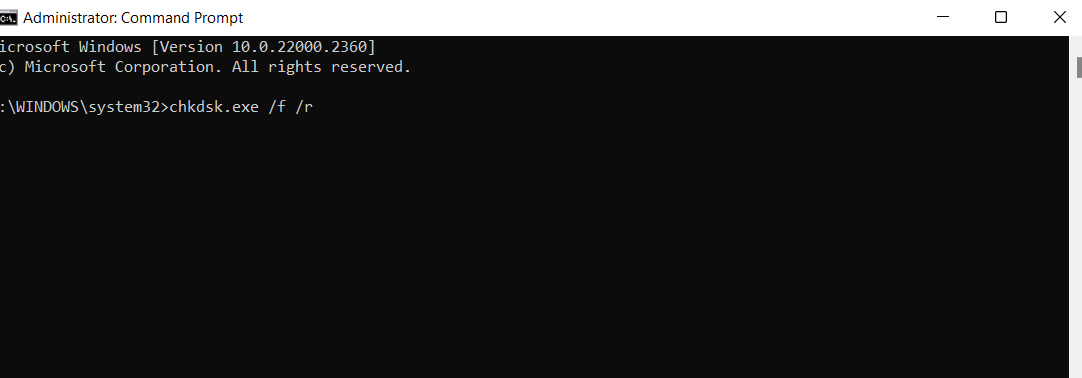
- Now, you need to open Command Prompt.
- Once Command Prompt is up, run the following command:
chkdsk /f C:
- Wait until the process is complete, then restart your computer.
If the BSOD error still appears, then you’ve confirmed that the HDD isn’t the issue. In this case, you should move on to the next solution.
Also read: How to Run Hard Drive Diagnostics on Windows PC?
Method 2: Inspect recently installed hardware
It is worth noting that almost every replaceable component in your computer can force your operating system to shut down to prevent further damage. You should know that when this happens, it does not necessarily mean that a piece of hardware is faulty. After all, you will not be able to boot your PC in the first place if one of the critical components is malfunctioning. So, it is likely that there are compatibility issues rather than defects in your hardware components behind your problem.
If your motherboard does not support the GPU or CPU you installed, your OS will crash. This event will prompt the BSOD error to appear. In this case, what you have to do is check if the CPU or GPU you added is compatible with your motherboard. If it is, then try updating your motherboard and see if this fixes the problem.
Also read: How to Find Your PC’s Windows System Information?
You should also ensure that all the other hardware components are in their proper places. Shut down your computer, then check if the RAM is connected properly. Aside from that, you must check if your power supply unit (PSU) is not malfunctioning and that your PC is not overheating.
Method 3: Updating your drivers
When there are corrupted or outdated drivers on your computer, you will encounter a host of issues, including BSOD errors. In most cases, the issue has something to do with major devices and their corresponding drivers. However, even peripheral devices like printers can cause an operating system to crash.
If you want to learn how to fix the “A problem has been detected and Windows has been shut down” error message, you must learn the ideal method to update your drivers. In this solution, you will need to boot into Safe Mode to access the Device Manager. As an extra step, you need to prevent Windows 10 from installing and updating the drivers automatically. Most of the time, it only finds generic drivers that are not suitable for your devices. Once you’re ready, you can proceed to the steps below:
- Go to Microsoft’s support site, then download the Show or hide updates troubleshooter.
- Restart your computer, then repeatedly press F8 to access the Startup Settings menu.
- Boot your computer in Safe Mode with Networking mode.
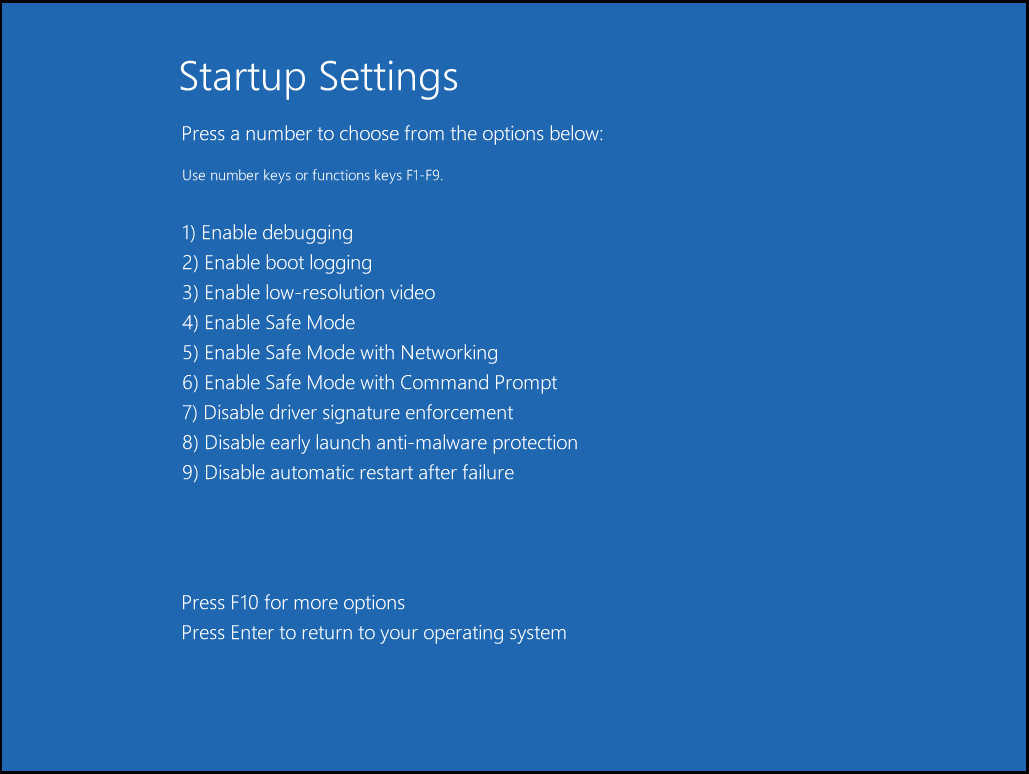
- Open the Device Manager, then update the drivers.
- Now, you need to run the Show or hide updates troubleshooter to keep your operating system from updating your drivers automatically.
- Restart your computer, then check if the error is gone.
Thankfully, there is an easier way to perform this task. With Auslogics Driver Updater, you can ensure that all your drivers will be updated to their latest versions. Moreover, you do not have to worry about compatibility issues because the tool will find the versions that are suitable for your operating system and processor.

Method 4: Resetting Windows 10
If the BSOD error persists even after trying the solutions above, then there must be something wrong with your Windows 10 installation. If it is corrupted, it will cause your PC to crash. To resolve this problem, we suggest that you perform a Windows 10 reset. However, before you opt for this solution, you must know that it will delete all the files from your system. So, it is best that you create a backup first before resorting to this method of resolving the “problem has been detected” issue.
Further reading: Easily Reset Your PC: How to Factory Reset a Windows 10 & 11 Computer
A Problem Has Been Detected and Windows Has Been Shut Down: Solved
In conclusion, a BSOD error can be alarming, but with patience and the right steps, it can be resolved relatively quickly. Check your HDD, inspect hardware, update drivers, or reset Windows 10 to troubleshoot the issue. Remember, systematic troubleshooting is key. If you have more questions, feel free to ask in the comments. Happy computing!
Are there other BSOD errors you’d like us to resolve?
Please do not hesitate to ask your questions in the comments below!


