
Windows Fast Startup helps your computer boot up more quickly by saving the system state when you shut it down. This allows your PC to pick up where it left off, saving time and improving productivity for those who need quick access to their workstations.
However, the fact that your system does not fully shut down can cause problems, such as preventing updates from being installed correctly. So if you are experiencing issues with Windows updates or dual boot, you might want to disable Fast Startup.
Read on as we explain what Fast Startup is, how to turn it off, and the pros and cons to consider before you do so. Let’s begin.
What Is Fast Startup in Windows 10/11?
Fast Startup is a feature in Windows that helps your computer to start up faster after shutting it down. It combines elements of the shutdown and hibernation processes.
This means it doesn’t fully power off your system like a regular shutdown, nor does it save everything like hibernation. Instead, it does a bit of both to speed up the next startup process.
When you turn it back on, everything is just as you left it. Fast Startup only saves important system files like the system kernel and drivers to make the computer start up faster. It does not save your open programs or files.
How Does Windows Fast Startup Actually Work?
When you shut down your PC with Fast Startup enabled, Windows closes all programs and logs off users but doesn’t fully power off the system. Instead, it saves important system components like the system kernel (the core component that provides basic services for all parts of the OS) and drivers in a special file called hiberfil.sys.
This file acts as a snapshot of your system’s core components. When you turn your PC back on, Windows loads the hiberfil.sys file, which saves time because it doesn’t have to start everything from scratch.
| Feature | Fast Startup on | Fast Startup off |
|---|---|---|
| Boot speed | Faster | Normal |
| Dual-boot support | Limited | Fully supported |
| Update processing | Can be delayed | Normal |
| Accessing BIOS/UEFI | Difficult | Easy |
| Shutdown behavior | Hybrid shutdown (hibernation-like) | Full shutdown (complete power off) |
| Power consumption | Lower during boot | Higher during boot |
| Drive integrity checks | Skipped or delayed | Performed normally |
| System stability | Can cause driver issues | More stable |
How Does Fast Startup Affect HDDs and SSDs?
HDDsFast Startup is particularly useful for computers with hard disk drives (HDDs) because it reduces the time needed for the drive to spin up and load Windows. For example, the typical boot time for hard drives without Fast Startup is around 30-60 seconds. You can reduce it to 20-30 seconds by enabling Fast Startup.
SSDs
For solid-state drives (SSDs), the improvement is less noticeable because SSDs already boot quickly due to their use of flash memory, which allows near-instant data access.
That said, it can still shave off a few seconds from the boot time.
For example, solid-state drives usually take 15-20 seconds to boot.
Fast Startup can decrease it to 10-15 seconds.
Here’s a comparison table that outlines how Fast Startup works, specifically in relation to SSDs and HDDs:
| Aspect | How Fast Startup works | SSD | HDD |
|---|---|---|---|
| Mechanism | Combines a hybrid shutdown and hibernation process to save the system state. | Saves kernel sessions and drivers to hiberfil.sys. On boot, reads from the file for a faster startup. | Similar process, but slower due to slower read/write speeds of HDDs. |
| Boot process | Uses a partial hibernation file to speed up boot without fully shutting down. | Since SSDs are fast, the reduced boot time is already noticeable without further optimization. | SSDs perform better here as the HDDs take longer to read from the hibernation file. |
| Speed | Faster startup since the system doesn’t fully shut down. | Extremely fast boot times due to high read/write speeds of SSDs. | Slower boot times due to slower read/write speeds of HDDs, even with Fast Startup. |
| Durability | No major impact on physical durability, as normal operations (like pagefile usage) cause more wear than Fast Startup. | Minor additional wear due to writing system states to hiberfil.sys on every shutdown. However, modern SSDs have high endurance, so this isn’t a real concern. | Less wear during startup since Fast Startup reduces the number of disk reads/writes compared to a full boot. |
| Efficiency | More energy-efficient as the system doesn’t completely shut down. | High efficiency due to quick access and low power consumption. | Less efficient than SSDs due to slower access times and higher power consumption. |
Why Disable Fast Startup on Windows 10/11?
There’s a good reason to disable the Fast Startup feature for SSD users, whether on Windows 10 or 11, since it doesn’t significantly affect them. But why should HDD users turn off this feature when it helps load their OS faster? There are several reasons why you might want to consider disabling Fast Startup either on your hard disk drive or solid-state drive.
Let’s go through them:

Windows updates often need a full restart to complete their installation. Fast Startup may prevent some updates that require a full restart to complete properly because the system state is not fully reset.
Disabling the feature can help solve Windows Update errors, especially those related to system file conflicts or issues with the update process, like the error 0x80070002 or 0x80070003.

When you shut down with Fast Startup enabled, Windows locks the disk, preventing other operating systems from accessing the drive. As a result, if you have a dual-boot system , you may face issues when trying to access the Windows partition from the other operating system.
Turning off Fast Startup allows the system to perform a complete shutdown, which clears the system state and allows other operating systems to properly access the drive without any conflicts.

Fast Startup can cause problems for disk encryption methods, like BitLocker , which are used to protect sensitive data on your hard drive. Since the system doesn’t fully shut down, the encrypted disk may not be unlocked properly when you start the computer again.
As a result, you might face difficulties accessing the encrypted data, as the system is still in a hybrid state. In extreme cases, the system might ask you to enter a recovery key to access the system.

When Fast Startup is enabled, it may be difficult to access the BIOS settings, as the system skips over the complete shutdown and restart process.
Disabling Fast Startup forces the computer to perform a full reboot, ensuring that the BIOS settings are loaded properly, and you can access them without issues.
This is particularly useful when you need to change boot order , update firmware, or troubleshoot hardware problems.

IT professionals may run into problems because the Fast Startup doesn’t fully reset the system’s uptime when the computer shuts down. The system’s kernel is saved when the feature is enabled.
As a result, when the computer starts up again, it doesn’t fully restart, and the uptime continues from the previous session. This can make it harder to diagnose performance issues or slow system problems.
To get an accurate picture of how long the system has really been running since the last shutdown, you might want to turn off Fast Startup .
How to Disable Fast Startup On Windows 10/11
Method 1: Using the Control Panel
One of the simplest methods to disable Fast Startup is to use the Control Panel . Let’s go through how it works:
- Press
Win + Rto open the Run dialog, type control , and hitEnter.

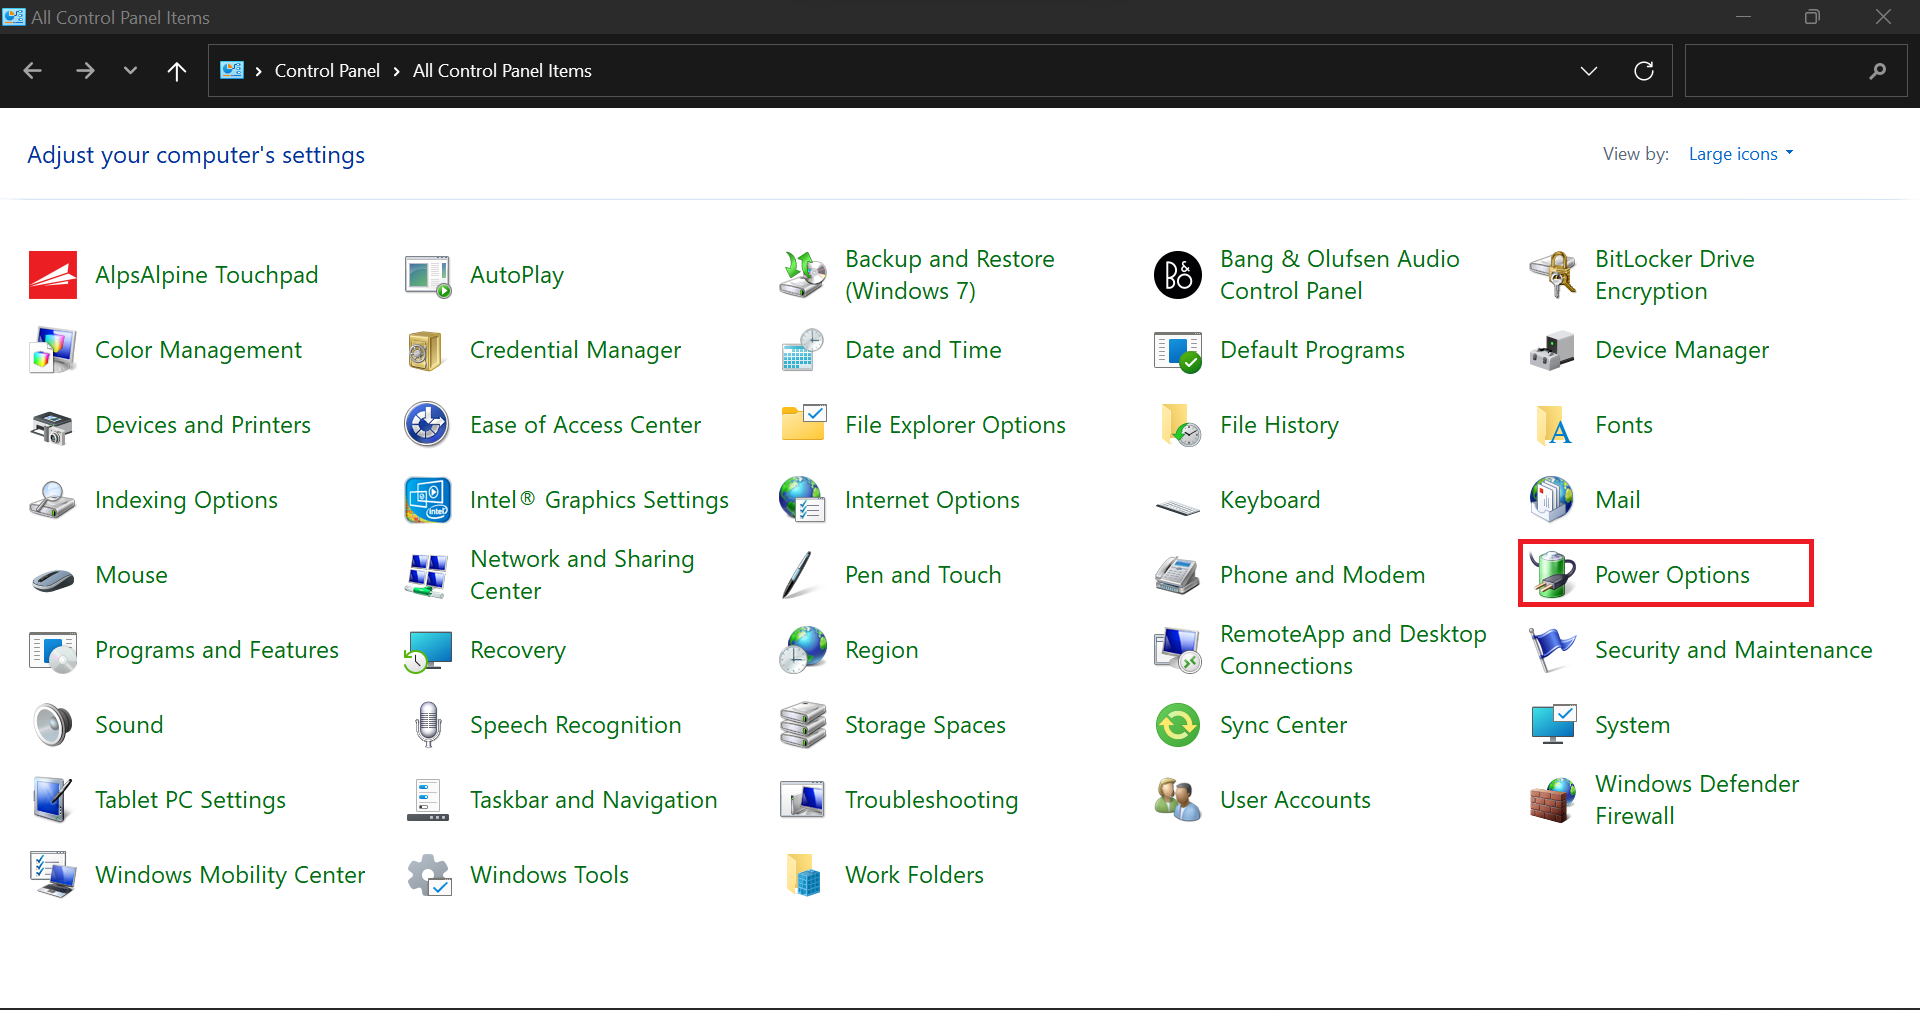
- In the Control Panel, go to Power Options.
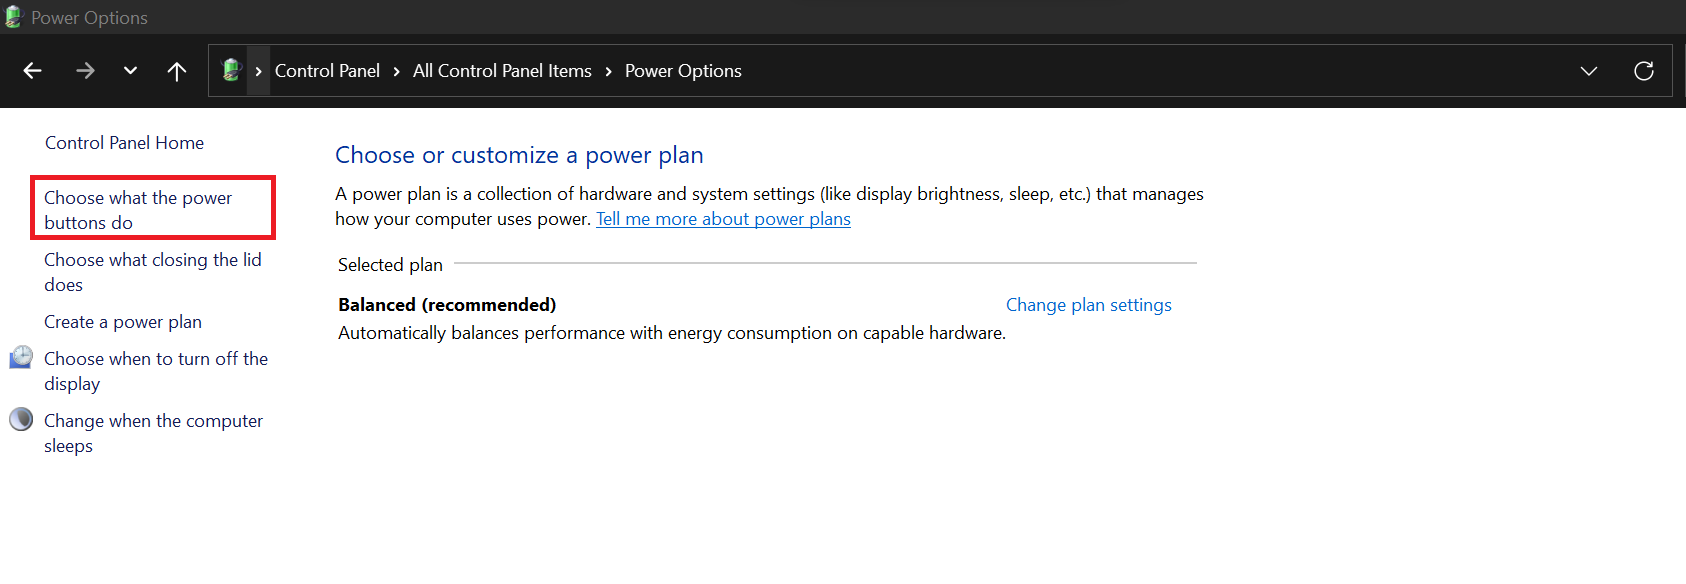
- On the left-hand side, click on Choose what the power buttons do .
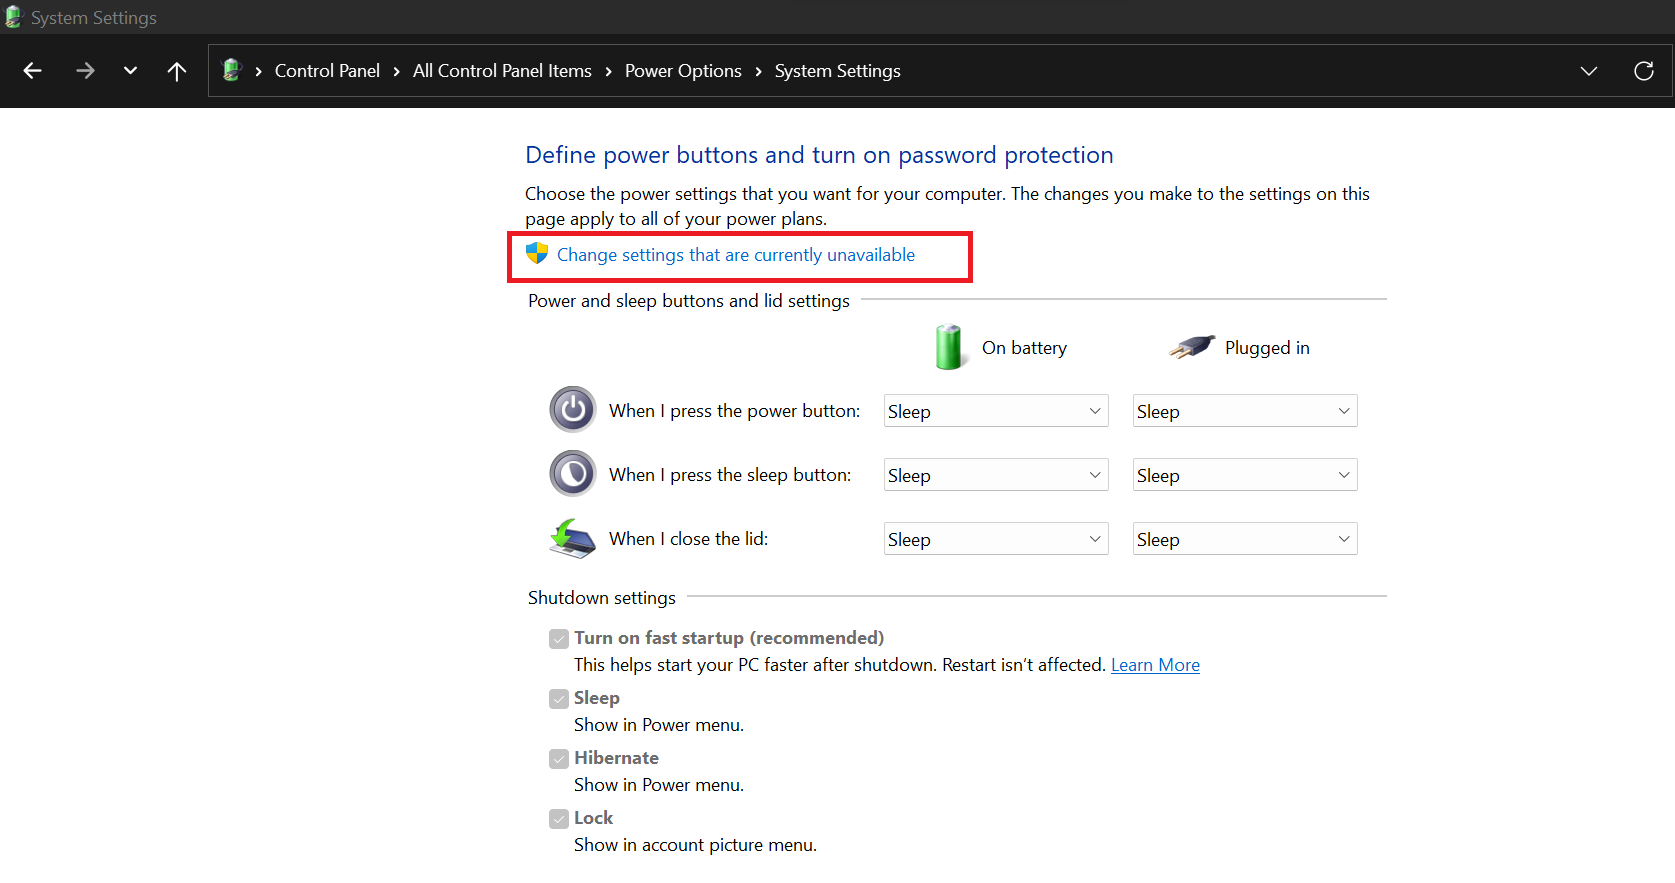
- Click on the blue link at the top that says Change settings that are currently unavailable .
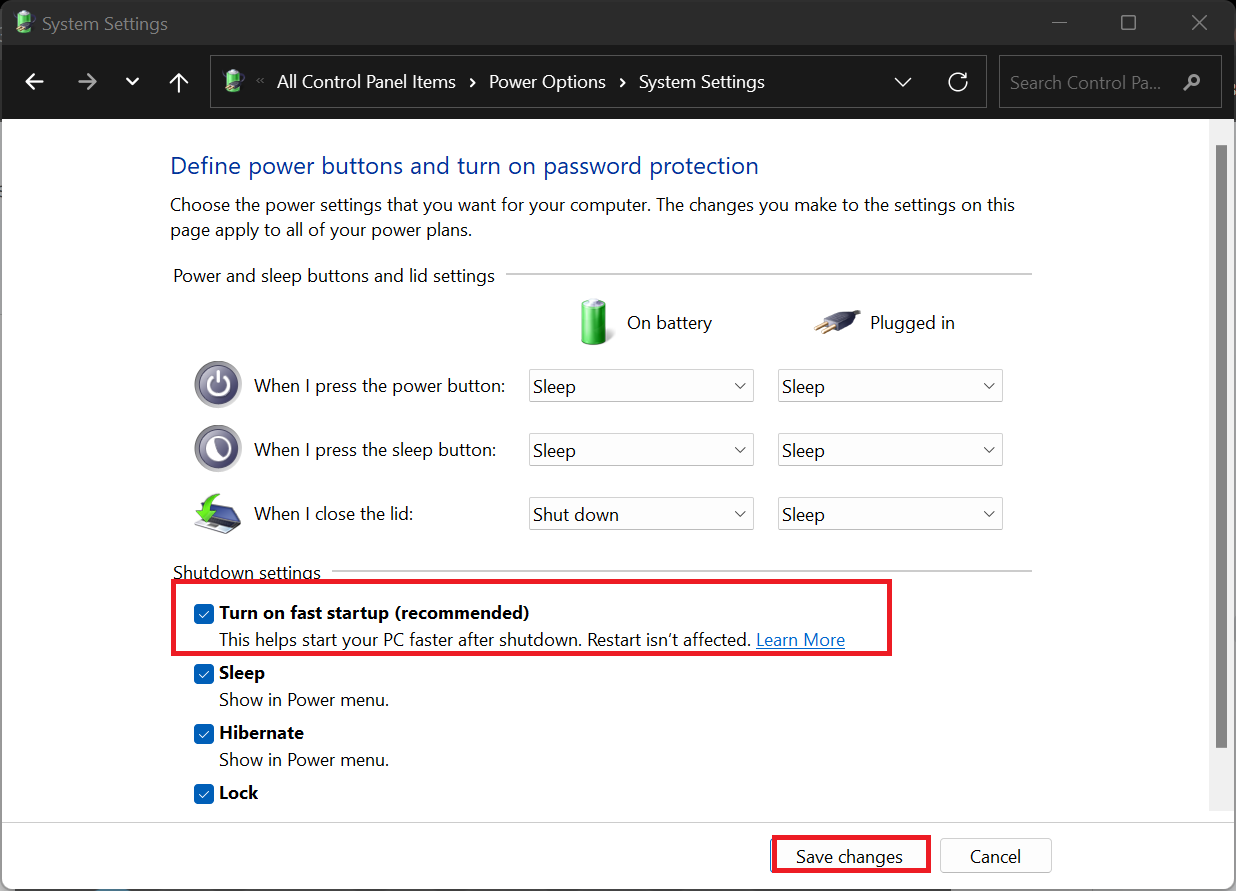
- Scroll down to the Shutdown settings section. Uncheck the box next to Turn on fast startup (recommended) .
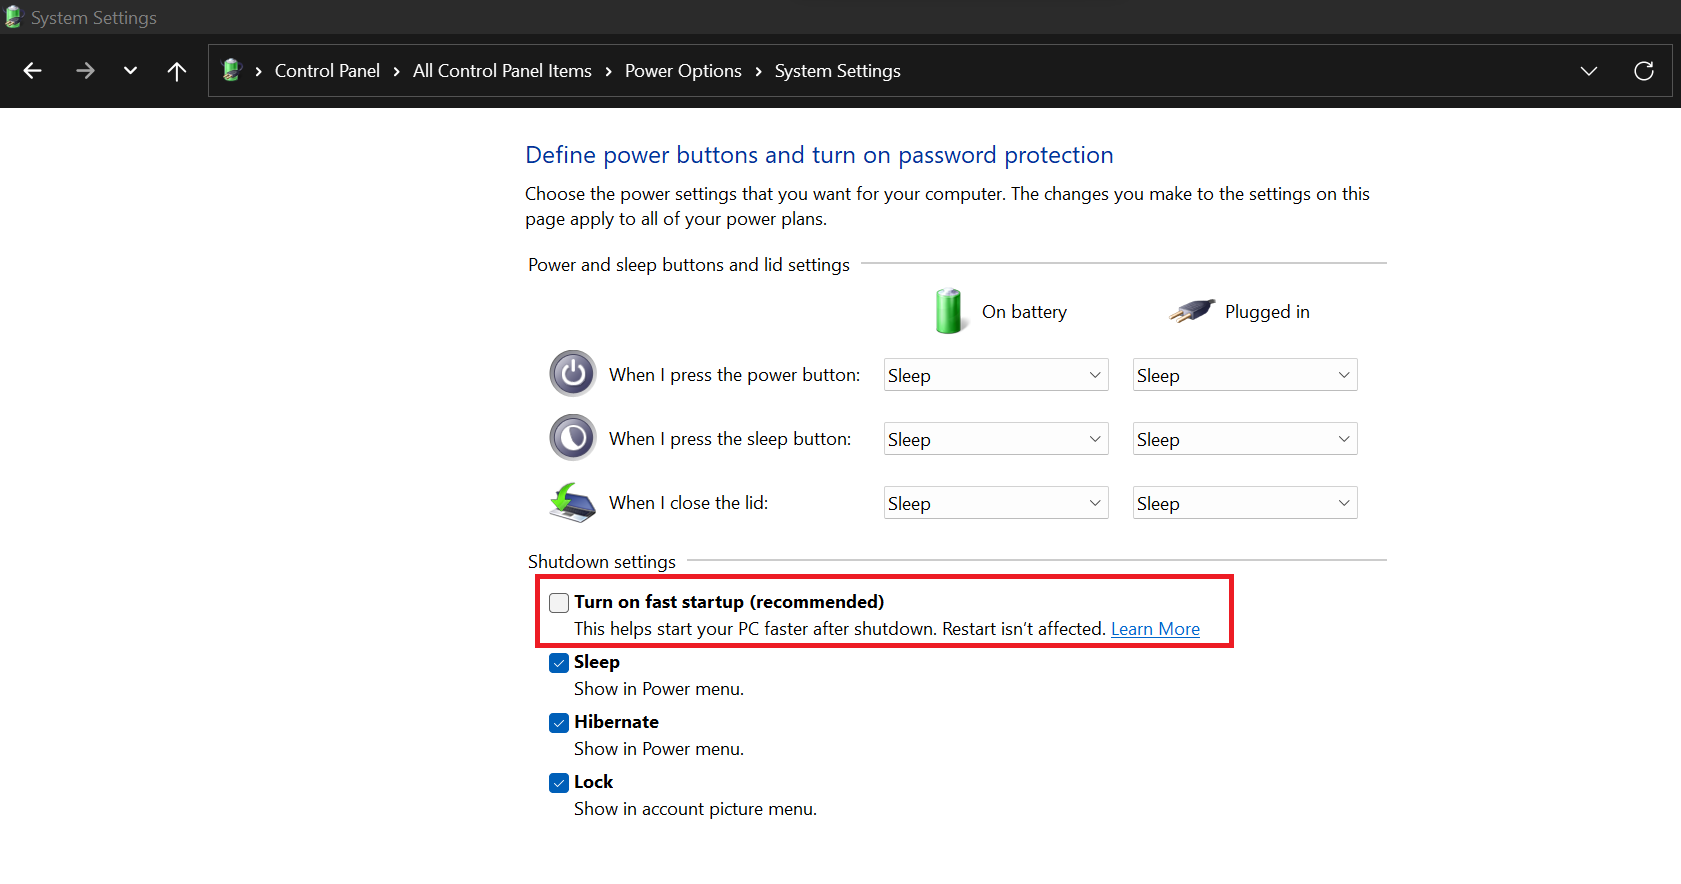
- Click Save changes to conclude the process.
How to re-enable Fast Startup using the Control PanelIf you change your mind, you can reactivate Fast Startup by following these steps:
- In the Control Panel, go to Power Option s > Choose what the power buttons do .
- Click on Change settings that are currently unavailable .
- Check the box next to Turn on fast startup (recommended).
- Click Save changes to finish.
Method 2: Using the Command Prompt
If you’re comfortable using the Command Prompt , follow the steps below. If not, proceed with the other methods:
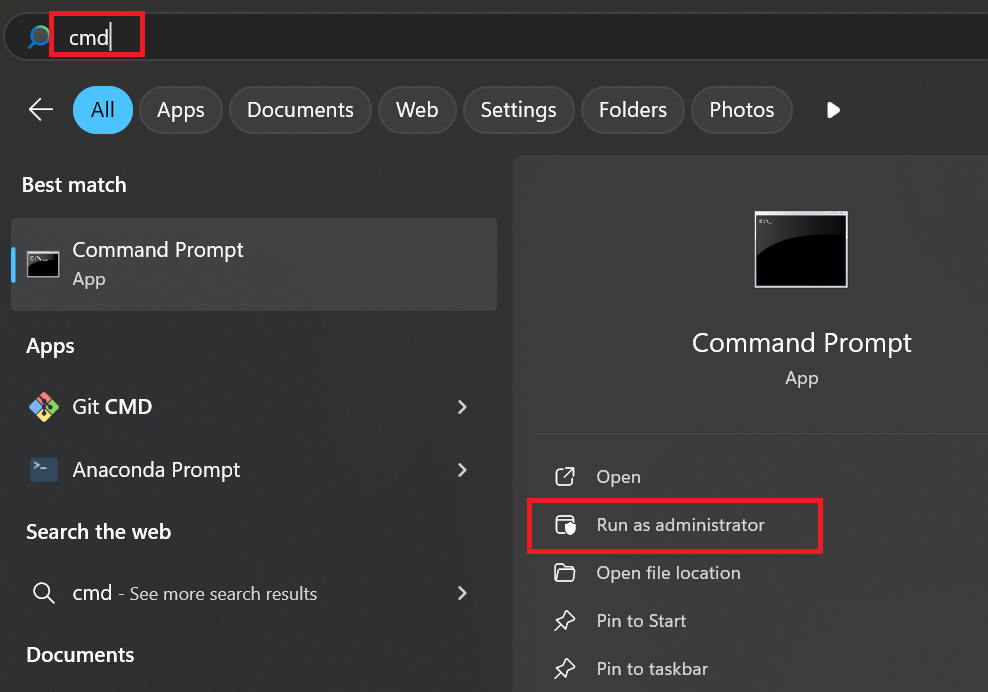
- Type cmd into your search bar and select the Run as administrator option under Command Prompt.
- Enter the following command and press
Enterto disable Fast Startup:
powercfg -h off

After running the command, restart your PC to apply the changes. This command will disable Fast Startup on Windows 10 and 11 , including the Hibernate feature.
How to re-enable Fast Startup using the Command Prompt
- Open the Command Prompt as an administrator, type the following command, and press
Enter:
powercfg -h on

- Once the command runs, it will reactivate hibernation and Fast Startup. Restart your computer to apply the changes.
Method 3: Using the Registry Editor
This method allows you to turn off Fast Startup directly through the registry. It’s more advanced and should be done carefully. In fact, if you have no experience with the Windows registry , skip this method.
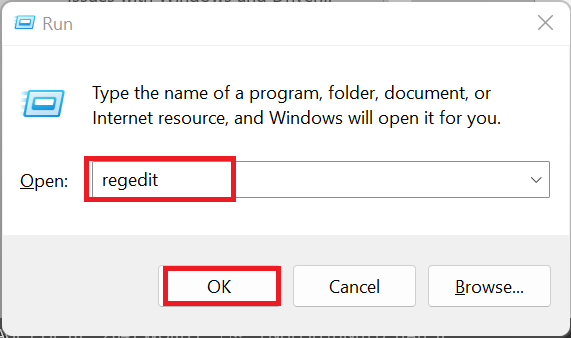
- Press
Win + R, type regedit , and pressEnter. This will open the Registry Editor.
- Navigate to the power settings by pasting this path in the address bar:
HKEY_LOCAL_MACHINE\SYSTEM\CurrentControlSet\Control\Session Manager\Power
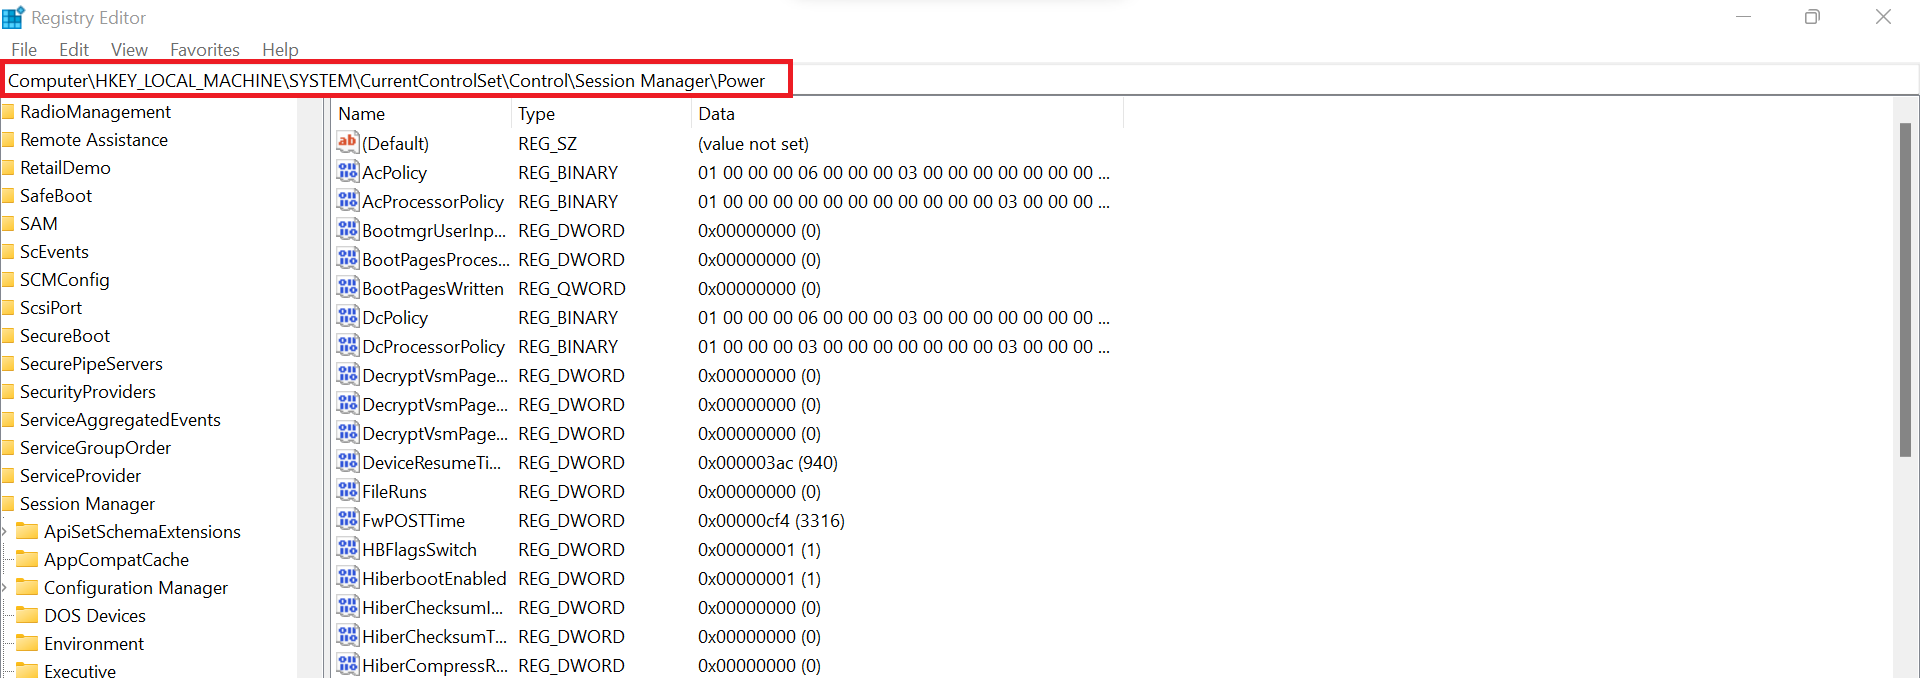
- Double-click on HiberbootEnabled on the right side.
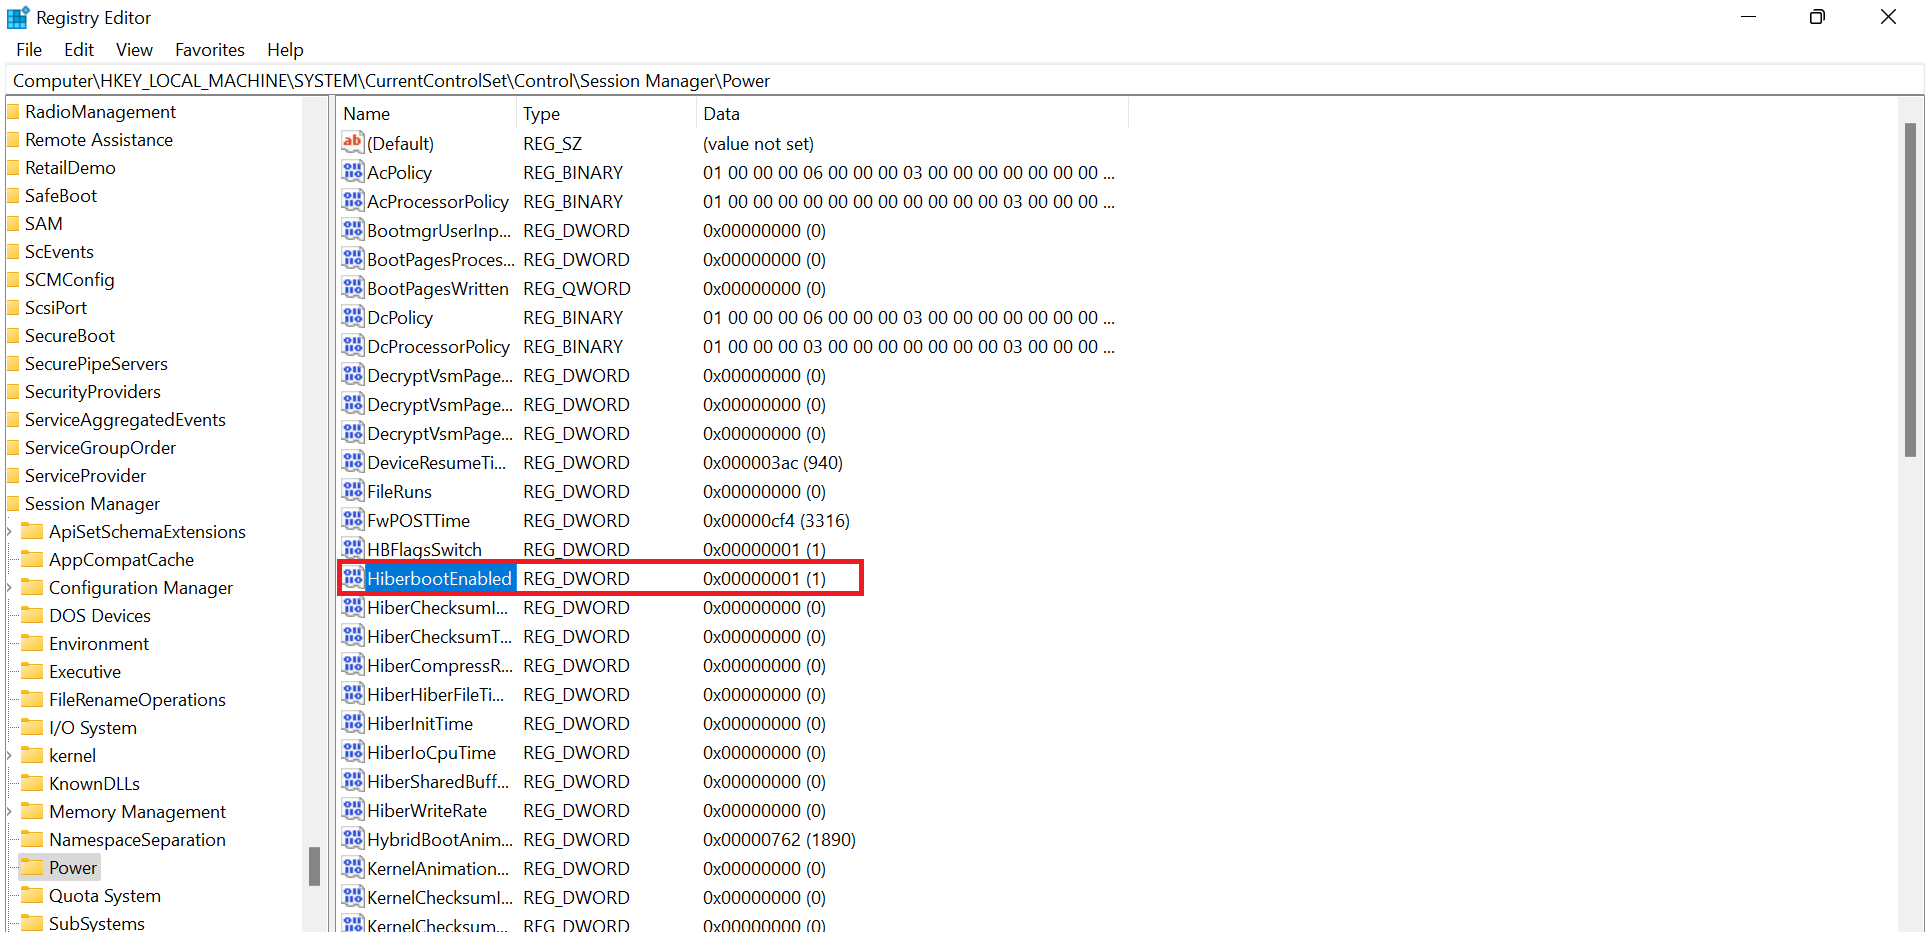
- Change its Value data to 0 (this disables Fast Startup).
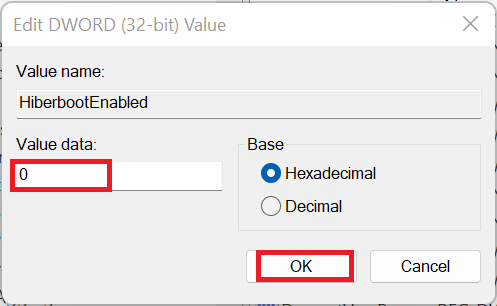
- Click OK and close the Registry Editor. Restart your computer to apply the changes.
How to re-enable Fast Startup using the Registry Editor If you decide you need Fast Startup after turning it off, here’s how to turn it back on:
- Open the Registry Editor.
- Copy and paste the following path into the address bar and press
Enter:
HKEY_LOCAL_MACHINE\SYSTEM\CurrentControlSet\Control\Session Manager\Power
- Find the entry named HiberbootEnabled in the right-hand pane.
- Double-click it and change its Value data to 1 .
- Click OK to save the changes. Close the Registry Editor and restart your computer to apply the changes.
Pros and Cons of Fast Startup
Finally, if you are not sure whether to enable or disable Fast Startup, here are some reasons to consider for either option:
| Reasons to keep Fast Startup enabled (-) | Reasons to disable Fast Startup (+) |
|---|---|
| Faster boot times. Your computer starts up more quickly by saving the system state. It also helps resume work faster by retaining cached data.
In the case of HDDs, disabling Fast Startup may significantly decrease boot time. |
Ensures a full shutdown. Disabling Fast Startup prevents Windows from hibernating kernel processes, ensuring a fresh start. |
| Power efficiency. Since the system doesn’t fully shut down, it uses less power when booting up again. The opposite is true when Fast Startup is disabled. | Prevents drive locking issues. Useful for dual-boot setups (Linux/Windows) and external drive access. |
| Convenient for most users. Reduces waiting time, especially on older HDDs. Ideal for users who frequently turn their PC on and off throughout the day. If your system is running fine, there’s little reason to disable it. | Fixes driver and update issues. Ensures drivers and updates are fully applied after a shutdown, which improves overall system health and stability. |
| Hibernate still works. If you use Hibernate mode, Fast Startup complements it.Turning off Fast Startup will disable the Hibernate feature. | Resolves power & sleep bugs. Helps fix shutdown-related issues, like the PC not turning off completely. |
| Works well on HDDs. Since SSDs are already fast, Fast Startup provides minimal extra benefit. However, for HDDs, it can significantly reduce loading time. | Better for troubleshooting. A full shutdown helps resolve software conflicts or system errors. |
So Should You Disable Windows Fast Startup?
Deciding whether to turn off Windows Fast Startup depends on what you need. Turning it off can help fix problems with some hardware or software, especially if you use more than one operating system on your computer.
It can also help solve certain system issues by making sure your computer fully shuts down. However, it might make your computer take longer to start up, especially if you have an HDD. If you have an SSD, you might not notice much difference.
In the end, if you want your computer to start up quickly, keep Fast Startup on. But if you have compatibility issues or need to troubleshoot, turning it off might be better.
Feel free to share your thoughts or experiences in the comments.