![[FIXED] “BlueStacks Can’t Connect to the Internet” Error](https://www.auslogics.com/en/articles/wp-content/uploads/2023/12/FIXED-BlueStacks-Cant-Connect-to-the-Internet-Error-568x359.png)
- What is the “BlueStacks Failed to Connect to the Server” Error?
- How to Fix the BlueStacks Can’t Connect to the Internet Error
- Fix 1: Check your Internet connection
- Fix 2: Switch to a wired connection
- Fix 3: Disable network apps running in the background
- Fix 4: Update Your Network Adapter Drivers
- Fix 5: Disable your proxy
- Fix 6: Disable your VPN
- Fix 7: Temporarily disable your antivirus solution
- Fix 8: Configure your DNS settings
- Fix 9: Obtain an IP address automatically
- Fix 10: Configure the app’s permissions
- Fix 11: Clear BlueStacks cache and data
- Fix 12: Adjust BlueStacks graphics engine settings
- Fix 13: Check for BlueStacks updates
- Fix 14: Reset network settings on your computer
- Fix 15: Ensure compatibility mode is set correctly
- Fix 16: Reinstall BlueStacks
- Fix 17: Perform a Clean Boot
- Conclusion
- FAQ
Encountering connectivity issues with BlueStacks can disrupt your app experience. This guide addresses the “Can’t connect to the Internet” error.Our guide is designed to help you swiftly troubleshoot and resolve BlueStacks not working on your PC. Whether it’s related to network settings, software conflicts, or other technical glitches, these methods aim to restore your access to online features in the emulator.
What is the “BlueStacks Failed to Connect to the Server” Error?
Cross-platform technology has made it even this far: thanks to BlueStacks, you can now easily run Android apps on your Windows 10 computer – which is by all means awesome, if you ask us. That said, unfortunately, BlueStacks App Player is not resistant to trouble, and since you are here, the chances are certain issues have come into play and brought about a drama known as the BlueStacks error “Failed to load channels. Unable to connect to the Internet.” The “BlueStacks failed to connect to the server” error can occur due to several reasons, often related to network issues or application-specific problems. Here are some of the possible causes:
- The most common cause is unstable or no internet connectivity. If your network connection is weak, intermittent, or down, BlueStacks may struggle to connect to its servers.
- Sometimes, the firewall or antivirus software on your computer can block BlueStacks from accessing the Internet. These security programs might mistakenly identify BlueStacks as a threat and prevent it from connecting to its servers.
Also read: What if Windows Firewall Can’t Recognize a Domain Network in Windows 10?
- Using an outdated version of BlueStacks can lead to compatibility issues and connection errors. The server might not respond if your application version is no longer supported.
- Occasionally, the servers of BlueStacks itself might be down for maintenance or experiencing technical difficulties, leading to connection issues.
- If you’re using a VPN or proxy, it might interfere with BlueStacks’ ability to connect to its servers, especially if these services are not configured correctly.
Also read: Why Do You Need a VPN for Gaming?
- Sometimes, the installation files of BlueStacks can get corrupted, or the app data might be compromised, leading to various errors including connection issues.
Also read: How to Find and Fix Corrupted Files in Windows 10?
Although that is a pretty discouraging experience, there is no need to despair whatsoever: if you are looking for the easiest way to fix BlueStacks not connecting to the Internet , you can easily get your BlueStacks back on track in Windows 10.
How to Fix the BlueStacks Can’t Connect to the Internet Error
So, now is the time to troubleshoot your problematic BlueStacks.
Fix 1: Check your Internet connection
If BlueStacks is acting up, there is a chance you are having connection issues. To check whether that is your case, see if you can actually access websites on your computer.
- When troubleshooting BlueStack issues, you may find it helpful to restart your internet connection:
- Navigate to the bottom-right corner of your screen and right-click on the network icon.
- Select the Network & Internet settings option. Then click Change adapter options.
- In the Network Connections window, locate your connection.
- Right-click it and select Disable.
- Wait a few seconds. Then right-click your connection again and click Enable.
If there is no luck, you can troubleshoot your connection problems with the built-in Windows network troubleshooter. To run it, use these instructions:
- Launch the Search app by pressing the
Windows key + Sshortcut on our keyboard. - Type Network troubleshooter into the Search bar and hit Enter.
- Select Identify and repair network problems from the list of results.
- Please be patient – the troubleshooting might take a while.
Related: Why Is My Internet Not Working? Pro Tips for a Quick Fix
Fix 2: Switch to a wired connection
Some users report that switching to a wired connection is an easy way to get rid of the BlueStacks issue. Try doing so and then see if that has resolved your problem.
Fix 3: Disable network apps running in the background
It is important to make sure that there are no network apps running in the background of your system – if there are some, they might be hogging the resources needed by BlueStacks, thus causing the error that has brought you here.
Related: How to Stop Apps from Running in the Background on Windows 10 PC?
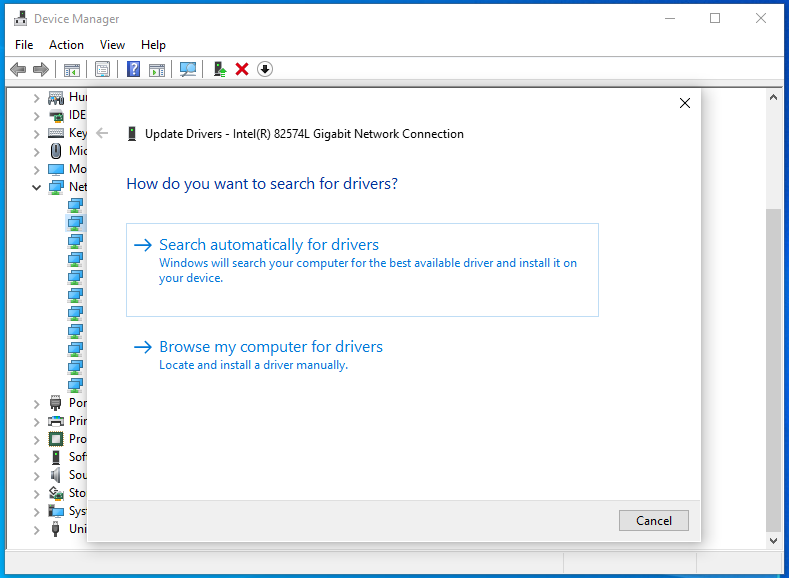
Fix 4: Update Your Network Adapter Drivers
Antiquated drivers are destructive by nature, so make sure the driver software you are using is up to date. To begin with, you should update your network adapter drivers – this trick may make your BlueStacks issue a thing of the past. For this purpose, you can go to the official website of your network adapter manufacturer and download the necessary software from there. Another method to update your network adapter drivers is to use Device Manager:
- Go to your taskbar.
- Right-click on the Windows logo icon.
- Select Device Manager from the menu.
- Move to your network adapter.
- Right-click on it.
- Click “Update driver.”
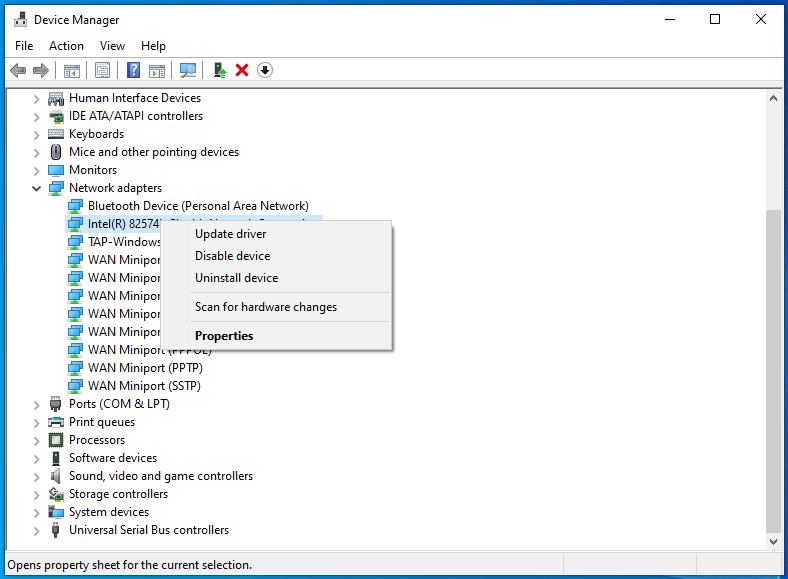
- Select “Search automatically for updated driver software.”
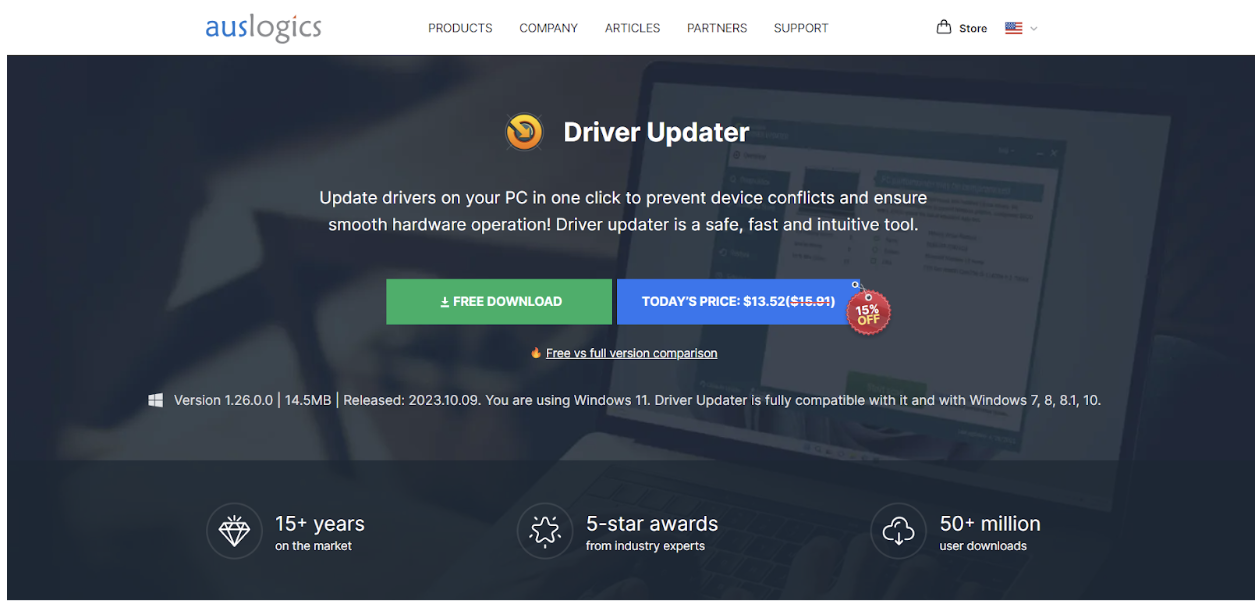
Obviously, the easiest method on this list implies automating the process. You can do that by using the intuitive Auslogics Driver Updater tool – you will get all your driver issues fixed in just one click.
Also Read: [EASY GUIDE] How to Update Device Drivers on a Windows 10 PC?
Fix 5: Disable your proxy
If the BlueStacks issue persists, you might need to disable your
proxy. Here is how you can do that:
- Press the
Windows key + Ikey simultaneously to invoke the Settings app. - Once it is up, go to the Network & Internet section.
- Move to the left-pane menu and select Proxy.
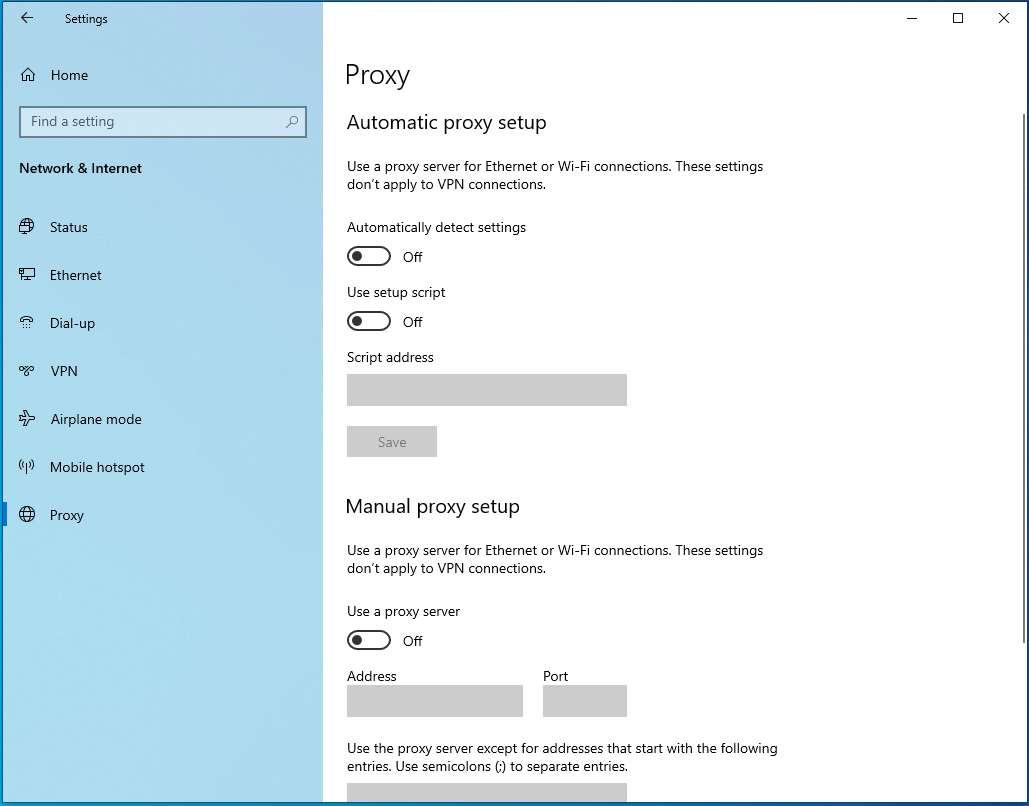
- Toggle your proxy settings to off in the right pane.
Now see if your problem is no more.
Fix 6: Disable your VPN
Another reportedly effective method to circumvent the BlueStacks trouble is by disabling your VPN connection. These are the steps you should take:
- Open your Settings app by pressing the
Windows key + Ishortcut. - Enter the
Network & Internetsection.
- Navigate to the left pane and move down to VPN. Click on this option.
- In the right pane, locate your VPN connection.
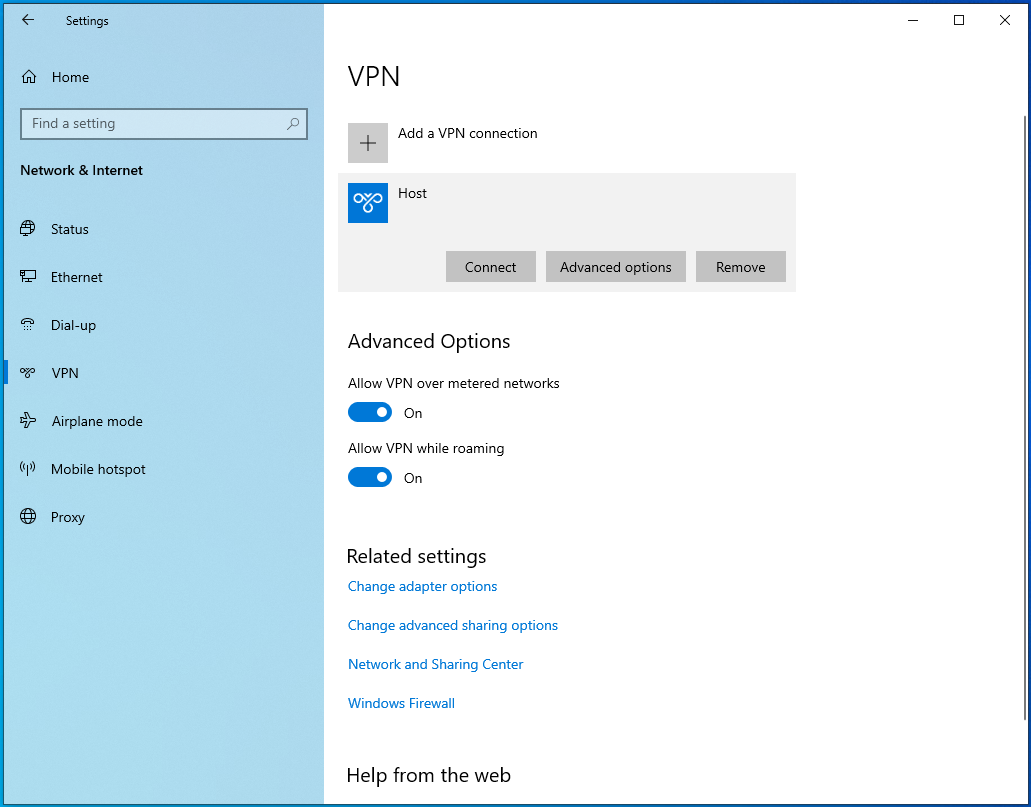
- Click on it and then click the Remove button.
- After doing that, see whether your issue is still here.
Windows 10/11 (8, 7, Vista, XP)
Related: Ultimate Guide: How to Fix Wi-Fi Not Working With a VPN?
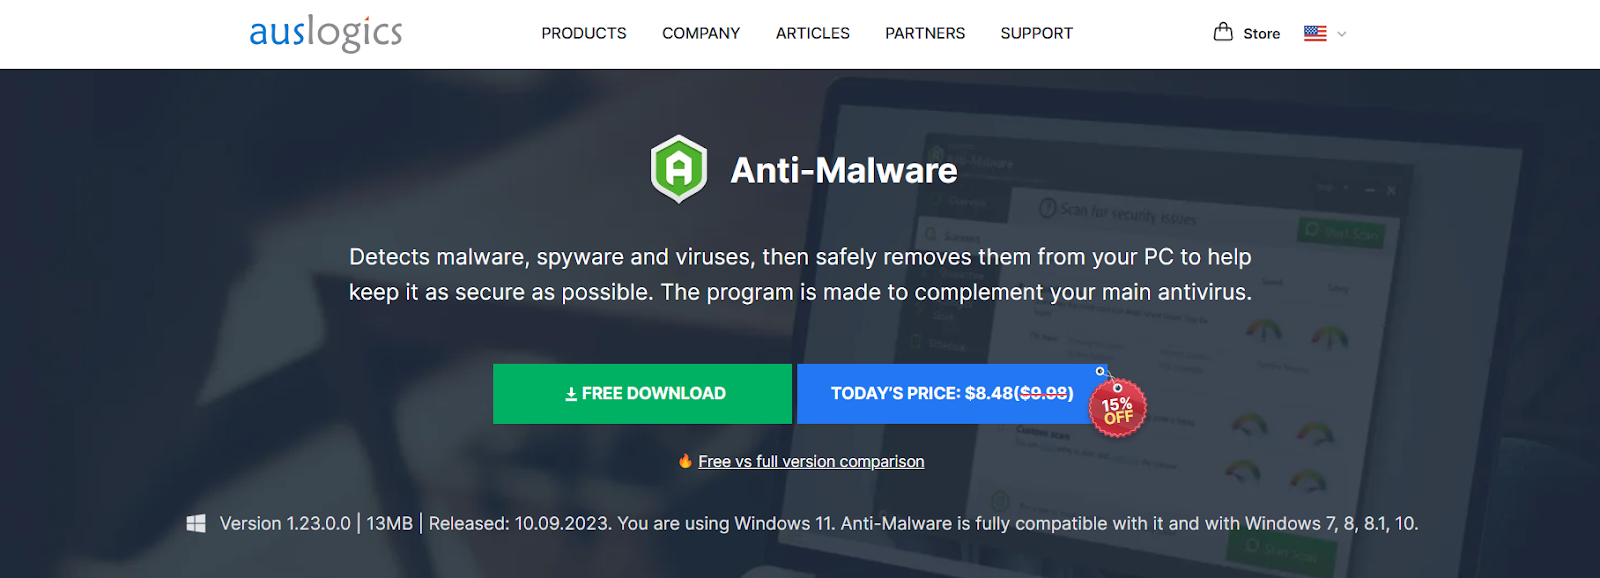
Fix 7: Temporarily disable your antivirus solution
The BlueStacks app can sometimes conflict with certain antivirus products. If you suspect this is the case, a good first step is to temporarily disable your antivirus software to see if it resolves the issue. If you find that your antivirus is indeed causing conflicts with BlueStacks, try adjusting its settings to create an exception for BlueStacks. This adjustment often resolves the conflict without compromising your security. However, if the problem persists and your antivirus software continues to interfere with BlueStacks, it may be necessary to consider alternative security solutions. In such scenarios, we recommend Auslogics Anti-Malware, which is fully compatible with Windows and known for its compatibility with a wide range of software. This robust solution offers effective protection against malware without causing conflicts with other applications like BlueStacks.
Fix 8: Configure your DNS settings
And here is another reportedly effective method that has helped some users eliminate BlueStacks problems. Just change your
DNS settings to get your BlueStacks up and running:
- Move to the bottom-right corner of your screen.
- Locate the network icon and right-click on it.
- Select Network & Internet settings.
- Proceed to Change adapter options.
- Once the Network Connections window is up, locate your network connection.
- Right-click on it and select Properties.
- Select Internet Protocol Version 4 (TCP/IPv4) and click Properties.
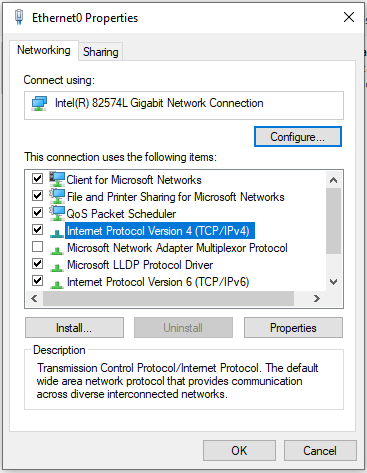
- Select the “‘Use the following DNS server addresses”’ option.
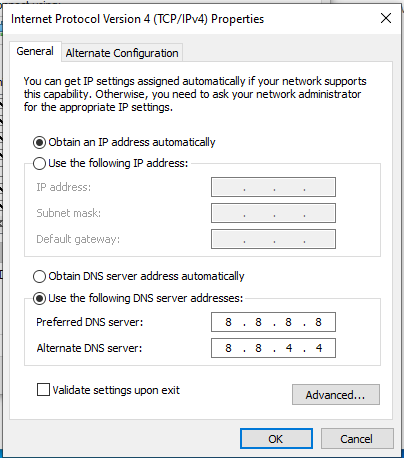
- Go to the Preferred DNS server section and enter 8.8.8.8.
- Move to the Alternate DNS server section and input 8.8.4.4.
Finally, click OK to save the changes you have made. Now see if they have helped you with your problem.
Also read: Simple Guide: How to View and Clear DNS Cache on Windows 10/11?
Fix 9: Obtain an IP address automatically
Your BlueStacks app needs this option enabled to run smoothly, so do the following:
- Use the instructions from the previous fix to access the Internet Protocol Version 4 (TCP/IPv4) properties.
- Select the option that states “Obtain an IP address automatically.”
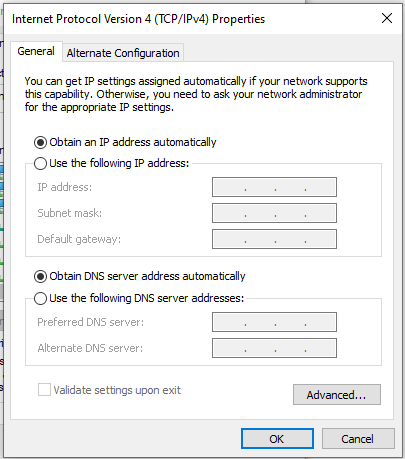
- Click OK to save the changes. BlueStacks is supposed to work now.
Fix 10: Configure the app’s permissions
The point is, BlueStacks might not have enough privileges to work the way it is supposed to. Here is your course of action in such a scenario:
- Go to the BlueStacks installation directory.
- Right-click it and select Properties.
- Navigate to the Security tab. Click Edit.
- Go to Group or user names. Select your user name.
- Navigate to the Permissions section below.
- In the Allow column, select the Full control option.
- Click Apply and OK for the changes to take effect. Then check if your BlueStacks nuisance has been eliminated.
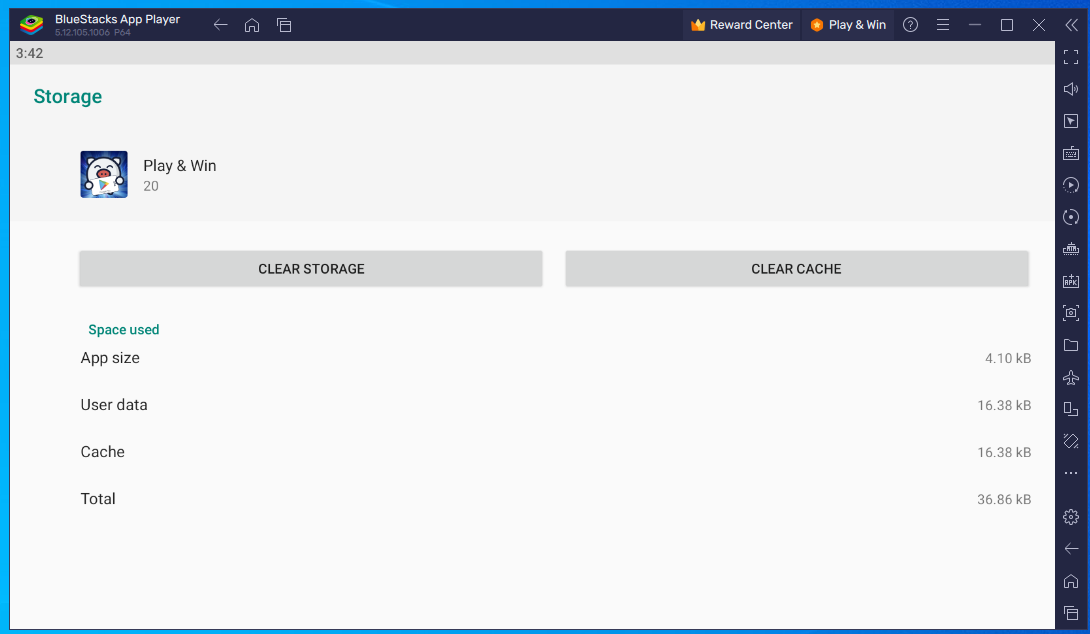
Fix 11: Clear BlueStacks cache and data
Over time, cache and data build-up can cause performance issues in BlueStacks. To clear the cache:
- Open BlueStacks, open the System apps folder and select Settings.
- Navigate to the Apps section.

- Select BlueStacks App Player, click on Storage and then choose Clear Data and Clear Cache.
Also read: How to Delete Temporary Files from Windows 10 PCs
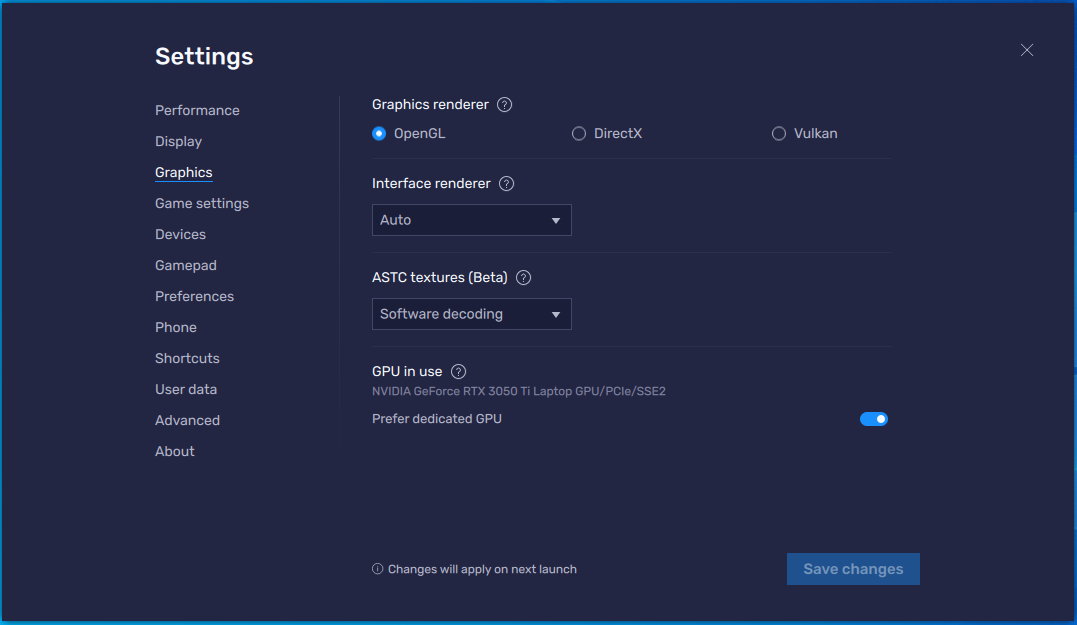
Fix 12: Adjust BlueStacks graphics engine settings
Sometimes, adjusting the graphics engine settings can resolve connection issues.
- Open BlueStacks settings.
- Go to the Graphics tab.
- Experiment with different graphics modes ( OpenGL or DirectX) and CPU/ RAM allocation to see if it improves connectivity.
Fix 13: Check for BlueStacks updates
Using an outdated version of BlueStacks can lead to connectivity and performance issues. Check for any available updates for BlueStacks and install them.
Also read: How to Keep Your Software Up to Date
Fix 14: Reset network settings on your computer
Issues with your computer’s network settings can affect BlueStacks. Resetting them might help: Open Command Prompt as an administrator and run the commands netsh winsock reset, netsh int ip reset, followed by a restart of your computer.
Fix 15: Ensure compatibility mode is set correctly
Sometimes setting BlueStacks to run in compatibility mode for a different version of Windows can resolve issues:
- Right-click on the BlueStacks shortcut, select Properties.
- Go to the Compatibility tab.
- Select a different compatibility mode.
Fix 16: Reinstall BlueStacks
Although that might seem the nuclear option, it might be your only way out. Follow our guide on how to uninstall an app
and remove its leftovers from your PC.
Then install BlueStacks from scratch. We hope this will resolve all your problems with this app.
Fix 17: Perform a Clean Boot
If all your efforts in troubleshooting the BlueStacks error “Failed to load channels. Unable to connect to the Internet” have yielded no results, there might be a software conflict behind the trouble. To trace it, you should perform a clean boot, which is an extremely helpful procedure, though it might seem no easy task:
- Press the
Windows key + Rkeyboard shortcut to open the Run app. - Type
msconfiginto the Run bar and press Enter or click the OK button.
- In the System Configuration window, locate the Services tab and navigate to it.
- Go to the Hide all Microsoft services option and check it.
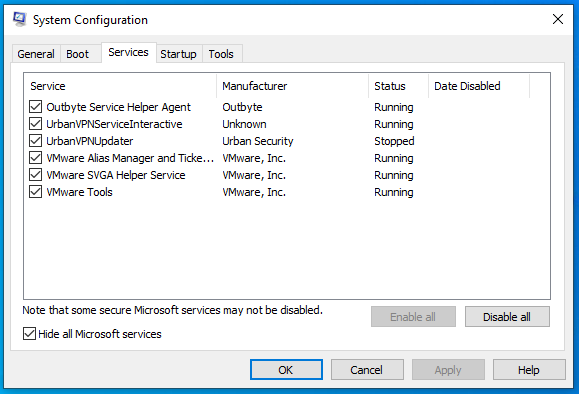
- Then click Disable all.
- Now go to the Startup tab. There locate and click the Open Task Manager link.
- Disable all the apps on the list. To do that, right-click each of them and select Disable.
- Return to System Configuration. To save the changes you have made, click Apply and OK.
- To clean boot your OS, restart your PC. Then see if your BlueStacks issue is present. If it is not, the culprit is among the disabled apps and services. You should enable them one by one to find out what causes your BlueStacks app to play up.
Windows 10/11 (8, 7, Vista, XP)
Conclusion
Encountering the “Can’t connect to the Internet” error in BlueStacks can be frustrating, but it’s often resolvable with a systematic approach. The fixes range from simple checks like verifying your internet connection and disabling network apps running in the background, to more technical solutions such as updating network adapter drivers, configuring DNS settings, and adjusting BlueStacks’ own engine settings. It’s crucial to remember that while some solutions may require a bit more technical expertise, patience and careful application of these troubleshooting steps can effectively resolve the issue.