- What Does Formatting a Hard Drive Do?
- Different Types of Formatting
- When to Format a Hard Drive in Windows
- How to Prepare for Formatting a Hard Drive
- How to Format a New Hard Drive
- How to Format a Primary Drive (C:)
- How to Format External and Non-Primary Internal Drives
- How to Format a Hard Drive: The Summary
- Alternatives to Formatting
- Common Issues During Hard Drive Formatting and How to Fix Them
- How to Format a Hard Drive Safely on Windows: Explained
- FAQ
Although it may seem like a tough decision, formatting a hard drive is sometimes unavoidable. And this article is here to guide you through what formatting is, why it may be necessary, and how to do it safely—without any regrets. Keep reading.
What Does Formatting a Hard Drive Do?
Before laying out how to format a hard drive on Windows 10 or Windows 11, I suggest that we get to understand the procedure first.
Hard drive formatting involves preparing your storage device for initial use. During this process, Windows erases the drive’s existing data, sets up a new file system, and sometimes creates partitions.
Check out our guide on how to factory reset your Windows 10/11 PC for more information.
If the hard drive is new, you’ll be setting up a file system that’s compatible with the device’s intended use. That’s because every drive needs a file system. It is the structure a computer uses to organize and manage data on storage devices.
For hard drives that have already been in use, formatting may be necessary to resolve performance issues, remove malware, or prepare the drive for a new operating system. In the case of external hard drives, formatting is often done to change the file system, so the drive is compatible with different devices.
Different Types of Formatting
One of the choices you must make when formatting a hard drive is selecting between the quick and full format options.
The full format prompts Windows to
assess every sector on your hard disk drive to confirm its viability. This process ensures your computer only writes to healthy hard disk sectors .The downside is the long hours it takes to complete. The good side is that you won’t have to run CHKDSK in the near future to fix disk errors.
The quick format skips the error-checking process. It only formats the drive and establishes the new file system. It’s lightning fast, unlike the former option.
Wiping, in turn, is designed to erase data beyond recovery, overwriting each sector several times and scrambling magnetic pattern traces. Learn more with our guide on how to wipe a hard drive .
While the full format checks for errors on HDDs, you don’t have to use it all the time unless you suspect the drive may be faulty. The quick format option is generally recommended for SSDs.
📌 Also read: SSD vs. HDD: What’s the Difference and What to Choose?
When to Format a Hard Drive in Windows
Understanding when to format a hard drive is as crucial as knowing how to do it. When you format a drive, all files are lost, including applications and settings on the primary drive, so think twice before resorting to this option.
Now, let’s cover scenarios that may warrant formatting your hard drive:
Giving away your computer
If you’re gifting away, selling, donating your PC , or simply getting rid of it, it would be wise to format your drive, especially if it contains sensitive and private information.
Preparing a new hard drive
Hard drive manufacturers do not generally format hard disk drives before shipping them. Some leave it up to users to set them up and use their preferred file systems.
In such cases, Windows will not recognize the drive until users initialize and format it.
Setting up a new file system
A drive’s file system determines how files are stored and which operating system can read or write to them. For example, you must format hard drives with the ext3 file system to use them on Windows.
You may also need to format the drive to choose a file system that works on other operating systems if you want to use the device on other platforms.
Performing a clean installation of Windows
Installing a fresh copy of Windows typically involves formatting the hard drive that will house the new operating system.
Fixing issues
Formatting a hard drive is often seen as the last resort for problems that won’t go away. These include file system corruption, hard drive errors , malware and virus infection, bad sectors, corrupt partitions, and other issues, such as the cyclic redundancy check error .
How to Prepare for Formatting a Hard Drive
Before jumping straight into the formatting process, there are a few preparatory steps recommended to take to ensure you do everything right and don’t lose any important data. Here’s what you need to do:

When you format a hard drive , it erases all data stored on it, so make sure to back up anything you don’t want to lose before proceeding. You can back up your data to an external hard drive , cloud storage service like Google Drive, OneDrive, or Dropbox, or network-attached storage (NAS) .

When formatting your drive, you’ll be asked to select a file system. The three most common options are NTFS, FAT32, and exFAT. Let’s take a look at each and when you should use them:
- NTFS (New Technology File System)
NTFS is most commonly used for Windows system drives and internal hard drives. ⇒ NTFS is your best bet if you’re formatting a drive that will primarily be used with Windows and need to store large files.
- FAT32 (File Allocation Table 32)
FAT32 is ideal for USB drives and small-sized external drives that need to be compatible across different platforms. ⇒ Go with FAT32 if you’re formatting a smaller external drive or USB stick that you need to use with various devices and operating systems.
- exFAT (Extended File Allocation Table)
exFAT is a modern alternative to FAT32, ideal for external drives that need compatibility and support for large files. ⇒ exFAT is a great option if you need a file system that supports large files and can be used across multiple operating systems.
| File system | Pros/cons | Best used for |
|---|---|---|
| NTFS | Pros:
Cons:
|
Internal hard drives or Windows system drives where large files and security are important |
| FAT32 | Pros:
Cons:
|
Small external drives or USB sticks for cross-platform use |
| exFAT | Pros:
Cons:
|
External HDDs and SSDs for large files, PlayStation consoles, and cross-platform use |
To sum up, NTFS is the best fit for internal drives, exFAT is ideal for using on PlayStation consoles and storing large files on external HDDs and SSDs, and FAT32 is your go-to option for handling files under 4GB on small portable devices like USB sticks, cameras, etc.
How to Format a New Hard Drive
As mentioned, many hard drive manufacturers ship their products without formatting them. This decision allows users to set up their drives for the first time and choose suitable file systems.
Drives that come formatted out of the box may have a file system that doesn’t serve the purpose for which they were bought.
If your drive came without a file system, Windows will not recognize it, and you must initialize it. You can skip the initialization step if the new drive has a file system.
Follow these steps to initialize the drive:
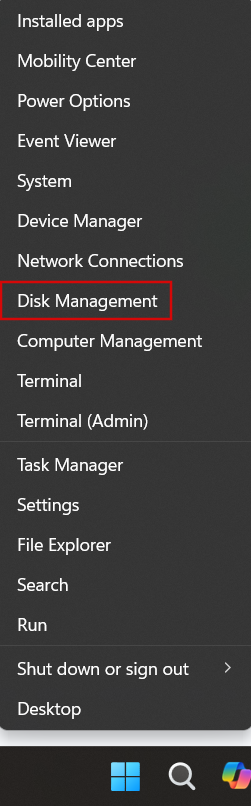
- Right-click the Start button and select Disk Management .
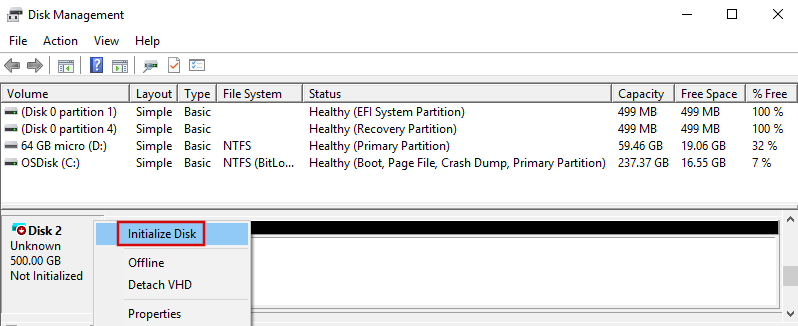
- Once the window opens, you should see the new disk listed as Not Initialized toward the bottom of the window.
- An Initialize Disk window may automatically pop up once Disk Management opens, asking you to initialize the disk.
- If you do not see the automatic pop-up window, right-click the new drive and select Initialize Disk.
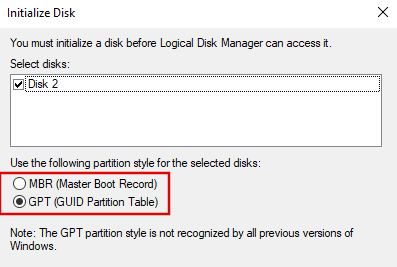
- Choose your preferred partition style for the drive and click OK . The partition style, MBR or GPT , is what your computer uses to understand how to access and use the drive’s data.
- Choose MBR (Master Boot Record) if your drive is below 2 TB.
- Choose GPT (GUID Partition Table) if your drive is above 2 TB (not supported on some older Windows versions).
- Windows will initialize the drive and list it as unallocated.
The drive will now come online but will still be unrecognized by Windows until you set up a file system and assign a volume name and letter. Follow these steps:
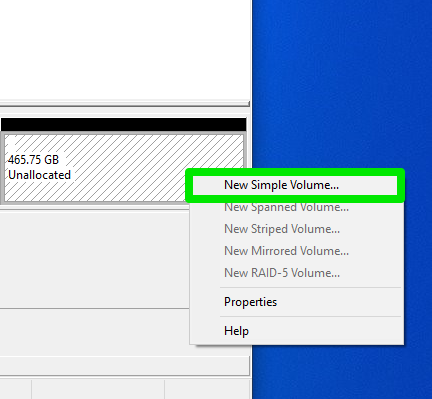
- Right-click the box labeled Unallocated and click New Simple Volume .
- Click Next in the Welcome and Specify Volume Size pages.
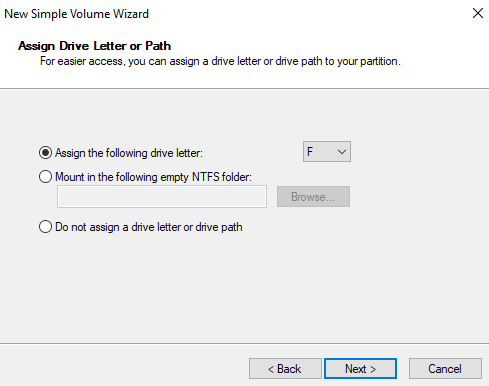
- You can select a custom drive letter on the Assign Drive Letter or Path page. However, the default option is fine. Click Next.
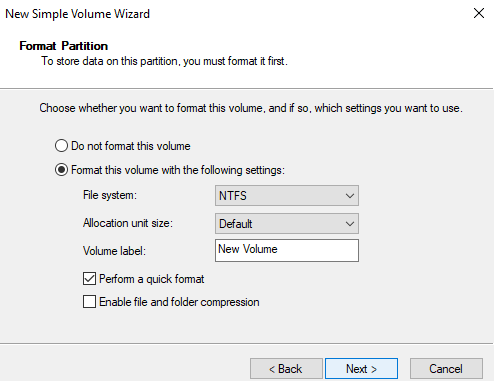
- The Format Partition page lets you choose a file system, allocation unit, and volume label (drive’s display name).
- Leave the Allocation unit size option as default and select a name you prefer for the drive next to Volume label .
- You can leave the Perform a quick format box checked, as unchecking it prompts the wizard to perform a full format, which will take longer to complete.
- Leave the Enable file and folder compression box unchecked.
- Click the Next button and select Finish .
If your drive still doesn’t show up after formatting, follow our guide on fixing unrecognized drives to fix the problem.
How to Format a Primary Drive (C:)
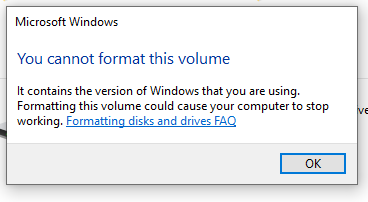
The primary drive is where Windows is installed and running. Formatting it while the system is active would be like trying to redo your home’s foundation while living in it. That is why Windows will prevent you from formatting the drive.
If you want to perform a clean installation of Windows, there are different ways to achieve it, depending on what your goal is .
If your hard drive has different partitions and you want to format one, you can use the reset method from Settings and choose the Remove everything option. However, different options are available for completely formatting your drive and all its partitions.
I’ll show you different ways to clean install Windows and format your drive.
Using the reset method
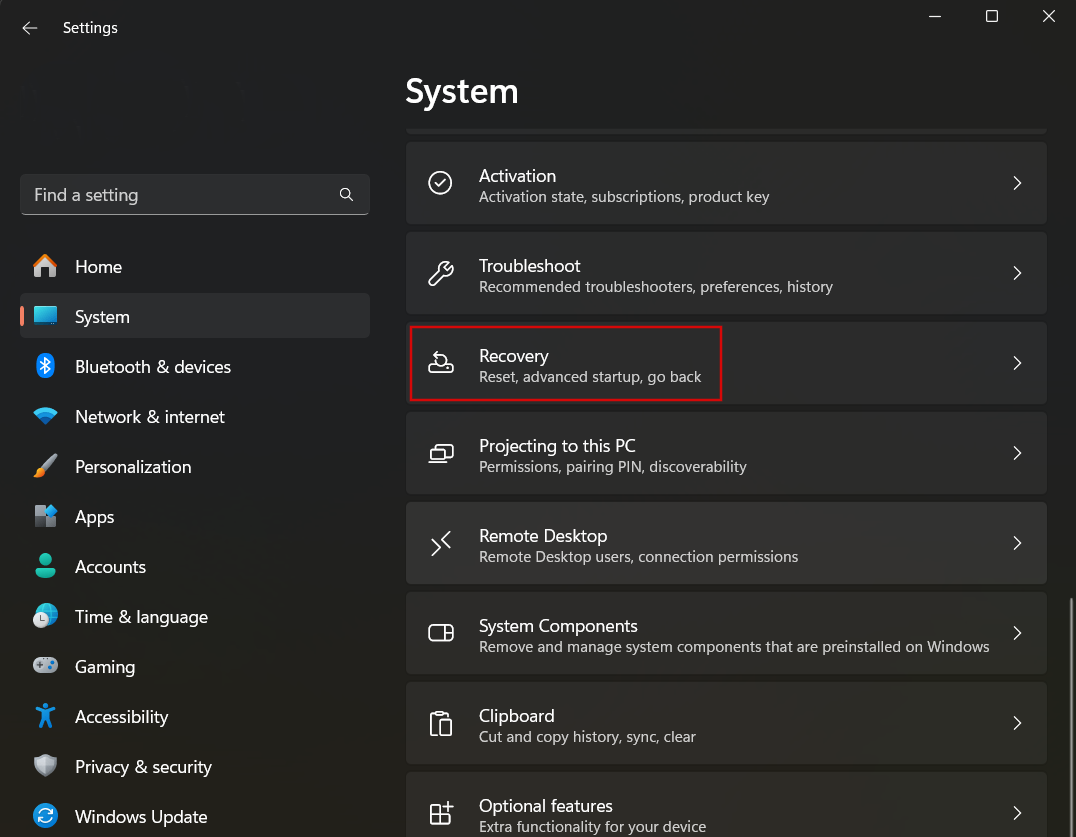
- Open the Settings app.
- Select System on the left side of the Settings page and choose Recovery (Update & Security > Recovery in Windows 10).
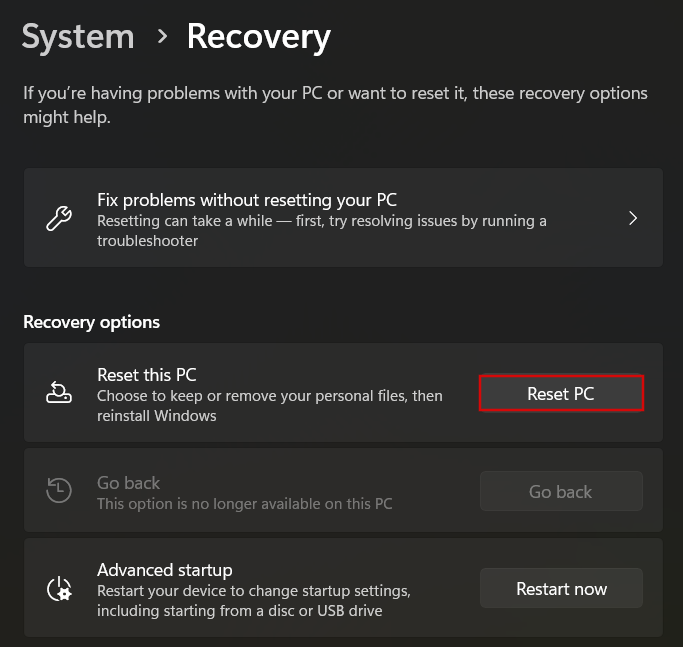
- Select Reset PC next to the Reset this PC option ( Reset this PC > Get started in Windows 10) .
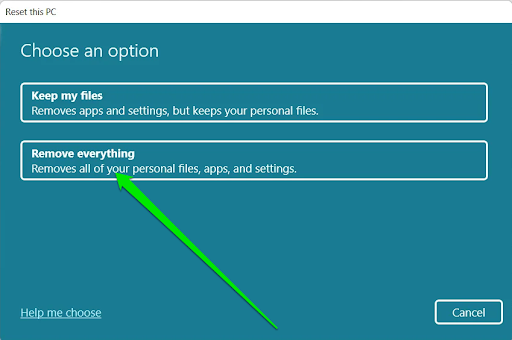
- Choose the Remove everything option once the Reset this PC interface appears.
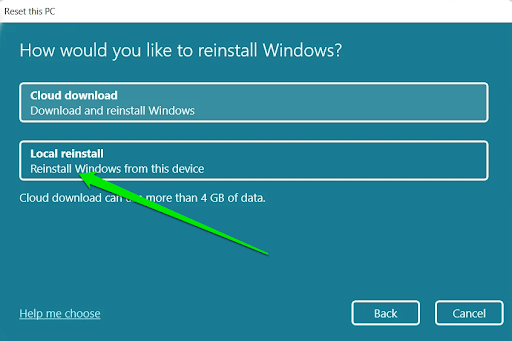
- Select Local reinstall on the next page. You can use Cloud download to get the latest Windows version. However, this may take time and consume data.
- When you get to the Additional settings page:
- Click Next if you only want to delete files on the partition where Windows is installed.
- Click Change settings and turn on the switches under Clean data? and, if prompted, under Delete files from all drives?
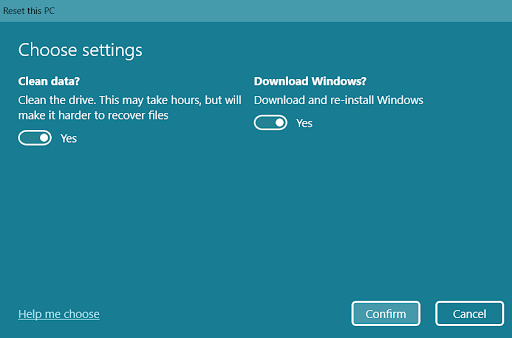
- Confirm your decision and allow Windows to format the drive and perform the reinstallation.
Performing a clean installation of Windows using installation media
A clean installation allows you to install a fresh copy of Windows. The setup process also lets you completely format your hard drive and delete its partitions, including recovery and health. The clean installation will also wipe your manufacturer’s apps and settings. The process starts with preparing an installation media to run the setup if you don’t have one:
- Download the Windows 10 or Windows 11 media creation tool from the official Microsoft website.
- Launch the tool and select your language and edition.
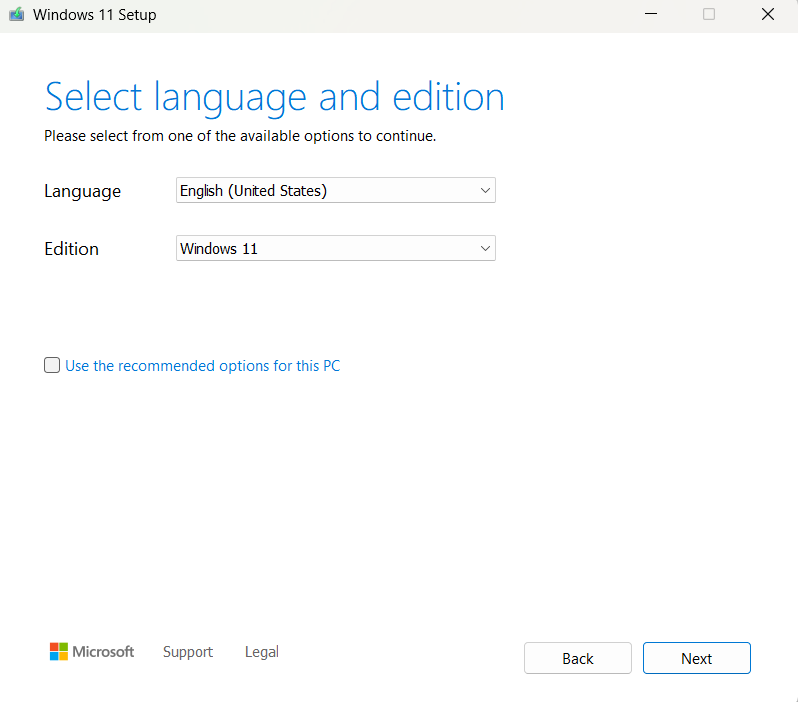
- Insert a USB drive (at least 8GB) or choose to save an ISO file.
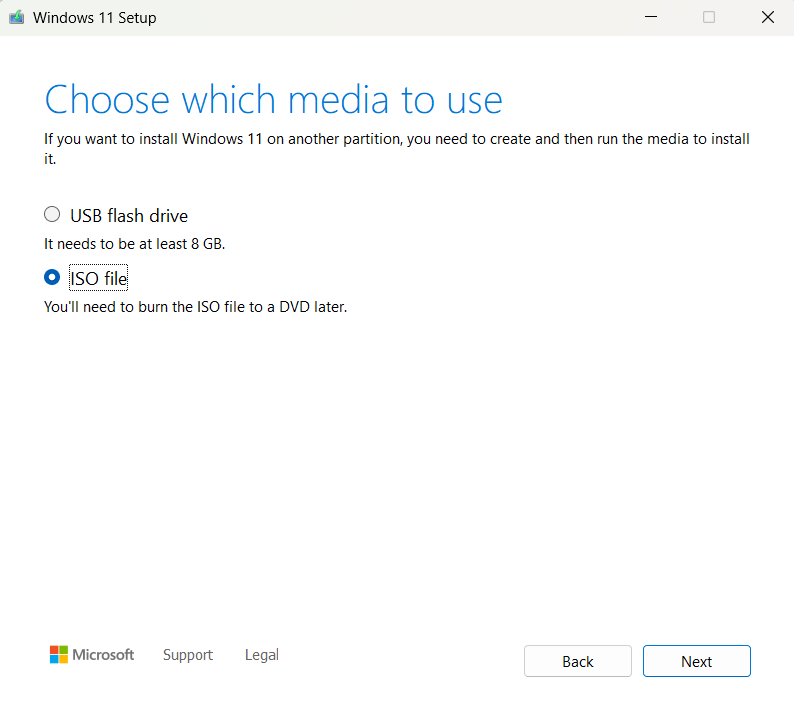
- Follow the on-screen instructions to complete the process.
For more detailed step-by-step instructions, follow this guide:How to Get and Use Windows 10 Media Creation Tool
Follow these steps to factory reset your drive and install Windows:
- Insert the drive or DVD and allow your computer to boot from it. Sometimes, you’ll see a prompt to press any key to boot from the drive.
If you don’t receive any prompts, head into your BIOS and select the external drive or DVD-ROM as the first boot device.
- Once the setup window appears, click the Next button after choosing your language, time and currency format, and keyboard or input method.
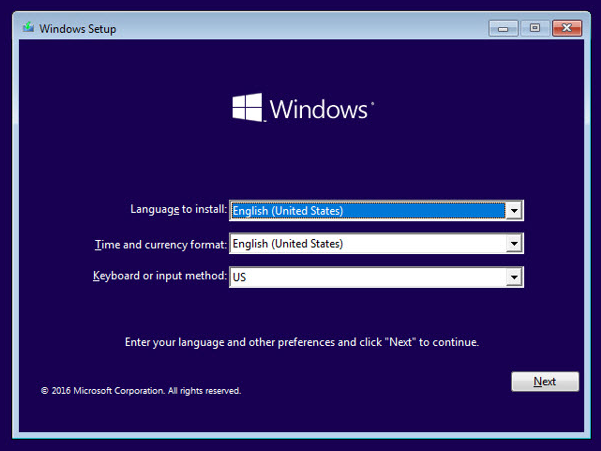
- Click Install now .
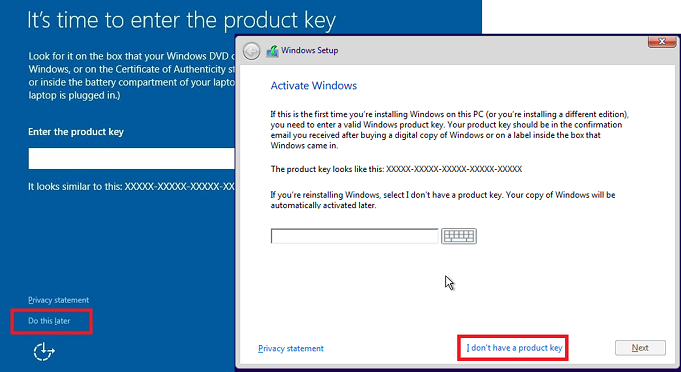
Enter your license key on the next page and continue. Click Do this later or I don’t have a product key if you don’t have one or want to activate Windows after setup.
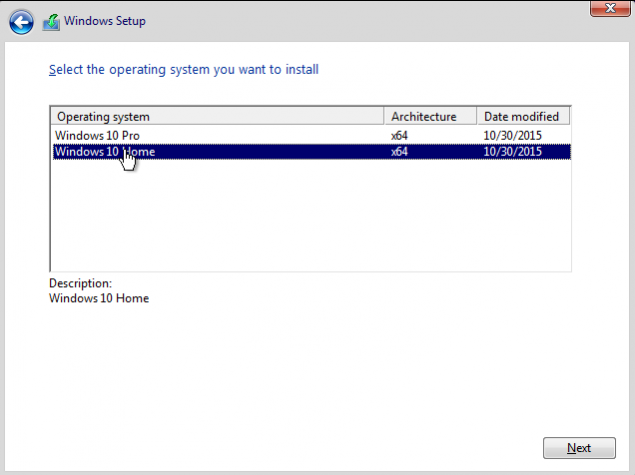
- Select the Windows edition you want to install and click Next .
- Accept the license terms on the page that follows and click Next .
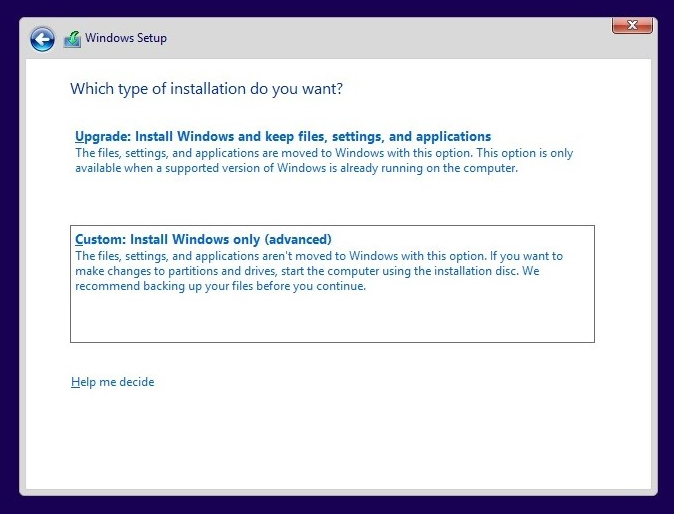
- Now, choose the Custom: Install Windows only (advanced) option.
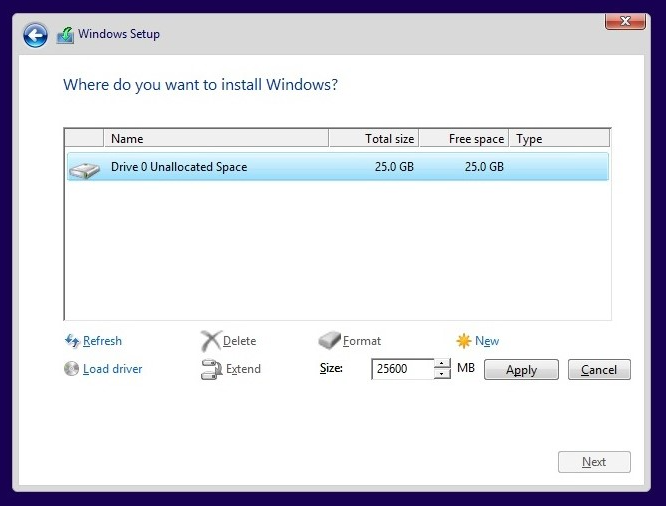
The Where do you want to install Windows? page will display all your drives and partitions. If you have only one drive, you’ll see Drive 0 alongside different partitions. If you have more than one drive, each drive will have a different number alongside its partitions.
For example, Drive 0 represents one storage device, and Drive 1 represents another hard drive.
Your primary drive is Drive 0 . If you only want to format that drive, delete all the partitions for Drive 0 until you see only one instance of Drive 0— Drive 0 Unallocated Space .
Next, select the partition where you want to install Windows or choose Drive 0 Unallocated Space if you didn’t create any partition, and click the Next button.
- Allow the setup utility to install Windows.
- The remaining steps involve Windows’ initial setup when you choose your country or region, keyboard input method, login details, and privacy preferences.
How to Format External and Non-Primary Internal Drives
If you want to format an external hard drive, a non-primary internal hard drive (other than the C: drive), or reformat a hard drive that’s already been in use, it can be a more straightforward process. However, you have to consider several things. If the drive has multiple partitions, determine whether you want to delete them and format the entire drive or format a specific partition. If you only want to format one partition, you can go through Windows Explorer. Here’s how:
- Press
Win + Eor click the folder icon in your taskbar. - Go to the left sidebar of the File Explorer window and click This PC .
- Now, right-click the volume you want to format and select Format.
- The Format dialog will now appear.
- Here, you can leave the Capacity and Allocation unit size options untouched. However, as explained earlier, you can change the File system option, depending on your preference.
- You can also enter a volume label of your choosing.
- Select the Quick Format option if you only want Windows to erase the files and set up the new file system.
- Uncheck the box if you want to run the normal format process, which takes a lot of time to complete but allows the operating system to check for and address bad sectors.
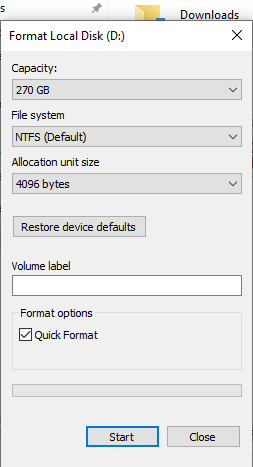
- Press Start to format the drive.
Now, here’s how to completely format a hard drive and delete its partitions:
- Right-click the Start button and select Disk Management .
- To format the entire device, right-click each partition and select Delete Volume .
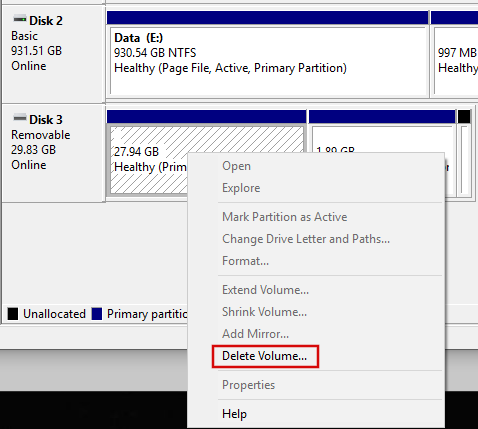
- Click Yes to confirm. The drive will now show as unallocated space.
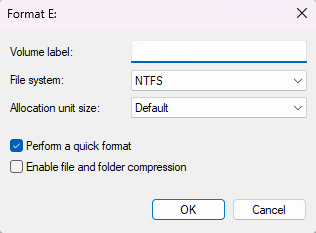
- Right-click on the drive and click Format.

- Here, you can indicate your volume label (drive name), select the file system you want to use, and the allocation unit size.
- The Perform a quick format checkbox allows you to format the hard drive without the long error-checking process.
- Leave the Enable file and folder compression box unchecked.
- Click OK .
- Click OK in the confirmation pop-up.
How to format a hard drive on Windows 11/10 using the Command Prompt
If the drive you’re attempting to format contains the operating system, it will have partitions called EFI System Partition and Recovery. The EFI System Partition contains bootloader files needed for booting the OS. The Recovery partition contains tools for system recovery, diagnostics, or reinstallation of the OS.
Both partitions are protected, so you must use Microsoft’s Diskpart utility to override the protection and delete the partitions. This command-line program lets you clean drives, create partitions, and set up file systems.
To be safe, consider disconnecting other secondary drives to avoid accidentally erasing them.
Identify the drive you want to clean:
- Right-click the Start button and click Disk Management .
- Go to the section where your disks are listed to confirm the device’s disk number.

Follow these steps to override the partition protection and erase the disk:
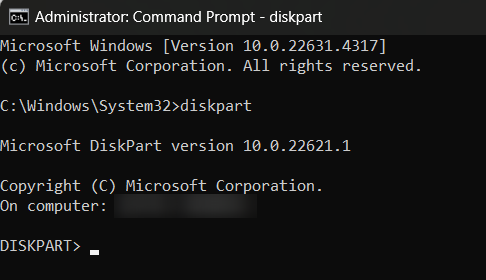
- Right-click the Windows logo in the taskbar and select Run .

- Type “cmd” into the text box, hold the Shift keyboard button, and hit the Enter key.
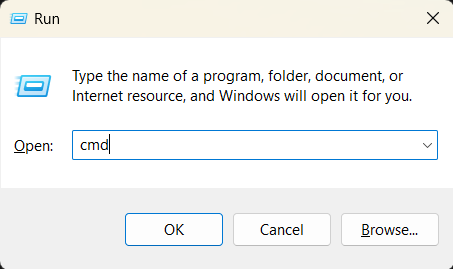
- Press Yes to allow Windows to run the Command Prompt as an administrator.
- After the Command Prompt opens, type “diskpart” and hit the Enter key.
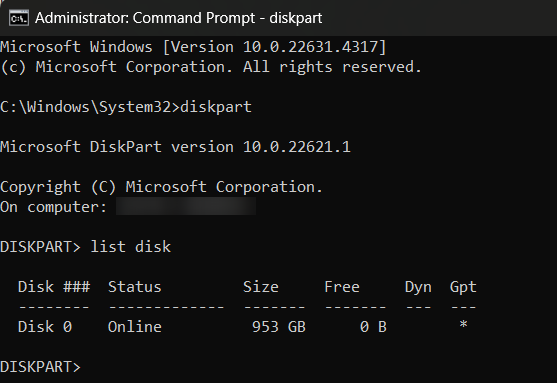
- Type “list disk” and hit Enter to display your disks.
- Type “select disk X” (replace X with the appropriate disk number).
- You’ll now see the Disk X is the selected disk message.
- Type “clean” and hit the Enter key.
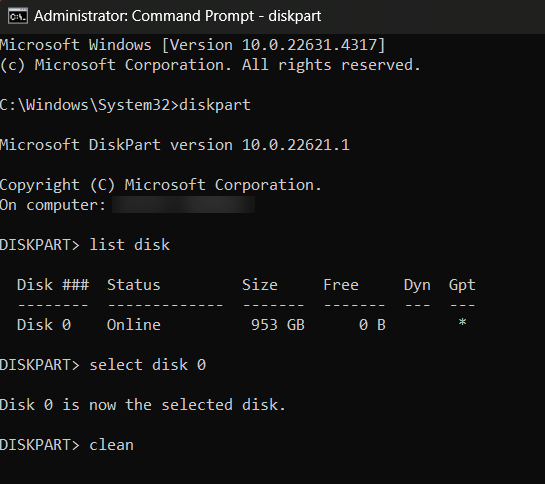
- Allow the utility to erase the disk.
If you see the message that says, “Diskpart succeeded in cleaning the disk,” then every data on your drive has been erased, and you must initialize it again like a new drive. Follow these steps:
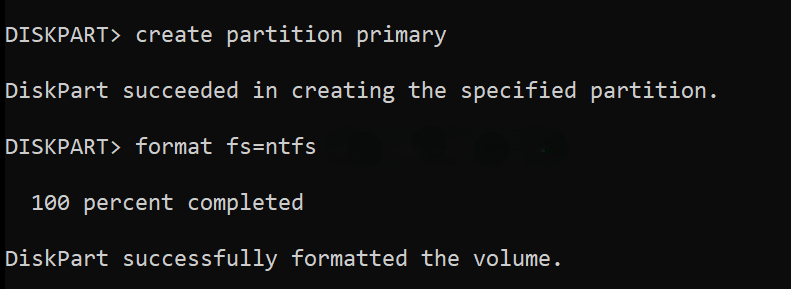
- Go to the next line, type “create partition primary,” and hit Enter. This command will create the unallocated partition without creating a file system.
- Next, type “format fs=ntfs” to format the drive and set up a file system. You can replace NTFS with FAT32 or exFAT, whichever you prefer.
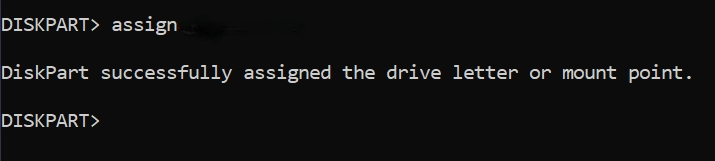
- Finally, type “assign” and hit Enter to prompt the tool to assign the drive a letter automatically.
How to Format a Hard Drive: The Summary
| Action | Formatting a new drive | Formatting a primary (C:) drive | Formatting an external or non-primary internal drive |
|---|---|---|---|
| When to perform | When setting up a new drive that has no file system or has a file system that doesn’t meet your needs. | When reinstalling Windows, fixing major OS issues, or performing a clean installation. | When cleaning data for reuse, changing a file system, or resolving file corruption for drives that are not the primary boot drive (e.g., external USB drives or secondary internal drives). |
| Methods |
|
|
|
Alternatives to Formatting
Formatting should be your last option for resolving any issue. In many cases, your hard drive might not require a complete format. Some alternative solutions can resolve problems or speed up your hard drive’s performance while you keep your data intact.
Let’s go through those options.
1. Disk Cleanup
You don’t have to format your laptop if your issue is poor performance or low storage space, as native Windows tools and third-party programs can help. Disk Cleanup is a built-in Windows tool that removes temporary files and other unnecessary data that clutters your drive.
2. Disk defragmentation
Defragmentation is relevant and effective for HDDs. It reorganizes the data on your drive to make it more efficient. Windows often does this automatically, but manual runs can be beneficial.
SSDs generally don’t need defragmentation since they don’t have disks and sectors. Instead, you can enable TRIM , a process that optimizes how the drive manages data.
3. Checking for disk errors
Windows provides tools to check your drives for errors. Using the “chkdsk” command in the Command Prompt can identify and even fix certain logical issues without the need for formatting.
4. Using repair utilities
If certain aspects of Windows are malfunctioning due to corrupted operating system files , you can repair or replace those files using utilities such as the System File Checker, DISM, and Startup Repair.
5. Using third-party software
Several third-party tools, such as Auslogics BoostSpeed , offer disk management solutions, including cleaning, optimization, disk defragmentation, and error checking—all in one. They can be more user-friendly and provide more features than built-in Windows tools.
Common Issues During Hard Drive Formatting and How to Fix Them
Issue 1. External hard drive won’t format
This can happen if the drive has file system errors or bad sectors. To fix it, try these steps:
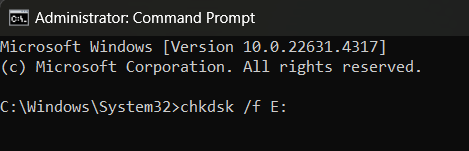
- Run CHKDSK: Open the Command Prompt as an admin and run “chkdsk /f X:” (replace X with your drive letter).
- Reformat in Disk Management: If CHKDSK doesn’t work, try reformatting through Windows Disk Management by right-clicking the drive and selecting Format .
Issue 2. The “Windows was unable to complete the format” error
This error often occurs due to a corrupted file system or hardware issue. Here’s what to do:
- Use Diskpart: Check out the steps I shared earlier in this article on how to clean the drive and create a new partition using the “diskpart” command.
- Try another file system: Sometimes switching the file system (e.g., from NTFS to exFAT) can fix the error.
Issue 3. Windows doesn’t recognize the hard drive
If your drive doesn’t show up in Windows, it could be a connection issue or an unallocated drive:
- Check connections: Ensure the drive is properly connected to your PC.
- Initialize the drive: Go to Disk Management, find the unrecognized drive, right-click it, and select Initialize Disk. Then format it as usual.
How to Format a Hard Drive Safely on Windows: Explained
And there you have it. Now you can format your hard drive confidently, knowing your files are backed up and the right file system has been chosen to suit your needs. While it’s always good to consider other options before formatting, if it’s unavoidable, just follow our instructions, and you’ll be all set.
Still have any questions or doubts? Don’t hesitate to drop them in the comments below. And if this article helped you, don’t forget to share it with your friends or on your socials.