- Common Reasons for Mouse and Keyboard Issues
- How to Fix wireless mouse and keyboard not working
- How to Fix USB-Connected Mouse and Keyboard Not Working
- Solution 1: Disable power management for the USB root hub
- Solution 2: Reinstall or update the USB root hub driver
- Solution 3: Reinstall or update the problematic hardware driver
- Solution 4: Verify hardware compatibility
- Solution 5: Update your Windows
- Solution 6: Check for physical damage
- Solution 7: Physically clean the mouse and keyboard
- Solution 8: Try Safe Mode
- Solution 9: Check and adjust BIOS/UEFI settings
- Solution 10: Perform system restore
- Conclusion
As an essential part of your computing experience, a functional mouse and keyboard are indispensable, but what if the keyboard and mouse stop working for no reason?
This article aims to address the common dilemma faced by many users experiencing their USB or wireless mouse not working and keyboard not typing on a laptop.
Common Reasons for Mouse and Keyboard Issues
In troubleshooting mouse and keyboard issues, it’s essential to consider potential causes for both wireless and USB-connected devices. First, let’s figure out the root causes of your wireless keyboard and mouse not working:
- Signal interference: Wireless peripherals may experience signal disruptions, particularly in crowded wireless environments or due to interference from other electronic devices.
- Low battery: Insufficient battery power can lead to erratic behavior or complete failure of wireless mice and keyboards.
- Signal quality: Weak signal strength or poor wireless receiver performance can result in your wireless mouse or wireless keyboard not working, especially in long-distance or obstructed setups.
- Driver issues: Outdated or incompatible Bluetooth drivers can cause your wireless mouse or keyboard not working.
Now, let’s take a look at the issues that may result in your USB mouse or USB keyboard not working:
- Hardware conflict: Incompatible or malfunctioning USB ports can lead to conflicts between connected devices, resulting in mouse and keyboard failures. As such, according to some Windows users, plugging in a USB drive resulted in their mouse and keyboard not working.
- Power management: Incorrect power management settings may cause USB devices to enter low-power states, leading to mouse and keyboard malfunction.
- Driver issues: Outdated or corrupted USB drivers can affect device recognition and functionality, resulting in mouse and keyboard issues.
Now that you’re aware of some possible reasons why the USB and wireless mouse and keyboard stop working, let’s proceed to solutions.
How to Fix wireless mouse and keyboard not working
In this section, we’ll explore a comprehensive list of fixes to help you restore your laptop’s full functionality. If you discovered your wireless keyboard or laptop mouse not working, here is what you can do to fix the problem:
Fix 1: Ensure proper connection and check power source
First of all, you need to check if the wireless dongle (receiver) is securely plugged in and powered. For wireless mice, ensure the receiver is connected or that the mouse is charged.
Try unplugging and then plugging the receiver back in to see if that helps. If it doesn’t, plug your wireless receiver into another USB port.
If it still doesn’t work, try replacing or recharging batteries if you still experience your keyboard and mouse not working on a laptop.
Fix 2: Check Bluetooth connection
Ensure Bluetooth is enabled on your computer and that both the mouse and keyboard are paired correctly. Here’s how to do it:
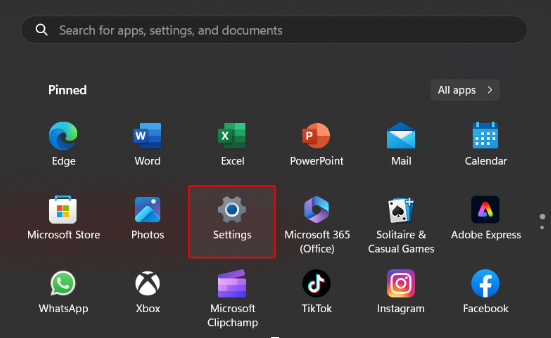
- Click Start, then select Settings.
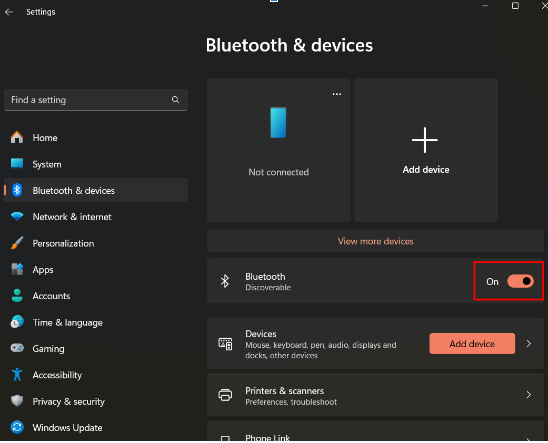
- In the Settings menu, select Bluetooth & devices (Devices > Bluetooth & other devices in Windows 10) from the left-hand sidebar.
- Under the Bluetooth & devices section, you’ll see the status of Bluetooth. Ensure it’s turned on.
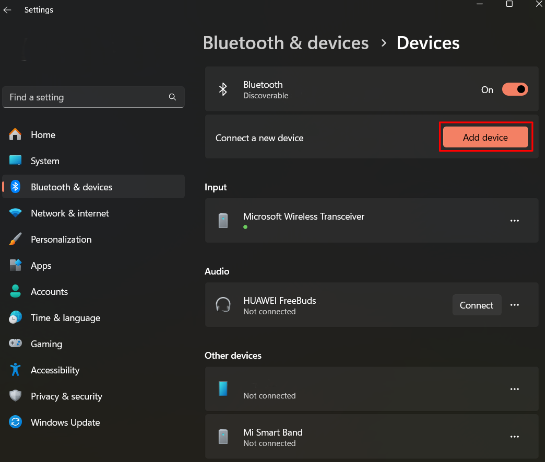
- Click on Devices below the Bluetooth status to see a list of connected devices. Look for your mouse or keyboard in this list. If it’s not listed, try turning off and on the mouse or keyboard to initiate the connection.
- If your mouse or keyboard is not listed, click on Add device and follow the on-screen instructions to pair your mouse or keyboard.
Also Read: [FIXED] Why Is My Bluetooth Not Working in Windows 10/11 PC?
Fix 3: Update drivers
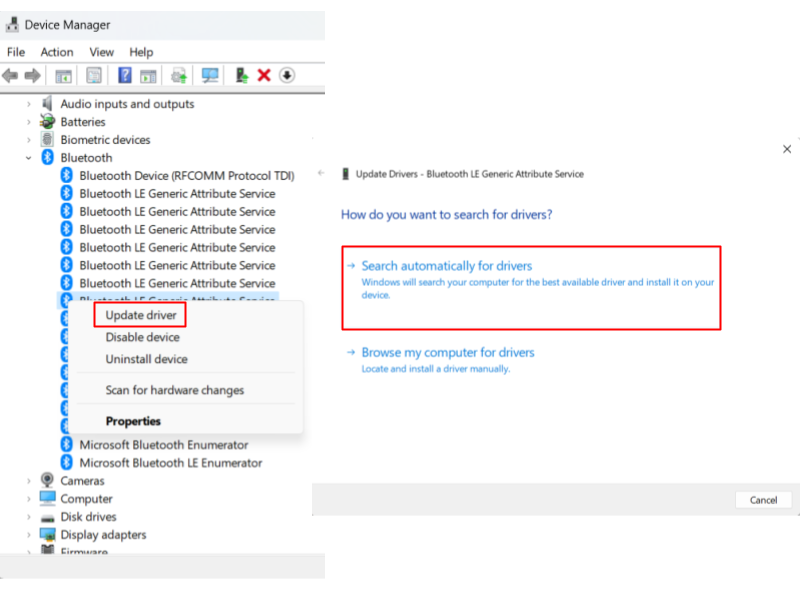
Another possible fix for your mouse and keyboard not working is updating your Bluetooth drivers. Here’s how to do it manually:
- Right-click Start and select Device Manager.
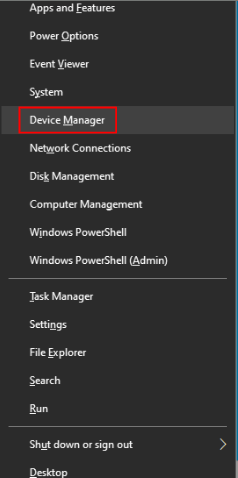
- Expand the Bluetooth category.
- Right-click on the problematic Bluetooth device and select Update driver.
- Select the Search automatically for drivers option and follow the prompts to complete the update.
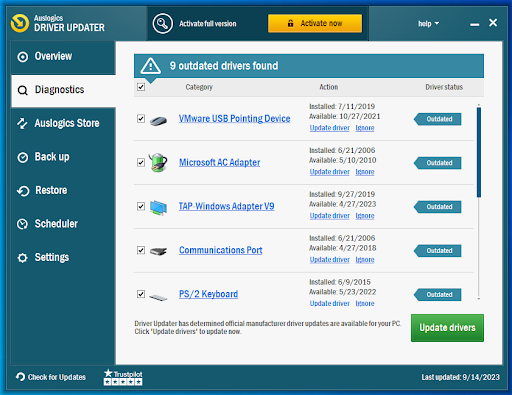
Consider using Auslogics Driver Updater , a reputable tool that automates this process, ensuring all drivers, including Bluetooth, are up-to-date with a single click.
It saves time and minimizes the risk of installing incorrect or incompatible drivers, which can lead to system instability.
Additionally, Auslogics Driver Updater regularly scans for driver updates, keeping your system optimized for performance and security without the hassle of manual intervention.
With its user-friendly interface and comprehensive driver database, Auslogics Driver Updater provides a convenient solution for maintaining system drivers.
Hopefully, these solutions helped you fix your wireless keyboard and mouse not working on a laptop.
If not, don’t worry, as we’ve still got a few more tricks up our sleeve to share that are listed below. But first, let’s see how you can revive a cable-connected mouse and keyboard.
Related: Auslogics Driver Updater: Update Your Drivers in One Click!
How to Fix USB-Connected Mouse and Keyboard Not Working
Solution 1: Disable power management for the USB root hub
Power Management on Windows preserves battery power by putting peripherals and other hardware in a low power mode when they’re not in use.
In this state, they draw minimal power from the battery, which helps to reduce overall power consumption.
On the flip side, if the USB root hub isn’t getting enough power, the connected devices can stop working when another piece of hardware, such as a flash drive, is connected.
This is because the newly connected device draws a lot of power, leaving little for the other peripherals to share.
It acts as an intermediary between USB devices and the host controller, facilitating communication and power management.
The root hub detects the insertion or removal of USB devices, allocates resources, and ensures proper power distribution to connected peripherals.
In essence, keeping the USB root hub on normal power may be less battery-friendly but will ensure that all attached peripherals get the power they need to work.
Therefore, if this issue happens, turning off the Power Management feature for the USB root hub can help. Here’s how to do that:
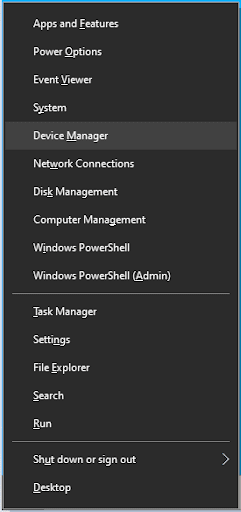
- Right-click Start (or just press
Win + X) and select “Device Manager.”
- In Device Manager, locate the “Universal Serial Bus controllers” option and double-click it to expand the entry.
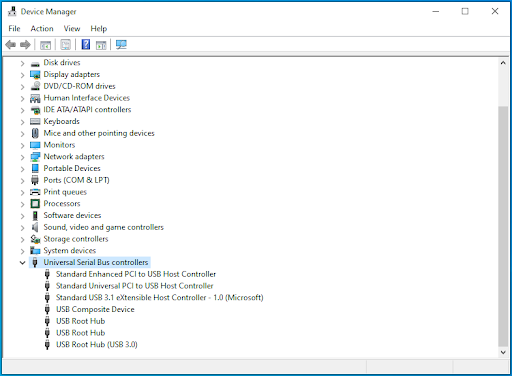
- You will find at least one “USB Root Hub” under “Universal Serial Bus controllers.” Right-click it and select “Properties.”
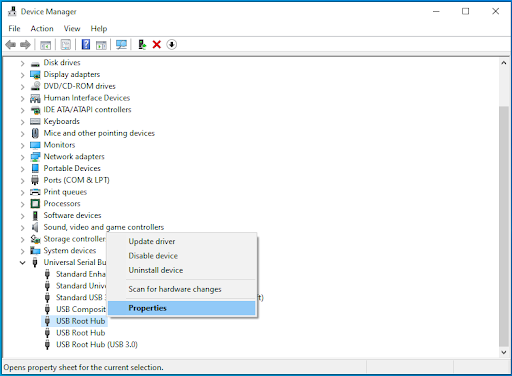
- In the “USB Root Hub Properties” window, go to the “Power Management” tab.
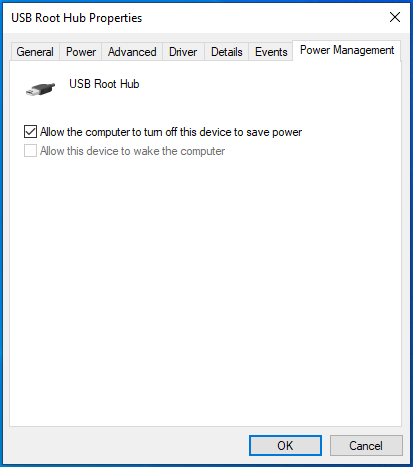
- Untick the checkbox next to “Allow the computer to turn off this device to save power.”
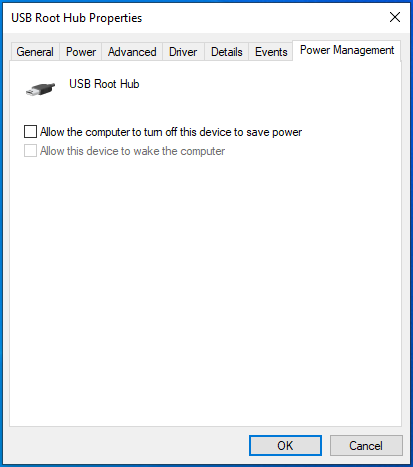
- Click “OK” to confirm the change and then reboot the system.
If you have multiple USB Root Hub entries listed under Universal Serial Bus controllers, repeat steps 3-5 for each one before you reboot the system.
Solution 2: Reinstall or update the USB root hub driver
The USB root hub controls the ports on your computer. Therefore, it also controls the connections between the laptop and any peripheral.
If the USB root hub driver is malfunctioning, this can result in your mouse and keyboard freezing upon connecting a flash drive.
One way to resolve this issue is to reinstall the USB root hub driver. Another way is to update it. You can use the Device Manager for this.
Here’s how to reinstall the USB root hub driver with Device Manager:
- Hit
Windows + Xand select Device Manager.

- In Device Manager, navigate to the Universal Serial Bus controllers node. Double-click it to expand the node.
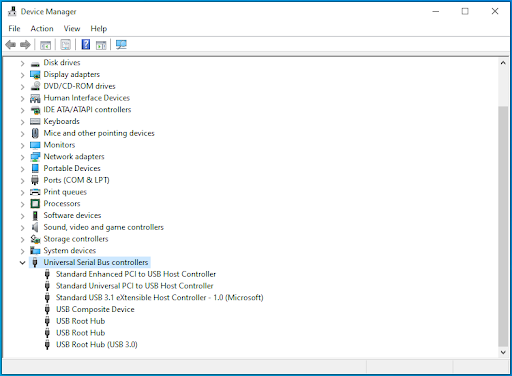
- Right-click the USB Root Hub option and select Uninstall device.
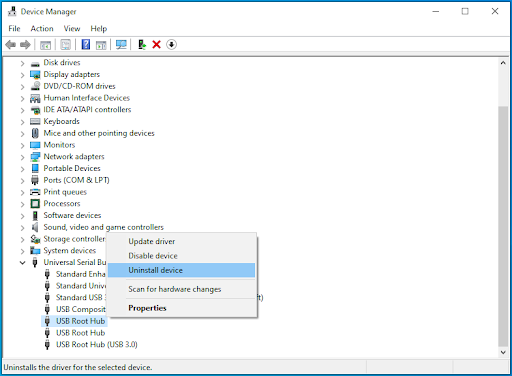
- A warning message will pop up. Click Uninstall.
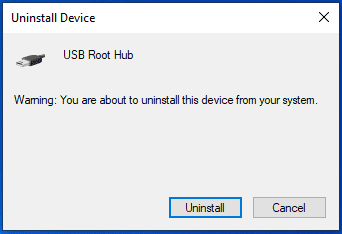
Also, depending on the nature of your computer’s port, you may see more than one USB Root Hub listed. Simply repeat the procedure for each one.
Then reboot the system. After the reboot, try plugging in the flash drive again and check whether it still causes the mouse and keyboard to stop working.
Also Read: [FIXED] How to Fix USB-C Port Not Working on Windows 10?
Solution 3: Reinstall or update the problematic hardware driver
Ensuring proper hardware driver functionality is crucial for connected peripherals. While Windows offers generic drivers, dedicated ones often provide optimal performance.
Issues such as corrupted or outdated drivers can lead to connectivity problems. Identifying the culprit (mouse, keyboard, or flash drive driver) can be challenging.
Check Device Manager for warning indicators (yellow triangle or exclamation mark beside them) or manually reinstall/update drivers.
Alternatively, employ Auslogics Driver Updater for a comprehensive solution.
This tool automatically identifies outdated or faulty drivers and updates them efficiently, ensuring device compatibility and system stability.
Further reading: How to Update Device Drivers on a Windows 10 PC?
Solution 4: Verify hardware compatibility
Ensure the mouse and keyboard are compatible with your laptop and operating system. Check the manufacturer’s website for any compatibility issues or recommended drivers.
Solution 5: Update your Windows
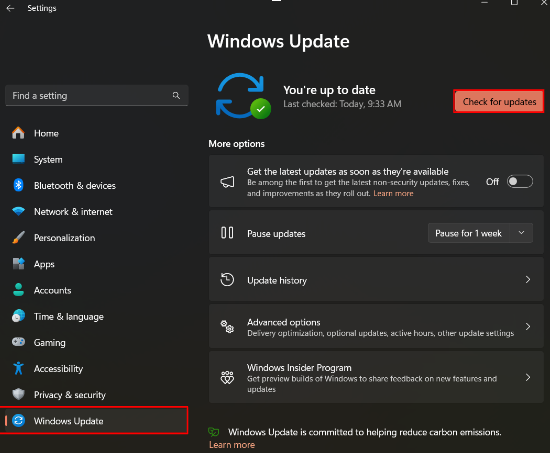
- Click on the Start menu, select Settings, then choose Windows Update (Update & security in Windows 10)
- Click on Check for updates and allow Windows to install any available updates.
- After installation, restart your laptop and verify if the mouse and keyboard are functioning properly.
Also read: How to Manually Check and Install Windows Updates
Solution 6: Check for physical damage
Inspect the keyboard and mouse for any physical damage, such as loose connections or damaged cables. Repair or replace the damaged components if such are found.
Solution 7: Physically clean the mouse and keyboard
- Turn off your laptop and disconnect the mouse.
- Use a clean, dry cloth or compressed air to remove dust and debris from the mouse’s surface and sensor area.
- If necessary, wipe the mouse with a damp cloth and let it dry completely before reconnecting.
- Check if the mouse functions properly after cleaning.
Solution 8: Try Safe Mode
Booting your laptop into Safe Mode can help diagnose whether a third-party software or driver is causing the issue. If the mouse and keyboard work in Safe Mode, it indicates a software conflict. To enter Safe Mode:
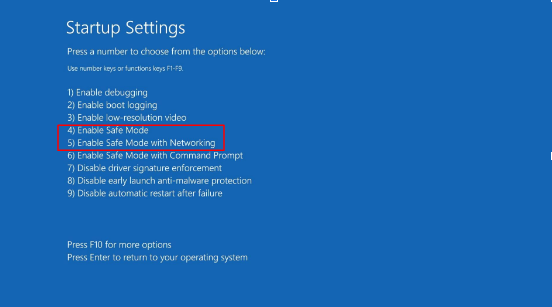
- Restart your laptop and press F8 before Windows starts.
- In the Advanced Boot Options menu, navigate to Startup Settings and select Safe Mode or Safe Mode with Networking using the arrow keys, then press Enter.
Related: Safe Mode Made Easy: How to Boot Windows 10 in Safe Mode?
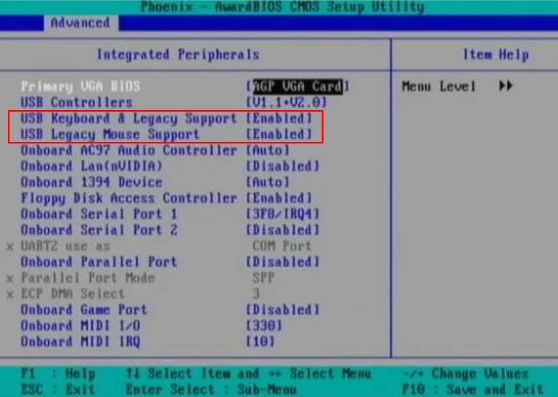
Solution 9: Check and adjust BIOS/UEFI settings
- Restart your laptop and access the BIOS setup menu by pressing the specified key during bootup (usually, F1, F2, F10, F12, Del, or Esc).
- Search for “Integrated Peripherals” or similar section.
- Ensure USB support is enabled and verify keyboard and mouse settings.
- Save changes and exit the BIOS menu. Restart your laptop to check if it fixed the problem.
Solution 10: Perform system restore
If the issue arose after a recent software change, performing a system restore to revert your system to a previous state when the keyboard and mouse were functioning correctly can be effective.
Conclusion
That’s it on how to fix your keyboard and mouse not working on a laptop. Encountering such issues can significantly disrupt productivity and user experience.
By understanding common causes and following effective troubleshooting steps outlined in this guide, users can promptly address these issues and restore seamless operation to their devices.


