
- How to Fix the Ctrl + Alt + Del Sequence Not Working
- Method 1: Check your keyboard
- Method 2: Update your keyboard driver
- Method 3: Change the settings for your keyboard
- Method 4: Use the Ctrl + Shift + Esc hotkeys
- Method 5: Perform a malware scan
- Method 6: Perform an SFC scan
- Method 7: Modify your registry
- Method 8: Perform a clean boot
- Method 9: Install the latest updates
- Method 10: Remove Microsoft HPC Pack
- Method 11: Restore your system
- The Ctrl + Alt + Del Sequence Not Working on Windows 10/11: Fixed
When using the Ctrl + Alt + Del sequence, you can summon many functions. You can press these keys simultaneously to launch the Task Manager or to lock your computer.
You can also use this keyboard shortcut to sign out or to switch to another user. Indeed, the Ctrl + Alt + Del sequence makes certain tasks on your computer a lot easier.
However, this function does not work all the time. If you find that this keyboard combination does not work, do not worry. Several Windows users have reported it. Consequently, there are also several ways to fix it.
In this article, we will share solutions on how to fix the Ctrl + Alt + Del sequence not working on Windows 11.
Let’s begin.
How to Fix the Ctrl + Alt + Del Sequence Not Working
Method 1: Check your keyboard
You may be using a defective keyboard. This is why the Ctrl + Alt + Del sequence is not working.
You can try using a new keyboard or connecting your existing one to another computer to determine whether the keyboard is causing the problem.
Also read: What to Do if the Mouse and Keyboard Are Not Working on a Laptop?
Method 2: Update your keyboard driver
In some cases, the issue is caused by an outdated or corrupted keyboard driver. To fix the problem, you can try updating your drivers. This can be done manually or automatically.
Also read: [EASY GUIDE] How to Update Device Drivers on a Windows 10 PC?
Manually updating drivers can be complicated and time-consuming. You would have to go to the manufacturer’s website and look for the correct drivers.
If you install the incorrect version, you might cause your computer more harm than good. So, why risk it when there is an easier and more accurate option?
Auslogics Driver Updater is a product of Auslogics, a certified Microsoft® Silver Application Developer. With a click of a button, you can enable Auslogics Driver Updater to detect your system automatically.
It will search for the latest driver versions recommended by the manufacturer.
What’s more, this tool is designed to repair all the problematic drivers on your computer—not just the one that might be causing the keyboard issue.
Related: Auslogics Driver Updater: Update Your Drivers in One Click!
Method 3: Change the settings for your keyboard
It is possible that the Ctrl + Alt + Del sequence issue occurred when you installed software that automatically modified your default keyboard settings.
It can also show up after you’ve added some custom keyboard shortcuts or hotkeys. So, you can try resetting your keyboard settings to resolve the issue. Here are the steps you should follow:
- Press
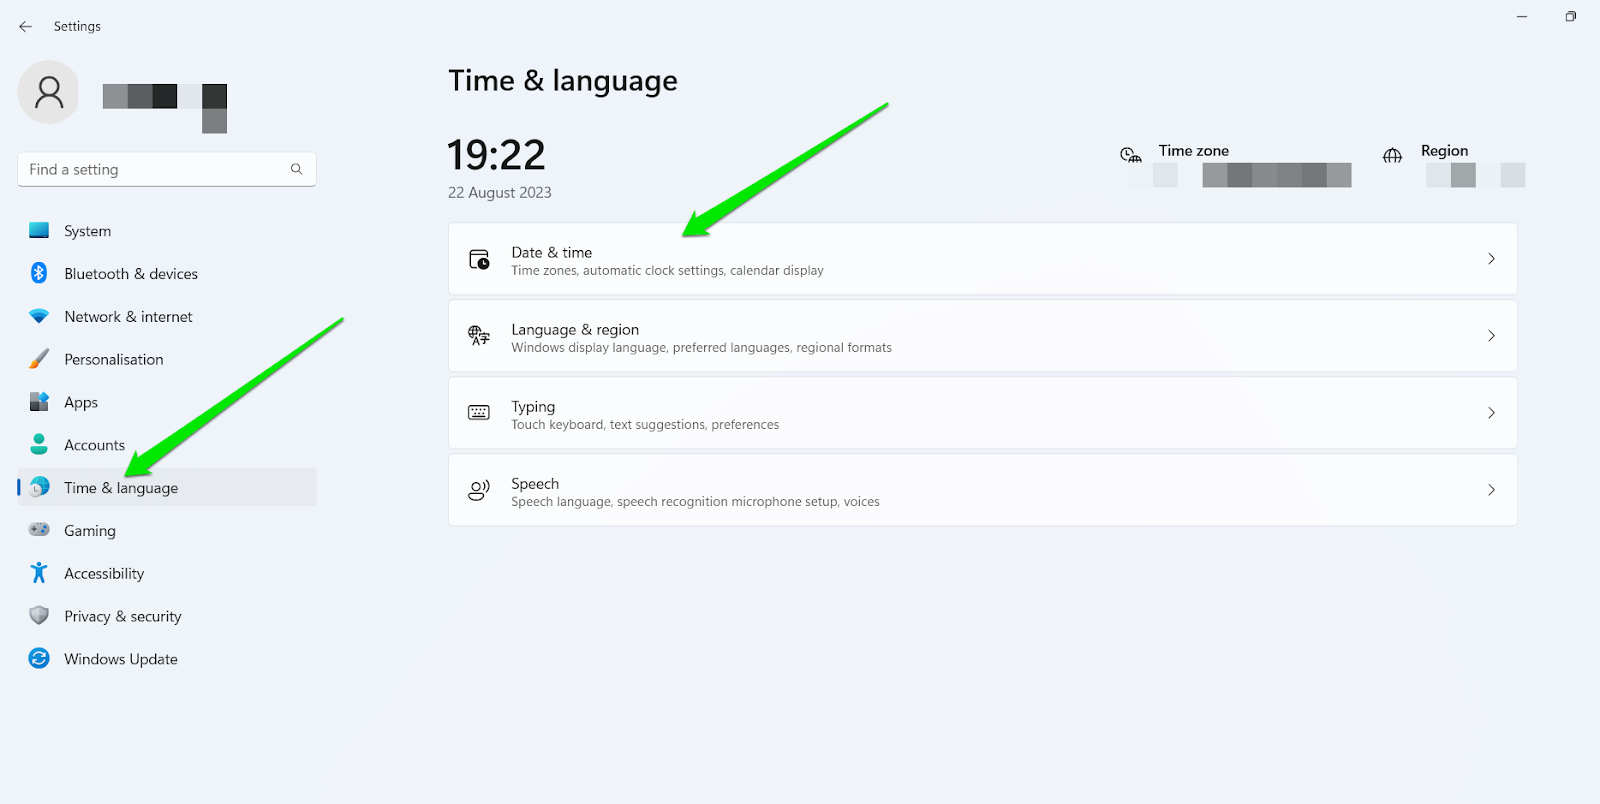
Windows key + Ion your keyboard. This should open Windows Settings. - Select Time & language > Language & region.
- If you’re currently using only one language, you can add another by clicking the Add a language option under Preferred languages. Make sure you do not select the Set as my Windows display language option. On the other hand, if you’re already using multiple languages, you can skip this step.
- Select your primary language. It should be the first one on the list. Click the down arrow, then the up arrow to take it back to the top of the list.
- Check if the
Ctrl + Alt + Delsequence is now working.
On Windows 11:
- Launch the Settings app, navigate to the Time & language option in the left pane, and select it.
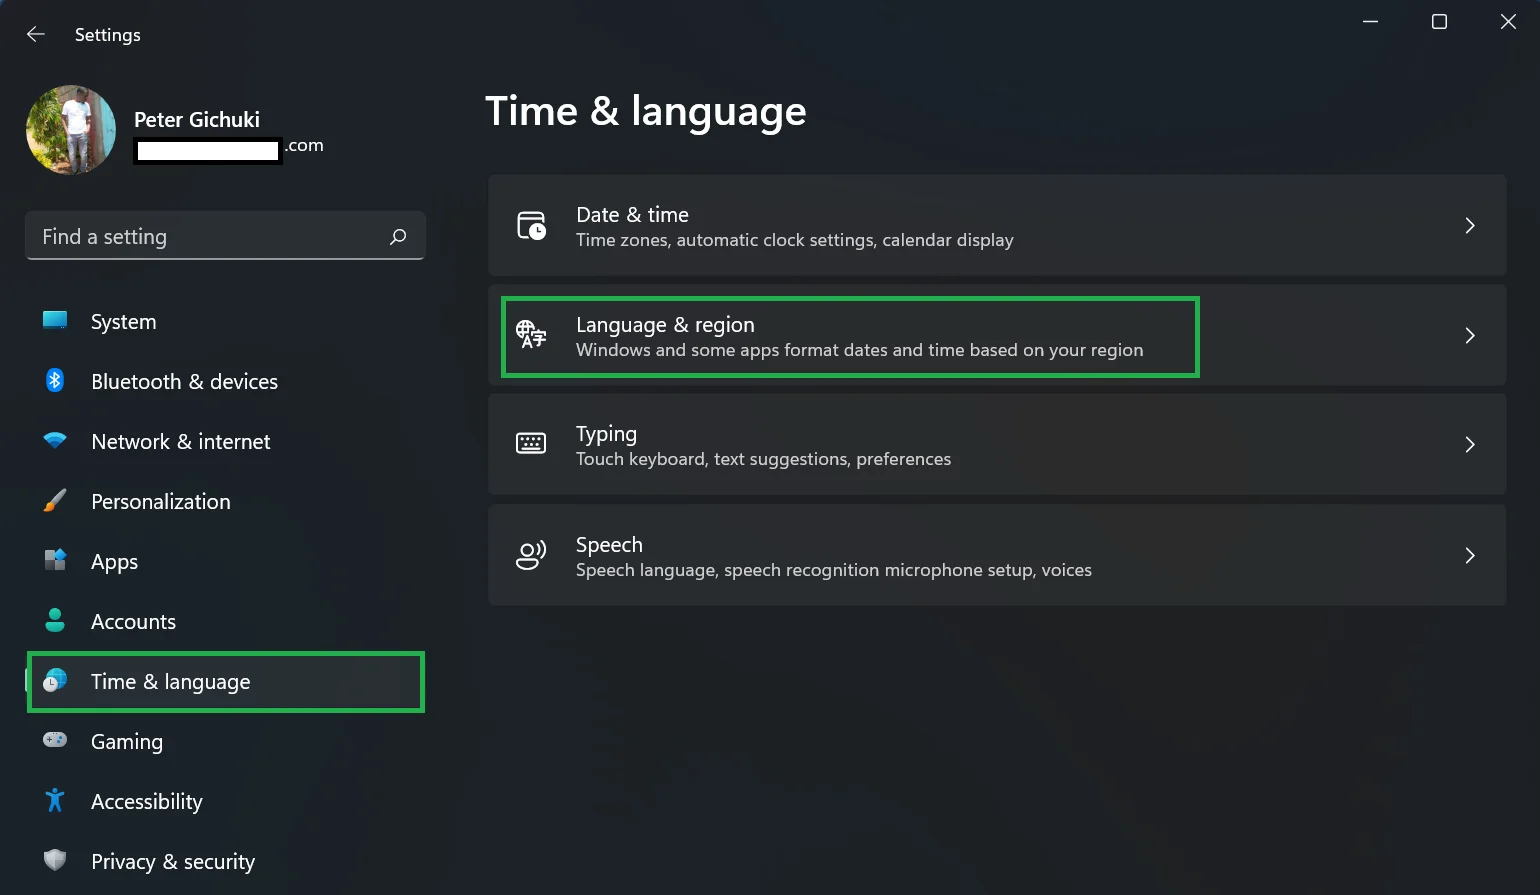
- Select Language & region, and then follow steps 3 through 5 that are described above.
Also read: Expert Tips: How to Clean Laptop Mouse and Keyboard
Method 4: Use the Ctrl + Shift + Esc hotkeys
The Ctrl + Alt + Del key combination is handy when the PC isn’t responding, as it gives you access to the Task Manager.
However, if it fails to work in the hour of need, you can use the Ctrl + Shift + Esc keyboard shortcut to forcefully shut down any unresponsive programs that could have triggered the error.
Here’s how:
- Press the
Ctrl + Shift + Esckeys simultaneously, in that order. - It should open with the Processes tab selected by default. Find the problematic program that you suspect caused the issue, select it, and click End task at the bottom left corner of the window.
- Repeat the process for all other unresponsive applications.
If you can’t access the Task Manager for some reason, press and hold the power button to initiate a hard shutdown.
Your Windows 10 or Windows 11 computer may be infected with malicious software. If that’s the case, follow the steps in Method 5 below to remove the malware.
Also read: Ultimate Guide: How to Set the Priority Using Windows Task Manager
Method 5: Perform a malware scan
Viruses and malware affect systems in a way that causes certain programs and configurations to malfunction.
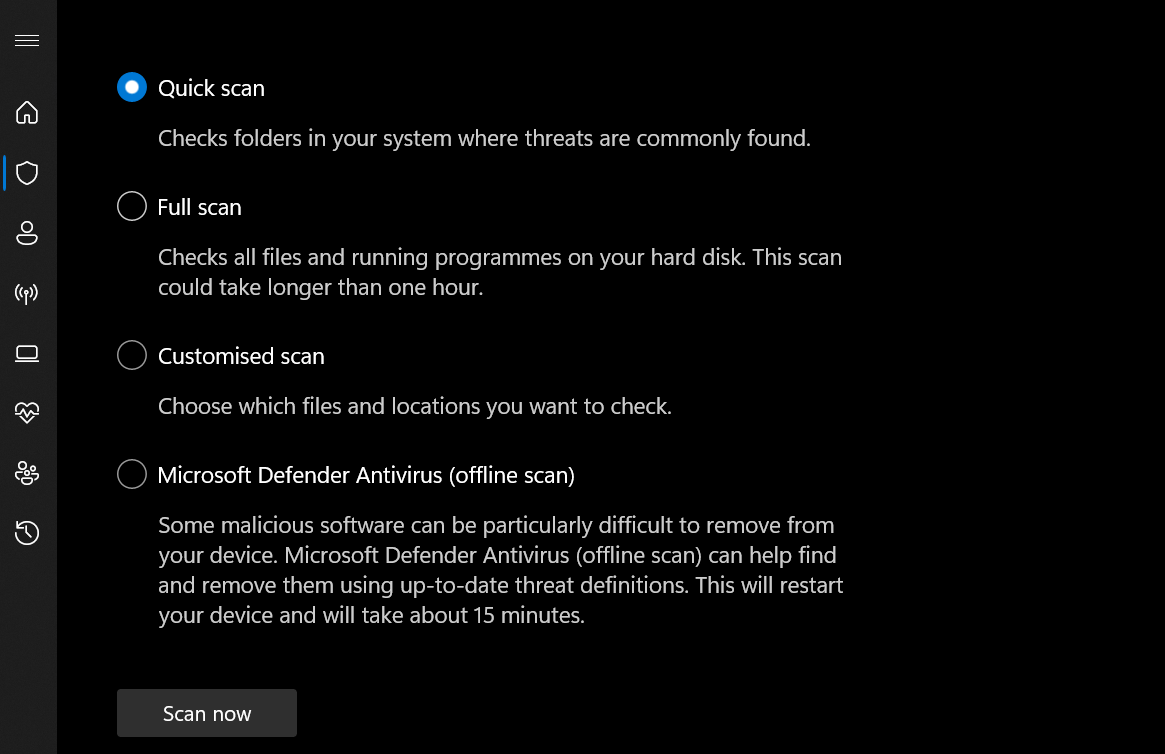
You can use the built-in Windows Defender security tool, which does a great job of removing viruses and malware. Here’s how:
- On your taskbar, click on the Show hidden icons option and select Windows Security.
- Select Virus & threat protection.

- Select Scan options, choose the type of scan you want to perform, and hit the Scan now button. For a more thorough scan, choose Microsoft Defender Antivirus (offline scan).
Most importantly, Auslogics Anti-Malware can detect even the rarest forms of malware and will keep your system safe from the sneakiest threats.
Method 6: Perform an SFC scan
In some cases, corrupted system files are causing the Ctrl + Alt + Del issue. To determine if this is the reason behind the problem, you can run an SFC (System File Checker) scan.
The tool will locate and repair corrupted Windows system files. Here are the instructions for launching the program:
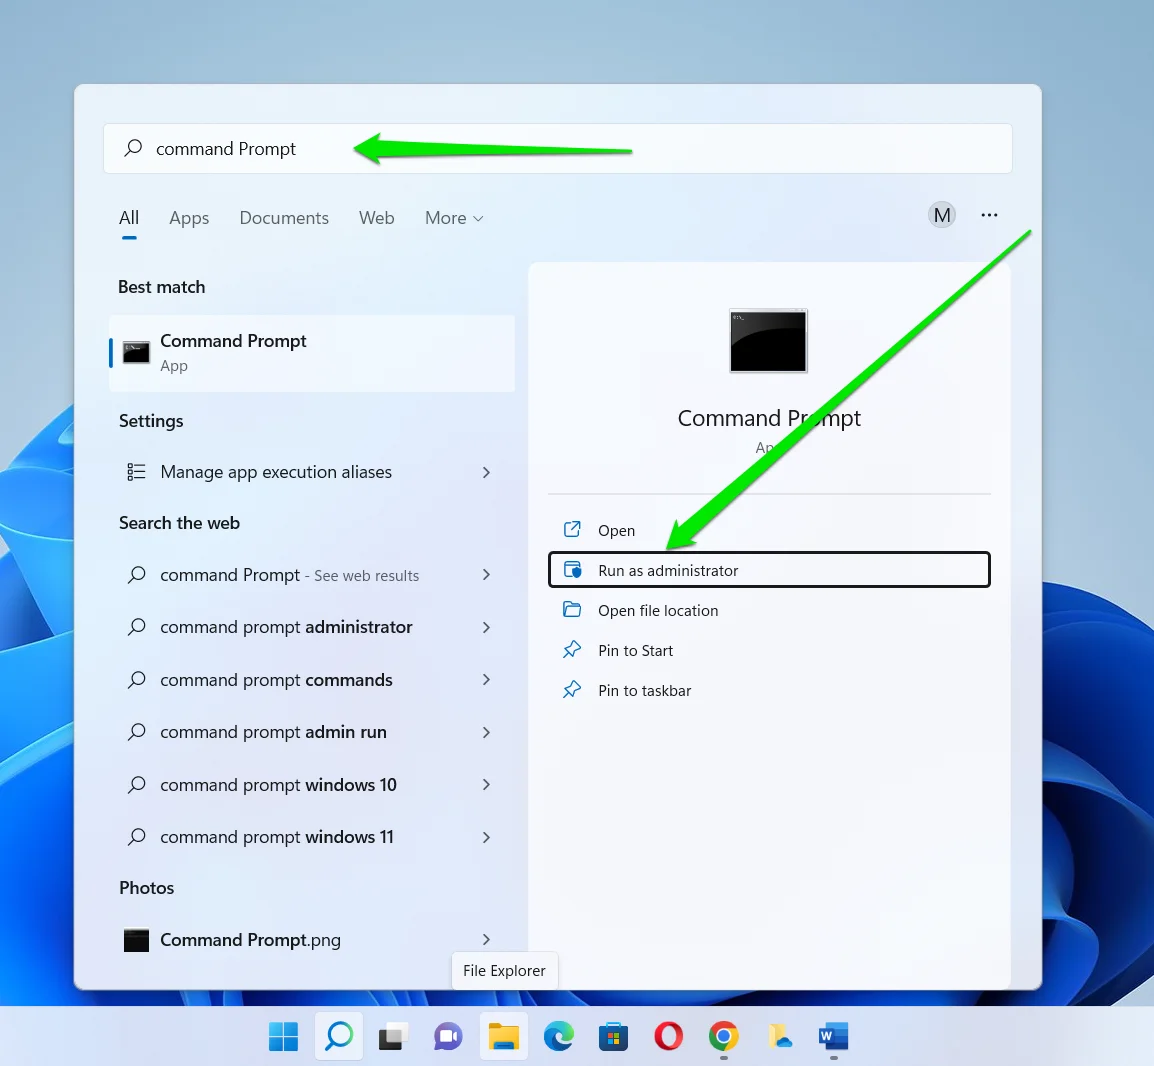
- Click the search icon on your taskbar.
- Type
Command Prompt. - Right-click Command Prompt from the results, then select Run as administrator. If a message appears asking for your consent, click Yes. This should allow you to launch Command Prompt.
- Run the commands below. Press Enter after every command and wait for the process to complete.
Dism /Online /Cleanup-Image /ScanHealth
Dism /Online /Cleanup-Image /CheckHealth
Dism /Online /Cleanup-Image /RestoreHealth|
sfc /scannow
- Once you’ve successfully run the aforementioned commands, you can now close Command Prompt. Try pressing
Ctrl + Alt + Deland check if the problem has been fixed.
Method 7: Modify your registry
Some users reported that third-party software automatically made some changes to their registry. So, in your case, it possibly modified the default values. You can fix this by getting the value back to its default value.
Before proceeding, you must know that the registry is a sensitive database. This means that even a single punctuation error can damage your computer.
So, you should only go ahead with the steps when you are absolutely confident that you can follow the instructions down to the smallest detail.
Otherwise, you should just ask a professional to do this for you.
Better still, be sure to back up your registry using the steps below:
- Launch the Run dialog box using the Win + R shortcut keys, type
regedit, and hit Enter. - Select Yes on the prompt.
- Click File > Export.
- Choose where to save the registry backup, assign the file an appropriate name like RegBackup, and select All under Export range.
- Finally, click Save.
That said, here are the instructions for correcting the default settings on your registry:
- Press
Windows key + Ron your keyboard. This should bring up the Run dialog box. - Type
regedit, then hit Enter. - Navigate to the following path:
HKEY_CURRENT_USER\Software\Microsoft\Windows\CurrentVersion\Policies\System
- If that path does not bring up results, you can go to:
HKEY_CURRENT_USER\Software\Microsoft\Windows\CurrentVersion\Policies
- Right-click Policies, then choose New.
- Create a new key by selecting Key from the list. Set the name of the new key to System. You can skip this step if a key named System already exists.
- Go to the right panel, then double-click DisableTaskMgr. This will allow you to view its properties.
- If you can’t see DisableTaskMgr, you can right-click System. Select New, then click DWORD (32-bit) Value. Set the name of this new DWORD entry to DisableTaskMgr. Double-click it to view its properties.
- Make sure that Value data is set to 0 (zero).
- Restart your computer, then check if the
Ctrl + Alt + Delkeyboard shortcut is now working.
Also read: How to Back Up and Restore the Windows 10 Registry
Method 8: Perform a clean boot
At this point, you might wonder, “Why does not the Ctrl + Alt + Del combination work on Windows 10/11?” Well, don’t give up just yet. In some cases, certain startup programs and services might be causing the problem.
So, you can resolve this by performing a clean boot. This troubleshooting technique allows you to manually disable the startup programs and services, enabling you to identify the problematic software.
Once you properly determine what’s causing the issue, you can remove it and get the Ctrl + Alt + Del sequence to function again.
Here’s how you can perform a clean boot:
- Press
Windows key + Rto open the Run dialog box. - Type
msconfig, then hit Enter. This should bring up the System Configuration window. - Go to the Services tab, then ensure the Hide all Microsoft services option is not selected.
- Click the Disable all button.
- Go to the Startup tab, then click the Open Task Manager link.
- Click each startup item, then click the Disable button.
- Go back to the System Configuration window, then click OK.
- Select Restart.
When your computer turns back on, try pressing Ctrl + Alt + Del and check if it is now functioning properly.
If it is, you need to repeat the steps to open the System Configuration window. Enable the services and applications one by one.
Make sure you restart your computer every time you activate an item. This will help you identify the software that’s causing the issue.
Windows 10/11 (8, 7, Vista, XP)
Also read: How to Perform a Clean Boot in Windows 10?
Method 9: Install the latest updates
It is also possible that you have missing updates, preventing the Ctrl + Alt + Del sequence from working properly on your PC.
You can fix this by installing the latest updates on your computer. You can manually check for updates by following the instructions below:
- Press
Windows key + Ion your keyboard. This should bring up the Settings app. - Select Update & Security.
- Go to the right pane, then click the Check for updates button. Your system will automatically search for available updates. It will also download them discreetly in the background.
- Once you’ve downloaded the latest updates, you can check if the
Ctrl + Alt + Delkeyboard shortcut is malfunctioning.
If you’re using Windows 11:
- Bring up the Settings app, scroll down to the last option—Windows Update—and select it.
- Check if there are pending updates and download them. Otherwise, click Check for updates, and Windows will automatically download and install all available updates.
Related: Ultimate Guide: How to Manually Check and Install Windows Updates
Method 10: Remove Microsoft HPC Pack
Some users reported that LogonUI.exe is somehow related with the Ctrl + Alt + Del issue. These users said that Microsoft HPC Pack probably caused the problem.
So, to resolve the issue, you must uninstall Microsoft HPC Pack from your computer.
Use an appropriate uninstaller to eliminate all the files associated with this service pack. Once you’ve done that, check if you can properly use the Ctrl + Alt + Del sequence again.
Method 11: Restore your system
System Restore is a crucial function on Windows systems that lets you take your system back to a state when everything is working as expected.
If the Ctrl + Alt + Del not working on Windows 10/11 issue started out of the blue, you might have done something, like installed a malicious program or changed certain system settings.
Keep in mind that system restore will remove device drivers and programs installed after the restore point is created.
Therefore, list down all the installed programs that you’ll need to reinstall so you can do so after the process.
System Restore is useful for cases where you can’t pinpoint the source of the problem. To perform a system restore:
- Bring up the Run dialog box using the
Win + Rshortcut keys. - Type
exeand hit Enter. - This action should launch the System Restore window. Select Recommended restore to undo the most recent changes to your system. Otherwise, select Choose a different restore point and click Next.
- Select a restore point or click on Show more restore points if you don’t see the appropriate restore point.
- Confirm your choice and click Finish.
System Restore will restart your PC to apply the changes. After it’s done, check if Ctrl + Alt + Del now works on your computer.
The Ctrl + Alt + Del Sequence Not Working on Windows 10/11: Fixed
If you find that the Ctrl + Alt + Del sequence is not working on your Windows 10 or 11 PC, don’t panic. There may be quite a few reasons for the issue, but it’s easy to solve.
Check your keyboard, update drivers, adjust settings, scan for malware, run an SFC scan, modify the registry, perform a clean boot, and make sure your system is up to date. Keep in mind that restoring your system to an earlier point can also be a helpful step if the issue persists.
Each of these methods is tried and tested, ensuring you can regain control over your PC with confidence.
If you’ve found this guide helpful, share it with others who might be experiencing the same issue, and don’t hesitate to reach out with any additional tips or insights in the comments below.