![[StepbyStep Guide] How to Upgrade Your Graphics Card on Laptop and Desktop PCs Like a Pro](https://www.auslogics.com/en/articles/wp-content/uploads/2025/01/Step-by-Step-Guide-How-to-Upgrade-Your-Graphics-Card-on-Laptop-and-Desktop-PCs-Like-a-Pro-568x359.webp)
- When Is It Necessary to Upgrade Your GPU on Your Laptop or Desktop PC?
- Factors to Consider before a Desktop PC or Laptop Graphics Card Upgrade
- How to Upgrade a Graphics Card on Your Laptop
- How to Upgrade a Graphics Card on Your Desktop PC
- What if the Laptop’s Graphics Card Can’t Be Upgraded?
- Possible Issues with the Graphics Card Upgrade and How to Fix Them
- Choose the Best GPU for Your Laptop Upgrade
- FAQ
Did you know that GPU performance doubles every two and a half years? This trend, known as Huang’s Law, shows that graphics cards are getting more powerful at a faster rate compared to traditional CPUs.
That means a graphics card upgrade on your laptop or PC can indeed help you increase your productivity, get faster processing times, and enjoy the latest games and applications.
Upgrading your GPU is relatively simple if:
- Your system allows it.
- Your system has enough power.
- You have a CPU that won’t create a bottleneck.
If you are not sure about the upgrade, this guide will help you decide. In addition, you’ll learn how to upgrade your GPU without damaging your computer.
When Is It Necessary to Upgrade Your GPU on Your Laptop or Desktop PC?
There are some things to consider before deciding whether to upgrade or not. If you upgrade your graphics card when it’s not needed, you might waste money on minimal performance gains while also facing potential bottlenecks or compatibility issues.
Additionally, the new graphics card could increase power consumption and depreciate quickly. And this can make the upgrade less cost-effective in the long run.
So, here are a few telltale signs that suggest you might need a laptop GPU upgrade :
- Poor performance in graphics-intensive applications. If your system is struggling with rendering graphics, playing demanding games , or experiencing lower than expected frames per second, it might be time for a change.
- Frequent crashes or system instability. If games or other graphics-heavy applications are constantly crashing, your GPU may be the culprit.
- Inability to run new software or games: If your laptop or PC can’t support the latest software or games, a GPU upgrade might be necessary.
- Your laptop screen stops working: If your computer screen goes completely blank or black, even though other components like the CPU and power are working properly, you might consider changing the GPU.
While these problems are typical with a failing graphics card, they can also be symptoms of something else. For instance, of the insufficient power supply, overheating , or corrupted or outdated drivers.
To rule these issues out, check for overheating, update your drivers, and look up the power requirement of your GPU on the manufacturer’s website. Also run a GPU stress test to check its performance.
Factors to Consider before a Desktop PC or Laptop Graphics Card Upgrade
You can’t simply pick the highest performing card and slot it into your laptop. Here are some factors to consider when upgrading your laptop or desktop PC. This will help you to evaluate the critical aspects before upgrading to avoid compatibility issues or unnecessary expenses:

1. Check your laptop’s hardware limitations
Not all laptops allow graphics card upgrades . In fact, replacing GPUs is nearly impossible in most modern laptops, like AMD Radeon Vega and Intel UHD. This is especially true for thin and light models, which often have integrated GPUs that can’t be replaced. So before anything else, check the laptop’s manual or official specifications for upgrade options. Here’s a simple way to check.
- Press
Windows + Rand type dxdiag and pressEnter. Go to the display tab and check your GPU model and manufacturer.
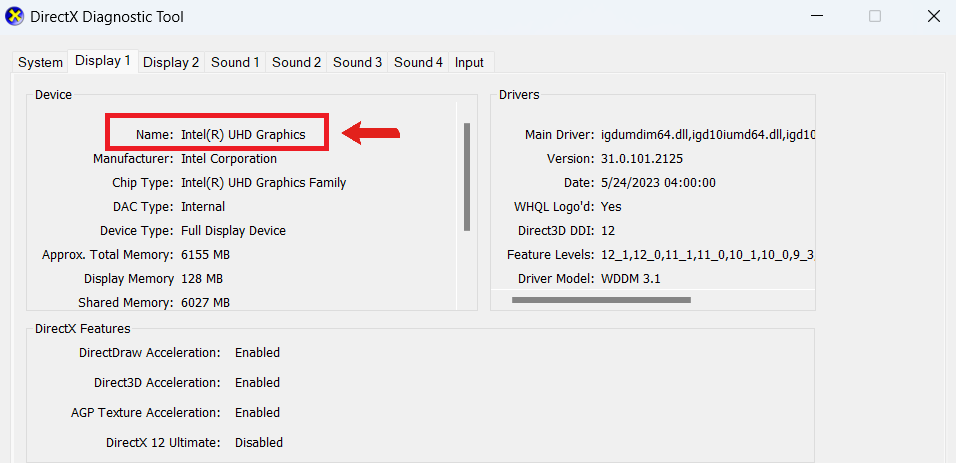
- From the screenshot above, the Intel(R) UHD Graphics means that I have an integrated GPU. That means I can’t replace or upgrade the video card because it’s physically part of the CPU. In this case, I’ll have to look for external GPUs (more on that later).
2. Check your graphics card
If your laptop lets you upgrade the GPU, the next foundational step is to know exactly what GPU you currently have , whether it’s the NVIDIA GeForce RTX 2070/2080 or the NVIDIA GeForce GTX 980. This helps you know what type of upgrade to go for and ensure that the physical size, power requirements, and connection types are all compatible.
3. Performance vs. cost
GPUs come in a wide range of prices. High-end GPUs can deliver amazing performance, but they also come with a hefty price tag. Evaluate your needs and decide whether the potential performance boost is worth the investment.
4. Upgrading for future-proofing
If you want your laptop to run future and more advanced games or applications smoothly, you might need to invest in a more powerful GPU.
5. Physical dimensions
Graphics cards come in various sizes. Make sure that the card you choose will fit into your laptop’s available space. You can do that by checking the user manual. It may provide the dimensions of the existing GPU and any space for available upgrades. If it doesn’t have such information, check the manufacturer’s website and search for details like “Supports GPU upgrades.”
6. Power consumption
High-end GPUs often require more power. Check your laptop’s power supply capacity from the laptop manufacturer’s website to ensure it can handle the new GPU. Compare your laptop’s power supply specs with the new GPU’s power requirement to ensure that it’s compatible and stable when upgraded.
7. Thermal management
Higher-performance GPUs generate more heat. Your laptop’s cooling system must be able to handle this to prevent overheating and maintain stable performance.
8. Laptop’s BIOS compatibility
Some laptops have a BIOS that may not be compatible with all graphics cards. Check your laptop manufacturer’s compatibility list to verify.
9. Check your motherboard’s compatibility
Generally, you don’t have to worry about your motherboard’s PCIe version, as PCIe maintains a degree of backward and forward compatibility. This compatibility means a newer graphics card can fit an older slot and vice versa. However, the motherboard and the new GPU must be electrically compatible, so it’s important to check.
And even though GPUs are upgradeable, they still need to fit into a PCIe slot on the motherboard.
Plus, if you decide to go for eGPUs, you need to know if your laptop supports Thunderbolt 3 or USB-C connections.
📌 Related read: How to Find the Motherboard Model I Have on My PC?
10. Consider your CPU
CPU compatibility is generally not a concern when installing new graphics cards. However, a powerful GPU paired with an older or weaker processor can lead to bottlenecking. This issue happens when the CPU limits the graphics card’s performance because it can’t keep up with the unit’s requests. So, when getting your GPU, ensure the difference in specification with your CPU won’t affect your expected speed.
📌 Further read: How to Check What CPU Do I Have on My Windows PC?
Upgrading your desktop’s video card is quite different from a laptop’s GPU upgrade. Let’s go over essential points to consider:
1. Check your current GPU performance
This is an important step because it helps you know your GPU’s baseline performance and determine if it meets your current needs. If you’re experiencing bottlenecks, checking the performance can help you pinpoint specific areas where performance is lacking, such as gaming frame rates or rendering times. This information will help you choose a GPU that addresses those issues. Here’s how to check the current video card performance:
- Open the DirectX Diagnostic Tool to check your GPU model and manufacturer (
Win + I, type dxdiag , and hitEnter). - Use free benchmarking tools like 3D Mark or Unigine Heaven to test your GPU’s performance. Then, note down the benchmark scores and compare them to average scores for similar GPUs.
Run a demanding program or play graphically intensive games, like Cyberpunk 2077 , and monitor the FPS and performance. If you notice lag, slowdowns, or low FPS, you’ll know which GPU upgrade to go for. For example, if you notice that your FPS drops massively, it means you need a graphics card with a higher VRAM and faster clock speeds.
2. Check for motherboard and power supply unit (PSU) compatibility
Here are some tips to keep in mind:
- Make sure your motherboard supports the new video card through the PCIe x16 slot, which is commonly used for GPUs.
- Verify that the slot’s generation, like PCIe 3.0, 4.0, etc., is compatible with the new graphics card. Even though the PCIe standards are backward and forward compatible, it’s still crucial to understand the slot’s generation to better optimize your desktop PC for performance.
- In terms of the PSU, make sure the power supply can provide enough power for the new video card, including having the necessary power connectors, like 6-pin, 8-pin, or multiple connectors.
- Check the wattage rating for your PSU to ensure it meets the requirements of the new video card. To do that, open your computer case and search for the PSU, which is usually at the bottom or back of the case. Look for the label and check for “Wattage” or “Power output” value. This shows the maximum wattage that the PSU supports.
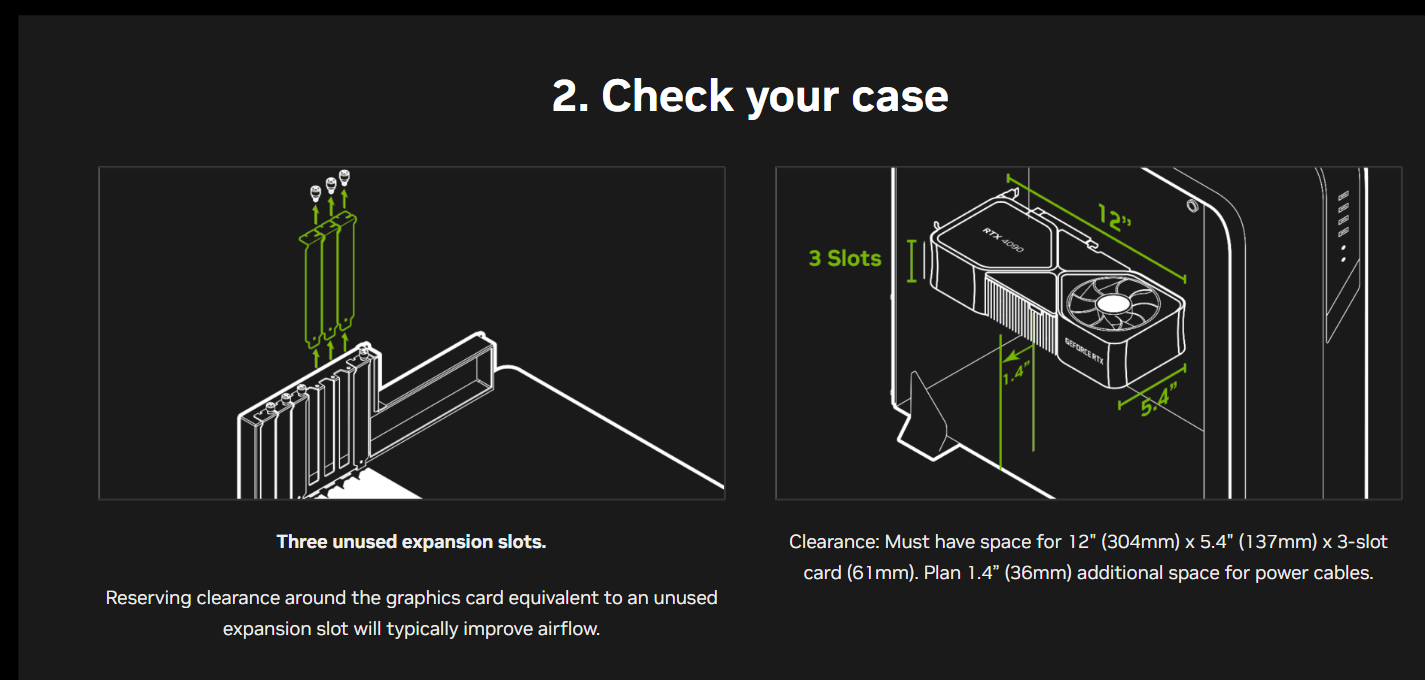
3. Check the physical size and case compatibility
Check if the new graphics card can physically fit inside your computer case. GPUs come in various sizes, and some high-end models can be pretty large. For example, the NVIDIA GeForce RTX 3080 is approximately 11.2 inches long, 4.4 inches high, and 2 inches wide. If your system case is 12 inches long, it fits, but you have to make sure there’s enough space for the height, width, and cooling.

You can check the GPU’s specifications on its manufacturer’s page to confirm its size demands. For example, NVIDIA provides information regarding the ideal clearance for airflow for the GeForce RTX 4090.
4. Don’t forget the cooling and ventilation
Does your case have enough cooling to support the new video card? For high-end GPU models, like the AMD Radeon RX 6900 XT, proper airflow and cooling are crucial to prevent overheating. If necessary, consider additional case fans or upgrading your cooling system.
5. Consider the budget
Plan your budget for the upgrade. Besides the cost of the GPU itself, you may need to invest in additional components, such as a more powerful PSU or enhanced cooling solutions. Ensure that your budget covers all potential expenses.
6. Consider how future-proof the new GPU is
Look for a new graphics card that can handle upcoming games and applications and that will remain relevant for years to come. Investing in a slightly more powerful GPU now can save you from needing another upgrade soon.
How to Upgrade a Graphics Card on Your Laptop
Let’s go through the process to upgrade your graphics card. However, before you begin, back up your data. It’s a crucial step, often overlooked, but shouldn’t be neglected.
Step 1: Gather the right tools
You will likely need:
- A screwdriver set, preferably one small enough for your laptop screws.
- An anti-static wrist strap. This will keep you grounded during the process and prevent potential damage to the laptop components. This is important because a static charge, even small, can cause severe harm to delicate electronics inside your laptop.
- A clean, well-lit workspace. This helps you see small screws and components clearly.
Step 2: Turn off the laptop
Before you start unscrewing your laptop, turn it off to avoid the risk of electric shock or damaging the laptop. Also, ensure you disconnect your laptop from any power source and remove the battery (if possible) for safety reasons.
Step 3: Open the case
Using your screwdriver, carefully remove the screws while noting their original positions. Some laptops use screws of different lengths, and mixing them up could cause issues during reassembly. To avoid such problems, separate the screws by size and store them safely in a small container or on a magnetic mat, so you don’t lose any. You might also consider labeling them according to where you removed them from.
You have to avoid static electricity at all costs because it can damage sensitive components, like frying circuits, corrupt data, and render parts like the GPU, CPU, and memory unusable.
So, if possible, wear an ESD wristband or touch a piece of metal that’s not painted. This will discharge any static electricity. If you move away from the workspace, repeat the process again to release any static electricity.
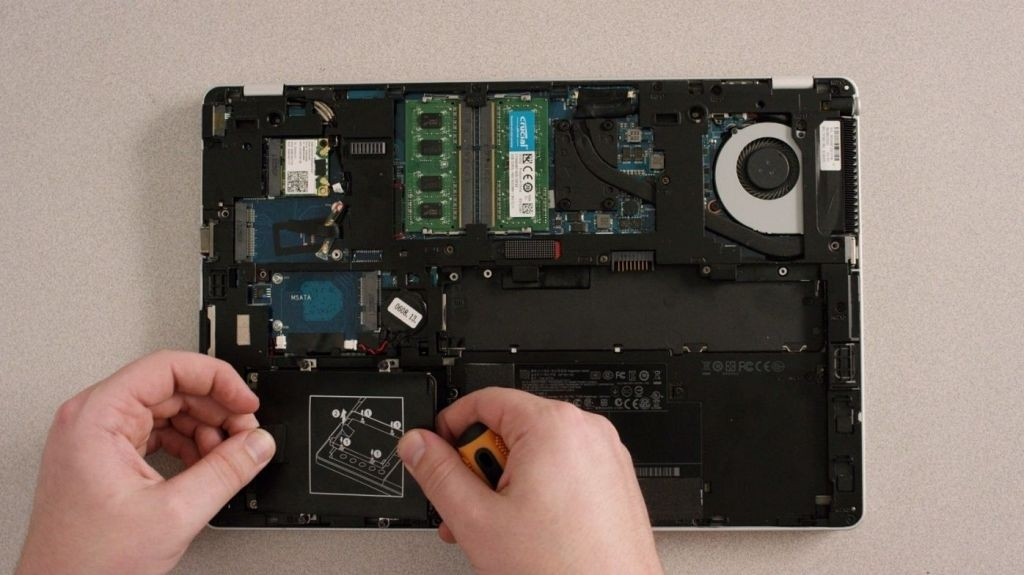
Step 4: Detach the GPU
Once you remove the back panels, locate the GPU by looking for markings or labels, such as the manufacturer’s name (e.g., NVIDIA, AMD). In most laptop models, it’s usually the largest component, situated near the CPU, often with a heat sink or a fan attached.
By the way, the CPU is usually located around the center of the motherboard. After identifying the GPU, unscrew it from its mount.
Step 5: Install the new graphics card
Be cautious during this step. Carefully align your new GPU with the slot and gently push it in until it fits securely. Avoid forcing the GPU into the slot; if it doesn’t fit easily, it might be misaligned.
Once seated correctly, screw it back into the mount to ensure it is secure and won’t move around when you’re using the laptop.
Step 6: Replace the back panel carefully
Be careful when replacing the back panel to ensure all ports and vents align correctly with their respective openings. Screw it back into place using the screws you removed earlier.
It’s crucial to ensure all screws are tight to prevent the back panel from coming loose. However, be mindful not to overtighten them, as this could damage the screw threads or the laptop casing.
Step 7: Turn on the PC and install drivers
After successfully upgrading a graphics card on a laptop, update the necessary drivers. To find the latest drivers for your new GPU:
- Visit the official website of your GPU’s manufacturer. The two most common ones are NVIDIA and AMD.
- Locate the drivers section.

- Download the appropriate driver for your specific GPU model.
- Open the downloaded file to start the installation process.
- Follow the instructions on the screen, which usually involve agreeing to terms and conditions and selecting an installation location.
- Restart your laptop after the installation to ensure the new drivers take effect.
If you run into issues during driver installation, try uninstalling old GPU drivers before installing the new ones. You can also use a reputable third-party driver updater to automatically update them according to the manufacturer’s recommendation.
Step 8: Test and optimize your graphics card
Here’s a quick rundown of how to check if the laptop GPU upgrade is working perfectly:
- Performance benchmarking: Use software like 3DMark or Unigine Heaven to test your GPU’s performance. These tools will provide scores that you can compare with standard results for your particular GPU.
- In-practice performance: Run graphics-intensive games or applications to check if there’s noticeable improvement.
What to do if the graphics card is underperforming
If your GPU doesn’t perform as expected or you encounter issues, try these common troubleshooting steps:
- Reinstall drivers. Issues might arise from faulty driver installation. Uninstall and reinstall them. You can do so from the Device Manager. Just right-click on your graphics card and select Uninstall device . After that, restart your PC to automatically reinstall the driver.

- Ensure the new GPU is properly seated. If your laptop isn’t recognizing the new GPU, it might not be properly inserted. Check the seating and reconnect if necessary.
- Check the power supply unit. Your GPU might not be getting enough power from the power supply unit. Check the GPU’s power requirements in the user manual. Use tools like HWMonitor to add the power consumption of all components (CPU, motherboard, RAM storage drives, cooling fans, and any peripherals). Make sure the total power consumption is less than the maximum PSU’s wattage rating. Ideally, you want your PSU to operate around 50-80% load for optimal efficiency.
If all else fails, seek professional help. Remember, this process can be technical, and it’s okay not to get everything right on the first try.
How to Upgrade a Graphics Card on Your Desktop PC
Follow the steps below to upgrade your desktop’s GPU:
Step 1: Toolkit for installation
You need a screwdriver and, optionally, an anti-static wrist strap to prevent electrostatic discharge.
You can use a Phillips-head screwdriver in most cases, but other types, such as Pozidriv, can work as long as they fit the screws in your chassis.
While you’ll be turning off your computer before installing the card, it won’t hurt to take extra precautions.
Step 2: Uninstall your current driver
Your graphics card driver is the software utility that helps the hardware communicate with your operating system and other hardware components. An incompatible driver can render your shiny new GPU useless.
So, before you start, remove any piece of software attached to the current GPU, as you’ll install a new one for the device you’re about to mount.
If you use a modern AMD or NVIDIA card, go to the Settings interface to remove the manufacturer software application. Follow these steps:
- Right-click the Start button and select Settings.
- Click Apps after the Settings app opens.
- Click Installed apps if you’re running Windows 11.
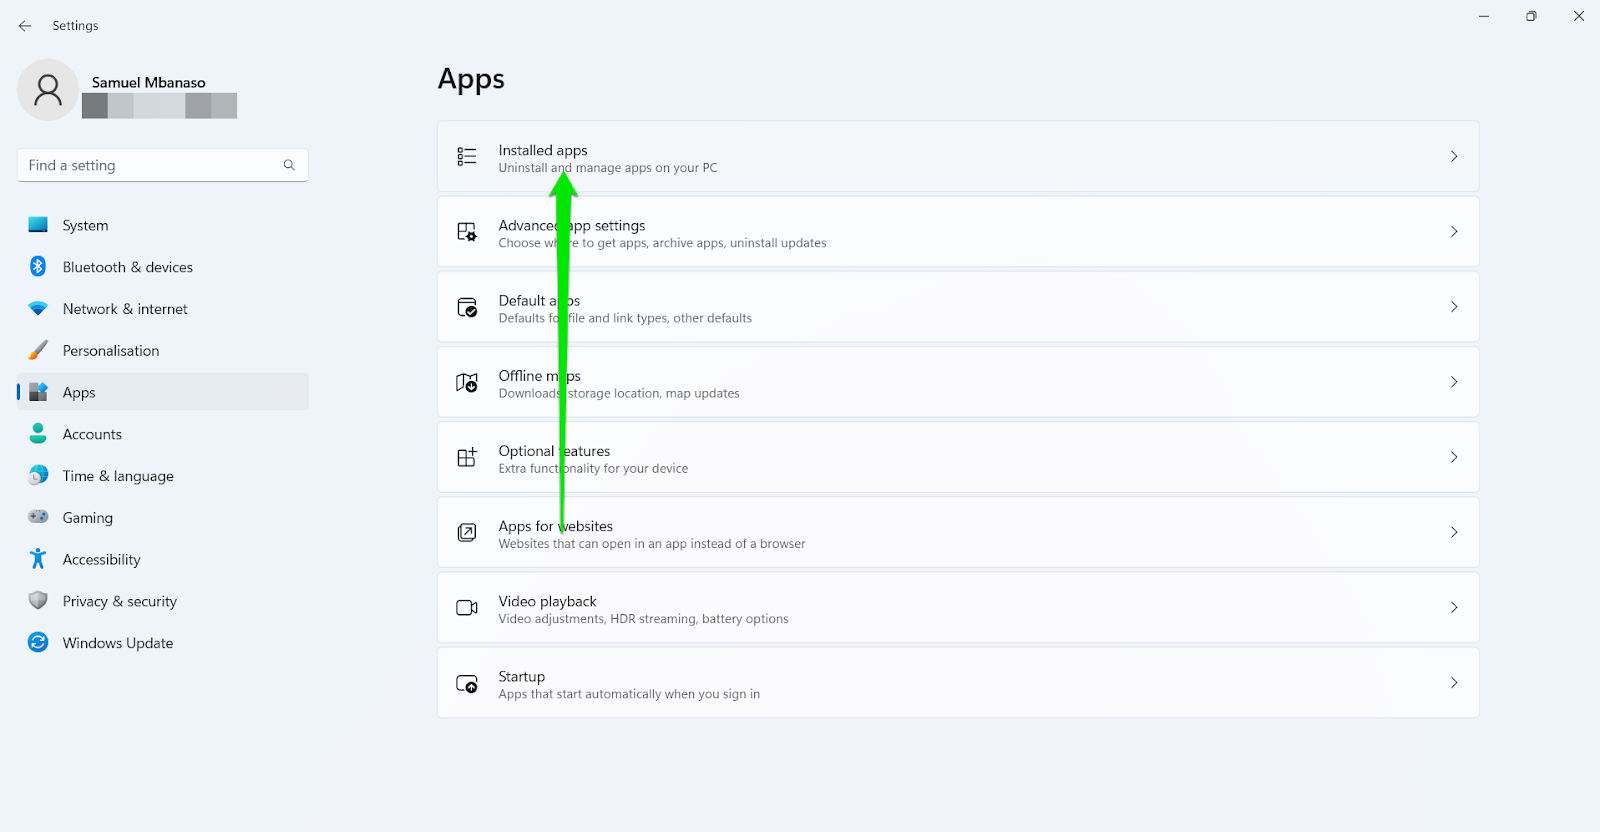
- Use the search bar to find the app (GeForce Experience or Radeon Software).
- Click the app and select Uninstall (Windows 10) or click the three dots beside the app and select Uninstall (Windows 11).
Step 3: Installing the graphics card The steps below make up the complete guide on how to install a new GPU:
- Unplug your computer
Shut down your PC, turn off its power supply unit, and unplug it from its power source. Once completely turned off, place your PC case by its side so your motherboard faces up.
- Unscrew the slot covers (expansion brackets)
Most modern PC cases come with metal plates at the rear. Others may come with disposable plastic plates. These plates typically have holes (like vents) for airflow. They serve as cover for slots that are not yet occupied. If you’re replacing a GPU, unscrew the brackets from the case.
- Locate your motherboard’s PCIe x16 slots
The ideal slot for your graphics card is the one closest to the CPU’s heat sink. You want to ensure you install the graphics card on the processor’s PCIe lane. If you’re replacing an existing GPU, detach its power connectors, press down the latch beside its slot, and remove it.
Clear the PCIe x16 area and ensure wires don’t obstruct access to the slot. Now, push down the latch on the end of the PCIe x16. You can use your screwdriver or a similar tool to press it down if your fingers can’t reach it.
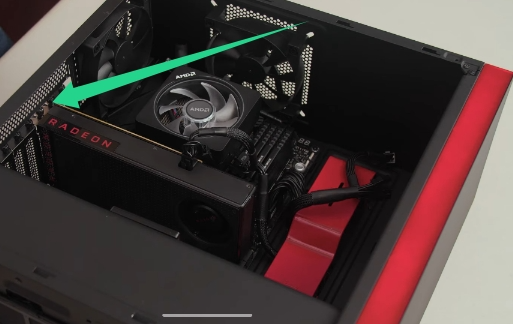
- Install the new graphics card on the PC
Check if the new graphics card’s PCIe interface has a cover and remove it. Next, position the interface over the x16 slot. Now, press gently until the GPU locks in and the latch returns to its upright position. You should hear a click when the latch stands erect.
- Screw the graphics card’s expansion bracket
After installing the graphics card on your motherboard, its brackets should align with your PC’s chassis on the rear. Use the screws you detached earlier to fasten the installed graphics card to the case.
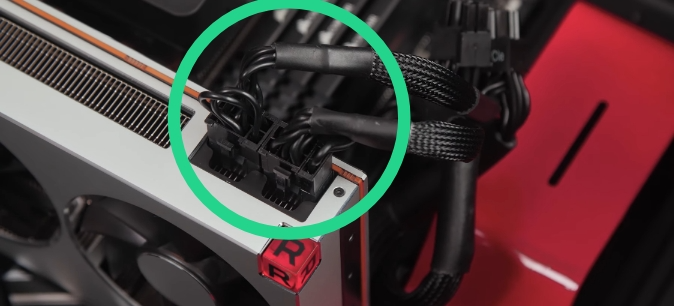
- Connect the power cable to the graphics card
Look at your graphics card’s power connector ports to determine how many pins it requires. You may need to plug in an 8-pin, 6-pin, or 6+2-pin connector. Close your PC’s case and turn on your computer.
Step 4: Install the driver
Mounting the graphics card is the hardware part of the process. The final lap involves installing its driver. You can go to the card manufacturer’s website to download the driver.
Take note of its make and model, as you must provide them when searching for the software application. Run the package after downloading it, then restart your computer.
The update of your graphics drivers is similar to laptops and PCs. So you can easily follow the guide we have provided in a previous section.
To keep the graphics card ship-shape, you need to watch for regular driver updates. If you use AMD or NVIDIA software, you’ll likely receive automatic updates for your device.
The tool is designed to detect outdated and malfunctioning drivers and install their latest versions. It can also update your graphics card’s driver.
What if the Laptop’s Graphics Card Can’t Be Upgraded?
Upgrading the graphics card on a laptop can be tricky, as you may have noticed in the previous section. And for most models, it’s simply not an option. Manufacturers prioritize portability, so they integrate the GPUs into the motherboard.
Let’s find out why you can’t upgrade video cards in most laptops and a few exceptions you can try out:
Why are most laptop graphics card upgrades not possible?
- Integrated GPUs. Many laptops, like Intel’s Arc or AMD’s Radeon hardware, come with integrated GPUs . These video cards are built directly into the CPU or processor and are part of the motherboard. Upgrading such a setup means replacing the entire motherboard. That’s like replacing your car’s engine instead of doing an oil change—it’s impractical and costly.
- Discrete GPUs. While laptops with discrete GPUs (dedicated graphics cards) may seem upgradeable, it’s usually not true. It’s a common misconception. Most of these video cards are custom-fitted to the laptop’s design and cooling system, so it’s impossible to swap them out.
- Thermal and power limitations. Even if an upgrade is theoretically possible, laptops are designed with specific power delivery and thermal management systems. A more powerful GPU would likely exceed the laptop’s capabilities, and that could lead to overheating or instability.
Are there exceptions to the laptop GPU upgrade?
It’s rare, but some high-end laptops do support graphic card upgrades, particularly those designed with MXM slots. MXM slots allow for a modular GPU design, making upgrades more feasible. Here’s a table comparison:
| Laptop model/series | Is the GPU upgradeable? | Description |
|---|---|---|
| Dell XPS 15/17 | Yes (with an MXM slot) | High-end NVIDIA or AMD GPUs connected via an MXM slot |
| Framework Laptop 16 | Yes | A modular design allows GPU upgrades |
| Lenovo ThinkPad X1 Extreme Gen 5 | Yes | Supports MXM-connected GPUs |
| Microsoft Surface Pro 9 | Yes | An MXM slot ensures GPU upgradeability |
| Alienware Area-51m (R1 and R2) | Yes | Uses a proprietary modular GPU design; upgrades are limited to compatible GPUs provided by Dell |
What to do if your laptop’s graphics card upgrade isn’t possible
If you find out your laptop’s GPU is not upgradable and you need more graphics power, consider using an external GPU (eGPU) enclosure. It’s an external device that connects your laptop via a Thunderbolt or USB-C port. It houses a desktop-class GPU to provide better performance for gaming, video editing, or other resource-intensive tasks. The table below lists eGPU models you can try out:
| eGPU enclosure model | Supported GPUs | Laptop compatibility | Description |
|---|---|---|---|
| Razer Core X | Full-size desktop GPUs (NVIDIA/AMD) | Requires a Thunderbolt 3 or 4 port | Sleek design; supports high-wattage GPUs |
| ASUS ROG XG Station 2 | Select NVIDIA and AMD GPUs | Compatible with ROG laptops and other Thunderbolt devices | Premium build, extra cooling features |
| AORUS Gaming Box | Comes with a pre-installed GPU | Thunderbolt 3-enabled laptops | Compact and portable |
| Sonnet eGFX Breakaway Box | Wide GPU compatibility | Works with macOS and Windows | An affordable and widely compatible option |
Why consider an eGPU?
Here are a few reasons to think about:
- Boost performance. You get a desktop-grade graphics performance for demanding tasks.
- Expand laptop lifespan. An eGPU allows you to keep using your laptop while vastly upgrading its capabilities.
- Setting up is easy. eGPUs are simple to set up with low technical know-how.
Possible Issues with the Graphics Card Upgrade and How to Fix Them

- Compatibility issues between the GPU and the computer’s display connector.
- Improper GPU installation.
- Misconfigured system settings.
To fix this, try connecting to an external display to see if the GPU is working to ensure the GPU is working. Next, check if it is correctly installed and that the display connector is compatible with your laptop. 
- The motherboard is much older than the card.
- The GPU is a different model.
- The GPU is from a different manufacturer.
To fix this, check the laptop manufacturer’s website for BIOS updates related to GPU compatibility. Make sure your BIOS is up to date before changing the GPU, as older BIOS versions might not recognize the new hardware properly.
📌 Related read: Best BIOS Settings for Gaming PC Performance

- If you’ve overclocked the GPU, revert to the default clock speeds and test the system. Make sure the drivers are properly installed and configured.
- Run hardware diagnostics and check the system logs to identify any underlying issues.
- If you’re using a Dell PC, you can use SupportAssist or use Hardware Diagnostics for HP PCs.
- Open the Run dialog box, enter mdsched.exe , and select your preferred option to run the diagnostics.

Choose the Best GPU for Your Laptop Upgrade
Learning how to upgrade your GPU is not enough. Finding the right GPU that gives you that significant boost without causing system issues is just as important. Remember there is no point upgrading if the laptop doesn’t get any better.
Before you begin, make sure you understand the specific requirements for your computer. Consider factors like performance needs, physical space, and budget to make an informed decision.
If this guide was helpful, we’d love to hear from you! Please leave a comment below and share your thoughts.