
iTunes offers you the best option for backing up your iPhone and iPad and syncing content between your Apple mobile devices and computer.But the fun of using iTunes is often spoiled for users who don’t know how to install the program or meet a roadblock during installation.
This article will help if you fall on either side of that coin.
You’ll learn how to install iTunes on Windows 10 and fix installation issues, such as problems with the Windows installer package for iTunes.
We’ll also show you how to fix common iTunes issues and make the application run smoothly.
Also read: [FIXED] Error 1720 “There is a problem with this Windows Installer package”
How to Install iTunes on Windows 10
The iTunes installation process is smooth and straightforward, all things being equal. If you want that kind of process, you must ensure your computer has everything in place to run the application.
While the program’s system requirements are a walkover for any Windows 10 computer, they are still worth looking at to ensure you cover all your bases. iTunes requires A PC with a minimum of a 1 GHz Intel or AMD processor or better and 512 MB of RAM, which is less than the minimum system requirements for Windows 10.
📌Also read: How to Find Your PC’s Windows System Information?
So, if your computer runs Windows 10, it should run iTunes without issues. That said, iTunes also needs 400 MB of free storage space to work. While this space is enough to carry the app’s program files, you still need more than that to save files you copy from your iPhone and store your backups.
Installing iTunes
You can go through the Microsoft Store or Apple’s website to install iTunes on Windows 10 . Going through the store is more straightforward, as it involves searching for the program and clicking the Get or Install button.
If you don’t want to install iTunes from the Microsoft Store, go to the Apple iTunes download page, save the iTunes Windows installer to your computer, and run it once the download is complete.
Installing the program either way achieves the same result. You will get the iTunes program alongside other background applications that help Windows communicate with your iPad and iPhone.
📌 Also read: How to Stop Apps from Running in the Background on Windows 10 PC?
Setting up iTunes
You can easily set up iTunes on your computer by connecting your iPhone or iPad via a USB cable. Once the device is connected, allow your phone to trust it when you see an alert. Go to the upper-left corner and click the device icon.
Next, go to the left side of the window to select the type of content you want to sync between your mobile device and computer.
After clicking the content type, go to the right side of the page and check the items you want to sync. Using your Apple ID, you can also log into the iTunes Store on your Windows computer.
To do that, launch iTunes, click Account, and select Sign In. This way, you enjoy the content you stream on your phone on your Windows computer.
Common iTunes Problems and Solutions
Users experience different iTunes problems with Windows 10. For some people, it’s installation issues. For others, it’s startup and crashing glitches. You’ll find fixes to eliminate the iTunes issue on your computer below.
Windows 10 Not Downloading
If you’re asking, “Why won’t iTunes download on Windows 10?” you likely have a storage or internet connection problem. Downloading iTunes through Apple’s website or the Microsoft Store requires a stable internet connection and at least 400 MB of free storage space, as mentioned earlier.
So, free up space on your hard drive or upgrade it and fix your internet issues to download the program. You can also try using a different web browser if you confirm that your connection is stable.
iTunes Installation Stuck
The latest version of iTunes may take a while to install, depending on your computer and internet connection. It’s natural to start worrying when the installation doesn’t move beyond a certain point.
The issue could be related to a common Windows installation problem you can clear by restarting your computer. However, there are other things that you can try.
Free Up Storage
As mentioned earlier, iTunes requires a minimum of 400 MB of free storage space. But that size is not always enough, as Windows requires extra free storage to run background processes and allocate to its virtual memory.
If you notice that your free storage space is in the red, try freeing up space on your hard drive and try again. You can do that by deleting temporary and unnecessary files, moving large files to a different storage device, and uninstalling unneeded third-party programs.
📌 Also read: How to Uninstall Programs and Delete Unnecessary Files in Windows 10
Make Sure Antivirus Program Is Not Blocking the InstallationYour antivirus program may be blocking the installation because it sees the installation package as a threat. While this situation is rare, it is possible, especially if you use a third-party antivirus program.
So, completely turn off the antivirus program and try installing iTunes again. If iTunes installs without issues, please turn on your antivirus program again to keep your computer protected from malware.
Note that the program may continue to block iTunes after installation. So, consider adding it as an exception. You can change the antivirus program if adding iTunes as an exception doesn’t work.
That said, if your antivirus license is still valid for an extended period, you can install Auslogics Anti-Malware to keep you protected whenever you turn off your main antivirus program to run iTunes. The tool is a powerful and cost-effective malware blocker that can run alongside any other security program without conflicts.
iTunes Won’t Open After Installation
It can get frustrating if iTunes is not opening on Windows 10 after installation. This problem commonly occurs because something interrupted the installation process and corrupted iTunes’ program files. Another program or background application may also prevent iTunes from starting.
The following methods can help you resolve the problem:
- Launching iTunes as an administrator
- Repairing and Resetting iTunes
- Reinstalling iTunes
- Performing a Clean Boot
These solutions will also help if you experience the “iTunes crashes on startup” problem.
Launching iTunes as an Administrator
Windows does not ascribe administrator status to apps on your computer by default just because you’re running an administrator account. It still limits access to advanced options and settings to maintain a fair level of security.
iTunes may fail to open because it lacks access to the components it needs to run optimally.
So, whenever you want to run iTunes, right-click it and select Run as administrator. If running the program as an administrator does not resolve the problem, move on to the next fix.
Repair or Reset iTunes
If you installed the program through the Microsoft Store, Windows will allow you to repair and reset it. When you choose the repair option, the operating system will scan the app’s program files and replace corrupt or missing files. Resetting is the same as reinstalling the application. Follow these steps to repair or reset iTunes:
- Use the Windows + I keyboard combo to open the Settings application.
- Click Apps. Select Installed apps if you’re on Windows 11.

- Next, use the search box to find iTunes, click the program, and select Advanced options. If you’re on Windows 11, click the three dots to the right of iTunes and choose Advanced options.
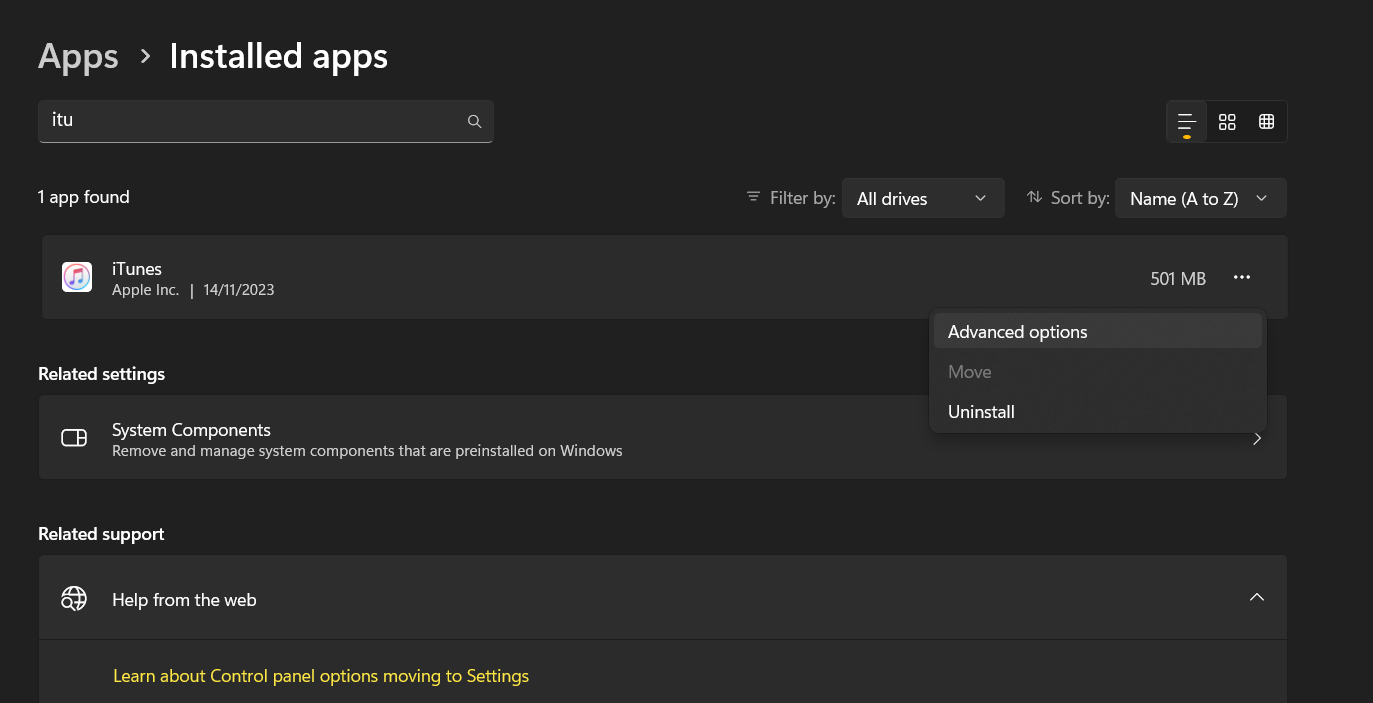 Note: You won’t see Advanced options if you did not install iTunes on Windows through the Microsoft application.
- Once the Advanced options window appears, scroll to the Reset section and click the Repair button.
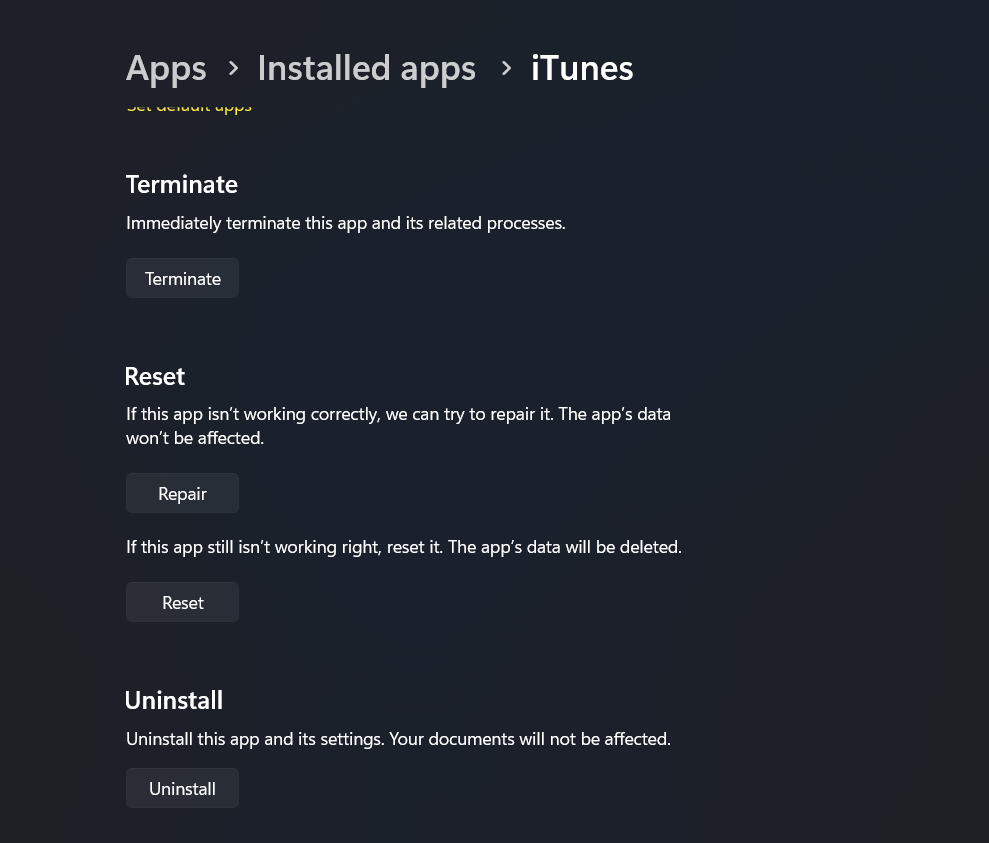
- You can select the Reset option if repairing the program does not resolve the “iTunes not working on Windows 10 ” issue.
Reinstall iTunesIf you downloaded the program from Apple’s website, you can try reinstalling it and check if that will resolve the iTunes problem . You can also reinstall iTunes if you got it from the Microsoft Store. Follow these steps:
- Use the Windows + I keyboard combo to open the Settings application.
- Click Apps. Select Installed apps if you’re on Windows 11.
- Next, use the search box to find iTunes, click the program, and select Uninstall. If you’re on Windows 11, click the three dots to the right of iTunes and choose Uninstall.
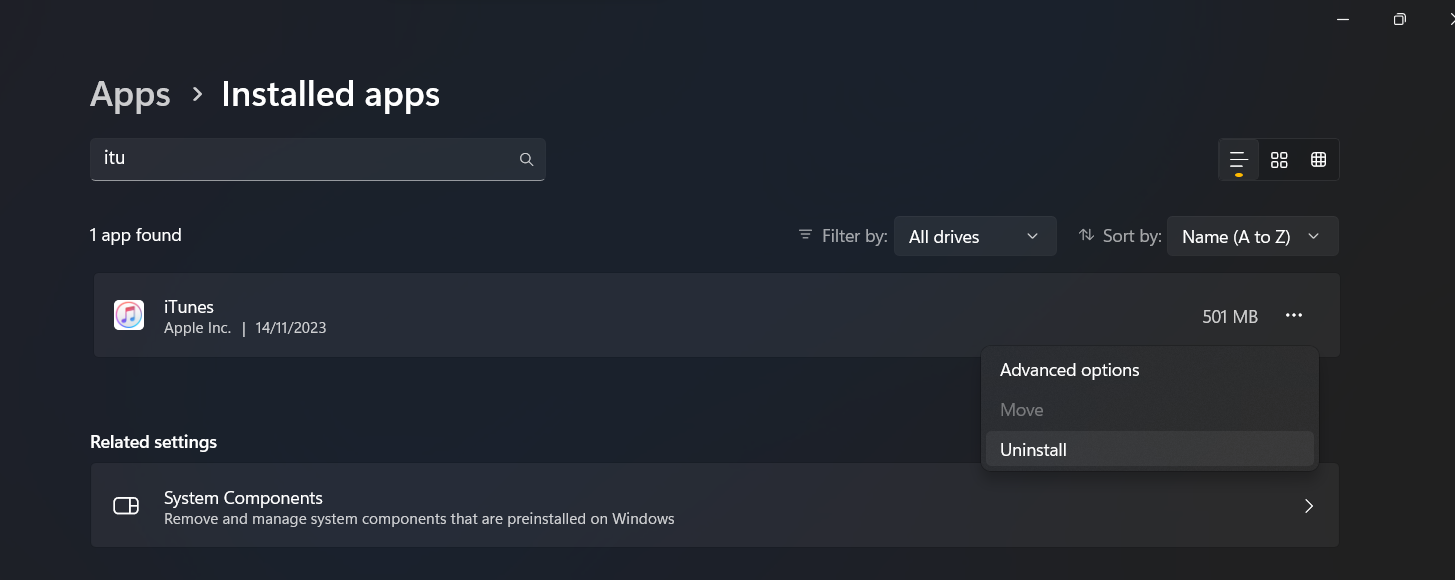
- Click Uninstall again when Windows tells you “This app and its related info will be uninstalled.”
- Restart your computer, install iTunes again, and run it to check if the problem persists.
Performing a Clean BootRunning a Clean Boot lets you confirm whether a background application or service prevents iTunes from starting. The process involves turning off non-Microsoft startup apps and services before running iTunes. If iTunes runs without any problems after stopping the apps and services, you must go to the next stage of pinpointing the specific program causing the problem. Our complete Clean Boot guide will show you what to do. Important: Please do not disable iTunes-related startup apps and services while running the Clean Boot process.
Syncing Issues
Syncing your iTunes with your iPhone, iPad, and iCloud account is one of the main reasons for installing the program. If you can’t get it to sync with your devices, there are different steps you can take.
Ensure You Have a Stable Internet Connection
If you cannot sync iTunes with your Apple-related content, you may be experiencing network problems. So, troubleshoot your computer’s network to ensure you don’t have connectivity issues.
Try restarting your internet devices and contacting your service provider.
Restart Your Devices
Your next step should be restarting your iPhone or iPad and computer. This process will clear memory backlogs and application conflicts that may block the syncing process.
Trust Your Computer
A notification flashes on your mobile device, asking you to trust your computer. Ensure you always select the Trust or Continue option whenever you attempt to connect.
Use a Different USB Cable
Your current USB cable may be the problem. You can confirm when you connect your phone using a different cable. You can also try connecting your iPhone to another computer to check if the issue lies with your phone.
Restart the Apple Mobile Device Service
The Apple Mobile Device Service connects your phone and iPad to your computer. You can restart it and set it to automatic to check if that will resolve the problem.
Follow these steps:
- Launch the Start menu, type “services” and launch the Services application.
- Locate and double-click Apple Mobile Device Service.
- Next, click Stop in the properties dialog and click Start.
- Select Automatic in the drop-down menu beside Startup type and click the OK button.
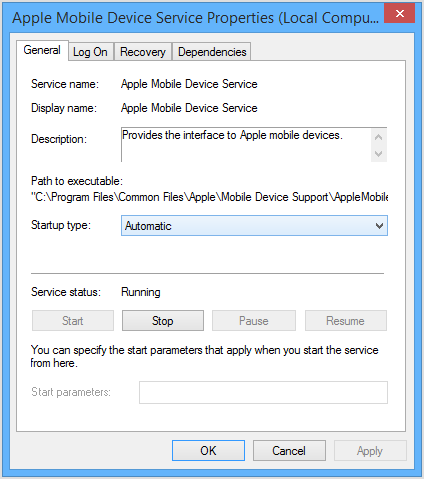
Image: Apple
Reset Your iPhone’s Network Settings
Resetting your phone’s network settings allows you to reinitialize the connection process with your computer. You will receive a new alert to trust your PC, especially if you accidentally chose the “Don’t Trust” option.
Follow these steps:
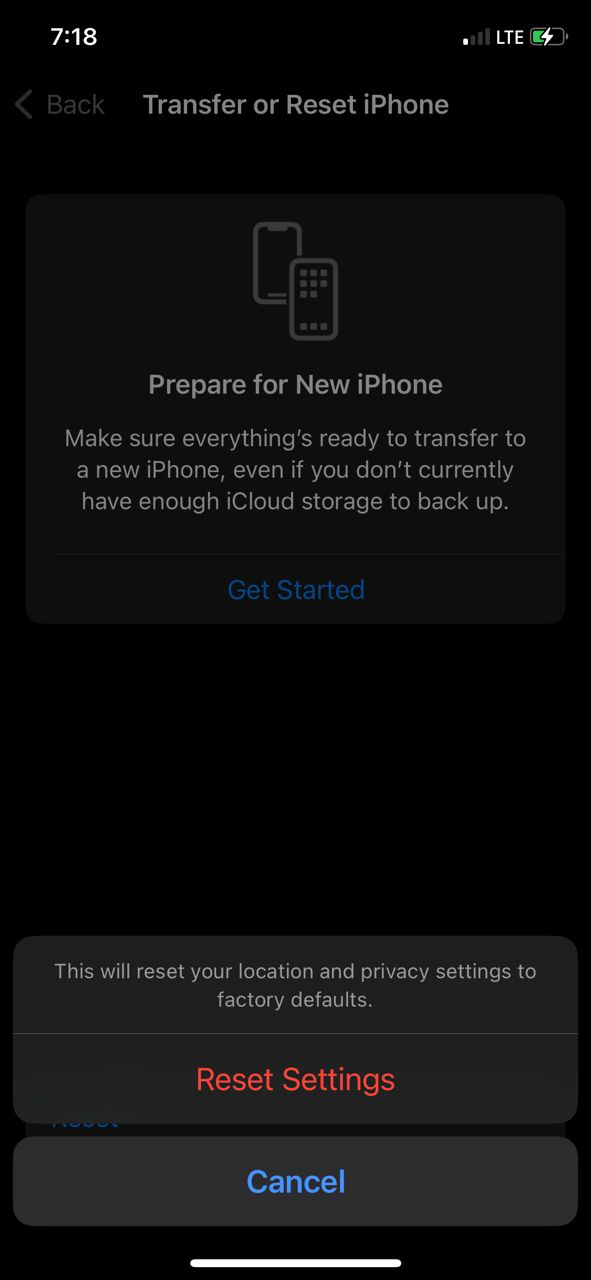
- Open your phone’s Settings app and select General.
- Tap the Transfer or Reset option in the General interface.
- Tap Reset.
- Next, choose Reset Location & Privacy.

- Enter your passcode on the next prompt and select Reset Settings to confirm your decision.
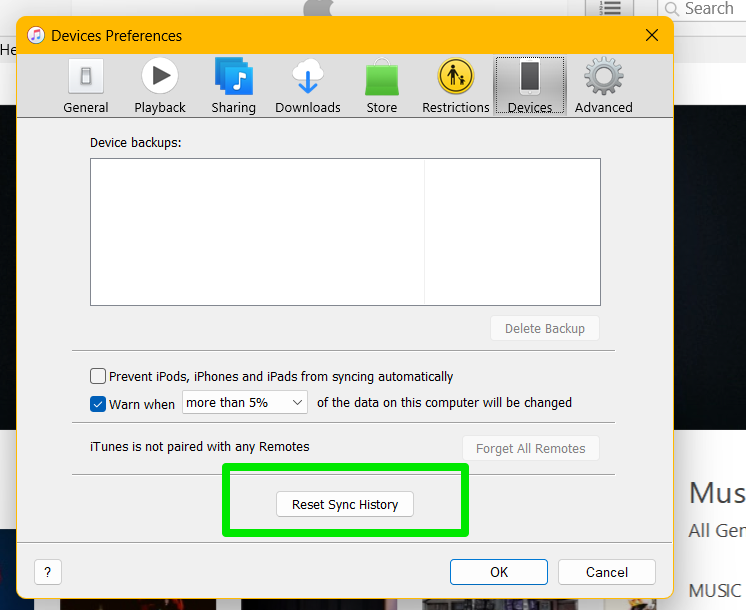
Reset Your Sync History in iTunes
If you’re still unable to sync iTunes, resetting your sync history can clear out the problem and help you start fresh.
Here’s what you can do:
- Launch iTunes.
- Go to the top of the application, select Edit, and click Preferences. You can tap the CTRL + , (comma) keyboard buttons to open the Preferences dialog.

- Click Devices and select the Reset Sync History button.
Tips for Smooth iTunes Performance on Windows 10
Apple designed iTunes to be smooth and fast. However, the application can be buggy, depending on how you use it and your computer’s configuration. If you sync or use many files and media, iTunes may burden your CPU and RAM and slow your entire system down.
That said, you can turn off some features and tweak some settings to improve the program’s performance.
Related: How to Clear RAM and Reduce RAM Usage in Windows 10
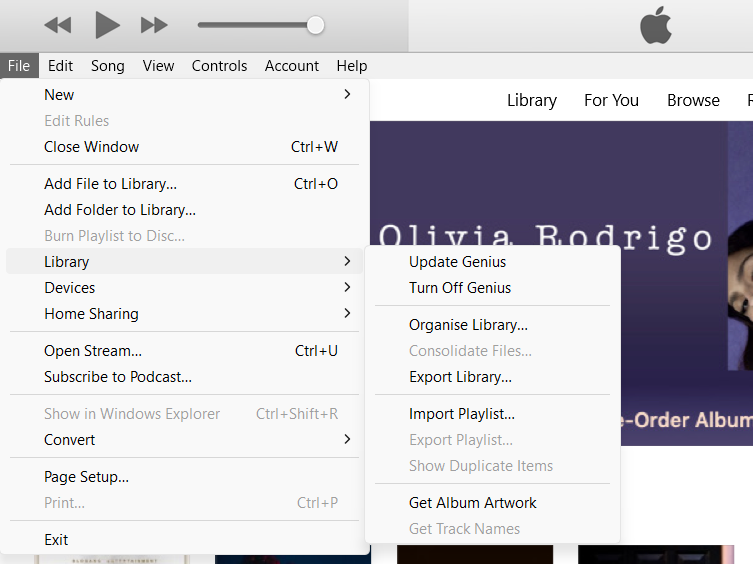
Turn Off Genius
Genius is an iTunes algorithm that helps you fetch personalized recommendations based on your iTunes media library. That way, you can see new music and videos similar to your taste. When Genius is active, it keeps iTunes and your computer busy as it collates media that you may like. Turning it off will save your system some computing power and make iTunes smoother. Follow these steps:
- Open iTunes.
- Select File.
- Click Library and select Turn Off Genius.
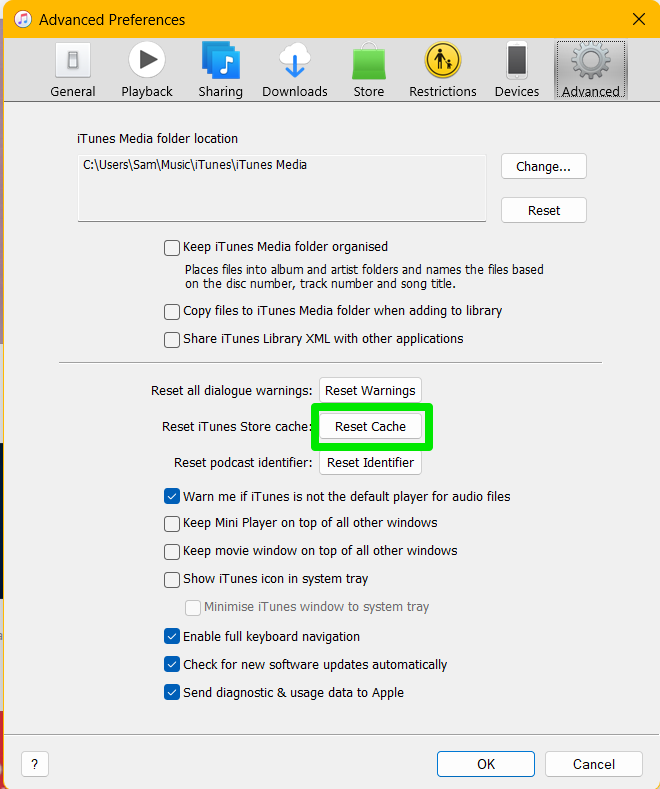
Remove iTunes Cache
Almost every Windows application creates temporary files to store information that they can retrieve quickly. These files may go on to slow down your computer if they grow too large or become corrupt. For iTunes, cached files usually keep iTunes Store information. The iTunes app for Windows has a feature that helps you remove the cached files to make the app run better. Follow these steps:
- Launch iTunes.
- Go to the menu bar, click Edit, and select Preferences.
- Go to the Advanced tab after the Preferences window opens.
- Now, click the Reset Cache button next to the “Reset iTunes Store cache.”
You can also eliminate temporary files created by other systems and third-party applications to boost your system’s performance. Auslogics BoostSpeed can help you do that automatically since applications do not stop making temporary files.
Also Read: How to Delete Temporary Files from Windows 10 PCs
When you install and set up the program, you no longer have to worry about temp and junk files slowing down your computer.
Delete Smart Playlists
You can create and save smart playlists on iTunes that automatically update whenever you add or delete items to your iTunes library on any device. The playlists will automatically sync and update anytime you open iTunes, causing the program to slow down sometimes.
You can delete playlists you no longer need or use to save your system’s computing power. Just right-click the playlist under Music Playlists and select Delete from Library.
Conclusion
That’s how to install iTunes on Windows 10 and fix the program’s common issues, and now you no longer have to ask, “Why can’t I download iTunes on Windows 10?” Always ensure you keep your computer free of junk files and unnecessary programs that may slow it down and spoil your iTunes experience. You should also ensure the program receives regular updates.
FAQ
C:\users\[YourUsername]\My Music\iTunes\iTunes Media
“YourUsername” is a placeholder for your user account name.
One reply on “How to Install iTunes on Windows 10 PC: Fixing Main Problems”
Thank you so much!!! This article helped me a lot