
One of the most persistent questions since PCs became a thing is how to increase laptop battery life. Using Windows hibernation function or Sleep Mode is a common suggestion to achieve this aim.
However, activating these functions is not always a straightforward process. Even after understanding how to enable and disable hibernation in Windows 10/11, it’s important to be aware of the implications of each choice.
This article is all about hibernation in Windows: how your computer hibernates, how to turn off hibernation in Windows 10/11, and even a bit about Sleep Mode. But first, let us look at what hibernation in Windows is.
What is Hibernation?
Hibernation is like shutting down your computer, except that it does not turn it off completely or shut it down. Instead, it places it in a sleep state that allows it to quickly wake up the next time you turn on your computer.
In more technical terms, hibernation is an alternative to the Shut Down function or Sleep Mode. Just before you click the Hibernate option in the Power menu, Windows captures the system’s current state and stores that ‘snapshot’ to your hard drive.
That way, it can immediately restore your system to that state when you turn it back on.
Why Should You Hibernate?
Hibernation is known to achieve two different things for the average PC user. The first is helping your computer wake up faster than usual so you can resume work from where you stopped.
Keeping app windows open is one of the main reasons people keep their computers turned on for long periods.
The second is conserving battery life. When you hibernate your computer, power is cut off from different components, such as your RAM, to prevent your system from using power while in this state.
Thus, if you were using your PC and wanted to step out quickly, you could enable Hibernate on Windows 10/11 .
First, your PC will boot up faster when you do so. And second, only a trickle of battery life would have been used.
Is Hibernation Risky?
While there are minor concerns about hibernation, they are not significant enough to make you stop the practice entirely.
The only downside that you may notice is slow performance at startup when your computer loads the ‘snapshot’ onto the RAM.
That said, it’s always a good idea to shut down your computer occasionally to improve its lifespan.
📌 Also read: Laptop Lifespan: Why You Should Definitely Shut Down Your PC Every Night
Difference Between Hibernation and Sleep Mode
Hibernation and Sleep Mode are often considered to be similar in the sense that both of them are conditions of ‘half asleep, half awake’ computers.
Yes, both are functions for shutting down computers without shutting them down completely. But they are also different from each other.
The biggest difference between hibernation and Sleep Mode in Windows 10/11 is the state of inactivity.
Choosing the hibernate power option means your computer is almost completely turned off, which is why it uses up so little battery life.
But Sleep Mode essentially puts the computer on ‘standby,’ keeping your apps open.
A second notable difference between Hibernation Mode and Sleep Mode in Windows 10/11 is that hibernation saves the snapshot of your computer state to the hard disk.
On the other hand, Sleep Mode saves the snapshot to your RAM.
📌 Also read: How to Stop Apps from Running in the Background on Windows 10 PC?
How to Enable ‘Hibernate’ on Windows 10/11
Now that we have defined the hibernation function in Windows 10/11 and differentiated it from Sleep Mode, how do you enable it? Not all Windows computers have hibernation enabled as a default power option. In computers with this function enabled by default, you will find it alongside the Restart and Sleep Mode functions in the Power menu.
However, for the majority of PCs, you have to activate the hibernation function yourself, after which it will be included in the Windows Power menu.
Once activated, you can click the power icon and select Hibernate or go to the Control Panel window and prompt your computer to hibernate whenever you press the power button or close the lid.
Now, let’s show you the different ways to activate the Hibernate option.
Solution 1: Enabling the hibernate function via control panel
Control Panel is the most common route for enabling the hibernation function. This method leads you to the Power Options on your Windows PC, allowing you to determine how to use available options to turn on the hibernate function.
📌 Also read: [FIXED] “There Are Currently No Power Options Available” Windows Issue
Follow these steps:
- Open the Run dialog window (press
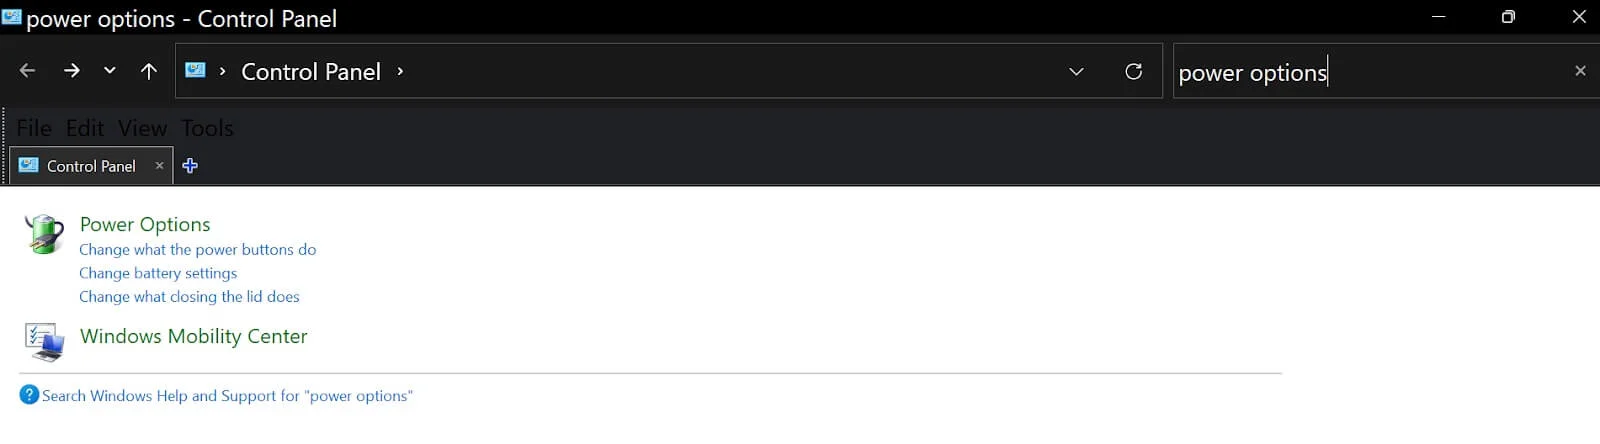
Windows + R), typecontrolinto the text field, and hitEnter. - Type
power optionsin the search field and click Choose what the power buttons do under Power Options.
- Now, go to the Shutdown settings section on the subsequent screen and check the box beside Hibernate.
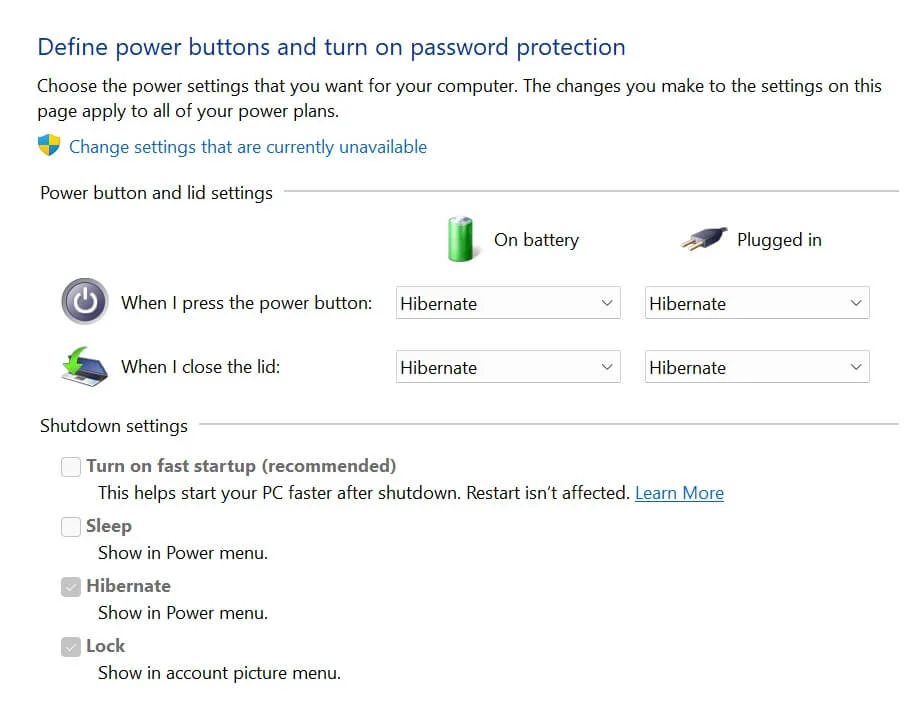
As a bonus, you can also choose to enable the Hibernate option whenever you close your PC lid or press the power button.
Solution 2: Enabling the hibernate function via the command prompt
The second method is the quickest, and it involves using the Command Prompt. Follow these steps:
- Go to the Start menu, type
CMDorCommand Prompt, and select the Run as administrator option in the search result.
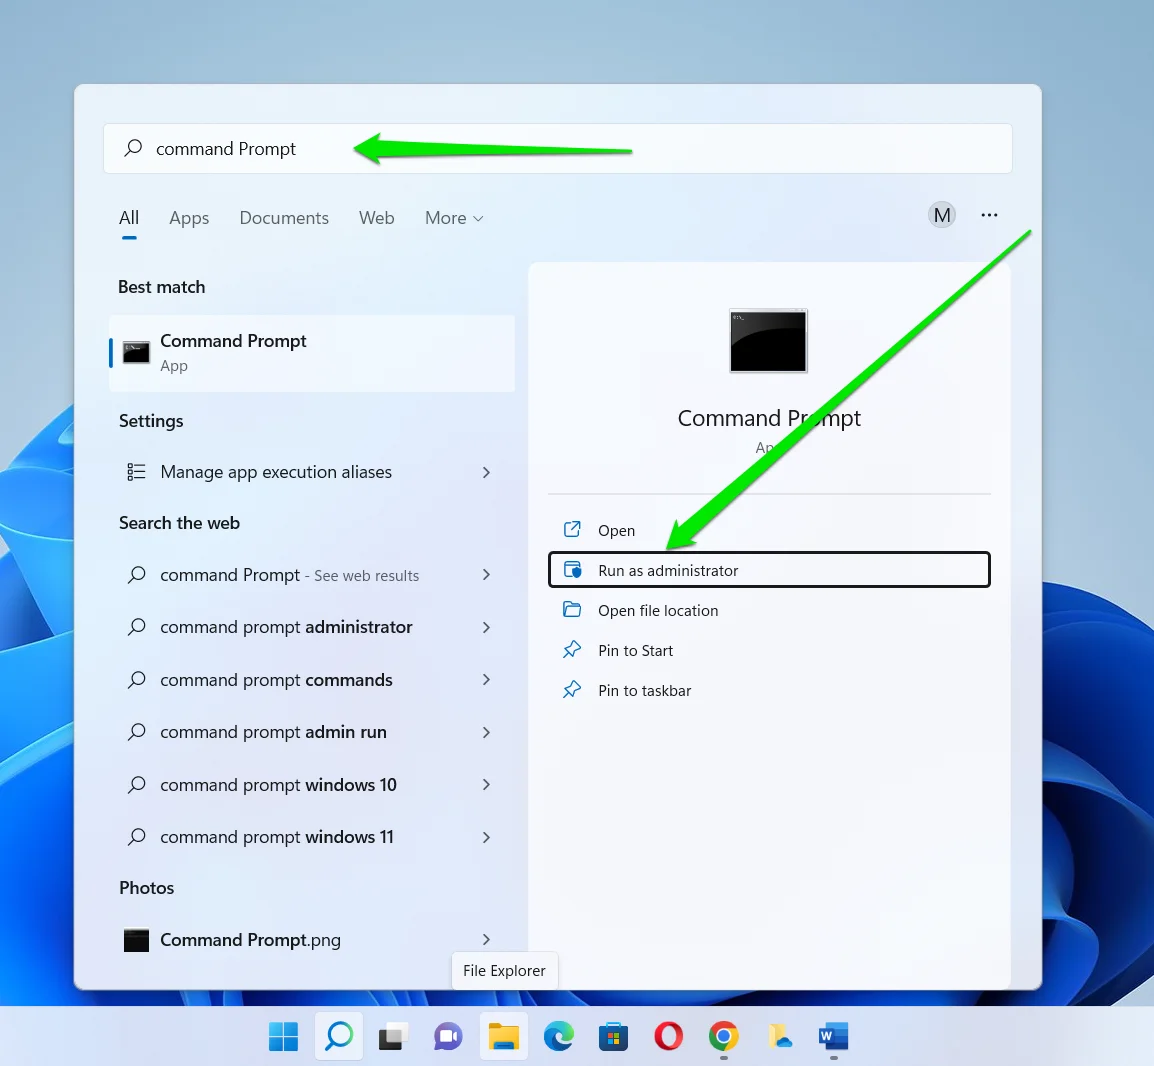
- Click Yes if Windows asks for permission to allow the program to make changes to your PC.
- Type the following code and press the
Enterkeyboard button once the Command Prompt window appears:
powercfg.exe /hibernate on You should now be able to hibernate your computer through the Power menu.
📌 Also read: Windows Command Prompt: 28 Most Useful CMD Commands [with Examples]
Solution 3: Enabling the hibernate function via the registry editor
The Windows Registry is one of the ‘sacred’ and delicate places on your Windows PC. Windows users are usually advised to stay away unless they are power users and know what they are doing.
But you can use the Registry Editor to enable Hibernate on your PC if you’re careful enough . That said, it’s important that you create a System Restore point or back up the registry before you proceed. That way, you can reverse any potential erroneous adjustment .
📌 Also read: Ultimate Guide: How to Fix Broken Registry Items in Windows 10/11
Follow these steps to enable the hibernate function on your Windows 10/11 via the Registry Editor:
- Go to the Start menu, type
regeditorregistry editor, and click the first result.
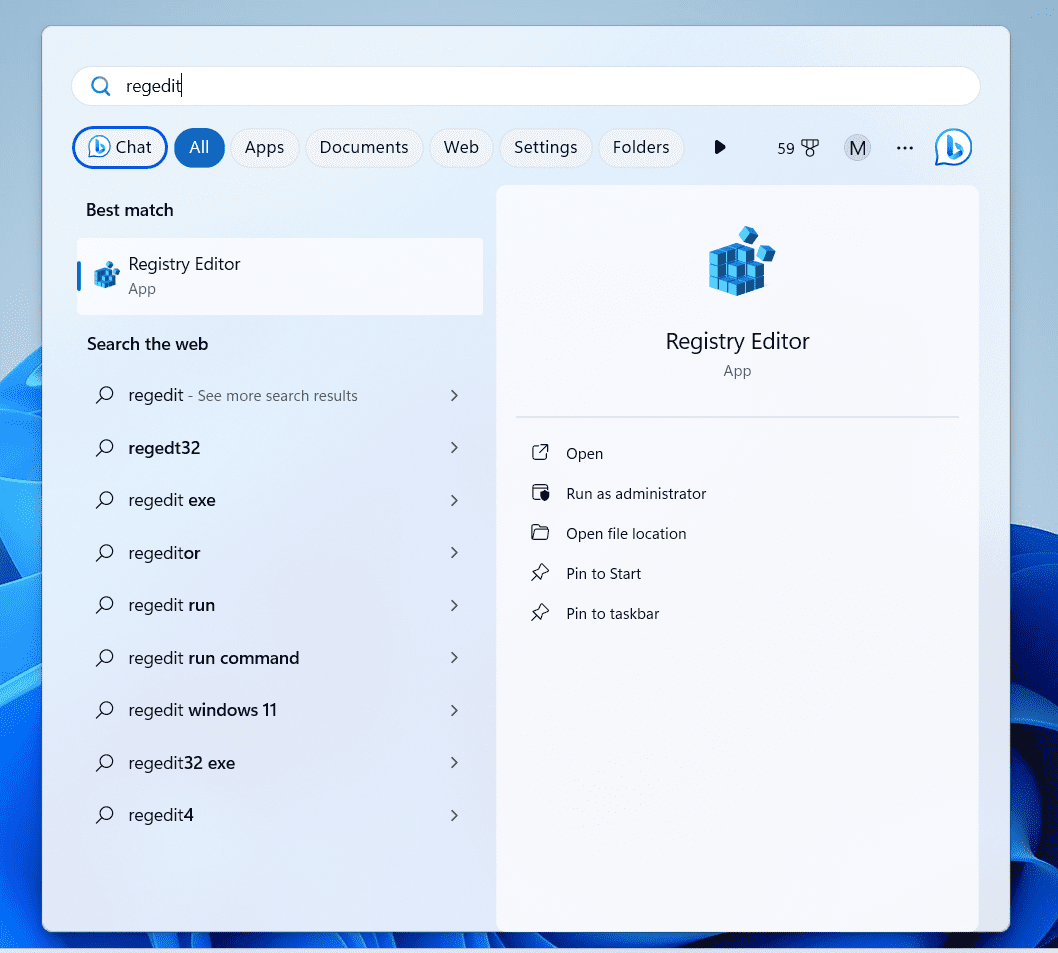
- Click Yes to grant the program advanced permission.
- After the Registry Editor window opens, go to the left sidebar and head to the following key:
Computer\HKEY_LOCAL_MACHINE\SYSTEM\CurrentControlSet\Control\Power
- Once you select the Power key, go to the right side of the screen and double-click the HibernateEnabled DWORD. If you don’t see that particular DWORD, right-click the space, select New > DWORD (32-bit) Value, and rename the new DWORD to HibernateEnabled.
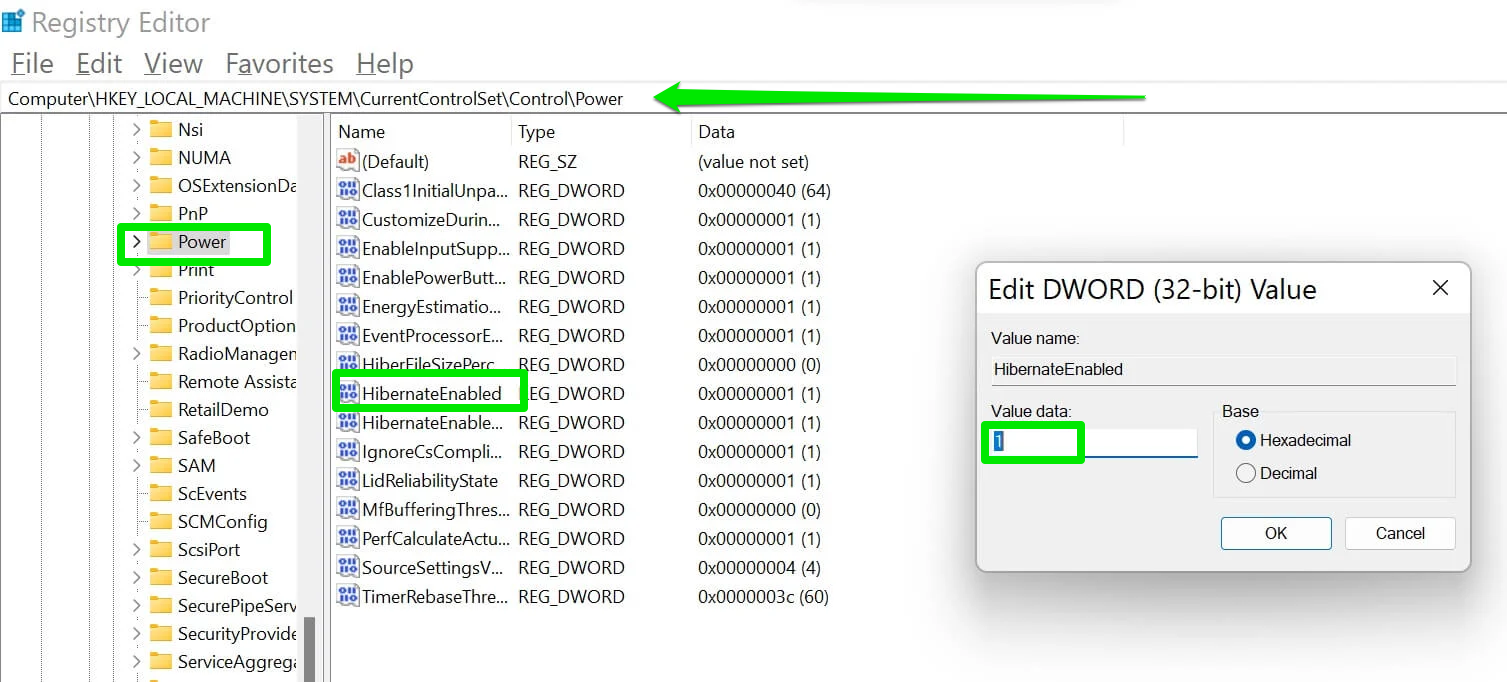
- Next, type
1in the Value data text field and hitEnterin the Edit DWORD (32-bit) Value dialog. - Restart your computer.
📌 Important read: Ultimate Guide: Why and How to Defrag Windows Registry?
How to Hibernate Windows 10/11?
There are three main ways you can hibernate your Windows PC:
Power Button: From the section on how to enable hibernation on Windows 10/11, we explained how to enable hibernation via Control Panel (Power Options). There, you can select Hibernate for When I press the power button.
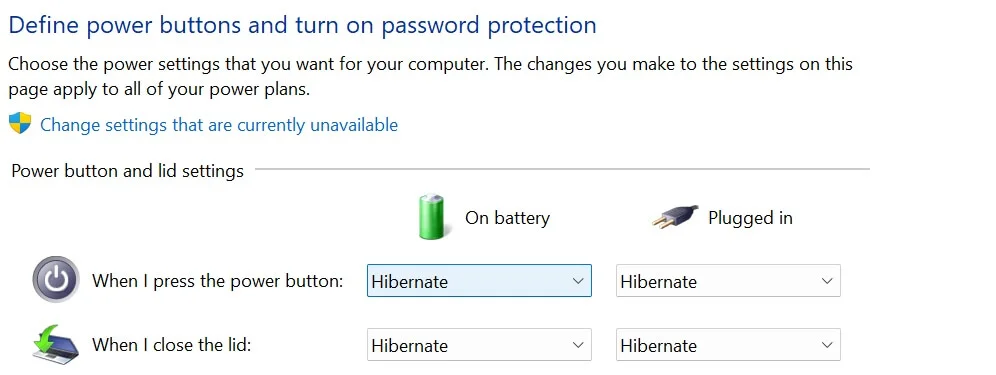
Close PC Lid: In the same page as cited for the power button method, you can choose Hibernation for When I close the lid.
Using Keyboard Shortcut: Many PCs have the Sleep Mode attached to the F3 function key. To activate it, you need to use the fn + F3 key combination and your PC will hibernate. However, this option is only available on some computer models.
Using the Power Menu: The more traditional method would be to open the Start menu, click the power icon, and select Hibernate. You can also right-click the Start button or press Windows + X, choose Shut down, and click Hibernate.
How to Turn Off Hibernation on Windows 10/11?
To turn off hibernation on Windows 10/11, you only have to reverse each of the activation processes we have described in this article. For example, for Command Prompt hibernation activation, you can enter
powercfg.exe / hibernate off instead of powercfg.exe / hibernate on
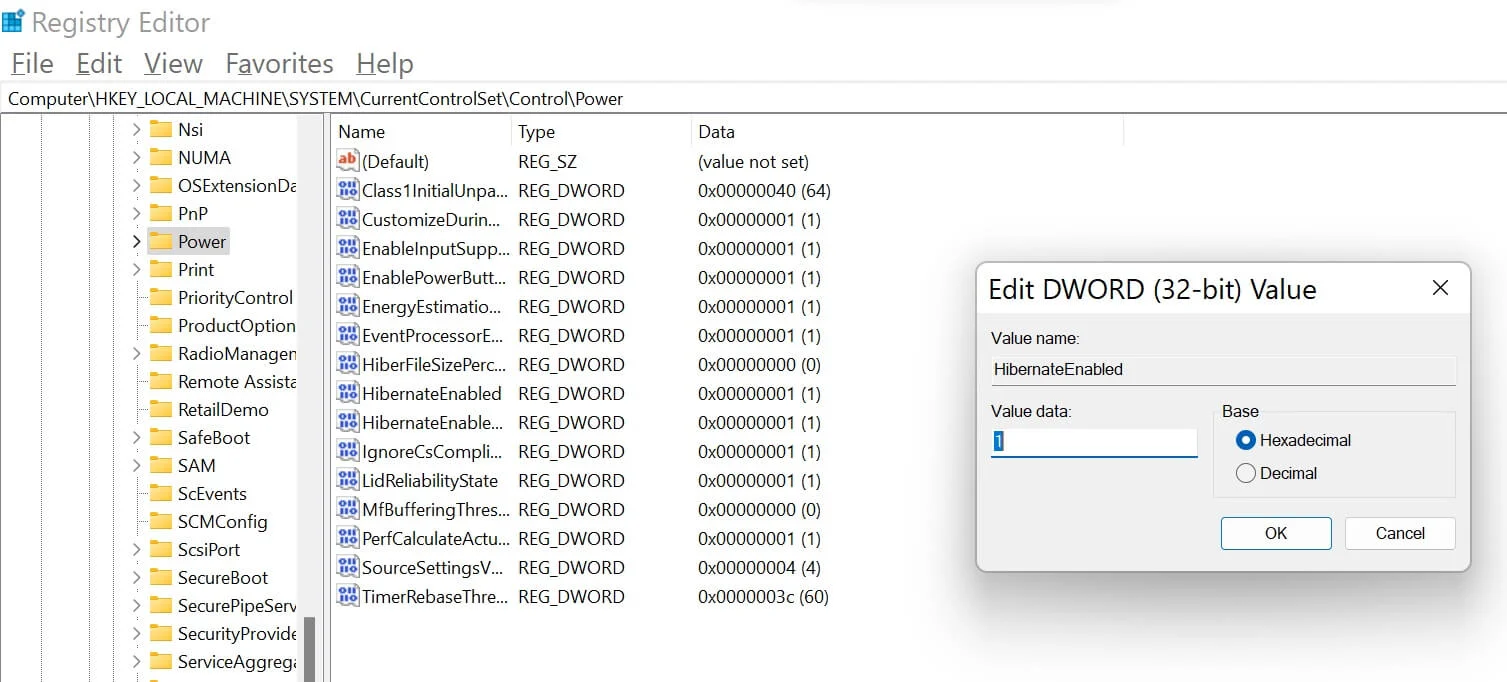
Similarly, for the Registry Editor option, when you modify the Value data for HibernateEnabled, enter 0 instead of 1 to turn off hibernation.
How to Disable Sleep Mode on Windows 10/11?
As earlier described, Sleep Mode is typically the default mode for your PC standby. However, if you want to turn it off so that your PC does not go into this standby mode, all you have to do is:
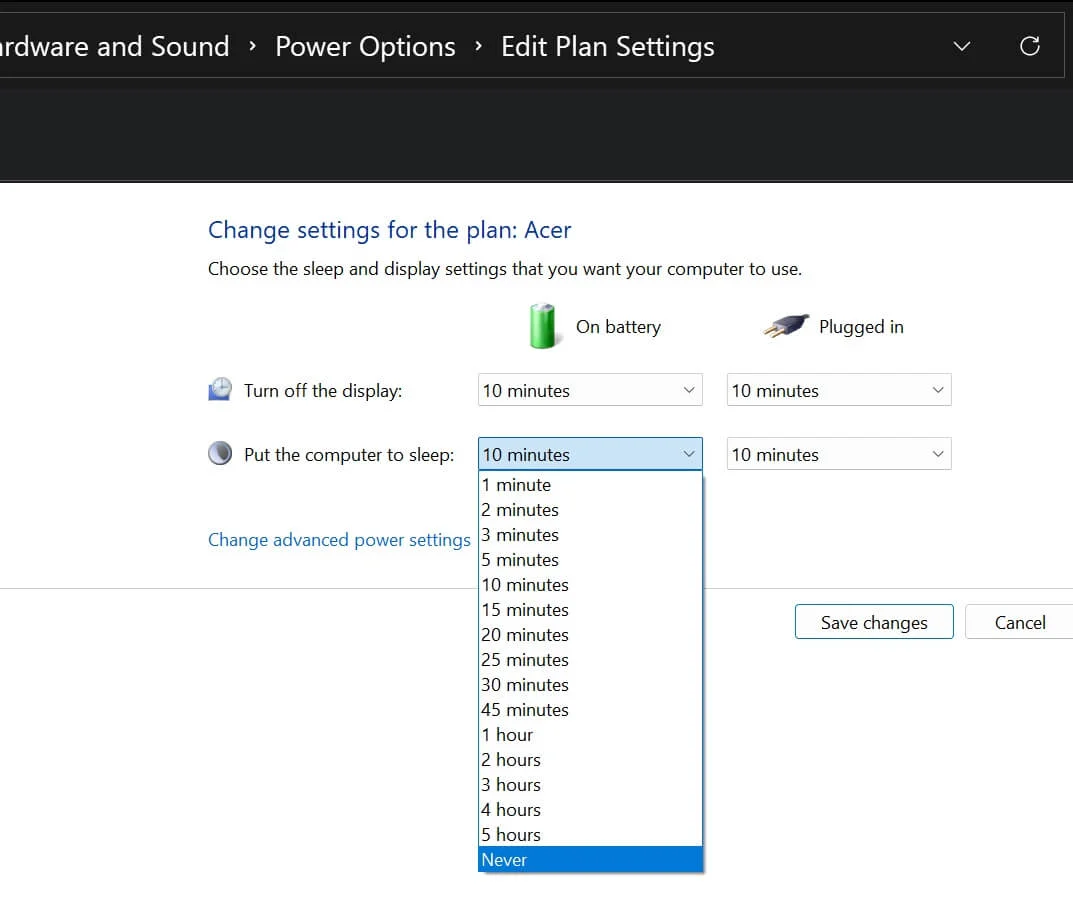
- Search for
edit power planon the Windows Start Menu. - Under the Change settings for the plan submenu, move your cursor to the Put the computer to sleep option and choose Never from the options.
Conclusion
Enabling and using the hibernation function on Windows 10/11 can help you conserve your PC’s battery and let you continue work where you left off. You can always use the methods we showed you earlier to disable it whenever you change your mind.