![[SOLVED] How to Troubleshoot No “Switch User” Option in Windows 10/11?](https://www.auslogics.com/en/articles/wp-content/uploads/2024/07/SOLVED-How-to-Troubleshoot-No-Switch-User-Option-in-Windows-1011-568x359.png)
Picture this scenario. You created different user accounts so that each user can log in separately and work on their files and applications. This way, each account won’t interfere with the personal information and applications of other users.But one day, the moment arrives when you need to seamlessly switch between these carefully crafted accounts, only to be met with an unexpected roadblock – other users don’t exist. This issue is widespread, and many Windows 10/11 users have been complaining about it. If you are having the same problem, you’re in good hands.In this post, we explain how to show the Switch User option in Windows 10/11.
What’s the Switch User Feature?
The Windows OS comes with various useful features that allow users to use it seamlessly regardless of the computer brand. One such feature is Switch User.It allows users to share the same computer by creating multiple user accounts so that they can separately log in to their own accounts to access files or use apps.
Also Read: How to set auto login in Windows 11/10?
So long as they have the correct credentials, one can create multiple accounts on the same PC and log in without problems.
You can switch users using various methods:
- From the Start menu, click on your profile icon and select the user account that you want to switch to from the drop-down menu.
- Press the
Ctrl + Alt + Delkeyboard shortcuts and select Switch User. - Press the
Win + Lkeyboard shortcut to get to the lock screen and select the user account that you want to access. - Via the Task Manager, by pressing
Ctrl + Shift + Escon your keyboard, go to the Users tab and select the user account that you want to access.
How to Fix the “Switch User” Option Is Missing on Windows 10/11
What if the Switch User button is missing on Windows 10/11? Sometimes, the feature goes missing, which means that you can’t switch user accounts.Most users said that the trouble started after upgrading to Windows 10/11, and it seems to affect different versions of Windows 10/11 systems.If you’re having the same problem, here’s how to fix it:
Fix 1: Configure the local users and groups option
- Press the
Win + Rshortcut, type or pastelusrmgr.mscin the Run dialog box. HitEnterto launch the Local Users and Groups window.
- Once the lusrmgr window opens, select Groups, right-click Administrators and select Add to Group. This action opens the Administrators Properties window.
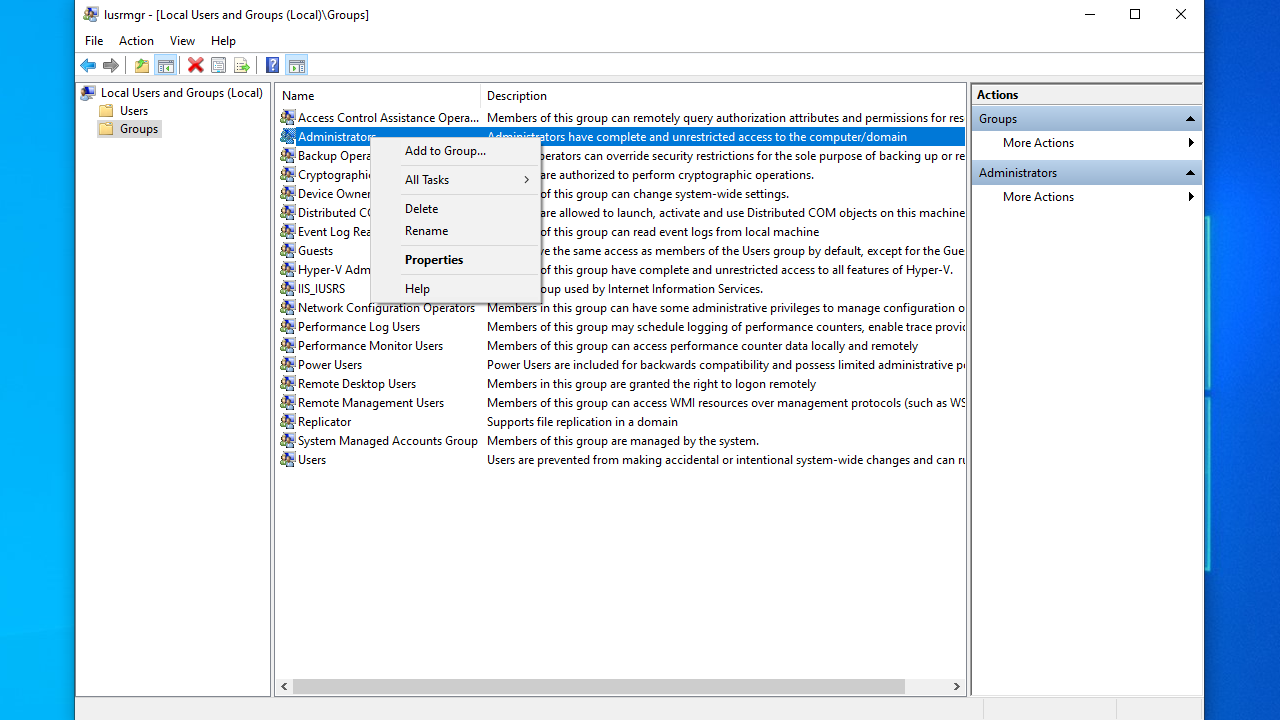
- Select Add and click on Object Type next to the Select this Object Type option.
- Uncheck all options, only leaving the Users checkbox marked, and click OK.
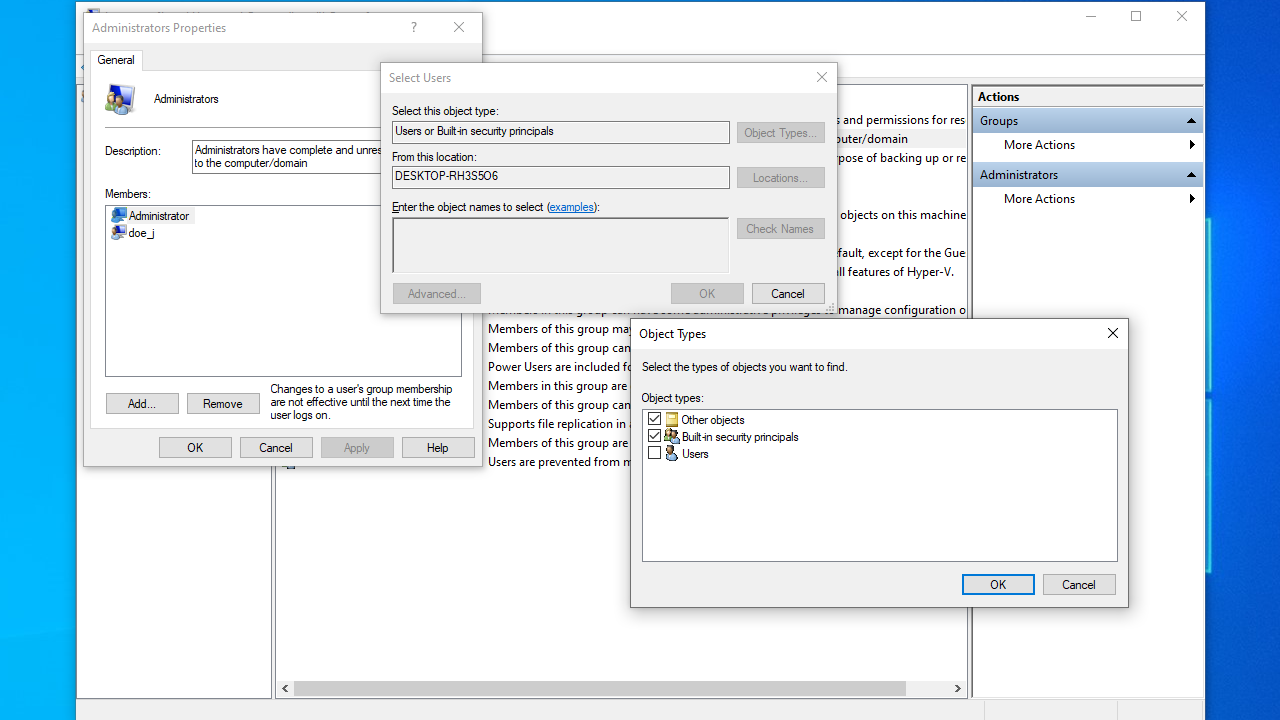
- Back on the Select Users screen, click Advanced > Find Now.
- A list of results should appear at the bottom of the screen. Select the user account that you can’t switch to and then click OK.
- Click the OK button on the next screen.

These steps should add the missing user’s account, and you should be able to switch accounts.
Also Read: Ultimate Guide: How to Create a New User on Windows 10 and 11
Fix 2: Configure Windows Group policy
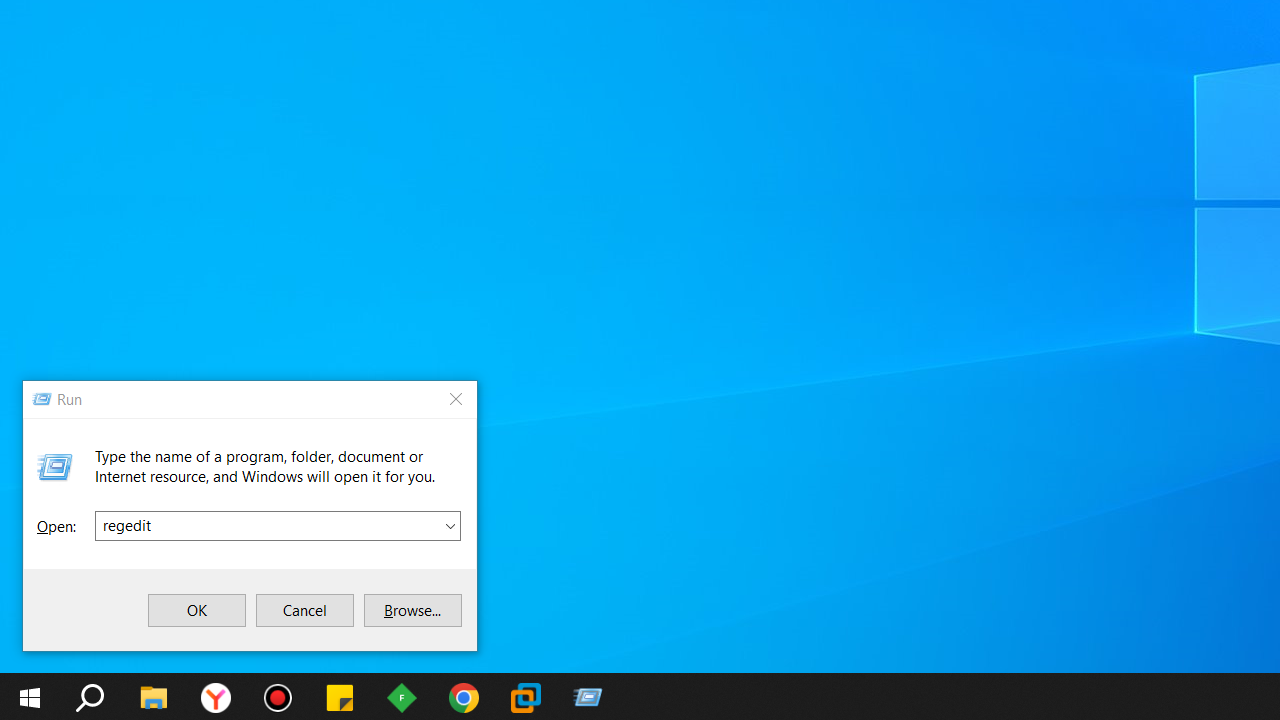
- Press the
Windows Key and Rsimultaneously, type in or pastegpedit.mscin the Run dialog box, and hitEnter.
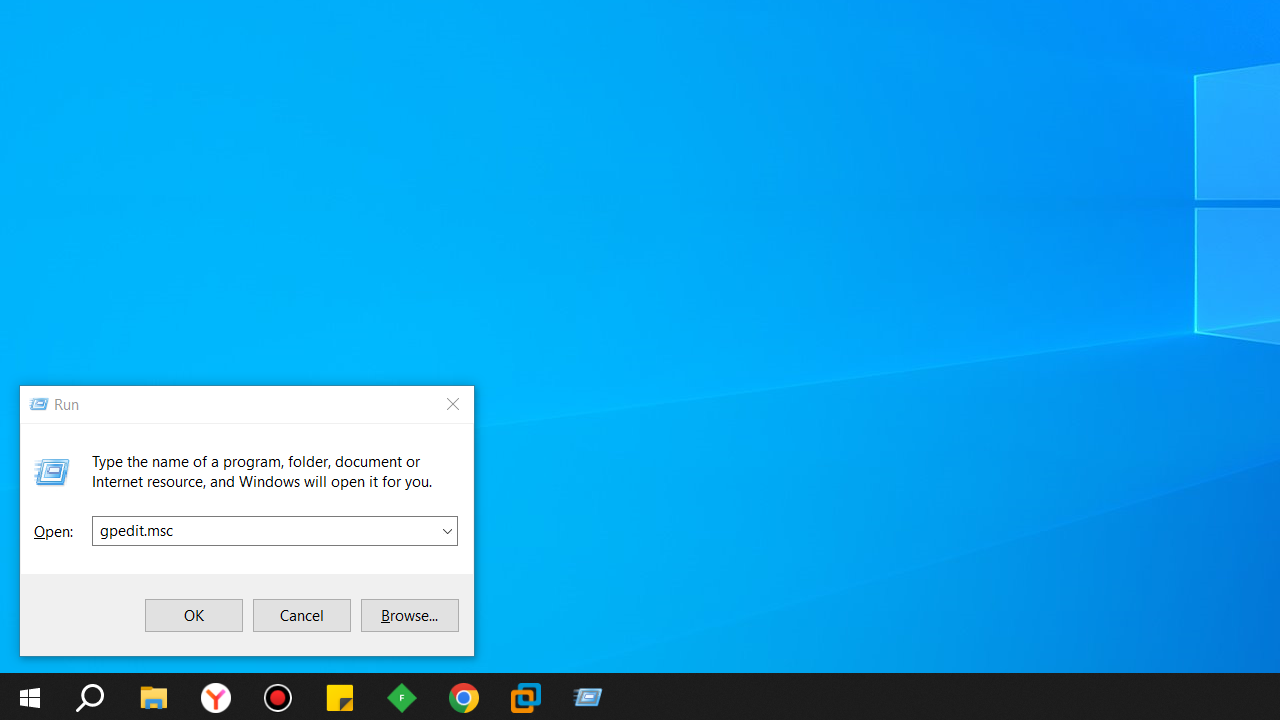
- The Local Group Policy window should appear next. Follow this path:
Computer Configuration > Administrative Templates > System > Logon
- Double-click “Hide Entry Points for Fast User Switching” to open it.
- Select Disabled to turn it on.
- Click Apply > OK.
- Exit the Local Group Policy Editor window and check if the Switch User option is back.
If this fix doesn’t work, let’s try to modify the Windows Registry.
Also Read:Group Policy Essentials: How to Access and Use Windows Group Policy Editor?
Fix 3: Edit the Windows registry
Here’s how to enable another user in Windows 10/11 through the registry:
Backing up your registry on Windows 10/11 is quite simple. Here’s the guide:
- Go to your Start menu, type in
regedit, and pressEnter.
- Right-click the first option – Registry Editor – and select Run as administrator.
- Click Yes when you get the system prompt.
- Select File > Export and pick the location where you want to save the backup file.
- Assign the file a name, and make sure to select the All option under Export Range.
- Click on Save.
Once you’re done, here’s how to enable another user in Windows 10/11 through the registry:
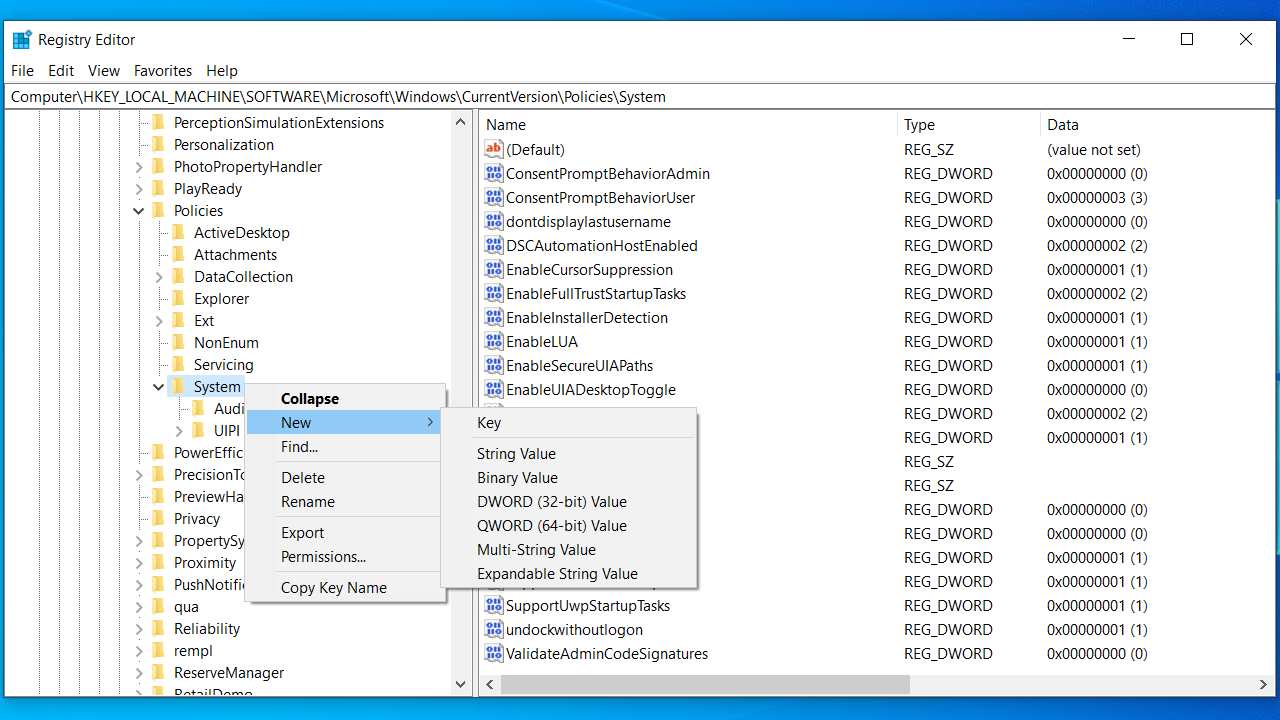
- Launch the Registry window once again and expand the following path:
Computer\HKEY_CURRENT_USER\Software\Microsoft\Windows\CurrentVersion\Policies\System
- Once you get to this location, search for a value labeled “HideFastUserSwitching”. If it doesn’t exist, you can quickly create one. To do so, right-click the System folder and select New > DWORD (32-bit) Value. Type the name
HideFastUserSwitchingand pressEnter. This will create the value.
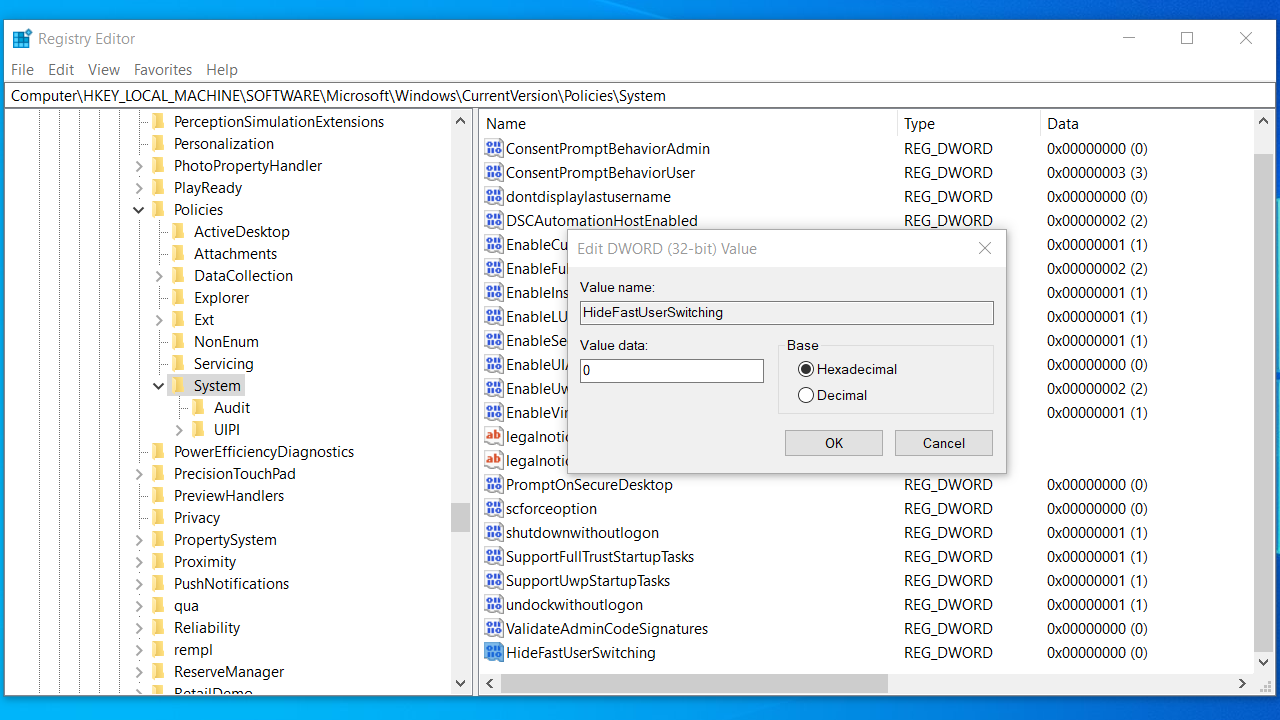
- Next, double-click the HideFastUserSwitching value and set the Value data to
0to enable it.
That should do it. Now, press the Windows logo on your keyboard and click on your user icon to check if this fix resolved the “no Switch User option” issue in your Windows 10/11 computer.
Also Read: Ultimate Guide: Why and How to Defrag Windows Registry?
Fix 4: Create a desktop shortcut to switch user accounts
You can create a desktop shortcut to switch between users based on tsidiscon. This method, however, is only applicable to Windows 11 Pro and Enterprise editions.
- Right-click on a blank area of your desktop and choose New.
- Shortcuts can be found in the context menu’s submenu.
- In the location text box, type
%windir%\System32\tsdiscon.exeand click Next.
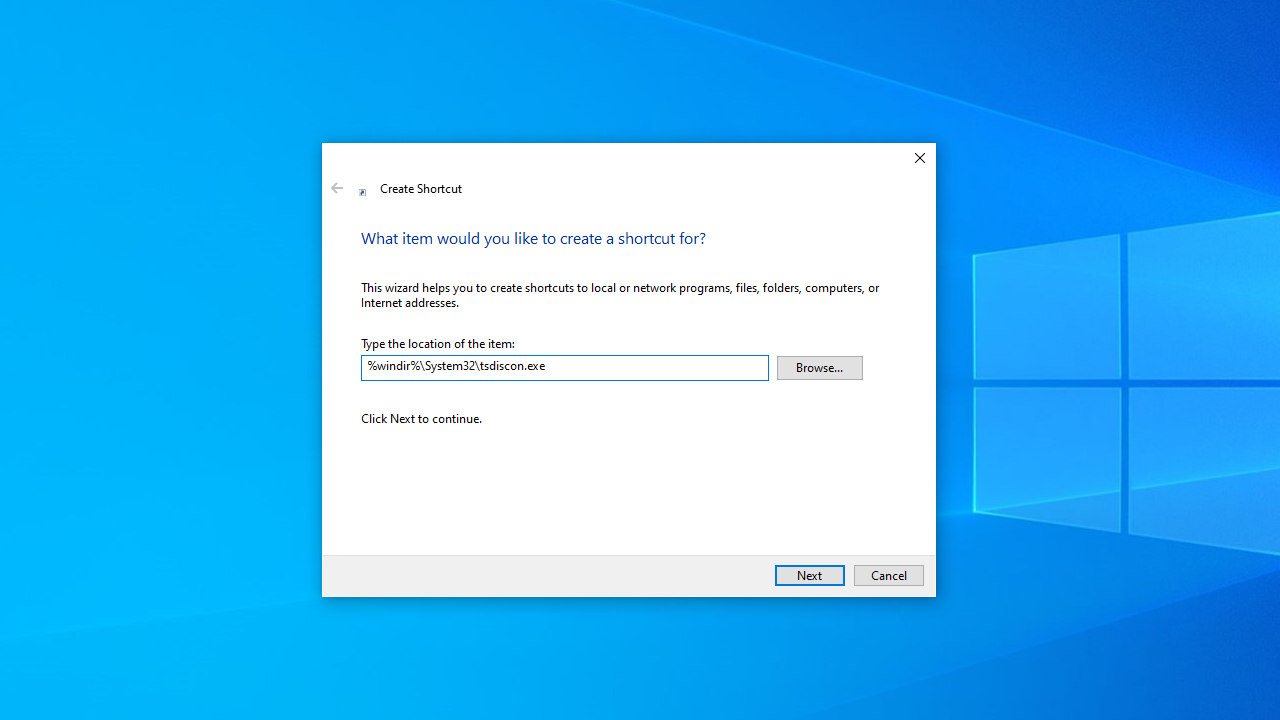
- To make the shortcut’s title, type Switch User Account.
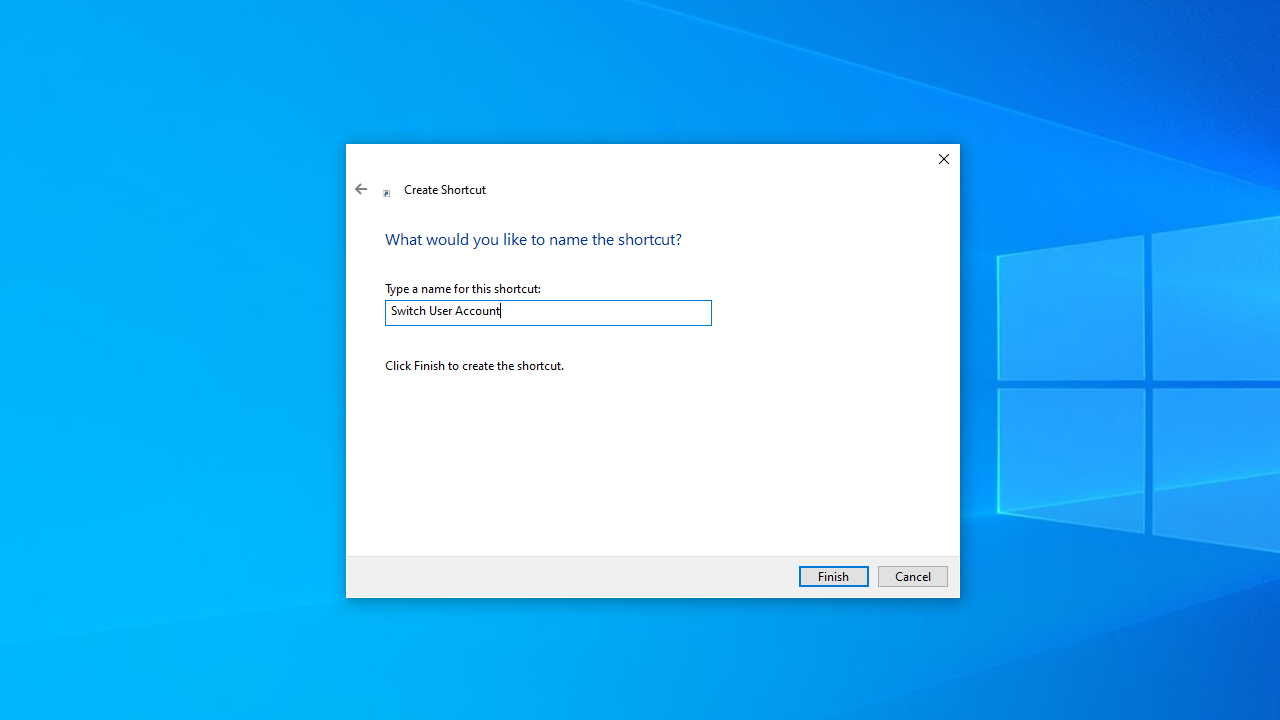
- To add the Switch User Account shortcut, click Finish.
To return to the login screen, double-click your new Switch User Account shortcut on the desktop. You can then sign in to a different account.How to change the image icon for the shortcutIf you want, you can change the icon for the Switch User Account shortcut. There are some user-themed icons available in imageres.dll. You can choose an imageres.dllicon for your shortcut as follows:
- Select Properties by right-clicking on the Switch User Account.
- On the Shortcut tab, click Change Icons.
- Select the Browse.
- Then navigate to the imageres.dll file in the C:\Windows\System32\imageres.dll
- Select the Open.
- Select an appropriate user account icon and press the OK.
- To change the icon of your shortcut, click the Apply.
- To close the shortcut’s properties window, click OK.
Fix 5: Safely repair registry errors
The Windows Registry is a vast database that contains configuration settings for everything that’s installed on your PC, including applications, programs, and hardware. Every time you install an application, new values and keys are embedded in the registry database. The opposite is true when uninstalling a program. That is, the keys and values are deleted from the database. Sometimes, these entries are not properly added to the registry. Meanwhile, if you’re uninstalling a program, the system, for various reasons, may fail to delete them properly. For the most part, these remnants may not cause any issues until they accumulate over time. You may run into various PC issues like Windows failing to boot or serious problems like the Blue Screen of Death (BSOD) error.
Developed with precision and accuracy, Registry Cleaner ensures that all duplicate, invalid, and orphaned entries are removed, keeping your registry lean and errors at bay.
Plus, Auslogics BoostSpeed comes with numerous tools to keep your PC performing at its best.
“Switch User” Option Is Missing on Windows 10/11: Fixed
By following these steps, you can troubleshoot and resolve the missing “Switch User” option in Windows 10/11 while also safeguarding your system’s registry integrity.Remember that altering system settings carries inherent risks, so proceed with care and always consider creating backups before making changes.
FAQ
Windows key + L. This locks the screen, and from there, you can choose to sign out .