- Why is Grammarly not Working in Microsoft Office Word?
- How to Fix the “Grammarly Missing” Issue from Office Word
- Solution 1: Restart Microsoft Word
- Solution 2: Restart your PC
- Solution 3: Enable Grammarly
- Solution 4: Check your antivirus program
- Solution 5: Reinstall Grammarly
- Solution 6: Enable User Account Control
- Solution 7: Update or Reinstall Microsoft Office
- Solution 8: Update Windows
- Solution 9: Optimize Microsoft Word for compatibility
- Conclusion
- FAQ
Grammarly is one of the most reliable tools for keeping written content crisp and correct. It always sits on the right-hand side of Microsoft Word, Docs, and other word processors to alert users to different types of writing errors.
Many writers and Windows users now depend on the application so much that they don’t feel their work is ever complete without running it.
So, imagine what happens when Grammarly is not showing in Word. You can restart Word and restart your computer to initialize the program.
If you’re experiencing this issue, you’ve brought yourself to the right place. We’ll show you the steps to fix the problem and make your articles error-free again.
Also Read: [EXPLAINED] Does Windows 11 Come with Microsoft Office?
Why is Grammarly not Working in Microsoft Office Word?
Grammarly for Windows isn’t a stand-alone program. After installation, it’s embedded into Microsoft Word as an add-in.
When turned on, it appears on the right-hand side, displaying corrections you can apply to the text.
When something goes wrong, Grammarly disappears from Word, and its tab is nowhere to be found. That’s the issue we’re dealing with.
So, what if Grammarly for Microsoft Office has disappeared? In this case, you can’t correct your work! You must take the necessary steps to get the tool back in Word.
Different issues could explain the program’s disappearance. For starters, the problem could be as fundamental as turning off the add-in. Sometimes, when you open Word, the add-in doesn’t launch properly.
Other possible reasons for the problem include:
- Disabled Grammarly add-in
- Software conflicts
- Broken Grammarly installation
- Antivirus interference
- Windows is blocking Grammarly’s installation
Also Read: [FIXED] Programs Keep Not Responding in Windows 10
How to Fix the “Grammarly Missing” Issue from Office Word
There’s a solution to the “Grammarly not working in Word” problem. What isn’t available is one fix for everyone.
You have to tackle the root cause of the issue on your system before you can see Grammarly again in Word.
So, apply the fixes we’ve put together below in chronological order.
Solution 1: Restart Microsoft Word
Whenever you launch Microsoft Word, it loads its add-ins as part of the startup process. Sometimes, this process does not complete successfully, leaving some add-ins disabled.
In this case, you won’t see the Open Grammarly button in the Home ribbon menu.
The problem may be occurring due to the way you started the program.
For example, opening a Word document you downloaded from the Internet or your email may leave Grammarly turned off because Word prevents you from editing the tool by default.
So, the first thing to do is restart Microsoft Word. Close the program and relaunch it from the Start menu, then open the document directly from Word using the Recent or Open tabs.
That’s how to turn on Grammarly in Word if you can’t see the app’s icon.
Note that if you relaunch Word again by opening the file you downloaded, the problem may occur again due to the file’s size.
Also Read: How to Reduce the Size of a Word Document
Solution 2: Restart your PC
If you haven’t already, turn off your system and turn it back on, or simply use the Restart function in the Start menu.
As a Windows user, you know how effective a simple reboot can be. Apart from that, Grammarly may not have initialized properly. So, restarting your system could do the trick.
If restarting the PC doesn’t work, follow the next solution.
Also Read: How to Speed Up Windows 10 Startup and Make Your PC Boot Faster?
Solution 3: Enable Grammarly
The second method is starting the program by clicking the Open Grammarly button if it is available in the top corner.
If you can’t find the button in the menu bar after restarting Word and your computer, the add-in may have been deactivated, and you have to add it back to Microsoft Word.
These steps will show you how to add Grammarly to Word:
- Open Microsoft Word.
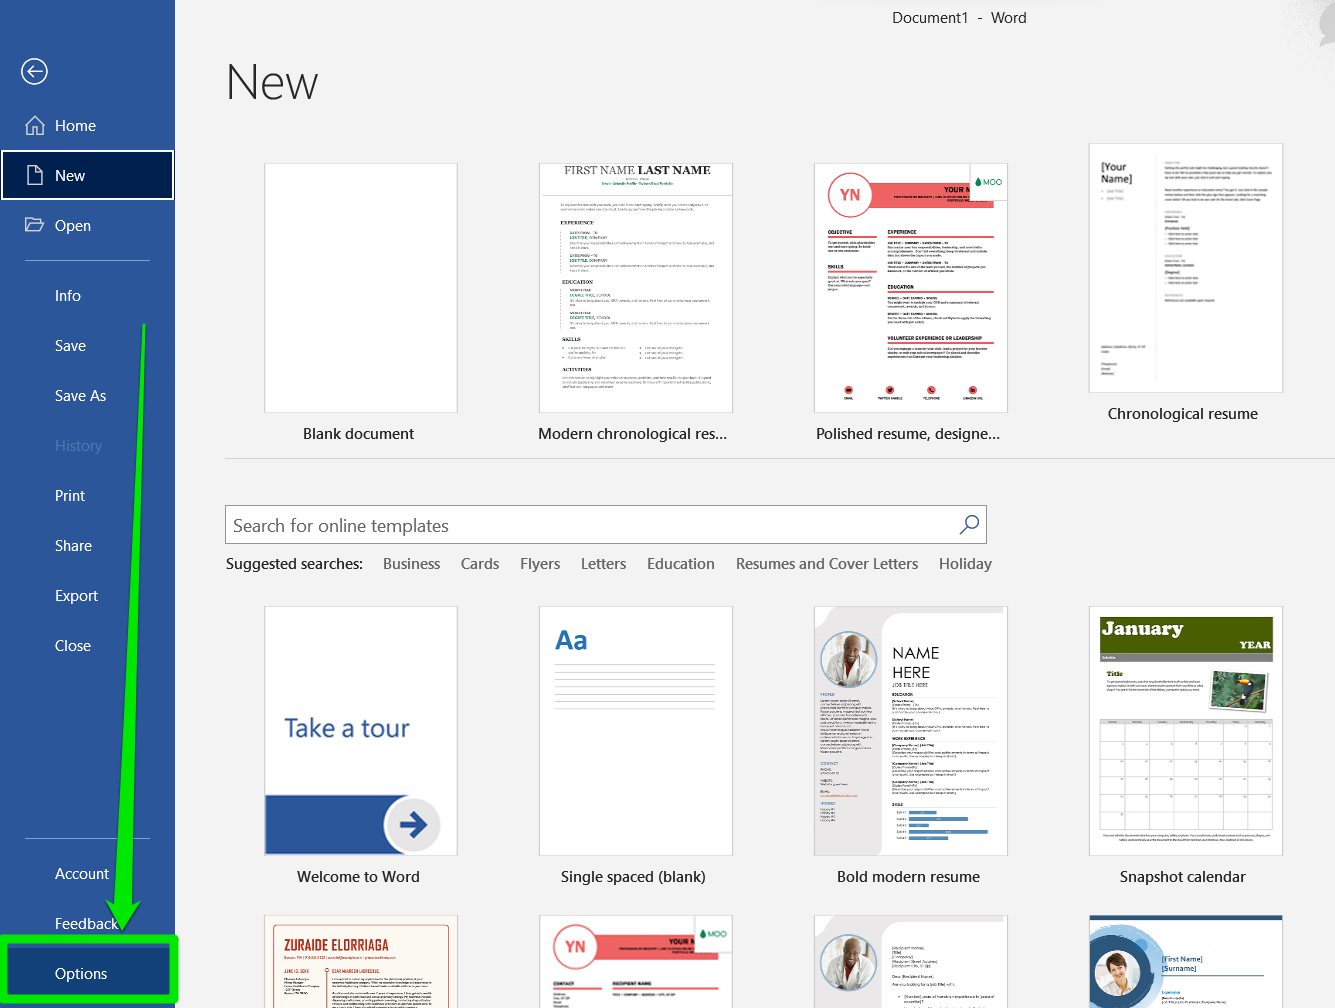
- After Word opens, click on File in the top-left corner of the window.
- Go to the bottom of the left pane and select More, then click Options. In some Word versions, you just have to click Options.
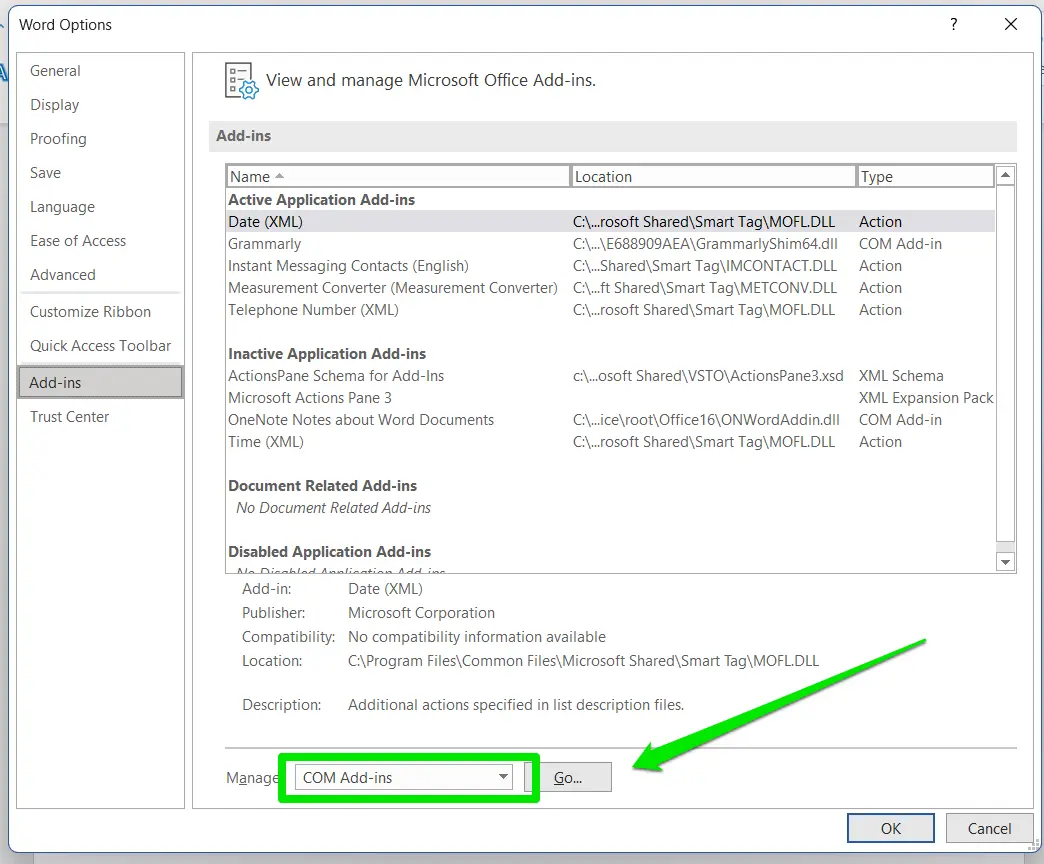
- Go to the left pane of the Word Options dialog window and click Add-ins.
- Now, navigate to the Add-ins tab (on the right).
- Go to the bottom of the tab, select COM Add-ins from the Manage drop-down menu, and click the Go button.
- When you see the COM Add-ins dialog box, make sure the box beside Grammarly is selected.
- Click on OK, and then restart Word.
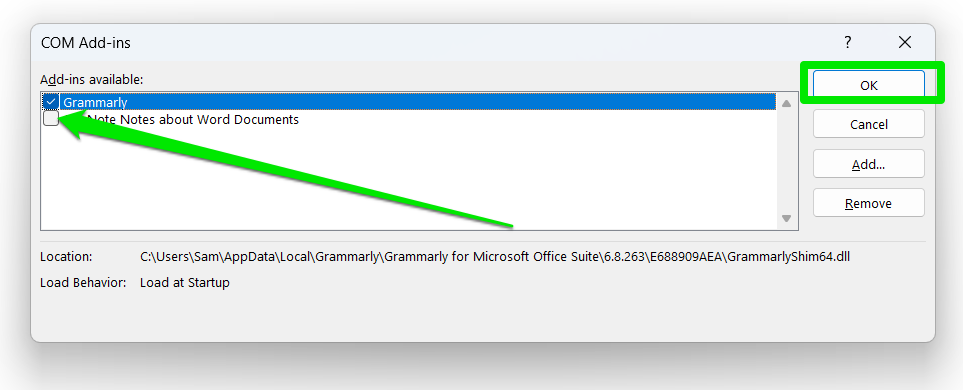
- Grammarly should now be visible.
Also Read: How to Lock a Word Document and Protect It from Editing
Solution 4: Check your antivirus program
Your antivirus program might block Grammarly’s files because it considers the program a threat.
You can quickly resolve the problem by preventing the security application from scanning Grammarly’s folder in the future. Once Grammarly is free from your antivirus program, it should appear in Word again.
There are different ways to prevent Grammarly from regular scans, and the method you’ll need depends on the antivirus you use.
If you use a third-party antivirus, you can check the website of its developers to find out how to go about this process.
If you don’t use any antivirus program apart from Windows Security, follow the steps below:
- Open the Start menu, type Virus, and select Virus & Threat Protection from the search results.
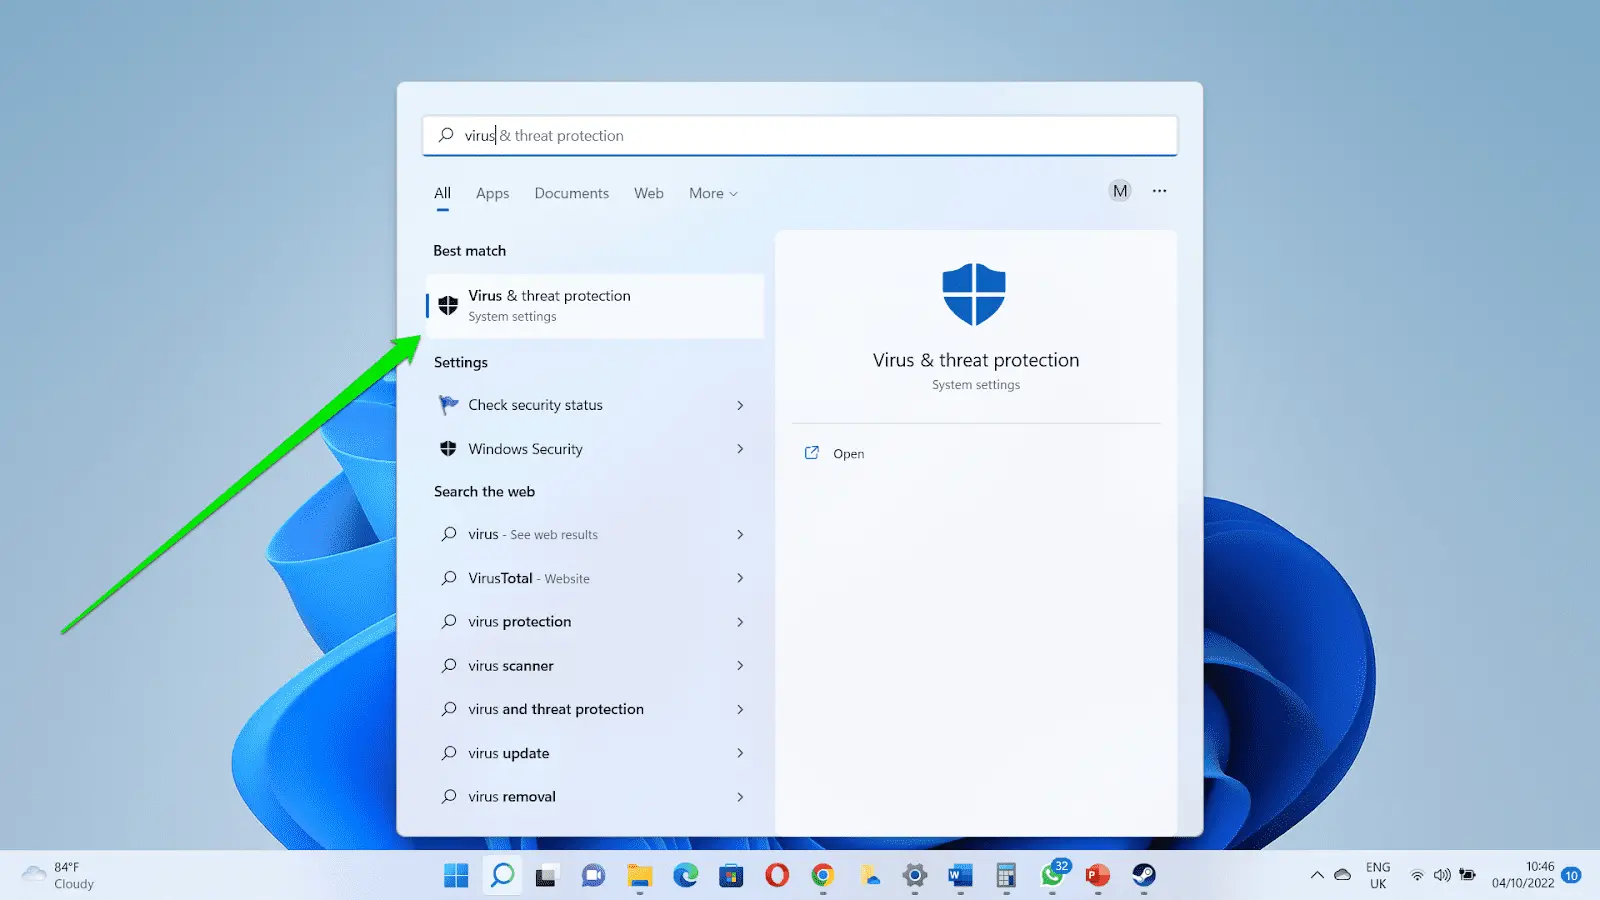
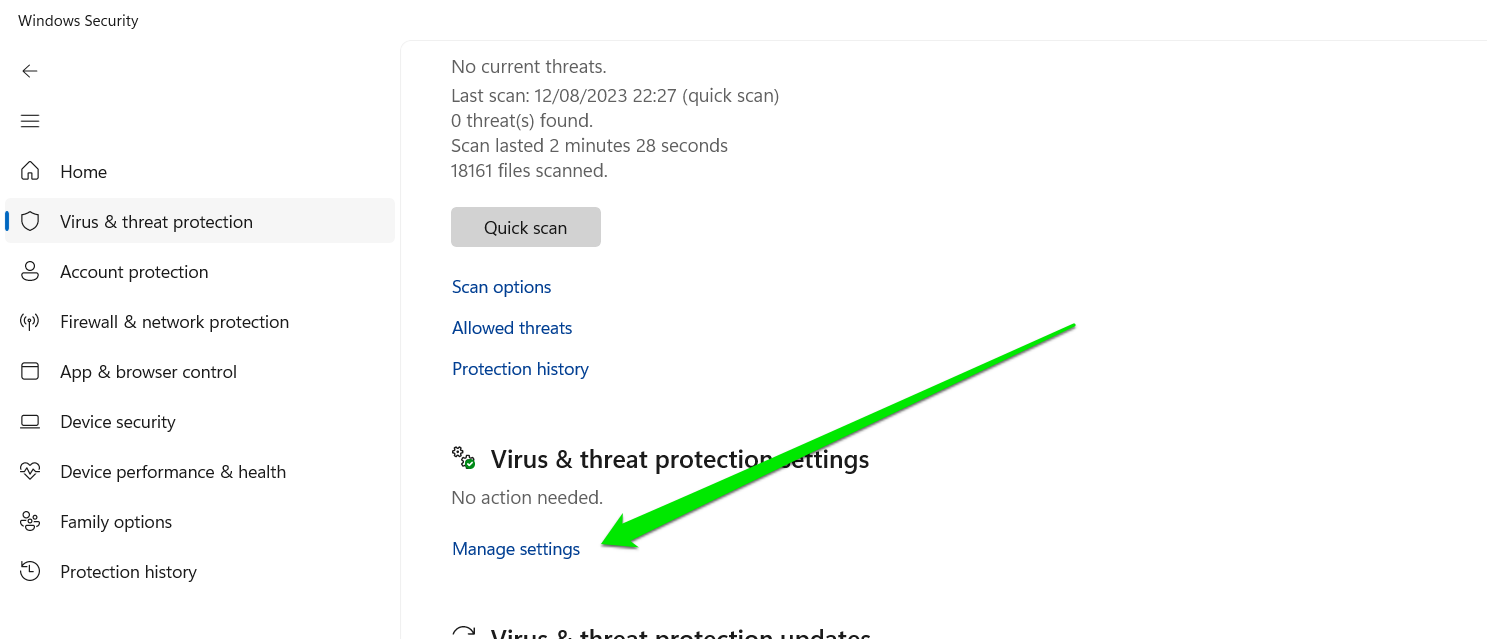
- Scroll through the Windows Security page and click Manage Settings under the Virus & Threat Protection Settings section.
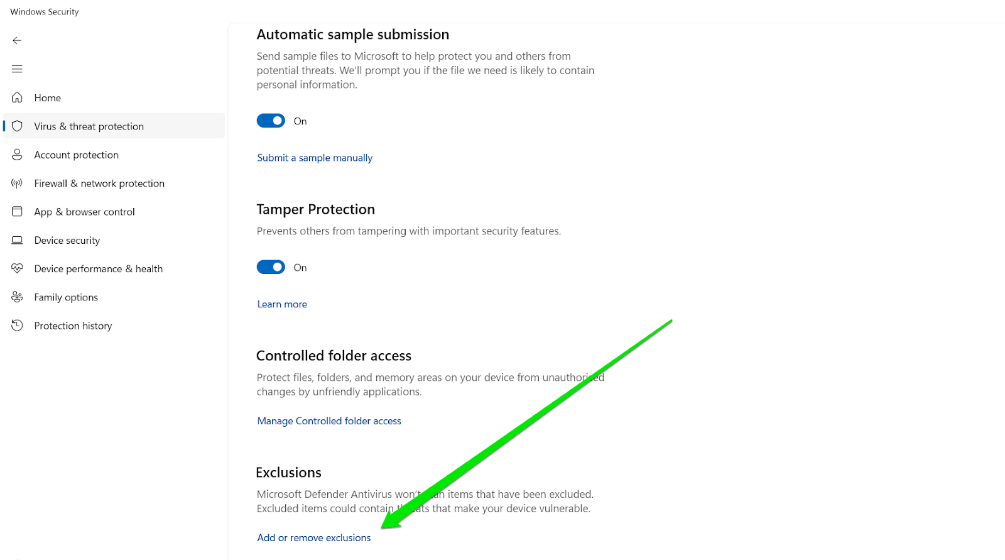
- Scroll through the Virus & Threat Protection Settings interface and click Add or remove exclusions under the Exclusions section.
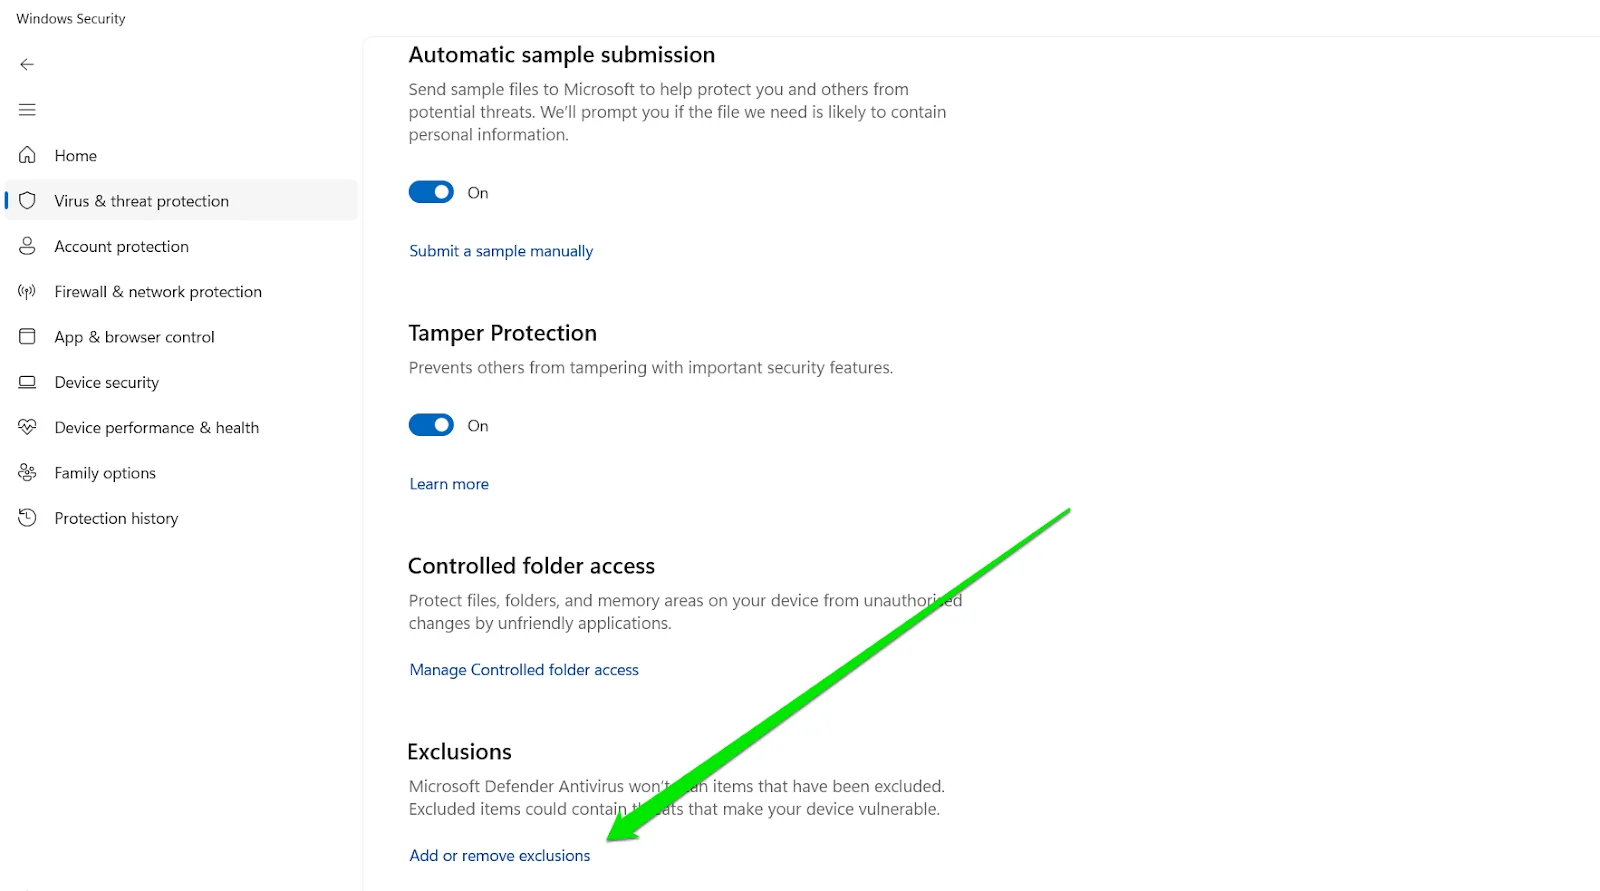
- Scroll through the Virus & Threat Protection Settings interface and click Add or remove exclusions under the Exclusions section.
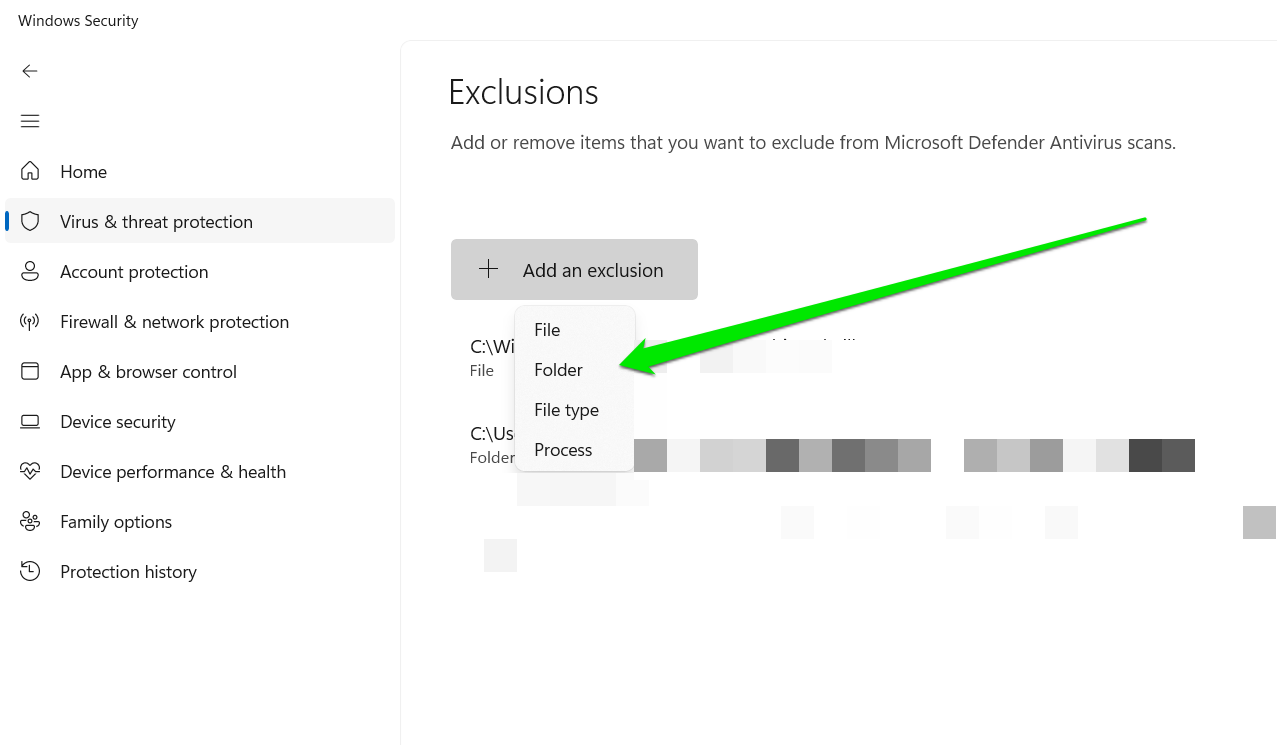
- Click Add an Exclusion.
- Select Folder from the menu.
- Now, navigate to Grammarly’s installation folder in the Select Folder dialog box and single-click it to select it.
- Click on the Select Folder button.
- Launch Word and check if Grammarly shows up.
If that doesn’t resolve the problem, try turning off your antivirus program temporarily. The process is easy. For Windows Security:
- Go to the Virus & Threat Protection tool.
- Scroll to Virus & Threat Protection Settings and click on Manage Settings.
- Toggle the switch under Real-Time Protection to Off.
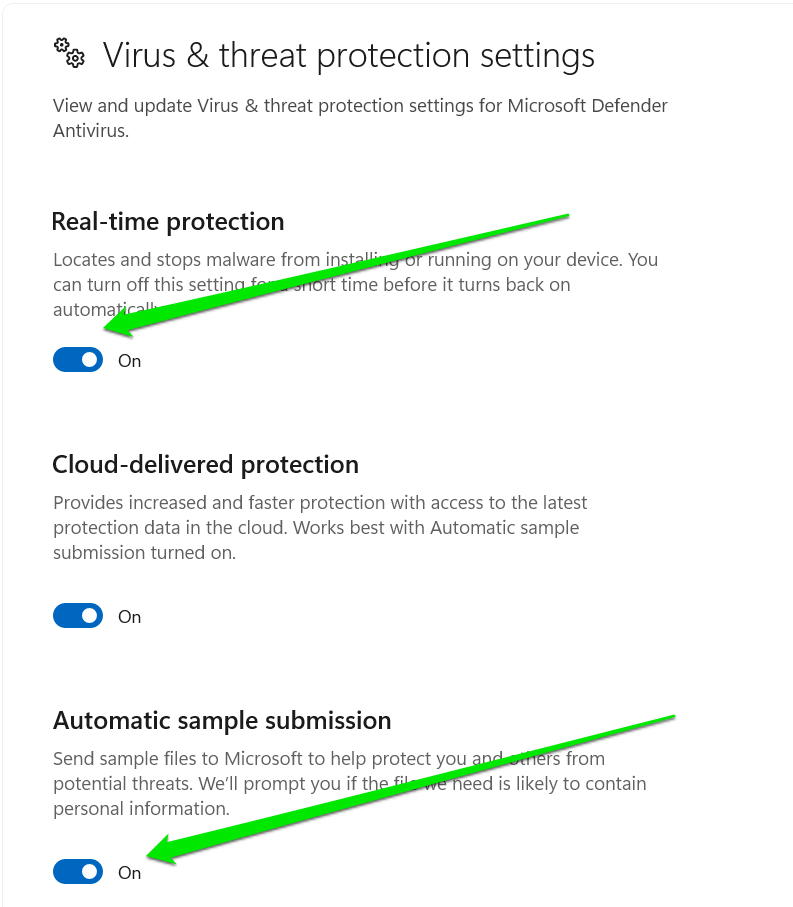
- Launch Grammarly and check for the problem.
If Grammarly works with your antivirus program turned off, consider using another security application.
It doesn’t make sense to keep your system vulnerable because you want to have error-free texts. You can have that and still keep your system protected.
Also Read: How to Prevent Malware: Lock Down Your Online Safety
Find out more: Auslogics Anti-Malware: Features and Reviews
Solution 5: Reinstall Grammarly
You might be dealing with broken installation files. If Grammarly isn’t displayed on the COM Add-ins dialog box, it isn’t installed correctly.
Perhaps something has tampered with its files—something like your antivirus program. So, remove the program, install it properly, and then check if that solves the problem.
First, you have to remove Grammarly. Follow these steps if you don’t know how to do that:
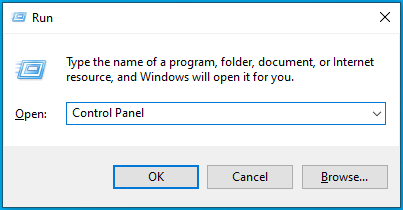
- Launch the Run dialog box by pressing
Windows + R. - Once Run opens, type control panel into the text field and press the Enter keyboard button.
- Click on Uninstall a Program under the Program section.
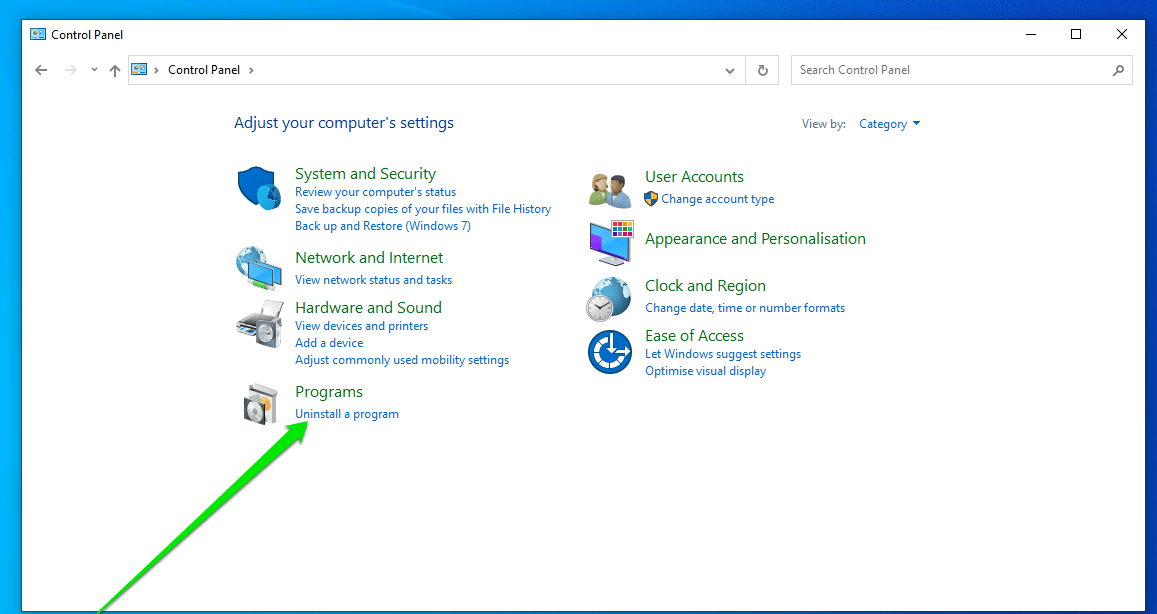
- The Programs and Features interface will now appear.
- Locate Grammarly for Microsoft Office Suite in the Programs and Features interface under the Uninstall or change a program list.
- Once you see the program, double-click or right-click it and select Uninstall.
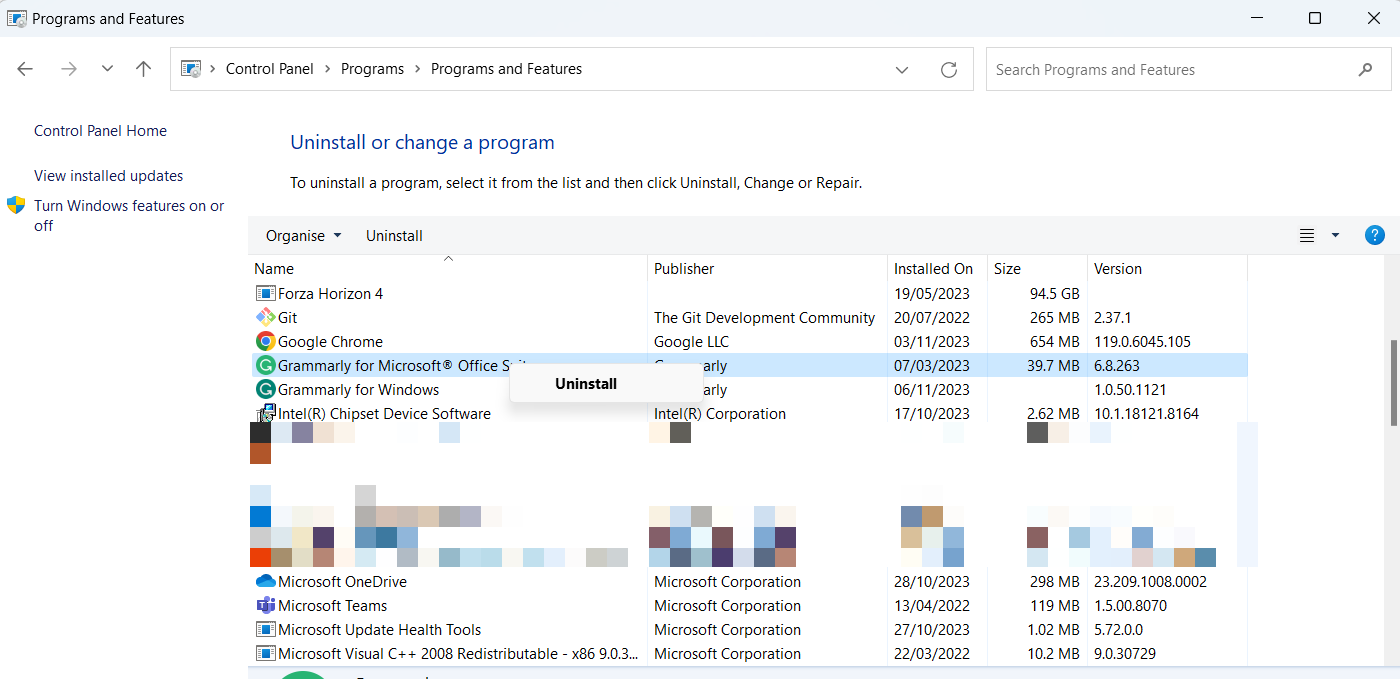
- Click on Yes in the first confirmation dialog that you see.
- If Microsoft Word is running, another dialog will pop up, asking you to close the open program. Do that.
- The program will now be uninstalled.
- Check the box beside Remove user settings and login information, then click the Finish button.
- Right-click on the Start button and click on Run in the Power User menu, or press
Windows + R. - After Run opens, type
%localappdata%into the text box and click OK. - Once the Local folder appears, search for the Grammarly folder and delete it.
- Restart your system.
How to install Grammarly in Word
- Go to Grammarly’s website and download the setup for Windows.
- Once you’ve downloaded it, go to your Download folder.
- Locate the GrammarlyAddInSetup.exe file and right-click it.
- Click on Run as Administrator in the context menu and select Yes in the User Account Control dialog box.
- Once the Welcome to Grammarly interface opens, press and hold the Shift and Ctrl keys, then click Get Started.
- The Advanced Settings window will now open.
- Select Install for all users, and then click on Next.
- Allow the installation to complete, restart your system, and check if the issue has been resolved.
- You can also go to the Options dialog window, head to Add-ins, and activate Grammarly.
Solution 6: Enable User Account Control
User Account Control is an implementation that helps regulate changes to your computer.
It always pops up to notify you when an application tries to perform an advanced operation on your system that might potentially cause harm. You can then deny or approve.
As it turns out, UAC might be connected to the issue you’re facing with Grammarly.
For many users, enabling the security feature fixed the problem. Try enabling it and check if Grammarly shows up in Word again. The following steps will show you what to do:
- Press
Windows + R. - Once Run opens, type control panel into the text field and press the Enter keyboard button.
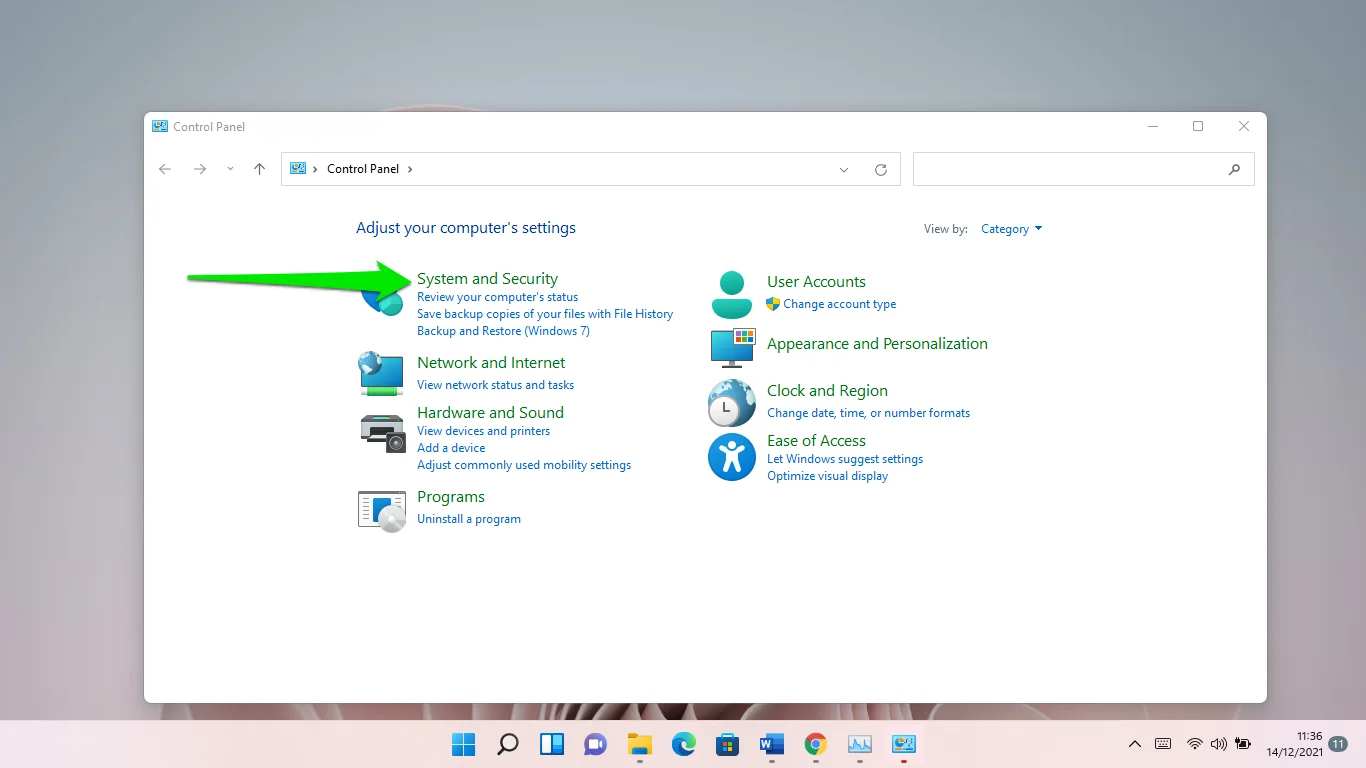
- After Control Panel opens, click on System and Security.
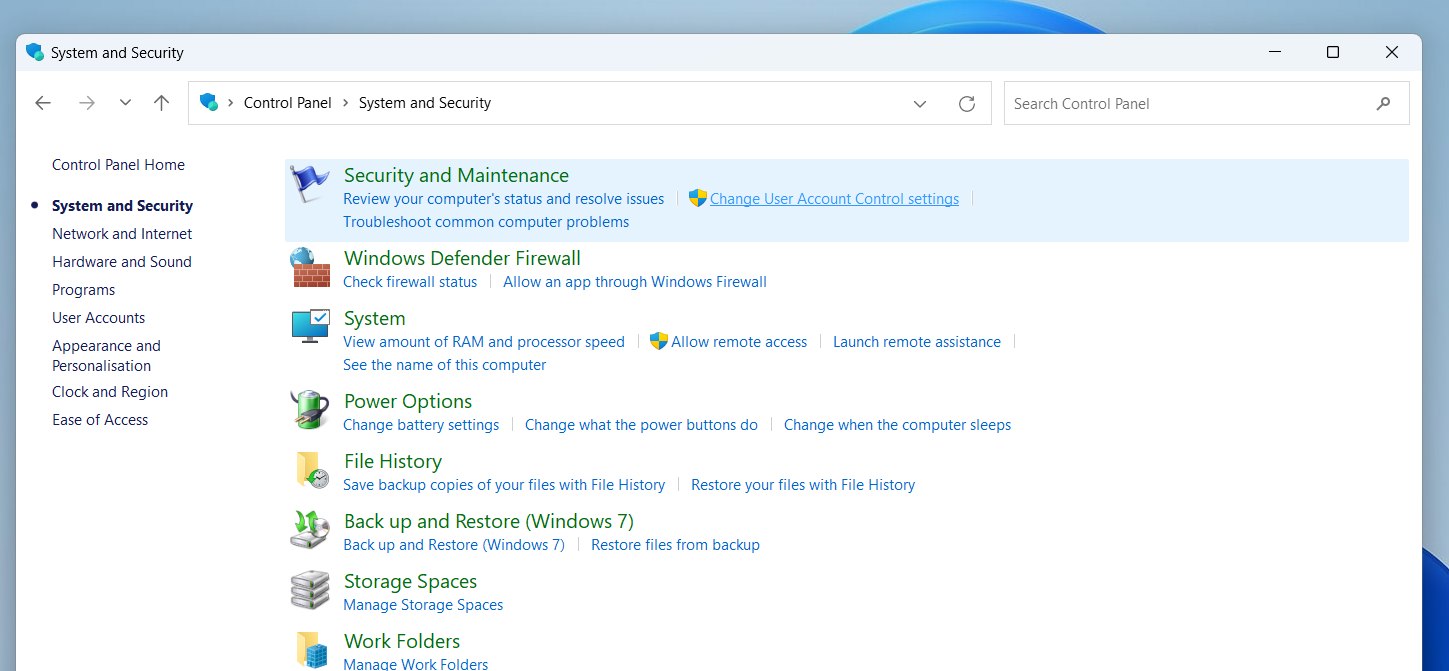
- On the System and Security interface, select Change User Account Control Settings under Security and Maintenance.
- After the User Account Control Settings dialog opens, use the selection steps from Always Notify to Never Notify to select any security level of your choice and click on the OK button.
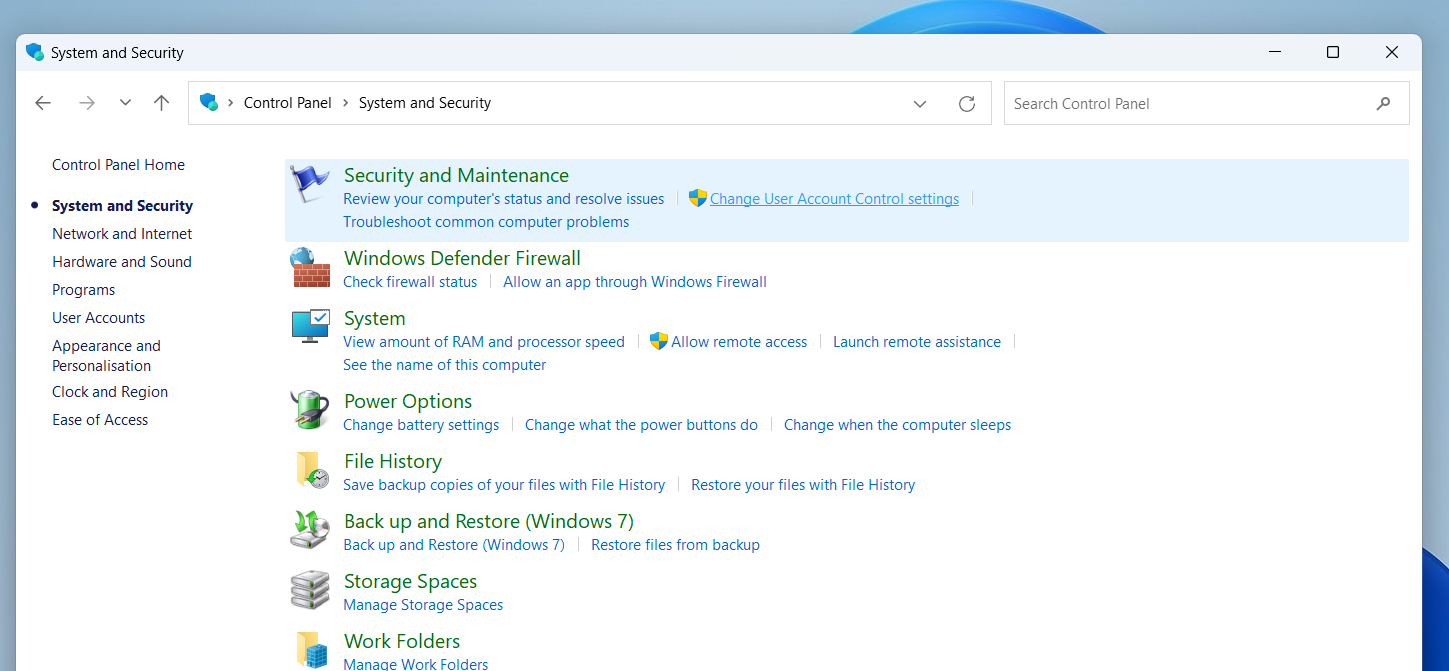
- It is not recommended to choose Never notify.
- Open Word and check if the issue persists.
Solution 7: Update or Reinstall Microsoft Office
Your Office installation might be out of date and may no longer support Grammarly. When Office is outdated, you may experience other issues, such as font support and corrupted files.
So, update MS Office and check if that resolves the problem. The following steps will help:
- Connect to the Internet.
- Launch Microsoft Word and open a document. Even a blank document will do.
- Go to the top-left corner of the window and click on File.
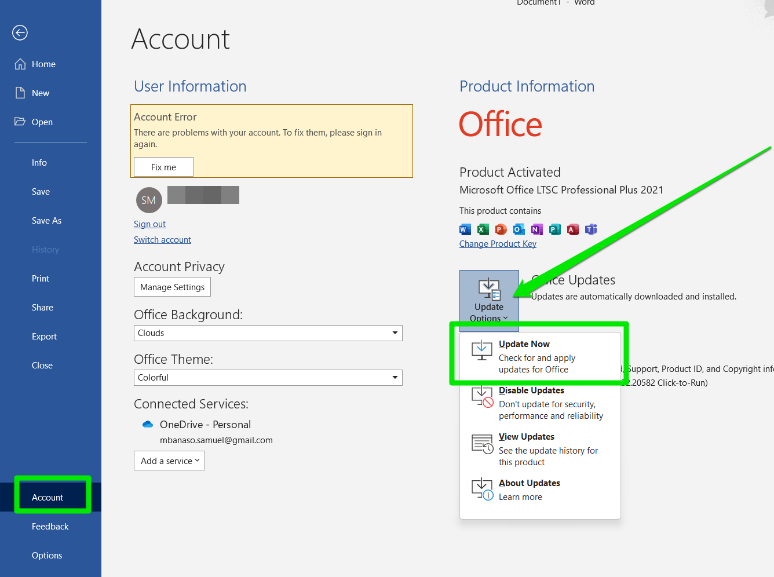
- On the next screen, click on Account at the bottom of the left pane.
- Under Product information, click the Update Options button and select Update Now in the drop-down menu.
- The application will now search for updates and install them.
- If your installation is up to date, you will be notified.
Reinstall your Microsoft Office
If updating doesn’t do the trick, you might have to reinstall Microsoft Office, as bad installation files could be at play. Follow these steps to remove the program:
- Press
Windows + R. - Once Run opens, type control panel into the text field and press the Enter keyboard button.
- In the Control Panel interface, locate Programs.
- Click on Uninstall a Program. The Programs and Features interface will now appear.
- Locate Microsoft Office in the Programs and Features interface, under the Uninstall or change a program list.
- Once you see the program, double-click it or right-click it and select Uninstall.
- Click on Yes in the first confirmation dialog that you see.
- Follow the subsequent prompts.
- You can download Office from Microsoft’s website or use your standard installation package to reinstall the product.
- After that, run it and check if the problem is resolved.
Also Read: How to repair and recover a corrupted Microsoft Word file
Solution 8: Update Windows
Downloading and installing important Windows updates could fix the problem. Your system should have been updated by now if Windows Update is doing its job as it should.
However, there are times when you have to initiate the update process yourself.
Follow these steps to check if your system is up to date:
- Open the search bar next to Start.
- Once the search bar opens, type “Updates” (don’t add the quotes) and click on “Check for updates in the results.”
- Once the Windows Update screen appears, the utility will automatically check for pending updates for your system.
Also Read: Windows Update Troubleshooter: Easily Fixing Windows Update Issues
Solution 9: Optimize Microsoft Word for compatibility
Microsoft allows users to set how they optimize Microsoft Office apps. You can choose to optimize the tool for appearance or compatibility.
Grammarly may not be responding correctly if you choose the first option. So, optimize the program for compatibility and check if that resolves the problem.
Follow these steps:
- Click File in the top-left corner of Word and select Options.
- After the Options dialog opens, go to the General tab and select Optimize for Compatibility (application restart required) under User Interface Options.
- Click OK, restart Word, and check for the issue.
Conclusion
You should now be able to use Grammarly again. If Grammarly is not showing up in Google Docs, you need to check your Internet connection and reload the page you’re working on. You can also restart your browser.


