
What do you do when your automatic repair couldn’t repair your PC? Of course, that is why you’re reading this article.
Some users and tech communities suggest a clean install or resetting your computer. Even though this may technically fix the problem, it should be the last resort.
Instead, you can perform a system restore, troubleshoot in Safe Mode, or disable the automatic repair itself.
I’ll show you how to execute these solutions and more and help you fix the issue if your startup repair couldn’t repair your PC.
Let’s get started.
Automatic Repair Couldn’t Repair Your PC: What Does it Mean?
When you get this error message, “startup repair couldn’t repair your PC,” it means when you turned on your PC, Windows ran through a problem and tried to fix it but couldn’t.
Now, there are plenty of reasons why this problem occurs. It could be that:
- There is a problem with your hardware,
- The system files are corrupted or damaged or
- Some software cannot work on the same system at the same time, causing software conflicts.
- Your hard drive has disk errors.
- Malware or viruses have attacked your system.
So, you usually don’t have to do anything. However, when it can’t fix the problem for various reasons, it causes the automatic repair to enter into an infinite loop. ”
Check this guide to learn how to fix the automatic repair loop: Simple and Fast: How to Fix Windows 10/11 Automatic Repair Loop.
How to Fix the Error “Startup Repair Couldn’t Repair Your PC.”
Before you follow the fixes below, I’d suggest restarting your PC.
I’ve seen that this can sometimes correct the problem if your automatic repair couldn’t repair your PC.
This often corrects any temporary glitches or issues that are stopping your system from starting up properly.
If you’re still seeing the error, go through the below solutions:
Fix 1: Boot in Safe Mode
One of the most recommended methods is to boot your computer in Safe Mode to troubleshoot and fix the problem.
When the system is in Safe Mode, it boots with only a few sets of services and drivers, giving you the chance to isolate and resolve the error.
Fix 2: Rebuild BCD and repair MBR.
Sometimes, rebuilding the Boot Configuration Data (BCD) and repairing the Master Boot Record (MBR) can correct the error “automatic repair couldn’t repair your PC.”
Here’s how the process works:
- Turn on your PC and quickly press F8 or other relevant keys to enter the recovery mode.
- Go to Troubleshoot, select Advanced Options, and click Command Prompt.
- Then, type the following commands one by one and press Enter:
bootrec.exe /rebuildbcd

bootrec.exe /fixmbr

bootrec.exe /fixboot

After running these commands, start your computer again and see whether you can start normally.
Related: CMD Navigation: How to Change Directory in CMD (Command Prompt)
Fix 3: Disable automatic startup repair
Here’s something interesting you probably didn’t know. Windows has a feature called Early Launch Anti-Malware Protection, or ELAM for short.
This service starts your PC’s antivirus and security software before any other driver executes to provide an additional layer of security.
However, in some situations, ELAM can interfere with how your computer starts. And this can stop the automatic start repair tool from running as it should.
So, if the automatic repair couldn’t repair your PC, disabling ELAM could fix the problem. Here’s how to do it:
- Enter the recovery mode by pressing F8 or other relevant keys.
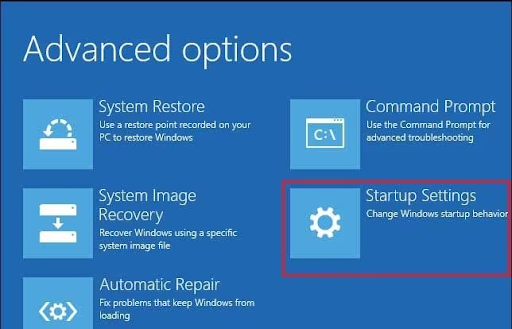
- Go to Troubleshoot and select Advanced Options.
- Then, choose Startup Settings.
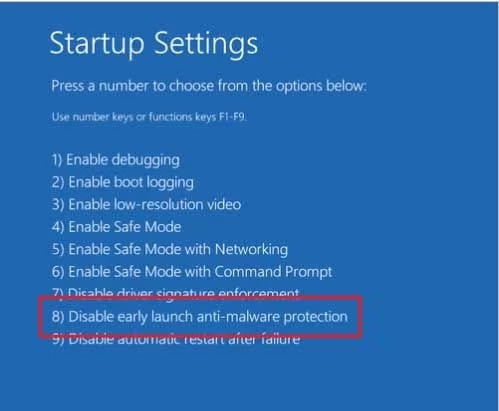
- Click on the Restart button. When you do that, various Startup Settings will display on your screen.
- Choose the 8th option, that is, Disable Early Launch Anti-Malware Protection.
After that, restart your computer and check if you’re still seeing the “startup repair couldn’t repair your PC” error on your screen.
Fix 4: Restore registry from RegBack directory
Another cause of the error “automatic repair couldn’t repair your PC” is a wrong registry value. To rule out this possibility, go to Advanced options and open the command prompt.
Then, type the following command and press Enter on your keyboard:
c:\windows\system32\config\RegBack\* c:\windows\system32\config
You’ll receive a prompt asking you to overwrite all or partial files. Type All and press Enter. Restart your computer and check whether the problem has been fixed.
Related: Ultimate Guide: Why and How to Defrag Windows Registry?
Fix 5: Run the DISM tool
Go through the steps below:
- Follow the previous steps to enter the recovery window.
- Navigate to Troubleshoot, select Advanced options, and open command prompt.
- Then, input the following command and press Enter:
DISM.exe /Online /Cleanup-image /Restorehealth
- Wait for the process to complete and restart the computer.

Fix 6: Reset your Windows
If none of the above methods work, your only option may be to reset or reinstall your Windows. This will restore your PC to its default settings.
However, remember that this will delete all information stored on your hard drive. So, make sure you backup your essential data before starting this process.
Further Reading: Easily Reset Your PC: How to Factory Reset a Windows 10 & 11 Computer
Conclusion
So there you have it. If your automatic repair couldn’t repair your PC, the methods I’ve laid out in this article can help you resolve the problem.
You don’t need to be tech-savvy to fix this issue. But, if you don’t know what you’re doing, get on a call with a professional.
One more thing. Thanks for reading this article.
Please take a second to share this article with your friends and socials so that others can benefit.
FAQ
When you’re in Safe Mode, delete any apps, or programs, or drivers you recently installed, and check to see if that fixes the problem.
I’ve detailed more solutions on this page. Go through the various solutions to resolve the problem once and for all.
The SrtTrail.txt error usually means that your Startup repair tool has a problem. And you’ll most likely see a blue screen of death (BSOD) when you get this error.
If you get this error, it means your system files are corrupt, your drivers are not compatible, or the system’s hardware is faulty.
If that is the case for you, try using the system restore feature to revert your PC to the state it was in when everything was working fine.