![[FIXED] Windows 10 Thumbnails Not Showing?](https://www.auslogics.com/en/articles/wp-content/uploads/2023/12/FIXED-Windows-10-Thumbnails-Not-Showing-1-568x359.png)
- Why Are Thumbnails Not Showing on Windows 10?
- How to Fix the “Windows Thumbnails Not Showing” Issue
- Change File Explorer Settings
- Restore File Explorer’s Default Options
- Delete the Thumbnail Cache
- Change Visual Effects Settings
- Turn on Taskbar Thumbnails in Group Policy
- Change the Default Application for the Affected Files
- Restore Windows
- Reset OneDrive
- Remove Malware
- Find and Fix Corrupt or Missing System Files
- Conclusion
- FAQ
Thumbnails are one of those things you hardly notice until they’re gone. Their absence immediately sets off alarm bells, even if you’ve never acknowledged their importance.
Your File Explorer will suddenly look strange when your thumbnails disappear, as you can no longer preview files at a glance. You now have to open every file to remind yourself what it is.
But thumbnails are not exclusive to the File Explorer. They are also generated in your taskbar to allow you to preview open applications. For example, if you open multiple browsing Windows, the generated thumbnails allow you to tell one from the other.
You don’t have to panic if you’re experiencing this freak incident on your Windows computer. The problem is fixable, and you can get things back to normal.
This article contains guidelines and troubleshooting steps that will teach you how to fix the “Windows 10 thumbnails not showing” problem.
📌 Further reading: Green Check Marks on Desktop Icons: Why Are They There and How to Get Rid of Them in Windows 10/11?
Why Are Thumbnails Not Showing on Windows 10?
Something must have gone wrong in the background before you noticed that Windows 10 stopped showing thumbnails.
At the basic level, you may have accidentally turned off some system settings that allow Windows to display your files’ preview-sized images.
Another likely cause of the problem is a corrupt thumbnail cache. Malware infection, software conflicts, or hard drive problems might prevent Windows from accessing files where generated thumbnails are stored.
Other reasons include OneDrive syncing problems, corrupt system files, and buggy system updates.
📌 Also read: Windows Update Troubleshooter: Easily Fixing Windows Update Issues
How to Fix the “Windows Thumbnails Not Showing” Issue
Windows not showing thumbnails right now doesn’t mean your computer has permanently lost the feature. Removing the problem’s underlying causes helps you restore your file previews.
We’ll cover different methods that teach you how to show thumbnails in Windows 10 and remove the glitches that prevent the operating system from displaying them.
Change File Explorer Settings
A specific File Explorer setting prevents your computer from displaying thumbnails when activated. The setting is couched in the File Explorer Options interface, and it is easy to miss. You may have accidentally turned on the option, causing only icons to display.
So, go to the File Explorer Options and disable that setting. The following steps will show you how to view thumbnails in Windows again:
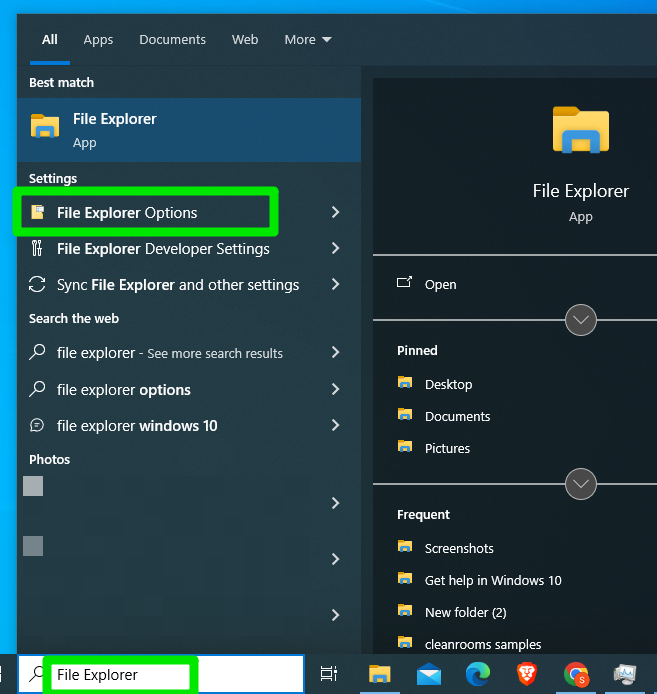
- Open the Start menu and type
File Explorer.
![Open the Start menu and type File Explorer.]()
- Click File Explorer Options in the search results.
- Go to the View tab after opening the File Explorer Options dialog window.
- Next, navigate to the Advanced settings list and ensure the box beside
Always show icons, never thumbnailsis unchecked.
![Next, navigate to the Advanced settings list and ensure the box beside Always show icons, never thumbnails is unchecked.]()
- Click the OK button and check if your thumbnails can now display.
Also Read: Windows File Explorer Not Responding? Try These Solutions
Restore File Explorer’s Default Options
As you have noticed, there are many different settings in File Explorer, and if you’ve been changing them a lot, some conflicting preferences may be preventing your thumbnails from showing. You can revert to the program’s default settings, as those options allow thumbnails to display.
Here’s how to restore File Explorer’s default settings:
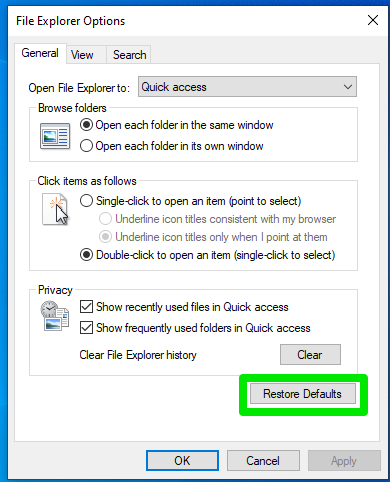
- Open the Start menu and type
File Explorer. - Click File Explorer Options in the search results.
- Click the Restore Defaults button under the General tab of the File Explorer Options dialog window.
![Click the Restore Defaults button under the General tab of the File Explorer Options dialog window.]()
Delete the Thumbnail Cache
Whenever you save a new file to your computer, Windows generates a thumbnail for it. The operating system saves the generated thumbnail to your hard disk to a cache file. That way, it can display the preview straight from the file instead of rendering it anytime you open File Explorer.
Sometimes, these cache files become corrupt due to system glitches, hardware issues, and software conflicts. You can force Windows to generate new thumbnails by deleting your entire thumbnail cache.
There are different ways to clear the cache, from the Disk Cleanup tool to File Explorer. We’ll show you how to use each method.
Through the Disk Cleanup tool:
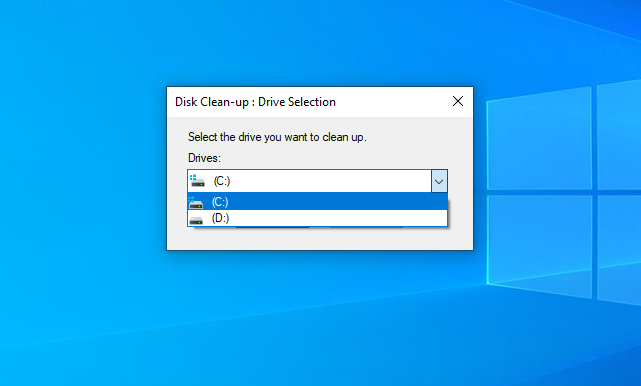
- Open the Start menu and type
Disk Cleanup. - Click Disk Cleanup in the search results and select your main drive.
![Click Disk Cleanup in the search results and select your main drive.]()
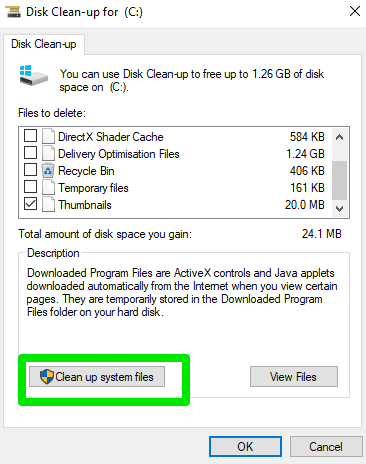
- Select the Thumbnails checkbox in the Files to delete list.
![Select the Thumbnails checkbox in the Files to delete list.]()
- Click the Clean up system files button to allow Disk Cleanup to compile temporary system files, including Thumbnails.
![Click the Clean up system files button to allow Disk Cleanup to compile temporary system files, including Thumbnails.]()
- Now, select the Thumbnails checkbox and click the OK button.

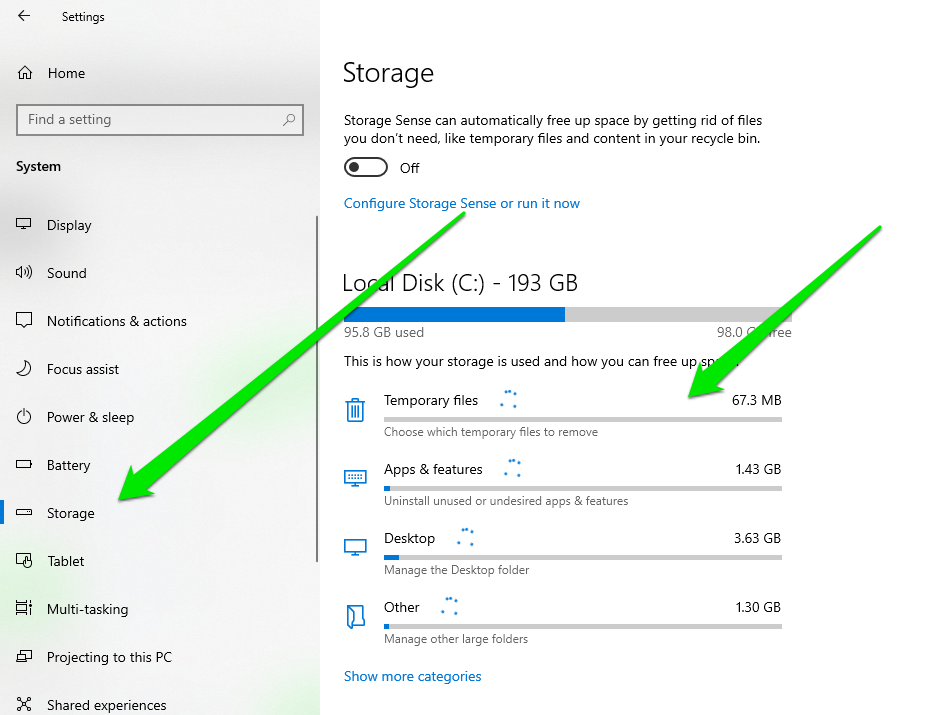
Going through Settings:
- Launch the Settings application and select System.
- Click Storage after the System page opens.
- Next, select Temporary files.
![Next, select Temporary files.]()
- Once Windows calculates your temporary files, check the Thumbnails box.
- Click the Remove files button.
Using Command Prompt:
- Right-click the Start menu and select Run.
- Type
cmd. - Hold the
Shiftkey on your keyboard and click the OK button or tapEnterto launch Command Prompt with admin privileges. - After Command Prompt opens, type these lines and press
Enterafter typing each:taskkill /f /im explorer.exe del /f /s /q /a %LocalAppData%\Microsoft\Windows\Explorer\thumbcache_*.db start explorer.exe
- Check if the problem persists.
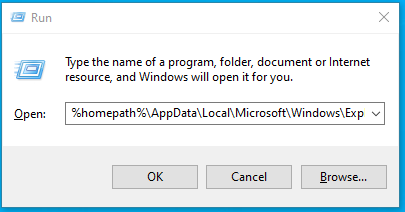
Clearing thumbnails manually:
- Right-click the Start menu and select Run.
- Type the following into the text box and hit the
Enterbutton:%homepath%\AppData\Local\Microsoft\Windows\Explorer
![Type the following into the text box and hit the Enter button:%homepath%AppDataLocalMicrosoftWindowsExplorer]()
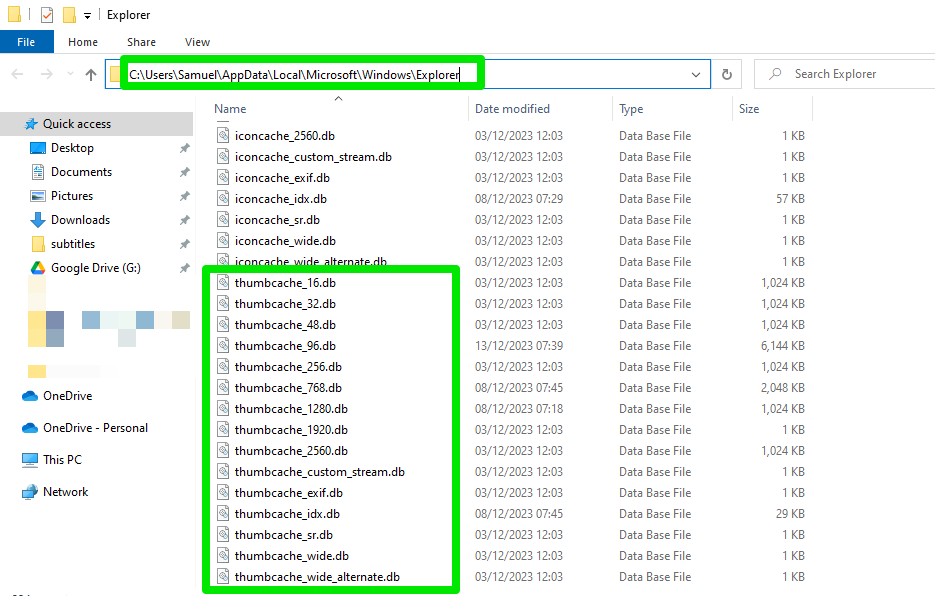
- Now, select the thumbnail files (thumbcache.db) and delete them. After selecting them, hold the
Shiftbutton and selectDelete.
![Now, select the thumbnail files (thumbcache.db) and delete them. After selecting them, hold the Shift button and select Delete.]()
Auslogics BoostSpeed is designed to work in the background without using up your system resources. Instead, it helps you find and fix glitches that would otherwise spoil your Windows experience.
Change Visual Effects Settings
Windows’ visual effects settings are designed to help you determine your computer’s graphics settings on the one hand and help you boost performance on the other hand. Some graphics settings may draw too much power and overburden your CPU, so disabling your system’s visual effects can help you experience smoother system performance.
One such performance setting that may be turned off unnoticed is the thumbnail display. Head to the Performance Options dialog window and allow your computer to show thumbnails.
These steps will guide you:
- Launch the Start menu and type
system settings. - Click View advanced system settings in the search results.
- Select the Settings button under Performance.
![Select the Settings button under Performance.]()
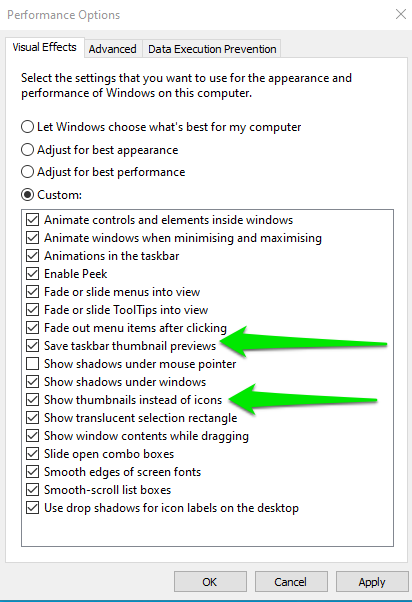
- Next, check the boxes next to
Save taskbar thumbnail previewsandShow thumbnails instead of icons.
![Next, check the boxes next to Save taskbar thumbnail previews and Show thumbnails instead of icons.]()
- Click OK in both dialog Windows and check for the problem.
Windows 10/11 (8, 7, Vista, XP)
Turn on Taskbar Thumbnails in Group Policy
You can also force your computer to display thumbnails by turning off a specific Local Group Policy Editor setting.
Note that the program is not available on Windows 10 Home versions.
Follow these steps if you run Windows 10 Pro and higher:
- Right-click the Start menu and select Run.
- Go to the text box, type
gpedit.mscand click OK.
![Go to the text box, type gpedit.msc and click OK.]()
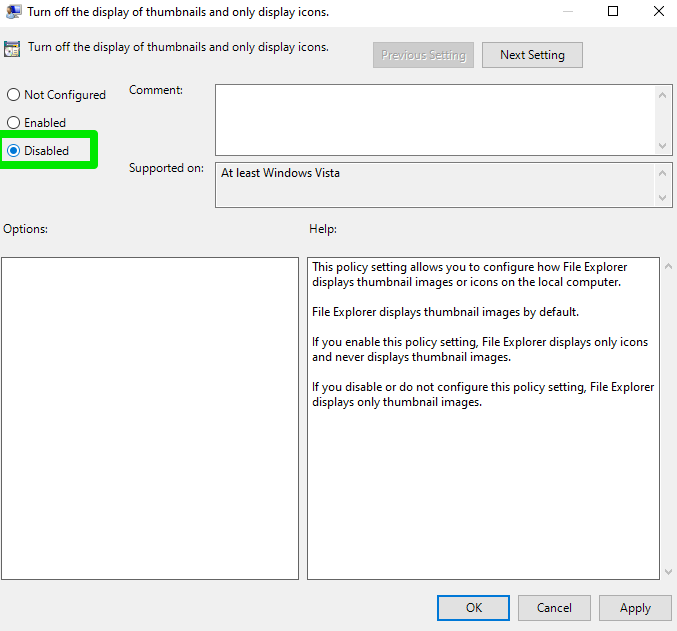
- After the Local Group Policy Editor window opens, go to the left pane and navigate to the following location:
User Configuration > Administrative Templates > Windows Components > File Explorer - Now, switch to the right side of the Window and double-click Turn off the display of thumbnails and only display icons under the Windows Components Settings list.
- Select Disabled on the dialog window that appears and click the OK button.
![Select Disabled on the dialog window that appears and click the OK button.]()
- You can now check if your thumbnails are now showing as they should.
- Next, return to the left side of the Local Group Policy Editor and navigate to User Configuration > Administrative Templates > Start Menu and Taskbar. Scroll through the right side of the screen, double-click Turn off taskbar thumbnails, and disable the option.

📌 Also read: How to manage the Group Policy on Windows 10, 8 and 8.1
Change the Default Application for the Affected Files
File thumbnails only appear when there is an application that can open the file. If the issue only affects a particular type of file, the problem is likely related to the file’s default application. Sometimes, the program may not support thumbnail previews, allowing you to see only the file’s icon.
You can try updating the app in question, as it may be outdated. Changing the default app is another way to resolve the problem in this case.
Here’s how to do that:
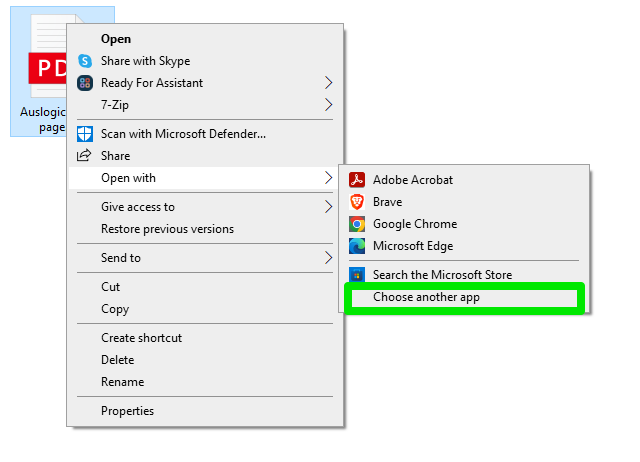
- Launch File Explorer and right-click one of the files affected by the issue.
- Hover your mouse button over “Open with” in the context menu and click “Choose another app.”
![Hover your mouse button over “Open with” in the context menu and click “Choose another app.”]()
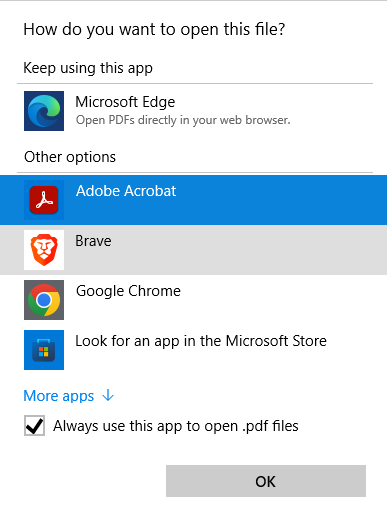
- When the apps list appears, select your preferred app, check the box beside
Always use this app to open files, and click the OK button.
![When the apps list appears, select your preferred app, check the box beside Always use this app to open files, and click the OK button.]()
- You can now check for the issue.
Restore Windows
Some changes you made to your computer may contribute to the problem. You may have uninstalled or installed an app that affected changes in the Windows registry. You can resolve the problem by restoring your computer to an earlier date when you could see thumbnails without issues.
Follow these steps to restore your computer using the System Restore utility:
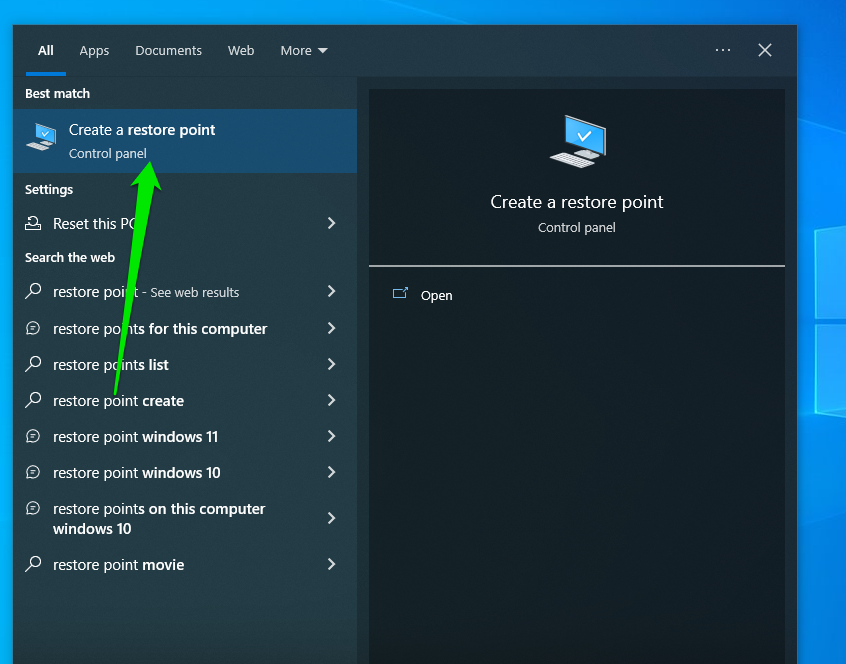
- Open the Start menu and type
restore. - When the results appear, select Create a restore point.
![When the results appear, select Create a restore point.]()
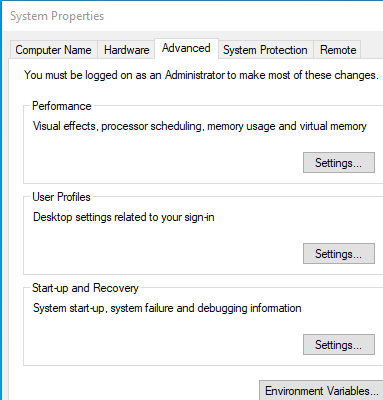
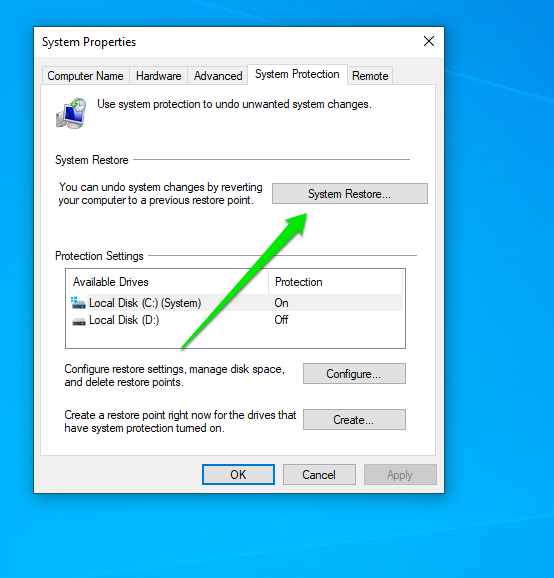
- Click the System Restore button under the System Protection tab once you see the System Properties dialog window.
![Click the System Restore button under the System Protection tab once you see the System Properties dialog window.]()
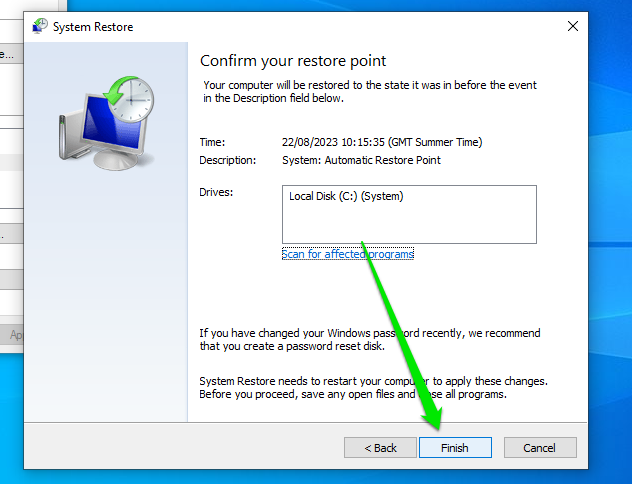
- Click the Next button after the System Restore wizard opens, select the restore point, click Next, and then click the Finish button.
![Click the Next button after the System Restore wizard opens, select the restore point, click Next, and then click the Finish button.]()
- Allow Windows to restart and return your computer to its previous working state.
📌 Also read: Ultimate Windows Recovery Guide: How to Restore Your Windows System
Reset OneDrive
Try turning on OneDrive to sync your files and check if you can now see your thumbnails. If that works, the issue is tied to the cloud application. But you should not be forced to always keep OneDrive turned on to see your thumbnails.
You can reset the application to resolve the issue. Follow these steps:
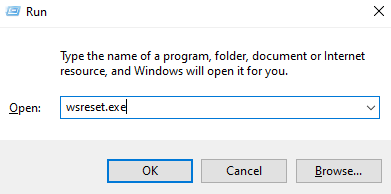
- Press the
Win + RWindows hotkey to launch the Run dialog window. - After Run appears, type
wsreset.exeand press theEnterbutton.
![After Run appears, type wsreset.exe and press the Enter button.]()
- If the problem does not go away, open Run again, type or paste the following into the text box, and hit the
Enterkey:
%localappdata%\Microsoft\OneDrive\onedrive.exe /reset
Type the following instead if you see an error:
C:\Program Files\Microsoft OneDrive\onedrive.exe /reset
Or use the following if you run a 32-bit operating system:
C:\Program Files (x86)\Microsoft OneDrive\onedrive.exe /reset
📌 Helpful read: How to Fix OneDrive Not Syncing on a Windows PC
Remove Malware
If a malicious application is the reason you cannot see thumbnails, the problem will keep on recurring even if you find temporary workarounds.
The permanent solution in this case is to find and remove the malware program corrupting your thumbnail cache, changing your computer settings, or affecting your system files.
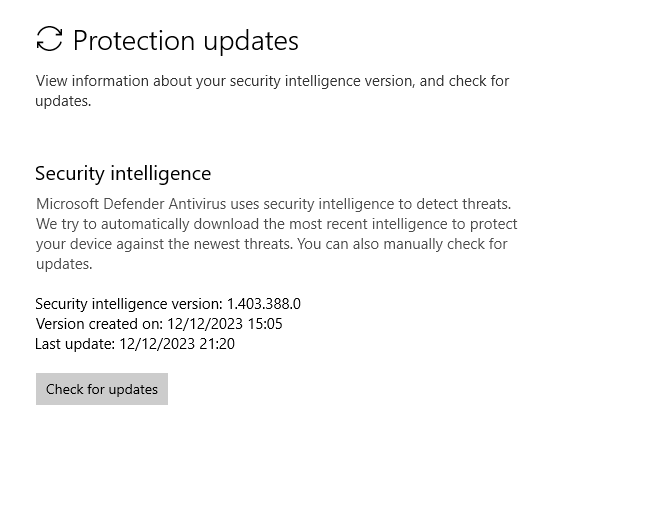
A full malware scan is the most effective way to find and remove viruses from your computer. But before running the scan, ensure your antivirus program has all the latest virus definitions.
You can check the program’s Settings or About interface for updates.
If you depend on Windows Security for your computer’s protection, open the Virus & thread protection interface, click Check for updates or Protection updates, and select the Check for updates button.
Once you confirm that the program is up to date, go to the main page, select Scan options, and choose the Full scan option. After running the full scan, return to the Scan options page, choose Microsoft Defender Offline scan, and click the Scan now button.
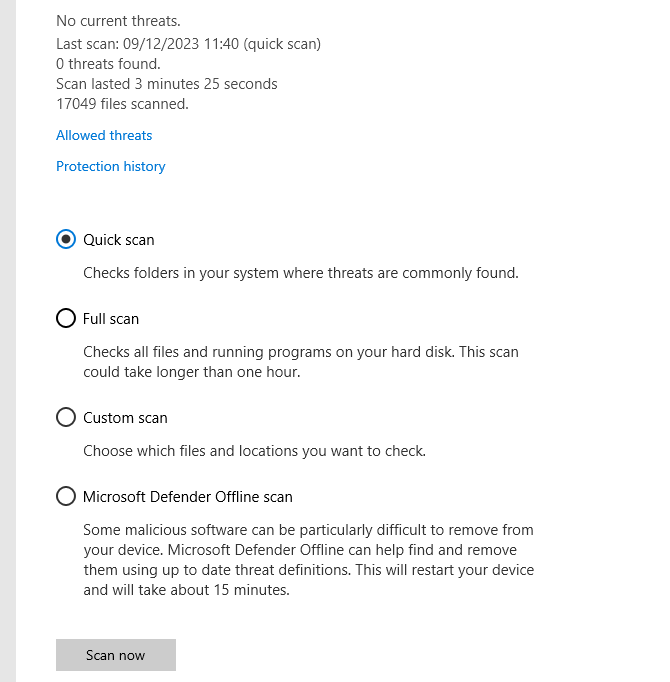
Those set of scans will check every part of your computer, including system folders, to find malicious programs and remove them.
📌 Also read: How to Prevent Malware: Lock Down Your Online Safety
Find and Fix Corrupt or Missing System Files
Windows relies on system resources to generate and display thumbnails. You may be seeing blank preview images or file icons because the files associated with those system resources are missing or corrupt.
These files may have been affected by malware, bad hard drive sectors, or software conflicts. The good thing is that you can recover the damaged or missing files when you deploy the System File Checker tool.
These steps will show you the most effective way to run the command-line program:
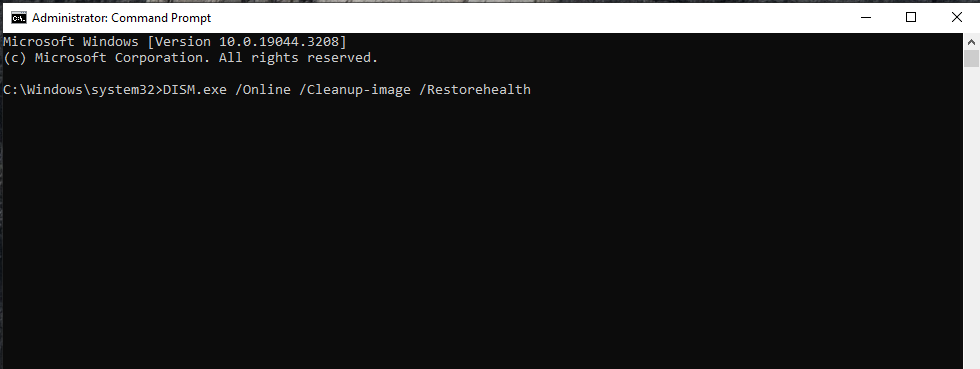
- Launch Command Prompt as an administrator by searching for it in the Start menu and selecting Run as administrator.
- Once the Command Prompt window appears, type the following command line and hit
Enterto run the Deployment Image Servicing and Management tool:DISM /Online /Cleanup-Image /RestoreHealth
This command will prompt DISM to repair the Windows image and provide the resources required by the SFC tool to replace faulty system files.
![Once the Command Prompt window appears, type the following command line and hit Enter to run the Deployment Image Servicing and Management tool:DISM /Online /Cleanup-Image /RestoreHealth]()
- Once the DISM code executes, type
sfc /scannowand hitEnter. - Restart your computer and check for the “thumbnails not showing” problem.
📌 Also read: [FIXED] “Windows resource protection cannot perform the requested operation”
Conclusion
You should now see previews of your files in File Explorer and programs in the taskbar. Remember to always keep your computer and antivirus program updated to prevent such issues in the future.
Please let us know how these solutions helped you resolve the thumbnails issue in the comments section below. Do not hesitate to include any challenges you may be facing, and we’ll be on hand to help!
FAQ
One reply on “[FIXED] Windows 10 Thumbnails Not Showing?”
now fixed after install register cleaner
thank you!