I’ll be showing you all the Windows 10 and 11 lock screen customisation options and what they do. You can allow Windows to show you beautiful scenic images or choose a background that blends with your custom theme .
How to Change Your Lock Screen on Windows 10
Customizing your lock screen in Windows 10 is more than just improving aesthetics. You can choose to see quick updates and notifications from selected apps. That way, you know the first things to attend to after you log in.
Follow these steps to get started:
- Press
Win + Ior right-click Start and select Settings to open the Settings app. - Click Personalization.
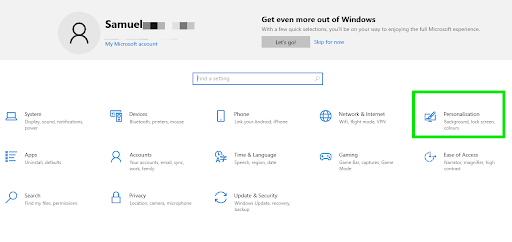
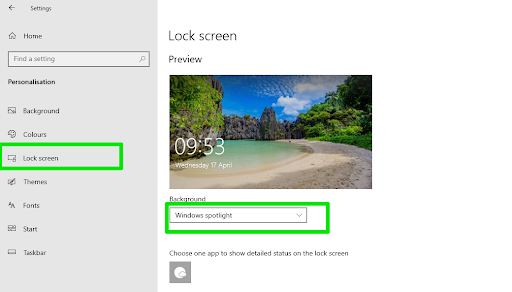
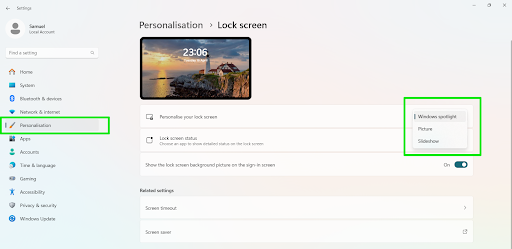
- Go to the left sidebar and select Lock screen .
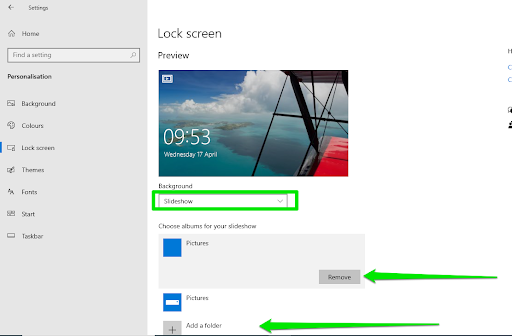
- Now, move to the Background drop-down menu and select one of the following:
Windows SpotlightThe Windows Spotlight option displays a rotating collection of beautiful images provided by Microsoft.
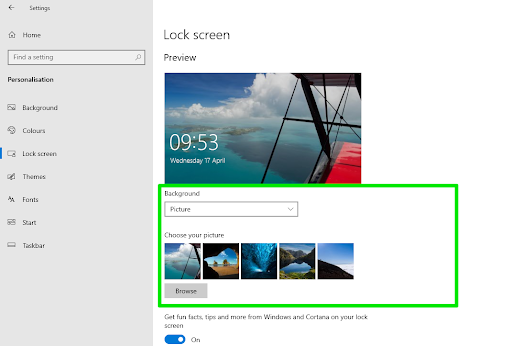
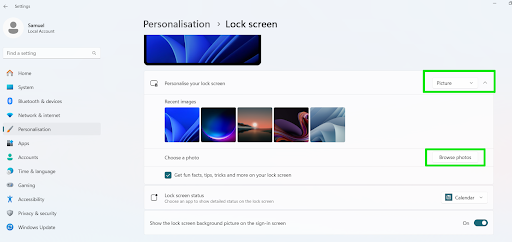
Picture
Allows you to choose a specific image from your computer to use as your lock screen background.
Click the Browse button to select which picture you want if you do not want the suggested images.
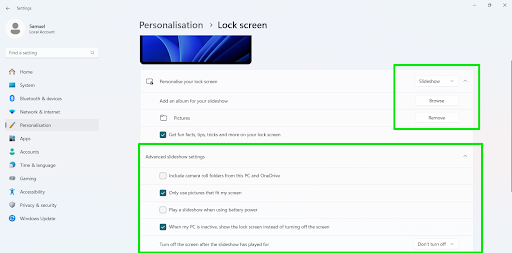
Slideshow
Allows Windows to create and display a slideshow of images from a selected folder on your computer.
Windows selects your Pictures folder by default. You can click each default folder and click Remove if you don’t want to keep the contents of those folders out of the slideshow . Use the Add a folder button to select the specific folders whose images you want to add to the slideshow.

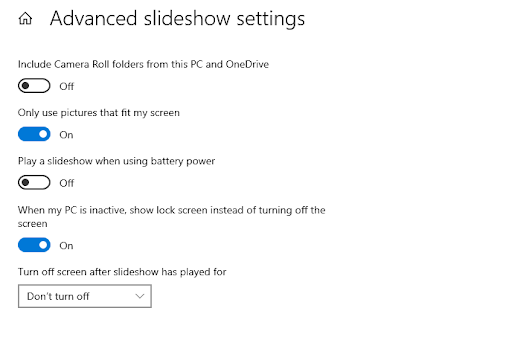
For example, the Include Camera Roll folders from this PC and OneDrive option will add images synced from your OneDrive-connected devices, including your smartphones.
Enabling the Only use pictures that fit my screen option can help you remove out-of-place photos.
Also read:Windows 10 Display Is Too Big for a Monitor
You can also turn off the slideshow when your laptop is running on battery power , choose if and when the screen goes off after the slideshow runs for a specific period, and force Windows to start the lock screen slideshow when your computer is inactive.
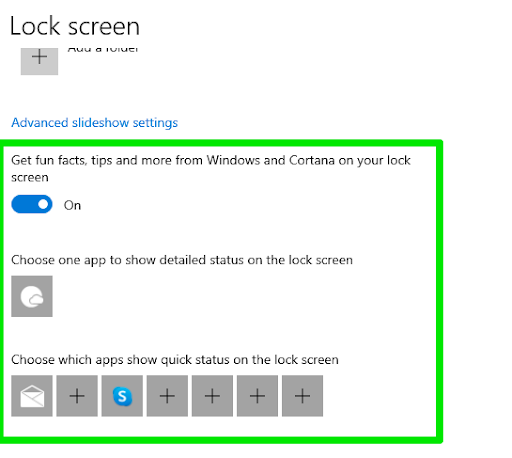
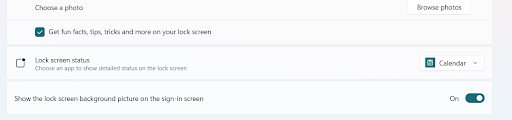
It doesn’t end there. Windows 10 can display tips and other information on your lock screen. Enable Get fun facts, tips, and more from Windows and Cortana on your lock screen to receive suggestions from Microsoft and its artificial intelligence.
The Choose one app to show detailed status on the lock screen option allows you to see information from a list of preset apps. Choosing Mail lets you see details of recent incoming emails, and selecting Weather shows weather updates.
You can go to the Choose which apps to show quick status on the lock screen ” section to pick other apps to display brief updates.
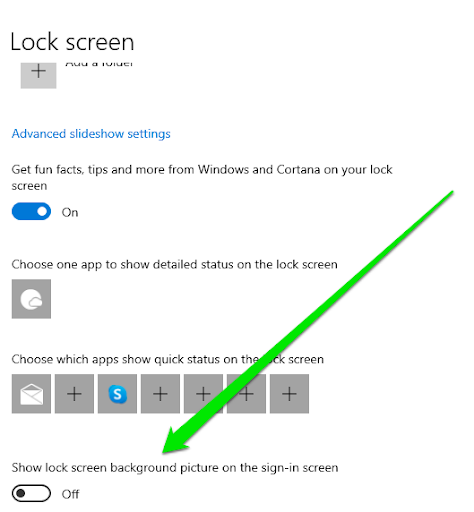
Once you’ve selected your preferred background, you can turn on the switch for Show lock screen background picture on the sign-in screen to see your custom photo instead of Windows’ background as you type your login details.
How to Change Lock Screen in Windows 11
The Windows 11 Settings interface may look different from Windows 10’s but their lock screen personalization options are almost identical.
Here’s how to change:
- Press
Win + Ior right-click Start and select Settings to open the Settings app. - Go to the left side of the screen and select Personalization .
- Click Lock screen under Personalization on the right side of the screen.
- Like Windows 10, you can do the following:
Choose Windows Spotlight to allow Windows to display beautiful images of different locations alongside their descriptions or select a specific picture.
Use a slideshow of images from a specific folder. You can click Remove next to the default folders to get rid of images you don’t want to see and select the folder whose image you want. You will also see Advanced slideshow options on the same page.
Windows 11 also allows you to see other content on the lock screen, such as tips from Microsoft and information from specific apps.
Unlike Windows 10, you can only select one app to show information on the lock screen.
How to Change Your Lock Screen on Windows: Explained
With these easy steps, you’ve brought your Windows 10 or 11 lock screen to life. Logging into your computer will now feel welcoming. You can always experiment with different image sources for your slideshow, adjust those notification settings, or alternate still backgrounds occasionally.
Head to the comments section to share your lock screen customization experience with us.
FAQ
Win + L keyboard combo is the fastest way to activate your lock screen using your keyboard. That said, you can tap Ctrl + Alt + Delete and select Lock using your keyboard to lock your screen.