
Whether you are using Windows 10 or 11, Ping Spikes affect your connection, forcing it to malfunction.
If you have had to deal with frequent slow speeds or network interruptions lately, then you may have ping spikes on your Windows 10 or 11.
How to Fix Ping Spikes in Wi-Fi
Ping spikes do not look good on either Windows 10 or 11, particularly if they happen constantly. Higher ping means a slower WiFi network, which has a negative impact on computing. It has also been reported to affect Ethernet connections.
So, when your ping spikes, Windows 11 may be telling you that your connection upticks are below average.
Higher pings can also lead to packet loss while streaming online videos or games. For example, if your average ping is 37ms, but you find out that it is running well over 200ms, then there is cause for worry.
The good thing about the issue is that you can fix ping spikes using different methods. If you are looking for the best solution on how to fix ping spikes on your WiFi, rest assured that you are in the right place.
As you continue reading, you will learn different ways to fix ping spikes on your Windows 10 or 11 PC.
How to Get Rid of Ping Spikes in Windows 11 and 10
Knowing how to get rid of ping spikes in Windows 11 and 10 can be the difference between a good experience and a frequently frustrating one.
Ping, also known as Packet Inter-Network Groper, simply tests the connection sent from one device to another. A low ping allows your connection to run smoothly and efficiently.
The best way to ensure low ping on your computer is to remove all sources of slow and inefficient performance. Malware, junk files, application and registry leftovers and other digital bits and pieces tend to accumulate the longer you use the PC.
They can grow bigger and start affecting the system’s performance. You can use a computer cleanup utility like Auslogics BoostSpeed to clear your PC and restore top performance.
In addition, these are alternative best ways to get rid of ping spikes in Windows 11 and 10:
Solution 1: Run the troubleshooter
If you are looking for the Best Ways to Fix Ping Spikes on Windows 10/11, then here is the first method to try. Troubleshooting is one of the best ways to fix ping spikes for many reasons.
Troubleshooting your Windows 11/10 helps automatically identify and fix problems, returning it to its best shape.
So, find below steps on how to get rid of ping spikes on your WiFi by running a troubleshooter:
On Windows 10:
- Click on the
Windows + Ikeys to open Settings. - Move down to locate Update & Security.
- Select Troubleshooting.
- Check the right pane for Additional Troubleshooting and then click on it.
- Look out for Network Adapters. When you find it, click on Run the Troubleshooter button.
- Select All Network Adapters and then click Next.
On Windows 11:
- Hold down the
Windows key + Ito launch Settings. - Navigate to System > Troubleshoot.
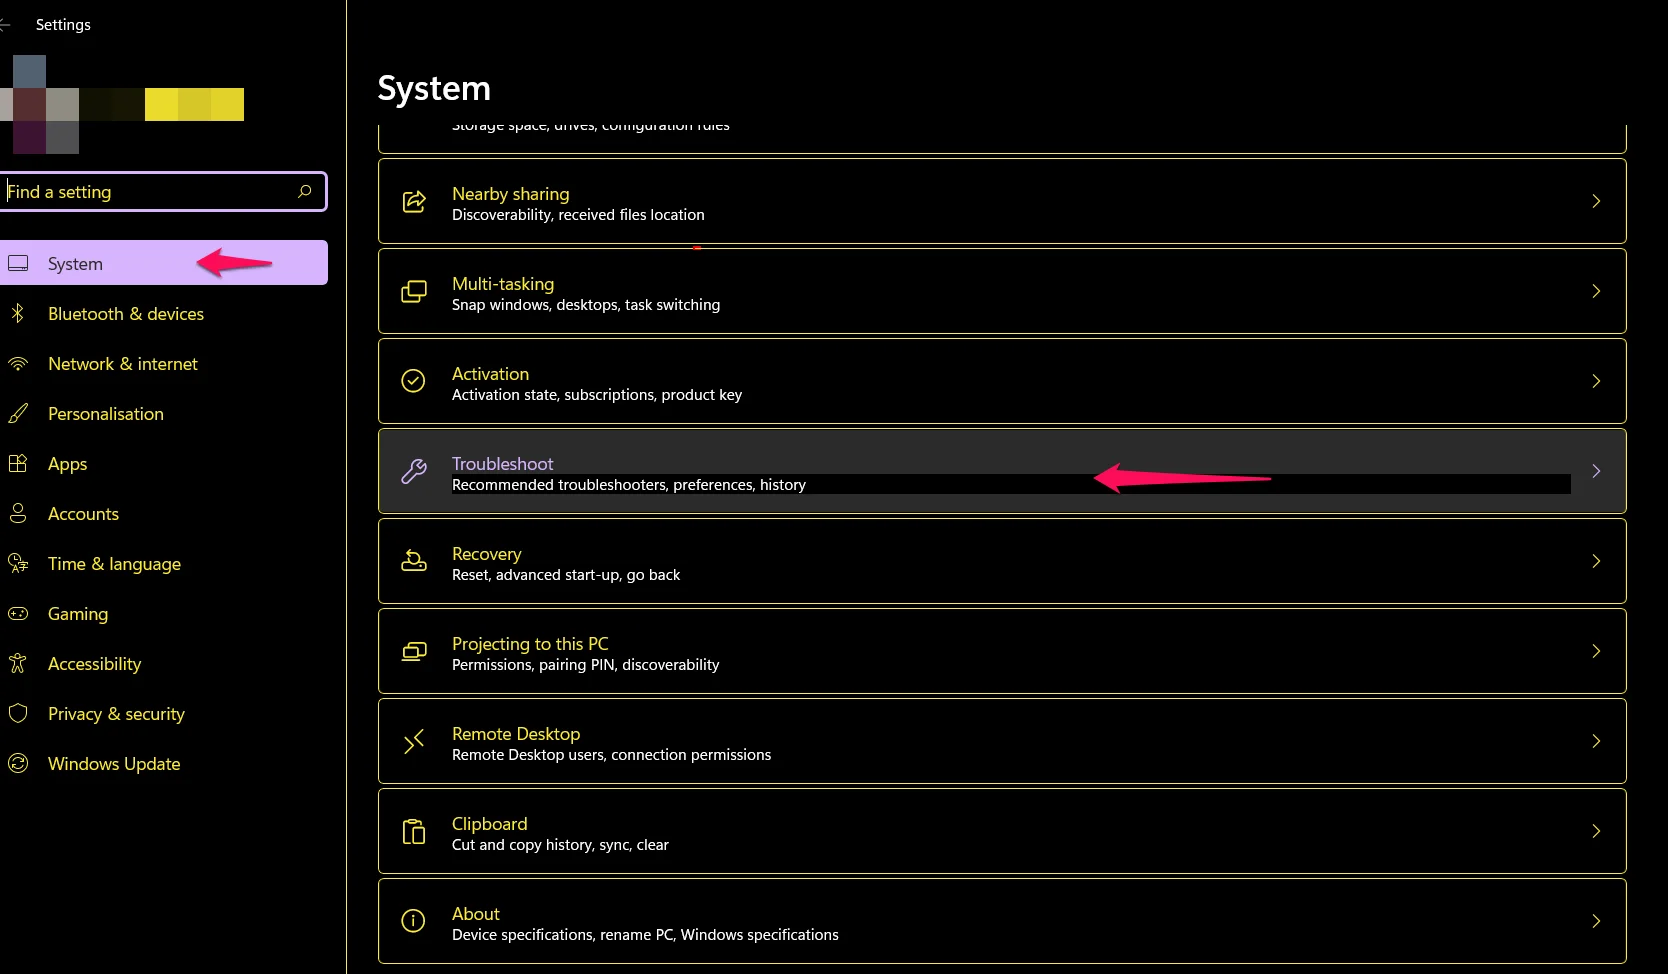
- On the Troubleshoot screen, select Other Troubleshooters.
- Scroll down the Other Troubleshooters screen and locate the Network Adapter tab.
- Click Run to launch the troubleshooter.
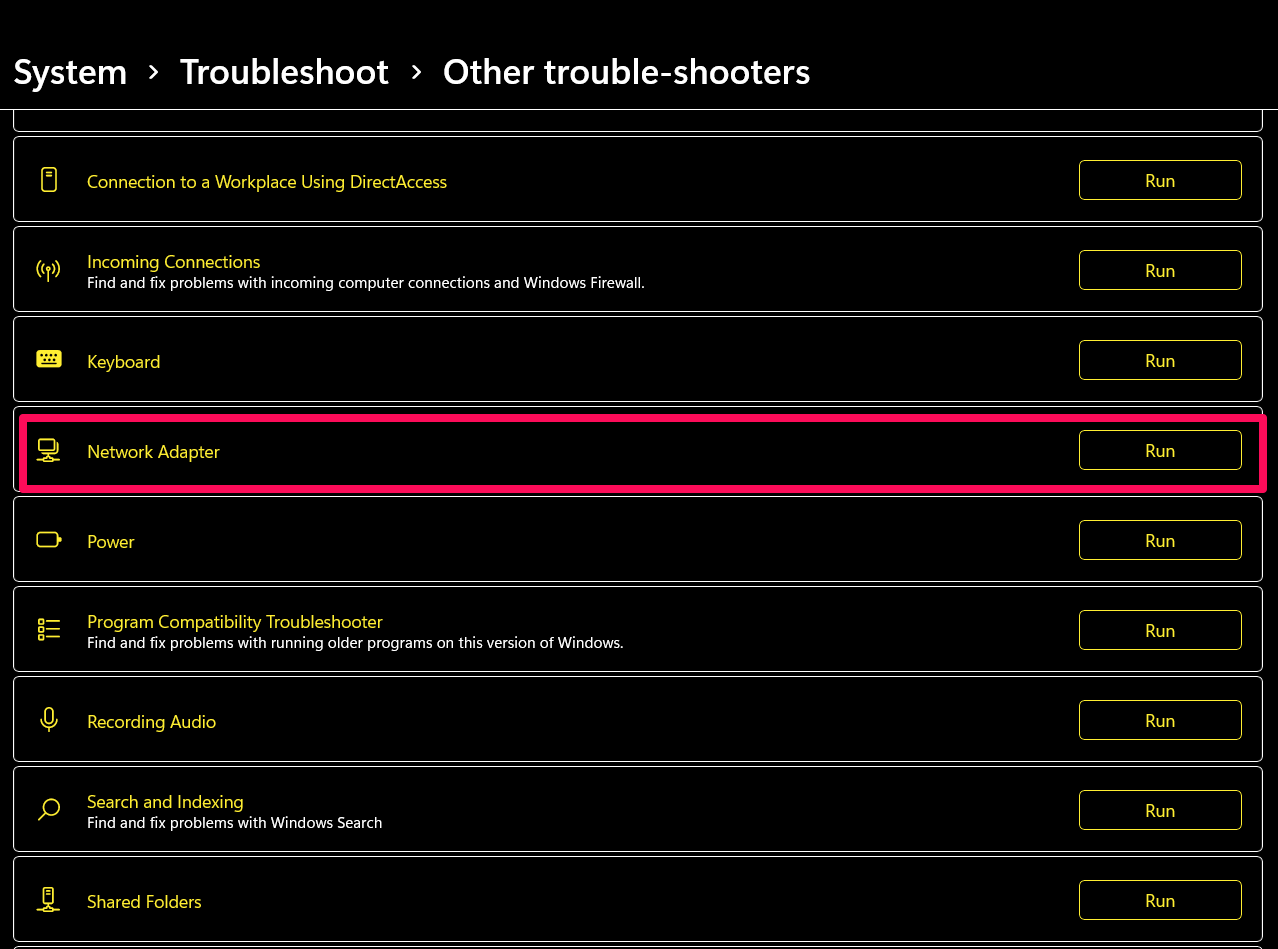
- Implement the suggested fix after the scanning finishes.
Remember to restart the device immediately after the troubleshooting is completed. As soon as the troubleshooting is completed and the device has been restarted, your ping spikes may be resolved.
Solution 2: Registry modification
The Windows Registry is a powerful centralized database. Modifying your registry can help eliminate ping spikes on your Windows 10/11 PC.
It is also true that your Windows 11/10 Registry is not user-friendly, but there is no reason to worry. Below, you will be guided on how to fix your ping spikes seamlessly.
- Press the
Windows Key + Rkey on your keyboard to open Run. - Type regedit in the Run field and click OK.
Before making further changes in the Registry after opening the Registry Editor, create a backup for safety reasons.
- Click on File and select Export.
- Modify Export Range as All and type your preferred file name.
- Select your location and Save.
You can now proceed with the registry modification.
- Navigate to the following key:
HKEY_LOCAL_MACHINE\SOFTWARE\Microsoft\WindowsNT\CurrentVersion\Multimedia\SystemProfile.
- Double-click on NetworkThrottlingIndex on the right.
- Change the Value Data field to FFFFFFFF and click on OK to save.
- Next, Navigate to the key below:
HKEY_LOCAL_MACHINE\SYSTEM\CurrentControlSet\Services\Tcpip\Parameters\Interfaces.
- Click on the subkey representing your network connection.
- Select New -> DWORD (32-bit) Value after right-clicking on the subkey.
- Rename DWORD into TCPackFrequency, double-click on it, and then set the Value Data field to 1.
- Repeat Step 10, set another DWORD and give it the following name: TCPNoDelay, Double-click on it and set Value Data to 1.
- Now, Navigate to this key:
HKEY_LOCAL_MACHINE\SOFTWARE\Microsoft\MSMQ.
- Create a new DWORD here, set its name to TCPNoDel and set its Value Data to 1.
- Now, expand MSMQ.
- Choose parameters and select New > Key. If parameters cannot be found, create a new registry entry under MSMQ and name it parameters.
- Create another DWORD under parameters and name it TCPNoDelay.
- The Value Data of that DWORD should be set to 1.
If this doesn’t help, perhaps another solution will. Also, issues like ping spikes can result from hidden inconsistencies in the registry. You can use a certified registry cleanup tool to eliminate all registry errors.
Related
: Ultimate Guide: Why and How to Defrag Windows Registry?
Solution 3: Use a VPN
If Ping Spikes takes over your connection and causes a lag, you might need to consider using a VPN.
A Virtual Private Network can regulate your internet connection and protect your PC from external eavesdropping and higher pings.
Many VPN apps are free, and they perform optimally. Download your preferred VPN, sign up, connect and put the predicament of ping spikes behind you.
Related:How to Choose VPN: Best Free VPN for Windows 10 PC
Solution 4: Restart your Internet connection
Simply restarting your internet device can be effective in fixing ping spikes on your Windows 10/11. This method is especially helpful when ping spikes occur on your WiFi.
- Shut down your PC.
- Unplug your modem or disconnect your router.
- Wait for around 10 minutes to power on your PC again.
- Reconnect your modem or router.
Related:Boost Internet on Your PC: Tips on How to Speed Up Your Internet Connection
Solution 5: Tweak wireless network adapter settings
To get rid of ping spikes in Windows 11 and 10, change your Wireless Network Adapter Settings using the following steps:
- Press the
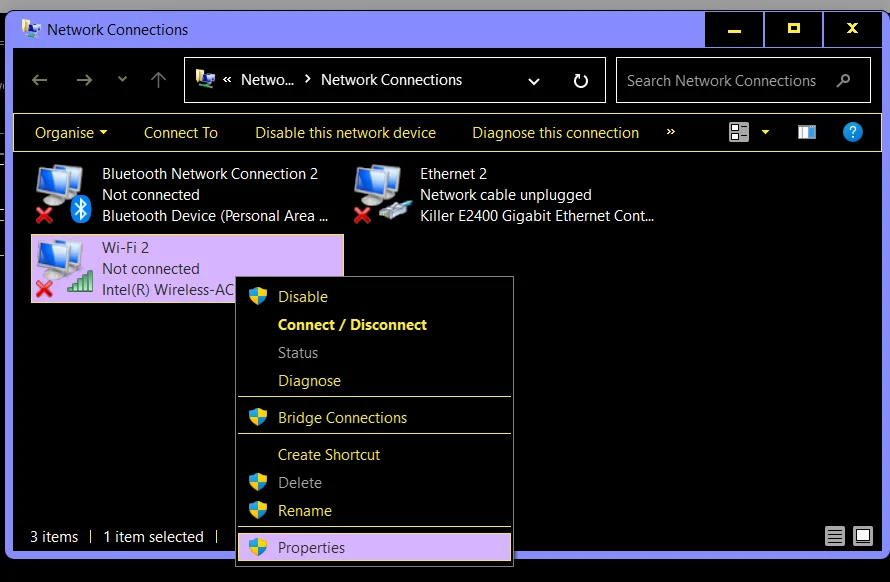
Windows + R keysat the same time to open Run. - Type
ncpa.cpland it will take you to the Network Connection page. - Locate and right-click your Internet connection and select Properties.
- Now, click on Configure.
- Move to the Advanced tab.
- Tweak the values this way:
11n channel width for 2.4GHz connections - 20MHz only
Preferred Band - 2.4GHz
Roaming Aggressiveness - 1
Wireless mode - 802.11b/g
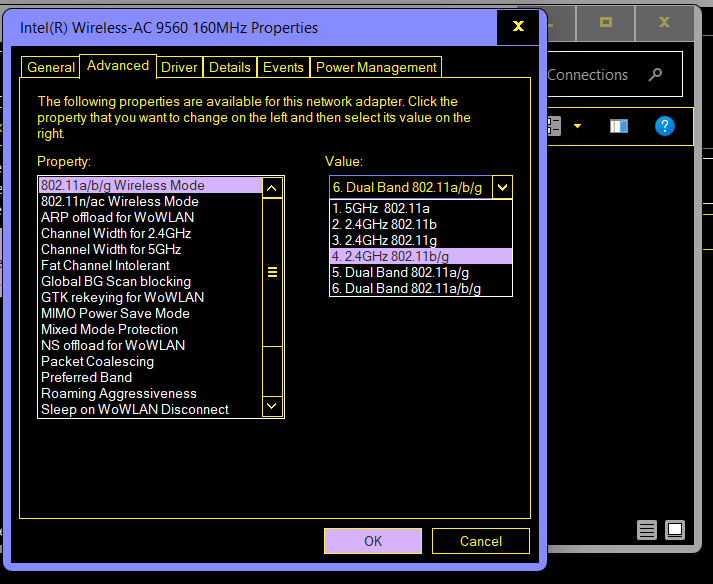
Once you complete the tweaking, click on OK to save.
Also Read:How to Fix the “Windows Could Not Find a Driver for Your Network Adapter” Error
Solution 6: Clean DNS
Cleaning DNS can instantly fix ping spikes. This action clears the old domain cache and can help you flush connection bugs.
This is how to clean DNS in both Windows 10 and 11:
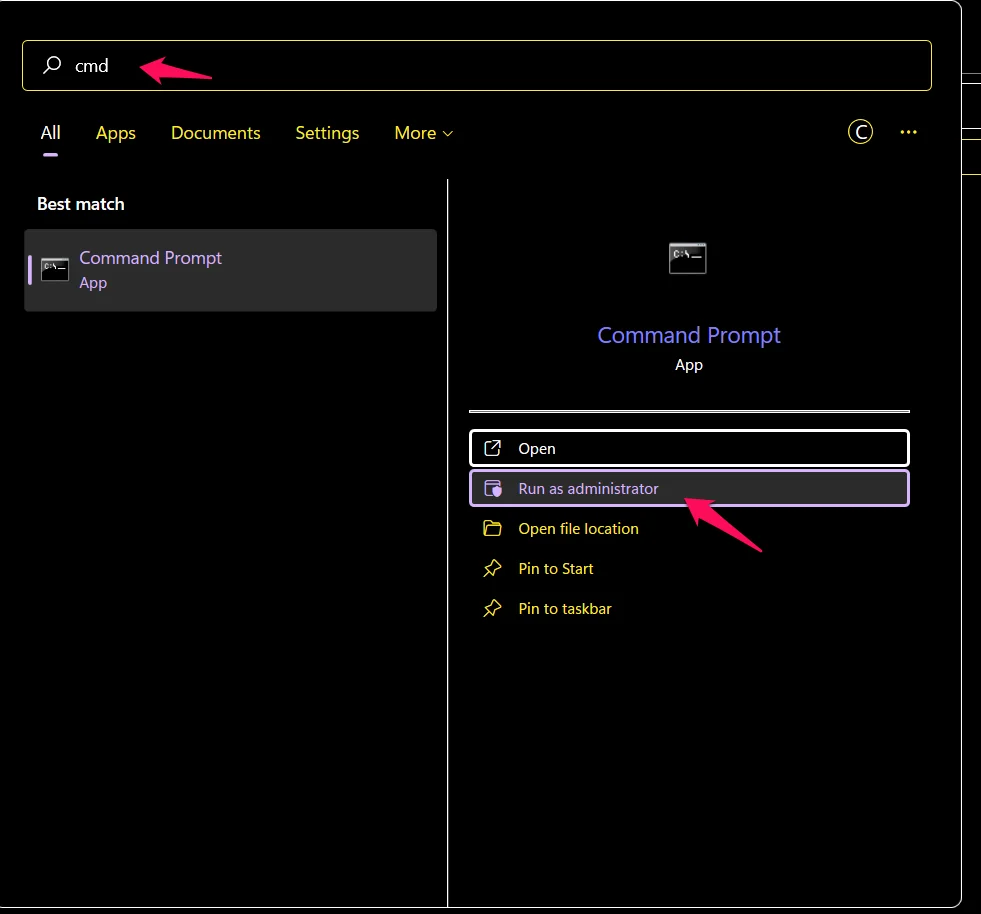
- Press the Windows key and wait for the search bar to show up.
- Right-click Command Prompt after typing CMD in the search box.
- Select Run as Administrator and then click on Yes when the UAC shows up.
- Type or paste the following commands but don’t forget to click Enter after each one. Also, wait for one to complete before entering another:
ipconfig /flushdns
ipconfig /registerdns
ipconfig /release
ipconfig /renew
netsh winsock reset
- Restart your computer
After this process, check to see if your ping spikes have been fixed.
Related:[FIXED] ‘Your DNS Server Might Be Unavailable’ Error on Windows 10
Solution 7: Run loopback ping
The good thing is that when you run Loopback Ping, your PC tests itself to ascertain that it is working correctly. This process also helps you fix Ping Spikes, and this is how you can go about it:
- Press the
Windows key + X. - Select Windows PowerShell (Admin).
- Click on Yes when the UAC prompt shows up.
- Run the following commands, one after the other:
ping Loopback
Type ping ::1
Solution 8: Run various scans on your Windows 10/11
Scans allow you to detect errors and ascertain the health status of your Windows. Problems with hardware and system files can also trigger ping spikes.
Here are the commands you can run:
- DISM
- System File Checker (SFC)
- Disk Cleanup
We will run each one for this solution. To begin, open Command Prompt or Windows PowerShell with elevated privileges on your PC. After that, run the three commands below in sequence. Let one operation complete before you start the next one:
dism.exe /online /cleanup-image /restorehealth
sfc /scannow
chkdsk X: /f
Related
: Disk Cleanup Tips: How to Compress a Drive to Save Disk Space in Windows 10
Conclusion
Now you know how to fix ping spikes on your Windows 10 and 11. We hope you found all the solutions useful. Go through the solutions and choose the ones that work for you. If this article was helpful, share it with your friends who might need it!
If you have additional tips or thoughts, let us know in the comment section below!
FAQ
You can get rid of Ping spikes by combining various troubleshooting methods. Start by determining the cause of the spikes, which software conflicts, hardware problems, or network congestion could cause.
Ping spikes are usually resolved by restarting your modem and router, shutting down unnecessary background apps, and ensuring your device is properly ventilated to avoid overheating.
If you continue to see ping spikes, you may want to look into possible network problems with your Internet Service Provider (ISP) or consider updating your hardware for improved performance.
To resolve ping spikes in Windows 11, first, make sure your network connection is stable. Restarting your modem and router will help. If possible, connect your PC straight to the router via an Ethernet wire.
Additionally, confirm that no apps or background activities use too much bandwidth. Keeping Windows 11 and your network drivers up to date might also help fix compatibility problems.
If the problem continues, try prioritizing gaming or streaming traffic on your router using the Quality of Service (QoS) settings. This will help lessen ping spikes when you’re online.