
The message typically appears when you run the built-in Windows Network Adapter troubleshooter to find and fix network-related problems. It indicates that your network adapter drivers are missing or corrupt, your computer does not recognize the device, or the current driver is incompatible with the adapter. You’re reading this article because you’re still searching for a solution. We’ll show you how to get your network card working again using different effective methods.
What Does “Windows Could Not Find a Driver for Your Network Adapter” Mean?
Device drivers are software applications that help your operating system to communicate with your computer’s hardware devices.
Devices like your network card will malfunction when their drivers become corrupt or go missing.
This particular error message indicates a problem with your network adapter driver. Without the network adapter, you won’t be able to connect to the Internet or join a network.
You may also lose Bluetooth connectivity if the issue affects your wireless network adapter.
Sometimes, users encounter the issue after upgrading Windows or performing a clean install. The problem can also result from malware corruption, faulty hardware, and firmware issues.
How to Fix Windows Did Not Detect Any Networking Hardware
Since the problem has different underlying causes, you need to try various fixes until you restore your network connection. We’ll start from the basic solutions to the more complex methods to guide you through resolving the issue.
Before you start, you must identify the network adapter displaying the error. If you cannot connect to the Internet using Wi-Fi, the issue lies with your wireless adapter.
If your wired connection is malfunctioning, you should focus on your ethernet controller.
Note that each fix works in different scenarios, so remember to move on to the next method if the issue persists.
While you can skip any fix you previously applied, we recommend giving it another shot in case you weren’t thorough the first time.
Fix 1: Perform a System Restore
If you recently encountered this problem, returning your system to a previous state can help resolve it.
A program or driver you installed or uninstalled may be conflicting with the network adapter driver.
You may have also installed a recent Windows update that isn’t compatible with your device’s software.
This is why it is important to manually create restore points once in a while. That said, Windows typically creates automatic restore points before installing updates.
Follow these easy steps to perform a restore:
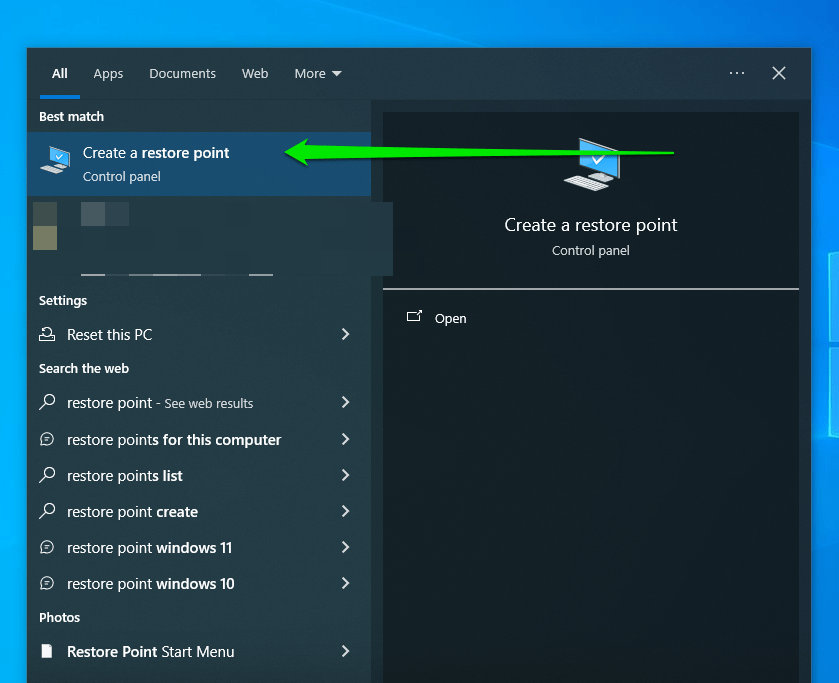
- Go to the search bar beside the Start button and type System restore.
- Click Create a restore point in the results.
- In the System Properties box that opens, click the button that says System Restore.
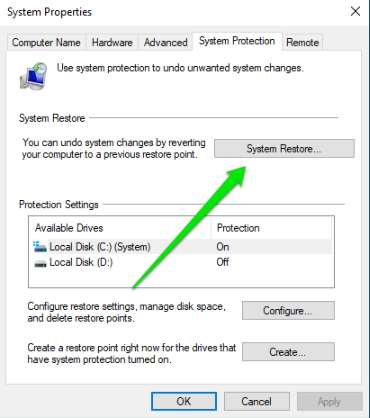
Alternatively, you can skip steps 1 through 4. Bring up the Run dialog (press the Windows logo + R shortcut on your keyboard). Then type rstrui.exe and click OK or press Enter.
- Click the Next button and select a restore point from the available list.
- Click Next.

- Confirm the restore point you’ve chosen, and then click Finish.
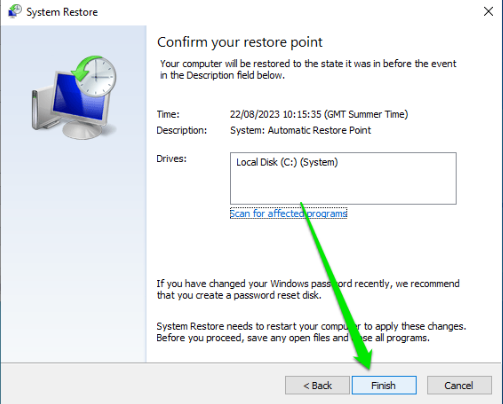
- You’ll now receive a prompt that says, “Once started, system restore cannot be interrupted. Do you wish to continue?” Click the Yes button, and then wait for the process to complete. Your system will restart afterward.
Check if the issue has been resolved.
Also Read:Ultimate Windows Recovery Guide: How to Restore Your Windows System
Fix 2: Reinstall the Network Driver
As mentioned earlier, the error may appear because the current driver software is corrupt. Reinstalling it will replace the faulty files with functioning ones, potentially resolving the problem for good.
These easy steps will show you how to reinstall the driver:
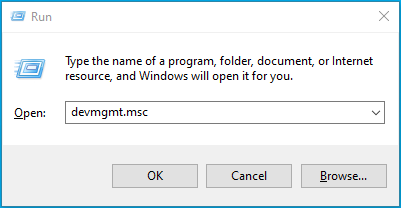
- Start the Run dialog (press the
Windows logo + Rcombo). - Type devmgmt.msc into the box and press Enter or click OK to open Device Manager.
- Expand Network adapters.
- Right-click your network adapter and select Uninstall device from the context menu.
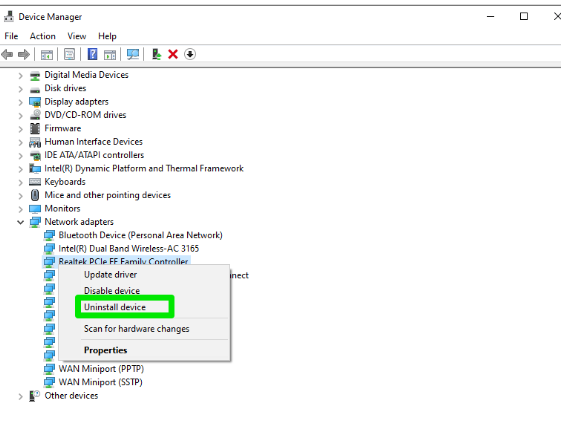
- Follow the instructions displayed on the screen to complete the process.
- Restart your computer.
- Windows will automatically reinstall the network driver once your computer restarts.
Windows 10/11 (8, 7, Vista, XP)
Fix 3: Update Your Network Adapter Driver
If reinstalling the driver does not eliminate the “Windows could not find a driver for your network adapter” error, the current driver may be outdated.
Installing the network adapter’s latest driver may fix the problem once and for all.
There are different ways to update the driver. They include using Device Manager, manually downloading and installing the driver, and using third-party applications.
Let’s start with Device Manager :
- Open the Run dialog by pressing the
Windows Key + Ron your keyboard. - Type devmgmt.msc into the text box and click OK or press Enter.
- After the Device Manager window opens, expand Network adapters and right-click on your network adapter.
- Select Update driver from the context menu.
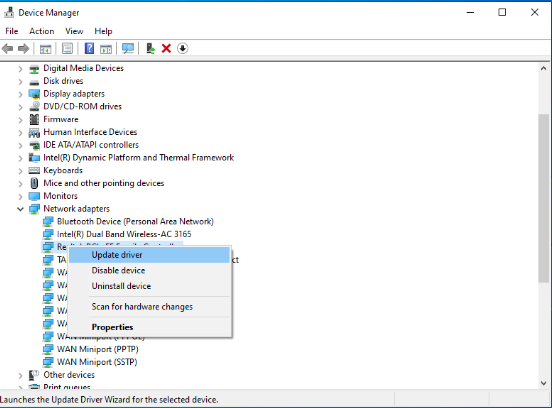
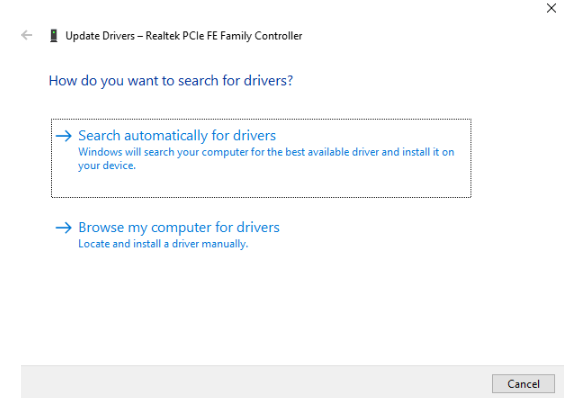
- Click the option that says, Search automatically for drivers.
- Once the driver has been updated, restart your computer and see if the issue has been resolved.
You could also visit the official website of your PC manufacturer to download the driver. You need to know your computer’s specifications, such as your PC’s model and Windows version, to download the correct software package. Installing the wrong driver version can lead to further problems. Going through the network card manufacturer’s website to fetch the driver is another option, as OEMs don’t always have the latest drivers. Whichever site you visit, head to the Support section and find your way to the Software and Drivers or Drivers and Download page. You may be prompted to provide details of your PC or network adapter.

Please ensure you stick to official websites and stay away from third-party web pages to avoid downloading harmful programs to your PC.
After downloading the driver, double-click and install it like a regular program if the file has an EXE extension.
If you downloaded files with SYS and INI extensions, follow these steps:
- Go to Device Manager.
- Select the Update driver option after right-clicking your network card.
- Choose Browse my computer for drivers.
- After that, point Windows to the folder where you downloaded the file and allow it to install the driver.
Further reading: How to Update Device Drivers on a Windows 10 PC
Using third-party programsThe manual process can be risky and stressful, especially when searching online. You can use a third-party program that will help you fetch the right driver software instead. We recommend Auslogics Driver Updater, as it is designed to recognize your computer’s specs and its devices, ensuring you get the correct driver. Once it runs a full scan, it will notify you of all missing, outdated, faulty, or corrupt drivers on your computer. You can then allow it to download and install the latest official driver version automatically. Using it means you will no longer have to deal with driver-related problems with your network adapter and other devices. Using other software programsThere are other third-party programs you can use. Suppose you use an Intel network card. In that case, you can download and install Intel Driver and Support Assistant, and it will notify you when new network adapter and Intel chipset drivers become available. Some OEMs also provide software utilities that scan drivers and provide updates. After the network adapter driver has been updated, restart your computer and check if the “Could not detect driver” problem has been resolved.
Fix 4: Change the Network Adapter’s Power Management Settings
Windows may deactivate the network adapter to save power when you switch to power-saving mode, especially when running on your laptop on battery.
The operating system may fail to communicate with the device’s driver once this happens, causing you to lose your network connection.
You can prevent Windows from turning off the adapter in the future by adjusting its power management settings. You’ll be applying the same adjustment to the LAN and wireless adapters.
Follow these steps:
- Right-click the Windows Start button and choose Device Manager when the Power User menu opens.
- Expand the Network adapters category, right-click your ethernet controller, and click Properties.
- Switch to the Power Management tab once the Properties dialog opens.
- Now, uncheck the box beside Allow the computer to turn off this device to save power.
- Click OK.
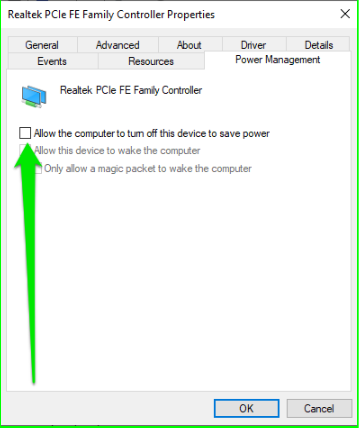
- Return to the Device Manager window and repeat the same process for your wireless network adapter.
Related:Pro Tips: Mastering Advanced Power Settings in Windows 10
Fix 5: Reset Your Network
Performing a network reset reinstalls all your network adapters and resets other network-related configurations, such as your IP address, firewall, DNS, VPN, and proxy settings.
Windows will remind you to reinstall programs, such as VPN client software, after the reset is complete.
This step can help resolve the issue as it will reinitialize the driver and stop any configuration that may be causing the error to appear.
Follow these steps:
- Launch the Settings application (use the
Windows + Icombo). - Click Network & Internet.
- Scroll to the bottom of the Status page and click Network reset.
- Click the Reset now button.
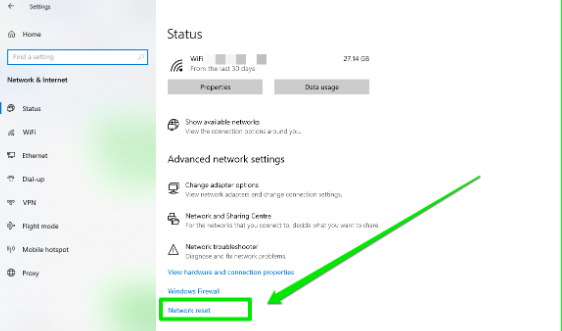
Follow these steps to reset your network in Windows 11:
- Launch the Start menu and click the Settings icon.
- Select Network & internet on the left sidebar.
- Go to Advanced network settings.
- Click Network reset.
Fix 6: Restore Your BIOS Defaults
Your BIOS, also called the UEFI, is the main software program that controls how your motherboard interacts with internal components, including the network card. Some changes to the BIOS may be preventing Windows from recognizing the adapter. Restoring the default settings can resolve the issue for good. These steps will show you what to do:
- Open the Start menu and click the Power icon.
- Hold the Shift button on your keyboard and select Restart from the power options.
- After your system restarts in the Advanced Startup menu, click Troubleshoot, select Advanced options, and click UEFI Firmware Settings.
- Your PC will now reboot to the BIOS environment.
- Look for the shortcut or keyboard button that restores your BIOS defaults and tap. Select Yes if prompted for confirmation.
- Now, save your settings and restart the computer.
- You can now check if Windows detects your network card without problems.
Conclusion
The “Did not detect a properly installed network adapter driver” error should now be resolved. Remember that drivers are critical software your computer depends on to run crucial tasks.
So, ensure you always keep them updated to avoid similar problems from your network adapter and other devices in the future.
You can avoid the stress of manually checking for the latest drivers when you use Auslogics Driver Updater.
If you have any questions or suggestions, please feel free to share your thoughts by leaving us a comment in the section below.
We’d love to hear from you.