What does the ‘Could not initialize graphics system’ error mean? Does it keep showing up when you try to run a game? We understand how discouraging that can get.
That is why we have compiled a list of effective solutions to help you resolve the issue. If that sounds good to you, proceed to the next section of our guide. We’ll go through the solutions in detail.
Ways to Get Rid ‘Could Not Initialize Graphics System’ Notification in Windows
Many Windows users said they encountered the problem when they tried to play Age of Empires. The error message suggested they check if their video card and driver are compatible with DirectDraw.
What exactly is DirectDraw? It is an old API that was once a part of Microsoft’s DirectX API. It renders graphics in applications that demand high performance.
It also makes it possible for applications to open on full screen or get embedded in a window.
For computers that have hardware acceleration enabled, DirectDraw takes advantage of it to give direct access to video memory.
Let us now go through the procedure for applying these fixes.
Fix 1: Update your graphics drivers
Without the correct drivers, your OS and apps cannot function as intended.
So if you are seeing this issue now, it could be that there is something wrong with your graphics drivers.
Either they are outdated or got missing or corrupt for some reason. New driver updates also contain patches to resolve bugs and ensure optimal performance, especially for gaming PCs.
There are four methods you can use to update your drivers:
- Through Device Manager
- Installing Windows updates
- Through the website of your device manufacturer
- Using an automatic updater tool
Method 1: Updating your graphics driver via the Device Manager
Follow these steps:
- Press the
Windows + Rkeys to invoke the Run dialog box. - Type
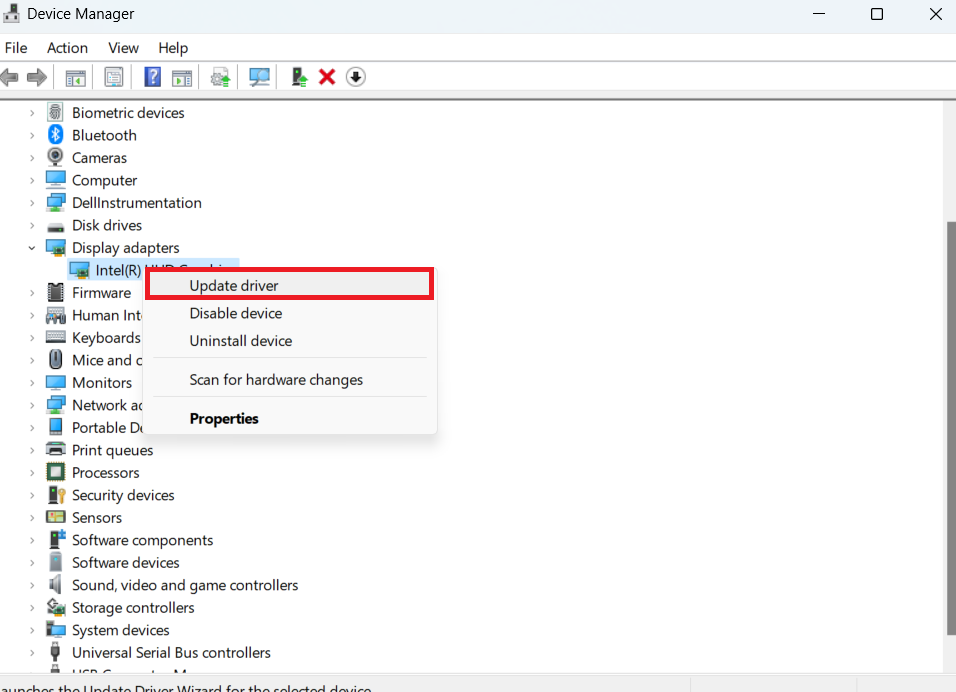
Devmgmt.mscin the text area and click OK or press the Enter key on your keyboard. - Look through the left pane of the Device Manager window and locate Display Adapters. Click the arrow next to it to reveal your graphics devices.
- Right-click on the device you want to update and click on Update Driver from the context menu.
- Turn on your Internet connection.
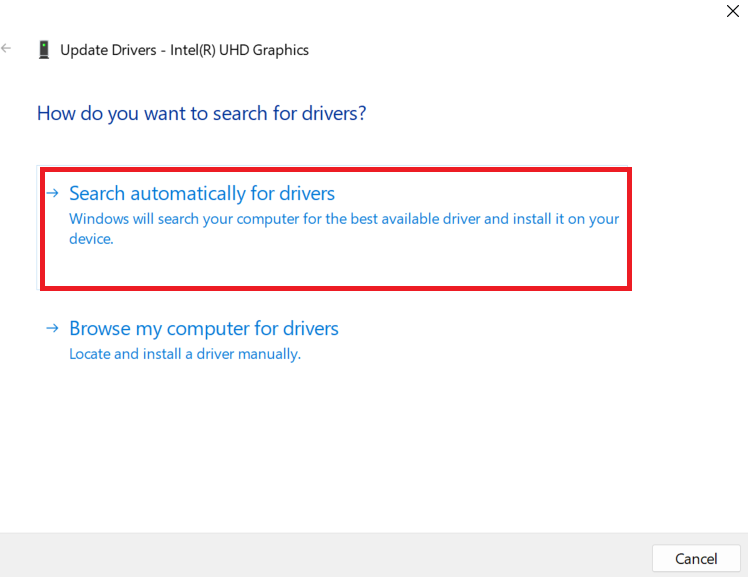
- Click on the Search automatically for updated driver software option. The system will search your PC storage and the internet for the latest drivers and then install them.
Method 2: Update drivers via Windows Updates
Windows updates contain new driver versions. Initiating Windows updates will automatically download and install the required drivers:
- Open the Settings app. You can do this by going to the Start menu and clicking on the gear icon. You can also use the
Windows + Ikeyboard combination. - Click on Update & Security.
- You will find the Windows Update option in the left pane of the next page that opens. Click on it.
- Click the Check for Updates button. If there are any updates, they will be downloaded and installed automatically.
- Restart your system to complete the process.
Method 3: Visit the website of your Device Manufacturer
Updating your drivers through Device Manager or Windows updates may not always yield the desired results. The system might fail to find the most recent driver versions.
It is often better to go directly to the NVIDIA, AMD, or Intel website.
Method 4: Use an automatic updater tool
The best and easiest way to update your graphics drivers is with the use of an automatic tool. Such a tool will be able to read your computer and detect drivers that require attention.
We suggest you use Auslogics Driver Updater. It is a software application that has been approved and recommended by Microsoft and trusted by millions of users worldwide.
Driver Updater, once installed, automatically detects the specifications of your computer. It then initiates a scan to detect problematic drivers.
After the scan is complete, you can choose to update all the devices on the list or just the ones you choose. All it takes is just a click of a button.
The tool ensures the correct driver versions are downloaded and installed. It also runs a backup so that you can easily perform a rollback if ever you need to.
Also Read: Auslogics Driver Updater: Update Your Drivers in One Click!
Fix 2: Run Windows Updates
Windows updates contain patches and new software versions required for the smooth functioning of your system and apps. Installing these updates can help resolve your gaming issue:
- Go to the Start menu and type Windows update in the search bar. Click on the option that appears in the search results.
- You will arrive in the Windows Settings app. Click the Check for updates button.
- Wait for the process to complete and then restart your computer.
- Check if your game will launch successfully.
Also Read: How to Fix Windows Update Error 0x800f0922?
Fix 3: Run your game in compatibility mode
Some apps may not function optimally in your version of Windows. Running them in compatibility mode can help fix that.
Compatibility mode is an easy-access tool that allows older programs to run on newer OS versions.
It alters the system settings on a program-by-program basis, making it possible for other apps to function normally on your PC. At the same time, it allows older applications to work.
Here’s how to enable compatibility mode for your game:
- Navigate to the installation folder of your game and right-click on the game. You could also right-click on the desktop shortcut.
- Click on the Properties option from the context menu.
- Go to the Compatibility tab in the window that opens.
- Click the drop-down menu under the Compatibility mode section and choose the older version of Windows you want the game to be compatible with.
- Under the Settings section, mark the checkboxes for the options Run this program as an administrator and Disable fullscreen optimizations.
- Click the Apply button to keep the change.
- Click OK.
- You can now try launching your game and see if the error will still come up. If it does, don’t worry. There are still other fixes to perform.
Fix 4: Modify the resolution of your display
Changing your computer’s screen resolution and display settings can help resolve the ‘Could not initialize graphics system’ error. Follow these easy steps:
- Right-click on a blank area on your desktop and click on Display Settings from the context menu that appears.
- Better still, you can skip Step 1 and open the Settings app by pressing the
Windows logo + Ikeyboard combo. Click on System in the window that opens. Afterward, click on Display in the left pane of the next page. - Now, expand the drop-down arrow under Display Resolution and select a new resolution. Check if your game will run successfully. If it doesn’t, try a different resolution until the game works.
There is one more fix to attempt. Hopefully, you will have resolved the error by now. Otherwise, try the final solution below.
Fix 5: Install DirectX manually
Microsoft DirectX is a suite of technologies that grant hardware acceleration for tasking multimedia applications, such as HD videos and 3D games.
It is included as an integral part of the Windows operating system. Newer versions are made available in Windows updates.
However, if you are still encountering issues with your game at this point in our guide, you should try installing the DirectX update manually:
- Visit Microsoft’s website and go to the DirectX download page.
- Click on the red Download button to download the setup file to your computer.
- Run the dxwebsetup.exe file and follow the on-screen instructions to complete the installation.
- The installation will only take a few seconds. Restart your computer after the process is complete.
How to Fix Unable to Initialize Graphics on Windows 11
Fixing ‘Unable to initialize graphics system’ on Windows 11 is not much different from Windows 10 since the causes of the error are similar.
When you get this error, first restart the game or use another video resolution in case your computer does not support the game’s graphics.
If the error persists, don’t worry. Read on to understand how to initialize graphics in Windows 11:
Fix 1: Install the latest version of DirectX
Games can utilize DirectX APIs (Application Programming Interface) to get the most out of the available hardware.
The program allows games to open and play with the best features available. This means you’ll be able to experience the best resolution possible.
Windows 11 has a built-in DirectX feature, but you can download it if it is not there. Installing DirectX is relatively straightforward and should only take a few minutes.
If you already have DirectX on your computer, follow these steps to check if it’s up to date:
- To begin, press the
Windows + Rcombination to initiate the Run command. - Type dxdiag into the text box, then press Enter or click OK to access the DirectX Diagnostic Tool.
- Locate the DirectX version entry near the bottom and check the version installed.
- Don’t start the download process if you already have the most recent version installed.
If you don’t have the updated version, use the following steps to download it:
- Open your device Settings via the Windows Start bar or by pressing the
Windows + Icombo. - Select Windows Update from the left navigation pane.
- Click Check for updates on the right. An updated DirectX will be downloaded and installed if available.
- Your computer will need a restart after the update.
Fix 2: Update Windows Graphics Driver
Updating your graphics card is vital for ensuring your gaming sessions are the best they can be.
You can update the drivers via third-party software or the auto-update feature in the device manager. This guide will show you where to find your graphic card drivers and how to update them:
- Access your device manager by pressing the
Windows + Xcombination, then select Device Manager or search for it in the search box on the taskbar. - Pick a category from the displayed list to see various device names.
- Next, right-click on the driver you want to update.
- Choose Update Driver then Search automatically for updated driver software.
- If the automatic search method doesn’t locate a new driver, you can browse for an updated one on the manufacturer’s website and install it manually.
Fix 3: Use the Roll Back Driver Feature
This method is helpful if the ‘Unable to initialize graphics’ error occurs after updating your graphics driver. It allows you to return to the previous driver version if the latest one is causing trouble. To roll back, follow the following steps:
- Open device manager by pressing
Windows + Xkeys simultaneously. - Right-click on your graphics driver, then select Properties.
- On the Driver tab, pick the Roll Back Driver option, then OK.
Conclusion
We hope you’ve found our guide helpful. Should you have any questions or comments, please feel free to share them with us in the comments section below.